Android 布局 ViewGroup
布局特点适用场景线性排列,权重分配简单的单行/列列表,等分布局相对定位,灵活减少嵌套的复杂布局,元素间有关联的布局层叠堆放重叠效果,如Fragment容器、图片浮层表格形式规整的表格式数据展示GridLayout网格,灵活规整的网格状布局(如计算器、图标网格)绝对坐标已废弃,不应使用现代开发建议:对于复杂界面,优先考虑使用更强大的 ConstraintLayout(约束布局),它可以高效地实现上述
文章目录
一、UI 的描述
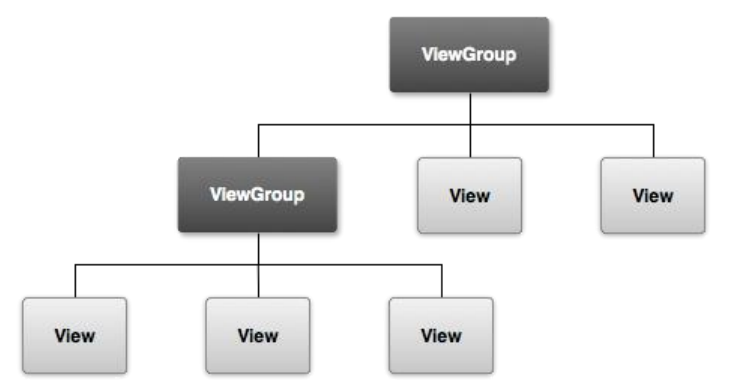
Android 已提供 View(输入控件,比如按钮,图片和文本域等)和 ViewGroup (布局模式,比如线程布局,相对布局,绝对布局,帧布局,表格布局等)的两个子类的集合。
二、用户界面布局
要声明布局,可以在代码中实例化对象并构建,而最简单的方法自然是使用xml文件。
<?xmlversion="1.0"encoding="utf-8"?>
<LinearLayout
xmlns:android="http://schemas.android.com/apk/res/android"
			   android:layout_width="match_parent"
			   android:layout_height="match_parent"
			   android:orientation="vertical">

	<TextView
		android:id="@+id/text"
		android:layout_width="wrap_content"
		android:layout_height="wrap_content"
		android:text="TextView"/>

	<Button
		android:id="@+id/button"
		android:layout_width="wrap_content"
		android:layout_height="wrap_content"
		android:text="Button"/>

</LinearLayout>
三、在Android中提供了几个常用 ViewGroup 布局:
- LinearLayout 线性布局
- RelativeLayout 相对布局
- FrameLayout 帧布局
- AbsoluteLayout 绝对布局
- TableLayout 表格布局
- GridLayout 网格布局
四、布局常用属性
1. LinearLayout(线性布局)
核心思想:将其子视图按单一方向(水平或垂直)依次排列。
常用属性:
1. 设置在 LinearLayout 本身的属性:
android:orientation:方向,是最关键的属性。vertical:垂直排列。horizontal:水平排列。
android:gravity:内容对齐方式。控制其所有子视图在布局内的整体对齐方式(如居中、靠右)。- 值:
center,center_vertical,center_horizontal,start,end,top,bottom等,可以组合使用(如center_vertical|right)。
- 值:
android:baselineAligned:基线对齐。通常用于包含文本的视图水平排列时,保持文本底部对齐。默认为true。在需要特殊对齐效果时可设为false。android:divider/android:showDividers:设置分割线。例如android:showDividers="middle"会在每个子视图之间显示分割线。
2. 设置在 LinearLayout 的子视图上的属性(以 android:layout_ 开头):
android:layout_width/android:layout_height:基本属性,所有视图都有。android:layout_weight:权重。这是LinearLayout的核心特性。它指定子视图在主方向上占据剩余空间的比例。权重值越大,分到的空间越大。- 技巧:通常将需要按比例分配的视图的宽或高设为
0dp,然后通过weight控制,这样可以避免双重计算,布局更高效。orientation="vertical":设android:layout_height="0dp"orientation="horizontal":设android:layout_width="0dp"
- 技巧:通常将需要按比例分配的视图的宽或高设为
android:layout_gravity:自身对齐方式。控制该子视图在父布局内的对齐方式(与父布局的gravity方向垂直的方向上有效)。- 例如:在垂直的
LinearLayout中,子视图的layout_gravity可以设为start,center_horizontal,end来控制水平位置。
- 例如:在垂直的
示例:三等分水平布局
<LinearLayout
    android:layout_width="match_parent"
    android:layout_height="wrap_content"
    android:orientation="horizontal">

    <!-- 将宽度设为0dp,用weight等分 -->
    <TextView
        android:layout_width="0dp"
        android:layout_height="wrap_content"
        android:layout_weight="1"
        android:text="第一部分"
        android:background="#ccc"
        android:gravity="center"/>

    <TextView
        android:layout_width="0dp"
        android:layout_height="wrap_content"
        android:layout_weight="1"
        android:text="第二部分"
        android:background="#ddd"
        android:gravity="center"/>

    <TextView
        android:layout_width="0dp"
        android:layout_height="wrap_content"
        android:layout_weight="1"
        android:text="第三部分"
        android:background="#eee"
        android:gravity="center"/>
</LinearLayout>
注意: LinearLayout 使用layout_weight属性,会重新绘制一次,降低效率。
2. RelativeLayout(相对布局)
核心思想:通过设定子视图相对于父布局或其他子视图的位置来进行布局。
常用属性(全部设置在子视图上):
1. 相对于父布局:
android:layout_alignParentTop:与父布局顶部对齐android:layout_alignParentBottom:与父布局底部对齐android:layout_alignParentStart/Left:与父布局左边对齐android:layout_alignParentEnd/Right:与父布局右边对齐android:layout_centerInParent:在父布局中居中android:layout_centerHorizontal:在父布局中水平居中android:layout_centerVertical:在父布局中垂直居中
2. 相对于其他视图(需要先为参考视图设置 android:id):
android:layout_above:位于指定视图的上方android:layout_below:位于指定视图的下方android:layout_toStartOf/toLeftOf:位于指定视图的左边android:layout_toEndOf/toRightOf:位于指定视图的右边android:layout_alignTop:与指定视图的顶部对齐android:layout_alignBottom:与指定视图的底部对齐android:layout_alignStart/alignLeft:与指定视图的左边对齐android:layout_alignEnd/alignRight:与指定视图的右边对齐android:layout_alignBaseline:与指定视图的文本基线对齐
示例:标题栏布局
<RelativeLayout
    android:layout_width="match_parent"
    android:layout_height="50dp">

    <!-- 返回按钮,左边、垂直居中 -->
    <Button
        android:id="@+id/btn_back"
        android:layout_width="wrap_content"
        android:layout_height="wrap_content"
        android:layout_alignParentStart="true"
        android:layout_centerVertical="true"
        android:text="返回" />

    <!-- 标题,水平、垂直居中 -->
    <TextView
        android:layout_width="wrap_content"
        android:layout_height="wrap_content"
        android:layout_centerInParent="true"
        android:text="我的标题" />

    <!-- 菜单按钮,右边、垂直居中,在返回按钮的右边 -->
    <Button
        android:layout_width="wrap_content"
        android:layout_height="wrap_content"
        android:layout_alignParentEnd="true"
        android:layout_centerVertical="true"
        android:text="菜单" />
</RelativeLayout>
3. FrameLayout(帧布局)
核心思想:所有子视图默认都堆叠在布局的左上角。后添加的视图会盖在先添加的视图上面。常用于重叠、图层式布局。
常用属性(设置在子视图上):
android:layout_gravity:这是FrameLayout中子视图最关键的属性,用于控制子视图在父布局中的位置。- 值:
top,bottom,start,end,center,center_vertical,center_horizontal等,可组合。
- 值:
示例:图片上覆盖文字
<FrameLayout
    android:layout_width="match_parent"
    android:layout_height="200dp">

    <!-- 底层:图片 -->
    <ImageView
        android:layout_width="match_parent"
        android:layout_height="match_parent"
        android:src="@drawable/my_picture"
        android:scaleType="centerCrop" />

    <!-- 上层:文字,位于底部中心 -->
    <TextView
        android:layout_width="wrap_content"
        android:layout_height="wrap_content"
        android:layout_gravity="bottom|center_horizontal"
        android:text="图片描述"
        android:background="#80000000" <!-- 半透明黑色背景 -->
        android:textColor="#fff" />

</FrameLayout>
4. TableLayout(表格布局)
核心思想:以行和列的形式组织子视图,是 LinearLayout 的子类,默认垂直方向。每行是一个 TableRow 对象,TableRow 里的每个子视图代表一个单元格。
常用属性:
1. 设置在 TableLayout 本身的属性:
android:stretchColumns:指定哪些列被拉伸以填满可用空间(列索引从0开始)。"*"代表所有列,"1,2"代表第1和第2列。android:shrinkColumns:指定哪些列可以被收缩以防内容被截断。android:collapseColumns:指定哪些列被折叠(隐藏)。
2. 设置在单元格(即 TableRow 的子视图)上的属性:
android:layout_column:指定该视图位于第几列(从0开始)。android:layout_span:指定该视图横跨的列数。
示例:简单的表格
<TableLayout
    android:layout_width="match_parent"
    android:layout_height="wrap_content"
    android:stretchColumns="*"> <!-- 所有列等宽 -->

    <TableRow>
        <TextView android:text="姓名" android:padding="5dp"/>
        <TextView android:text="年龄" android:padding="5dp"/>
        <TextView android:text="城市" android:padding="5dp"/>
    </TableRow>

    <TableRow>
        <TextView android:text="张三" android:padding="5dp"/>
        <TextView android:text="25" android:padding="5dp"/>
        <TextView android:text="北京" android:padding="5dp"/>
    </TableRow>

</TableLayout>
5. GridLayout(网格布局)

核心思想:将布局区域划分为无限细的网格线,将子视图放置到任意网格单元格中,功能比 TableLayout 更强大灵活(Android 4.0+引入)。
常用属性(可设置在布局和子视图上):
1. 设置在 GridLayout 本身的属性:
android:columnCount:指定最大列数。android:rowCount:指定最大行数。android:orientation:指定子视图排列方向(horizontal先填满行,vertical先填满列)。
2. 设置在子视图上的属性:
android:layout_column:指定视图起始列的索引。android:layout_row:指定视图起始行的索引。android:layout_columnSpan:指定视图横跨的列数。android:layout_rowSpan:指定视图横跨的行数。android:layout_gravity:控制视图在其分配的网格区域内的对齐方式。
示例:计算器按钮布局
<GridLayout
    android:layout_width="wrap_content"
    android:layout_height="wrap_content"
    android:columnCount="4"> <!-- 定义4列 -->

    <Button android:text="7" />
    <Button android:text="8" />
    <Button android:text="9" />
    <Button android:text="/" />

    <Button android:text="4" />
    <Button android:text="5" />
    <Button android:text="6" />
    <Button android:text="*" />

    <!-- 0按钮横跨两列 -->
    <Button
        android:text="0"
        android:layout_columnSpan="2"
        android:layout_gravity="fill" /> <!-- 填充两列的空间 -->

    <Button android:text="." />

</GridLayout>
6. AbsoluteLayout(绝对布局)【已废弃】
核心思想:通过精确的 X/Y 坐标来定位子视图。
- 属性:
android:layout_x,android:layout_y。 - 状态:强烈不推荐使用,已在现代 Android 开发中废弃。
- 原因:无法在不同屏幕尺寸和密度上自适应,兼容性极差。应使用
RelativeLayout、ConstraintLayout或CoordinatorLayout来实现类似但更灵活的效果。
总结与建议
| 布局 | 特点 | 适用场景 |
|---|---|---|
| LinearLayout | 线性排列,权重分配 | 简单的单行/列列表,等分布局 |
| RelativeLayout | 相对定位,灵活 | 减少嵌套的复杂布局,元素间有关联的布局 |
| FrameLayout | 层叠堆放 | 重叠效果,如Fragment容器、图片浮层 |
| TableLayout | 表格形式 | 规整的表格式数据展示 |
| GridLayout | 网格,灵活 | 规整的网格状布局(如计算器、图标网格) |
| AbsoluteLayout | 绝对坐标 | 已废弃,不应使用 |
现代开发建议:对于复杂界面,优先考虑使用更强大的 ConstraintLayout(约束布局),它可以高效地实现上述大多数布局的效果,并能显著减少布局嵌套层次,提升性能。上述经典布局在简单场景中依然非常实用。

有“AI”的1024 = 2048,欢迎大家加入2048 AI社区
更多推荐

 15
15 0
0- 0


 已为社区贡献2条内容

所有评论(0)