OPENMV巡线及通信讲解
sensor.GRAYSCALE模式下图片,黑红两色处理后较为相近。sensor.RGB565模式下图片,黑红两色区分较为明显。设置为灰度格式时,因红线和黑线阈值相似,无法区分。打开OpenMV盘中的main.py文件保存即可。没有用到加权循迹的方式,且代码还有优化的空间。设置为彩色格式时,能单独识别红线。
·
概要
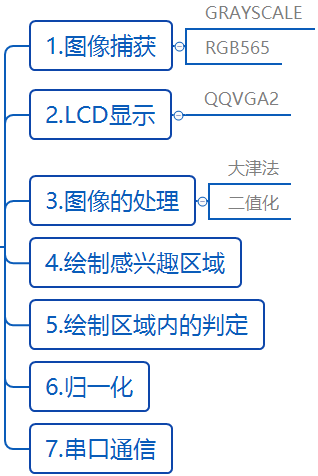
一、构建感兴趣区域(模块化构建)
1.感光元件设置
(1)基本信息:
OpenMV图像处理的基本方法
OpenMV中文入门教程-感光元件
(2)两种像素图像的区别
sensor.GRAYSCALE模式下图片,黑红两色处理后较为相近
sensor.RGB565模式下图片,黑红两色区分较为明显
(3)参考代码(GRAYSCALE):
""" 调用库函数 """
import sensor

""" 初始化OV7725摄像头传感器 """
def init_sensor():
    try:
        sensor.reset()                          # 初始化感光元件
        sensor.set_pixformat(sensor.GRAYSCALE)  # 设置像素模式 sensor.GRAYSCALE:灰度,每个像素8bit, sensor.RGB565:彩色。每个像素16bit
        sensor.set_framesize(sensor.QQVGA2)     # 设置图像大小 像素尺寸128×160 适配LCD屏幕
        sensor.skip_frames(50)                  # 跳过前50帧 等待感光元件稳定
        sensor.set_auto_gain(False)             # 关闭自动增益,避免ROI颜色波动
        sensor.set_auto_whitebal(False)         # 关闭自动白平衡,保证红色一致
        sensor.set_contrast(3)                  # 提高对比度,让ROI更清晰
    except Exception as e:
        print(f"摄像头初始化失败: {e}")
        raise

""" 主程序 """
def main():
    try:
        init_sensor() #上电初始化
        while True:
            sensor.snapshot()

    except Exception as e:
        print(f"程序运行出错: {e}")

""" 程序入口判断 """
if __name__ == "__main__":
    main()
2.LCD显示图像
(1)基本信息:
(2)参考代码
单独展示(官网例程)
# LCD显示例程
# 注意:要运行这个例子,你需要一个用于OpenMV的LCD扩展板。
# LCD扩展板允许您在运行时查看您的OpenMV Cam的帧缓冲区。
# 此代码适用于4.5.1至最新的固件版本。

import sensor
import display

sensor.reset()  # 初始化sensor
sensor.set_pixformat(sensor.RGB565)  # or sensor.GRAYSCALE
sensor.set_framesize(sensor.QQVGA2)  # 128x160大小的特定液晶屏。
# 初始化lcd屏幕。
# 注意:如果支持,可以使用 DAC 或 PWM 背光控制器来控制背光强度:
#  lcd = display.SPIDisplay(backlight=display.DACBacklight(channel=2))
#  lcd.backlight(25) # 25% intensity
# 否则,将使用默认的 GPIO(开on/关off)控制器。
lcd = display.SPIDisplay()

while True:
    lcd.write(sensor.snapshot())  # 拍照并显示图像。
模块化代码参考
""" 调用库函数 """
import sensor
import display

""" 变量声明区域 """
lcd = display.SPIDisplay()

""" 初始化OV7725摄像头传感器 """
def init_sensor():
    try:
        sensor.reset()                          # 初始化感光元件
        sensor.set_pixformat(sensor.RGB565)  # 设置像素模式 sensor.GRAYSCALE:灰度,每个像素8bit, sensor.RGB565:彩色。每个像素16bit
        sensor.set_framesize(sensor.QQVGA2)     # 设置图像大小 像素尺寸128×160 适配LCD屏幕
        sensor.skip_frames(50)                  # 跳过前50帧 等待感光元件稳定
        sensor.set_auto_gain(False)             # 关闭自动增益,避免ROI颜色波动
        sensor.set_auto_whitebal(False)         # 关闭自动白平衡,保证红色一致
        sensor.set_contrast(3)                  # 提高对比度,让ROI更清晰
    except Exception as e:
        print(f"摄像头初始化失败: {e}")
        raise

""" 主程序 """
def main():
    try:
        init_sensor() #上电初始化
        while True:
            img = sensor.snapshot() #保存拍摄到的图像到img变量
            lcd.write(img)          # 将拍摄到的图像显示到LCD

    except Exception as e:
        print(f"程序运行出错: {e}")

""" 程序入口判断 """
if __name__ == "__main__":
    main()
LCD显示图片
3.图像的处理
(1)基本信息:
(2)参考代码
大津法:
# Otsu.py - By: Royic - 周三 9月 22 2021

import sensor, image

sensor.reset()
sensor.set_pixformat(sensor.GRAYSCALE)
sensor.set_framesize(sensor.QVGA)
sensor.skip_frames(time = 2000)

while(True):
    img = sensor.snapshot()
    histogram = img.get_histogram()
    Thresholds = histogram.get_threshold()
    img.binary([(Thresholds.value(), 255)])
识别效果图:
二值化法-取LAB值
设置为彩色格式时,能单独识别红线
设置为灰度格式时,因红线和黑线阈值相似,无法区分
import sensor

# -------------------------- 传感器初始化 --------------------------
sensor.reset()  # 重置传感器
sensor.set_pixformat(sensor.RGB565)  # 设置彩色图像格式
sensor.set_framesize(sensor.QQVGA)  # 设置分辨率(160x120,平衡速度与精度)
sensor.skip_frames(50)  # 跳过50帧,等待传感器稳定
sensor.set_auto_gain(False)  # 关闭自动增益(手动阈值需固定增益,避免亮度波动)
sensor.set_auto_whitebal(False)  # 关闭自动白平衡(保证灰度值稳定)

# -------------------------- 手动阈值配置 --------------------------
MANUAL_THRESHOLD = (100, 0, -55, 6, -88, 17)  #放置调整后的LAB值

# -------------------------- 二值化核心主循环 --------------------------
while True:
    img = sensor.snapshot()
    img.binary([MANUAL_THRESHOLD], invert=True)
识别效果图(RGB格式)

模块化合并代码(默认为取值二值化,用大津法自行取消注释)
""" 调用库函数 """
import sensor
import display

""" 变量声明区域 """
lcd = display.SPIDisplay()

RED_THRESHOLD =(0, 100, -128, 3, -105, 30)   #LAB采样值存放变量--手动取值

""" 初始化OV7725摄像头传感器 """
def init_sensor():
    try:
        sensor.reset()                          # 初始化感光元件
        sensor.set_pixformat(sensor.RGB565)     #设置像素模式 大津法用GRAYSCALE好些,二值化想单独识别红线用RGB565
        sensor.set_framesize(sensor.QQVGA2)     # 设置图像大小 像素尺寸128×160 适配LCD屏幕
        sensor.skip_frames(50)                  # 跳过前50帧 等待感光元件稳定
        sensor.set_auto_gain(False)             # 关闭自动增益,避免ROI颜色波动
        sensor.set_auto_whitebal(False)         # 关闭自动白平衡,保证红色一致
        sensor.set_contrast(3)                  # 提高对比度,让ROI更清晰
    except Exception as e:
        print(f"摄像头初始化失败: {e}")
        raise

""" 图像处理相关 二值化 """
def process_image(img):
    try:
        """Otsu算法自动计算最优阈值(无需手动调参,适配光线变化)"""
        # hist = img.get_histogram()
        # threshold_obj = hist.get_threshold()
        # thresh_value = threshold_obj.value()  # 提取阈值整数(0-255)
        # binary_img = img.binary([(0, thresh_value)] , invert=True)

        """" 取值二值化 """
        binary_img = img.binary([RED_THRESHOLD] , invert=True)
        return binary_img

        # 异常处理:避免全黑/全白图像导致直方图统计失败(防止程序崩溃)
    except Exception as e:
        print(f"二值化计算异常:{e}")
        return img  # 出错时返回原图像

""" 主程序 """
def main():
    try:
        init_sensor() #上电初始化
        while True:
            img = sensor.snapshot() #保存拍摄到的图像到img变量
            process_img = process_image(img)#将图像处理后保存到process_img变量
            lcd.write(process_img)          # 将处理后的图像显示到LCD

    except Exception as e:
        print(f"程序运行出错: {e}")

""" 程序入口判断 """
if __name__ == "__main__":
    main()
4.感兴趣区域的绘制
(1)基本信息:
(2)在红线上方绘制一个矩形框
""" 调用库函数 """
import sensor
import display

""" 变量声明区域 """
lcd = display.SPIDisplay()

RED_THRESHOLD =(0, 100, -128, 3, -105, 30)   #LAB采样值存放变量--手动取值

""" 初始化OV7725摄像头传感器 """
def init_sensor():
    try:
        sensor.reset()                          # 初始化感光元件
        sensor.set_pixformat(sensor.RGB565)     #设置像素模式 大津法用GRAYSCALE好些,二值化想单独识别红线用RGB565
        sensor.set_framesize(sensor.QQVGA2)     # 设置图像大小 像素尺寸128×160 适配LCD屏幕
        sensor.skip_frames(50)                  # 跳过前50帧 等待感光元件稳定
        sensor.set_auto_gain(False)             # 关闭自动增益,避免ROI颜色波动
        sensor.set_auto_whitebal(False)         # 关闭自动白平衡,保证红色一致
        sensor.set_contrast(3)                  # 提高对比度,让ROI更清晰
    except Exception as e:
        print(f"摄像头初始化失败: {e}")
        raise

""" 图像处理相关 二值化 """
def process_image(img):
    try:
        """Otsu算法自动计算最优阈值(无需手动调参,适配光线变化)"""
        # hist = img.get_histogram()
        # threshold_obj = hist.get_threshold()
        # thresh_value = threshold_obj.value()  # 提取阈值整数(0-255)
        # binary_img = img.binary([(0, thresh_value)] , invert=True)

        """" 取值二值化 """
        binary_img = img.binary([RED_THRESHOLD] , invert=True)
        return binary_img

        # 异常处理:避免全黑/全白图像导致直方图统计失败(防止程序崩溃)
    except Exception as e:
        print(f"二值化计算异常:{e}")
        return img  # 出错时返回原图像

""" 图像处理相关 绘制感兴趣区域 """
def draw_roi(img):
    roi = (53,47,13,22) #(x,y,w,h)
    img.draw_rectangle(roi,color=(0, 255, 0))

    return img

""" 主程序 """
def main():
    try:
        init_sensor() #上电初始化
        while True:
            img = sensor.snapshot() #保存拍摄到的图像到img变量
            process_img = process_image(img)#将图像处理后保存到process_img变量
            roi_img = draw_roi(process_img) #基于处理后的图像绘制ROI区域
            lcd.write(roi_img)          # 将处理后的图像显示到LCD

    except Exception as e:
        print(f"程序运行出错: {e}")

""" 程序入口判断 """
if __name__ == "__main__":
    main()
绘制后显示图片
5.基于roi区域的检测
(1)参考代码
""" 调用库函数 """
import sensor
import display

""" 变量声明区域 """
lcd = display.SPIDisplay()

RED_THRESHOLD =(0, 100, -128, 3, -105, 30)   #LAB采样值存放变量--手动取值

""" 初始化OV7725摄像头传感器 """
def init_sensor():
    try:
        sensor.reset()                          # 初始化感光元件
        sensor.set_pixformat(sensor.RGB565)     #设置像素模式 大津法用GRAYSCALE好些,二值化想单独识别红线用RGB565
        sensor.set_framesize(sensor.QQVGA2)     # 设置图像大小 像素尺寸128×160 适配LCD屏幕
        sensor.skip_frames(50)                  # 跳过前50帧 等待感光元件稳定
        sensor.set_auto_gain(False)             # 关闭自动增益,避免ROI颜色波动
        sensor.set_auto_whitebal(False)         # 关闭自动白平衡,保证红色一致
        sensor.set_contrast(3)                  # 提高对比度,让ROI更清晰
    except Exception as e:
        print(f"摄像头初始化失败: {e}")
        raise

""" 图像处理相关 二值化 """
def process_image(img):
    try:
        """Otsu算法自动计算最优阈值(无需手动调参,适配光线变化)"""
        # hist = img.get_histogram()
        # threshold_obj = hist.get_threshold()
        # thresh_value = threshold_obj.value()  # 提取阈值整数(0-255)
        # binary_img = img.binary([(0, thresh_value)] , invert=True)

        """" 取值二值化 """
        binary_img = img.binary([RED_THRESHOLD] , invert=True)
        return binary_img

        # 异常处理:避免全黑/全白图像导致直方图统计失败(防止程序崩溃)
    except Exception as e:
        print(f"二值化计算异常:{e}")
        return img  # 出错时返回原图像

""" 图像处理相关 绘制感兴趣区域 """
def draw_roi(img):
    roi = (53,47,13,22) #(x,y,w,h)
    img.draw_rectangle(roi,color=(0, 255, 0))

    #获取区块统计信息
    stats = img.get_statistics(roi=roi)#统计区块内信息
    black_pixels_avg = stats.l_mean() #平均亮度值 (0-255)

    if black_pixels_avg > 50:
        # 在检测区域中心绘制绿点(可视化)
        cy = 47 + 22//2
        img.draw_circle(60, cy, 2, color=(0, 255, 0))

    return img

""" 主程序 """
def main():
    try:
        init_sensor() #上电初始化
        while True:
            img = sensor.snapshot() #保存拍摄到的图像到img变量
            process_img = process_image(img)#将图像处理后保存到process_img变量
            roi_img = draw_roi(process_img) #基于处理后的图像绘制ROI区域
            lcd.write(roi_img)          # 将处理后的图像显示到LCD

    except Exception as e:
        print(f"程序运行出错: {e}")

""" 程序入口判断 """
if __name__ == "__main__":
    main()
识别显示效果
6.串口发送识别情况
PCB背面引脚丝印
丝印详细(背面)
| RST | PB15 |
|---|---|
| BOOT | PB14 |
| NC | PB13 |
| PG3 | PB12 |
| PD13 | PB10 |
| PD12 | PB11 |
| 5V | PA5 |
| GND | VCC |
(1)串口引脚接线(uart3)
| OpenMV | TTL |
|---|---|
| PB10(Tx) | Rx |
| PB11(Rx) | Tx |
| GND | GND |
| OpenMV | Arduino |
|---|---|
| PB10(Tx) | Tx |
| PB11(Rx) | Rx |
| GND | GND |
(2)示例代码
打印到串行终端
""" 调用库函数 """
import sensor
import display

""" 变量声明区域 """
lcd = display.SPIDisplay()

RED_THRESHOLD =(0, 100, -128, 3, -105, 30)   #LAB采样值存放变量--手动取值
detection = ['0']

""" 初始化OV7725摄像头传感器 """
def init_sensor():
    try:
        sensor.reset()                          # 初始化感光元件
        sensor.set_pixformat(sensor.RGB565)     #设置像素模式 大津法用GRAYSCALE好些,二值化想单独识别红线用RGB565
        sensor.set_framesize(sensor.QQVGA2)     # 设置图像大小 像素尺寸128×160 适配LCD屏幕
        sensor.skip_frames(50)                  # 跳过前50帧 等待感光元件稳定
        sensor.set_auto_gain(False)             # 关闭自动增益,避免ROI颜色波动
        sensor.set_auto_whitebal(False)         # 关闭自动白平衡,保证红色一致
        sensor.set_contrast(3)                  # 提高对比度,让ROI更清晰
    except Exception as e:
        print(f"摄像头初始化失败: {e}")
        raise

""" 图像处理相关 二值化 """
def process_image(img):
    try:
        """Otsu算法自动计算最优阈值(无需手动调参,适配光线变化)"""
        # hist = img.get_histogram()
        # threshold_obj = hist.get_threshold()
        # thresh_value = threshold_obj.value()  # 提取阈值整数(0-255)
        # binary_img = img.binary([(0, thresh_value)] , invert=True)

        """" 取值二值化 """
        binary_img = img.binary([RED_THRESHOLD] , invert=True)
        return binary_img

        # 异常处理:避免全黑/全白图像导致直方图统计失败(防止程序崩溃)
    except Exception as e:
        print(f"二值化计算异常:{e}")
        return img  # 出错时返回原图像

""" 图像处理相关 绘制感兴趣区域 """
def draw_roi(img):
    roi = (53,47,13,22) #(x,y,w,h)
    img.draw_rectangle(roi,color=(0, 255, 0))

    #恢复检测变量
    detection = ['0']

    #获取区块统计信息
    stats = img.get_statistics(roi=roi)#统计区块内信息
    black_pixels_avg = stats.l_mean() #平均亮度值 (0-255)

    if black_pixels_avg > 50:
        # 在检测区域中心绘制绿点(可视化)
        detection = ['1']
        cy = 47 + 22//2
        img.draw_circle(60, cy, 2, color=(0, 255, 0))

    return img,detection

""" 主程序 """
def main():
    try:
        init_sensor() #上电初始化
        while True:
            img = sensor.snapshot() #保存拍摄到的图像到img变量
            process_img = process_image(img)#将图像处理后保存到process_img变量
            roi_img,detection = draw_roi(process_img) #基于处理后的图像绘制ROI区域,并获取detection的值
            lcd.write(roi_img)          # 将处理后的图像显示到LCD

            #发送获取值
            result_str = ''.join(detection)
            print(f"检测:{result_str}")

    except Exception as e:
        print(f"程序运行出错: {e}")

""" 程序入口判断 """
if __name__ == "__main__":
    main()
打印到串口
""" 调用库函数 """
import sensor
import display
from pyb import UART

""" 变量声明区域 """
lcd = display.SPIDisplay()
uart = UART(3,9600)
RED_THRESHOLD =(0, 100, -128, 3, -105, 30)   #LAB采样值存放变量--手动取值
detection = ['0']

""" 初始化OV7725摄像头传感器 """
def init_sensor():
    try:
        sensor.reset()                          # 初始化感光元件
        sensor.set_pixformat(sensor.RGB565)     #设置像素模式 大津法用GRAYSCALE好些,二值化想单独识别红线用RGB565
        sensor.set_framesize(sensor.QQVGA2)     # 设置图像大小 像素尺寸128×160 适配LCD屏幕
        sensor.skip_frames(50)                  # 跳过前50帧 等待感光元件稳定
        sensor.set_auto_gain(False)             # 关闭自动增益,避免ROI颜色波动
        sensor.set_auto_whitebal(False)         # 关闭自动白平衡,保证红色一致
        sensor.set_contrast(3)                  # 提高对比度,让ROI更清晰
    except Exception as e:
        print(f"摄像头初始化失败: {e}")
        raise

""" 图像处理相关 二值化 """
def process_image(img):
    try:
        """Otsu算法自动计算最优阈值(无需手动调参,适配光线变化)"""
        # hist = img.get_histogram()
        # threshold_obj = hist.get_threshold()
        # thresh_value = threshold_obj.value()  # 提取阈值整数(0-255)
        # binary_img = img.binary([(0, thresh_value)] , invert=True)

        """" 取值二值化 """
        binary_img = img.binary([RED_THRESHOLD] , invert=True)
        return binary_img

        # 异常处理:避免全黑/全白图像导致直方图统计失败(防止程序崩溃)
    except Exception as e:
        print(f"二值化计算异常:{e}")
        return img  # 出错时返回原图像

""" 图像处理相关 绘制感兴趣区域 """
def draw_roi(img):
    roi = (53,47,13,22) #(x,y,w,h)
    img.draw_rectangle(roi,color=(0, 255, 0))

    #恢复检测变量
    detection = ['0']

    #获取区块统计信息
    stats = img.get_statistics(roi=roi)#统计区块内信息
    black_pixels_avg = stats.l_mean() #平均亮度值 (0-255)

    if black_pixels_avg > 50:
        # 在检测区域中心绘制绿点(可视化)
        detection = ['1']
        cy = 47 + 22//2
        img.draw_circle(60, cy, 2, color=(0, 255, 0))

    return img,detection

""" 主程序 """
def main():
    try:
        init_sensor() #上电初始化
        while True:
            img = sensor.snapshot() #保存拍摄到的图像到img变量
            process_img = process_image(img)#将图像处理后保存到process_img变量
            roi_img,detection = draw_roi(process_img) #基于处理后的图像绘制ROI区域,并获取detection的值
            lcd.write(roi_img)          # 将处理后的图像显示到LCD

            #发送获取值
            result_str = ''.join(detection)
            uart.write(f"W{result_str}\n")
            # print(f"检测:{result_str}")

    except Exception as e:
        print(f"程序运行出错: {e}")

""" 程序入口判断 """
if __name__ == "__main__":
    main()
VOFA接收
二、其他
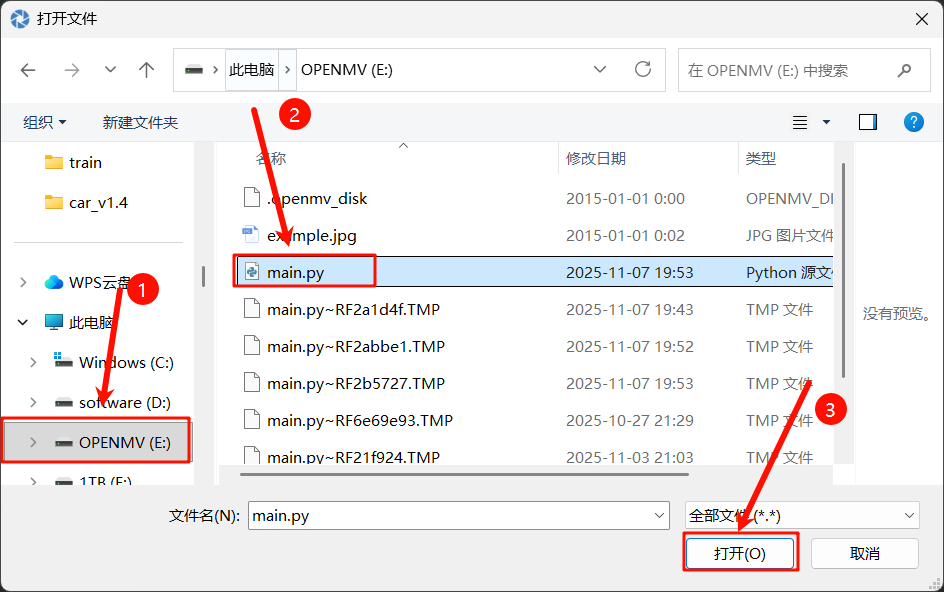
1.代码保存到视觉模块
打开OpenMV盘中的main.py文件保存即可

2.VOFA设置


三、全地形小车巡线完整代码
没有用到加权循迹的方式,且代码还有优化的空间
import sensor
import display
from pyb import UART

#变量定义区域
ROI_CENTER = (63,60)                            #七路感兴趣区域中心点
ROI_SIZE = (17,13)                              #单个ROI区域的宽(17)与高(13)
GRAYSCALE_WEIGHTS = [-3, -2, -1, 0, 1, 2, 3]    #七路ROI区域加权值设置
RED_THRESHOLD =(100, 0, -23, 21, -128, 127)   #LAB采样值存放变量

#初始化相关声明
lcd = display.SPIDisplay()
uart = UART(3,9600)

"""初始化OV7725摄像头传感器(抗光干扰配置)"""
def init_sensor():
    try:
        sensor.reset()                           # 初始化感光元件
        sensor.set_pixformat(sensor.RGB565)      # 设置为彩色模式 以便于更容易区分红线和黑线
        sensor.set_framesize(sensor.QQVGA2)      # 分辨率设置为128*160 符合LCD的显示
        sensor.skip_frames(20)                 # 跳过20帧,等待传感器稳定
        sensor.set_auto_gain(False)              # 关闭自动增益,避免ROI颜色波动
        sensor.set_auto_whitebal(False)          # 关闭自动白平衡,保证红色一致
        sensor.set_contrast(3)                   # 提高对比度,让ROI更清晰
        # sensor.set_saturation(3)                 # 提高饱和度以增强红色
        return True
    except Exception as e:
        print(f"摄像头初始化失败: {e}")
        return False


""" 图像处理相关 采用LAB值二值化 """
def process_image(img):
    try:
        return img.binary([RED_THRESHOLD] , invert=True) #使用LAB颜色空间识别红色
    except Exception as e:  # 异常处理:避免全黑/全白图像导致直方图统计失败(防止程序崩溃)
        print(f"二值化计算异常:{e}")
        return img  # 出错时返回原图像

""" 图像处理相关 绘制感兴趣区域 """
def process_rois(img):
    detection = ['0']*7
    center_x, center_y = ROI_CENTER
    roi_width, roi_height = ROI_SIZE

    # 计算所有7个ROI的中心X坐标(-3w, -2w, -w, 0, w, 2w, 3w)
    x_coords = [center_x + i * roi_width for i in range(-3, 4)]

    # 绘制所有ROI
    for i,x in enumerate(x_coords):
        rect_x = x - roi_width // 2
        roi = (rect_x, center_y, roi_width, roi_height)
        img.draw_rectangle(roi,color=(0, 255, 0))

        #获取区块统计信息
        stats = img.get_statistics(roi=roi)
        red_pixels_avg = stats.l_mean() #平均亮度值 (0-255)

        if red_pixels_avg > 50: #更改为识别白色区域
            detection[i] = '1'

            # 在检测区域中心绘制绿点(可视化)
            img.draw_circle(x, center_y + roi_height//2, 2, color=(0, 255, 0)) # x,y,半径,颜色

    return img,detection

""" 根据检测的结果计算加权值 """
def calculate_weighted_value(detection):
    global GRAYSCALE_WEIGHTS
    weighted_sum = 0
    active_sensors = 0

    for i in range(7):
        if detection[i] == '1':
            weighted_sum += GRAYSCALE_WEIGHTS[i]
            active_sensors += 1

    #处理无线条情况
    if active_sensors == 0:
        return 101

    #十字路口判断 检测特定roi区域识别数量
    if active_sensors >= 3:
        return 102

    #归一化处理(-100 到 +100)
    normailzed_value = int(weighted_sum * (100/6))
    return normailzed_value

def main():
    try:
        if not init_sensor(): #上电初始化
            return

        while True:
            #图像获取与处理
            img = sensor.snapshot()#获取图像
            red_lines = process_image(img) #获取二值化后的图像
            processed_img,detection = process_rois(red_lines)

            #显示处理结果到lcd
            lcd.write(processed_img)  # Take a picture and display the image.

            #计算并发送加权值
            weighted_value = calculate_weighted_value(detection)
            uart.write(f"W{weighted_value}\n")

            #串行终端调试打印(烧录到视觉模块时可以注释掉)
            print(f"检测:{''.join(detection)} 加权值:{weighted_value}")

    except Exception as e:
        print(f"程序运行出错: {e}")

if __name__ == "__main__":
    main()

有“AI”的1024 = 2048,欢迎大家加入2048 AI社区
更多推荐


 16
16 0
0- 0


 已为社区贡献1条内容

所有评论(0)