Qwen3VL高精度2D/3D缺陷检测本地部署
Qwen3VL本地部署实现2D/3D缺陷检测本项目基于Qwen3VL大模型实现了高效准确的2D和3D缺陷检测系统。系统采用模块化设计,包含API客户端、图像处理工具和可视化模块,支持从普通图片理解到专业目标检测的多模式分析。核心功能:双平台API支持:可对接魔搭社区和阿里云平台的AI服务智能图像处理:自动编码/解码图像,支持高低分辨率切换多维度检测:同时实现2D图像缺陷识别和3D空间分析可视化展示
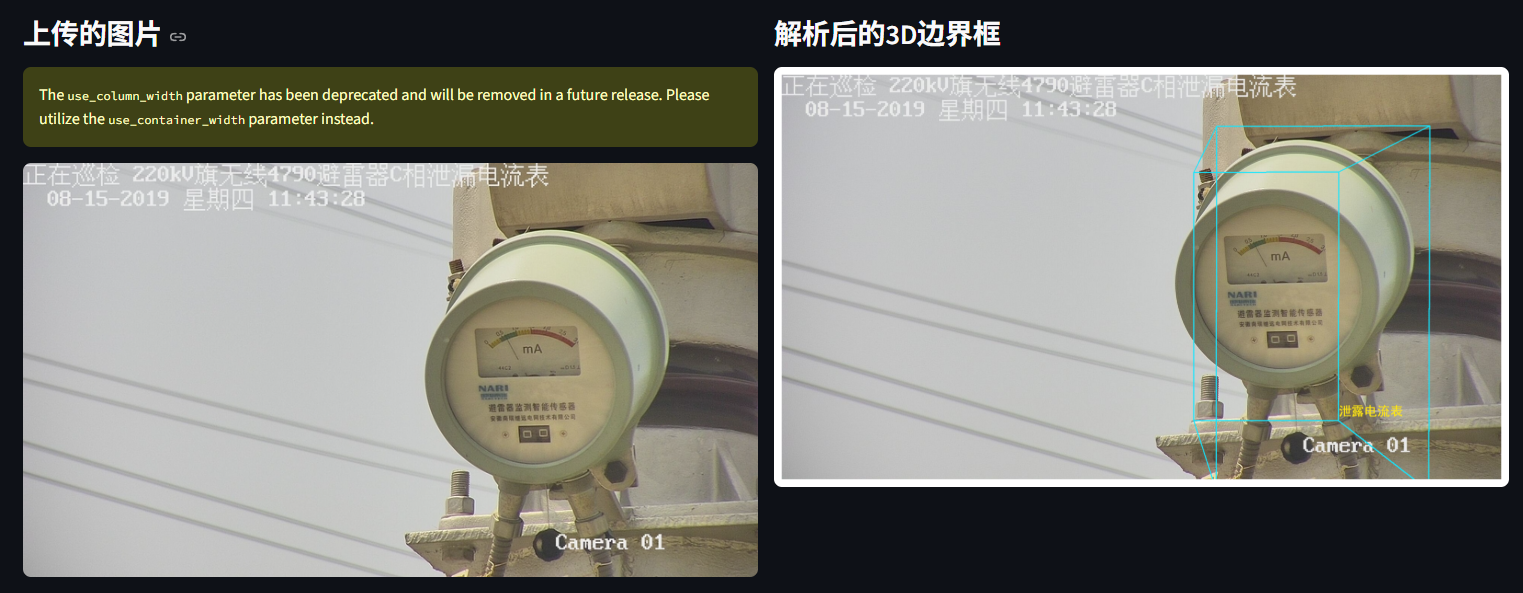
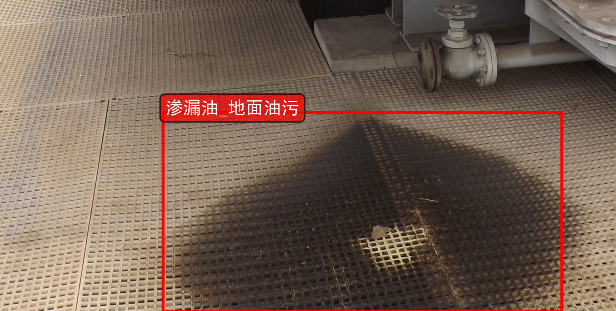
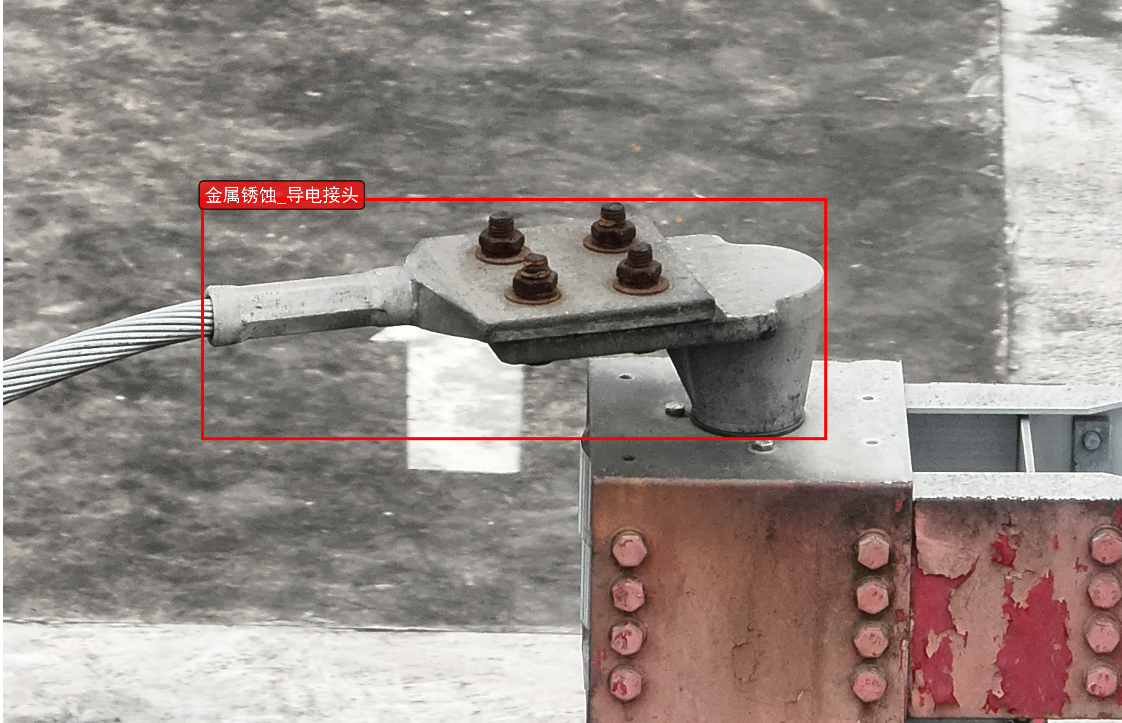
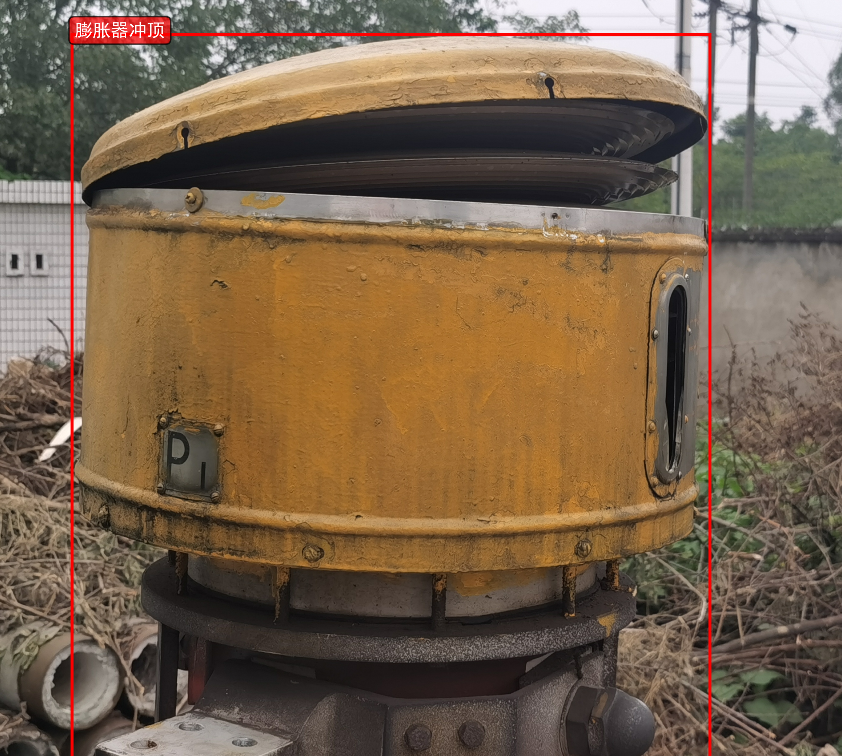
本地部署Qwen3VL 实现高精度2D、3D缺陷检测
object_detection_platform/
├── app.py # 主应用文件
├── modules/
│ ├── api_client.py # API客户端模块
│ ├── image_utils.py # 图像处理工具
│ └── visualization.py # 可视化模块
3d_object_detection_platform/
├── app.py # 主应用文件
├── modules/
│ ├── init.py
│ ├── api_client.py # API客户端模块
│ ├── image_utils.py # 图像处理工具
│ ├── visualization.py # 可视化模块
│ ├── visualization_2d.py # 2D可视化模块
│ └── camera_utils.py # 相机参数工具
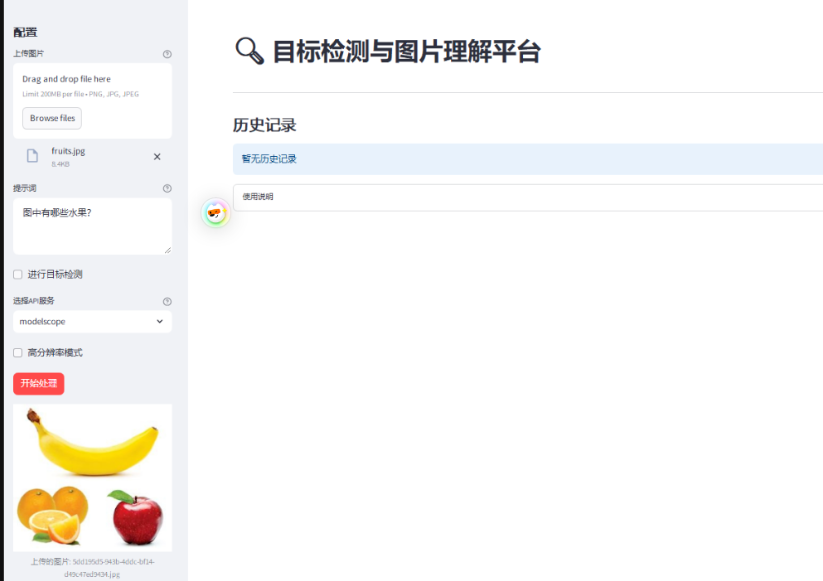
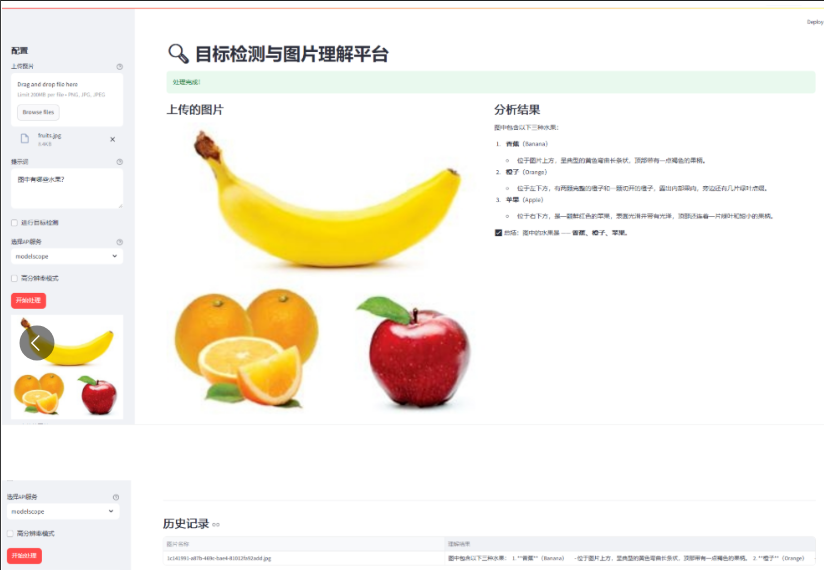
示例

主要功能特点
- 模块化设计: 代码按功能分为API客户端、图像处理、可视化等模块
- 用户友好界面: 清晰的侧边栏配置和主界面布局
- 双模式支持: 普通图片理解和目标检测模式
- 历史记录: 自动保存处理记录,支持查看历史
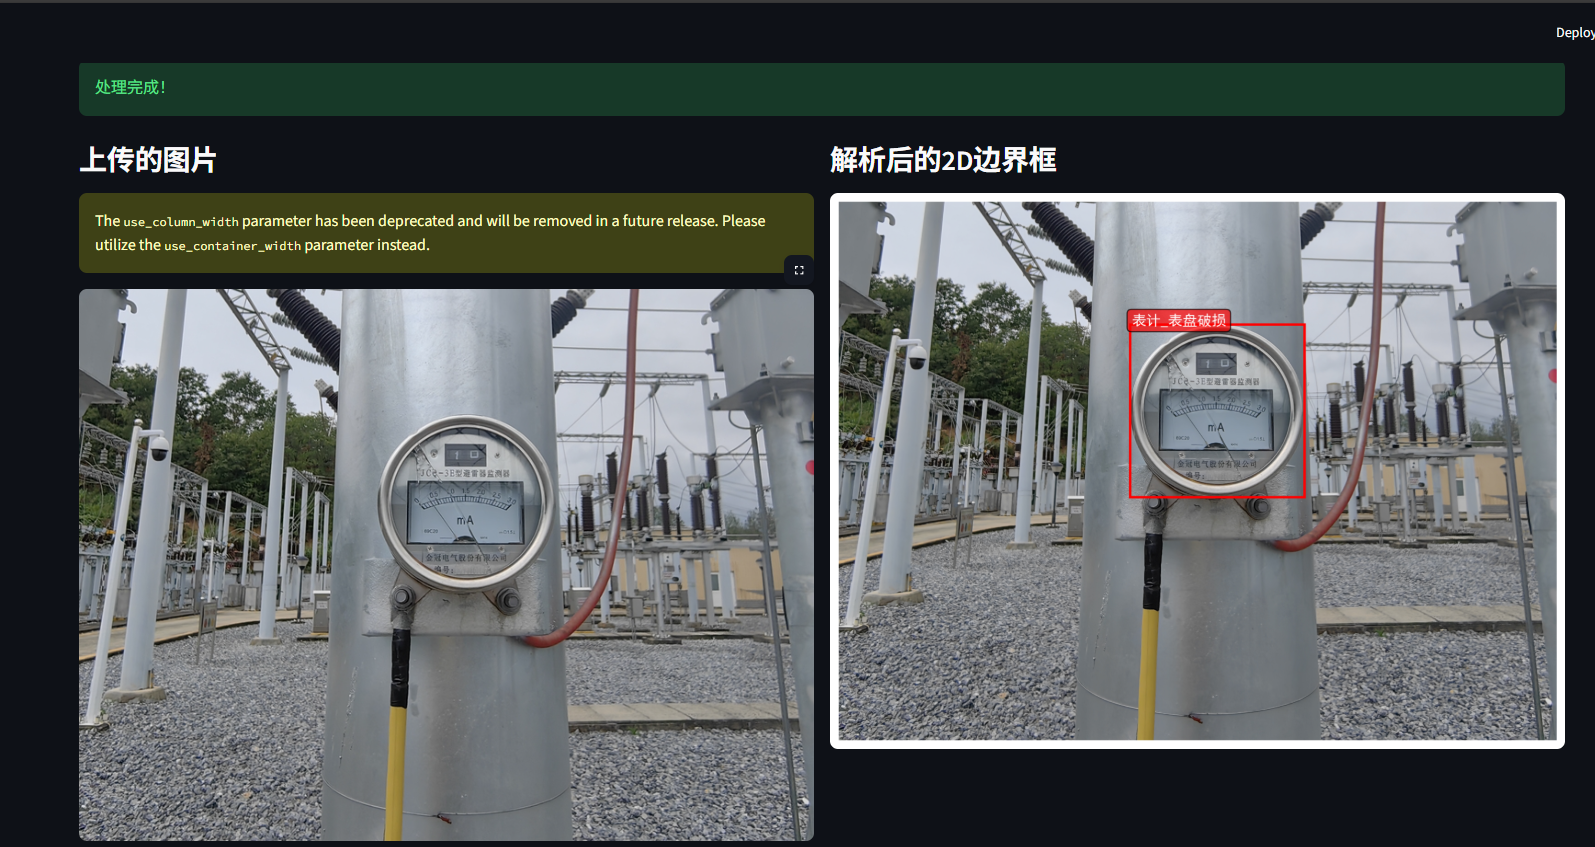
- 可视化结果: 目标检测结果以边界框形式可视化显示
- 多API支持: 可切换不同的AI服务提供商
modules/api_client.py
import os
import base64
import json
from openai import OpenAI
from dotenv import load_dotenv

# 加载环境变量
load_dotenv()

class APIClient:
    """
    用于与多个AI模型服务API交互的客户端类,支持魔搭社区(ModelScope)和阿里云(DashScope)平台的调用。

    属性:
        ms_api_key (str): 魔搭社区的API密钥,从环境变量中加载
        ms_base_url (str): 魔搭社区的基础URL,从环境变量中加载
        dash_api_key (str): 阿里云平台的API密钥,从环境变量中加载
        dash_base_url (str): 阿里云平台的基础URL,从环境变量中加载
    """

    def __init__(self):
        # 初始化API配置信息:分别读取魔搭和阿里云的相关环境变量
        self.ms_api_key = os.getenv("ms_api_key")
        self.ms_base_url = os.getenv("ms_base_url")
        self.dash_api_key = os.getenv("dash_api_key")
        self.dash_base_url = os.getenv("dash_base_url")

    def encode_image(self, image_path):
        """
        将指定路径下的本地图片文件转换为Base64编码格式字符串。

        参数:
            image_path (str): 图片文件的本地路径

        返回:
            str: Base64编码后的图片数据字符串
        """
        with open(image_path, "rb") as image_file:
            return base64.b64encode(image_file.read()).decode('utf-8')

    def inference_with_api(self, image_path, prompt, api_type="modelscope",
                          high_resolution=False, model_name=None,
                          min_pixels=64 * 32 * 32, max_pixels=9800 * 32 * 32):
        """
        调用远程API对输入图像和提示文本进行推理,并返回结果。

        参数:
            image_path (str): 待分析图像的本地路径
            prompt (str): 提供给模型的用户提示文本
            api_type (str): 指定使用的API平台,可选值:"modelscope" 或 "dashscope",默认为 "modelscope"
            high_resolution (bool): 是否启用高分辨率图像处理模式,默认为 False
            model_name (str): 使用的具体模型名称,若未提供则使用各平台推荐模型
            min_pixels (int): 图像最小像素数限制,默认为 64*32*32
            max_pixels (int): 图像最大像素数限制,默认为 9800*32*32

        返回:
            str: 来自API响应的内容部分,通常为模型输出的结果文本

        异常:
            FileNotFoundError: 当指定的图片路径不存在时抛出异常
        """
        if not os.path.exists(image_path):
            raise FileNotFoundError(f"图片文件不存在: {image_path}")

        # 根据API类型设置对应的认证信息和基础URL
        if api_type == "modelscope":
            api_key = self.ms_api_key
            base_url = self.ms_base_url
            if model_name is None:
                model_name = 'Qwen/Qwen3-VL-235B-A22B-Instruct'
        else:  # dashscope
            api_key = self.dash_api_key
            base_url = self.dash_base_url
            if model_name is None:
                model_name = "qwen3-vl-plus"

        # 对图像进行Base64编码以便传输至API接口
        base64_image = self.encode_image(image_path)

        client = OpenAI(api_key=api_key, base_url=base_url)

        # 构造请求消息体,包括图像和文本内容
        messages = [
            {
                "role": "user",
                "content": [
                    {
                        "type": "image_url",
                        "image_url": {
                            "url": f"data:image/jpeg;base64,{base64_image}"
                        },
                        "min_pixels": min_pixels,
                        "max_pixels": max_pixels
                    },
                    {"type": "text", "text": prompt},
                ],
            }
        ]

        # 设置额外参数,如是否开启思考过程、是否使用高清图像解析等
        extra_body = {
            'enable_thinking': False,
            "vl_high_resolution_images": high_resolution
        }

        # 向API发起推理请求并获取响应
        response = client.chat.completions.create(
            model=model_name,
            messages=messages,
            stream=False,
            extra_body=extra_body
        )

        return response.choices[0].message.content

    def parse_json(self, json_output):
        """
        解析可能被Markdown代码块包裹的JSON字符串,提取其中的有效JSON内容。

        参数:
            json_output (str): 包含或不包含Markdown代码块标记的原始JSON字符串

        返回:
            str: 去除Markdown代码块标记后的真实JSON字符串
        """
        lines = json_output.splitlines()
        for i, line in enumerate(lines):
            if line == "```json":
                json_output = "\n".join(lines[i+1:])
                json_output = json_output.split("```")[0]
                break
        return json_output
这个 [api_client.py](javascript:void(0)) 脚本定义了一个名为 [APIClient](javascript:void(0)) 的 Python 类,用于与多个 AI 模型服务 API 进行交互,支持魔搭社区(ModelScope)和阿里云(DashScope)平台的调用。
其主要功能包括:
1. 初始化和配置:
- 类在初始化时通过 dotenv 加载环境变量,获取 ModelScope 和 DashScope 平台的 API 密钥和基础 URL。
- 这些配置信息存储在类的属性中,供后续调用使用。
2. 图像编码: - [encode_image](javascript:void(0)) 方法用于将本地图片文件转换为 Base64 编码字符串,以便通过 API 发送。
3. API 推理调用: - [inference_with_api](javascript:void(0)) 方法是核心功能,它将图像和提示文本发送到指定的 API 服务(ModelScope 或 DashScope)进行处理。
- 支持高分辨率图像处理模式,并允许指定不同的模型名称。
- 根据选择的平台,使用相应的 API 密钥和基础 URL 创建客户端,并构造包含图像和文本内容的消息体发送请求。
- 最终返回 API 响应的内容部分。
4.JSON 解析: - [parse_json](javascript:void(0)) 方法用于从可能被 Markdown 代码块标记(```json)包裹的字符串中提取有效的 JSON 内容。
modules/image_utils.py
import os
import uuid
from PIL import Image
import io

class ImageUtils:
    @staticmethod
    def save_uploaded_file(uploaded_file, upload_dir="uploaded_images"):
        """
        保存上传的文件到指定目录

        参数:
            uploaded_file: 上传的文件对象,需要支持getbuffer()方法和name属性
            upload_dir: 保存文件的目录路径,默认为"uploaded_images"

        返回:
            tuple: 包含文件完整路径和唯一文件名的元组 (file_path, unique_filename)
        """
        # 检查并创建上传目录
        if not os.path.exists(upload_dir):
            os.makedirs(upload_dir)

        # 生成唯一文件名
        file_extension = os.path.splitext(uploaded_file.name)[1]
        unique_filename = f"{uuid.uuid4()}{file_extension}"
        file_path = os.path.join(upload_dir, unique_filename)

        # 保存文件
        with open(file_path, "wb") as f:
            f.write(uploaded_file.getbuffer())

        return file_path, unique_filename

    @staticmethod
    def resize_image(image_path, max_size=(800, 600)):
        """
        调整图片大小以适应显示

        参数:
            image_path: 图片文件的路径
            max_size: 图片最大尺寸元组(width, height),默认为(800, 600)

        返回:
            PIL.Image: 调整大小后的Image对象
        """
        image = Image.open(image_path)
        image.thumbnail(max_size, Image.Resampling.LANCZOS)

        # 处理带透明通道的图片格式
        if image.mode in ('RGBA', 'LA'):
            background = Image.new('RGB', image.size, (255, 255, 255))
            background.paste(image, mask=image.split()[-1])
            image = background

        return image
modules/visualization.py
import matplotlib.pyplot as plt
import matplotlib.patches as patches
from PIL import Image
import numpy as np
import json

# 设置中文字体
plt.rcParams['font.sans-serif'] = ['SimHei', 'Microsoft YaHei', 'DejaVu Sans']  # 用来正常显示中文标签
plt.rcParams['axes.unicode_minus'] = False  # 用来正常显示负号

class Visualization:
    @staticmethod
    def draw_bboxes(image_path, bbox_data, output_path="output_with_bboxes.png"):
        """
        在图像上绘制边界框(bounding boxes)和对应的标签,并将结果保存为文件。支持多种输入格式的边界框数据。

        参数:
            image_path (str): 输入图像的路径,用于加载并显示图像内容
            bbox_data (list or str): 边界框数据,可以是以下几种形式之一:
                - JSON 字符串表示的列表或对象
                - 包含边界框信息的字典组成的列表,每个字典应至少包含 'bbox_2d' 和 'label' 键
                - 字符串组成的列表,其中每个字符串是一个可解析为字典的 JSON 对象
            output_path (str): 输出图像的保存路径,默认为 "output_with_bboxes.png"

        返回:
            str: 保存带边界框图像的文件路径
        """

        # 读取图片
        image = Image.open(image_path)
        raw_width,raw_height = image.size

        # 创建图形
        fig, ax = plt.subplots(1, figsize=(12, 8))

        # 显示图片
        ax.imshow(image)

        # 定义颜色列表供不同边界框使用
        colors = [
            '#FF0000', '#00FF00', '#0000FF', '#FFFF00', '#FF00FF', '#00FFFF',
            '#FFA500', '#800080', '#008000', '#FFC0CB', '#FFD700', '#4B0082',
            '#00FF7F', '#DC143C', '#8A2BE2', '#7CFC00', '#FF4500', '#DA70D6',
            '#20B2AA', '#FF69B4', '#32CD32', '#BA55D3', '#9370DB', '#3CB371'
        ]

        # 存储处理后的边界框数据
        processed_bboxes = []

        # 情况1:如果是字符串,尝试解析为JSON
        if isinstance(bbox_data, str):
            try:
                bbox_data = json.loads(bbox_data)
            except json.JSONDecodeError:
                print("无法解析JSON字符串")
                return output_path

        # 情况2:如果是列表,处理每个元素
        if isinstance(bbox_data, list):
            for item in bbox_data:
                if isinstance(item, dict):
                    # 标准字典格式
                    processed_bboxes.append({
                        "bbox_2d": item.get("bbox_2d", []),
                        "label": item.get("label", "unknown")
                    })
                elif isinstance(item, str):
                    # 字符串格式,尝试解析
                    try:
                        parsed_item = json.loads(item)
                        processed_bboxes.append({
                            "bbox_2d": parsed_item.get("bbox_2d", []),
                            "label": parsed_item.get("label", "unknown")
                        })
                    except:
                        print(f"无法解析项目: {item}")
                else:
                    print(f"未知的数据格式: {type(item)}")

        print(f"处理后的边界框数据: {processed_bboxes}")

        # 遍历所有处理好的边界框并进行绘制
        for i, item in enumerate(processed_bboxes):
            bbox = item["bbox_2d"]  # [x1, y1, x2, y2]
            label = item["label"]
            color = colors[i % len(colors)]

            # 检查边界框数据是否有效
            if len(bbox) != 4:
                print(f"无效的边界框数据: {bbox}")
                continue

            # 计算边界框的宽度和高度
            abs_y1 = int(item["bbox_2d"][1] / 1000 * raw_height)
            abs_x1 = int(item["bbox_2d"][0] / 1000 * raw_width)
            abs_y2 = int(item["bbox_2d"][3] / 1000 * raw_height)
            abs_x2 = int(item["bbox_2d"][2] / 1000 * raw_width)

            if abs_x1 > abs_x2:
                abs_x1, abs_x2 = abs_x2, abs_x1

            if abs_y1 > abs_y2:
                abs_y1, abs_y2 = abs_y2, abs_y1

            # 计算边界框的宽度和高度
            width = abs_x2 - abs_x1
            height = abs_y2 - abs_y1

            # 创建矩形框并添加到图中
            rect = patches.Rectangle((abs_x1, abs_y1), width, height,
                                   linewidth=2, edgecolor=color, facecolor='none')
            ax.add_patch(rect)

            # 添加标签文本
            ax.text(abs_x1 + 8, abs_y1 + 6, label,
               bbox=dict(boxstyle="round,pad=0.3", facecolor=color, alpha=0.7),
               color='white', fontsize=12, weight='bold')

        # 隐藏坐标轴
        ax.axis('off')

        # 保存结果图像并关闭绘图窗口以释放资源
        plt.tight_layout()
        plt.savefig(output_path, dpi=300, bbox_inches='tight')
        plt.close()  # 关闭图形以释放内存

        return output_path
app.py (主应用文件)
import streamlit as st
import pandas as pd
import os
from modules.api_client import APIClient
from modules.image_utils import ImageUtils
from modules.visualization import Visualization
import tempfile

# 页面配置
st.set_page_config(
    page_title="目标检测平台",
    page_icon="🔍",
    layout="wide",
    initial_sidebar_state="expanded"
)

# 初始化工具类
api_client = APIClient()
image_utils = ImageUtils()
visualizer = Visualization()

# 初始化session state
if 'history' not in st.session_state:
    st.session_state.history = pd.DataFrame(columns=['图片名称', '理解结果'])
if 'current_image' not in st.session_state:
    st.session_state.current_image = None
if 'current_image_name' not in st.session_state:
    st.session_state.current_image_name = None

# 标题
st.title("🔍 目标检测与图片理解平台")

# 侧边栏
with st.sidebar:
    st.header("配置")

    # 图片上传
    uploaded_file = st.file_uploader(
        "上传图片",
        type=['png', 'jpg', 'jpeg'],
        help="支持 PNG, JPG, JPEG 格式"
    )

    # 提示词输入
    prompt = st.text_area(
        "提示词",
        placeholder="请输入对图片的提问...",
        help="例如:描述图片中的内容、识别特定物体等"
    )

    # 目标检测开关
    object_detection = st.checkbox("进行目标检测", value=False)

    if object_detection:
        st.info("目标检测模式下,请在提示词中输入要检测的物体名称")

    # API选择
    api_type = st.selectbox(
        "选择API服务",
        ["modelscope", "dashscope"],
        help="选择使用的AI服务提供商"
    )

    # 高分辨率选项
    high_resolution = st.checkbox("高分辨率模式", value=False)

    # 处理按钮
    process_button = st.button("开始处理", type="primary")

# 处理上传的图片
if uploaded_file is not None:
    # 保存上传的图片并更新当前会话状态
    image_path, image_name = image_utils.save_uploaded_file(uploaded_file)
    st.session_state.current_image = image_path
    st.session_state.current_image_name = image_name

    # 显示上传的图片
    resized_image = image_utils.resize_image(image_path)
    st.sidebar.image(resized_image, caption=f"上传的图片: {image_name}", use_column_width=True)

# 处理按钮点击事件
if process_button and st.session_state.current_image:
    if not prompt:
        st.warning("请输入提示词")
    else:
        with st.spinner("正在处理图片..."):
            try:
                # 构建目标检测的提示词
                if object_detection:
                    detection_prompt = f"定位所有属于以下类别的实例:'{prompt}'。以 JSON 格式报告边界框坐标"
                else:
                    detection_prompt = prompt

                # 调用API获取推理结果
                response = api_client.inference_with_api(
                    image_path=st.session_state.current_image,
                    prompt=detection_prompt,
                    api_type=api_type,
                    high_resolution=high_resolution
                )

                # 显示成功信息
                st.success("处理完成!")

                # 主界面布局
                col1, col2 = st.columns(2)

                with col1:
                    st.subheader("上传的图片")
                    resized_image = image_utils.resize_image(st.session_state.current_image)
                    st.image(resized_image, use_column_width=True)

                with col2:
                    st.subheader("分析结果")

                    if object_detection:
                        # 解析JSON响应
                        parsed_response = api_client.parse_json(response)
                       # st.json(parsed_response)

                        # 可视化边界框
                        with st.spinner("生成可视化结果..."):
                            output_path = f"detection_result_{st.session_state.current_image_name}.png"
                            vis_path = visualizer.draw_bboxes(
                                st.session_state.current_image,
                                parsed_response,
                                output_path
                            )

                            if os.path.exists(vis_path):
                                st.image(vis_path, caption="目标检测结果", use_column_width=True)
                    else:
                        st.write(response)

                # 添加到历史记录
                new_record = pd.DataFrame({
                    '图片名称': [st.session_state.current_image_name],
                    '理解结果': [response]
                })
                st.session_state.history = pd.concat([st.session_state.history, new_record], ignore_index=True)

            except Exception as e:
                st.error(f"处理过程中出现错误: {str(e)}")

# 显示历史记录
st.markdown("---")
st.subheader("历史记录")

if not st.session_state.history.empty:
    st.dataframe(
        st.session_state.history,
        use_container_width=True,
        hide_index=True
    )

    # 清空历史记录按钮
    if st.button("清空历史记录"):
        st.session_state.history = pd.DataFrame(columns=['图片名称', '理解结果'])
        st.rerun()
else:
    st.info("暂无历史记录")

# 使用说明
with st.expander("使用说明"):
    st.markdown("""
    ### 平台使用指南

    1. **上传图片**: 在侧边栏上传需要分析的图片
    2. **输入提示词**:
       - 普通模式: 输入任意图片理解问题
       - 目标检测模式: 输入要检测的物体名称(多个物体用逗号分隔)
    3. **选择模式**:
       - 取消勾选"进行目标检测": 进行普通的图片理解
       - 勾选"进行目标检测": 进行物体检测和定位
    4. **开始处理**: 点击按钮开始分析

    ### 功能特点
    - 支持多种图片格式
    - 可选择不同的AI服务提供商
    - 高分辨率模式提升检测精度
    - 自动保存处理历史
    - 目标检测结果可视化
    """)
这是一个基于Streamlit的目标检测和图像理解应用程序。以下是详细解释:
初始化和配置
camera_utils.py
import json
import math
import numpy as np
from PIL import Image
import os

class CameraUtils:
    @staticmethod
    def load_camera_params(image_name, json_path='./spatial_understanding/cam_infos.json'):
        """
        从JSON文件中加载指定图像的相机参数

        参数:
            image_name (str): 图像文件名,用作查找相机参数的键
            json_path (str): 包含相机参数的JSON文件路径,默认为'./spatial_understanding/cam_infos.json'

        返回:
            dict or None: 成功时返回对应图像的相机参数字典,失败或未找到时返回None
        """
        try:
            # 检查JSON文件是否存在
            if os.path.exists(json_path):
                with open(json_path, 'r') as f:
                    cam_infos = json.load(f)
                # 返回指定图像的相机参数,如果不存在则返回None
                return cam_infos.get(image_name, None)
            return None
        except Exception as e:
            print(f"加载相机参数失败: {e}")
            return None

    @staticmethod
    def generate_camera_params(image_path, fx=None, fy=None, cx=None, cy=None, fov=60):
        """
        根据图像尺寸和可选的相机内参生成相机参数

        参数:
            image_path (str): 图像文件路径,用于获取图像尺寸
            fx (float): 相机x轴焦距,如果为None则根据视场角计算
            fy (float): 相机y轴焦距,如果为None则根据视场角计算
            cx (float): 相机光心x坐标,如果为None则设为图像宽度的一半
            cy (float): 相机光心y坐标,如果为None则设为图像高度的一半
            fov (int): 相机视场角(度),默认为60度,用于计算焦距

        返回:
            dict: 包含相机内参的字典,包括fx, fy, cx, cy四个参数
        """
        try:
            # 打开图像并获取尺寸
            image = Image.open(image_path)
            w, h = image.size

            # 如果未提供焦距参数,则根据视场角和图像尺寸计算
            if fx is None or fy is None:
                # 使用宽高的平均值来计算焦距,让fx和fy相同
                avg_dimension = (w + h) / 2
                focal_length = round(avg_dimension / (2 * np.tan(np.deg2rad(fov) / 2)), 2)
                fx = focal_length
                fy = focal_length

            # 如果未提供光心坐标,则设置为图像中心
            if cx is None or cy is None:
                cx = round(w / 2, 2)
                cy = round(h / 2, 2)

            return {'fx': fx, 'fy': fy, 'cx': cx, 'cy': cy}
        except Exception as e:
            print(f"生成相机参数失败: {e}")
            # 返回默认参数
            return {'fx': 1000, 'fy': 1000, 'cx': 640, 'cy': 360}
visualization_2d.py
import matplotlib.pyplot as plt
import matplotlib.patches as patches
from PIL import Image
import numpy as np
import json

class Visualization2D:
    """
    用于在图像上绘制二维边界框(bounding boxes)和对应标签的可视化工具类
    """

    def __init__(self):
        """
        初始化函数,设置中文字体支持以确保中文显示正常
        """
        self._setup_chinese_font()

    def _setup_chinese_font(self):
        """
        配置matplotlib使用支持中文的字体,并关闭unicode负号替换功能
        """
        plt.rcParams['font.sans-serif'] = ['SimHei', 'Microsoft YaHei', 'DejaVu Sans']
        plt.rcParams['axes.unicode_minus'] = False

    def draw_bboxes_2d(self, image_path, bbox_data, output_path=None):
        """
        在指定图像上绘制2D边界框及标签信息,并可选择性地将结果保存为文件

        参数:
            image_path (str): 输入图像的路径
            bbox_data (list or str): 边界框数据,可以是字典列表、坐标列表或JSON字符串形式
            output_path (str, optional): 输出图像的保存路径,默认为None表示不保存

        返回:
            matplotlib.figure.Figure: 包含绘图结果的Figure对象,可用于进一步操作或展示
        """
        try:
            # 读取输入图像
            image = Image.open(image_path)
            raw_width, raw_height = image.size

            # 创建绘图画布
            fig, ax = plt.subplots(1, figsize=(12, 8))

            # 将图像显示在画布上
            ax.imshow(image)

            # 定义一组颜色用于区分不同边界框
            colors = [
                '#FF0000', '#00FF00', '#0000FF', '#FFFF00', '#FF00FF', '#00FFFF',
                '#FFA500', '#800080', '#008000', '#FFC0CB', '#FFD700', '#4B0082',
                '#00FF7F', '#DC143C', '#8A2BE2', '#7CFC00', '#FF4500', '#DA70D6',
                '#20B2AA', '#FF69B4', '#32CD32', '#BA55D3', '#9370DB', '#3CB371'
            ]

            # 存储处理后的边界框信息
            processed_bboxes = []

            # 如果输入的是字符串,则尝试将其解析为JSON格式的数据
            if isinstance(bbox_data, str):
                try:
                    bbox_data = json.loads(bbox_data)
                except json.JSONDecodeError:
                    print("无法解析JSON字符串")
                    return fig

            # 处理列表类型的边界框数据
            if isinstance(bbox_data, list):
                for item in bbox_data:
                    if isinstance(item, dict):
                        # 判断是否存在有效的边界框字段并提取相关信息
                        bbox_key = None
                        if 'bbox_2d' in item:
                            bbox_key = 'bbox_2d'
                        elif 'bbox' in item:
                            bbox_key = 'bbox'
                        elif 'bounding_box' in item:
                            bbox_key = 'bounding_box'

                        if bbox_key and item.get(bbox_key):
                            processed_bboxes.append({
                                "bbox": item[bbox_key],
                                "label": item.get("label", "unknown"),
                                "score": item.get("score", 1.0)
                            })
                    elif isinstance(item, list) and len(item) >= 4:
                        # 若为直接坐标列表,则默认标签为"object"
                        processed_bboxes.append({
                            "bbox": item,
                            "label": "object",
                            "score": 1.0
                        })

            print(f"处理后的2D边界框数据: {processed_bboxes}")

            # 遍历所有处理好的边界框进行绘制
            for i, item in enumerate(processed_bboxes):
                bbox = item["bbox"]
                label = item["label"]
                score = item["score"]
                color = colors[i % len(colors)]

                # 根据边界框坐标的数值范围判断其是否需要转换成像素单位
                if len(bbox) == 4:
                    if bbox[2] > 1 and bbox[3] > 1:  # 假设是绝对坐标
                        x1, y1, x2, y2 = bbox
                    else:  # 可能是归一化坐标
                        img_w, img_h = image.size
                        x1, y1, x2, y2 = bbox[0]*img_w, bbox[1]*img_h, bbox[2]*img_w, bbox[3]*img_h
                else:
                    print(f"无效的边界框数据: {bbox}")
                    continue

                abs_y1 = int(item["bbox"][1] / 1000 * raw_height)
                abs_x1 = int(item["bbox"][0] / 1000 * raw_width)
                abs_y2 = int(item["bbox"][3] / 1000 * raw_height)
                abs_x2 = int(item["bbox"][2] / 1000 * raw_width)

                if abs_x1 > abs_x2:
                    abs_x1, abs_x2 = abs_x2, abs_x1

                if abs_y1 > abs_y2:
                    abs_y1, abs_y2 = abs_y2, abs_y1

                # 计算边界框的宽度和高度
                width = abs_x2 - abs_x1
                height = abs_y2 - abs_y1

                # 绘制矩形边界框
                rect = patches.Rectangle((abs_x1, abs_y1), width, height,
                                       linewidth=2, edgecolor=color, facecolor='none')
                ax.add_patch(rect)

                # 构造要显示的文本内容并在边界框上方添加标签
                label_text = f"{label}: {score:.2f}" if score < 1.0 else label
                ax.text(abs_x1 + 8, abs_y1 + 6, label_text,
                       bbox=dict(boxstyle="round,pad=0.3", facecolor=color, alpha=0.7),
                       color='white', fontsize=12, weight='bold')

            # 设置图表标题并隐藏坐标轴刻度
            #ax.set_title('2D目标检测结果', fontsize=16)
            ax.axis('off')

            # 如有指定输出路径则保存图像至该位置
            if output_path:
                plt.tight_layout()
                plt.savefig(output_path, dpi=300, bbox_inches='tight')
                print(f"结果已保存到: {output_path}")

            return fig

        except Exception as e:
            print(f"绘制2D边界框时出错: {e}")
            # 出现异常时返回一个包含错误提示的空白图像
            fig, ax = plt.subplots(1, figsize=(12, 8))
            ax.text(0.5, 0.5, f"可视化错误: {str(e)}",
                   ha='center', va='center', transform=ax.transAxes)
            ax.axis('off')
            return fig
启动
streamlit run app.py

感谢博主!!!!

有“AI”的1024 = 2048,欢迎大家加入2048 AI社区
更多推荐
 6
6 0
0- 0


 已为社区贡献2条内容

所有评论(0)