【AI应用探索】-OpenManus使用及源码解析
Manus是一款通用型AI助手能将想法转化为行动不止思考更注重成果Manus处理工作与生活中的各类任务在你安心休息的同时一切能够妥善完成因为Manus是闭源的,所以我们无法知道是怎么实现的,这里我们采用github上的OpenManus来了解下整个流程OpenManus地址:https://github.com/FoundationAgents/OpenManus/blob/main/README
【AI应用探索】-OpenManus及源码解析
1 引言
1.1 什么是Manus?
Manus是一款通用型AI助手能将想法转化为行动不止思考更注重成果
Manus处理工作与生活中的各类任务在你安心休息的同时一切能够妥善完成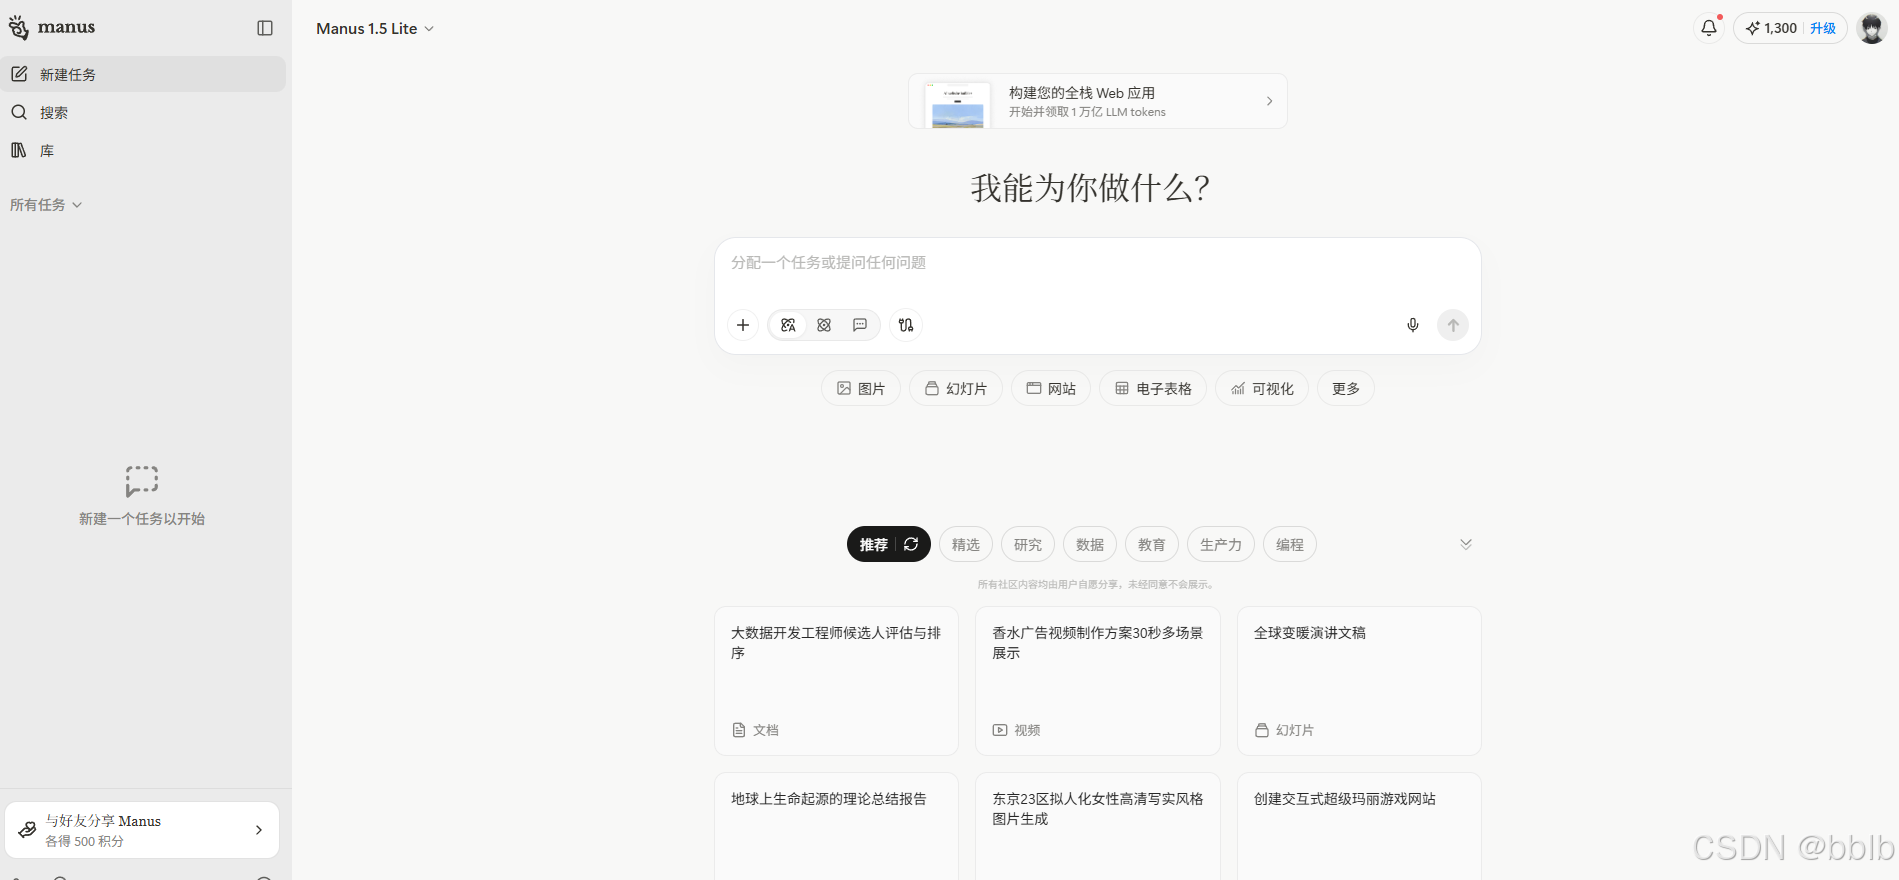
1.2 什么是OpenManus?
因为Manus是闭源的,所以我们无法知道是怎么实现的,这里我们采用github上的OpenManus来了解下整个流程
OpenManus地址:https://github.com/FoundationAgents/OpenManus/blob/main/README_zh.md
OpenManus是一个专注于基于强化学习(RL,例如 GRPO)的方法来优化大语言模型(LLM)智能体的开源项目
2 环境配置
2.1 conda环境配置
创建新的 conda 环境:
conda create -n open_manus python=3.12
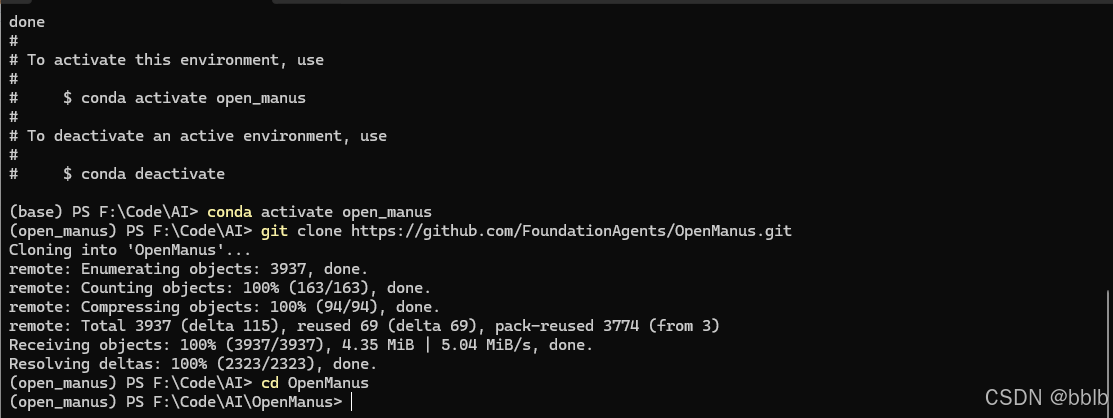
conda activate open_manus
克隆仓库:
git clone https://github.com/FoundationAgents/OpenManus.git
cd OpenManus
安装依赖:
pip install -i https://mirrors.aliyun.com/pypi/simple/ -r requirements.txt
2.2 添加配置
OpenManus 需要配置使用的 LLM API,请按以下步骤设置:
在 config 目录创建 config.toml 文件:
cp config/config.example.toml config/config.toml
编辑 config/config.toml 添加 API 密钥和自定义设置:
# 全局 LLM 配置
[llm]
model = "qwen-plus"
base_url = "https://dashscope.aliyuncs.com/compatible-mode/v1"
api_key = "sk-..."
max_tokens = 4096
temperature = 0.0

[daytona]
daytona_api_key = "sk-xxx"

# 可选特定 LLM 模型配置
[llm.vision]
model = "qwen-plus"
base_url = "https://dashscope.aliyuncs.com/compatible-mode/v1"
api_key = "sk-..."
2.3 快速启动
一行命令运行 OpenManus:
python main.py
然后通过终端输入你的创意!
如需使用 MCP 工具版本,可运行:
python run_mcp.py
如需体验不稳定的多智能体版本,可运行:
python run_flow.py
添加自定义多智能体
目前除了通用的 OpenManus Agent, 我们还内置了DataAnalysis Agent,适用于数据分析和数据可视化任务,你可以在config.toml中将这个智能体加入到run_flow中
# run-flow可选配置
[runflow]
use_data_analysis_agent = true     # 默认关闭,将其改为true则为激活
3 使用OpenManus
准备好后我们一键启动
python main.py

提示需要输入prompt or 任务,我们输入我们的任务:
3.1 日本旅行
我需要一份2025年5月15日至23日从杭州出发的7天日本行程。我们喜欢历史遗迹、隐藏的宝石和日本文化(剑道、茶道、禅修)。我们想看看奈良的鹿,步行探索城市。请提供详细的行程和简单的HTML旅行手册,其中包括包含地图、景点描述、基本的日语短语和旅行提示,我们可以在整个旅程中参考。
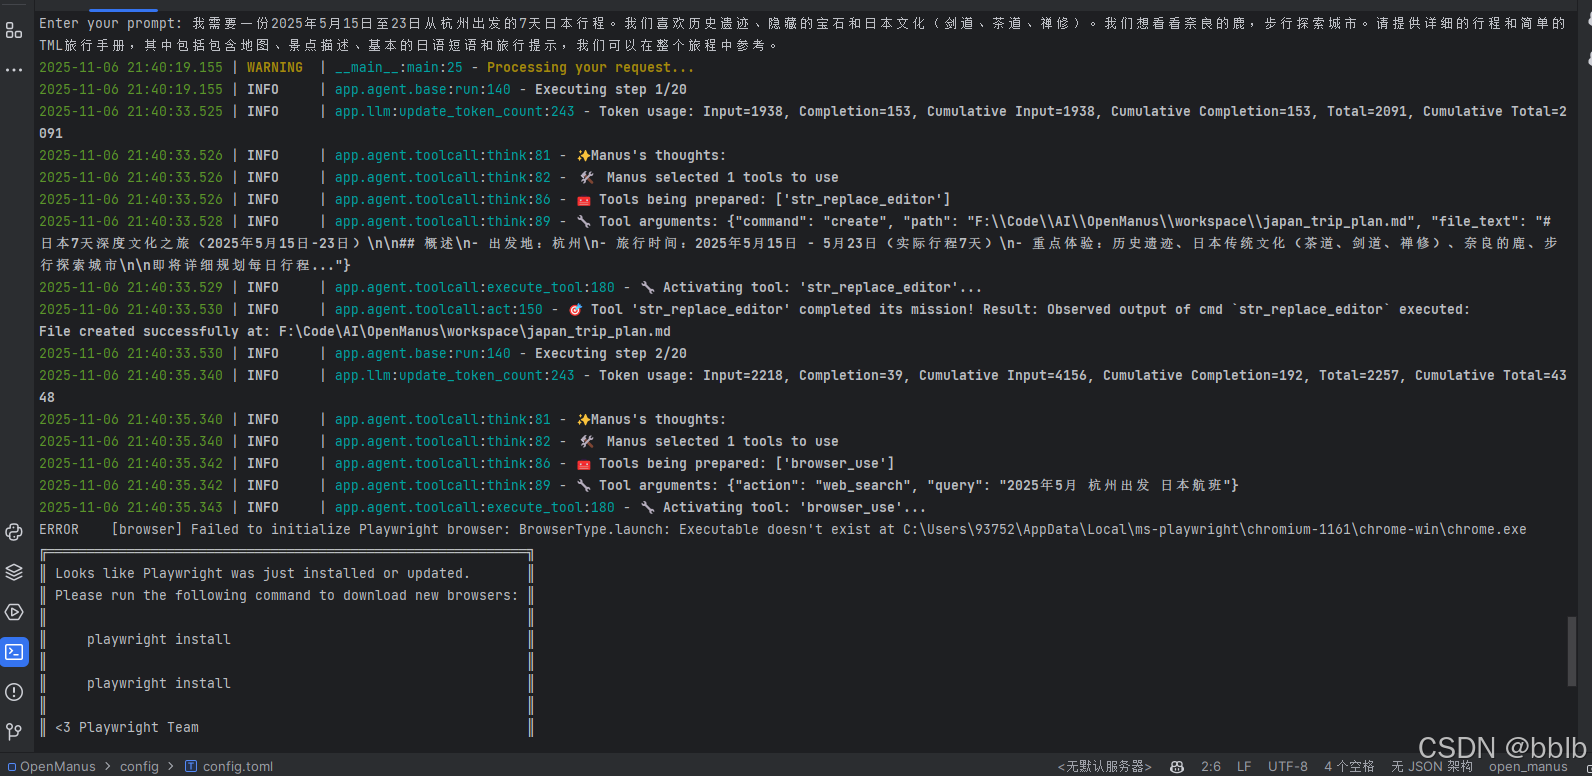
预计有20步,稍微等待后我们看看效果。
生成了快十分钟,不过内容还是很详实的。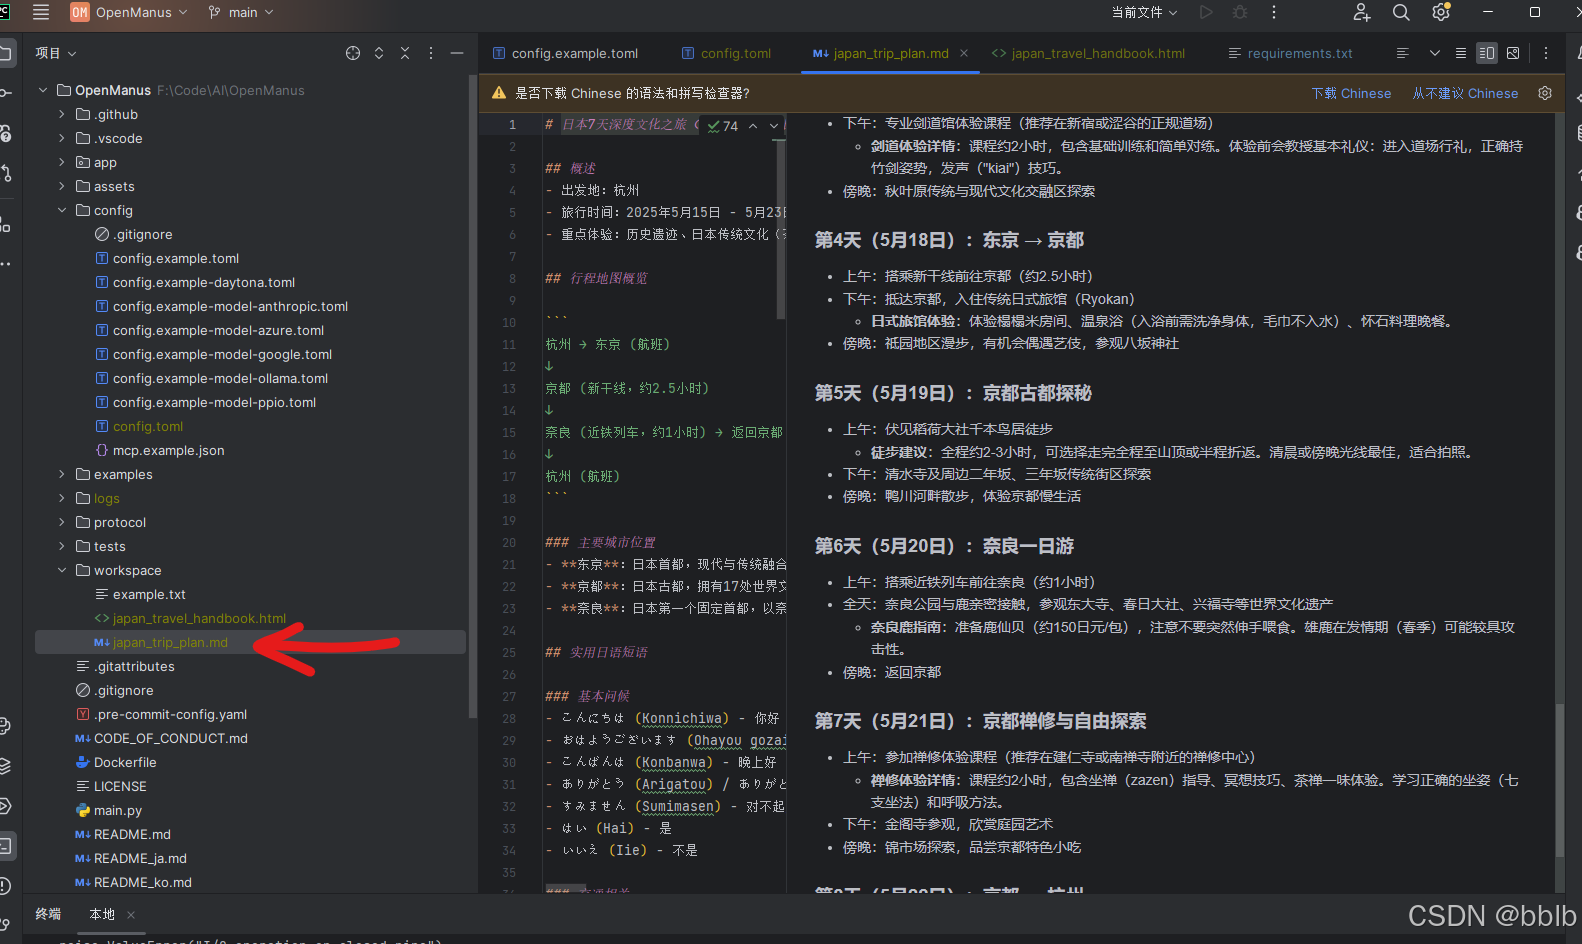
# 日本7天深度文化之旅(2025年5月15日-23日)

## 概述
- 出发地:杭州
- 旅行时间:2025年5月15日 - 5月23日(实际行程7天)
- 重点体验:历史遗迹、日本传统文化(茶道、剑道、禅修)、奈良的鹿、步行探索城市

## 行程地图概览
杭州 → 东京 (航班)
↓
京都 (新干线,约2.5小时)
↓
奈良 (近铁列车,约1小时) → 返回京都
↓
杭州 (航班)

### 主要城市位置
- **东京**:日本首都,现代与传统融合的大都市
- **京都**:日本古都,拥有17处世界文化遗产
- **奈良**:日本第一个固定首都,以奈良公园的鹿群闻名

## 实用日语短语

### 基本问候
- こんにちは (Konnichiwa) - 你好
- おはようございます (Ohayou gozaimasu) - 早上好
- こんばんは (Konbanwa) - 晚上好
- ありがとう (Arigatou) / ありがとうございます (Arigatou gozaimasu) - 谢谢(普通/正式)
- すみません (Sumimasen) - 对不起/打扰一下
- はい (Hai) - 是
- いいえ (Iie) - 不是

### 交通相关
- 駅はどこですか?(Eki wa doko desu ka?) - 车站在哪里?
- トイレはどこですか?(Toire wa doko desu ka?) - 卫生间在哪里?
- これはどこ行きですか?(Kore wa doko yuki desu ka?) - 这是去哪的?
- 一枚ください (Ichi-mai kudasai) - 请给我一张(车票)

### 餐厅用语
- メニューをください (Menyuu o kudasai) - 请给我菜单
- おすすめは何ですか?(Osusume wa nan desu ka?) - 有什么推荐的吗?
- お会計をお願いします (O-kaikei o onegaishimasu) - 请结账
- とても美味しかったです (Totemo oishikatta desu) - 非常好吃

### 文化体验相关
- 茶道を体験したいです (Sadou o taiken shitai desu) - 我想体验茶道
- 剣道の体験授業がありますか?(Kendou no taiken jugyou ga arimasu ka?) - 有剑道体验课吗?
- 禅の瞑想を体験できますか?(Zen no meisou o taiken dekimasu ka?) - 可以体验禅修冥想吗?
- 写真を撮ってもいいですか?(Shashin o totte mo ii desu ka?) - 可以拍照吗?

### 紧急情况
- 助けて!(Tasukete!) - 救命!
- 医者を呼んでください (Isha o yonde kudasai) - 请叫医生
- 大丈夫です (Daijoubu desu) - 我没事

## 旅行贴士

### 交通信息
- **日本铁路通票 (JR Pass)**:建议购买7天普通车票的JR Pass(约30,000日元),可无限次乘坐新干线(除Nozomi和Mizuho号)、JR特急、快速和普通列车。在东京到京都之间使用新干线非常方便。
- **IC卡**:在机场购买Suica或Pasmo卡,可用于地铁、公交和便利店购物。
- **地铁系统**:东京和京都的地铁系统发达但复杂,建议下载离线地图应用(如Google Maps)并保存常用路线。

### 文化礼仪
- **鞠躬礼仪**:日本人见面时通常鞠躬致意,角度根据场合而定(15度为日常问候,30度为正式场合,45度为深切感谢或道歉)。
- **脱鞋习惯**:进入传统旅馆、寺庙、某些餐厅和私人住宅时需要脱鞋。注意门口的鞋柜和室内拖鞋。
- **公共秩序**:公共交通工具上保持安静,避免大声通话或外放音频。排队时遵守秩序,不插队。
- **垃圾分类**:日本实行严格的垃圾分类,请注意垃圾桶上的标识,或将垃圾带回酒店处理。

### 实用信息
- **货币**:日本主要使用现金,尽管信用卡在大城市越来越普及。建议携带一些现金,特别是在小城镇和乡村地区。
- **电源插座**:日本电压为100V,插座类型为A型(两脚扁平),与中国相似,大部分中国电器可直接使用。
- **网络连接**:建议租用便携式Wi-Fi设备或购买当地SIM卡,以便随时导航和查找信息。
- **小费文化**:日本没有给小费的习惯,服务费已包含在账单中。

### 季节与着装
- **5月天气**:5月中旬的日本气候宜人,平均气温20-25°C。建议携带轻便外套应对早晚温差。
- **穿着建议**:舒适的步行鞋至关重要,因为行程涉及大量步行。参观寺庙时避免过于暴露的服装。
- **雨具**:5月是春末,偶尔会有阵雨,建议携带折叠伞或轻便雨衣。

### 餐饮提示
- **饮食安全**:日本食品安全标准很高,自来水可直接饮用(标注"飲料水"的水龙头)。
- **用餐礼仪**:不要将筷子直插在米饭中(类似葬礼仪式),传递食物时不要用筷子传递食物到另一个人的筷子上。
- **特色美食体验**:尝试京都的怀石料理、奈良的传统点心、东京的寿司和拉面。

### 安全与健康
- **紧急电话**:报警110,急救119,旅游咨询中心050-3816-2787
- **药品**:携带常用药品,注意日本对某些含麻黄碱或可待因的药品有严格限制。
- **保险**:建议购买涵盖医疗、行李丢失和行程取消的旅游保险。

## 每日行程概览

### 第1天(5月15日):杭州 → 东京
- 上午:从杭州萧山国际机场出发,搭乘航班前往东京羽田机场
- 下午:抵达东京,入住酒店,调整时差
- 傍晚:浅草地区漫步,参观浅草寺,体验传统街区氛围
- **文化小贴士**:浅草寺是东京最古老的寺庙,建于公元645年。参拜时记得"二礼二拍一礼"的礼仪。

### 第2天(5月16日):东京文化体验
- 上午:明治神宫参访,感受神道教文化
- 下午:参加茶道体验课程(推荐银座或表参道的专业茶道馆)
  - **茶道体验详情**:体验时间约90分钟,包含抹茶和和果子。学习茶道基本礼仪:进入茶室前净手漱口,跪坐姿势,品茶时转动茶碗避免喝到正面。
- 傍晚:原宿竹下通步行街探索,感受现代与传统的碰撞

### 第3天(5月17日):东京历史与剑道
- 上午:皇居东御苑参观,了解日本皇室历史
- 下午:专业剑道馆体验课程(推荐在新宿或涩谷的正规道场)
  - **剑道体验详情**:课程约2小时,包含基础训练和简单对练。体验前会教授基本礼仪:进入道场行礼,正确持竹剑姿势,发声("kiai")技巧。
- 傍晚:秋叶原传统与现代文化交融区探索

### 第4天(5月18日):东京 → 京都
- 上午:搭乘新干线前往京都(约2.5小时)
- 下午:抵达京都,入住传统日式旅馆(Ryokan)
  - **日式旅馆体验**:体验榻榻米房间、温泉浴(入浴前需洗净身体,毛巾不入水)、怀石料理晚餐。
- 傍晚:祗园地区漫步,有机会偶遇艺伎,参观八坂神社

### 第5天(5月19日):京都古都探秘
- 上午:伏见稻荷大社千本鸟居徒步
  - **徒步建议**:全程约2-3小时,可选择走完全程至山顶或半程折返。清晨或傍晚光线最佳,适合拍照。
- 下午:清水寺及周边二年坂、三年坂传统街区探索
- 傍晚:鸭川河畔散步,体验京都慢生活

### 第6天(5月20日):奈良一日游
- 上午:搭乘近铁列车前往奈良(约1小时)
- 全天:奈良公园与鹿亲密接触,参观东大寺、春日大社、兴福寺等世界文化遗产
  - **奈良鹿指南**:准备鹿仙贝(约150日元/包),注意不要突然伸手喂食。雄鹿在发情期(春季)可能较具攻击性。
- 傍晚:返回京都

### 第7天(5月21日):京都禅修与自由探索
- 上午:参加禅修体验课程(推荐在建仁寺或南禅寺附近的禅修中心)
  - **禅修体验详情**:课程约2小时,包含坐禅(zazen)指导、冥想技巧、茶禅一味体验。学习正确的坐姿(七支坐法)和呼吸方法。
- 下午:金阁寺参观,欣赏庭园艺术
- 傍晚:锦市场探索,品尝京都特色小吃

### 第8天(5月22日):京都 → 杭州
- 上午:最后购物时光,购买纪念品
- 下午:前往关西国际机场,搭乘航班返回杭州

### 第9天(5月23日):抵达杭州
- 上午:抵达杭州,结束美好旅程
4 源码解析
4.1 整体架构
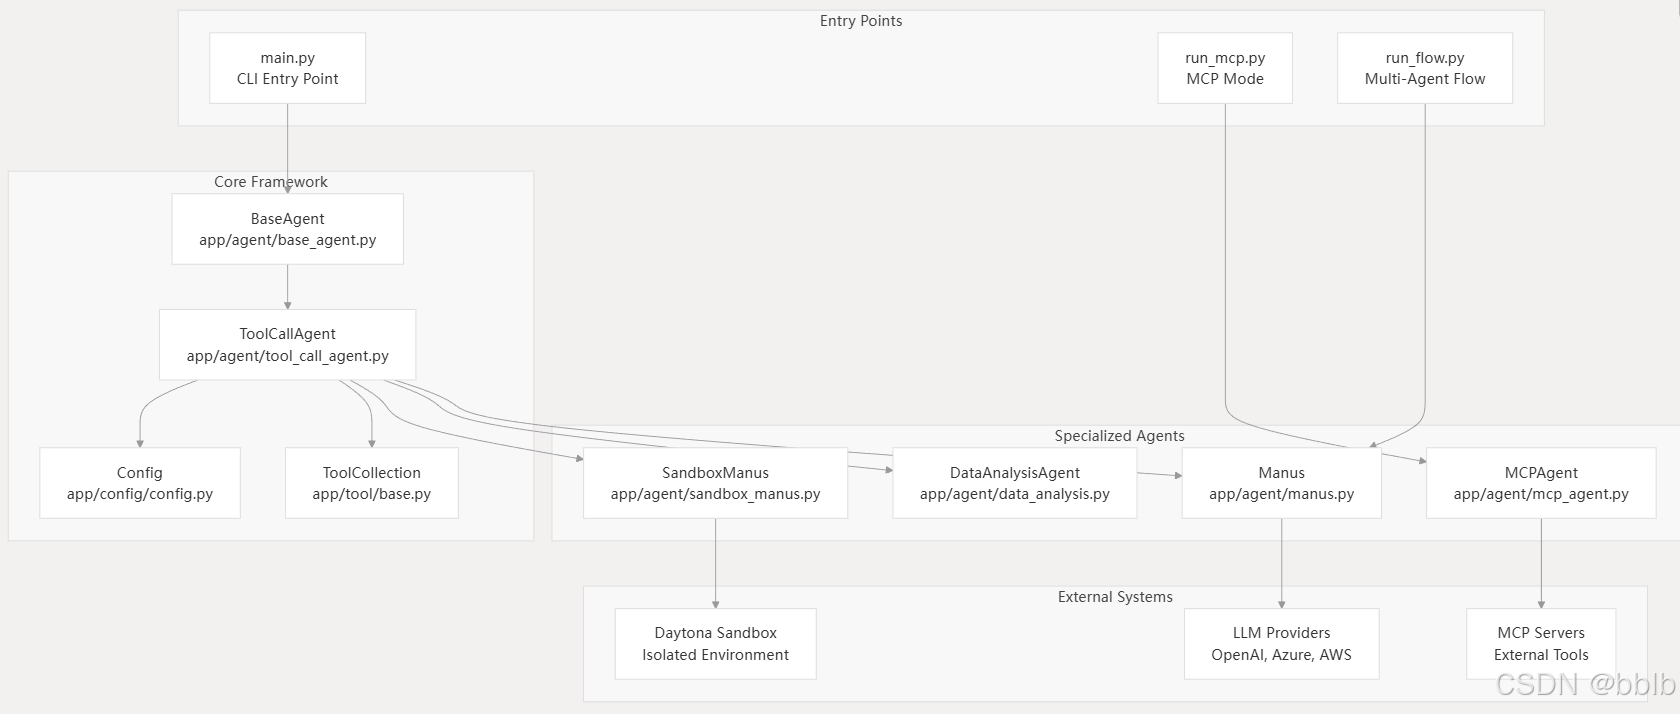
代理框架是围绕分层类结构构建的,旨在提供模块化和可扩展的功能。
| 组件 (Component) | 文件路径 (File Path) | 目的 (Purpose) |
|---|---|---|
BaseAgent |
app/agent/base_agent.py |
具有内存和LLM集成的抽象基类 |
ToolCallAgent |
app/agent/tool_call_agent.py |
在基类的基础上,增加了工具执行功能 |
Manus |
app/agent/manus.py |
通用的、核心的代理实现 |
DataAnalysisAgent |
app/agent/data_analysis.py |
专门用于数据处理和分析任务的代理 |
MCPAgent |
app/agent/mcp_agent.py |
与 MCP (Model Context Protocol) 协议集成,用于多模型协作 |
4.1.1 Manus智能体初始化
asyncio.run(main())
完成主函数调用,我们可以看到主函数调用就是异步的async def main():
解析完我们的命令行参数后
parser = argparse.ArgumentParser(description="Run Manus agent with a prompt")
如果有参数就会加入,之后使用工厂模式,根据不同的参数异步创建不同的Manus智能体实例
agent = await Manus.create()
4.1.1.1 Manus工厂方法初始化
instance = cls(**kwargs)
    @classmethod
    async def create(cls, **kwargs) -> "Manus":
        """Factory method to create and properly initialize a Manus instance."""
        instance = cls(**kwargs)
        await instance.initialize_mcp_servers()
        instance._initialized = True
        return instance
创建Manus实例并且初始化MCP服务器的连接
初始化基础属性,llm属性还有记忆化
    @model_validator(mode="after")
    def initialize_agent(self) -> "BaseAgent":
        """Initialize agent with default settings if not provided."""
        if self.llm is None or not isinstance(self.llm, LLM):
            self.llm = LLM(config_name=self.name.lower())
        if not isinstance(self.memory, Memory):
            self.memory = Memory()
        return self
设置BrowserContextHelper
    @model_validator(mode="after")
    def initialize_helper(self) -> "Manus":
        """Initialize basic components synchronously."""
        self.browser_context_helper = BrowserContextHelper(self)
        return self
4.1.1.2 初始化MCP服务器连接
await instance.initialize_mcp_servers()
遍历mcp服务器配置
    async def initialize_mcp_servers(self) -> None:
        """Initialize connections to configured MCP servers."""
        for server_id, server_config in config.mcp_config.servers.items():
            try:
                if server_config.type == "sse":
                    if server_config.url:
                        await self.connect_mcp_server(server_config.url, server_id)
                        logger.info(
                            f"Connected to MCP server {server_id} at {server_config.url}"
                        )
                elif server_config.type == "stdio":
                    if server_config.command:
                        await self.connect_mcp_server(
                            server_config.command,
                            server_id,
                            use_stdio=True,
                            stdio_args=server_config.args,
                        )
                        logger.info(
                            f"Connected to MCP server {server_id} using command {server_config.command}"
                        )
            except Exception as e:
                logger.error(f"Failed to connect to MCP server {server_id}: {e}")
连接配置所有MCP服务器
await self.connect_mcp_server(server_config.url, server_id)
4.1.2 运行智能体处理请求
await agent.run(prompt)
BaseAgent.run()基类执行
    async def run(self, request: Optional[str] = None) -> str:
        """Execute the agent's main loop asynchronously.

        Args:
            request: Optional initial user request to process.

        Returns:
            A string summarizing the execution results.

        Raises:
            RuntimeError: If the agent is not in IDLE state at start.
        """
        if self.state != AgentState.IDLE:
            raise RuntimeError(f"Cannot run agent from state: {self.state}")

        if request:
            self.update_memory("user", request)

        results: List[str] = []
        async with self.state_context(AgentState.RUNNING):
            while (
                self.current_step < self.max_steps and self.state != AgentState.FINISHED
            ):
                self.current_step += 1
                logger.info(f"Executing step {self.current_step}/{self.max_steps}")
                step_result = await self.step()

                # Check for stuck state
                if self.is_stuck():
                    self.handle_stuck_state()

                results.append(f"Step {self.current_step}: {step_result}")

            if self.current_step >= self.max_steps:
                self.current_step = 0
                self.state = AgentState.IDLE
                results.append(f"Terminated: Reached max steps ({self.max_steps})")
        await SANDBOX_CLIENT.cleanup()
        return "\n".join(results) if results else "No steps executed"
这里我们可以看到他已经更改了对应的状态为进行中
async with self.state_context(AgentState.RUNNING):
更改完状态则循环的处理用户的请求,之后更改状态为完成
            while (
                self.current_step < self.max_steps and self.state != AgentState.FINISHED
            ):
4.2 核心组件
4.2.1 代理层级和专业化
代理框架围绕分层继承结构构建,从而能够实现通用代理和专用代理。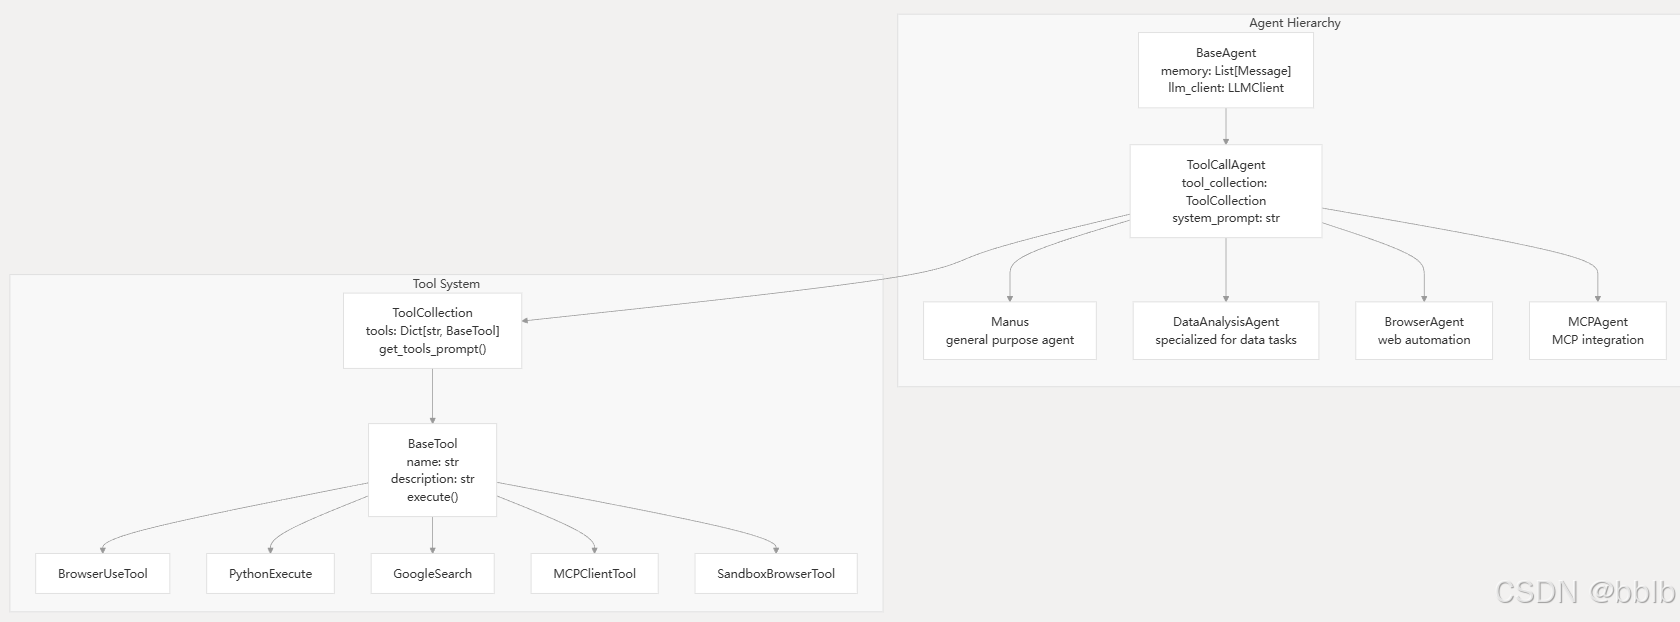
4.2.1.1 BaseAgent
我们刚刚已经了解了BaseAgent的大致过程,具体过程是怎样的呢?
我们刚刚使用的过程中已经看到了他会预先分成几个step,那么代码中也是如此
            while (
                self.current_step < self.max_steps and self.state != AgentState.FINISHED
            ):
                self.current_step += 1
                logger.info(f"Executing step {self.current_step}/{self.max_steps}")
                step_result = await self.step()

                # Check for stuck state
                if self.is_stuck():
                    self.handle_stuck_state()

                results.append(f"Step {self.current_step}: {step_result}")
在while中单个调用子类实现的step方法
step_result = await self.step()
我们刚刚在运行main.py也注意到,如果某一步step超时,那么也会对其进行相应的清除
await SANDBOX_CLIENT.cleanup()
4.2.1.2 ReActAgent
思维阶段:根据模型的种类判断是否进行思考和行动
    async def step(self) -> str:
        """Execute a single step: think and act."""
        should_act = await self.think()
        if not should_act:
            return "Thinking complete - no action needed"
        return await self.act()
行动阶段:则调用对应act方法
4.2.1.3 ToolCallAgent
ToolCallAgent继承于上文提到的ReActAgent
class ToolCallAgent(ReActAgent):
其think方法,实现LLM调用,这个其实跟我们之前写过的java版的流式调用类似
    async def think(self) -> bool:
        """Process current state and decide next actions using tools"""
        if self.next_step_prompt:
            user_msg = Message.user_message(self.next_step_prompt)
            self.messages += [user_msg]

        try:
            # Get response with tool options
            response = await self.llm.ask_tool(
                messages=self.messages,
                system_msgs=(
                    [Message.system_message(self.system_prompt)]
                    if self.system_prompt
                    else None
                ),
                tools=self.available_tools.to_params(),
                tool_choice=self.tool_choices,
            )
        except ValueError:
            raise
        except Exception as e:
            # Check if this is a RetryError containing TokenLimitExceeded
            if hasattr(e, "__cause__") and isinstance(e.__cause__, TokenLimitExceeded):
                token_limit_error = e.__cause__
                logger.error(
                    f"🚨 Token limit error (from RetryError): {token_limit_error}"
                )
                self.memory.add_message(
                    Message.assistant_message(
                        f"Maximum token limit reached, cannot continue execution: {str(token_limit_error)}"
                    )
                )
                self.state = AgentState.FINISHED
                return False
            raise

        self.tool_calls = tool_calls = (
            response.tool_calls if response and response.tool_calls else []
        )
        content = response.content if response and response.content else ""

        # Log response info
        logger.info(f"✨ {self.name}'s thoughts: {content}")
        logger.info(
            f"🛠️ {self.name} selected {len(tool_calls) if tool_calls else 0} tools to use"
        )
        if tool_calls:
            logger.info(
                f"🧰 Tools being prepared: {[call.function.name for call in tool_calls]}"
            )
            logger.info(f"🔧 Tool arguments: {tool_calls[0].function.arguments}")

        try:
            if response is None:
                raise RuntimeError("No response received from the LLM")

            # Handle different tool_choices modes
            if self.tool_choices == ToolChoice.NONE:
                if tool_calls:
                    logger.warning(
                        f"🤔 Hmm, {self.name} tried to use tools when they weren't available!"
                    )
                if content:
                    self.memory.add_message(Message.assistant_message(content))
                    return True
                return False

            # Create and add assistant message
            assistant_msg = (
                Message.from_tool_calls(content=content, tool_calls=self.tool_calls)
                if self.tool_calls
                else Message.assistant_message(content)
            )
            self.memory.add_message(assistant_msg)

            if self.tool_choices == ToolChoice.REQUIRED and not self.tool_calls:
                return True  # Will be handled in act()

            # For 'auto' mode, continue with content if no commands but content exists
            if self.tool_choices == ToolChoice.AUTO and not self.tool_calls:
                return bool(content)

            return bool(self.tool_calls)
        except Exception as e:
            logger.error(f"🚨 Oops! The {self.name}'s thinking process hit a snag: {e}")
            self.memory.add_message(
                Message.assistant_message(
                    f"Error encountered while processing: {str(e)}"
                )
            )
            return False
其act方法,工具执行的具体逻辑
    async def act(self) -> str:
        """Execute tool calls and handle their results"""
        if not self.tool_calls:
            if self.tool_choices == ToolChoice.REQUIRED:
                raise ValueError(TOOL_CALL_REQUIRED)

            # Return last message content if no tool calls
            return self.messages[-1].content or "No content or commands to execute"

        results = []
        for command in self.tool_calls:
            # Reset base64_image for each tool call
            self._current_base64_image = None

            result = await self.execute_tool(command)

            if self.max_observe:
                result = result[: self.max_observe]

            logger.info(
                f"🎯 Tool '{command.function.name}' completed its mission! Result: {result}"
            )

            # Add tool response to memory
            tool_msg = Message.tool_message(
                content=result,
                tool_call_id=command.id,
                name=command.function.name,
                base64_image=self._current_base64_image,
            )
            self.memory.add_message(tool_msg)
            results.append(result)

        return "\n\n".join(results)
4.2.2 工具生态架构系统
该工具系统为各种功能提供统一的界面,同时支持本地执行和远程集成。
该工具系统通过 BaseTool 接口提供可扩展的功能,允许代理与外部环境进行交互。
这个也是从我们上文提到过的ToolCallAgent.act() 进来的
所以我们继续看,跟MCP配置类似,也是先遍历再使用单个工具
        for command in self.tool_calls:
            # Reset base64_image for each tool call
            self._current_base64_image = None

            result = await self.execute_tool(command)

            if self.max_observe:
                result = result[: self.max_observe]

            logger.info(
                f"🎯 Tool '{command.function.name}' completed its mission! Result: {result}"
            )

            # Add tool response to memory
            tool_msg = Message.tool_message(
                content=result,
                tool_call_id=command.id,
                name=command.function.name,
                base64_image=self._current_base64_image,
            )
            self.memory.add_message(tool_msg)
            results.append(result)
execute_tool() 单个工具执行:
- 解析工具参数
args = json.loads(command.function.arguments or "{}") - 再委托ToolCollection执行具体的工具
result = await self.available_tools.execute(name=name, tool_input=args) - 在execute中查找对应工具的实例
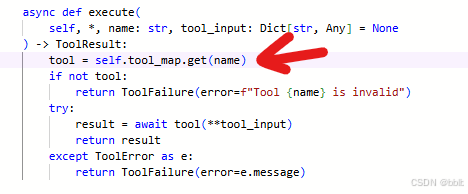
- 再通过tool调用这个工具真正的方法
result = await tool(**tool_input)
这样循环的遍历所有的工具及执行,然后截断结果长度
            if self.max_observe:
                result = result[: self.max_observe]
之后再加入到对应的记忆化存储中
            tool_msg = Message.tool_message(
                content=result,
                tool_call_id=command.id,
                name=command.function.name,
                base64_image=self._current_base64_image,
            )
            self.memory.add_message(tool_msg)
同样如果发生问题了也会进行工具的抛弃
4.3 系统集成
4.3.1 LLM集成和配置
OpenManus 通过集中式客户端系统抽象 LLM 交互,该系统支持多个提供商,同时保持一致的接口。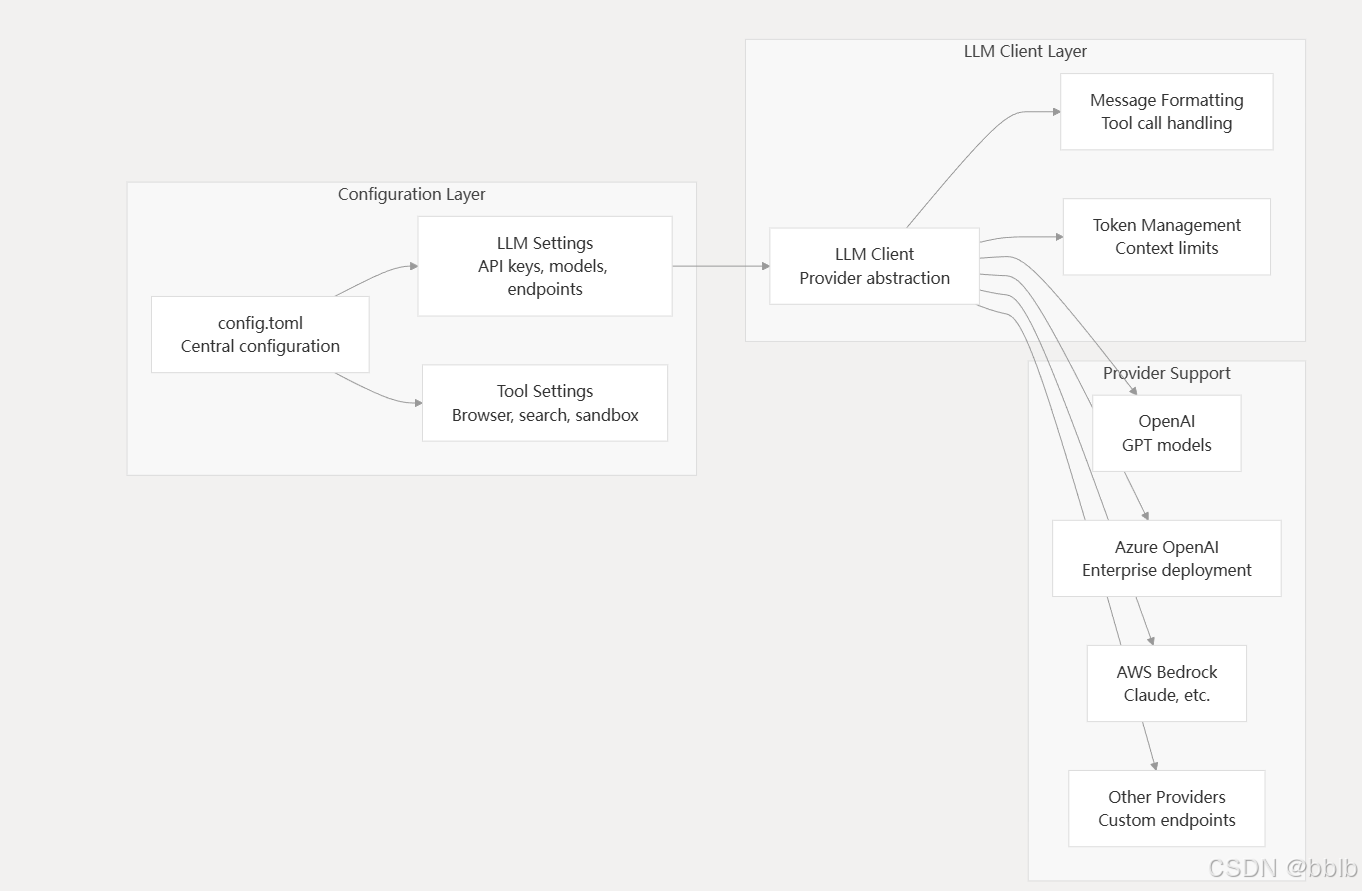
4.3.2 多智能体流程编排
流程系统能够协调多个专业代理,以进行复杂任务的分解和执行
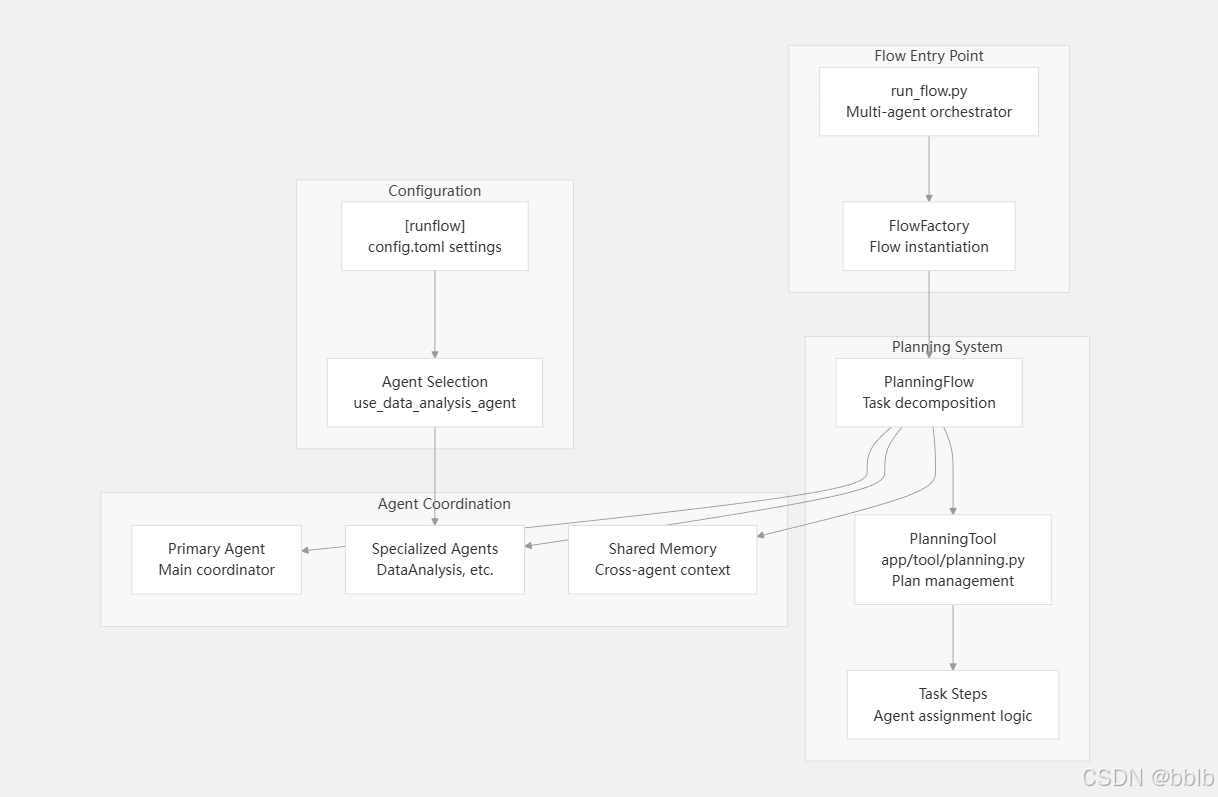
多智能体与之前的main.py类似,只不过之后流程有些许变化
4.3.2.1 创建计划流程
在run_low主入口中依旧异步执行,通过工厂创建PlanningFlow
        flow = FlowFactory.create_flow(
            flow_type=FlowType.PLANNING,
            agents=agents,
        )
创建的流程则为:
    @staticmethod
    def create_flow(
        flow_type: FlowType,
        agents: Union[BaseAgent, List[BaseAgent], Dict[str, BaseAgent]],
        **kwargs,
    ) -> BaseFlow:
        flows = {
            FlowType.PLANNING: PlanningFlow,
        }

        flow_class = flows.get(flow_type)
        if not flow_class:
            raise ValueError(f"Unknown flow type: {flow_type}")

        return flow_class(agents, **kwargs)
4.3.2.2 执行流程
启动计划流程执行任务
            result = await asyncio.wait_for(
                flow.execute(prompt),
                timeout=3600,  # 60 minute timeout for the entire execution
            )
4.3.2.3 创建初始计划
记得我们最开始他要输入计划 or prompt吗?这里也是同样的
            if input_text:
                await self._create_initial_plan(input_text)

                # Verify plan was created successfully
                if self.active_plan_id not in self.planning_tool.plans:
                    logger.error(
                        f"Plan creation failed. Plan ID {self.active_plan_id} not found in planning tool."
                    )
                    return f"Failed to create plan for: {input_text}"
之后则执行计划循环,先获取当前的步骤,记得我们的1/20step吗?
self.current_step_index, step_info = await self._get_current_step_info()
之后根据步骤的类型选择合适智能体
                step_type = step_info.get("type") if step_info else None
                executor = self.get_executor(step_type)
                step_result = await self._execute_step(executor, step_info)
                result += step_result + "\n"
我们看看他选择的逻辑是怎样的:
    def get_executor(self, step_type: Optional[str] = None) -> BaseAgent:
        """
        Get an appropriate executor agent for the current step.
        Can be extended to select agents based on step type/requirements.
        """
        # If step type is provided and matches an agent key, use that agent
        if step_type and step_type in self.agents:
            return self.agents[step_type]

        # Otherwise use the first available executor or fall back to primary agent
        for key in self.executor_keys:
            if key in self.agents:
                return self.agents[key]

        # Fallback to primary agent
        return self.primary_agent
先按照类型匹配智能体,如果没匹配上,则默认使用主智能体。
执行步骤:
async def _execute_step(self, executor: BaseAgent, step_info: dict) -> str:
具体的智能体执行具体的方法:
step_result = await executor.run(step_prompt)
这里就原绕回我们之间的run方法了。
4.3.2.4 完成计划总结
    async def _finalize_plan(self) -> str:
        """Finalize the plan and provide a summary using the flow's LLM directly."""
        plan_text = await self._get_plan_text()

        # Create a summary using the flow's LLM directly
        try:
            system_message = Message.system_message(
                "You are a planning assistant. Your task is to summarize the completed plan."
            )

            user_message = Message.user_message(
                f"The plan has been completed. Here is the final plan status:\n\n{plan_text}\n\nPlease provide a summary of what was accomplished and any final thoughts."
            )

            response = await self.llm.ask(
                messages=[user_message], system_msgs=[system_message]
            )

            return f"Plan completed:\n\n{response}"
之后生成的东西会放在当前目录。
4.4 外部系统集成
4.4.1 MCP
4.4.1.1 MCP服务器配置
OpenManus 通过模型上下文协议与外部工具和服务集成,从而实现可扩展的工具生态系统。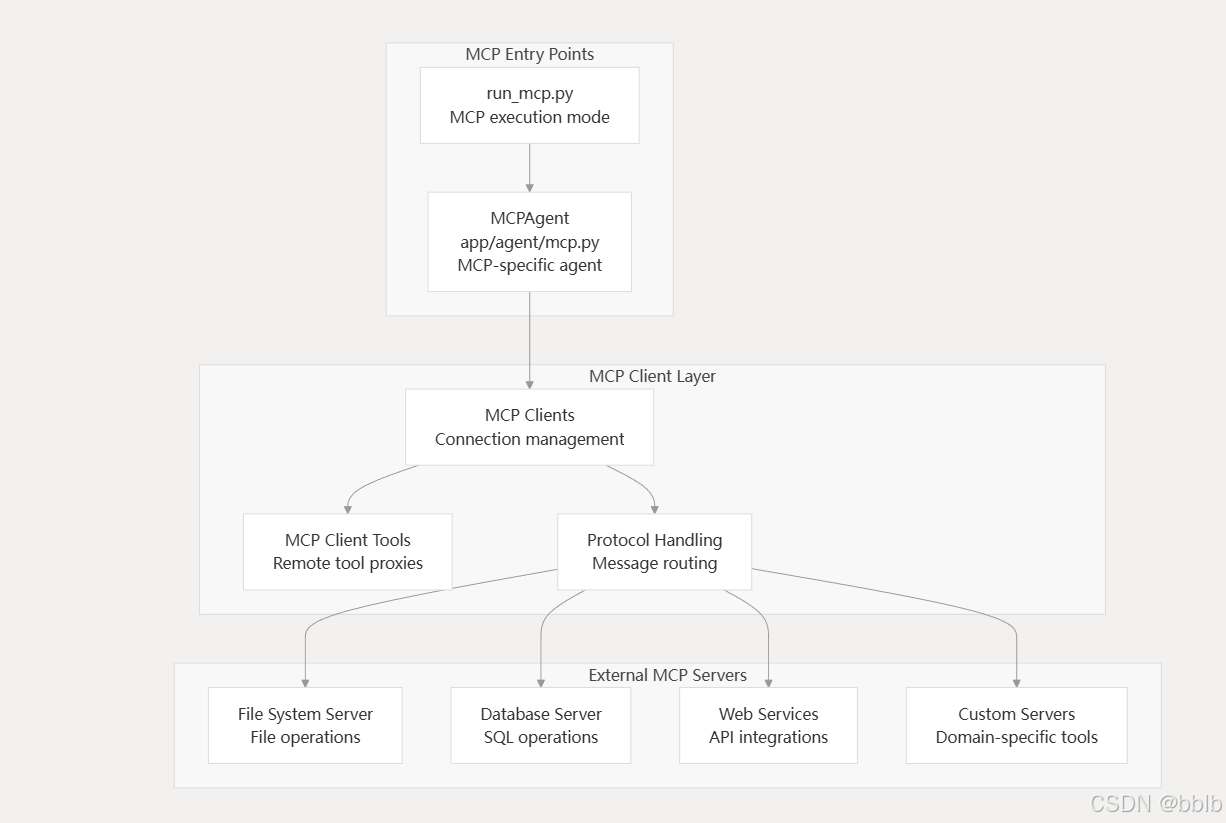
这个我们之前已经说过了,遍历配置的MCP服务器
for server_id, server_config in config.mcp_config.servers.items():
目前大模型的流式输出主要分为两种场景和对应的技术:
- 网络场景:当用户通过网络与远程的 LLM 服务交互时,Server-Sent Events (SSE) 是最主流、最核心的流式传输技术。
- 本地/进程间场景:当应用程序在本地环境中直接调用或集成 LLM 模型时,Standard I/O (Stdio) 是一种常见且高效的通信方式。
连接sse类型服务器
            await self.mcp_clients.connect_sse(server_url, server_id)
            self.connected_servers[server_id or server_url] = server_url
连接stdio类型服务器
            await self.mcp_clients.connect_stdio(
                server_url, stdio_args or [], server_id
            )
            self.connected_servers[server_id or server_url] = server_url
记录连接状态后更新connected_servers的映射
self.connected_servers[server_id or server_url] = server_url
4.4.1.2 添加MCP工具
在connect_mcp_server中:将连接好的MCP工具添加到可用工具集中
self.available_tools.add_tools(*new_tools)
4.4.2 沙箱环境集成
OpenManus 通过与 Daytona 沙箱集成,提供隔离的执行环境,以实现安全的任务执行。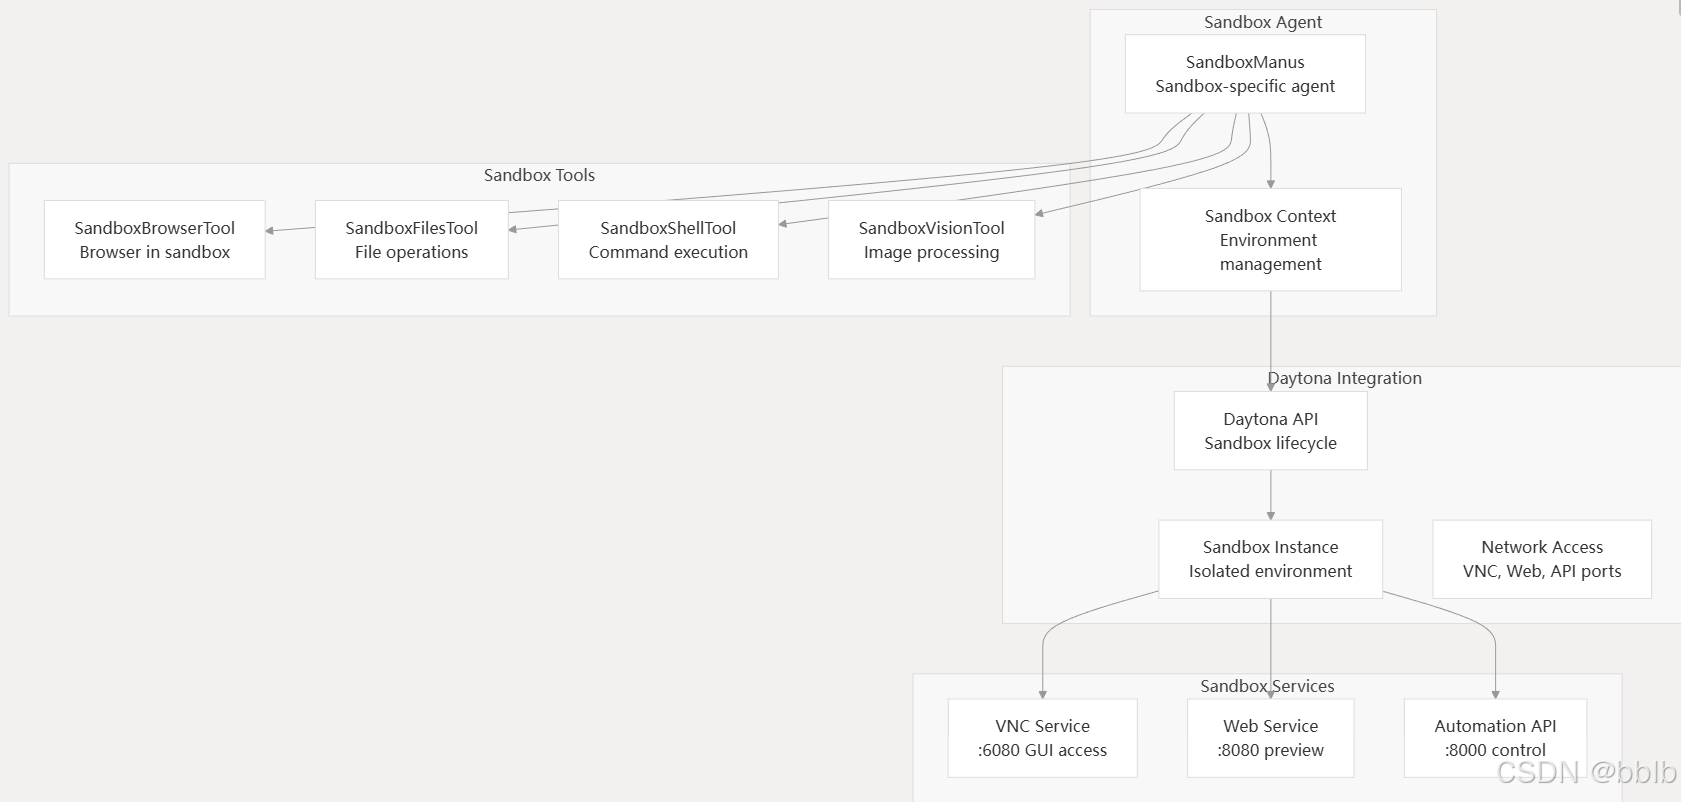
为不同任务提供一个隔离、干净、按需创建的执行环境。
一个任务可能需要处理 PDF,依赖 PyMuPDF 库;而另一个任务需要进行图像识别(OCR),依赖特定版本的 Tesseract 或 PyTorch。如果 OpenManus 作为一个长期运行的代理,试图在单一环境中满足所有潜在的任务需求,将会导致环境臃肿:
- 依赖冲突:不同任务可能需要不兼容的库版本,导致无法共存。
- 环境污染:前一个任务安装的库或生成的临时文件可能会干扰后续任务的执行。
- 安全风险:在一个共享环境中执行由 AI 生成的代码,存在极高的安全风险,可能会影响到宿主系统或其他任务。
通过与 Daytona 这样的开发环境管理器集成,OpenManus 能够为每个复杂的计划或会话动态地启动一个全新的、隔离的沙箱。这个沙箱是一个轻量级的容器化环境,任务执行完毕后即可销毁,从而完美地解决了上述所有问题。
| 特性 | Daytona (基于容器技术如 Docker) | Conda 环境 |
|---|---|---|
| 隔离级别 | 操作系统级隔离 | 应用/进程级隔离 |
| 隔离内容 | 包含独立的文件系统、进程空间、网络栈和操作系统库。可以是一个完整的、与宿主机不同的操作系统(如在 macOS 上运行一个 Ubuntu 容器)。 | 主要隔离 Python 解释器和安装的库/包。它仍然与宿主机共享同一个操作系统内核、网络和大部分文件系统。 |
| 环境定义 | 通过 devcontainer.json 文件进行声明式定义。 这个文件可以指定基础镜像、操作系统依赖(如apt-get install)、开发工具、插件乃至 IDE 配置,实现了整个开发环境的完全复现。 |
通过 environment.yml 文件定义。主要管理 Conda 和 Pip 包列表,对于操作系统级别的依赖(如系统库、编译器)管理能力较弱。 |
| 安全性 | 高。容器提供了一个强大的安全边界,内部进程很难“逃逸”出来影响宿主系统,非常适合执行不可信的 AI 生成代码。 | 低。环境中运行的代码与宿主机共享内核,拥有几乎相同的系统访问权限,执行恶意代码的风险很高。 |
| 启动开销 | 相对较高(秒级),需要启动容器运行时。 | 非常低(毫秒级),只是切换路径和环境变量。 |
| 适用场景 | 需要高度安全、环境一致性强、跨平台部署的复杂任务执行。 | 快速切换不同项目的 Python 依赖,主要用于本地开发和数据科学实验。 |

有“AI”的1024 = 2048,欢迎大家加入2048 AI社区
更多推荐
 10
10 0
0- 0


 已为社区贡献3条内容

所有评论(0)