嵌入式AI Arm_linux_第一个Demo_让IPU跑起来
嵌入式Arm_linux_第一个Demo_让IPU跑起来
使用Comake PI D1开发板需要使用星宸科技推出的适配Soc的sdk架构,在这里我们为了快速运行起来IPU,直接拉取整包的Comake PI D1的代码,在这个整包代码的基础上添加我们的第一个Demo程序,让IPU跑起来。
1. 配置环境
这里可以参考Comake PI D1环境搭建
如果没有服务器,可以在自己的windows电脑下安装虚拟机,可参考下面的虚拟机安装链接进行安装ubuntu
1.1 虚拟机安装
1.2 账号申请与git配置
在这里可直接参考git账号申请与配置
2. 拉取Comake PI D1 整包代码
2.1 拉取整包code
参考1.2的文章内容,下载整包code
2.2 编译工具链配置
1.2顺利申请到git账号之后按照1.2配置好git,输入以下命令获取编译工具链
git clone “https://git03.sigmastar.com.cn:9083/sigmastar/release_tool”
然后参考Comake PI D1环境搭建
3. IPU_ToolChain环境搭建
3.1 Docker安装
建议网上搜索,根据自己的环境实际搭建docker环境
3.2 IPU_ToolChain环境搭建
拉取 IPU_ToolChain的docker环境
git clone "https://git03.sigmastar.com.cn:9083/sigmastar/ipu_release"
拉取的ipu_release下包含了IPU_ToolChain的docker环境以及SGS_Model
进入到 docker 文件夹下,阅读readme.txt
cat readme.txt
根据 readme.txt的内容操作即可顺利安装docker环境
3.3 拉取pytorch_classification模型文件
在docker环境中,一般默认docker环境下的 /work/ 下是映射到你的ubuntu环境的 根目录下
##进入到你拉取ipu_release的目录下
cd /work/xxxx
此处建议在你的工作目录下创建一个文件夹
mkdir pyclass
cd pyclass
git clone https://github.com/WZMIAOMIAO/deep-learning-for-image-processing.git

## 后面 以mobilenetv2为例实际操作
cd deep-learning-for-image-processing/pytorch_classification/Test6_mobilenet
4.以mobilenetv2为例实际操作
4.1 验证模型
在这个
deep-learning-for-image-processing/pytorch_classification/Test6_mobilenet
路径下创建infer.py文件,验证模型正确与否
验证图片:
vi infer.py
输入以下内容
import os
import json

import torch
from PIL import Image
from torchvision import transforms
import matplotlib.pyplot as plt

from model_v2 import MobileNetV2

def main():
    device = torch.device("cuda:0" if torch.cuda.is_available() else "cpu")

    data_transform = transforms.Compose(
        [transforms.Resize(256),
        transforms.CenterCrop(224),
        transforms.ToTensor(),
        transforms.Normalize([0.485, 0.456, 0.406], [0.229, 0.224, 0.225])])

    # load image
    img_path = "./apple.jpg"
    assert os.path.exists(img_path), "file: '{}' dose not exist.".format(img_path)
    img = Image.open(img_path)
    plt.imshow(img)
    # [N, C, H, W]
    img = data_transform(img)
    # expand batch dimension
    img = torch.unsqueeze(img, dim=0)

    # create model
    model = MobileNetV2(num_classes=1000).to(device)
    # load model weights
    model_weight_path = "./opendla/mobilenet_v2-b0353104.pth"
    model.load_state_dict(torch.load(model_weight_path, map_location=device))
    model.eval()
    with torch.no_grad():
        # predict class
        output = torch.squeeze(model(img.to(device))).cpu()
        predict = torch.softmax(output, dim=0)
        predict_cla = torch.argmax(predict).numpy()
        print("class id", predict_cla)

if __name__ == '__main__':
    main()
然后在 conda 的 classification 环境下运行
python3 infer.py
4.2 转换模型为onnx模型
在这个
deep-learning-for-image-processing/pytorch_classification/Test6_mobilenet
路径下创建export.py文件,验证模型正确与否
vi export.py
输入以下内容
import os
import json

import torch
from PIL import Image
from torchvision import transforms
import matplotlib.pyplot as plt

from model_v2 import MobileNetV2

def main():
    device = torch.device("cuda:0" if torch.cuda.is_available() else "cpu")

    data_transform = transforms.Compose(
        [transforms.Resize(256),
        transforms.CenterCrop(224),
        transforms.ToTensor(),
        transforms.Normalize([0.485, 0.456, 0.406], [0.229, 0.224, 0.225])])

    # load image
    img_path = "./apple.jpg"
    assert os.path.exists(img_path), "file: '{}' dose not exist.".format(img_path)
    img = Image.open(img_path)
    plt.imshow(img)
    # [N, C, H, W]
    img = data_transform(img)
    # expand batch dimension
    img = torch.unsqueeze(img, dim=0)

    # create model
    model = MobileNetV2(num_classes=1000).to(device)
    # load model weights
    model_weight_path = "./opendla/mobilenet_v2-b0353104.pth"
    model.load_state_dict(torch.load(model_weight_path, map_location=device))
    model.eval()
    torch.onnx.export(
        model,
        img.to(device),
        "./opendla/mobilenetv2.onnx",
        opset_version=13,
        input_names=['images'], ##这里是 后面转换模型的 input name
        output_names=['output'],##这里是 后面转换模型的 output name
        do_constant_folding=False
    )

if __name__ == '__main__':
    main()
# 转换模型为 onnx 模型
python3 export.py

# 优化图结构
python3 -m onnxsim opendla/mobilenetv2.onnx opendla/mobilenetv2_sim.onnx
5.转换onnx模型为离线模型
5.1 docker环境转换离线模型
在当前路径下创建 xx.ini 文件,输入以下内容
[INPUT_CONFIG]
inputs=images;
training_input_formats = RGB;
input_formats=BGRA;
quantizations=TRUE;
mean=123.68:116.28:103.53;         # 均值, 顺序为RGB,多个输入需以“,”隔开
std_value = 58.395:57.12:57.375;

[OUTPUT_CONFIG]
outputs=output;
dequantizations=FALSE;
在当前路径下创建模型预处理xx.py文件,输入以下内容
# -*- coding: utf-8 -*-
import os

from PIL import Image
import torch
import torch.nn as nn
import numpy as np
import os
from torchvision.transforms import transforms


def tv_standard_preprocess(image_file, input_size=224, norm=True):
    ori_image = Image.open(image_file).convert('RGB')
    if input_size == 299:
        scaled_size = input_size
    else:
        scaled_size = 256
    image = transforms.Resize(scaled_size)(ori_image)
    image = transforms.CenterCrop(input_size)(image)
    if norm:
        image = transforms.Compose(
            [
             transforms.ToTensor(),
             transforms.Normalize(mean=[0.485, 0.456, 0.406], std=[0.229, 0.224, 0.225])
             ]
        )(image)
    else:
        image = np.array(image)
        # image = np.expand_dims(image, 0).astype(np.uint8)
        image = torch.from_numpy(image)
        image = image.permute((2, 0, 1))
    image = torch.unsqueeze(image, 0)
    return image


def sim_standard_preprocess(image_file, input_size=224, norm=True):
    ori_image = Image.open(image_file).convert('RGB')
    if input_size == 299:
        scaled_size = input_size
    else:
        scaled_size = 256
    image = transforms.Resize(scaled_size)(ori_image)
    image = transforms.CenterCrop(input_size)(image)
    if norm:
        image = transforms.Compose(
            [
             transforms.ToTensor(),
             transforms.Normalize(mean=[0.485, 0.456, 0.406], std=[0.229, 0.224, 0.225])
             ]
        )(image)
        image = np.array(image)
        image = np.expand_dims(image, 0).astype(np.float32)
        image = np.transpose(image, axes=(0, 2, 3, 1)).copy()
    else:
        image = np.array(image)
        image = np.expand_dims(image, 0).astype(np.uint8)
    return image


def tv_classification_visualize(image_file, processed_output, k=5):
    if isinstance(processed_output, np.ndarray):
        processed_output = torch.from_numpy(processed_output)
    predictions = nn.functional.softmax(processed_output, dim=1)
    predictions = predictions.detach().cpu().numpy().flatten()
    topk = np.argsort(predictions)[-1:-(k+1):-1]
    print('Image File: {}'.format(os.path.basename(image_file)))
    print('Top{} Predictions:'.format(k))
    for i in range(len(topk)):
        print('{:d} {:.2%}'.format(topk[i], predictions[topk[i]]))


def onnx_preprocess(image_file, input_size=224):
    torch_processed = torch_preprocess(image_file, input_size)
    onnx_processed = np.array(torch_processed)
    return onnx_processed


def onnx_postprocess(model_outputs, **kwargs):
    processed_outputs = model_outputs
    if 'visualize' in kwargs and kwargs['visualize'] is True:
        assert 'image_file' in kwargs
        torch_processed = torch.from_numpy(processed_outputs)
        tv_classification_visualize(kwargs['image_file'], torch_processed, k=5)
    return processed_outputs

def torch_preprocess(image_file, input_size=224):
    processed_image = tv_standard_preprocess(image_file, input_size)
    return processed_image


def torch_postprocess(model_outputs, **kwargs):
    processed_outputs = model_outputs
    if 'visualize' in kwargs and kwargs['visualize'] is True:
        assert 'image_file' in kwargs
        tv_classification_visualize(kwargs['image_file'], processed_outputs, k=5)
    return processed_outputs


def sim_preprocess(image_file, input_size=224, norm=True):
    sim_processed = sim_standard_preprocess(image_file, input_size, norm=norm)
    return sim_processed


def sim_postprocess(model_outputs, **kwargs):
    processed_outputs = model_outputs
    if 'visualize' in kwargs and kwargs['visualize'] is True:
        assert 'image_file' in kwargs
        tv_classification_visualize(kwargs['image_file'], processed_outputs, k=5)
    return processed_outputs


def image_preprocess(img_path, norm=True):
    return sim_preprocess(img_path, norm=norm)
输入以下内容进行模型转换
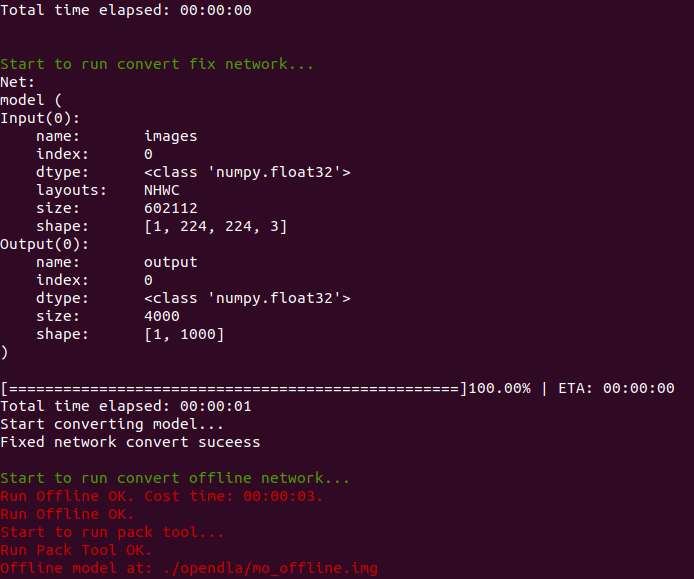
python3 /work/SGS_V1.8_18.04/home/xxx(你的本地IPU_ToolChain的路径)/SGS_IPU_Toolchain_25070213/Scripts/ConvertTool/SGS_converter.py onnx --model_file ./opendla/mobilenetv2_sim.onnx --input_config ./input_config.ini -i ./apple.jpg -n pre.py --output_file ./opendla/mo_offline.img --soc_version pcupid
5.2 使用 comake 社区的端侧云ai仿真转换离线模型
详情可参考Comake 社区AI在线开发平台使用
请记得将6.1的两个文件同样上传到你的工作目录下
onnx2float
python3 /tools/IPU_ToolChain/SGS_IPU_Toolchain_25070213/Scripts/ConvertTool/ConvertTool.py onnx --model_file ./mobilenetv2_sim.onnx --input_config ./input_config.ini --input_shapes 1,3,224,224 --output_file ./mobi_float.sim --soc_version pcupid
float2fixed
python3 /tools/IPU_ToolChain/SGS_IPU_Toolchain_25070213/Scripts/calibrator/calibrator.py --input_config ./input_config.ini -i ./apple.jpg -n mobilenet_pre.py -m ./mobi_float.sim --soc_version pcupid
fixed2offline
python3 /tools/IPU_ToolChain/SGS_IPU_Toolchain_25070213/Scripts/calibrator/compiler.py -m ./mobi_fixed.sim --output ./ --soc_vers
ion pcupid
onnx2offline
python3 /work/SGS_V1.8_18.04/home/sigmastar/Desktop/wx/SGS_IPU_Toolchain_25070213/Scripts/ConvertTool/SGS_converter.py onnx --model_file ./opendla/mobilenetv2_sim.onnx --input_config ./input_config.ini -i ./quant_data/ -n pre.py --output_file ./opendla/mo_offline.img --soc_version pcupid
6.拷贝到板端,离线运行模型
将 5 中转换好的模型img文件,拷贝至板端
这里先用sdk/verify/opendla/classification的代码验证一下
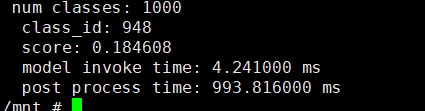
在板端执行:
/customer/opendla/prog_classification -m mobilenet_v2_224.img -i apple.jpg

有“AI”的1024 = 2048,欢迎大家加入2048 AI社区
更多推荐

 16
16 0
0- 0


 已为社区贡献4条内容

所有评论(0)