Nacos 3.1.0 正式发布,支持 A2A 注册中心与 MCP 注册协议增强
的新版本发布,能够支持快速开发简单的 Agent 并暴露 A2A 协议服务,同时注册到 Nacos 上并让上有 Agent 应用发现且能够进行远程调用,实现 Agent 的分布式部署。的注册中心协议,Nacos 3.1.0 已经极速完成了适配,若需要使用该功能请下载最新的 Nacos 3.1.0 发布包及镜像。同样的,仅需 3 步就完成 A2A Client Agent 的构建和开发,之后仅需启动
1.1 全新特性:A2A 注册中心正式上线
Nacos 3.1.0 首次引入 A2A 注册中心 功能,为 AI Agent 框架(如 Spring AI Alibaba)及开发者提供轻量化的 Agent 服务注册与发现能力。
-
核心能力:
- 支持
AgentCard及 Agent 服务端点的注册,实现 Agent 元数据(如名称、版本、描述)的统一管理。 - 提供基础的 Agent 发现 API,支持基于 Agent 名称的精准发现和模糊搜索,未来将扩展基于技能标签(Skills)、描述等多维度的检索能力。
- 支持
-
应用场景:
- 为分布式 AI 代理服务提供基础设施,简化 Agent 生命周期管理。
- 在 AI Agent 框架中快速集成,助力构建多 Agent 协作的 AI 应用。
1.2 MCP 注册协议能力全面增强
在 3.0.X 版本支持标准 MCP Registry API 的基础上,3.1.0 进一步优化 MCP 生态兼容性与管理效率:
-
协议与部署升级:
- 更新官方 MCP 注册协议,用户可将 Nacos 作为私有化 MCP 注册中心,构建企业级模型市场或服务目录。
- 新增 MCP 服务器导入功能,支持通过 JSON 文件快速注册 MCP 服务,并支持从 MCP URL 自动获取工具配置。
- 支持从 MCP 官方注册中心中一键导入 MCP 服务。
-
安全与管控增强:
- 控制台支持动态启用 / 禁用 MCP 服务,灵活控制资源占用。
- 新增 MCP 工具配置加密功能,结合配置加密插件保障敏感数据存储安全。
-
兼容性保障:
- 数据结构与协议全面对齐 MCP 官方标准,确保后续版本升级兼容性。
由于 MCP 官方注册中心协议还属于 preview 阶段,Nacos 目前适配了当前最新版本的协议
2025-07-09,若 MCP 官方注册中心协议新版本中存在不兼容改动,可能导致 MCP 官方注册中心一键导入功能失效。Nacos 3.1.0 版本发布期间,MCP 官方发布新了新版本
2025-09-16的注册中心协议,Nacos 3.1.0 已经极速完成了适配,若需要使用该功能请下载最新的 Nacos 3.1.0 发布包及镜像。
1.3 其他重要改进
-
功能优化:
- 新增命名空间存在性校验,避免无效操作。
- 增强控制台提示,如重复发布 Agent 名称时的友好提醒。
-
问题修复:
- 修复 MySQL 与 Derby 数据库配置发布性能不一致问题。
- 解决 MCP 控制台 OpenAPI 文件解析异常、URL 编码错误等问题。
- 修复 A2A 订阅判断逻辑、模糊搜索结果异常等关键缺陷。
-
依赖升级:
- 升级 Spring Boot 至 3.4.9、gRPC 至 1.75.0,提升稳定性与安全性。
升级注意事项:
1. 从 3.1.0-BETA 升级: > - 需在升级前删除所有
AgentCard,或升级后删除agent和agent-version配置组,并重新发布AgentCard。2. 从 3.0.0 版本升级: > - 若从 3.0.0 版本升级,需使用社区提供的迁移工具将旧版 MCP 服务迁移至
public命名空间。3. 从其他版本升级正常升级。
更多 3.1.0 版本的变更日志如下:
## Feature
[#12191] Add namespace existence check.
[#13322] Support A2A registry.
[#13423] Support enabled or disabled MCP server in console.
[#13543] Add MCP server import functionality with registry support.
[#13783] Add config metadata update admin api.
[#13808] Add Support official mcp registry protocol.
[#13814] Support prompt encrypt for mcp tools.

## Enhancement/Refactor
[#13777] Enhance namespace exist check logic to improve code quality.
[#13829] Enhance the hint when publish duplicate name of agent.

## BugFix
[#13744] Fix omitted CONFIG_INFO_GRAY_WRAPPER_ROW_MAPPER for config datasource plugin.
[#13752] Fix NPE and ignore InterruptedException stack log.
[#13761] Fix add validation when deleting roles to prevent issues like mistakenly deleting ROLE_ADMIN.
[#13767] Fix service NullPointerException when K8S getSpec().
[#13773] Fix preserve protocol slashes when building MCP OpenAPI-derived URLs.
[#13779] Fix Mcp tool description edit limitation.
[#13787] Fix bug where the Nacos Mcp console cannot correctly parse OpenApi files.
[#13801] Fix bug that sometimes garbled characters appear when parsing OpenAPI file URL in MCP console.
[#13810] Fix bug that caused inconsistent performance between Derby and MySQL databases when publishing configurations.
[#13824][#13826] Fix AI gRPC resource parser and leak auth login for MCP/A2A request in nacos-client.
[#13830] Fix agentCard subscribe judgement problem.
[#13832] Fix blur search may contain unexpected results.

## Dependencies
[#13385] Upgrade os-maven-plugin version to 1.7.1.
[#13711] Upgrade spring boot version to 3.4.9.
[#13753] Upgrade grpc version to 1.75.0.
[#13825] Upgrade jraft version to 1.3.15.bugfix.
Nacos+Spring AI AIibaba 快速开发分布式 Agent 应用
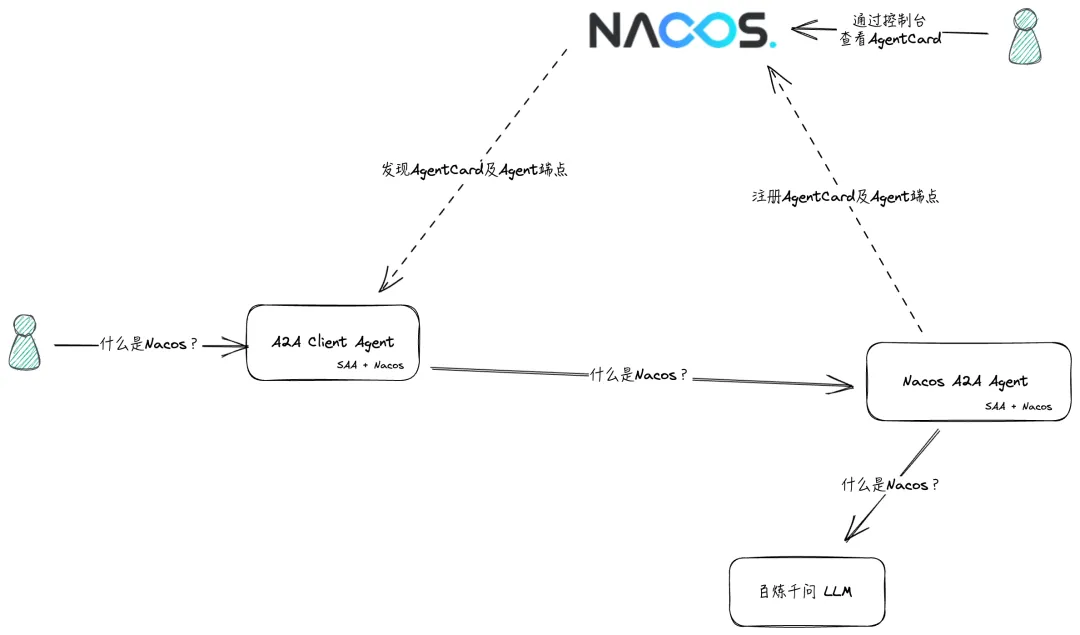
随着 Nacos 3.1.0 及 Spring AI Alibaba 的新版本发布,能够支持快速开发简单的 Agent 并暴露 A2A 协议服务,同时注册到 Nacos 上并让上有 Agent 应用发现且能够进行远程调用,实现 Agent 的分布式部署。接下来以 Nacos 问答助手为例,手把手带您实现基于 Nacos 3.1.0 与 Spring AI Alibaba 的分布式 AI Agent 系统:
样例工程已发布至 nacos-group/nacos-spring-ai-alibaba-example [ 1] ,欢迎尝试。
2.1 环境准备和启动
- JDK 17+
- Nacos Server 3.1.0+
- Spring AI Alibaba 1.0.0.4+
- 阿里云百炼 API KEY
Nacos 的安装与启动,请参考 Nacos 快速开始 [ 2] 或 Nacos Docker 快速开始 [ 3] 进行安装。
阿里云百炼的 API-KEY 可参考文档 [ 4] 获取,若已获取,则忽略此步骤。
首次开通阿里云百炼时会提供 100 万 Token 的免费额度。
2.2 构建 A2A Server Agent
2.2.1 引入 pom
<properties>
  <spring.ai.alibaba.version>1.0.0.4</spring.ai.alibaba.version>
</properties>
<dependencies>
<!-- 引入A2A Server starter -->
  <dependency>
    <groupId>com.alibaba.cloud.ai</groupId>
    <artifactId>spring-ai-alibaba-starter-a2a-server</artifactId>
    <version>${spring.ai.alibaba.version}</version>
  </dependency>
<!-- 引入A2A Nacos 注册中心 -->
  <dependency>
    <groupId>com.alibaba.cloud.ai</groupId>
    <artifactId>spring-ai-alibaba-starter-a2a-registry</artifactId>
    <version>${spring.ai.alibaba.version}</version>
  </dependency>
<!-- 引入A2A 百炼大模型客户端,可以用其他的spring ai大模型客户端代替,如openai -->
  <dependency>
    <groupId>com.alibaba.cloud.ai</groupId>
    <artifactId>spring-ai-alibaba-starter-dashscope</artifactId>
    <version>${spring.ai.alibaba.version}</version>
  </dependency>
</dependencies>
2.2.2 添加配置文件 application.yml
server:
  port: 9999
spring:
  application:
    name: a2s-server-example
  ai:
    # 配置百炼大模型
    dashscope:
      api-key: ${BAILIAN_API_KEY}
      base-url: https://dashscope.aliyuncs.com/compatible-mode
      chat:
        options:
          model: qwen-plus-latest
    alibaba:
      a2a:
        # 配置Nacos的地址和用户名密码
        nacos:
          server-addr: ${NACOS_ADDRESS:localhost:8848}
          username: ${NACOS_USERNAME:nacos}
          password: ${NACOS_PASSWORD}
        # 配置A2A server的额外信息,如版本号,agentCard中的Skills等
        server:
          version: 1.0.1
          card:
            url: http://localhost:9999/a2a
            skills:
              - id: nacos-question-answer
                name: Nacos Question Answer
                description: Answer questions about Nacos.
                tags:
                  - Nacos
                examples:
                  - What is Nacos?
            icon-url: https://img.alicdn.com/imgextra/i4/O1CN01rW3vAB1FDWKSOiFf0_!!6000000000453-2-tps-204-40.png
            documentation-url: https://nacos.io
            provider:
              organization: Alibaba
              url: https://www.alibaba.com
logging:
  level:
    root: debug
2.2.3 构建 A2A Server Agent 代码
/**
 * Spring AI Alibaba 启动类
 */
@SpringBootApplication
publicclassA2aServerExampleApplication {
publicstaticvoidmain(String[] args) {
        SpringApplication.run(A2aServerExampleApplication.class, args);
    }
}
/**
 * Spring AI Alibaba Agentic API构建LLMAgent
 */
@Configuration
publicclassRootAgentConfiguration {
privatestaticfinal String SYSTEM_PROMPT =
"An assistant or maintainer for nacos. You only try to answer nacos' question. "
+"If user ask not nacos relative question, Please answer with apology. \n When you answer Nacos' question, "
+"you can try to use relative tools to query data and do analyze. If no suitable tools found, please answer Nacos' question by your knowledge.\n";
    @Bean
    @Primary
public BaseAgent rootAgent(ChatModel chatModel) throws GraphStateException {
return ReactAgent.builder().name("Nacos Agent").description(
"Answer question about Nacos and do some maintain and query operation about Nacos Cluster.")
                .model(chatModel).instruction(SYSTEM_PROMPT).outputKey("output").build();
    }
}
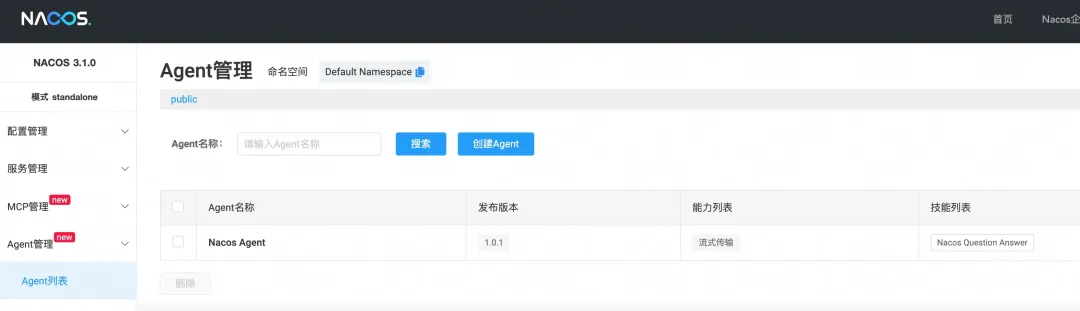
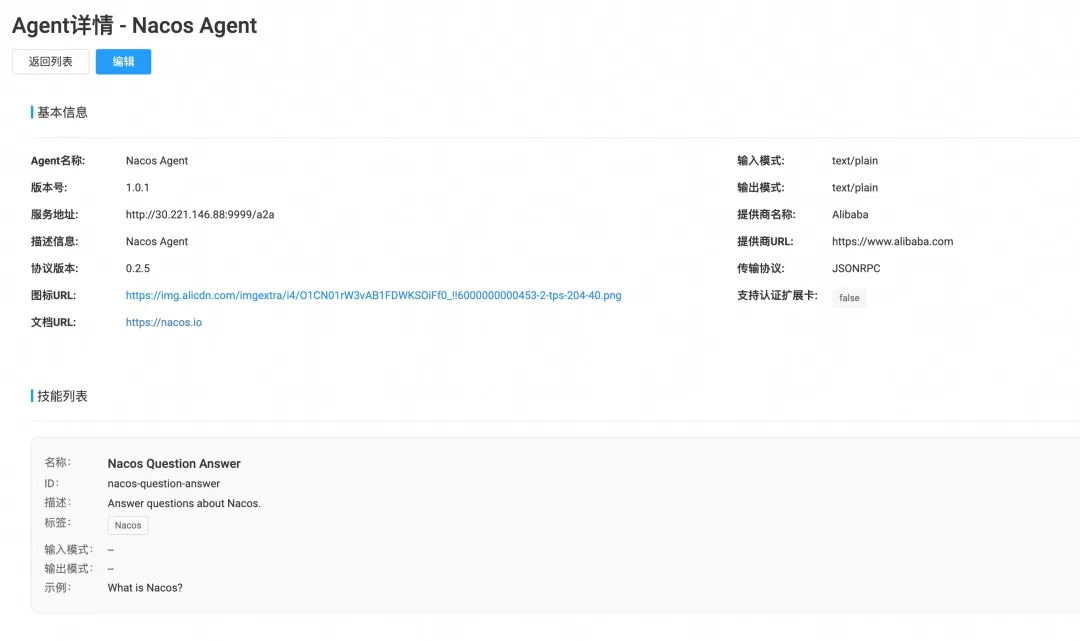
至此,仅需 3 步完成 A2A Server Agent 的构建和开发,之后仅需启动即可,如使用 mvn spring-boot:run,启动成功后,在 Nacos 控制台上即可查看到注册的 AgentCard 并且能从详情中查看到具体信息:
2.3 构建 A2A Client Agent
2.3.1 引入 pom
<properties>
  <spring.ai.alibaba.version>1.0.0.4</spring.ai.alibaba.version>
  <spring.boot.version>3.4.5</spring.boot.version>
</properties>
<dependencies>
<!-- 引入A2A Client starter -->
  <dependency>
    <groupId>com.alibaba.cloud.ai</groupId>
    <artifactId>spring-ai-alibaba-starter-a2a-client</artifactId>
    <version>${spring.ai.alibaba.version}</version>
  </dependency>
<!-- 引入A2A Nacos 注册中心 -->
  <dependency>
    <groupId>com.alibaba.cloud.ai</groupId>
    <artifactId>spring-ai-alibaba-starter-a2a-registry</artifactId>
    <version>${spring.ai.alibaba.version}</version>
  </dependency>
<!-- 可选,引入web构建简单的页面 -->
  <dependency>
    <groupId>org.springframework.boot</groupId>
    <artifactId>spring-boot-starter-web</artifactId>
    <version>${spring.boot.version}</version>
  </dependency>
</dependencies>
2.3.2 添加配置文件 application.yml
server:
  port: 8888
spring:
  application:
    name: a2s-client-example
  ai:
    alibaba:
      a2a:
        nacos:
          # 开启从Nacos中自动发现Agent
          discovery:
            enabled: true
          server-addr: ${NACOS_ADDRESS:localhost:8848}
          username: ${NACOS_USERNAME:nacos}
          password: ${NACOS_PASSWORD}
logging:
  level:
    root: debug
2.3.3 构建 A2A Client Agent 代码
/**
 * Spring AI Alibaba 启动类
 */
@SpringBootApplication
public class A2aClientExampleApplication {
    public static void main(String[] args) {
        SpringApplication.run(A2aClientExampleApplication.class, args);
    }
}
/**
 * Spring AI Alibaba Agentic API构建LLMAgent
 */
@Configuration
public class RootAgentConfiguration {
    @Bean
    public BaseAgent rootAgent(AgentCardProvider agentCardProvider) throws GraphStateException {
        return A2aRemoteAgent.builder()
                // 传入自动构建的Nacos AgentCard Provider
                .agentCardProvider(agentCardProvider)
                // 设置需要的Agent的名称,Nacos AgentCard Provider会根据此名称自动订阅AgentCard和Agent的可访问端点
                .name("Nacos Agent")
                .description("Answer Nacos questions or query and operate datum in Nacos.")
                .inputKey("messages")
                .outputKey("messages")
                .build();
    }
}
/**
 * 构建简单的访问API.
 */
@RestController
@RequestMapping("/")
public class TestController {
    private static final Logger LOGGER = org.slf4j.LoggerFactory.getLogger(TestController.class);
    private final BaseAgent rootAgent;
    public TestController(BaseAgent rootAgent) {
        this.rootAgent = rootAgent;
    }
    @GetMapping("sync")
    public Object sync(@RequestParam("question") String question) throws GraphStateException, GraphRunnerException {
        System.out.println(question);
        return rootAgent.invoke(Map.of("messages", List.of(new UserMessage(question)))).orElseThrow().value("messages")
                .orElseThrow();
    }
    @GetMapping("stream")
    public Flux<String> stream(@RequestParam("question") String question) throws GraphStateException, GraphRunnerException {
        return rootAgent.stream(Map.of("messages", List.of(new UserMessage(question)))).mapNotNull(output -> {
            LOGGER.debug("stream agent invoke : `{}`", output.toString());
            if (output.isSTART() || output.isEND()) {
                return null;
            }
            if (output instanceof StreamingOutput) {
                return ((StreamingOutput) output).chunk();
            }
            return null;
        }).publishOn(Schedulers.parallel());
    }
}
同样的,仅需 3 步就完成 A2A Client Agent 的构建和开发,之后仅需启动即可,如使用 mvn spring-boot:run,启动成功后,可通过浏览器访问 localhost:8888/index.html 进行测试。

有“AI”的1024 = 2048,欢迎大家加入2048 AI社区
更多推荐

 57
57 0
0- 0


 已为社区贡献6条内容

所有评论(0)