mybatis
文章目录
Mybatis
1、简介
1.1、什么是Mybatis
- MyBatis 是一款优秀的持久层框架
- 它支持自定义 SQL、存储过程以及高级映射。
- MyBatis 免除了几乎所有的 JDBC 代码以及设置参数和获取结果集的工作。
- MyBatis 可以通过简单的 XML 或注解来配置和映射原始类型、接口和 Java POJO(Plain Old Java Objects,普通老式 Java 对象)为数据库中的记录。
1.2、获得Mybatis
- GitHub下载:https://github.com/mybatis/mybatis-3/releases
- Maven仓库:
<!-- https://mvnrepository.com/artifact/org.mybatis/mybatis -->
<dependency>
    <groupId>org.mybatis</groupId>
    <artifactId>mybatis</artifactId>
    <version>3.5.6</version>
</dependency>
1.3、持久化
- 持久化就是将程序的数据从瞬时状态转化成持久状态的过程
- 内存:断电即失,为了不让数据丢失去持久化
- 数据库(jdbc)持久化,io文件持久化
1.4、持久层
Dao层,Service层,Controller层
- 完成持久化工作的代码块
1.5、为什么使用Mybatis
- 帮助程序员将数据存入数据库
- 传统jdbc代码太复杂,简化流程
- 方便易学
- 能将sql与代码分离,降低耦合
2、第一个Mybatis程序
思路:搭建环境->导入Mybatis->编写代码->测试
2.1、搭建环境
- 搭建数据库
CREATE DATABASE `mybatis_study`;
USE `mybatis_study`;
CREATE TABLE `user`(
	`id` INT(20) NOT NULL,
	`name` VARCHAR(30) DEFAULT NULL,
	`pwd` VARCHAR(30) DEFAULT NULL,
	PRIMARY KEY(`id`)
)ENGINE=INNODB DEFAULT CHARSET=utf8mb4;

INSERT INTO `user`(`id`,`name`,`pwd`) VALUES
(1,"张三","123456"),
(2,"李四","123456"),
(3,"王五","124325")
-
新建项目
-
新建一个普通的maven项目
-
删除src目录
-
导入maven依赖
<dependencies>
        <!--mysql driver-->
        <dependency>
            <groupId>com.mysql</groupId>
            <artifactId>mysql-connector-j</artifactId>
            <version>8.4.0</version>
        </dependency>
        <!--Mybatis-->
        <dependency>
            <groupId>org.mybatis</groupId>
            <artifactId>mybatis</artifactId>
            <version>3.5.6</version>
        </dependency>
        <!--junit-->
        <dependency>
            <groupId>junit</groupId>
            <artifactId>junit</artifactId>
            <version>4.13.2</version>
        </dependency>
    </dependencies>
-
2.2、创建一个模块
-
编写mybatis核心配置文件
<?xml version="1.0" encoding="UTF-8" ?> <!DOCTYPE configuration PUBLIC "-//mybatis.org//DTD Config 3.0//EN" "http://mybatis.org/dtd/mybatis-3-config.dtd"> <!--configuration core file--> <configuration> <environments default="development"> <environment id="development"> <transactionManager type="JDBC"/> <dataSource type="POOLED"> <property name="driver" value="com.mysql.cj.jdbc.Driver"/> <property name="url" value="jdbc:mysql://localhost:3306/mybatis_study?useSSL=false&useUnicode=true&characterEncoding=UTF-8"/> <property name="username" value="root"/> <property name="password" value="root"/> </dataSource> </environment> </environments> </configuration> -
编写mybatis工具类
package com.zhao.utils;

import org.apache.ibatis.io.Resources;
import org.apache.ibatis.session.SqlSession;
import org.apache.ibatis.session.SqlSessionFactory;
import org.apache.ibatis.session.SqlSessionFactoryBuilder;

import java.io.IOException;
import java.io.InputStream;

public class MybatisUtils {
    private static SqlSessionFactory sessionFactory;
    static {
        //使用Mybatis第一步:获取sqlSessionFactory对象
        try {
            String resource = "mybatis-config.xml";
            InputStream inputStream = Resources.getResourceAsStream(resource);
            sessionFactory = new SqlSessionFactoryBuilder().build(inputStream);
        } catch (IOException e) {
            throw new RuntimeException(e);
        }
    }
    //既然有了 SqlSessionFactory,顾名思义,我们可以从中获得 SqlSession 的实例。
    // SqlSession 提供了在数据库执行 SQL 命令所需的所有方法。你可以通过 SqlSession 实例来直接执行已映射的 SQL 语句。
    public static SqlSession getSqlSession(){
//        SqlSession sqlSession = sessionFactory.openSession();
//        return sqlSession;
        return sessionFactory.openSession();
    }
}
2.3、编写代码
-
实体类
package com.zhao.entity; import lombok.Data; @Data public class User { private int id; private String name; private String password; } -
mapper接口(等价于dao层接口)
public interface UserMapper { List<User> selectAll(); } -
接口实现类由原来的UserDaoImpl转变成一个Mapper配置文件。
<?xml version="1.0" encoding="UTF-8" ?>
<!DOCTYPE mapper
        PUBLIC "-//mybatis.org//DTD Mapper 3.0//EN"
        "http://mybatis.org/dtd/mybatis-3-mapper.dtd">
<!--namespace绑定dao/mapper层接口-->
<mapper namespace="com.zhao.mapper.UserMapper">
    <!--select查询,id绑定dao/mapper层接口方法名,resultType绑定返回值类型-->
    <select id="selectAll" resultType="com.zhao.entity.User">
        select * from user
    </select>
</mapper>
2.4、测试
-
mybatis配置文件中注册mapper
<mappers> <mapper resource="mapper/UserMapper.xml"/> </mappers> -
junit测试
package com.zhao.mapper;

import com.zhao.entity.User;
import com.zhao.utils.MybatisUtils;
import org.apache.ibatis.session.SqlSession;
import org.junit.Test;

import java.util.List;

public class UserMapperTest {
    @Test
    public void test(){
        //第一步:获得SqlSession对象
        SqlSession sqlSession = MybatisUtils.getSqlSession();
        //第二步:getMapper并调用方法
        UserMapper mapper = sqlSession.getMapper(UserMapper.class);
        List<User> users = mapper.selectAll();
        for (User user : users) {
            System.out.println(user);
        }
        //第三步:关闭SqlSession
        sqlSession.close();
    }
}
可能遇到的问题:
- 配置文件没有注册;
- 绑定接口错误;
- 方法名不对;
- 返回类型不对;
- Maven导出资源问题。
3、CRUD
3.1、namespace
namespace中的包名要和Dao/Mapper接口的包名一致!
3.2、Select
-
id:就是对应的namespace中的方法名;
-
resultType:Sql语句执行的返回值!
-
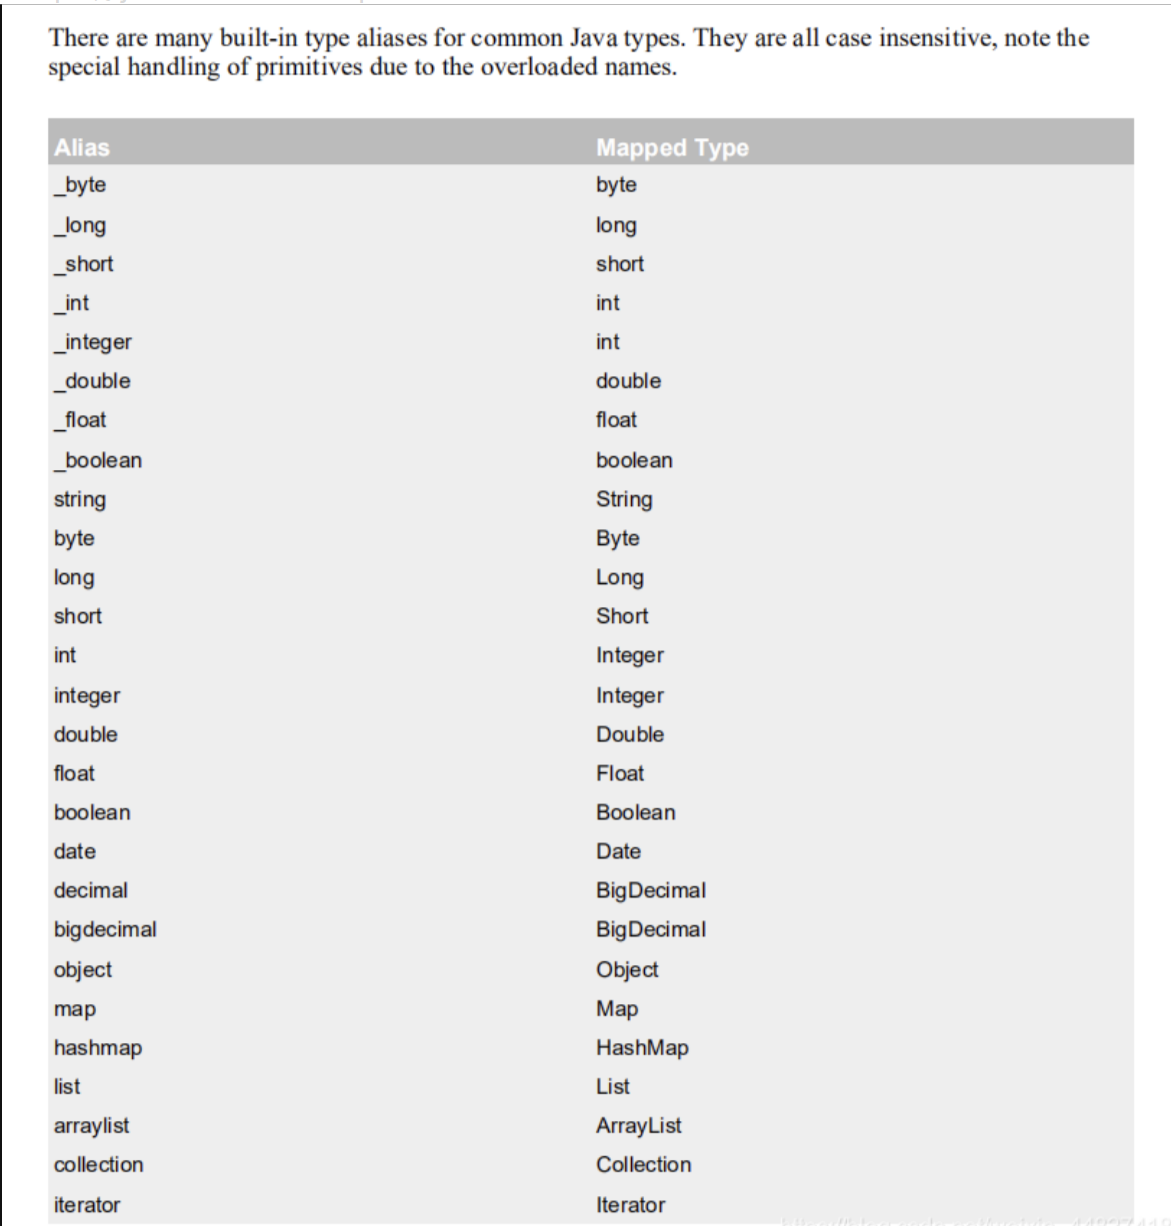
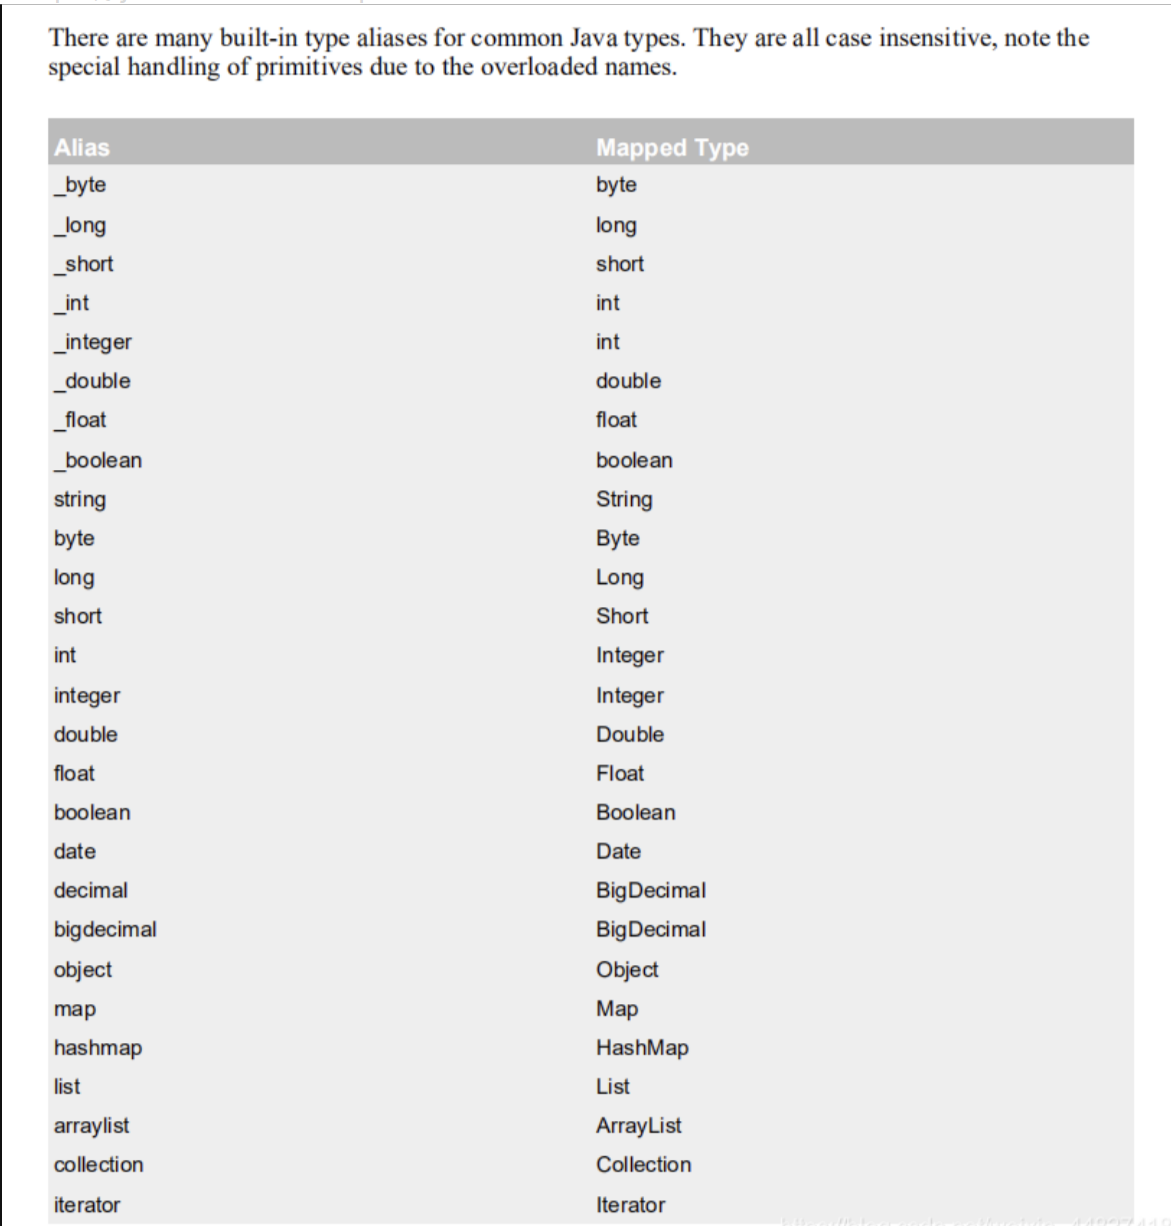
parameterType:参数类型!(int对应为integer,_int才对应为int)
-
编写接口
User selectById(int id); -
编写对应的mapper中的sql语句
<select id="selectById" resultType="com.zhao.entity.User" parameterType="int"> select * from user where id = #{id} </select> -
测试
@Test
public void getUserById(){
    SqlSession sqlSession = MybatisUtils.getSqlSession();
    UserMapper mapper = sqlSession.getMapper(UserMapper.class);
    User user = mapper.selectById(1);
    System.out.println(user);
    sqlSession.close();
}
3.3、Insert
增删改测试时需要提交事务:sqlSession,commit()
<insert id="insert" parameterType="com.zhao.entity.User">
    insert into user(id,name,pwd) values(#{id},#{name},#{pwd})
</insert>
3.4、Update
<update id="update" parameterType="com.zhao.entity.User">
    update user set name=#{name},pwd=#{pwd} where id=#{id}
</update>
3.5、Delete
<delete id="delete" parameterType="int">
    delete from user where id=#{id}
</delete>
3.6、分析错误
-
xml文件中注释不能出现中文报错,查看自己的是UTF-8还是GBK编码,改成为相应的就行。
<?xml version="1.0" encoding="UTF-8" ?> <?xml version="1.0" encoding="GBK" ?> -
标签不要匹配错!
-
resource绑定mapper,需要使用路径/
-
程序配置文件必须符合规范!
-
maven资源没有导出问题!
-
NullPointerException,没有注册到资源!
3.7、万能map
在工作中我们可能会遇到一种情况,那就是不希望创建对象,但是需要传递多个参数进行sql查询,此时我们就要用到map集合作为载体来传递参数。
int insertByMap(Map<String,Object> map);
<insert id="insertByMap" parameterType="map">
    insert into user(id,name,pwd)
    values (#{userid},#{username},#{userpwd})<!--传递参数只需要与map的key一样即可,不必对应数据库字段-->
</insert>
@Test
public void insertByMap(){
    SqlSession sqlSession = MybatisUtils.getSqlSession();
    UserMapper mapper = sqlSession.getMapper(UserMapper.class);
    HashMap<String, Object> hashMap = new HashMap<>();
    hashMap.put("userid",4);
    hashMap.put("username","刘尔");
    hashMap.put("userpwd","654321");
    mapper.insertByMap(hashMap);
    sqlSession.commit();
    sqlSession.close();
}
3.8、传递多参数
有四大方式,以查询为例
-
通过map查询
resultType用于指定 SQL 查询结果的返回类型。它适用于简单的映射场景,尤其是当数据库字段名与 Java 对象属性名一致时。resultMap是 MyBatis 中最强大且灵活的结果映射方式。它适用于复杂的映射场景,尤其是当数据库字段名与 Java 对象属性名不一致时,或者需要进行高级映射(如一对一、一对多)时。//通过map查询用户名和密码 User selectByMap(Map<String,Object> map);<resultMap id="userMap" type="com.zhao.entity.User"> <!--id标签表示主键--> <id column="id" property="id"/> <!--result标签表示非主键,数据库表列名为column,实体类属性名为property--> <result column="name" property="name"/> <result column="pwd" property="pwd"/> </resultMap> <select id="selectByMap" resultMap="userMap" parameterType="map"> select * from user where name = #{username} and pwd = #{userpwd} </select>@Test public void selectByMap(){ SqlSession sqlSession = MybatisUtils.getSqlSession(); UserMapper mapper = sqlSession.getMapper(UserMapper.class); HashMap<String, Object> hashMap = new HashMap<>(); hashMap.put("username","刘尔"); hashMap.put("userpwd","654321"); User user = mapper.selectByMap(hashMap); System.out.println(user); sqlSession.close(); } -
通过javabean查询
//通过javabean查询用户名和密码 User selectByUser(User user);<select id="selectByUser" parameterType="com.zhao.entity.User" resultType="com.zhao.entity.User"> select * from user where name = #{name} and pwd = #{pwd} </select>@Test public void selectByUser(){ SqlSession sqlSession = MybatisUtils.getSqlSession(); UserMapper mapper = sqlSession.getMapper(UserMapper.class); User user1 = new User(); user1.setName("刘尔"); user1.setPwd("654321"); User user = mapper.selectByUser(user1); System.out.println(user); sqlSession.close(); } -
通过java Bean + 命名式参数 的方式
@Param使用场景-
方法有多个参数,需要 @Param 注解
-
当需要给参数取一个别名的时候,需要 @Param 注解
-
XML 中的 SQL 使用了 $ ,那么参数中也需要 @Param 注解,$ 会有注入漏洞的问题,但是有的时候你必须要 $ 符号,例如要传入列名或者表名的时候,这个时候必须要
-
动态 SQL ,如果在动态 SQL 中使用了参数作为变量,那么也需要 @Param 注解,即使你只有一个参数。
//通过java Bean + 命名式参数 的方式查询用户名和密码 User selectByUser2(@Param("u") User user);<select id="selectByUser2" resultType="com.zhao.entity.User"> select * from user where name = #{u.name} and pwd = #{u.pwd} </select>@Test public void selectByUser2(){ SqlSession sqlSession = MybatisUtils.getSqlSession(); UserMapper mapper = sqlSession.getMapper(UserMapper.class); User user1 = new User(); user1.setName("张三"); user1.setPwd("123456"); User user = mapper.selectByUser2(user1); System.out.println(user); sqlSession.close(); } -
-
通过命名式参数 的方式
//通过命名式参数 的方式查询用户名和密码 User selectByUser3(@Param("name") String username,@Param("pwd") String userpwd);<select id="selectByUser3" resultType="com.zhao.entity.User"> select * from user where name = #{name} and pwd = #{pwd} </select>@Test public void selectByUser3(){ SqlSession sqlSession = MybatisUtils.getSqlSession(); UserMapper mapper = sqlSession.getMapper(UserMapper.class); User user = mapper.selectByUser3("张三","123456"); System.out.println(user); sqlSession.close(); }
3.9、传递参数中有集合或数组
查询叫张三,李四的人
//传递参数中有集合或数组
    List<User> selectBySomeName(@Param("names")String[] names);
<select id="selectBySomeName" resultType="com.zhao.entity.User">
    select * from user where name in (
    <foreach collection="names" separator="," item="name">
        #{name}
    </foreach>
    )
</select>
<!--或者下面这种,推荐使用下面-->
<select id="selectBySomeName" resultType="com.zhao.entity.User">
    select * from user where name in
    <foreach collection="names" open="(" close=")" separator="," item="name">
        #{name}
    </foreach>
</select>
@Test
public void selectBySomeName(){
    SqlSession sqlSession = MybatisUtils.getSqlSession();
    UserMapper mapper = sqlSession.getMapper(UserMapper.class);
    List<User> users = mapper.selectBySomeName(new String[]{"张三","李四"});
    for (User user : users) {
        System.out.println(user);
    }
    sqlSession.close();
}
3.10、#和$区别
- $ 只是字符串的拼接,不能防止SQL注入
${value}会被直接替换,而#{value}会被使用?作为 预处理
List<User> selectUserByName(String name);
<select id="selectUserByName" resultType="com.zhao.entity.User" parameterType="string">
    select * from user where name = ${name}
</select>
@Test
public void selectUserByName(){
    SqlSession sqlSession = MybatisUtils.getSqlSession();
    UserMapper mapper = sqlSession.getMapper(UserMapper.class);
    List<User> users = mapper.selectUserByName("'张三' or 1=1");
    for (User user : users) {
        System.out.println(user);
    }
    sqlSession.close();
}
---------------
输出:
User(id=1, name=张三, pwd=123456)
User(id=2, name=李四, pwd=123456)
User(id=3, name=王五, pwd=124325)
User(id=4, name=刘尔, pwd=654321)
3.11、模糊查询
-
通过$符号(易被sql注入)
List<User> selectUserByLikeName(String name);<select id="selectUserByLikeName" resultType="com.zhao.entity.User"> select * from user where name like "%${name}%" </select>@Test public void selectUserByLikeName(){ SqlSession sqlSession = MybatisUtils.getSqlSession(); UserMapper mapper = sqlSession.getMapper(UserMapper.class); List<User> users = mapper.selectUserByLikeName("张"); for (User user : users) { System.out.println(user); } sqlSession.close(); } -
手动添加"%"通配符(容易忘记)
List<User> selectUserByLikeName(String name);<select id="selectUserByLikeName" resultType="com.zhao.entity.User"> select * from user where name like #{name} </select>@Test public void selectUserByLikeName(){ SqlSession sqlSession = MybatisUtils.getSqlSession(); UserMapper mapper = sqlSession.getMapper(UserMapper.class); List<User> users = mapper.selectUserByLikeName("%张%"); for (User user : users) { System.out.println(user); } sqlSession.close(); } -
通过字符串连接函数
<select id="selectUserByLikeName" resultType="com.zhao.entity.User"> select * from user where name like concat("%",#{name},"%") </select> ----------或者--------- <select id="selectUserByLikeName" resultType="com.zhao.entity.User"> select * from user where name like "%"#{name}"%" </select> -
通过bind标签
<select id="selectUserByLikeName" resultType="com.zhao.entity.User">
    <bind name="item" value="'%' + name + '%'"/>
    select * from user where name like #{item}
</select>
3.12、插入语句并获得主键
- 通过useGeneratedKeys
通过 useGeneratedKeys拿到数据库自动增长的id值,赋给插入对象的主键字段(user 对象的id属性)
void insertUser(User user);
<insert id="insertUser" parameterType="User" useGeneratedKeys="true" keyPropert ="id">
    insert into user(username,birthday,sex,address) values(#{username},#{birthday},#{sex}, #{address} )
</insert>
User user = newUser("龙哥","0",new Date(),"重庆");
userMapper.insertUser(user);//持有持久化ID
System.out.println(user.getId());
- 通过数据库函数实现
自动增长的id : select last_insert_id()
获取uuid: select uuid()
void insertEmployee(Employee employee);
void insertUser1(User user);
<!-- 字符串类型作为主键 -->
<insert id="insertEmployee" parameterType="Employee">
    <selectKey resultType="string" keyProperty="id" order="BEFORE">
        select uuid()
    </selectKey>
    insert into employee(id,name) values(#{id},#{name})
</insert>
<!-- int 类型作为主键 -->
<insert id="insertUser1" parameterType="User">
    <selectKey resultType="_int" keyProperty="id" order="AFTER">
        select last_insert_id()
    </selectKey>
    insert into user(username,birthday,sex,address) values(#{username},#{birthday},#{sex}, #{address})
</insert>
Employee employee = new Employee();
/* employee.setId(IDGener.getUUID()); 默认情况下,缺少主键不能插入数据库*/
employee.setName("员工222");
employeeMapper.insertEmployee(employee);
System.out.println(employee.getId());
//-------------------------------
User user = new User("黄爷","0",new Date(),"重庆");
userMapper.insertUser1(user);
System.out.println(user.getId());
4、配置解析
4.1、核心配置文件
- mybatis-config.xml
- MyBatis的配置文件包含了会深深影响MyBatis行为的设置和属性信息
//必须按顺序配置
configuration(配置)
properties(属性)
settings(设置)
typeAliases(类型别名)
typeHandlers(类型处理器)
objectFactory(对象工厂)
plugins(插件)
environments(环境配置)
environment(环境变量)
transactionManager(事务管理器)
dataSource(数据源)
databaseIdProvider(数据库厂商标识)
mappers(映射器)
4.2、环境配置(environments)
Mybatis可以配置成适应多种环境
不过要记住:尽管可以配置多个环境,但每个SqlSessionFactory实例只能选择一种环境。
学会使用配置多套运行环境!
transactionManager:Mybatis默认的事务管理器就是JDBC,还有MANAGED
dataSource:Mybatis默认的连接池为POOLED。还有UNPOOLED,JNDI
<!--default选择使用哪个环境-->
<environments default="test">
<environment id="development">
<transactionManager type="JDBC"/>
<dataSource type="POOLED">
<property name="driver" value="com.mysql.cj.jdbc.Driver"/>
<property name="url" value="jdbc:mysql://localhost:3306/mybatis_study?useSSL=false&useUnicode=true&characterEncoding=UTF-8"/>
<property name="username" value="root"/>
<property name="password" value="root"/>
</dataSource>
</environment>
<environment id="test">
<transactionManager type="JDBC"/>
<dataSource type="POOLED">
<property name="driver" value="com.mysql.cj.jdbc.Driver"/>
<property name="url" value="jdbc:mysql://localhost:3306/mybatis_study?useSSL=false&useUnicode=true&characterEncoding=UTF-8"/>
<property name="username" value="root"/>
<property name="password" value="root"/>
</dataSource>
</environment>
</environments>
4.3、属性(properties)
我们可以通过properties属性来实现引用配置文件
db.properties
driver=com.mysql.cj.jdbc.Driver
url=jdbc:mysql://localhost:3306/mybatis_study?useSSL=false&useUnicode=true&characterEncoding=UTF-8
username=root
password=root
<properties resource="db.properties">
</properties>
<!--default选择使用哪个环境-->
<environments default="development">
    <environment id="development">
        <transactionManager type="JDBC"/>
        <dataSource type="POOLED">
            <property name="driver" value="${driver}"/>
            <property name="url" value="${url}"/>
            <property name="username" value="${username}"/>
            <property name="password" value="${password}"/>
        </dataSource>
    </environment>
</environments>
<!--引入外部配置文件,也可以自己添加一些属性配置-->
<properties resource="db.properties">
    <property name="username" value="root"/>
    <property name="pwd" value="root"/>
</properties>
如果引入文件与增添属性配置有同一个字段,优先使用外部配置文件的!
4.4、类型别名(typeAliases)
- 类型别名是为Java类型设置一个短的名字。
- 存在的意义仅在于用来减少类完全限定名的冗余。
<typeAliases>
    <!--这两种选一种-->
    <typeAlias type="com.zhao.entity.User" alias="User"/>
    <!--扫描实体类的包,它的默认别名就为这个类的类名,首字母小写!-->
    <package name="com.zhao.entity"/>
</typeAliases>
在实体类比较少的时候,使用第一种方式。
如果实体类十分多,建议使用第二种。
第一种可以DIY别名,第二种则不行,如果非要改,需要在实体上增加注解
@Alias("user")
//实体类
public class User {}
自带的别名:
4.5、设置(settings)
| 设置参数 | 描述 | 有效值 |
|---|---|---|
| cacheEnabled | 全局地开启或关闭配置文件中的所有映射器已经配置的任何缓存。 | true | false |
| lazyLoadingEnabled | 延迟加载的全局开关。当开启时,所有关联对象都会延迟加载。 特定关联关系中可通过设置fetchType属性来覆盖该项的开关状态。 | true | false |
| useGeneratedKeys | 允许 JDBC 支持自动生成主键,需要驱动兼容。 如果设置为 true 则这个设置强制使用自动生成主键,尽管一些驱动不能兼容但仍可正常工作(比如 Derby)。 | true | false |
| logImpl | 指定 MyBatis 所用日志的具体实现,未指定时将自动查找。 | SLF4J | LOG4J | LOG4J2 | JDK_LOGGING | COMMONS_LOGGING | STDOUT_LOGGING | NO_LOGGING |
| mapUnderscoreToCamelCase | 是否开启自动驼峰命名规则(camel case)映射,即从经典数据库列名 A_COLUMN 到经典 Java 属性名 aColumn 的类似映射。 | true | false |
4.6、映射器(mappers)
注册绑定Mapper文件
-
推荐使用
<mappers> <mapper resource="mapper/UserMapper.xml"/> </mappers> -
使用class文件绑定注册
<mappers>
    <mapper class="com.zhao.mapper.UserMapper"/>
</mappers>
注意点:
- 接口和它的Mapper映射文件必须同名!
- 接口和它的Mapper映射文件必须在同一个包下!
-
使用扫描包进行注入绑定
<mappers>
    <package name="com.zhao.mapper"/>
</mappers>
注意点:
- 接口和它的Mapper映射文件必须同名!
- 接口和它的Mapper映射文件必须在同一个包下!
4.7、其他设置
- typeHandlers(类型处理器)
- objectFactory(对象工厂)
- plugins(插件)
- mybatis-generator-core逆向工程
- mybatis-plus
- 通用mapper
4.8、生命周期与作用域
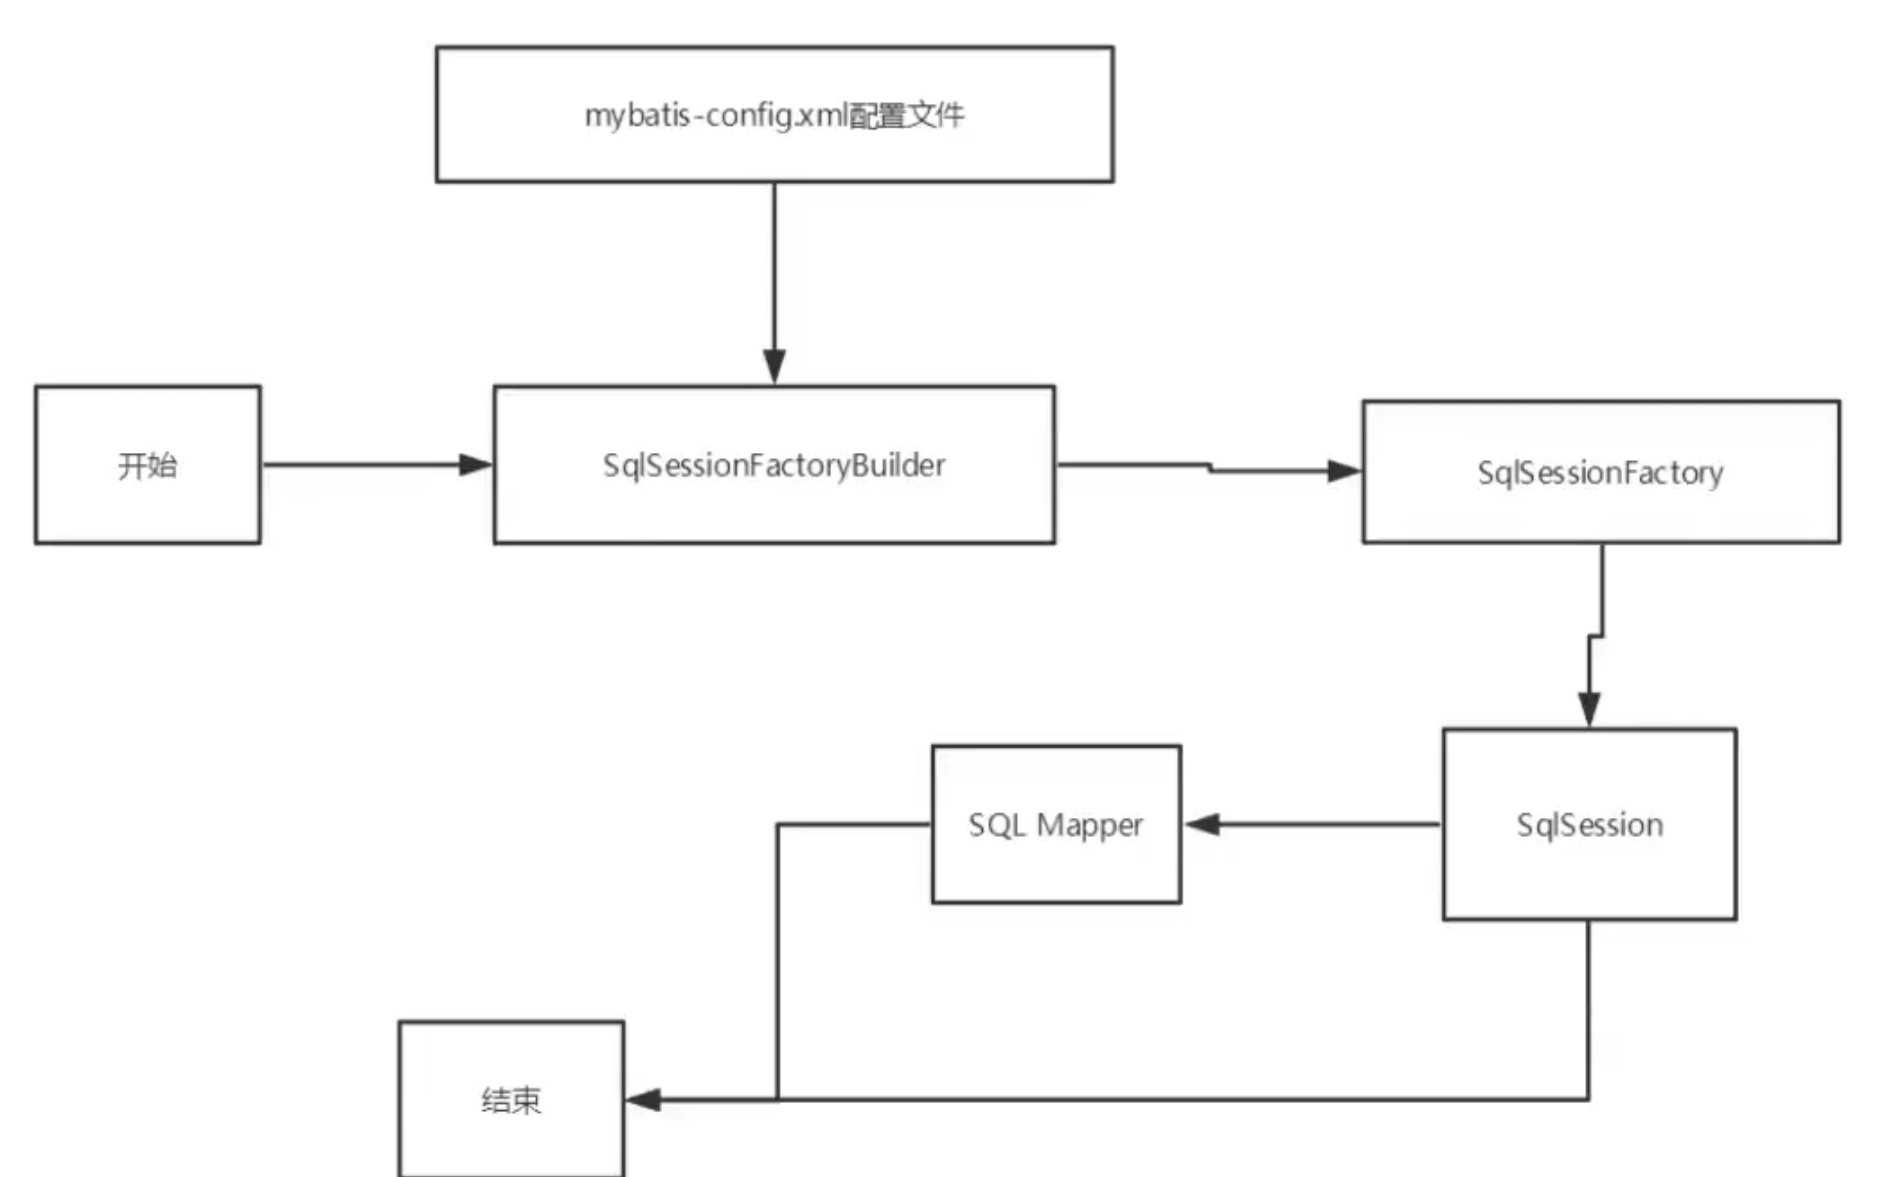
SqlSessionFactoryBuilder:
- 一旦创建了 SqlSessionFactory,就不再需要它了。
- 局部变量
SqlSessionFactory:
- 说白就是可以想象为:数据库连接池。
- SqlSessionFactory 一旦被创建就应该在应用的运行期间一直存在,没有任何理由丢弃它或重新创建另一个实例。
- SqlSessionFactory 的最佳作用域是应用作用域。
- 最简单的就是使用单例模式或者静态单例模式。
SqlSession:
- 连接到连接池的一个请求!
- SqlSession 的实例不是线程安全的,因此是不能被共享的,所以它的最佳的作用域是请求或方法作用域。
- 用完后需要赶紧关闭,否则资源被占用
5、解决属性名和字段名不一致的问题
5.1、问题
数据库中的字段
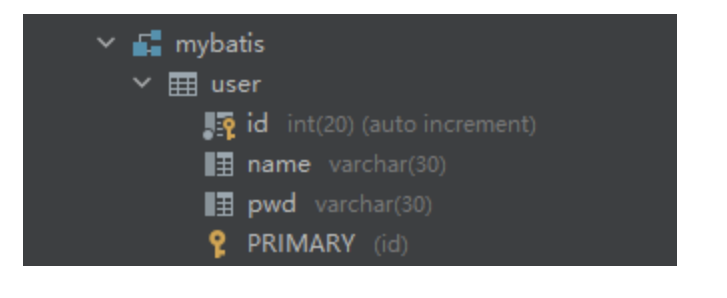
新建一个项目,拷贝之前的,测试实体类字段不一致的情况
public class User {
    private int id;
    private String name;
    private String password;
}
测试出现问题:
User(id=1, name=张三, password=null)
解决办法:
-
起别名
<select id="selectById" resultType="com.zhao.entity.User" parameterType="int"> select id,name,pwd as password from user where id = #{id} </select> -
resultmap解决
5.2、resultMap
结果集映射
resultMap 是 MyBatis 中最强大且灵活的结果映射方式。它适用于复杂的映射场景,尤其是当数据库字段名与 Java 对象属性名不一致时,或者需要进行高级映射(如一对一、一对多)时。
id name pwd
id name password
将pwd映射为password
<!--  结果集映射  -->
<resultMap id="UserMap" type="com.zhao.entity.User">
    <!--column数据库中的字段,property实体类中的属性-->
    <result column="id" property="id" />
    <result column="name" property="name" />
    <result column="pwd" property="password" /><!--只有pwd与password不一致,可以只写这一行-->
</resultMap>

<select id="selectById" parameterType="int" resultMap="UserMap">
    select * from user where id = #{id}
</select>
6、日志
6.1、日志工厂
如果一个数据库操作出现了异常,我们需要排错。日志就是最好的助手!
曾经:sout、debug
现在:日志工厂!
settings,logImpl
- SLF4J
- LOG4J 【掌握】
- LOG4J2
- JDK_LOGGING
- COMMONS_LOGGING
- STDOUT_LOGGING【掌握】
- NO_LOGGING
STDOUT_LOGGING标准日志输出
在mybatis-config.xml核心配置文件中,配置我们的日志!
<settings>
    <setting name="logImpl" value="STDOUT_LOGGING"/>
</settings>
6.2、Log4j
什么是Log4j?
- Log4j是Apache的一个开源项目,通过使用Log4j,我们可以控制日志信息输送的目的地是控制台、文件、GUI组件
- 我们也可以控制每一条日志的输出格式;
- 通过定义每一条日志信息的级别,我们能够更加细致地控制日志的生成过程。
- 可以通过一个配置文件来灵活地进行配置,而不需要修改应用的代码。
-
先在pom.xml文件中导入log4j的依赖包
<dependencies> <!-- https://mvnrepository.com/artifact/log4j/log4j --> <dependency> <groupId>log4j</groupId> <artifactId>log4j</artifactId> <version>1.2.17</version> </dependency> </dependencies> -
在resources文件夹下建立log4j.properties文件进行配置
#将等级为DEBUG的日志信息输出到console和file这两个目的地,console和file的定义在下面的代码 log4j.rootLogger = DEBUG,console ,file #控制台输出的相关设置 log4j.appender.console = org.apache.log4j.ConsoleAppender log4j.appender.console.Target = System.out log4j.appender.console.Threshold = DEBUG log4j.appender.console.layout = org.apache.log4j.PatternLayout log4j.appender.console.layout.ConversionPattern = [%c]-%m%n #文件输出的相关设置 log4j.appender.file = org.apache.log4j.RollingFileAppender log4j.appender.file.File = ./log/zhao.log log4j.appender.file.MaxFileSize = 10mb log4j.appender.file.Threshold = DEBUG log4j.appender.file.layout = org.apache.log4j.PatternLayout log4j.appender.file.layout.ConversionPattern = [%p][%d{yy-MM-dd}][%c]%m%n #日志输出级别 log4j.logger.org.mybatis=DEBUG log4j.logger.java.sql=DEBUG log4j.logger.java.sql.Statement=DEBUG log4j.logger.java.sql.ResultSet=DEBUG log4j.logger.java.sql.PreparedStatement=DEBUG -
在mybatis-config.xml核心配置文件中,配置log4j为日志的实现
<settings> <setting name="logImpl" value="LOG4J"/> </settings> -
Log4j的使用,直接测试运行
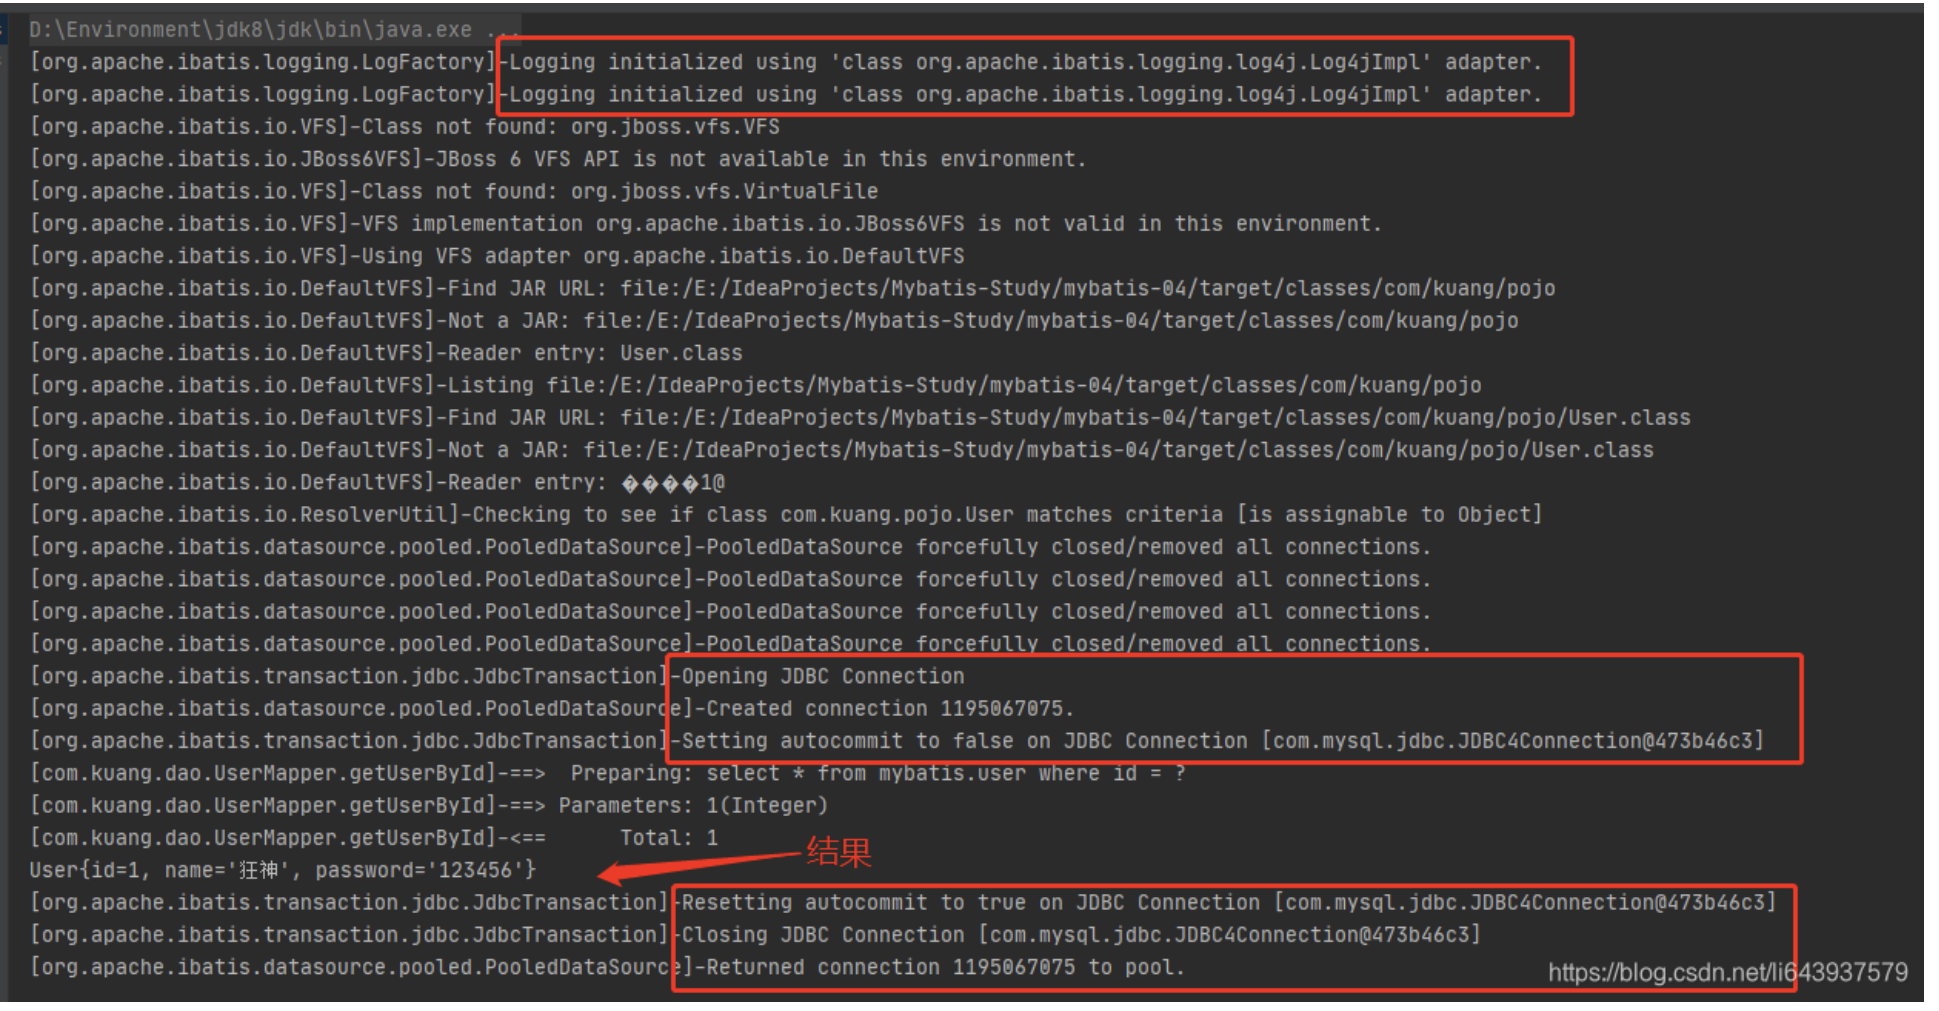
20251024160145052.png&pos_id=img-UOdjhlvn-1761731101863)
简单使用
-
在要使用Log4j的测试类中,导入包import org.apache.log4j.Logger;
-
日志对象,参数为当前类的class
static Logger logger = Logger.getLogger(UserDaoTest.class); -
日志级别
logger.info("info:进入了testLog4j"); logger.debug("DEBUG:进入了testLog4j"); logger.error("erro:进入了testLog4j"); -
在log文件夹中查看生成的日志文件
7、分页
为了减少数据的处理量
7.1、limit分页
语法:SELECT * from user limit startIndex,pageSize
SELECT  * from user limit 3 #[0,n]
-
接口
List<User> selectByLimit(Map<String,Integer> map); -
Mapper映射
<resultMap id="userMap" type="com.zhao.entity.User"> <id column="id" property="id"/> <result column="name" property="name"/> <result column="pwd" property="password"/> </resultMap> <select id="selectByLimit" resultMap="userMap" parameterType="map"> select * from user limit #{StartPage},#{PageSize} </select> -
测试
@Test
public void selectByLimit(){
    SqlSession sqlSession = MybatisUtils.getSqlSession();
    UserMapper mapper = sqlSession.getMapper(UserMapper.class);
    Map<String, Integer> hashMap = new HashMap<>();
    hashMap.put("StartPage",0);
    hashMap.put("PageSize",3);
    List<User> users = mapper.selectByLimit(hashMap);
    for (User user : users) {
        System.out.println(user);
    }
    sqlSession.close();
}
7.2、分页插件
Mybatis PageHelper的基本使用
-
在 pom.xml 中添加如下依赖:
<dependency> <groupId>com.github.pagehelper</groupId> <artifactId>pagehelper</artifactId> <version>5.0.3</version> </dependency> -
配置config文件
<plugins> <plugin interceptor="com.github.pagehelper.PageInterceptor"></plugin> </plugins> -
接口
List<User> selectByPageHelper(); -
Mapper映射
<select id="selectByPageHelper" resultMap="userMap"> select * from user </select> -
测试
@Test
public void selectByPageHelper(){
    SqlSession sqlSession = MybatisUtils.getSqlSession();
    UserMapper mapper = sqlSession.getMapper(UserMapper.class);
    //会自动给下一行的sql操作进行分页
    PageHelper.offsetPage(3,3);
    List<User> users = mapper.selectByPageHelper();
    for (User user : users) {
        System.out.println(user);
    }
    sqlSession.close();
}
8、使用注解开发
使用注解能使代码变得更简洁,但对复杂语句不适用,还是要配置映射实现
-
注解在UserMapper接口上实现
@Select("select * from user") List<User> selectAllByAnnotation(); -
需要在mybatis-config.xml核心配置文件中绑定接口
<mappers> <!--如果映射文件也存在,要先扫描包,再引入映射文件--> <mapper class="com.zhao.mapper.UserMapper"/> <mapper resource="mapper/UserMapper.xml"/> </mappers> -
测试
@Test
public void selectAllByAnnotation(){
    SqlSession sqlSession = MybatisUtils.getSqlSession();
    UserMapper mapper = sqlSession.getMapper(UserMapper.class);
    List<User> users = mapper.selectAllByAnnotation();
    for (User user : users) {
        System.out.println(user);
    }
    sqlSession.close();
}
本质:反射机制实现(在运行时获得程序中每一个类型的成员信息)
底层:动态代理!(在编译时不需要定义代理类,而是在运行时创建)
8.1、CRUD
-
在MybatisUtils工具类创建的时候实现自动提交事务!
public static SqlSession getSqlSession(){ // SqlSession sqlSession = sessionFactory.openSession(); // return sqlSession; return sessionFactory.openSession(true); } -
编写接口,增加注解
public interface UserMapper {

    @Select("select * from user")
    List<User> getUsers();

    //方法存在多个参数,所有参数前面必须加上@Param()注解
    @Select("select * from user where id=#{id}")
    User getUserById(@Param("id") int id);

    @Insert("insert into user (id,name,pwd) values(#{id},#{name},#{password})")
    int addUser(User user);

    @Update("update user set name=#{name},pwd=#{password} where id=#{id}")
    int updateUser(User user);

    @Delete("delete from user where id = #{uid}")
    int deleteUser(@Param("uid") int id);

}
关于@Param()注解
-
基本类型的参数或者String类型,需要加上
-
引用类型不需要加
-
如果只有一个基本类型的话,可以忽略,但是建议都加上!
-
我们在SQL中引用的就是我们这里的@Param(“”)中设定的属性名!
-
方法有多个参数,需要 @Param 注解
-
当需要给参数取一个别名的时候,需要 @Param 注解
-
XML 中的 SQL 使用了 $ ,那么参数中也需要 @Param 注解,$ 会有注入漏洞的问题,但是有的时候你必须要 $ 符号,例如要传入列名或者表名的时候,这个时候必须要
-
动态 SQL ,如果在动态 SQL 中使用了参数作为变量,那么也需要 @Param 注解,即使你只有一个参数。
-
9、mybatis的详细执行流程
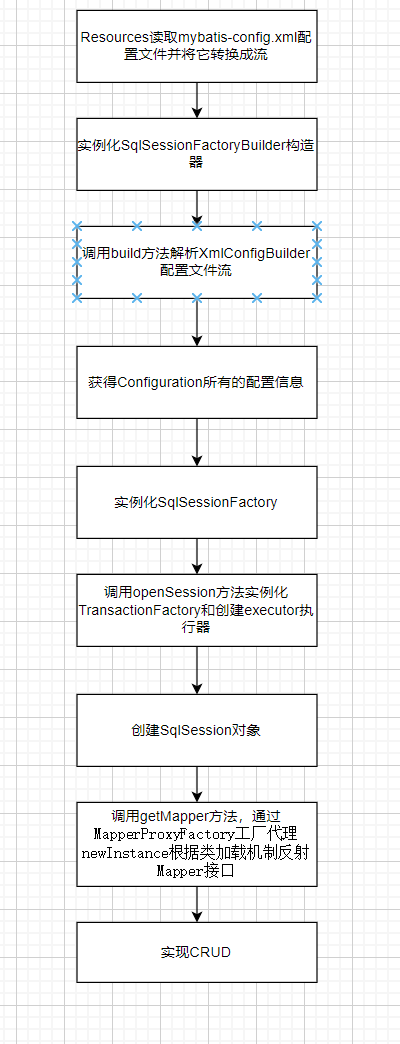
10、多对一处理
多对一:
- 多个学生,对应一个老师
- 对于学生而言,关联–多个学生,关联一个老师【多对一】
- 对于老师而言,集合–一个老师,有很多个学生【一对多】
10.1、环境搭建
CREATE TABLE `teacher` (
	`id` INT(10) NOT NULL,
	`name` VARCHAR(30) DEFAULT NULL,
	PRIMARY KEY (`id`)
)ENGINE = INNODB DEFAULT CHARSET=utf8;

INSERT INTO teacher(`id`,`name`) VALUES (1,'秦老师');

CREATE TABLE `student` (
	`id` INT(10) NOT NULL,
	`name` VARCHAR(30) DEFAULT NULL,
	`tid` INT(10) DEFAULT NULL,
	PRIMARY KEY (`id`),
	KEY `fktid`(`tid`),
	CONSTRAINT `fktid` FOREIGN KEY (`tid`) REFERENCES `teacher` (`id`)
)ENGINE = INNODB DEFAULT CHARSET=utf8;

INSERT INTO `student`(`id`,`name`,`tid`) VALUES ('1','小明','1');
INSERT INTO `student`(`id`,`name`,`tid`) VALUES ('2','小红','1');
INSERT INTO `student`(`id`,`name`,`tid`) VALUES ('3','小张','1');
INSERT INTO `student`(`id`,`name`,`tid`) VALUES ('4','小李','1');
INSERT INTO `student`(`id`,`name`,`tid`) VALUES ('5','小王','1');
- 导入Lombok
- 新建实体类Teacher,Student
- 建立Mapper接口
- 建立Mapper.XML文件
- 在核心配置文件中绑定注册我们的Mapper接口或者文件!【方式很多,随心选】(resource不支持通配符一键导入)
- 测试查询是否能够成功!
10.2、按照查询嵌套处理(对应sql中子查询)
<!--
      思路:
          1.查询所有的学生信息
          2.根据查询出来的学生的tid,寻找对应的老师! 子查询
-->
<select id="selectAll2" resultMap="StudentMap">
    select * from student
</select>

<resultMap id="StudentMap" type="com.zhao.entity.Student">
    <id column="id" property="id"/>
    <result column="name" property="name"/>
    <!--  复杂的属性,我们需要单独处理 对象:association 集合:collection      -->
    <association property="teacher" column="tid" javaType="com.zhao.entity.Teacher" select="selectTeacherById"/>
</resultMap>

<select id="selectTeacherById" resultType="com.zhao.entity.Teacher">
    select * from teacher where id=#{tid}
</select>
10.3、按照结果嵌套处理(对应sql中联表查询)
<select id="selectAll3" resultMap="StudentMap2">
    select s.id,s.name,s.tid,t.name tname from student s
    inner join teacher t
    on s.tid=t.id
</select>
<resultMap id="StudentMap2" type="com.zhao.entity.Student">
    <id column="id" property="id"/>
    <result column="name" property="name"/>
    <association property="teacher" javaType="com.zhao.entity.Teacher">
        <id column="tid" property="id"/>
        <result column="tname" property="name"/>
    </association>
</resultMap>
回顾Mysql多对一查询方式:
- 子查询
- 联表查询
11、一对多处理
11.1、环境搭建
@Data
public class Student {
    private int id;
    private String name;
    private int tid;
}
@Data
public class Teacher {
    private int id;
    private String name;

    //一个老师拥有多个学生
    private List<Student> students;
}
11.2、按照查询嵌套处理
<select id="selectAll" resultMap="teacherMap">
    select * from teacher
</select>
<resultMap id="teacherMap" type="com.zhao.entity.Teacher">
    <id property="id" column="id"/>
    <result property="name" column="name"/>
    <collection property="students" javaType="ArrayList" ofType="com.zhao.entity.Student" select="selectStudentsByTeacherId" column="id"/>xml
</resultMap>
<select id="selectStudentsByTeacherId" resultType="com.zhao.entity.Student">
    select * from student where tid=#{tid}
</select>
11.3、按照结果嵌套查询
<select id="selectAll2" resultMap="teacherMap2">
    select t.id,t.name,s.id sid,s.name sname,s.tid from teacher t
    inner join student s
    on t.id=s.tid
</select>
<resultMap id="teacherMap2" type="com.zhao.entity.Teacher">
    <id property="id" column="id"/>
    <result property="name" column="name"/>
    <collection property="students" ofType="com.zhao.entity.Student" javaType="ArrayList">
        <result property="id" column="sid"/>
        <result property="name" column="sname"/>
        <result property="tid" column="tid"/>
    </collection>
</resultMap>
12、动态sql
什么是动态SQL:动态SQL就是 指根据不同的条件生成不同的SQL语句
12.1、搭配环境
CREATE TABLE `blog`(
	`id` VARCHAR(50) NOT NULL COMMENT '博客id',
	`title` VARCHAR(100) NOT NULL COMMENT '博客标题',
	`author` VARCHAR(30) NOT NULL COMMENT '博客作者',
	`create_time` DATETIME NOT NULL COMMENT '创建时间',
	`views` INT(30) NOT NULL COMMENT '浏览量'
)ENGINE=INNODB DEFAULT CHARSET=utf8
@Data
public class Blog {
    private String id;
    private String title;
    private String author;
    private Date createTime; //属性名和字段名不一致,配置文件开启数据库字段名驼峰转换
    private int views;
}
12.2、If
List<Blog> selectBlogIf(Map map);
<select id="selectBlogIf" resultType="com.zhao.entity.Blog" parameterType="map">
    select * from blog where 1=1
    <if test="title != null">
        and title = #{title}
    </if>
    <if test="author != null">
        and author = #{author}
    </if>
</select>
where 1=1不合规范,使用where标签,它会自动删除第一个条件的and
<select id="selectBlogIf" resultType="com.zhao.entity.Blog" parameterType="map">
    select * from blog
    <where>
        <if test="title != null">
            and title = #{title}
        </if>
        <if test="author != null">
            and author = #{author}
        </if>
    </where>
</select>
@Test
public void selectBlogIf(){
    SqlSession sqlSession = MybatisUtils.getSqlSession();
    BlogMapper mapper = sqlSession.getMapper(BlogMapper.class);
    HashMap<String, Object> map = new HashMap<>();
    map.put("author","张三");
    List<Blog> blogs = mapper.selectBlogIf(map);
    for (Blog blog : blogs) {
        System.out.println(blog);
    }
    sqlSession.close();
}
12.3、choose(when,otherwise)
<select id="selectBlogChoose" resultType="com.zhao.entity.Blog" parameterType="map">
    select * from blog
    <where>
        <choose>
            <when test="title != null">
                and title = #{title}
            </when>
            <when test="author != null">
                and author = #{author}
            </when>
            <otherwise>
                and views = #{views}
            </otherwise>
        </choose>
    </where>
</select>
12.4、trim(where,set)
<trim prefix="" suffix="" suffixOverrides="" prefixOverrides=""></trim>
prefix:
- 表示在trim包裹的SQL语句前面添加的指定内容。
suffix:
- 表示在trim包裹的SQL末尾添加指定内容
prefixOverrides:
- 表示去掉(覆盖)trim包裹的SQL的指定首部内容
suffixOverrides:
- 表示去掉(覆盖)trim包裹的SQL的指定尾部内容
<update id="update">
    update blog
    <set>
        <if test="title != null">
            title = #{title},
        </if>
        <if test="author != null">
            author = #{author},
        </if>
        <if test="views != 0">
            views = #{views}
        </if>
    </set>
    where id = #{id}
</update>
12.5、ForEach
动态 SQL 的另一个常见使用场景是对集合进行遍历(尤其是在构建 IN 条件语句的时候)。
<select id="selectBlogForEach" resultType="com.zhao.entity.Blog">
    SELECT * FROM blog
    <where>
        <if test="authors != null and authors.size() > 0">
            AND author IN
            <foreach collection="authors" item="author"
                     open="(" close=")" separator=",">
                #{author}
            </foreach>
        </if>
    </where>
</select>
12.6、Sql片段
有的时候,我们可以能会将一些功能的部分抽取出来,方便复用!
- 使用SQL标签抽取公共的部分
<sql id="if-title-author">
    <if test="title != null">
        title = #{title}
    </if>
    <if test="author != null">
        and author = #{author}
    </if>
</sql>
- 在需要使用的地方使用Include标签引用即可
<select id="queryBlogIF" parameterType="map" resultType="Blog">
    select * from mybatis.blog
    <where>
        <include refid="if-title-author"></include>
    </where>
</select>
13、缓存
13.1、简介
- 什么是缓存[Cache]?
- 存在内存中的临时数据。
- 将用户经常查询的数据放在缓存(内存)中,用户去查询数据就不用从磁盘上(关系型数据库查询文件)查询,从缓存中查询,从而提高查询效率,解决了高并发系统的性能问题。
- 为什么使用缓存?
减少和数据库的交互次数,减少系统开销,提高系统效率。 - 什么样的数据能使用缓存?
经常查询或不经常改变的数据。
13.2、Mybatis缓存
- Mybatis包含一个非常强大的查询缓存特性,它可以非常方便地定制和配置缓存。缓存可以极大的提升查询效率。
- Mybatis系统中默认定义了两级缓存:一级缓存和二级缓存
- 默认情况下,只有一级缓存开启。(SqlSession级别的缓存,也称为本地缓存)
- 二级缓存需要手动开启和配置,它是基于namespace级别的缓存。
- 为了提高扩展性,Mybatis定义了缓存接口Cache,我们可以通过实现Cache接口来自定义二级缓存。
13.3、一级缓存
- 一级缓存也叫本地缓存:
- 与数据库同一次会话期间查询到的数据会放在本地缓存中。
- 以后如果需要获取相同的数据,直接从缓存中拿,没必要再去查询数据库
- 缓存失效的情况:
- 查询不同的东西;
- 增删改操作,可能会改变原来的数据,所以必定会刷新缓存!
- 查询不同的Mapper.xml
- 手动清理缓存!
- 一级缓存默认是开启的,只在一次SqlSession中有效,也就是拿到连接到关闭连接这个区间段!
一级缓存相当于一个Map。
13.4、二级缓存
- 二级缓存也叫全局缓存,一级缓存作用域太低了,所以诞生了二级缓存;
- 基于namespace级别的缓存,一个名称空间,对应一个二级缓存;
- 工作机制
- 一个会话查询一条数据,这个数据就会被放在当前会话的一级缓存中;
- 如果当前会话关闭了,这个会话对应的一级缓存就没了;但是我们想要的是,会话关闭了,一级缓存中的数据被保存到二级缓存中;
- 新的会话查询信息,就可以从二级缓存中获取内容;
- 不同的mapper查出的数据就会放在自己对应的缓存(map)中;
步骤:
-
在mybatis-config.xml开启全局缓存
<!--显式的开启全局缓存,默认开启的,写出来增强可读性--> <setting name="cacheEnabled" value="true"/> -
在要使用二级缓存的Mapper中开启
<!--在当前Mapper.xml中使用二级缓存-->
<cache/>
也可以自定义参数
<!--在当前Mapper.xml中使用二级缓存--> <cache eviction="FIFO" flushInterval="60000" size="512" readOnly="true"/> <!--FiFo先进先出策略,60秒刷新缓存,最大引用数量512,开启只读策略 LRU策略最少使用--> -
实体类实现序列化
小结:
-
只要开启了二级缓存,在同一个Mapper下就有效;
-
所有的数据都会先放在一级缓存中;
-
只有当会话提交或者关闭的时候,才会提交到二级缓存中!

有“AI”的1024 = 2048,欢迎大家加入2048 AI社区
更多推荐


 10
10 0
0- 0


 已为社区贡献3条内容

所有评论(0)