在windows 的子系统Ubuntu部署qanything-v2
4. 修改配置文件 /home/qanything/qanything_kernel/configs/model_config.py 和 /home/qanything/docker-compose-linux.yaml。如果docker compose -f docker-compose-linux.yaml logs -f qanything_local 显示连接报错,参考 https://b
QAnything
开发者:网易有道
核心特点:
支持多种文件格式,包括PDF、Word、PPT、Excel、图片等
采用两阶段检索架构(Embedding + Rerank),解决大规模数据检索准确率问题
支持纯本地部署,保障数据安全
跨语种问答能力,中英文混合问答
支持 高性能,数据量越大效果越好
部署方式:Docker Compose一键部署,支持Windows(WSL2)、Linux和macOS
技术架构:基于自研RAG引擎,集成BCEmbedding和Reranker模型
0. 默认已开启Hyper-V、适用于Linux的Windows子系统 、虚拟机平台;
安装了ubuntu;
升级了WSL2;
1. 设置WSL内存
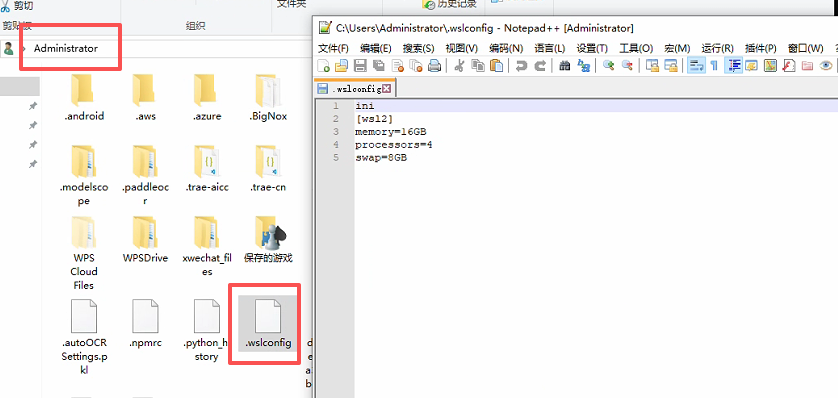
1.1 配置WSL2
在文件路径中输入%USERPROFILE%,并创建.wslconfig
文件内容:
ini
[wsl2]
memory=16GB # 增加到 16GB
processors=4
swap=8GB # 增加到 8GB
关闭 wsl --shutdown 服务
2. 在Ubuntu上拉取 QAnything项目
在ubuntu安装unzip;
sudo apt update 更新包管理器索引
sudo apt install unzip
cd /home
sudo wget https://github.com/netease-youdao/QAnything/archive/refs/heads/qanything-v2.zip
# 解压
sudo unzip qanything-v2.zip
# 重命名
sudo mv QAnything-qanything-v2/ qanything
sudo chmod -R 777 /home/qanything
3. 安装docker
参考 https://blog.csdn.net/sgx1825192/article/details/146965328
选择在Windows电脑上安装Docker Desktop on Windows
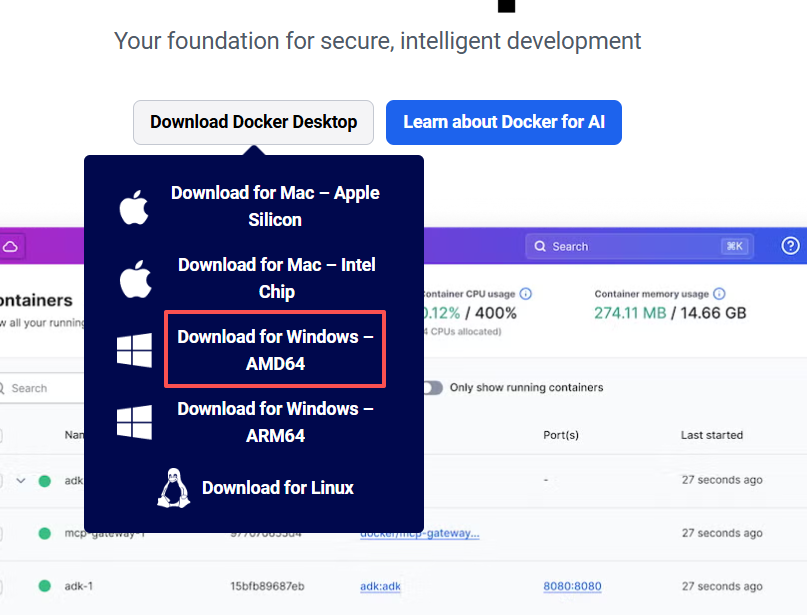
一般是选择 Download for Windows AMD64;可以查看自己电脑的处理器信息,
1. 按 Win + X,然后选择 设备管理器。
2. 展开 处理器 部分,查看显示的处理器型号。
3. 如果显示的是 Intel 或 AMD,通常就是 AMD64 版本;
4. 如果是 ARM 处理器(如 Qualcomm Snapdragon 或 Apple M1/M2),则是 ARM64。
如果你的电脑是使用 Intel 或 AMD 的 64 位处理器,选择 Download for Windows  AMD64。
docker 命令
查看所有容器:docker ps -a
停止所有正在运行的容器:docker stop $(docker ps -q)
删除所有容器(停止并移除):docker rm $(docker ps -aq)
强制停止并删除所有容器:docker rm -f $(docker ps -aq)
停止容器 docker stop <container_id_or_name>
删除容器 docker rm <container_id_or_name>
强制删除运行中的容器 docker rm -f <container_id_or_name>
# 检查磁盘空间
df -h
# 清理 Docker 资源
sudo docker system prune -a
# 清除所有未使用的镜像和构建缓存
sudo docker system prune -a --volumes
测试docker拉取镜像
sudo docker pull hello-world
如果报 failed to unpack image on snapshotter overlayfs: unexpected media type text/html for sha256:ef190a734c6ddb9dc29de0770bcc321a0b1eef445cd1d5368385ef650cc03024: not found;此报错为镜像源的问题, 在网上查一些新的可用的镜像源
https://www.wangdu.site/course/2109.html 查看最新镜像源
在docker设置中添加新的
"registry-mirrors": [
"https://docker-0.unsee.tech",
"https://666860.xyz",
"https://hub.rat.dev",
"https://registry.cyou",
"https://dockerproxy.net",
"https://666860.xyz"
]
通过 sudo curl -I https://docker.m.daocloud.io测试链接是否可用。registry-mirrors中只保留可用的链接。
4. 修改配置文件 /home/qanything/qanything_kernel/configs/model_config.py 和 /home/qanything/docker-compose-linux.yaml
import os
from dotenv import load_dotenv

load_dotenv()
# 获取环境变量GATEWAY_IP
GATEWAY_IP = os.getenv("GATEWAY_IP", "localhost")
# LOG_FORMAT = "%(levelname) -5s %(asctime)s" "-1d: %(message)s"
# logger = logging.getLogger()
# logger.setLevel(logging.INFO)
# logging.basicConfig(format=LOG_FORMAT)
# 获取项目根目录
# 获取当前脚本的绝对路径
current_script_path = os.path.abspath(__file__)
root_path = os.path.dirname(os.path.dirname(os.path.dirname(current_script_path)))
UPLOAD_ROOT_PATH = os.path.join(root_path, "QANY_DB", "content")
IMAGES_ROOT_PATH = os.path.join(root_path, "qanything_kernel/qanything_server/dist/qanything/assets", "file_images")
print("UPLOAD_ROOT_PATH:", UPLOAD_ROOT_PATH)
print("IMAGES_ROOT_PATH:", IMAGES_ROOT_PATH)
OCR_MODEL_PATH = os.path.join(root_path, "qanything_kernel", "dependent_server", "ocr_server", "ocr_models")
RERANK_MODEL_PATH = os.path.join(root_path, "qanything_kernel", "dependent_server", "rerank_server", "rerank_models")
EMBED_MODEL_PATH = os.path.join(root_path, "qanything_kernel", "dependent_server", "embed_server", "embed_models")
PDF_MODEL_PATH = os.path.join(root_path, "qanything_kernel/dependent_server/pdf_parser_server/pdf_to_markdown")

# LLM streaming reponse
STREAMING = True

SYSTEM = """
You are always a reliable assistant that can answer questions with the help of external documents.
You are an AI assistant that follows instructions extremely well. Help as much as you can.
Your answer needs to be accurate, well-structured, and focused on key points.
The answer should have sources from the reference document. Do not hallucinate, do not make up factual information.
Your tone should be professional and helpful.
Today's date is {{today_date}}. The current time is {{current_time}}.

### Global Answering Rules:
1. **Strict content matching**:
    - Your responses should always be based on the reference information provided.
    - Do not speculate or invent information that is not present in the documents.
2. **Answer format**:
    - Provide well-structured answers, using headings, bullet points, or tables when appropriate.
3. **No redundancy**:
    - If different parts of the reference contain overlapping information, merge and summarize them to avoid repetition.
4. **Flexible use of information sources**:
    - During the **inference and reasoning process**, use the "Information Sources" module to track document citations and ensure accuracy.
    - **Each reference** must be listed separately with its corresponding information (ref_number, title, section, abstract).
    - **Do not include the full "Information Sources" section in the final user-facing answer**.
5. **Start the "Inferred Answer" Section**:
    - Directly start the user-facing response with "According to the reference information".
    - Ensure that the answer is natural, professional, logically coherent, and directly relevant to the question.
6. **Post-answer check**:
    - Ensure all parts of the question are addressed, citations are accurate, and the response is logically consistent.
7. **Language and Format**:
    - The response should be in the same language as the question.
    - Use Markdown format for headings (##, ###, ####), bullet points (- or 1., 2., 3.), and tables for clarity.
"""

INSTRUCTIONS = """
- Task: Answer the question "{{question}}" strictly based on the reference information provided between <DOCUMENTS> and </DOCUMENTS>, following the steps and format outlined below.

---

### Answering Steps:
1. **Use of Information Sources** (Internal step):
    - During the inference process, use the "Information Sources" section to gather and organize the relevant document citations.
    - **Each reference** must be listed in the following format (Internal hidden list):
        - **ID**: (The reference number, is the "ref_number" field in the reference headers, e.g., [REF.1])
            - **Title**: (The filename or title, is the "文件名" field in the reference headers. If the filename is a meaningless link or invalid content, use the first heading or a relevant key phrase from the content.)
            - **Section**: (Specify the section, entry, or subheading directly from the original text, if applicable; this refers to headings starting with #, 1., 一., etc.)
            - **Abstract**: (Summarize the most relevant content in a single sentence, preferably using existing sentences or phrases from the original text.)
    - **Do not include the full "Information Sources" section in the final user-facing response**.
2. **Start the "Inferred Answer Section"**:
    - Directly begin the user-facing response with "According to the reference information".
    - **Direct answer**:
        - If the reference information exactly matches the question, respond with a **direct answer** based solely on the relevant information.
    - **Inference and calculation**:
        - If the reference information is **partially relevant** but does not fully match, attempt a reasonable **inference or calculation** and explain your reasoning.
        - Ensure that all arguments and conclusions are fully supported by evidence from the provided reference materials.
        - Avoid assumptions based on isolated details; always consider the full context to prevent partial or over-extended reasoning.
    - **Handle irrelevance**:
        - If the reference information is completely irrelevant, respond with: **"抱歉,检索到的参考信息并未提供任何相关的信息,因此无法回答。"**
        - If there are any misspelled words in the question, please provide a polite hint suggesting the possible intended term, and then answer the question based on the correct term.
---

### Pre-Answer Confirmation:
1. Ensure all key points from the reference information are addressed.
2. Avoid redundancy by merging and summarizing overlapping information.
3. Ensure there are no contradictions or inconsistencies in the response.

---

### Post-Answer Checklist:
1. **Answer completeness**: Ensure all parts of the question have been addressed.
2. **Logic & consistency**: Double-check for any logical errors or internal contradictions in the response.
3. **Citation accuracy**: Ensure the relevance, completeness, and accuracy of the information source, as well as the consistency of the format.

---

### Language and Format:
- Respond in the same language as the question "{{question}}", using "根据参考信息" if in Chinese, or "According to the reference information" if in English.
- **Flexible Format**:
    - Use headings (##, ###, ####), bullet points, or tables as appropriate.
    - Use **bullet points** (- or 1., 2., 3.) for listing multiple points.
    - **Highlight key information** using **bold** or *italic* text where relevant.
    - **Reference ID visibility**:
        - Do not show reference IDs in the final answer.
    - For list or comparison-based questions, use **tables** or **bullet points**.
    - For narrative-style answers, use **paragraphs** to clearly explain the details.
"""

PROMPT_TEMPLATE = """
<SYSTEM>
{{system}}
</SYSTEM>

<INSTRUCTIONS>
{{instructions}}
</INSTRUCTIONS>

<DOCUMENTS>
{{context}}
</DOCUMENTS>

<INSTRUCTIONS>
{{instructions}}
</INSTRUCTIONS>
"""

CUSTOM_PROMPT_TEMPLATE = """
<USER_INSTRUCTIONS>
{{custom_prompt}}
</USER_INSTRUCTIONS>

<DOCUMENTS>
{{context}}
</DOCUMENTS>

<INSTRUCTIONS>
- All contents between <DOCUMENTS> and </DOCUMENTS> are reference information retrieved from an external knowledge base.
- Now, answer the following question based on the above retrieved documents(Let's think step by step):
{{question}}
</INSTRUCTIONS>
"""


SIMPLE_PROMPT_TEMPLATE = """
- You are a helpful assistant. You can help me by answering my questions. You can also ask me questions.
- Today's date is {{today}}. The current time is {{now}}.
- User's custom instructions: {{custom_prompt}}
- Before answering, confirm the number of key points or pieces of information required, ensuring nothing is overlooked.
- Now, answer the following question:
{{question}}
Return your answer in Markdown formatting, and in the same language as the question "{{question}}".
"""

# 缓存知识库数量
CACHED_VS_NUM = 100

# 文本分句长度
SENTENCE_SIZE = 100

# 知识库检索时返回的匹配内容条数
VECTOR_SEARCH_TOP_K = 30

VECTOR_SEARCH_SCORE_THRESHOLD = 0.3

KB_SUFFIX = '_240625'
# MILVUS_HOST_LOCAL = 'milvus-standalone-local'
# MILVUS_PORT = 19530
MILVUS_HOST_LOCAL = "milvus" #修改 使用容器服务名   旧GATEWAY_IP
MILVUS_PORT = 19530  #修改 改成容器内部端口
MILVUS_COLLECTION_NAME = 'qanything_collection' + KB_SUFFIX

# ES_URL = 'http://es-container-local:9200/'
ES_URL = "http://elasticsearch:9200/" #修改 使用容器服务名 # f'http://{GATEWAY_IP}:9210/'
ES_USER = None
ES_PASSWORD = None
ES_TOP_K = 30
ES_INDEX_NAME = 'qanything_es_index' + KB_SUFFIX

# MYSQL_HOST_LOCAL = 'mysql-container-local'
# MYSQL_PORT_LOCAL = 3306
MYSQL_HOST_LOCAL = "mysql"  #修改 使用容器服务名
MYSQL_PORT_LOCAL = 3306     #修改 改成容器内部端口
MYSQL_USER_LOCAL = 'root'
MYSQL_PASSWORD_LOCAL = '123456'
MYSQL_DATABASE_LOCAL = 'qanything'

LOCAL_OCR_SERVICE_URL = "localhost:7001"

LOCAL_PDF_PARSER_SERVICE_URL = "localhost:9009"

LOCAL_RERANK_SERVICE_URL = "localhost:8001"
LOCAL_RERANK_MODEL_NAME = 'rerank'
LOCAL_RERANK_MAX_LENGTH = 512
LOCAL_RERANK_BATCH = 1
LOCAL_RERANK_THREADS = 1
LOCAL_RERANK_PATH = os.path.join(root_path, 'qanything_kernel/dependent_server/rerank_server', 'rerank_model_configs_v0.0.1')
LOCAL_RERANK_MODEL_PATH = os.path.join(LOCAL_RERANK_PATH, "rerank.onnx")

LOCAL_EMBED_SERVICE_URL = "localhost:9001"
LOCAL_EMBED_MODEL_NAME = 'embed'
LOCAL_EMBED_MAX_LENGTH = 512
LOCAL_EMBED_BATCH = 1
LOCAL_EMBED_THREADS = 1
LOCAL_EMBED_PATH = os.path.join(root_path, 'qanything_kernel/dependent_server/embedding_server', 'embedding_model_configs_v0.0.1')
LOCAL_EMBED_MODEL_PATH = os.path.join(LOCAL_EMBED_PATH, "embed.onnx")

TOKENIZER_PATH = os.path.join(root_path, 'qanything_kernel/connector/llm/tokenizer_files')

DEFAULT_CHILD_CHUNK_SIZE = 400
DEFAULT_PARENT_CHUNK_SIZE = 800
SEPARATORS = ["\n\n", "\n", "。", ",", ",", ".", ""]
MAX_CHARS = 1000000  # 单个文件最大字符数,超过此字符数将上传失败,改大可能会导致解析超时

# llm_config = {
#     # 回答的最大token数,一般来说对于国内模型一个中文不到1个token,国外模型一个中文1.5-2个token
#     "max_token": 512,
#     # 附带的上下文数目
#     "history_len": 2,
#     # 总共的token数,如果遇到电脑显存不够的情况可以将此数字改小,如果低于3000仍然无法使用,就更换模型
#     "token_window": 4096,
#     # 如果报错显示top_p值必须在0到1,可以在这里修改
#     "top_p": 1.0
# }

# Bot
BOT_DESC = "一个简单的问答机器人"
BOT_IMAGE = ""
BOT_PROMPT = """
- 你是一个耐心、友好、专业的机器人,能够回答用户的各种问题。
- 根据知识库内的检索结果,以清晰简洁的表达方式回答问题。
- 不要编造答案,如果答案不在经核实的资料中或无法从经核实的资料中得出,请回答“我无法回答您的问题。”(或者您可以修改为:如果给定的检索结果无法回答问题,可以利用你的知识尽可能回答用户的问题。)
"""
BOT_WELCOME = "您好,我是您的专属机器人,请问有什么可以帮您呢?"
services:
  elasticsearch:
    networks:
      - qanything-net  # 添加这行
    container_name: elasticsearch #修改 es-container-local
    image: docker.elastic.co/elasticsearch/elasticsearch:8.13.2
    user: root
    privileged: true
    ports:
      - "9210:9200"  # Windows/WSL 用 localhost:9210 访问
    restart: on-failure
    environment:
      - discovery.type=single-node
      - xpack.security.enabled=false
      - "ES_JAVA_OPTS=-Xms1024m -Xmx1024m"
    volumes:
      - ${DOCKER_VOLUME_DIRECTORY:-.}/third_party/es/plugins:/usr/share/elasticsearch/plugins
      - ${DOCKER_VOLUME_DIRECTORY:-.}/volumes/es/data:/usr/share/elasticsearch/data
    command: >
      /bin/bash -c "
        mkdir -p /usr/share/elasticsearch/data /usr/share/elasticsearch/plugins &&
        chown -R elasticsearch:elasticsearch /usr/share/elasticsearch &&
        su elasticsearch -c '/usr/share/elasticsearch/bin/elasticsearch'
      "
    healthcheck:
      test: curl --fail http://localhost:9200/_cat/health || exit 1
      interval: 10s
      timeout: 20s
      retries: 3
      start_period: 30s  # 添加启动延迟

  etcd:
    networks:
      - qanything-net  # 添加这行
    container_name: milvus-etcd-local
    image: quay.io/coreos/etcd:v3.5.5
    environment:
      - ETCD_AUTO_COMPACTION_MODE=revision
      - ETCD_AUTO_COMPACTION_RETENTION=1000
      - ETCD_QUOTA_BACKEND_BYTES=4294967296
      - ETCD_SNAPSHOT_COUNT=50000
    volumes:
      - ${DOCKER_VOLUME_DIRECTORY:-.}/volumes/etcd:/etcd
    command: etcd -advertise-client-urls=http://127.0.0.1:2379 -listen-client-urls http://0.0.0.0:2379 --data-dir /etcd
    healthcheck:
      test: ["CMD", "etcdctl", "endpoint", "health"]
      interval: 10s
      timeout: 20s
      retries: 3

  minio:
    networks:
      - qanything-net  # 添加这行
    container_name: milvus-minio-local
    image: minio/minio:RELEASE.2023-03-20T20-16-18Z
    environment:
      MINIO_ACCESS_KEY: minioadmin
      MINIO_SECRET_KEY: minioadmin
    # ports:
    #   - "9001:9001"
    #       - "9000:9000"
    volumes:
      - ${DOCKER_VOLUME_DIRECTORY:-.}/volumes/minio:/minio_data
    command: minio server /minio_data --console-address ":9001"
    healthcheck:
      test: ["CMD", "curl", "-f", "http://localhost:9000/minio/health/live"]
      interval: 10s
      timeout: 20s
      retries: 3

  milvus: # 修改,原名为standalone
    networks:
      - qanything-net  # 添加这行
    container_name: milvus # milvus-standalone-local
    image: milvusdb/milvus:v2.4.8
    logging:
      driver: "json-file"
      options:
        max-size: "100m"
        max-file: "3"
    command: ["milvus", "run", "standalone"]
    security_opt:
      - seccomp:unconfined
    environment:
      ETCD_ENDPOINTS: etcd:2379
      MINIO_ADDRESS: minio:9000
    volumes:
      - ${DOCKER_VOLUME_DIRECTORY:-.}/volumes/milvus:/var/lib/milvus
    healthcheck:
      test: ["CMD", "curl", "-f", "http://localhost:9091/healthz"]
      interval: 10s
      start_period: 120s
      timeout: 20s
      retries: 5
    ports:
      - "19540:19530"   # 修改 Windows/WSL 用 localhost:19540 访问
    depends_on:
      - "etcd"
      - "minio"
    deploy:  # 修改 添加资源限制
      resources:
        limits:
          memory: 4G

  mysql:
    networks:
      - qanything-net  # 添加这行
    container_name: mysql # mysql-container-local
    privileged: true
    image: mysql:8.4
    ports:
      - "3316:3306"  # Windows/WSL 用 localhost:3316 访问
    command: --max-connections=10000
    environment:
      - MYSQL_ROOT_PASSWORD=123456
      - MYSQL_DATABASE=qanything
    volumes:
      - ${DOCKER_VOLUME_DIRECTORY:-.}/volumes/mysql:/var/lib/mysql

    healthcheck:
      test: ["CMD", "mysqladmin", "ping", "-u", "root", "-p123456"]
      interval: 5s
      timeout: 3s
      retries: 10
      start_period: 30s

  qanything_local:
    container_name: qanything-container-local
    image: xixihahaliu01/qanything-linux:v1.5.1
    command: /bin/bash -c "sleep 150 && cd /workspace/QAnything && bash scripts/entrypoint.sh"
    privileged: true
    shm_size: '8gb'
    volumes:
      - ${DOCKER_VOLUME_DIRECTORY:-.}/:/workspace/QAnything/
    # 修改
    ports:
      - "8777:8777"  # Windows/WSL 浏览器可直接访问 http://localhost:8777
    # network_mode: "host"
    networks:
      - qanything-net
    healthcheck:
          test: ["CMD", "curl", "-f", "http://localhost:8777/health"]
          interval: 30s
          timeout: 10s
          retries: 5

    environment:
      - NCCL_LAUNCH_MODE=PARALLEL
      - GPUID=${GPUID:-0}
      - USER_IP=${USER_IP:-0.0.0.0}
      - Gateway_IP=${Gateway_IP:-0.0.0.0}

    depends_on:
      milvus: # 修改名字
        condition: service_healthy
      mysql:
        condition: service_healthy
      elasticsearch:
        condition: service_healthy
    tty: true
    stdin_open: true
    # 修改
    deploy:
      resources:
        limits:
          memory: 8G
        reservations:
          memory: 4G

# 修改
networks:
  qanything-net:
    driver: bridge

# networks:
#  default:
#    name: QAnything
5. 分步启动服务
up -d : up 表示启动,-d 表示在后台运行
查看服务名称 docker compose -f docker-compose-linux.yaml config --services
# 先启动基础服务
docker compose -f docker-compose-linux.yaml up -d etcd minio mysql elasticsearch milvus
# 查看服务状态 必须都为(healthy)状态
docker compose -f docker-compose-linux.yaml ps | grep -E "etcd|minio|mysql|elasticsearch|milvus"

查看MySQL运行状态(显示/usr/sbin/mysqld: ready for connections.就是正确的) docker compose -f docker-compose-linux.yaml logs mysql | grep -A 20 "mysqld:"# 检查 MySQL 是否接受连接 docker exec mysql mysqladmin ping -u root -p123456 sleep 180 # 最后启动 QAnything docker compose -f docker-compose-linux.yaml up -d qanything_local # 查看 QAnything 实时日志, ctrl+c 退出 docker compose -f docker-compose-linux.yaml logs -f qanything_local

这个状态就是启动成功 在windows浏览器访问 http://127.0.0.1:8777/qanything
其他命令
停止 QAnything 服务
docker compose -f docker-compose-linux.yaml down qanything_local
重新启动服务
docker compose -f docker-compose-linux.yaml up -d qanything_local
docker 安装curl和 netstat
docker exec qanything-container-local bash -c "apt update && apt install -y curl"
docker exec qanything-container-local apt update
docker exec qanything-container-local apt install -y net-tools
使用 xclip 或 xsel 命令将文件内容复制到剪贴板。
sudo apt install xclip
xclip -sel clip < xx.txt
查看IP地址:ip addr show eth0 | grep inet
# 或者使用hostname命令: hostname -I
如果docker compose -f docker-compose-linux.yaml logs -f qanything_local 显示连接报错,
重新运行服务
1. 先停止所有服务
docker compose -f docker-compose-linux.yaml down -v --remove-orphans
2. 清理 Docker 资源
docker system prune -f
2.1 强制删除问题网络
docker network rm qanything-network || true
3. docker compose -f docker-compose-linux.yaml up -d etcd minio mysql elasticsearch milvus
4. sleep 180
# 最后启动
QAnything
docker compose -f docker-compose-linux.yaml up -d qanything_local
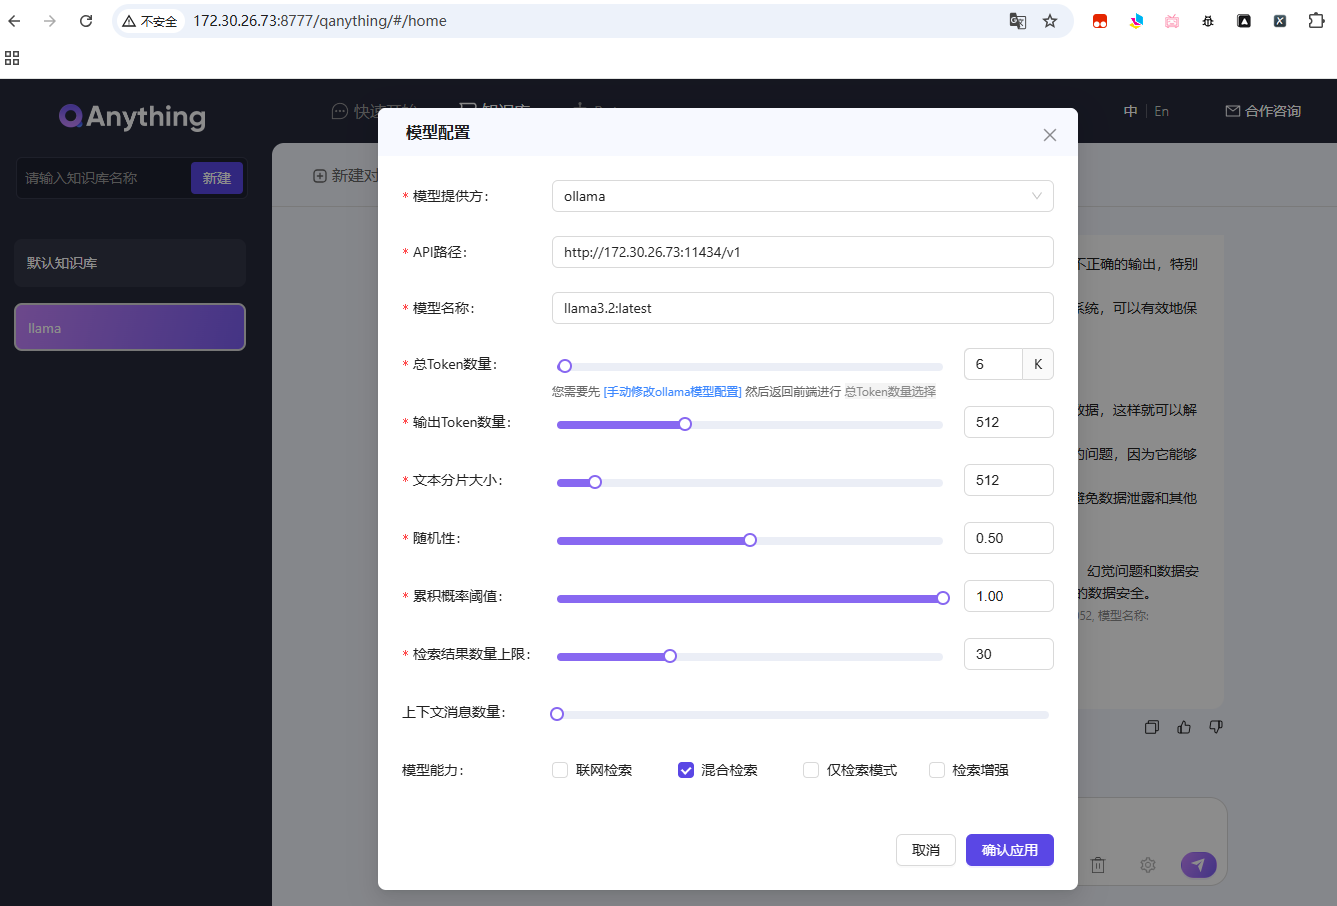
6. 大模型接入
6.1 参考案例 https://blog.csdn.net/qq_37128840/article/details/149196890
step1: docker部署ollama
docker run --gpus all -d -p 11434:11434 --name ollama -v ollama:/root/.ollama ollama/ollama
在浏览器访问http://127.0.0.1:11434
显示Ollama is running则代表安装成功(ip在Ubuntu上用 hostname -I 获取)
step2: ollama下载大模型(选择下载其他模型参考上面的链接)
sudo docker exec ollama ollama run llama3.2
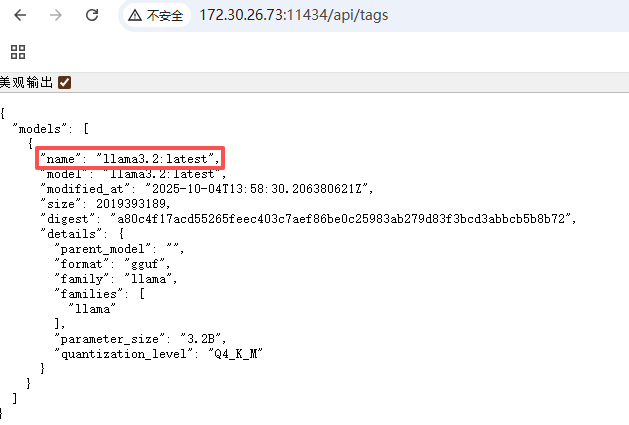
访问 http://127.0.0.1:11434/api/tags 显示当前ollama已下载的大模型
如果http://127.0.0.1:11434/api/tags 没有显示则用一下方式拉取模型
拉取模型
ollama pull llama3.2
查看本机已有模型
ollama list
加载模型
docker exec -it ollama ollama run llama3.2
ctrl+d 退出
测试模型
curl http://127.0.0.1:11434/api/generate -d '{"model":"llama3.2","prompt":"hi","stream":false}'
这里的name在设置模型里面用到
6.2 添加自己的问答文件
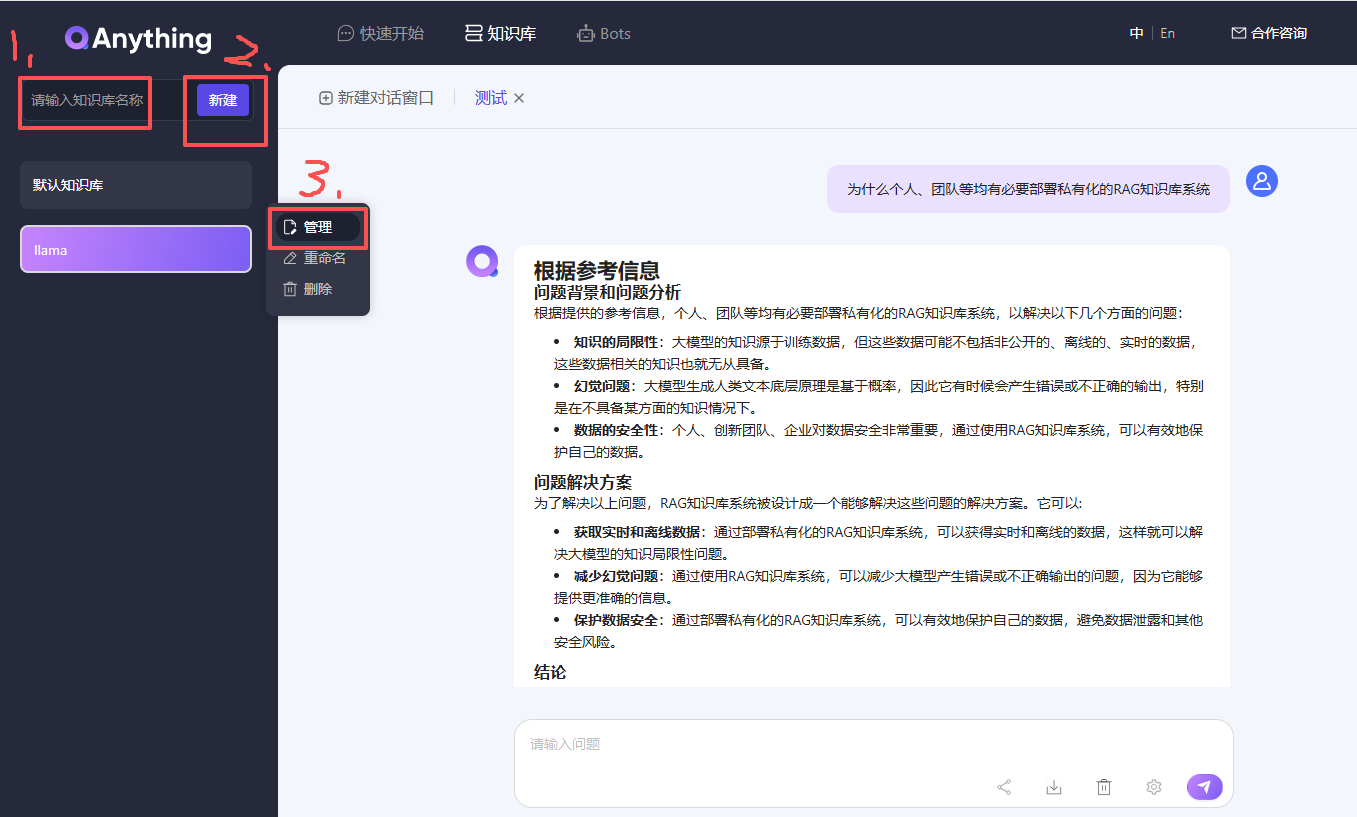
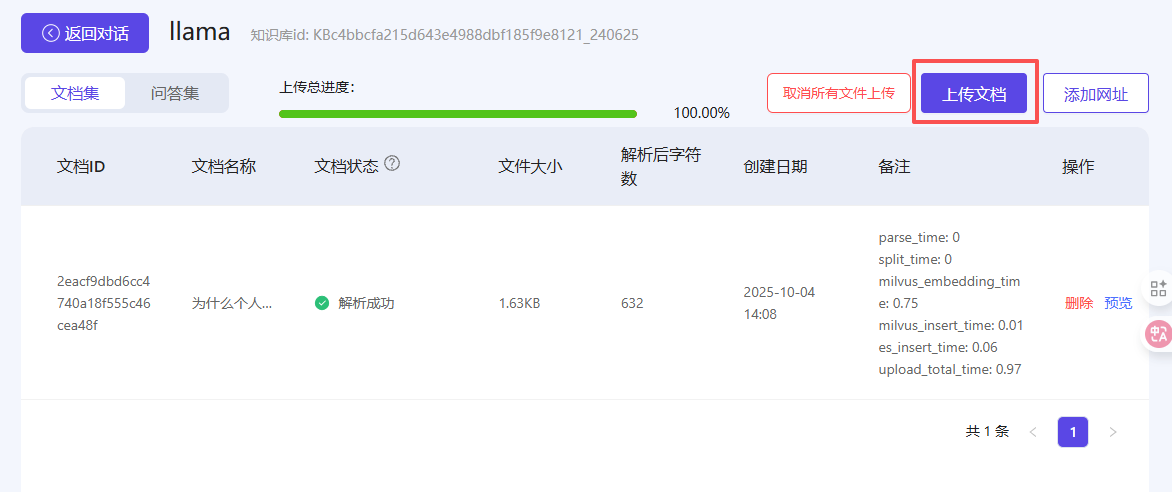
测试文件:为什么个人、团队等均有必要部署私有化的RAG知识库系统.txt
测试文件内容:
自ChatGPT发布以来,大型语言模型(Large Language Model,LLM,大模型)得到了飞速发展,它在解决复杂任务、增强自然语言理解和生成类人文本等方面的能力让人惊叹,几乎各行各业均可从中获益。
然而,在一些垂直领域,这些开源或闭源的通用的基础大模型也暴露了一些问题,主要有以下3个方面:
1. **知识的局限性:** 大模型的知识源于训练数据,目前主流大模型(如:通义千问、文心一言等)的训练数据基本来源于网络公开的数据。因此,非公开的、离线的、实时的数据大模型是无法获取到(如:团队内部实时业务数据、私有的文档资料等),这些数据相关的知识也就无从具备。
2. **幻觉问题:** 大模型生成人类文本底层原理是基于概率(目前还无法证明大模型有意识),所以它有时候会**一本正经地胡说八道**,特别是在不具备某方面的知识情况下。当我们也因缺乏这方面知识而咨询大模型时,大模型的幻觉问题会各我们造成很多困扰,因为我们也无法区分其输出的正确性。
3. **数据的安全性:** 对于个人、创新团队、企业来说,**数据安全**至关重要,老牛同学相信没有谁会愿意承担数据泄露的风险,把自己内部私有数据上传到第三方平台进行模型训练。这是一个矛盾:我们既要借助通用大模型能力,又要保障数据的安全性!
为了解决以上3个大模型通用问题,**检索增强生成**(Retrieval-Augmented Generation,**RAG**)方案就应运而生了!

有“AI”的1024 = 2048,欢迎大家加入2048 AI社区
更多推荐


 21
21 0
0- 0


 已为社区贡献3条内容

所有评论(0)