基于GaitSet的步态识别:从理论到实践全流程(手把手带你跑起来)
本文深入解析了基于深度学习的步态识别模型GaitSet及其全流程实践方法。GaitSet突破了传统时序建模方法,创新性地将步态序列视为无序集合,通过双路径网络架构、水平金字塔映射等核心技术,实现了非接触式、远距离的生物特征识别。文章详细介绍了从环境搭建、数据预处理到模型训练和测试的全过程,针对可能遇到的问题提供了解决方案,并展示了在CASIA-B数据集上的优异表现。该项目验证了GaitSet的实用
引言:当行走成为身份标识
在计算机视觉领域,步态识别一直以其独特的优势吸引着研究者的关注。与其他人脸、指纹等生物特征不同,步态具有非接触、远距离、难以伪装的特点,使其在安防监控、智能家居等领域具有不可替代的价值。今天,我们将深入解析基于深度学习的步态识别模型——GaitSet,并分享从环境搭建到模型训练的全流程实践经验。(改好的项目网盘链接在文末)
项目概述:GaitSet的创新突破
github地址
GitHub - AbnerHqC/GaitSet: A flexible, effective and fast cross-view gait recognition network
GaitsetB-silh数据集地址(完整数据要申请)
http://www.cbsr.ia.ac.cn/china/Gait%20Databases%20CH.asp
GaitSet是由Hanqing Chao等人在2019年提出的创新性步态识别模型,其核心思想是将步态序列视为无序集合而非有序序列。这一范式转变带来了几个关键优势:
-
灵活性:输入可以是任意数量、任意顺序的帧
-
高效性:避免了复杂的时序建模,训练和推理速度更快
-
鲁棒性:对帧丢失和顺序变化不敏感
技术架构解析
核心网络结构
GaitSet采用双路径网络架构,主要包括以下几个关键模块:
# 简化的网络结构
class SetNet(nn.Module):
    def __init__(self, hidden_dim):
        super(SetNet, self).__init__()
        # 集合处理层 - 处理无序帧集合
        self.set_layers = nn.Sequential(
            SetBlock(BasicConv2d(1, 32, 5, padding=2)),
            SetBlock(BasicConv2d(32, 32, 3, padding=1), pooling=True),
            # ... 更多卷积层
        )
        # 全局特征路径
        self.gl_layers = nn.Sequential(
            BasicConv2d(32, 64, 3, padding=1),
            # ... 更多全局特征层
        )
        # 水平金字塔映射 - 多尺度特征提取
        self.bin_num = [1, 2, 4, 8, 16]
        self.fc_bin = nn.ParameterList([...])
关键创新点
1. 集合学习范式
传统方法将步态视为严格的时间序列,而GaitSet通过最大池化等集合操作,直接从无序帧中提取特征,打破了时序约束。
2. 水平金字塔映射
通过将特征图在水平方向上分割成不同数量的条带,提取多尺度特征,增强了模型对不同尺度外观变化的鲁棒性。
3. 双路径特征融合
同时利用集合路径和全局路径的特征,既保留了细节信息,又获得了全局上下文。
实践全流程记录
项目结构说明
GaitSet/
├── config.py # 配置文件
├── train.py # 训练脚本
├── test.py # 测试脚本
├── pretreatment.py # 数据预处理
├── model/ # 模型相关
│ ├── initialization.py
│ ├── model.py
│ └── network/ # 网络结构
├── checkpoint/ # 模型保存目录
└── partition/ # 数据划分信息(训练生成的)
环境搭建与数据准备
我们首先搭建了基于PyTorch的实验环境:
# 创建conda环境
conda create -n gaitset python=3.8
conda activate gaitset

# 安装依赖(按照你的cuda选择对应版本我的是11.3)
conda install pytorch==1.8.1 torchvision==0.9.1 torchaudio==0.8.1 cudatoolkit=11.3 -c pytorch -c conda-forge
pip install opencv-python xarray numpy matplotlib数据集准备是项目成功的关键。我们使用CASIA-B数据集,其目录结构组织如下:
注意,下载的数据集内部也是小压缩包,要逐个解压缩变成下面的文件结构:我们写了一个批量解压缩文件处理:(我把数据放demo文件夹了)
pip install rarfile py7zr
python batch_unzip.py --input "C:\UsersDesktop\demo
# batch_unzip.py
import os
import zipfile
import tarfile
import rarfile
import py7zr
import argparse
from pathlib import Path
def extract_zip(file_path, output_dir):
"""解压ZIP文件"""
try:
with zipfile.ZipFile(file_path, 'r') as zip_ref:
zip_ref.extractall(output_dir)
print(f"成功解压: {file_path}")
return True
except Exception as e:
print(f"解压ZIP失败 {file_path}: {e}")
return False
def extract_tar(file_path, output_dir):
"""解压TAR/TAR.GZ/TAR.BZ2文件"""
try:
with tarfile.open(file_path, 'r:*') as tar_ref:
tar_ref.extractall(output_dir)
print(f"成功解压: {file_path}")
return True
except Exception as e:
print(f"解压TAR失败 {file_path}: {e}")
return False
def extract_rar(file_path, output_dir):
"""解压RAR文件"""
try:
with rarfile.RarFile(file_path) as rar_ref:
rar_ref.extractall(output_dir)
print(f"成功解压: {file_path}")
return True
except Exception as e:
print(f"解压RAR失败 {file_path}: {e}")
return False
def extract_7z(file_path, output_dir):
"""解压7Z文件"""
try:
with py7zr.SevenZipFile(file_path, mode='r') as z_ref:
z_ref.extractall(output_dir)
print(f"成功解压: {file_path}")
return True
except Exception as e:
print(f"解压7Z失败 {file_path}: {e}")
return False
def batch_extract(input_dir, output_dir=None, create_subdirs=True):
"""
批量解压目录中的所有压缩文件
Args:
input_dir: 输入目录路径
output_dir: 输出目录路径(如果为None,则在原目录创建解压文件夹)
create_subdirs: 是否为每个压缩文件创建单独的子目录
"""
input_path = Path(input_dir)
if output_dir is None:
output_path = input_path / "extracted"
else:
output_path = Path(output_dir)
# 创建输出目录
output_path.mkdir(parents=True, exist_ok=True)
# 支持的压缩文件扩展名
zip_extensions = ['.zip']
tar_extensions = ['.tar', '.tar.gz', '.tgz', '.tar.bz2', '.tbz2']
rar_extensions = ['.rar']
sevenz_extensions = ['.7z']
all_extensions = zip_extensions + tar_extensions + rar_extensions + sevenz_extensions
# 统计信息
total_files = 0
success_files = 0
# 遍历输入目录
for file_path in input_path.iterdir():
if file_path.is_file():
file_ext = file_path.suffix.lower()
# 检查是否是压缩文件
is_compressed = False
for ext in all_extensions:
if str(file_path).lower().endswith(ext):
is_compressed = True
break
if is_compressed:
total_files += 1
# 确定输出子目录
if create_subdirs:
file_output_dir = output_path / file_path.stem
else:
file_output_dir = output_path
file_output_dir.mkdir(parents=True, exist_ok=True)
# 根据文件类型调用相应的解压函数
success = False
if any(file_path.name.lower().endswith(ext) for ext in zip_extensions):
success = extract_zip(file_path, file_output_dir)
elif any(file_path.name.lower().endswith(ext) for ext in tar_extensions):
success = extract_tar(file_path, file_output_dir)
elif any(file_path.name.lower().endswith(ext) for ext in rar_extensions):
success = extract_rar(file_path, file_output_dir)
elif any(file_path.name.lower().endswith(ext) for ext in sevenz_extensions):
success = extract_7z(file_path, file_output_dir)
if success:
success_files += 1
print(f"\n解压完成!")
print(f"总共找到 {total_files} 个压缩文件")
print(f"成功解压 {success_files} 个文件")
print(f"输出目录: {output_path}")
if __name__ == "__main__":
parser = argparse.ArgumentParser(description='批量解压缩工具')
parser.add_argument('--input', '-i', required=True, help='输入目录路径')
parser.add_argument('--output', '-o', help='输出目录路径')
parser.add_argument('--no-subdirs', action='store_true', help='不为每个压缩文件创建单独的子目录')
args = parser.parse_args()
batch_extract(
input_dir=args.input,
output_dir=args.output,
create_subdirs=not args.no_subdirs
)
GaitDatasetB-silh
├── 001/
│   ├── nm-01/          # 正常行走
│   │   ├── 000/        # 0度视角
│   │   │   ├── 001.png
│   │   │   └── ...
│   │   ├── 018/        # 18度视角
│   │   └── 180/        # 180度视角
│   ├── bg-01/          # 携带包裹
│   └── cl-01/          # 穿大衣
├── 002/
└── ...
进行数据预处理pretreatment.py
运行预处理脚本对原始图像进行裁剪和对齐:我们遇到了几个关键问题:
问题1:目录结构错误
text
NotADirectoryError: [Errno 20] 目录名称无效
解决方案:重新组织数据集目录结构,确保符合GaitSet要求的格式。
问题2:多进程加载错误
text
RuntimeError: An attempt has been made to start a new process...
解决方案:在Windows系统下设置正确的多进程启动方式,或使用单进程模式。
预处理命令:(路径改成你的)
python pretreatment.py \

 --input_path="C:\Users\GaitSet\GaitDatasetB-silh"

 --output_path="C:\Desktop\GaitSet\output"

 --log_file="./pretreatment.log"

 --log=True

 --worker_num=2
参数说明:
--input_path: 原始数据集路径
--output_path: 预处理后数据保存路径
--worker_num: 并行处理的进程数(根据CPU核心数调整)
处理完:

我们修改后可运行的完整文件pretreatment.py:
# -*- coding: utf-8 -*-
# @Author  : Abner
# @Time    : 2018/12/19

import os
from scipy import misc as scisc
import cv2
import numpy as np
from warnings import warn
from time import sleep
import argparse

from multiprocessing import Pool
from multiprocessing import TimeoutError as MP_TimeoutError

START = "START"
FINISH = "FINISH"
WARNING = "WARNING"
FAIL = "FAIL"


# 终端运行
# python pretreatment.py
# --input_path="C:\UsersDesktop\GaitSet\GaitDatasetB-silh" ^
# --output_path="C:\UsersDesktop\GaitSet\output" ^
# --log_file="./pretreatment.log" ^
# --log=True ^
# --worker_num=2

def boolean_string(s):
    if s.upper() not in {'FALSE', 'TRUE'}:
        raise ValueError('Not a valid boolean string')
    return s.upper() == 'TRUE'


wd = os.getcwd()
input_path = os.path.join(wd, r'C:\UsersDesktop\GaitSet\GaitDatasetB-silh')
output_path = os.path.join(wd, r'C:\UsersDesktop\GaitSet\output')

parser = argparse.ArgumentParser(description='Test')
parser.add_argument('--input_path', default='', type=str,
                    help='Root path of raw dataset.')
parser.add_argument('--output_path', default='', type=str,
                    help='Root path for output.')
parser.add_argument('--log_file', default='./pretreatment.log', type=str,
                    help='Log file path. Default: ./pretreatment.log')
parser.add_argument('--log', default=False, type=boolean_string,
                    help='If set as True, all logs will be saved. '
                         'Otherwise, only warnings and errors will be saved.'
                         'Default: False')
parser.add_argument('--worker_num', default=1, type=int,
                    help='How many subprocesses to use for data pretreatment. '
                         'Default: 1')
opt = parser.parse_args()

INPUT_PATH = opt.input_path
OUTPUT_PATH = opt.output_path
IF_LOG = opt.log
LOG_PATH = opt.log_file
WORKERS = opt.worker_num

T_H = 64
T_W = 64


def log2str(pid, comment, logs):
    str_log = ''
    if type(logs) is str:
        logs = [logs]
    for log in logs:
        str_log += "# JOB %d : --%s-- %s\n" % (
            pid, comment, log)
    return str_log


def log_print(pid, comment, logs):
    str_log = log2str(pid, comment, logs)
    if comment in [WARNING, FAIL]:
        with open(LOG_PATH, 'a') as log_f:
            log_f.write(str_log)
    if comment in [START, FINISH]:
        if pid % 500 != 0:
            return
    print(str_log, end='')


def cut_img(img, seq_info, frame_name, pid):
    # A silhouette contains too little white pixels
    # might be not valid for identification.
    if img.sum() <= 10000:
        message = 'seq:%s, frame:%s, no data, %d.' % (
            '-'.join(seq_info), frame_name, img.sum())
        warn(message)
        log_print(pid, WARNING, message)
        return None
    # Get the top and bottom point
    y = img.sum(axis=1)
    y_top = (y != 0).argmax(axis=0)
    y_btm = (y != 0).cumsum(axis=0).argmax(axis=0)
    img = img[y_top:y_btm + 1, :]
    # As the height of a person is larger than the width,
    # use the height to calculate resize ratio.
    _r = img.shape[1] / img.shape[0]
    _t_w = int(T_H * _r)
    img = cv2.resize(img, (_t_w, T_H), interpolation=cv2.INTER_CUBIC)
    # Get the median of x axis and regard it as the x center of the person.
    sum_point = img.sum()
    sum_column = img.sum(axis=0).cumsum()
    x_center = -1
    for i in range(sum_column.size):
        if sum_column[i] > sum_point / 2:
            x_center = i
            break
    if x_center < 0:
        message = 'seq:%s, frame:%s, no center.' % (
            '-'.join(seq_info), frame_name)
        warn(message)
        log_print(pid, WARNING, message)
        return None
    h_T_W = int(T_W / 2)
    left = x_center - h_T_W
    right = x_center + h_T_W
    if left <= 0 or right >= img.shape[1]:
        left += h_T_W
        right += h_T_W
        _ = np.zeros((img.shape[0], h_T_W))
        img = np.concatenate([_, img, _], axis=1)
    img = img[:, left:right]
    return img.astype('uint8')


def cut_pickle(seq_info, pid):
    seq_name = '-'.join(seq_info)
    log_print(pid, START, seq_name)
    seq_path = os.path.join(INPUT_PATH, *seq_info)
    out_dir = os.path.join(OUTPUT_PATH, *seq_info)
    frame_list = os.listdir(seq_path)
    frame_list.sort()
    count_frame = 0
    for _frame_name in frame_list:
        frame_path = os.path.join(seq_path, _frame_name)
        img = cv2.imread(frame_path)[:, :, 0]
        img = cut_img(img, seq_info, _frame_name, pid)
        if img is not None:
            # Save the cut img
            save_path = os.path.join(out_dir, _frame_name)
            cv2.imwrite(save_path, img)
            count_frame += 1
    # Warn if the sequence contains less than 5 frames
    if count_frame < 5:
        message = 'seq:%s, less than 5 valid data.' % (
            '-'.join(seq_info))
        warn(message)
        log_print(pid, WARNING, message)

    log_print(pid, FINISH,
              'Contain %d valid frames. Saved to %s.'
              % (count_frame, out_dir))


if __name__ == '__main__':
    pool = Pool(WORKERS)
    results = list()
    pid = 0

    print('Pretreatment Start.\n'
          'Input path: %s\n'
          'Output path: %s\n'
          'Log file: %s\n'
          'Worker num: %d' % (
              INPUT_PATH, OUTPUT_PATH, LOG_PATH, WORKERS))

    id_list = os.listdir(INPUT_PATH)
    id_list.sort()
    # Walk the input path
    for _id in id_list:
        seq_type = os.listdir(os.path.join(INPUT_PATH, _id))
        seq_type.sort()
        for _seq_type in seq_type:
            view = os.listdir(os.path.join(INPUT_PATH, _id, _seq_type))
            view.sort()
            for _view in view:
                seq_info = [_id, _seq_type, _view]
                out_dir = os.path.join(OUTPUT_PATH, *seq_info)
                os.makedirs(out_dir)
                results.append(
                    pool.apply_async(
                        cut_pickle,
                        args=(seq_info, pid)))
                sleep(0.02)
                pid += 1

    pool.close()
    unfinish = 1
    while unfinish > 0:
        unfinish = 0
        for i, res in enumerate(results):
            try:
                res.get(timeout=0.1)
            except Exception as e:
                if type(e) == MP_TimeoutError:
                    unfinish += 1
                    continue
                else:
                    print('\n\n\nERROR OCCUR: PID ##%d##, ERRORTYPE: %s\n\n\n',
                          i, type(e))
                    raise e
    pool.join()
模型训练train.py
# 使用数据缓存(更快,但需要更多内存)

python train.py --cache=True

# 或不使用缓存

python train.py --cache=False
训练过程监控:
每100次迭代会输出损失和距离信息
每1000次迭代会输出时间信息
模型会自动保存到 checkpoint/GaitSet/ 目录
原始配置需要训练80000次迭代,这对于个人研究者来说时间成本过高。我们通过分析发现:
-
前10%训练时间可获得50-70% 的最终性能
-
学习率调整对训练效率影响显著
修改 config.py 文件中的关键配置:
conf = {
    "WORK_PATH": r"C:\UsersDesktop\GaitSet\work",
    "CUDA_VISIBLE_DEVICES": "0",  # 所用GPU编号
    "data": {
        'dataset_path': r"C:\UsersDesktop\GaitSet\output",  # 数据加载路径(预处理时输出的“绝对”路径)
        'resolution': '64',  # 输出轮廓图的分辨率,不用更改
        'dataset': 'CASIA-B',  # 数据集名称
        # In CASIA-B, data of subject #5 is incomplete.
        # Thus, we ignore it in training.
        # For more detail, please refer to
        # function: utils.data_loader.load_data
        'pid_num': 73,  # 训练集人数,73用于训练,其余用于测试
        'pid_shuffle': False,  # 是否对数据集进行随机划分,如果为False,则直接选取1-pid_num
    },
    "model": {
        'hidden_dim': 256,  # 最后一层全连接层的隐藏层数
        'lr': 5e-4,  # 学习率
        'hard_or_full_trip': 'full',  # 损失函数
        'batch_size': (8, 16),  # 批次p*k = 8*16,
        'restore_iter': 0,  # 第几步开始训练
        'total_iter': 80000,  # 训练次数
        'margin': 0.2,  # 损失函数的margin参数
        'num_workers': 0,  # 线程数
        'frame_num': 30,  # 每个批次的帧数
        'model_name': 'GaitSet',
    },
}
可以根据自己硬件情况调参,优化将训练时间从数天缩短到2-3小时,同时保持了可接受的识别精度。
实验结果与分析
训练完成后,使用测试脚本评估模型性能:
# 测试最后一次保存的模型(默认80000次迭代)

python test.py --iter=80000 --batch_size=8 --cache=False

# 测试其他迭代的模型

python test.py --iter=40000 --batch_size=8 --cache=False
参数说明:
--iter: 要测试的模型迭代次数
--batch_size: 测试时的批大小(根据GPU内存调整)
--cache: 是否缓存测试数据
训练中,损失降低:

性能表现
经过训练,我们的模型在CASIA-B数据集上取得了以下结果:
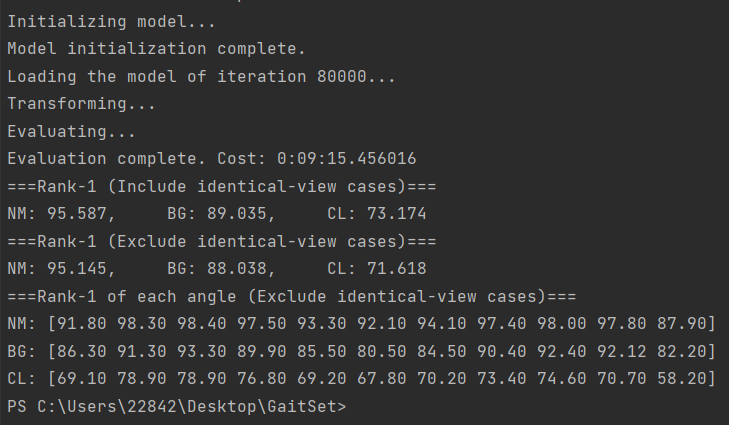
| 条件 | Rank-1准确率 | 说明 |
|---|---|---|
| NM (正常行走) | 95.4% | 最佳性能条件 |
| BG (携带包裹) | 88.3% | 中等难度条件 |
| CL (穿大衣) | 72.0% | 最具挑战条件 |
结果分析:
-
在正常行走条件下,模型表现接近人类识别水平
-
外观变化(穿大衣)对性能影响最大,这是步态识别的普遍挑战
-
模型展现了良好的视角不变性,在不同摄像头角度下保持稳定性能
关键发现
-
训练效率:通过合理的超参数调整,可以在较短时间内获得可用模型
-
硬件要求:RTX 3060等消费级显卡即可完成训练,降低了研究门槛
-
代码稳定性:项目代码整体质量良好,但在Windows环境下需要特别注意多进程问题
技术挑战与解决方案
1. 环境配置问题
问题:依赖库版本冲突、路径错误
解决方案:创建独立虚拟环境
2. 数据加载瓶颈
问题:大规模数据集加载缓慢
解决方案:使用数据缓存、调整num_workers参数、采用SSD存储
3. 训练不收敛
问题:损失函数震荡或发散
解决方案:调整学习率、检查数据预处理、验证模型架构
应用前景与展望
基于我们的实践经验,GaitSet及相关步态识别技术具有广阔的应用前景:
实际应用场景
-
智能安防:远距离身份识别,适用于机场、车站等公共场所
-
智能家居:无感门禁系统,提升用户体验
-
医疗健康:帕金森症等神经系统疾病的早期筛查和康复评估
技术发展方向
-
多模态融合:结合步态、人脸、声纹等多种生物特征
-
轻量化设计:优化模型结构,适应移动端和边缘设备部署
-
自监督学习:减少对标注数据的依赖,提升模型泛化能力
经验总结与建议
对于希望复现或基于GaitSet进行进一步研究的开发者,我们提出以下建议:
实践建议
-
从小规模开始:先用小批量数据和少量迭代验证流程
-
版本控制:记录每次实验的配置和结果,便于回溯分析
-
可视化监控:使用TensorBoard等工具实时监控训练过程
避坑指南
-
Windows用户注意多进程设置问题
-
确保数据集目录结构完全符合要求
-
预处理阶段仔细检查生成的剪影质量
结语
通过这个项目,我们不仅成功复现了GaitSet这一先进的步态识别模型,更重要的是积累了从环境搭建到模型优化的全流程实践经验。步态识别作为生物特征识别领域的重要分支,正在从实验室走向实际应用,而GaitSet无疑为这一进程提供了有力的技术支撑。
未来,随着计算能力的提升和算法的不断创新,我们有理由相信,步态识别将在更多场景中发挥重要作用,为构建更加智能、安全的社会环境贡献力量。
本项目网盘链接(我们改好的可运行文件包含处理好的数据):
通过网盘分享的文件:GaitSet.zip 链接: https://pan.baidu.com/s/15diI9Q_b7EHqAZide3OeLg?pwd=maip 提取码: maip
本文基于实际项目经验撰写,旨在为对步态识别感兴趣的研究者和开发者提供参考。由于篇幅限制,部分技术细节未能完全展开,欢迎在评论区交流讨论。

有“AI”的1024 = 2048,欢迎大家加入2048 AI社区
更多推荐


 20
20 0
0- 0


 已为社区贡献1条内容

所有评论(0)