【玩转树莓派CM0】写出你的OLED-AI助手
一、项目简介
本项目实现了在 Raspberry Pi Compute Module 0 (CM0) 上调用 火山引擎豆包大模型(Ark 平台) 的文本生成功能,并将生成的诗句显示到 0.96 英寸 SSD1306 OLED 屏幕(I²C 接口) 上。
该项目涵盖:
-
云端 AI 调用;
-
虚拟环境搭建;
-
I²C 屏幕驱动;
-
错误调试;
-
远程开发部署。
二、硬件环境
| 硬件 | 说明 |
|---|---|
| 主控板 | Raspberry Pi Compute Module 0 (CM0) |
| 显示屏 | OLED 0.96英寸,SSD1306 驱动,I²C 接口 |
| 接口 | SDA、SCL 接 Raspberry Pi I²C |
| 网络 | 以太网或 USB Wi-Fi(需联网) |
⚠️ 注意:部分系统或
Adafruit_Blinka库会自动识别为 CM1,这是正常现象,不影响功能。
我们仍在代码中声明实际板型为 CM0 以保持一致。export BLINKA_FORCEBOARD=RASPBERRY_PI_CM1
三、软件环境
| 组件 | 版本或描述 |
|---|---|
| 系统 | Linux Buildroot / Raspberry Pi OS Lite |
| Python | 3.7+(本项目使用 3.13) |
| Pip | 已安装 |
| 虚拟环境 | venv |
| SDK | volcengine-python-sdk[ark] |
| OLED 驱动 | adafruit-circuitpython-ssd1306 |
| 图形库 | Pillow |
| 硬件抽象层 | adafruit-blinka |
四、环境搭建步骤
1. 创建 Python 虚拟环境
cd ~/Desktop/workspace
python3 -m venv venv
source venv/bin/activate
2. 安装依赖(使用国内镜像)
pip install -i https://pypi.tuna.tsinghua.edu.cn/simple --upgrade "volcengine-python-sdk[ark]"
pip install -i https://pypi.tuna.tsinghua.edu.cn/simple adafruit-circuitpython-ssd1306 pillow adafruit-blinka
3. 配置 API Key
export ARK_API_KEY="你的火山引擎API密钥"
建议把这行加入
~/.bashrc,让系统开机自动加载。
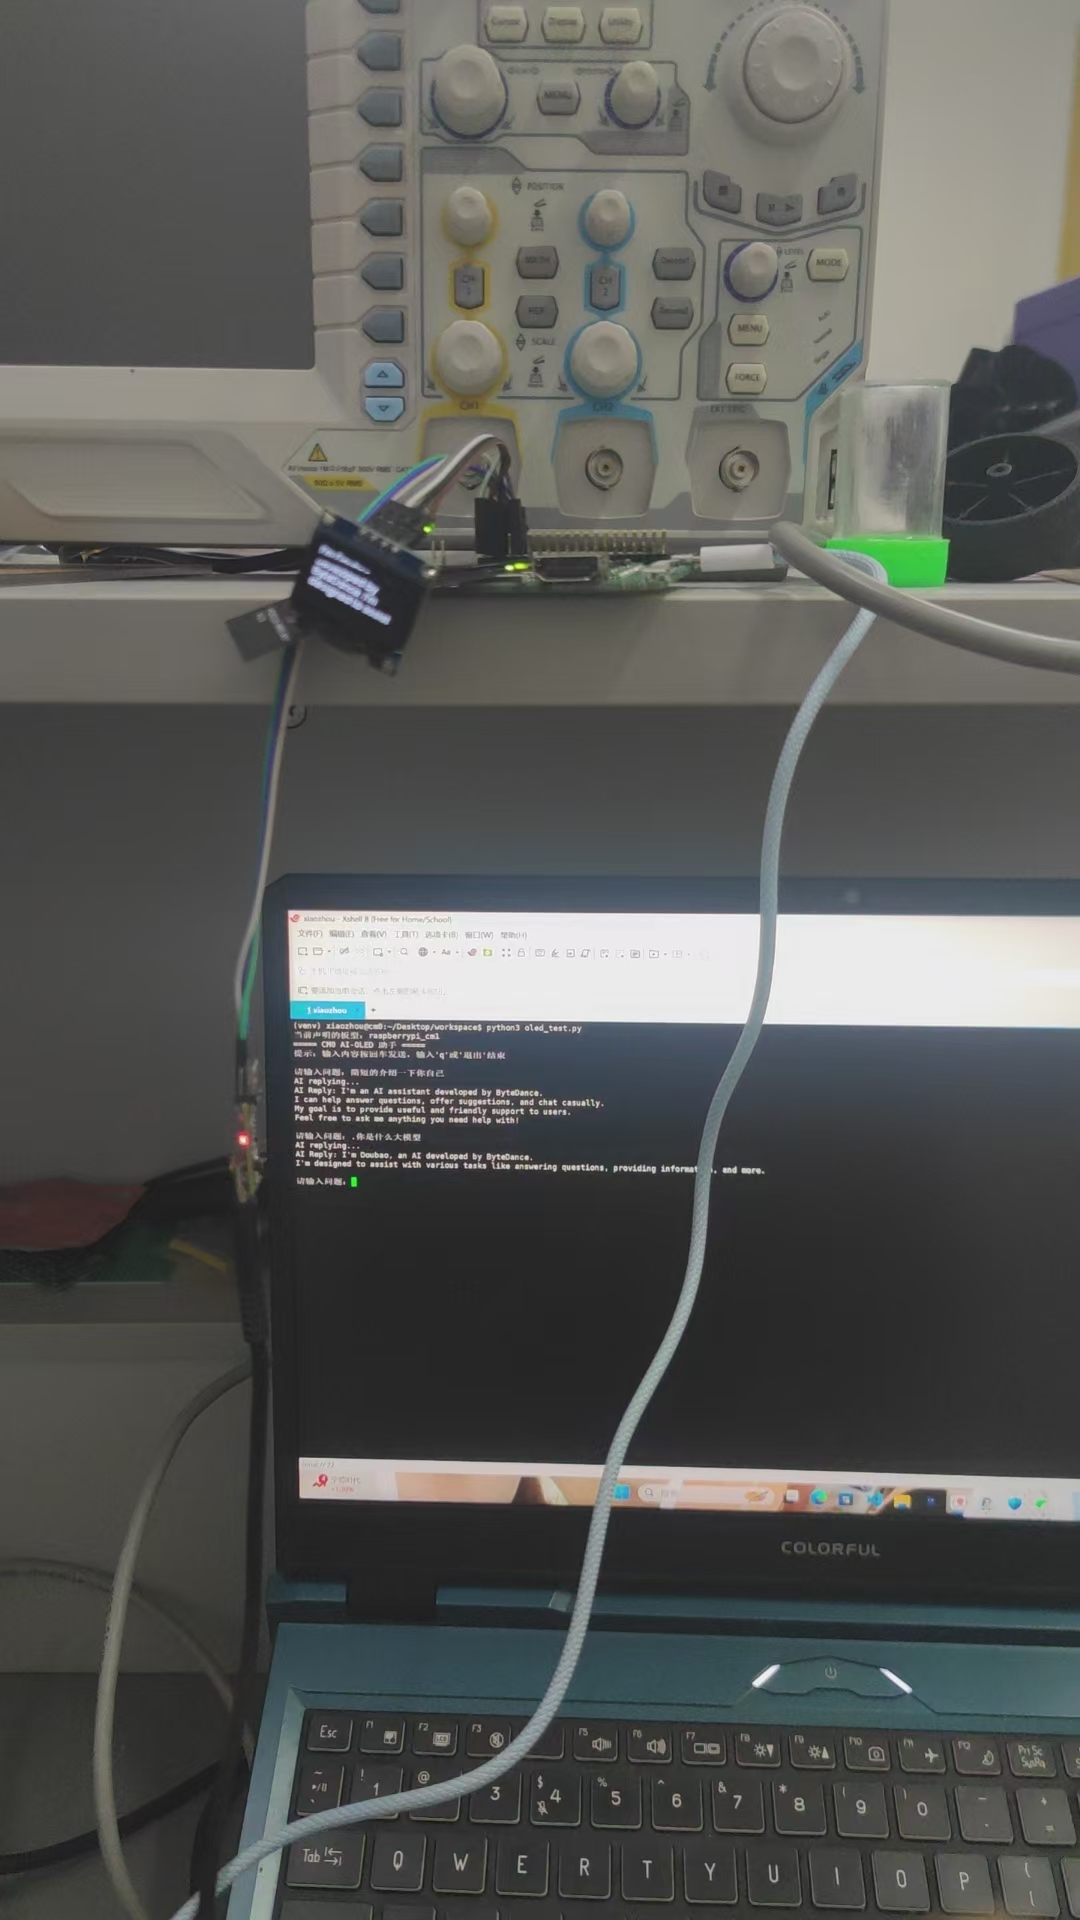
五、开发与远程调试
1. 通过 VS Code Remote-SSH 连接
-
安装插件:
Remote - SSH -
连接开发板:
ssh xiaozhou@<树莓派IP> -
进入工作目录:
~/Desktop/workspace -
激活虚拟环境后执行:
python3 oled_test.py
🧠 技巧:可在
/etc/ssh/ssh_config或 Windows~/.ssh/config中保存密码实现自动登录。
六、AI 调用与 OLED 显示代码
# -*- coding: utf-8 -*-
import os
import time
import board
import busio
from PIL import Image, ImageDraw, ImageFont
import adafruit_ssd1306
from volcenginesdkarkruntime import Ark

# ==============================
# OLED初始化(适配CM0的I2C总线)
# ==============================
def init_oled():
    WIDTH = 128
    HEIGHT = 64
    I2C_ADDR = 0x3C  # 你的OLED地址
    I2C_BUS = 1  # 树莓派CM1的I2C默认总线为1(与物理引脚SDA=2, SCL=3对应)

    try:
        # 初始化CM0的I2C总线
        i2c = busio.I2C(board.SCL, board.SDA)  # 自动映射到CM1的I2C引脚
        oled = adafruit_ssd1306.SSD1306_I2C(WIDTH, HEIGHT, i2c, addr=I2C_ADDR)
        oled.fill(0)
        oled.show()
        image = Image.new("1", (WIDTH, HEIGHT))
        draw = ImageDraw.Draw(image)
        font = ImageFont.load_default(size=12)  # 英文默认字体
        return oled, image, draw, font
    except Exception as e:
        print(f"OLED初始化失败:{e}")
        return None, None, None, None

# ==============================
# OLED显示函数(英文适配)
# ==============================
def display_on_oled(oled, image, draw, font, text):
    if not all([oled, image, draw, font]):
        return

    oled.fill(0)
    draw.rectangle((0, 0, oled.width, oled.height), outline=0, fill=0)

    line_height = 14
    max_width = oled.width - 4
    lines = []
    words = text.split()
    current_line = ""
    for word in words:
        if draw.textlength(f"{current_line} {word}", font=font) < max_width:
            current_line = f"{current_line} {word}".strip()
        else:
            lines.append(current_line)
            current_line = word
    if current_line:
        lines.append(current_line)

    y = 0
    for line in lines[:4]:  # 0.96寸最多显示4行
        draw.text((2, y), line, font=font, fill=255)
        y += line_height

    oled.image(image)
    oled.show()

# ==============================
# AI客户端与回复处理
# ==============================
def init_ai_client():
    try:
        return Ark(
            base_url="https://ark.cn-beijing.volces.com/api/v3",
            api_key=os.environ.get("ARK_API_KEY")
        )
    except Exception as e:
        print(f"AI客户端初始化失败:{e}")
        return None

def get_ai_reply(ai_client, model_id, user_input):
    try:
        prompt = f"User's question: {user_input}\nReply ONLY in English, concise (max 4 lines)."
        completion = ai_client.chat.completions.create(
            model=model_id,
            messages=[{"role": "user", "content": [{"type": "text", "text": prompt}]}]
        )
        content = completion.choices[0].message.content
        return content[0]["text"].strip() if (isinstance(content, list) and len(content) > 0 and "text" in content[0]) else str(content).strip()
    except Exception as e:
        return f"Error: {str(e)[:15]}"

# ==============================
# 主逻辑
# ==============================
if __name__ == "__main__":
    # 打印板型声明信息(验证是否生效)
    print(f"当前声明的板型:{os.environ.get('BLINKA_BOARD')}")

    oled, image, draw, font = init_oled()
    ai_client = init_ai_client()
    model_id = "doubao-seed-1-6-251015"  # 替换为你的模型ID

    if not ai_client:
        print("AI客户端初始化失败,程序退出")
        exit(1)
    if not oled:
        print("OLED初始化失败,仅命令行模式运行")

    print("===== CM0 AI-OLED 助手 =====")
    print("提示:输入内容按回车发送,输入'q'或'退出'结束")
    if oled:
        display_on_oled(oled, image, draw, font, "RPi CM0 Ready")
        time.sleep(2)

    try:
        while True:
            user_input = input("\n请输入问题:").strip()

            if user_input.lower() in ["q", "退出"]:
                print("对话结束")
                if oled:
                    display_on_oled(oled, image, draw, font, "Bye!")
                    time.sleep(2)
                    oled.fill(0)
                    oled.show()
                break

            if not user_input:
                print("输入不能为空")
                if oled:
                    display_on_oled(oled, image, draw, font, "No empty input")
                    time.sleep(1.5)
                continue

            print("AI replying...")
            if oled:
                display_on_oled(oled, image, draw, font, "Thinking...")
                time.sleep(0.5)

            ai_reply = get_ai_reply(ai_client, model_id, user_input)
            print(f"AI Reply: {ai_reply}")
            if oled:
                display_on_oled(oled, image, draw, font, ai_reply)

            time.sleep(5)

    except KeyboardInterrupt:
        print("\n程序中断")
        if oled:
            oled.fill(0)
            oled.show()
    except Exception as e:
        print(f"错误:{e}")
        if oled:
            display_on_oled(oled, image, draw, font, "Error")
            time.sleep(3)
            oled.fill(0)
            oled.show()
七、运行项目
source venv/bin/activate
python3 oled_ai_display.py
屏幕显示示例:
星落满肩时,
夜便有了重量。
八、调试与问题记录
1️⃣ 模块缺失错误
报错:
ModuleNotFoundError: No module named 'httpx'
解决:
pip install httpx
2️⃣ IndentationError(缩进错误)
原因: Python 中 for 循环后未缩进。
解决: 检查所有 for / if / try 语句后的缩进对齐。
3️⃣ InternalServerError (500)
报错:
volcenginesdkarkruntime._exceptions.ArkInternalServerError: Error code: 500
原因: 火山引擎模型端短时异常。
解决: 稍后重试,或更换模型 ID。
4️⃣ OLED 无显示
排查步骤:
-
检查 I²C 地址是否为
0x3C; -
执行
i2cdetect -y 1确认屏幕是否被识别; -
确认电源与地线连接正确。
5️⃣ Remote-SSH 登录繁琐
解决方案:
在 Windows/Linux 的 SSH 配置中保存:
Host cm0
    HostName 192.168.x.x
    User xiaozhou
    IdentityFile ~/.ssh/id_rsa
然后直接执行:
ssh cm0
6️⃣ pip 下载缓慢
解决: 使用清华镜像:
pip install -i https://pypi.tuna.tsinghua.edu.cn/simple 包名
7️⃣ API Key 读取为空
现象:
api_key=os.environ.get("ARK_API_KEY") 返回 None
解决:
手动导出或添加到 .bashrc:
export ARK_API_KEY="xxxxxxxx"
source ~/.bashrc
九、运行效果与扩展方向
| 功能 | 状态 |
|---|---|
| AI 文本生成 | ✅ 正常 |
| OLED 显示 | ✅ 正常 |
| 网络访问 | ✅ Ping 通 |
| Remote-SSH 调试 | ✅ 支持 |
| 文生图 / 图生文 | 🔜 可扩展 |
扩展建议:
-
定时刷新新诗句;
-
加入语音输入模块;
-
在 OLED 上滚动长文本;
-
增加按键交互触发 AI 对话。
十、总结
本项目成功实现了在 树莓派 CM0 上使用 火山引擎豆包 AI 进行自然语言生成,并通过 OLED 屏幕 实时显示结果。

有“AI”的1024 = 2048,欢迎大家加入2048 AI社区
更多推荐


 22
22 0
0- 0


 已为社区贡献3条内容

所有评论(0)