Open-webui
然后,将这些检索到的信息与原始问题一起输入到一个大型语言模型中,由该模型生成最终的、更具信息量和上下文相关性的答案。分块的大小和策略对后续检索效果有重要影响。将原始的用户问题和检索到的上下文信息整合成一个新的、增强的提示 (augmented prompt)。LLM 利用其强大的理解和生成能力,结合提供的上下文信息,生成一个更加准确、相关和详细的答案。将预处理后的文本块通过一个预训练的语言模型(例
code execution
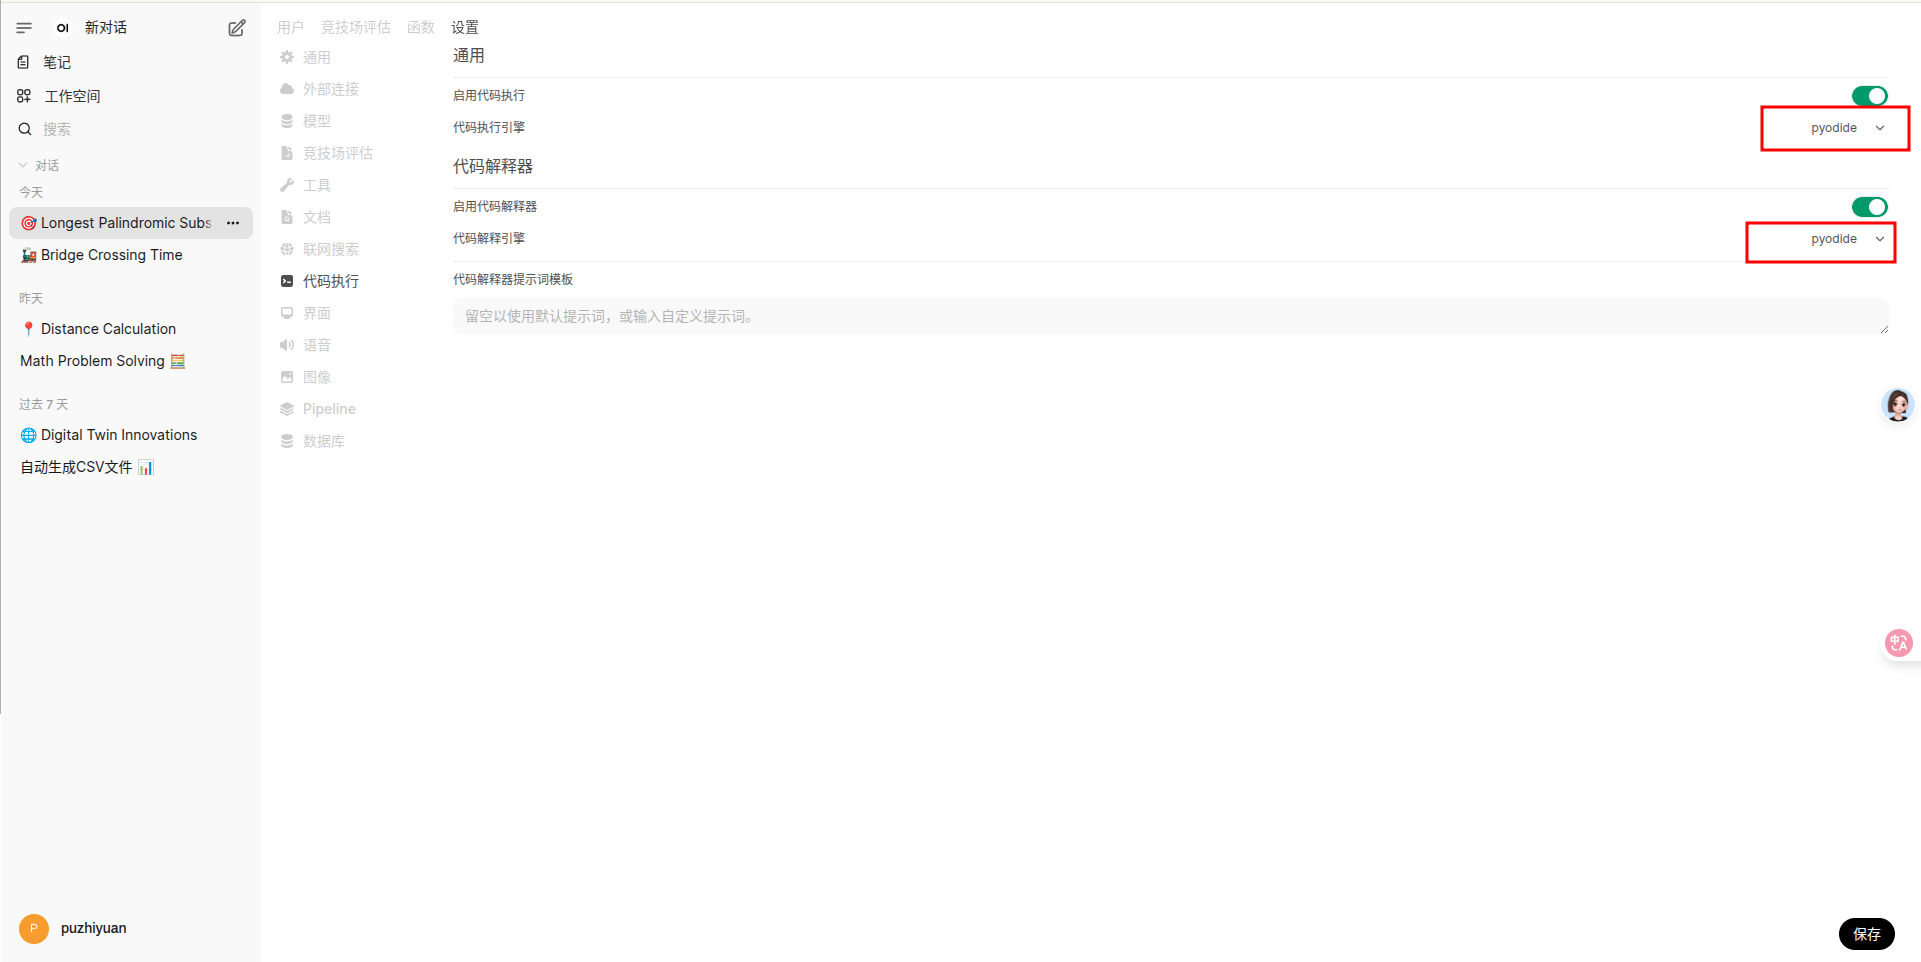
在 OpenWebUI 中,代码执行是通过集成 Pyodide 和本地 Python 服务来实现的。
settings
- 使用集成的 Pyodide ,开启代码执行和代码解释,选择 Pyodide。
Pyodide 是一个 将 Python 解释器编译为 WebAssembly(WASM) 的项目,使你可以 在浏览器中直接运行 Python 代码,并与 JavaScript 无缝交互。
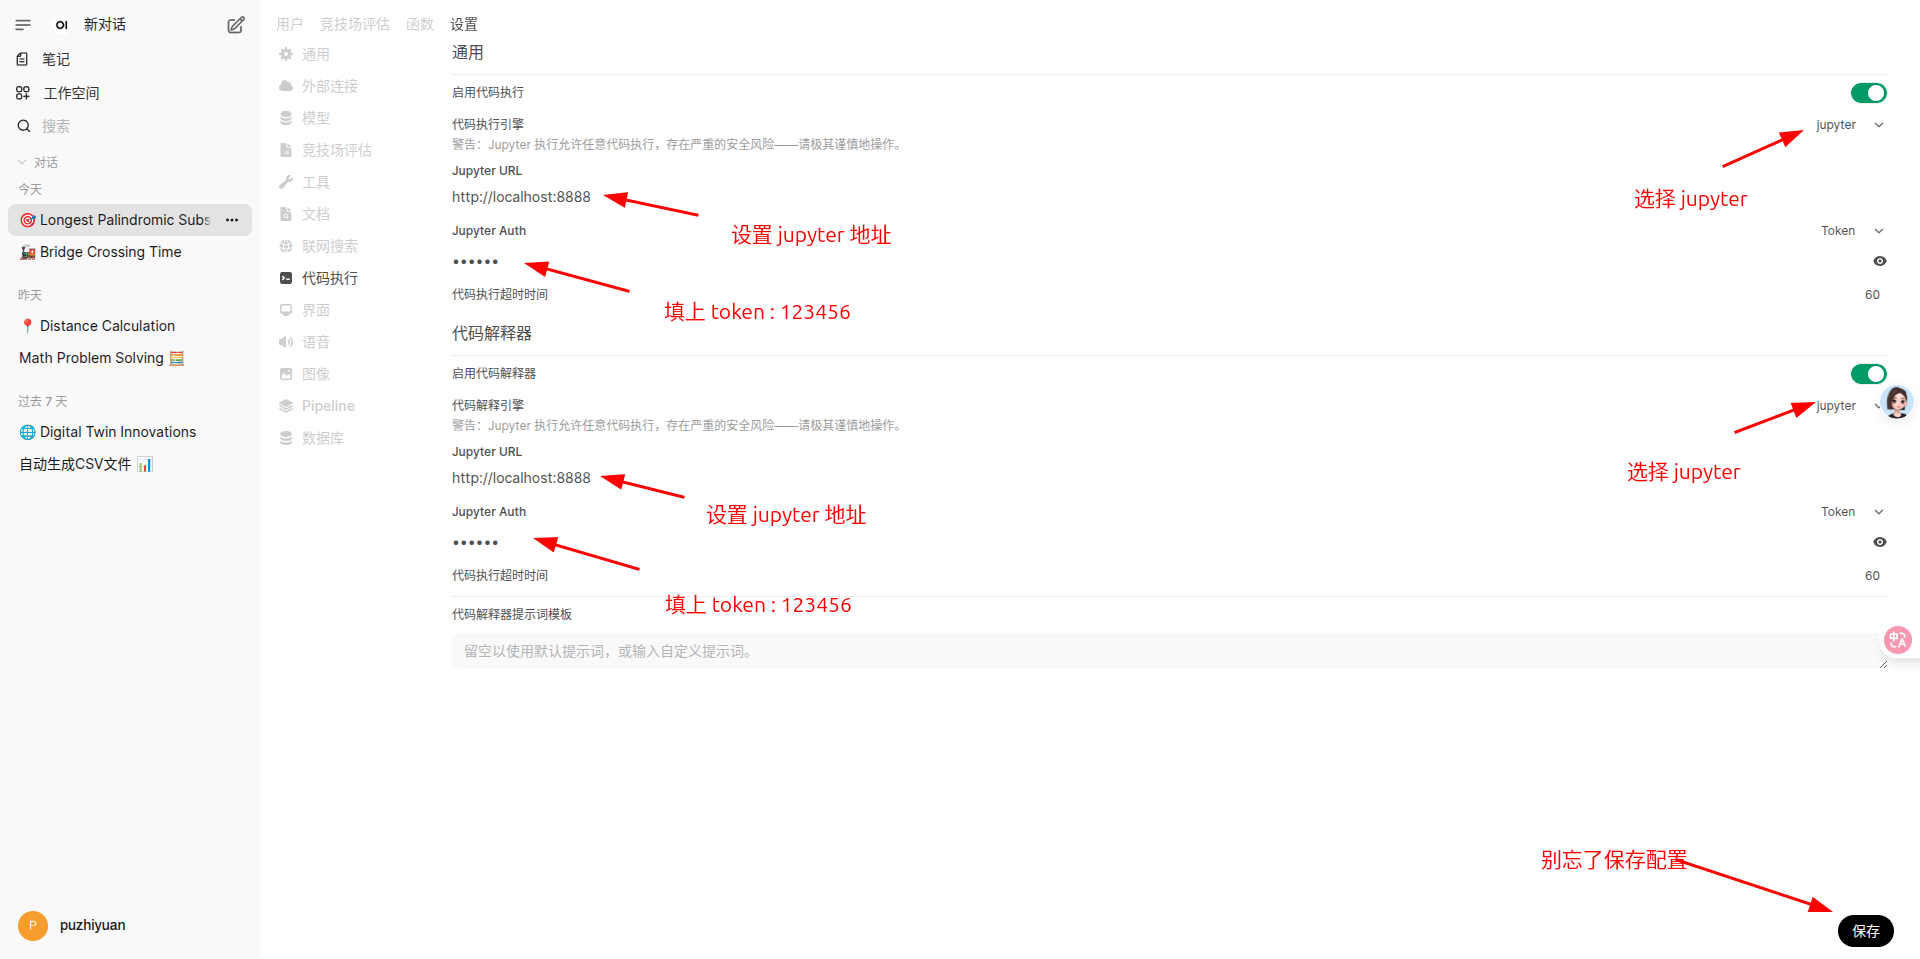
- 使用 jupyter ,开启代码执行和代码解释,选择 jupyter。
安装并启动 jupyter 。
pip install jupyterlab
pip install notebook

mkdir ~/code_execution
cd ~/code_execution
jupyter lab --NotebookApp.token='123456'
然后配置一下代码执行使用 jupyter 就可以了。
usage
在对话框中输入问题,同时选中代码解释器按钮。
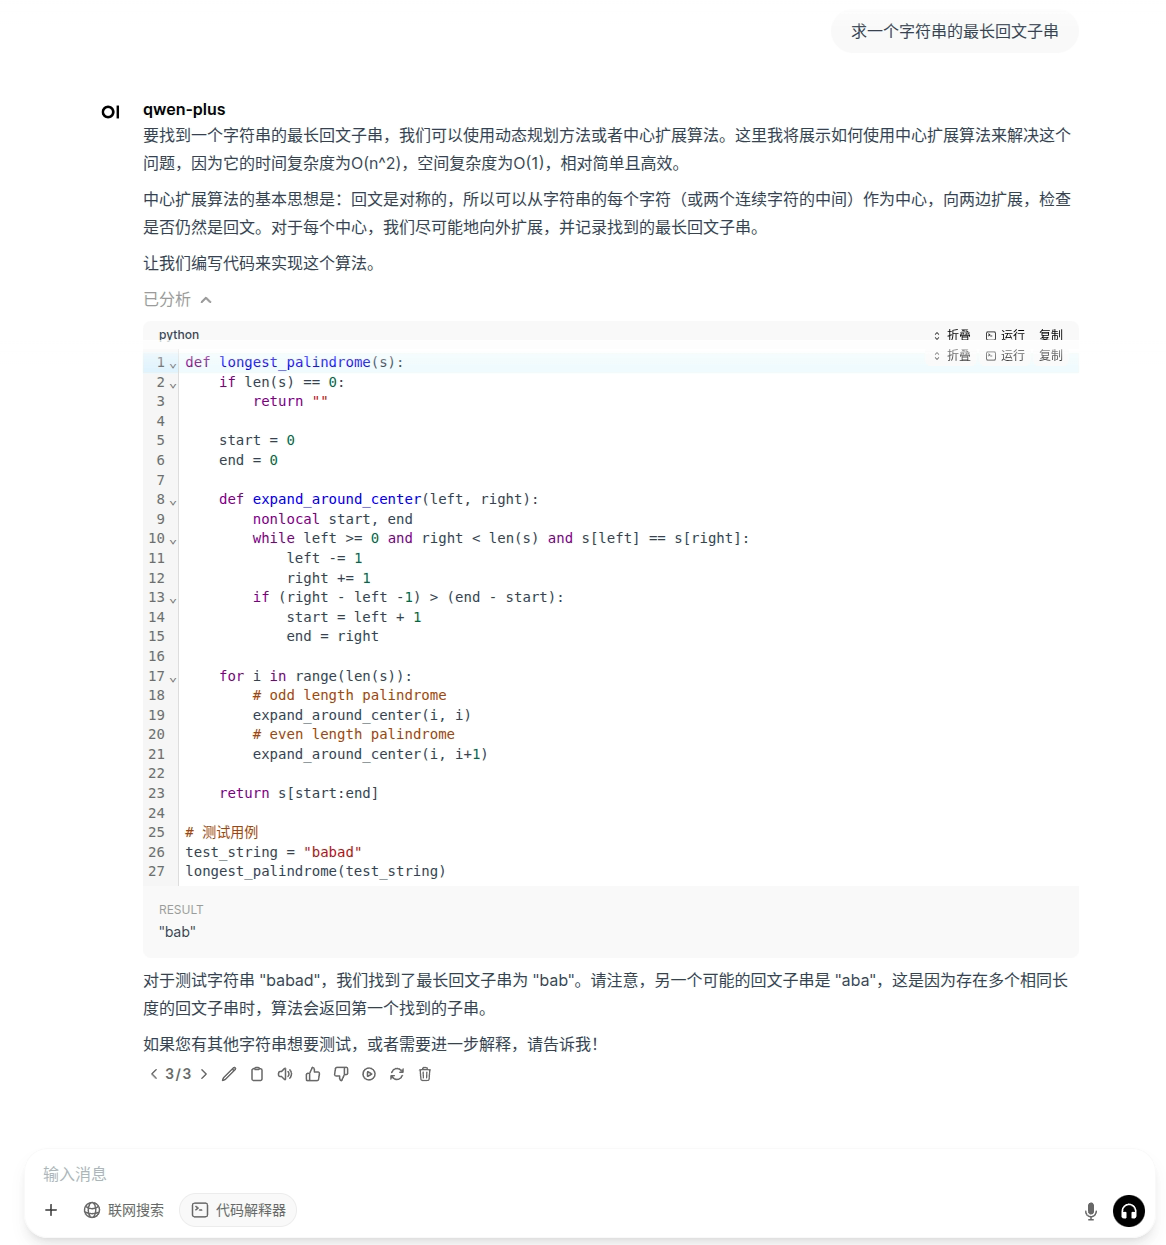
Pyodide
让 qwen-plus 模型执行我们的需求,帮我们求一个字符串的最长回文子串。
jupyter
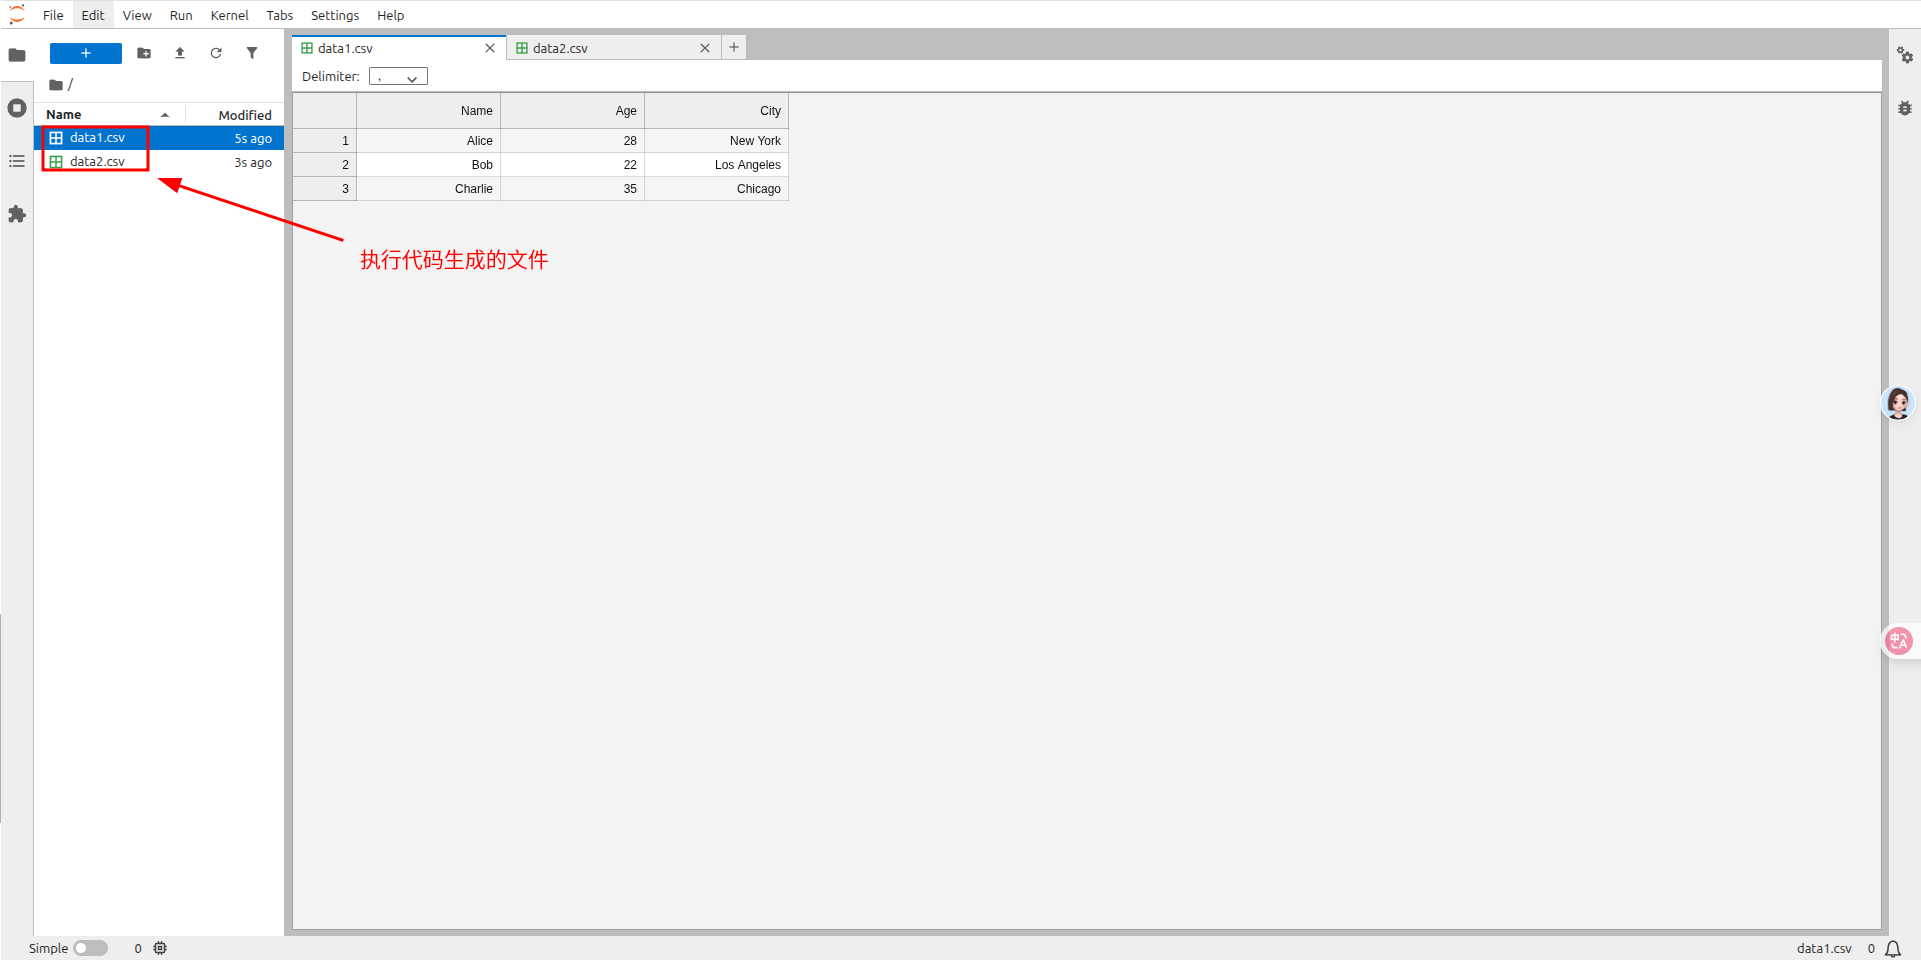
让 qwen-plus 模型执行我们的需求,帮我们生成两个含有随机数据的csv文件。
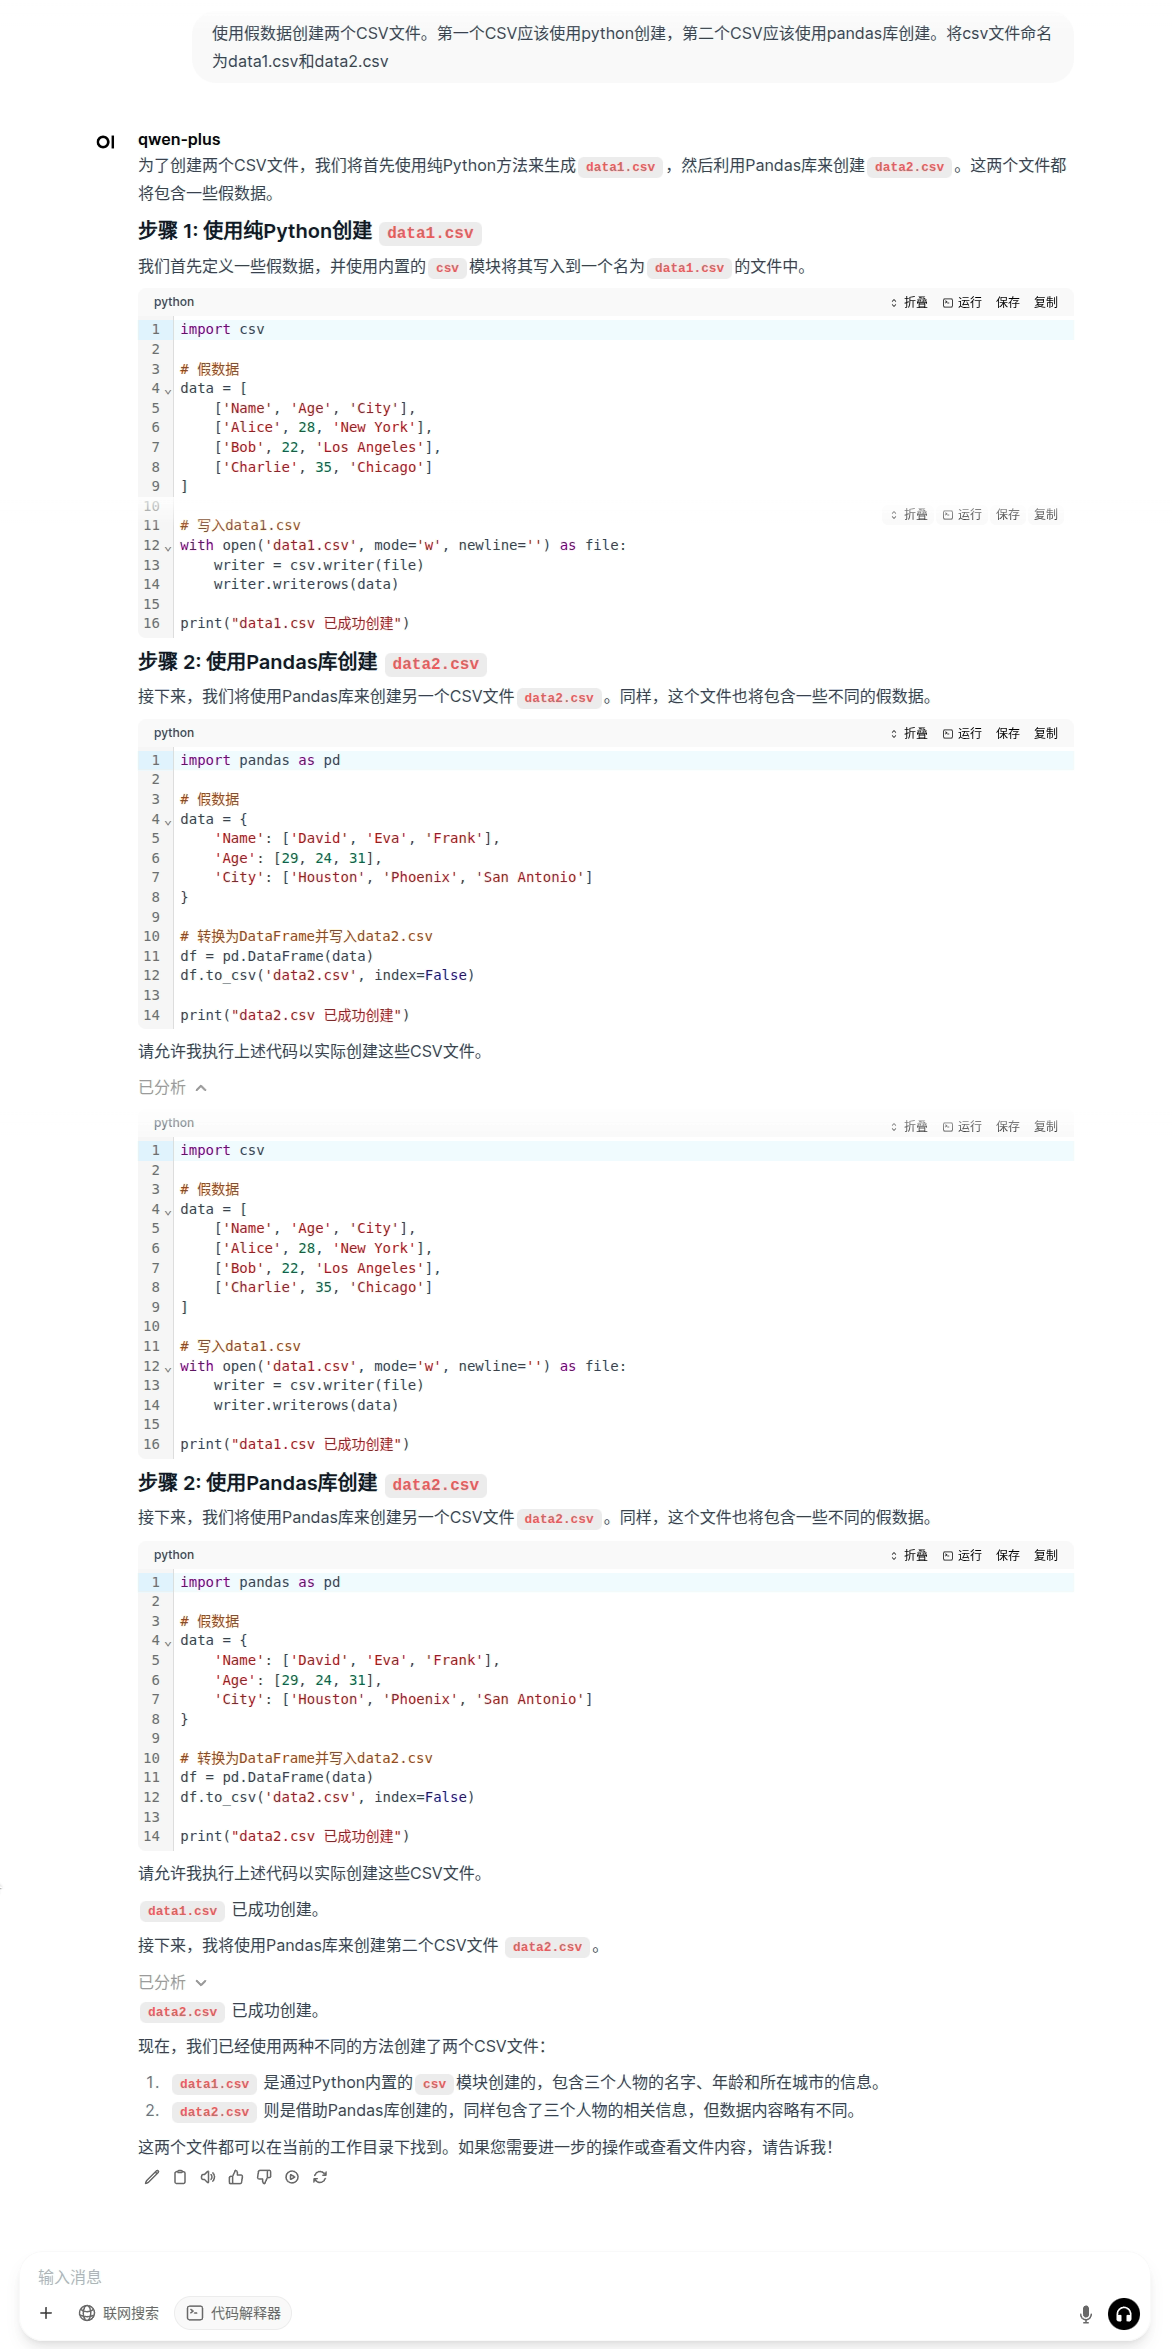
此时,可以在 jupyter 里面看到生成的两个 csv 文件。
RAG
RAG (Retrieval Augmented Generation) 是一种结合了检索和生成模型的技术。其核心流程是:当用户提出问题时,系统首先从一个大规模的知识库中检索与问题最相关的文档或文本片段;然后,将这些检索到的信息与原始问题一起输入到一个大型语言模型中,由该模型生成最终的、更具信息量和上下文相关性的答案。
RAG 的完整流程
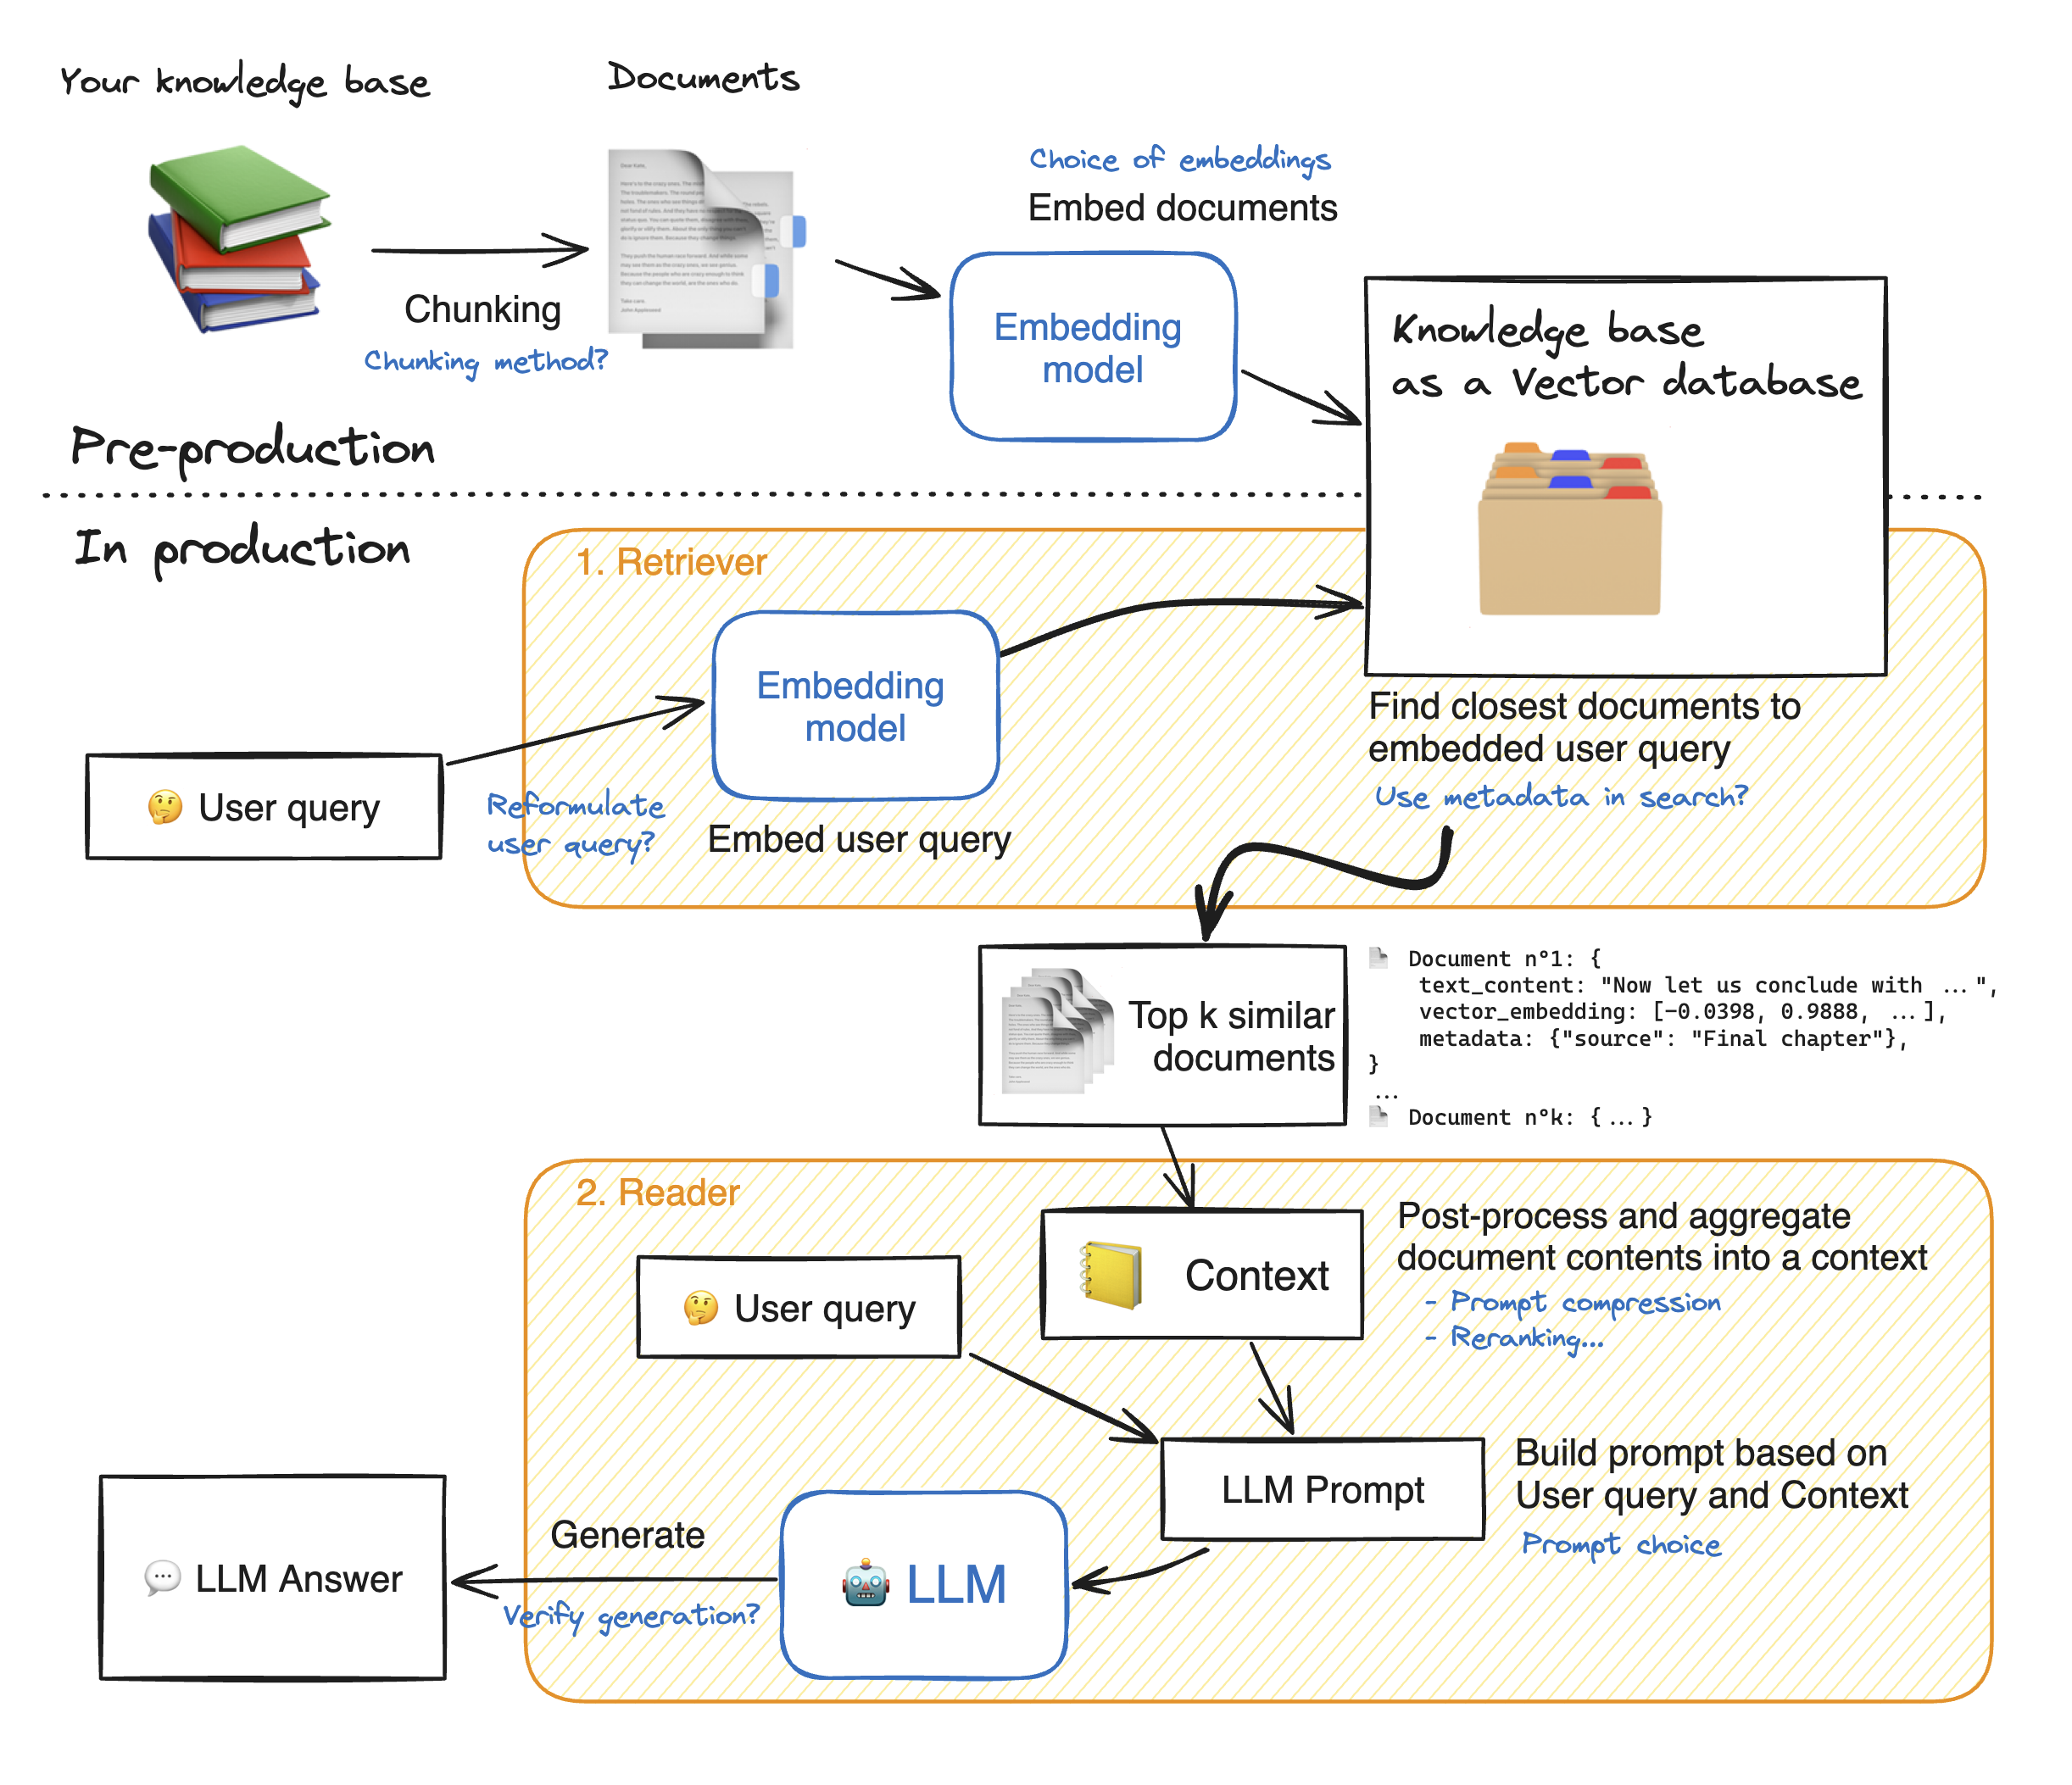
- 数据准备和索引 (Data Preparation and Indexing / Ingestion):
- 数据收集与预处理 (Data Collection and Preprocessing): 首先,需要准备一个知识库,这个知识库可以包含各种类型的文档,例如公司的内部文档、网页、FAQ、研究论文等。这些数据需要进行预处理,包括清洗(去除无关信息、格式转换)、分块(将长文档切分成更小的、易于检索的文本块,称为 chunks)。分块的大小和策略对后续检索效果有重要影响。
- 向量化 (Vectorization / Embedding): 将预处理后的文本块通过一个预训练的语言模型(例如 Sentence-BERT, OpenAI Ada 等)转换为高维向量,这些向量能够捕捉文本的语义信息。每个文本块都会被表示为一个向量。
- 索引 (Indexing): 将这些文本块的向量表示存储到一个专门的向量数据库或检索引擎中(例如 FAISS, Pinecone, Weaviate, Elasticsearch 等)。这样做可以高效地进行相似性搜索,快速找到与查询向量最相似的文本块向量。
- 检索阶段 (Retrieval Phase):
- 用户提问 (User Query): 用户输入一个问题或提示 (prompt)。
- 查询向量化 (Query Vectorization): 与数据准备阶段类似,用户的查询也会被同一个或兼容的嵌入模型转换为一个查询向量。
- 相似性搜索 (Similarity Search): 系统使用查询向量在之前构建的索引中进行搜索,找出与查询向量语义最相似的 Top-K 个文本块。常用的相似性度量方法包括余弦相似度、点积等。
- 上下文构建 (Context Augmentation): 将检索到的 Top-K 个文本块作为上下文信息。
- 生成阶段 (Generation Phase):
- 构建增强提示 (Augmented Prompt Construction): 将原始的用户问题和检索到的上下文信息整合成一个新的、增强的提示 (augmented prompt)。通常的格式可能是:“基于以下信息:[检索到的上下文信息],请回答问题:[用户的问题]”。
- 大型语言模型生成答案 (LLM Answer Generation): 将这个增强的提示输入到一个大型语言模型中(例如 GPT 系列, LLaMA, PaLM 等)。LLM 利用其强大的理解和生成能力,结合提供的上下文信息,生成一个更加准确、相关和详细的答案。
- 答案输出 (Answer Output): LLM 生成的答案最终呈现给用户。
RAG 的优势
- 提高答案的准确性和事实性: 通过引入外部知识,减少了大型语言模型产生幻觉(hallucination)或编造事实的可能性。
- 知识更新的便捷性: 当知识库内容更新时,只需要更新索引,而不需要重新训练整个大型语言模型,这大大降低了维护成本和时间。
- 可解释性和可追溯性: 可以追溯答案的来源,因为可以明确指出是基于哪些检索到的文档生成的答案。
- 领域适应性: 可以方便地将 RAG 应用于特定领域的知识,只需构建该领域的知识库即可。
RAG 效果的关键因素
- 分块策略 (Chunking Strategy): 文本块的大小和重叠度会影响检索的粒度和信息的完整性。
- 嵌入模型的选择 (Embedding Model Choice): 嵌入模型的质量直接影响检索结果的准确性。
- 检索的数量 (Number of Retrieved Documents - Top-K): 检索过少可能导致信息不足,检索过多可能引入噪声。
- 大型语言模型的选择 (LLM Choice): LLM 的能力决定了最终答案的质量和流畅度。
- 提示工程 (Prompt Engineering): 如何有效地将检索到的信息和原始问题结合成提示,对生成结果有显著影响。
usage
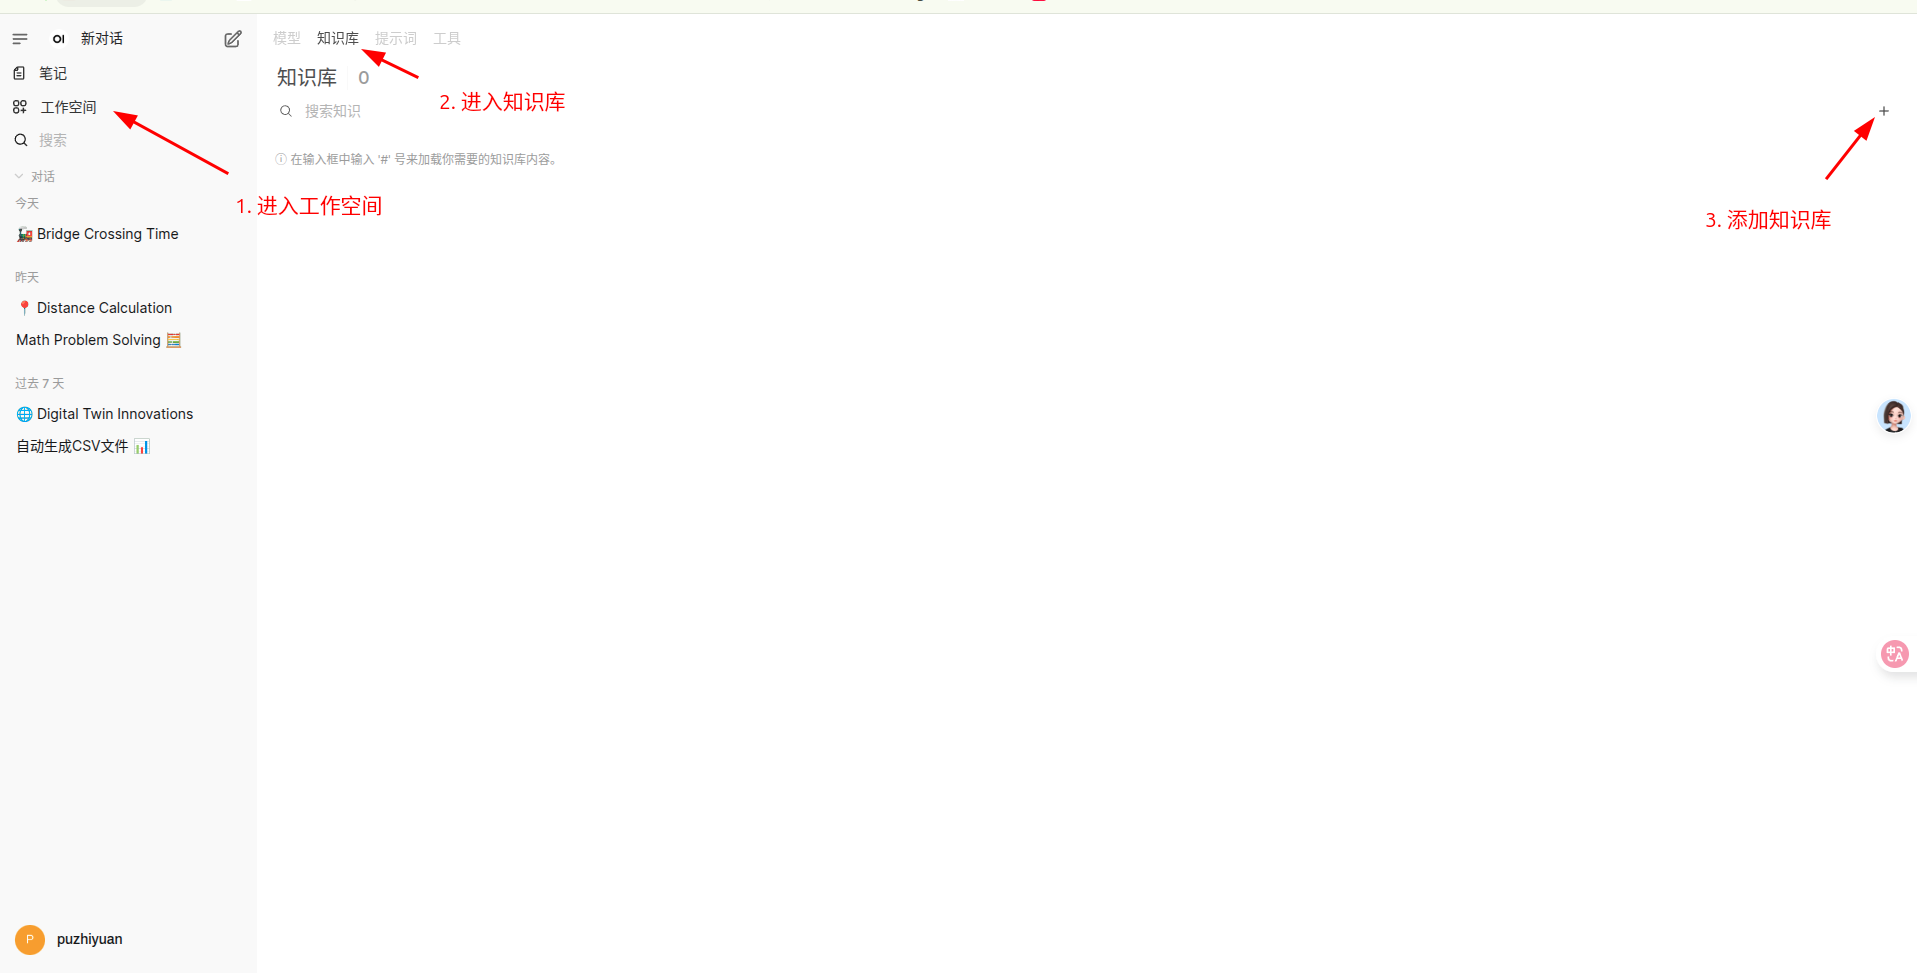
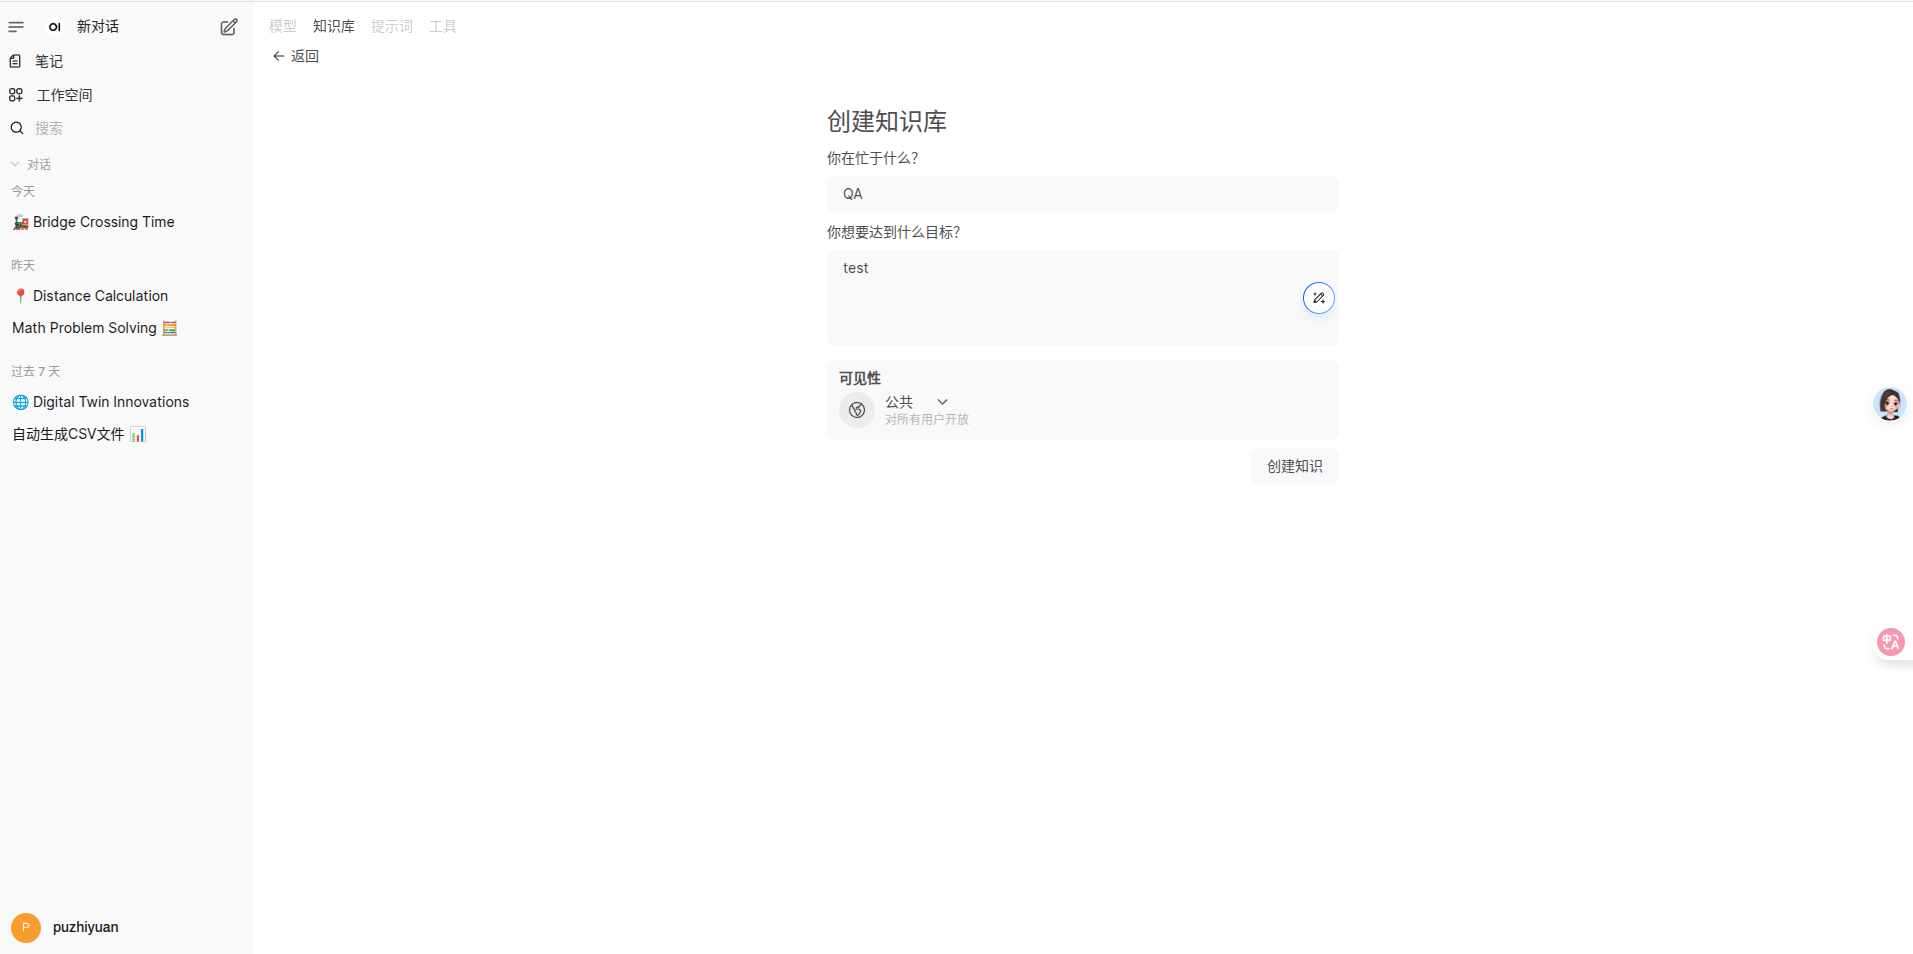
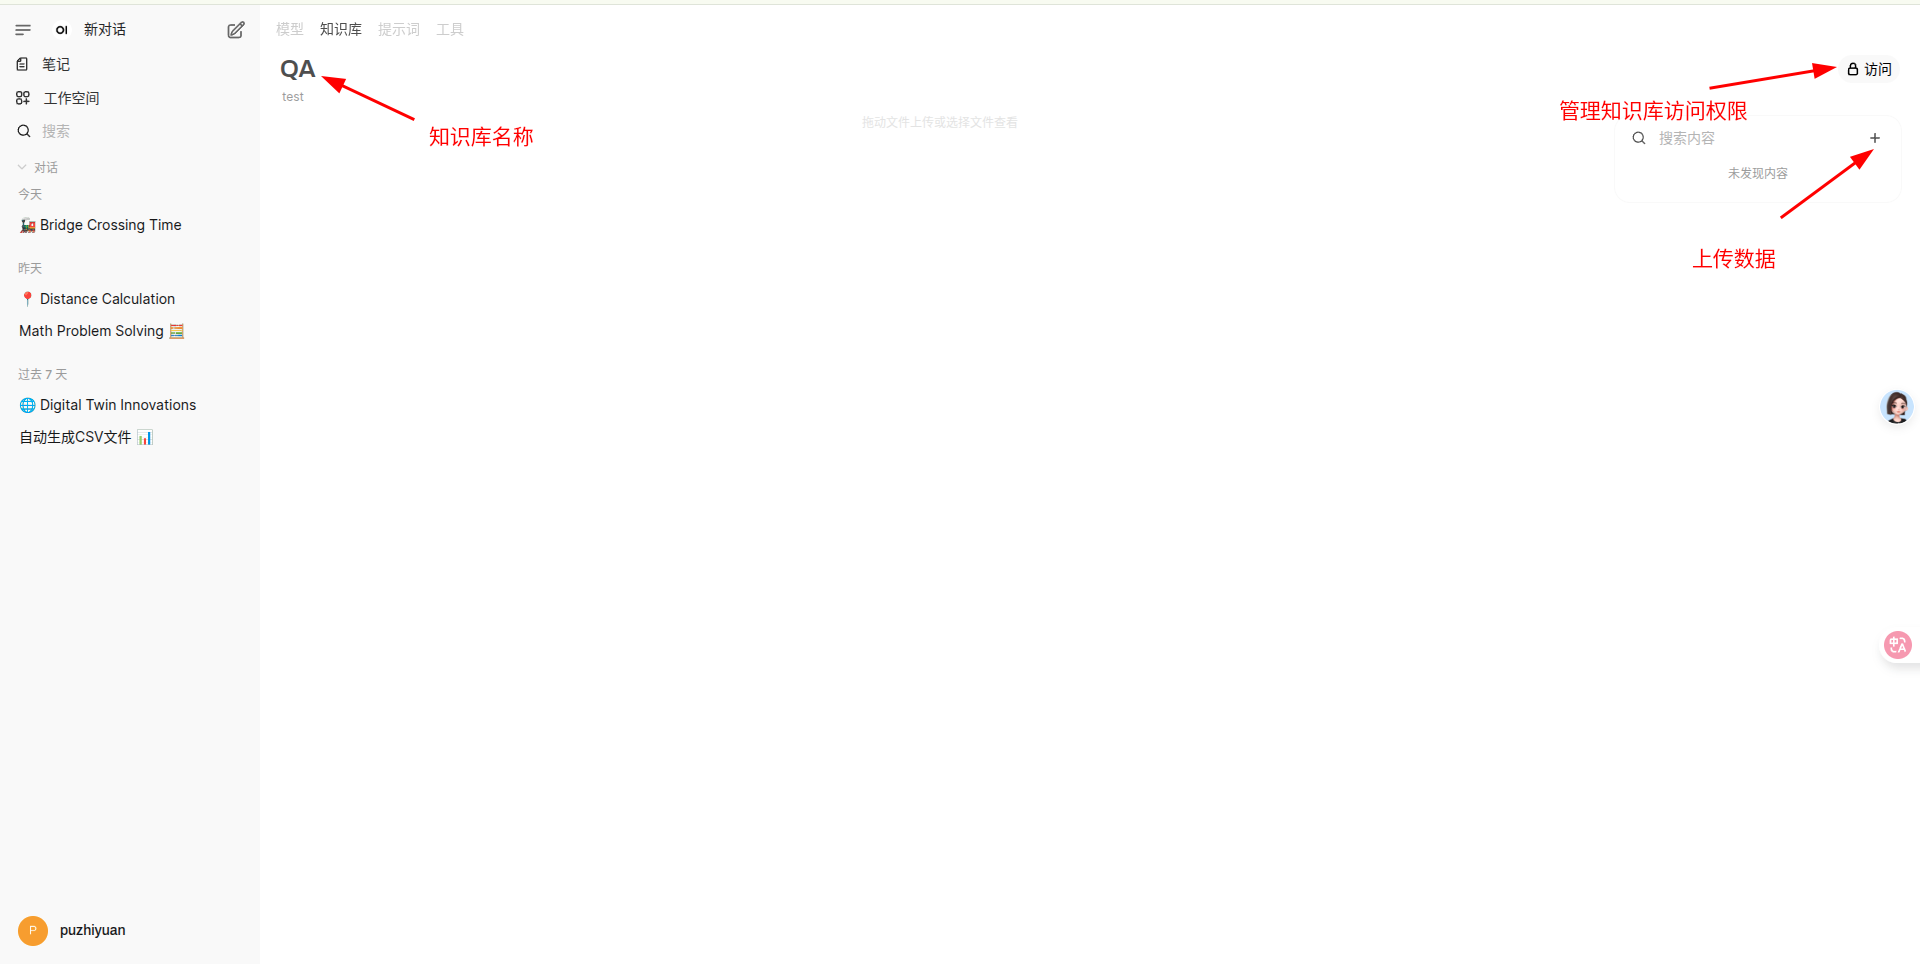
创建知识库
导航到 工作空间->知识库 中,创建知识库并上传数据。
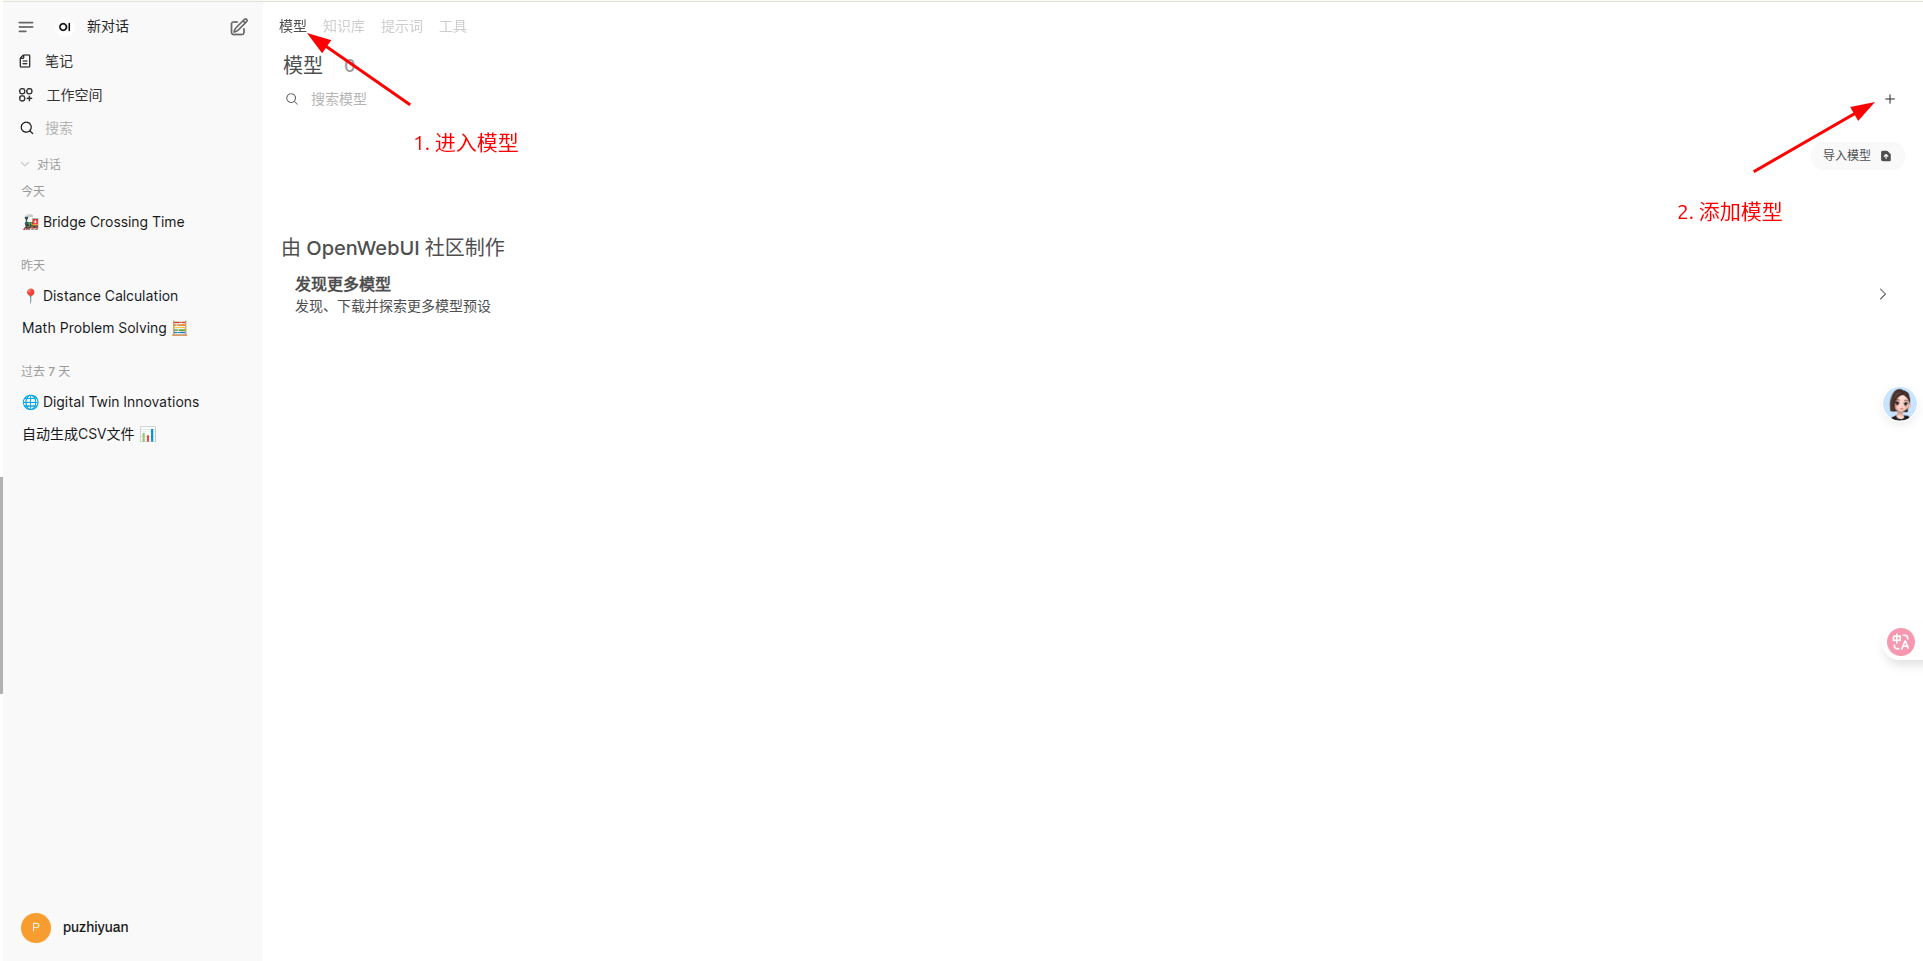
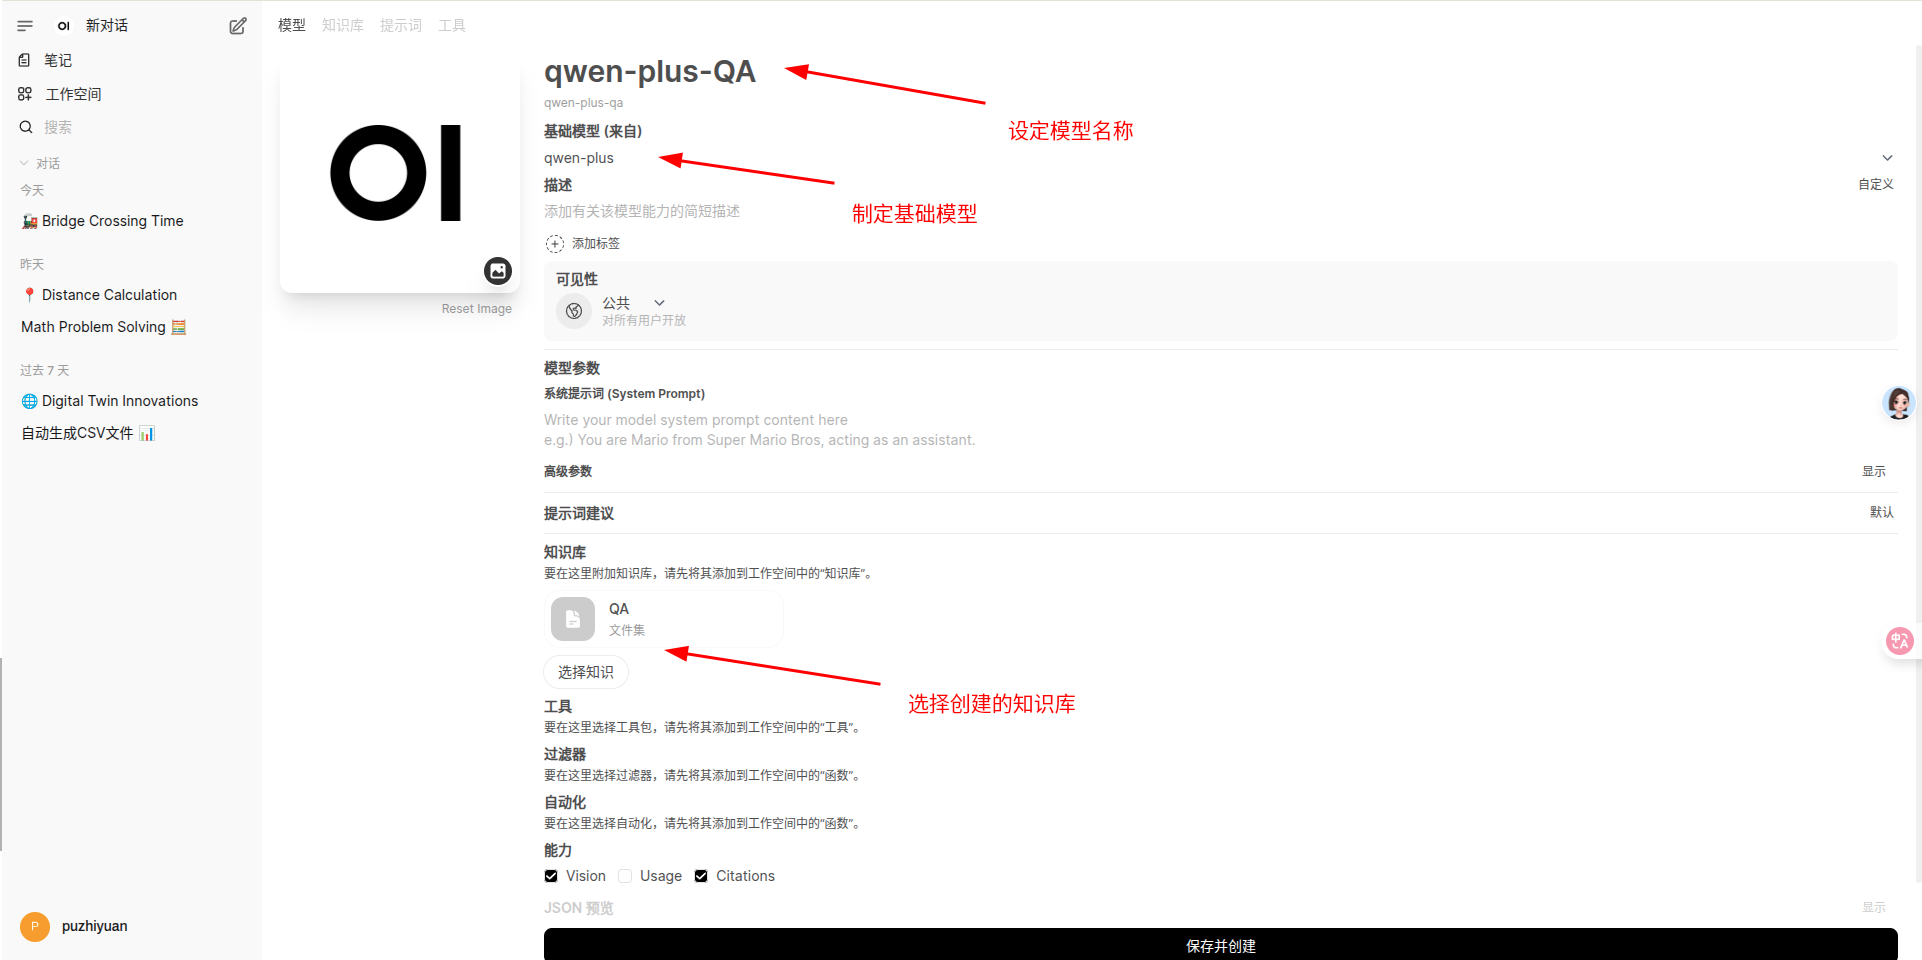
创建知识库模型
需要指定创建的模型名称、依赖的基础模型和知识库等
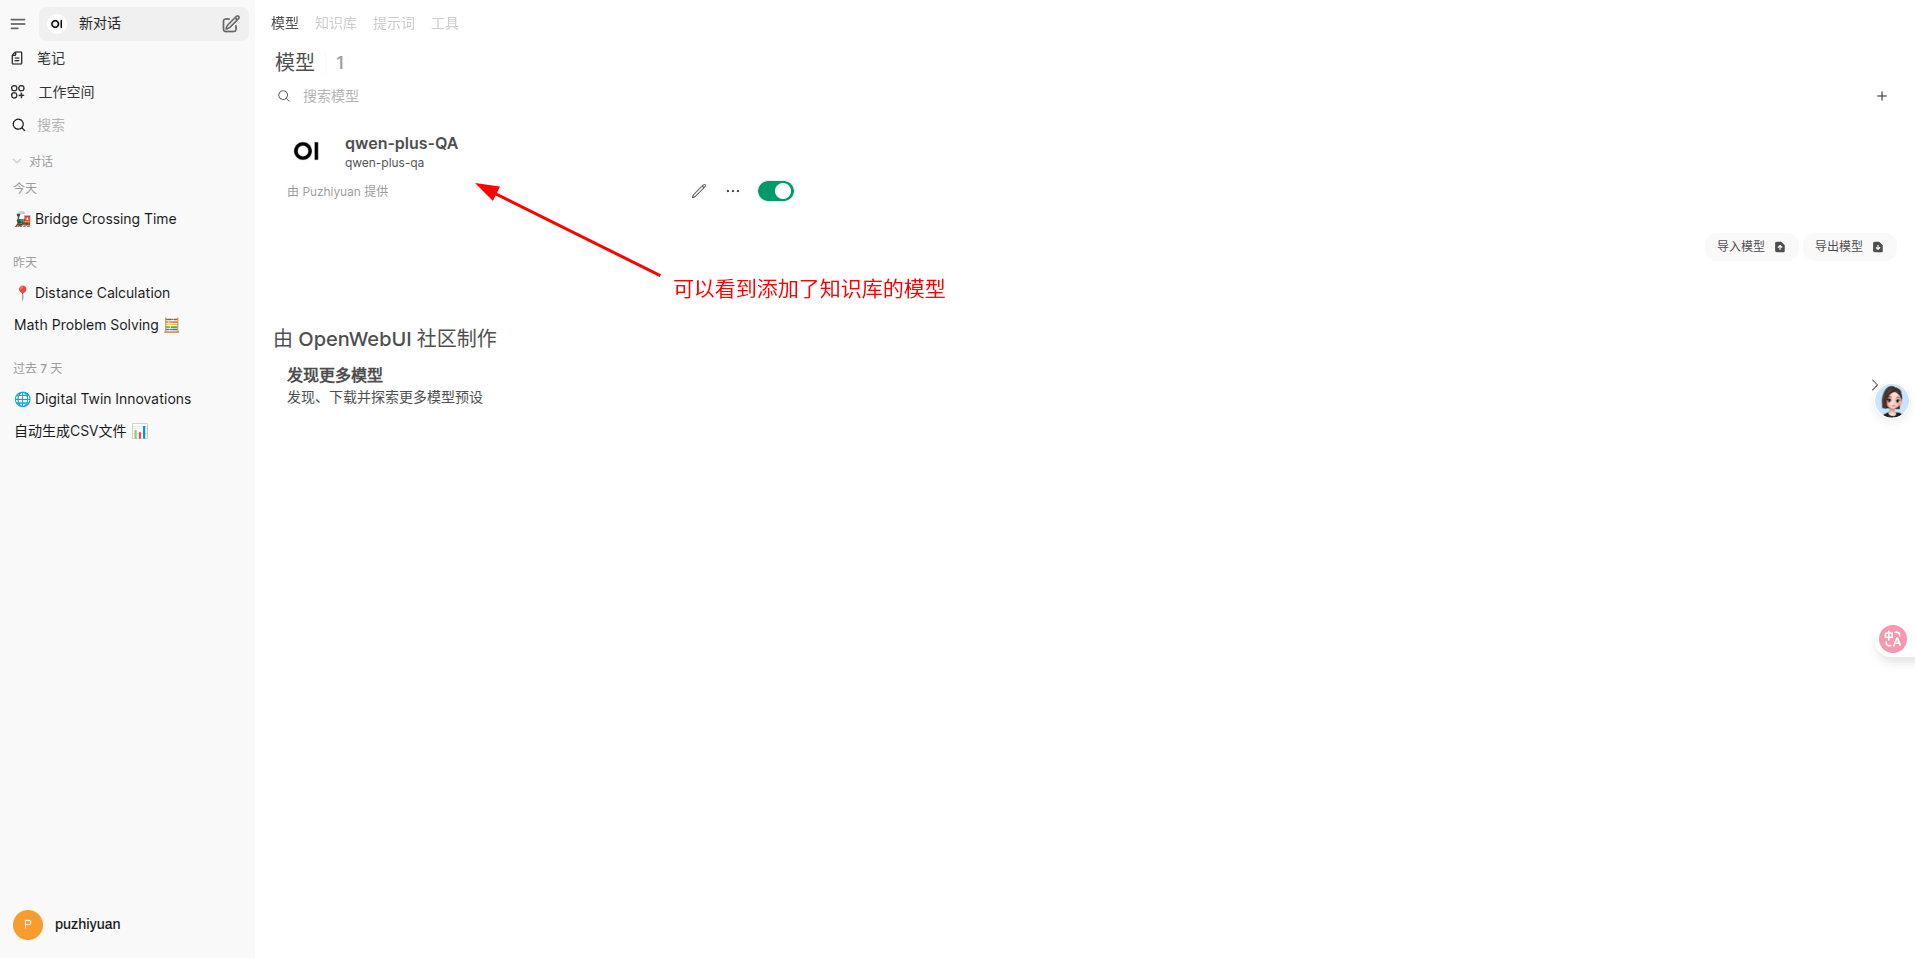
使用带有知识库的模型
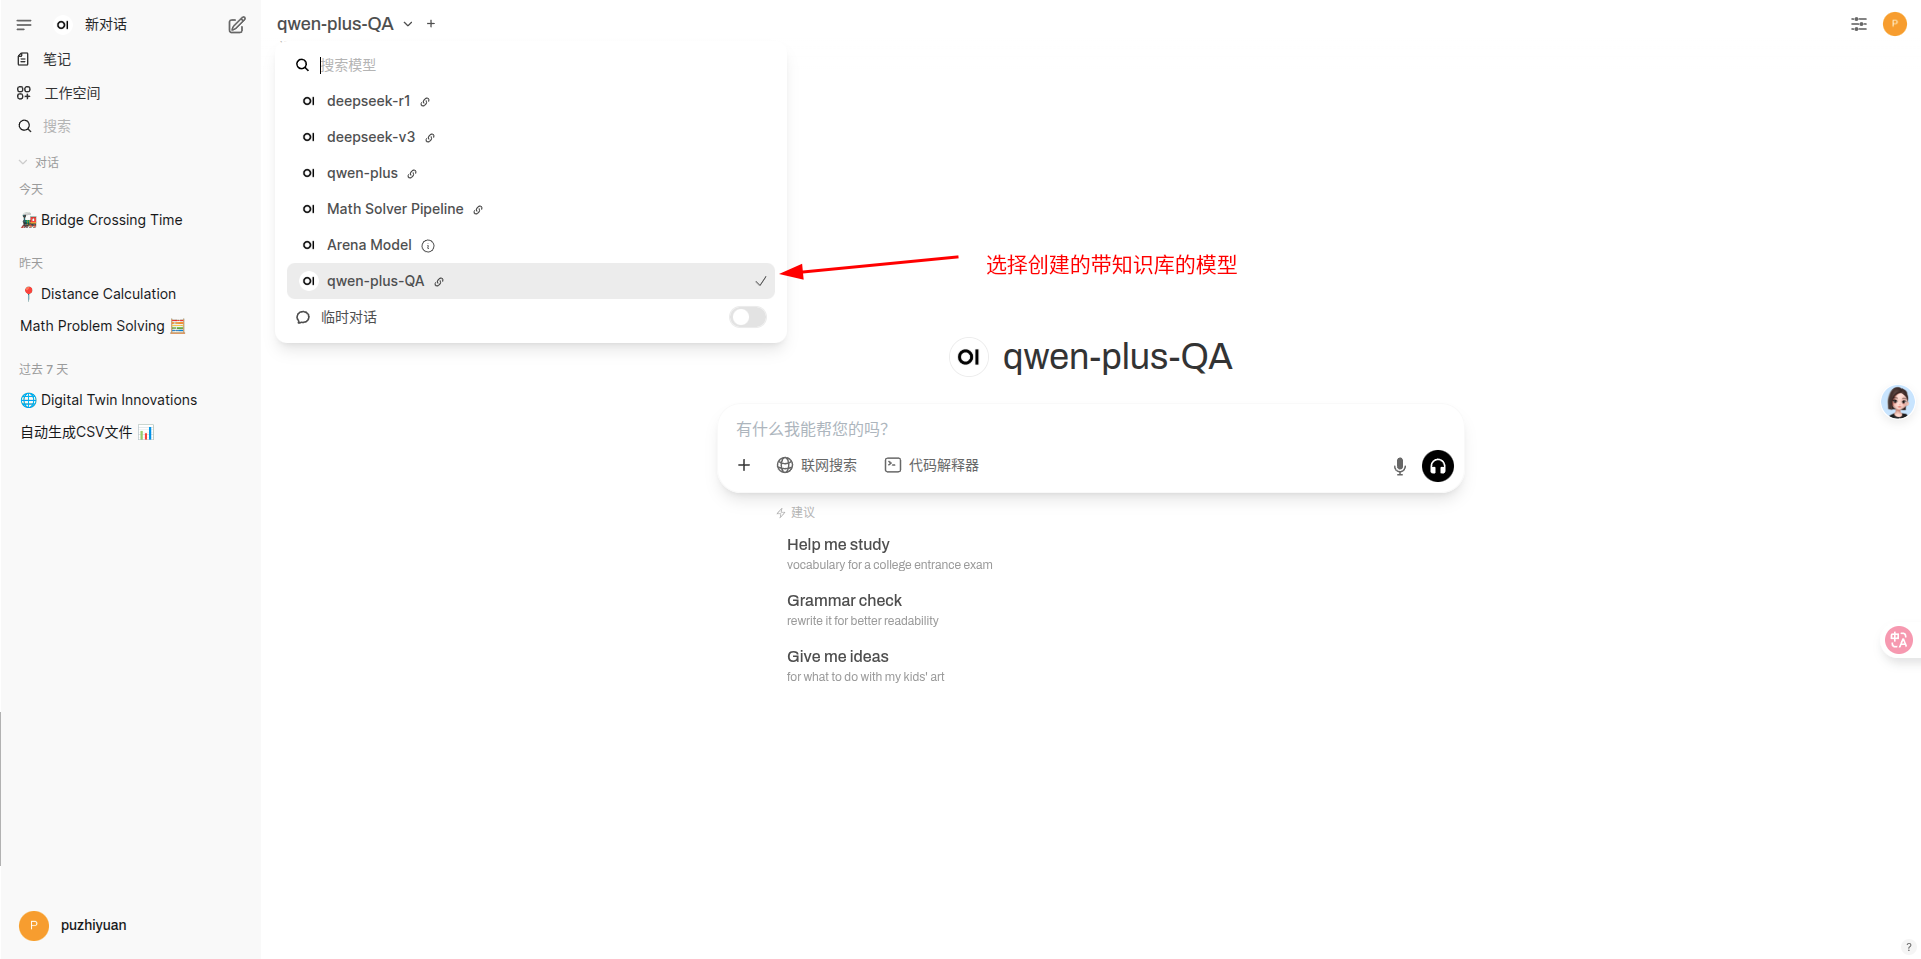
Tips
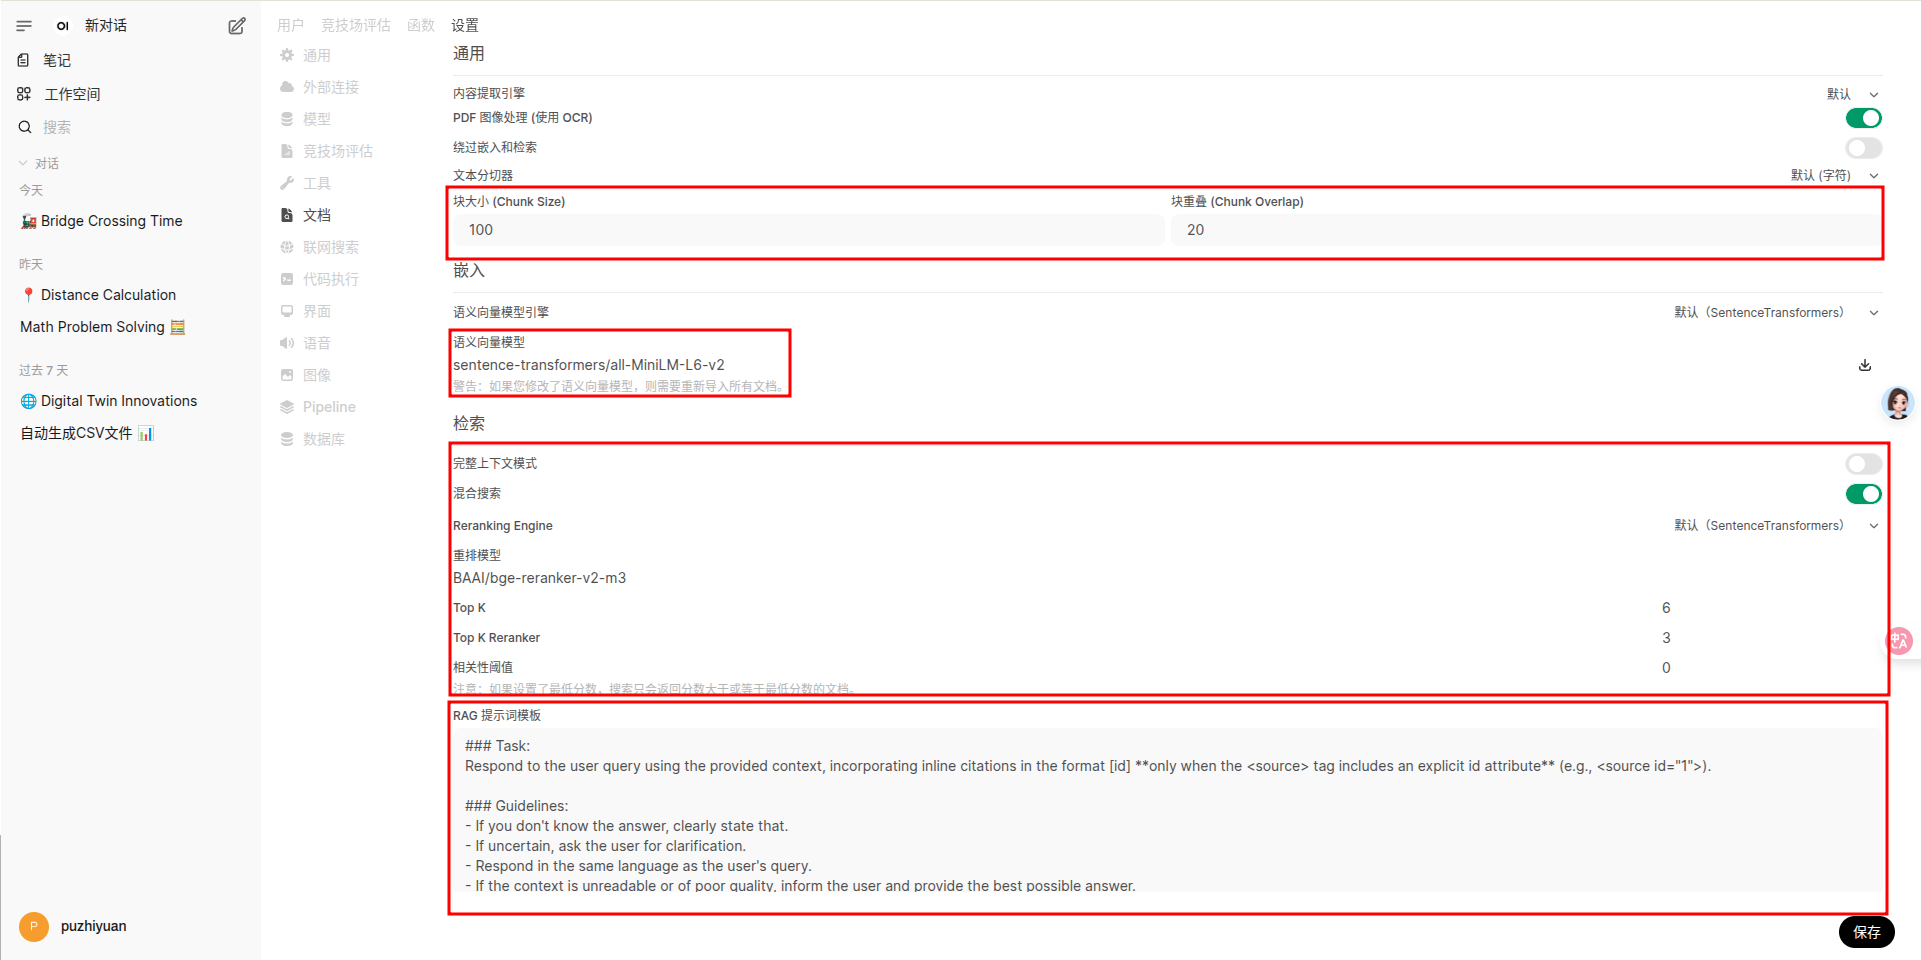
如果发现回答效果不好,可以在 管理员面板->设置->文档 中修改配置。
- 文档切块大小和块重叠,根据上传的数据特点适当调整
- 更换 embedding 模型
- 配置检索模式
- 修改提示词模板
Pipeline
GitHub - open-webui/pipelines: Pipelines: Versatile, UI-Agnostic OpenAI-Compatible Plugin Framework
install
- clone 源码
- 创建 conda 环境
git clone https://github.com/open-webui/pipelines.git

conda create -n pipeline python=3.11 -y
conda activate pipeline
cd pipelines
pip install -r requirements.txt
run
启动 pipeline 后端
sh ./start.sh
usage
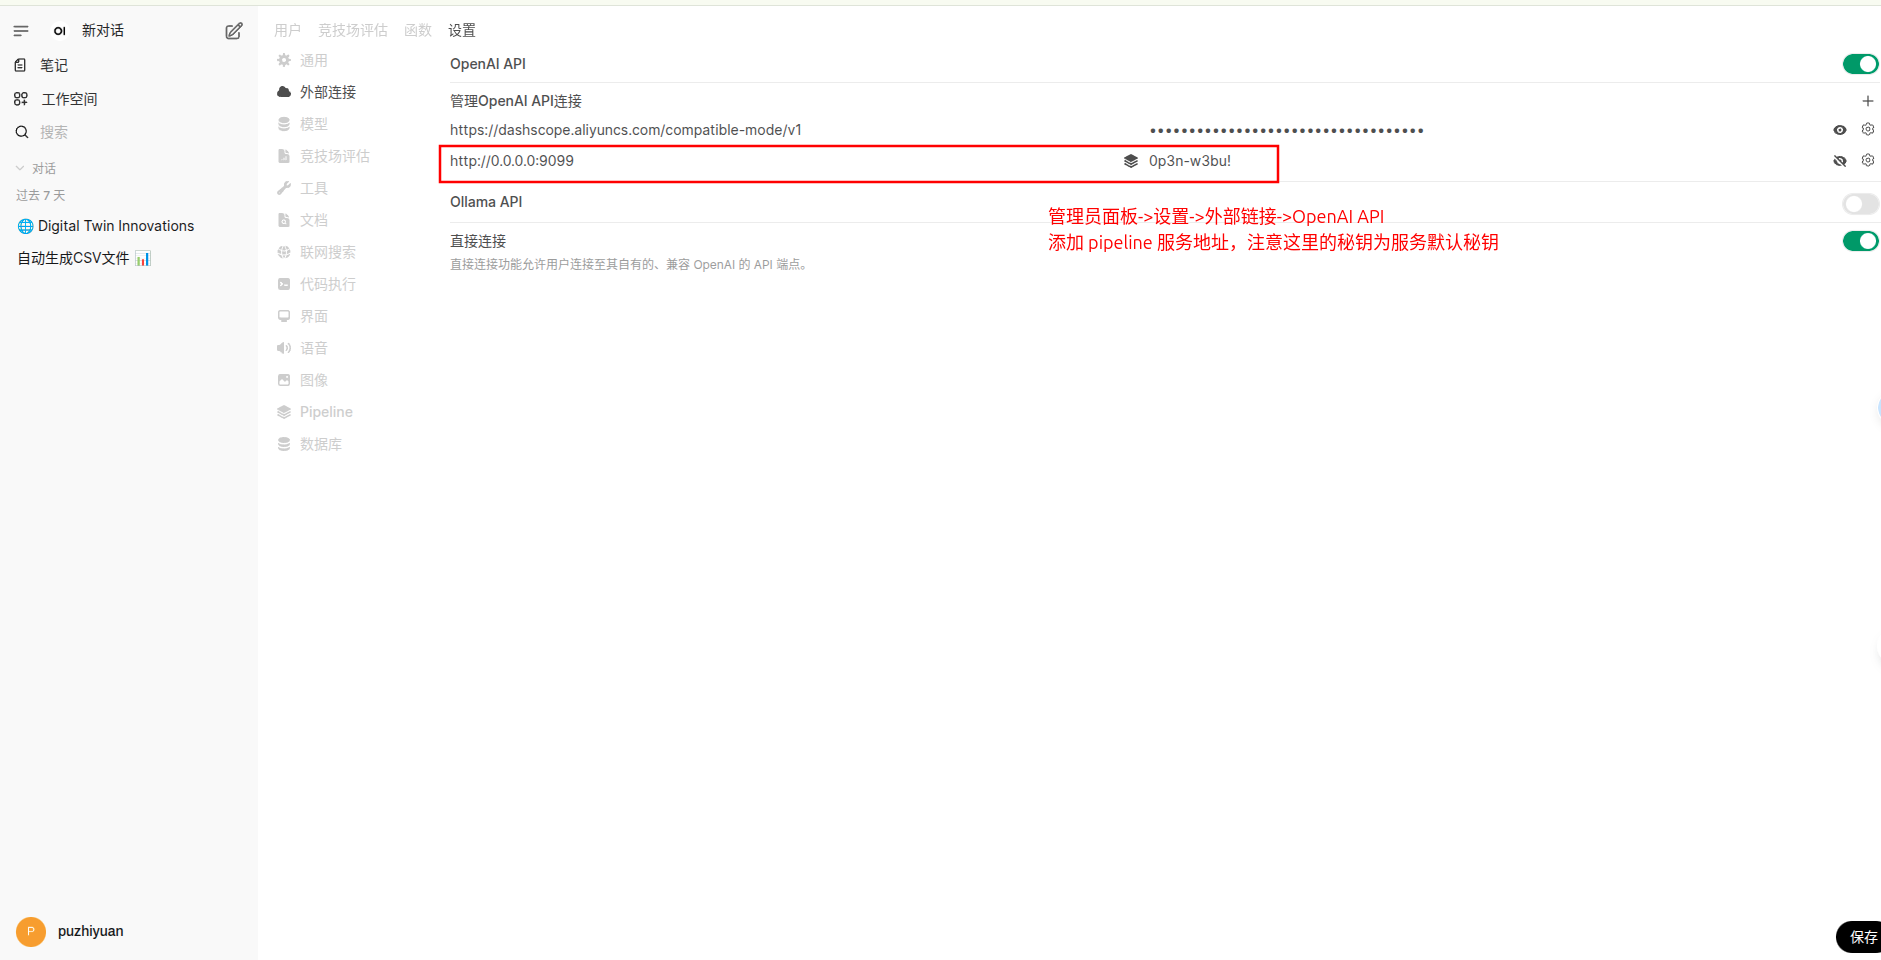
- 配置外部链接,让 open-webui 能够访问到 pipeline 后端。
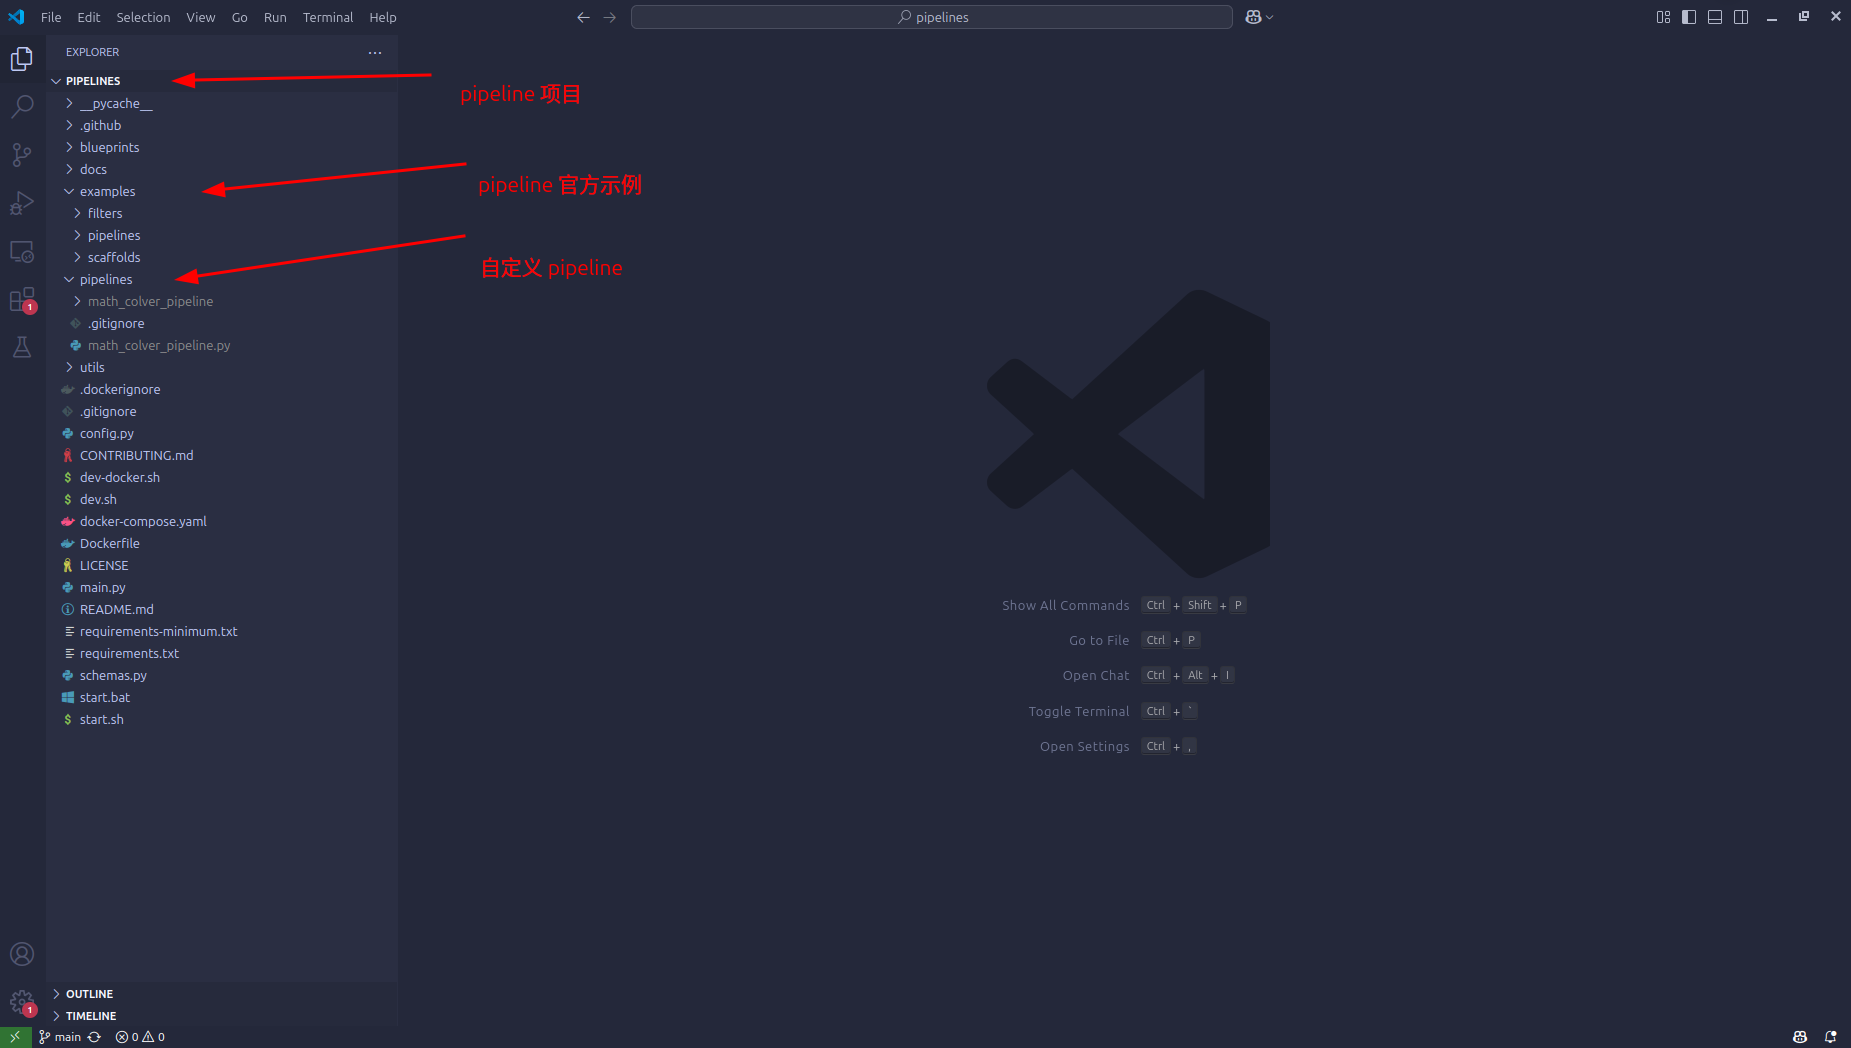
- 定义 pipeline
- 项目中 example 文件夹包含了官方实现的一些 pipeline ,可以参考。
- 想要在 open-webui 中执行 pipeline ,需要将对应的 pipeline 代码文件放在 pipeline 文件夹中,新添加代码时注意可能需要重新启动服务。
下面的代码是一个将大模型回答中的代码放到 python 解释器中运行,并最终返回完整结果的 pipeline 。
import os
import re
import json
import requests
import subprocess
from typing import List, Union, Generator, Iterator
from schemas import OpenAIChatMessage
from pydantic import BaseModel
from openai import OpenAI
from random import choices

os.environ["OPENAI_BASE_URL"] = "https://dashscope.aliyuncs.com/compatible-mode/v1"
os.environ["OPENAI_API_KEY"] = "xxxxxx"
client = OpenAI()

execution_desc = ["运行以上代码,输出会是: ",
                  "现在将上面的代码复制到Python环境中运行,运行结果为:",
                  "执行上述Python代码,运行结果将是:",
                  "上面的Python代码执行结果为:",
                  "运行上述代码,我们可以得到题目要求的答案。输出结果将是:"]


class Pipeline:
    class Valves(BaseModel):
        pass

    def __init__(self):
        self.name = "Math Solver Pipeline"
        pass

    async def on_startup(self):
        # This function is called when the server is started.
        print(f"on_startup:{__name__}")
        pass

    async def on_shutdown(self):
        # This function is called when the server is stopped.
        print(f"on_shutdown:{__name__}")
        pass

    def pipe(
        self, user_message: str, model_id: str, messages: List[dict], body: dict
    ) -> Union[str, Generator, Iterator]:
        # This is where you can add your custom pipelines like RAG.
        print(f"pipe:{__name__}")
        print(f"user_message: {user_message}")
        query = user_message
        messages = [{"role": "system","content": "你是一个数学解题大师,请解决下面的数学题,给出思考过程,必要时需要给出解题过程中的Python代码。正确答案的数值用\\boxed{}包围起来,最终的答案以因此开头,不要讲多余的废话。"}]
        messages.append({"role": "user", "content": f"题目:{query}"})
        result = client.chat.completions.create(messages=messages,
                                                model="qwen-plus",
                                                temperature=0.2,
                                                stream=True)
        reply_message = ""
        for chunk in result:
            if hasattr(chunk, "choices") and chunk.choices[0].delta.content:
                reply_message += chunk.choices[0].delta.content

        # find python code and execute the code
        if '```python' in reply_message and '\n```' in reply_message:
            messages.append({"role": "assistant", "content": '```'.join(reply_message.split('```')[:-1]) + '```'})
            python_code_string = re.findall(r'```python\n(.*?)\n```', reply_message, re.S)[0]
            python_file_path = 'temp.py'
            with open(python_file_path, 'w') as f:
                f.write(python_code_string)
            python_code_run = subprocess.run(['python3', python_file_path], stdout=subprocess.PIPE, timeout=10)
            if python_code_run.returncode:
                raise RuntimeError("生成的Python代码无法运行!")
            python_code_execution = python_code_run.stdout.decode('utf-8')
            os.remove(python_file_path)
            code_reply_str = choices(execution_desc, k=1)[0]
            code_reply = f"\n{code_reply_str}```{python_code_execution.strip()}```\n"
            reply_message += code_reply
            messages.append({"role": "user", "content": code_reply})
            result = client.chat.completions.create(messages=messages,
                                                    model="qwen-plus",
                                                    temperature=0.2,
                                                    stream=True)

            final_reply = ""
            for chunk in result:
                if hasattr(chunk, "choices") and chunk.choices[0].delta.content:
                    reply_message += chunk.choices[0].delta.content
                    final_reply += chunk.choices[0].delta.content
            return reply_message.replace('```python', '\n```python')
        else:
            return reply_message
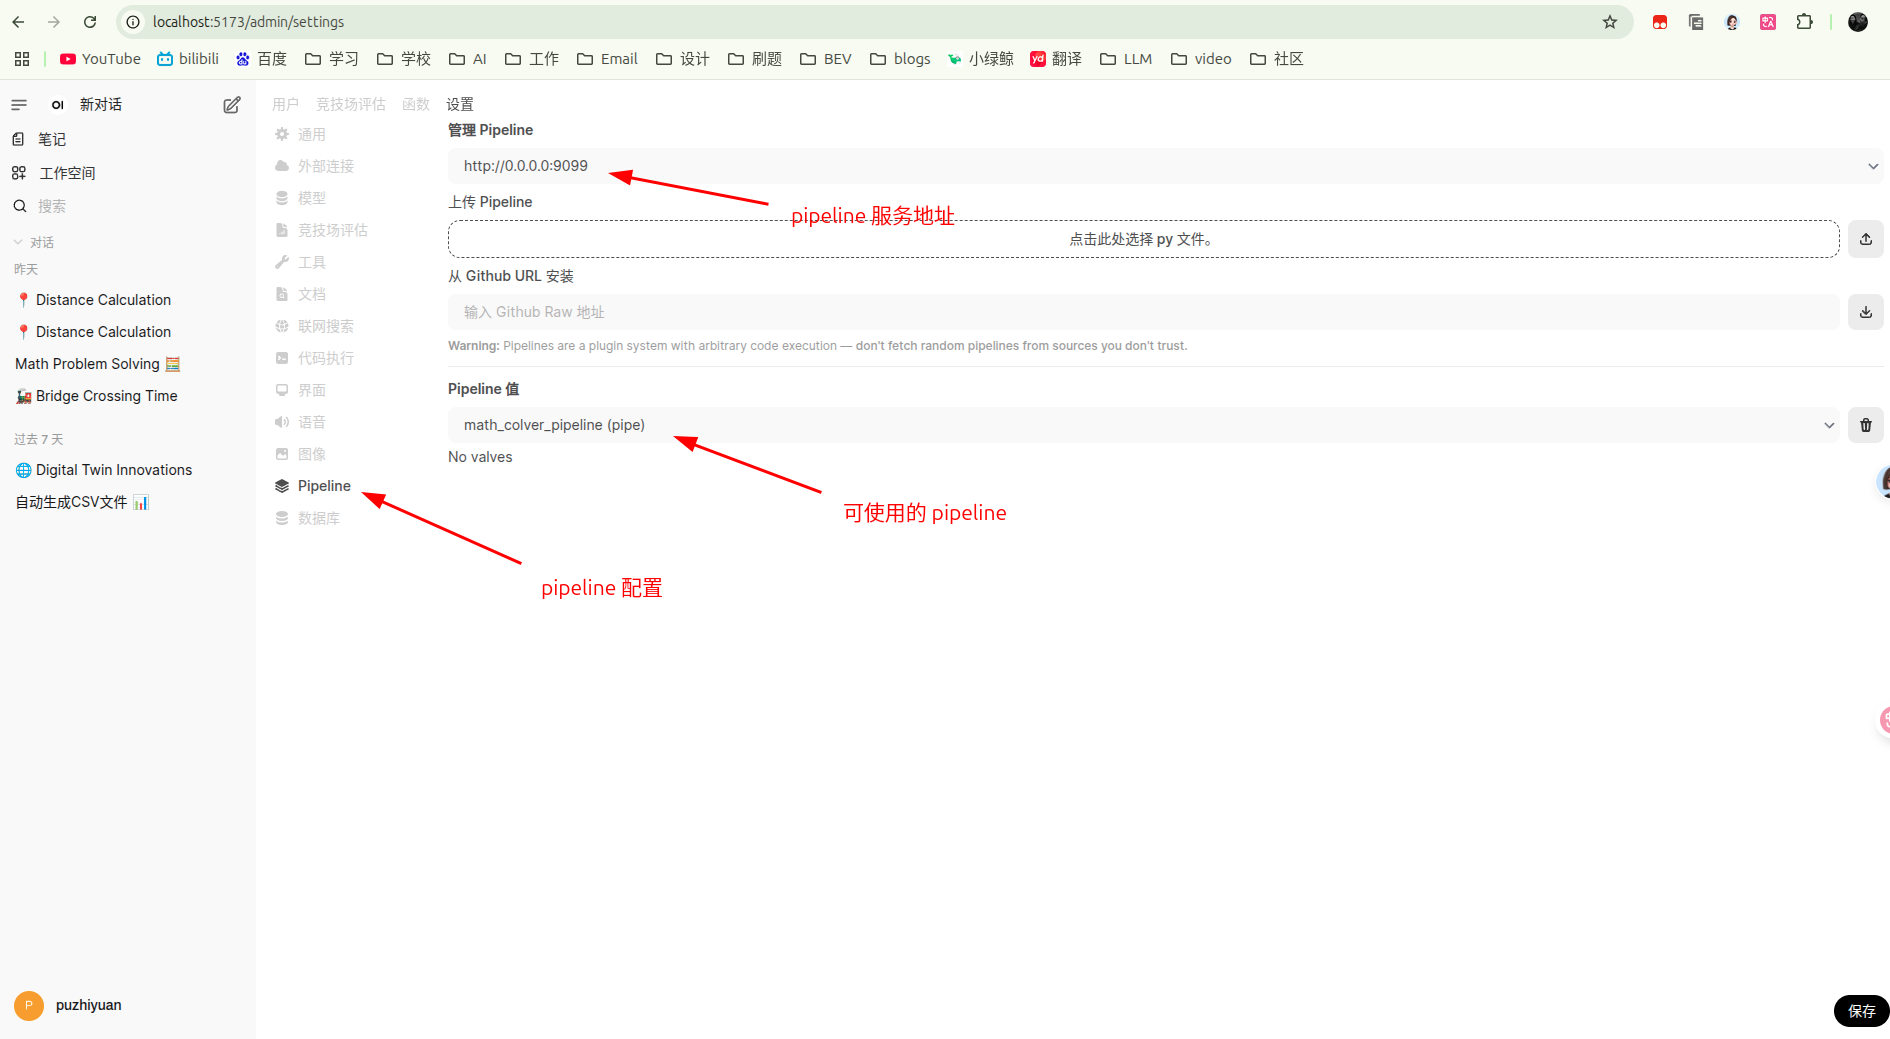
- 使用 pipeline
- 在 open-webui 的管理员设置中,选择 pipeline 配置,可以看到上面定义的 pipeline 服务。
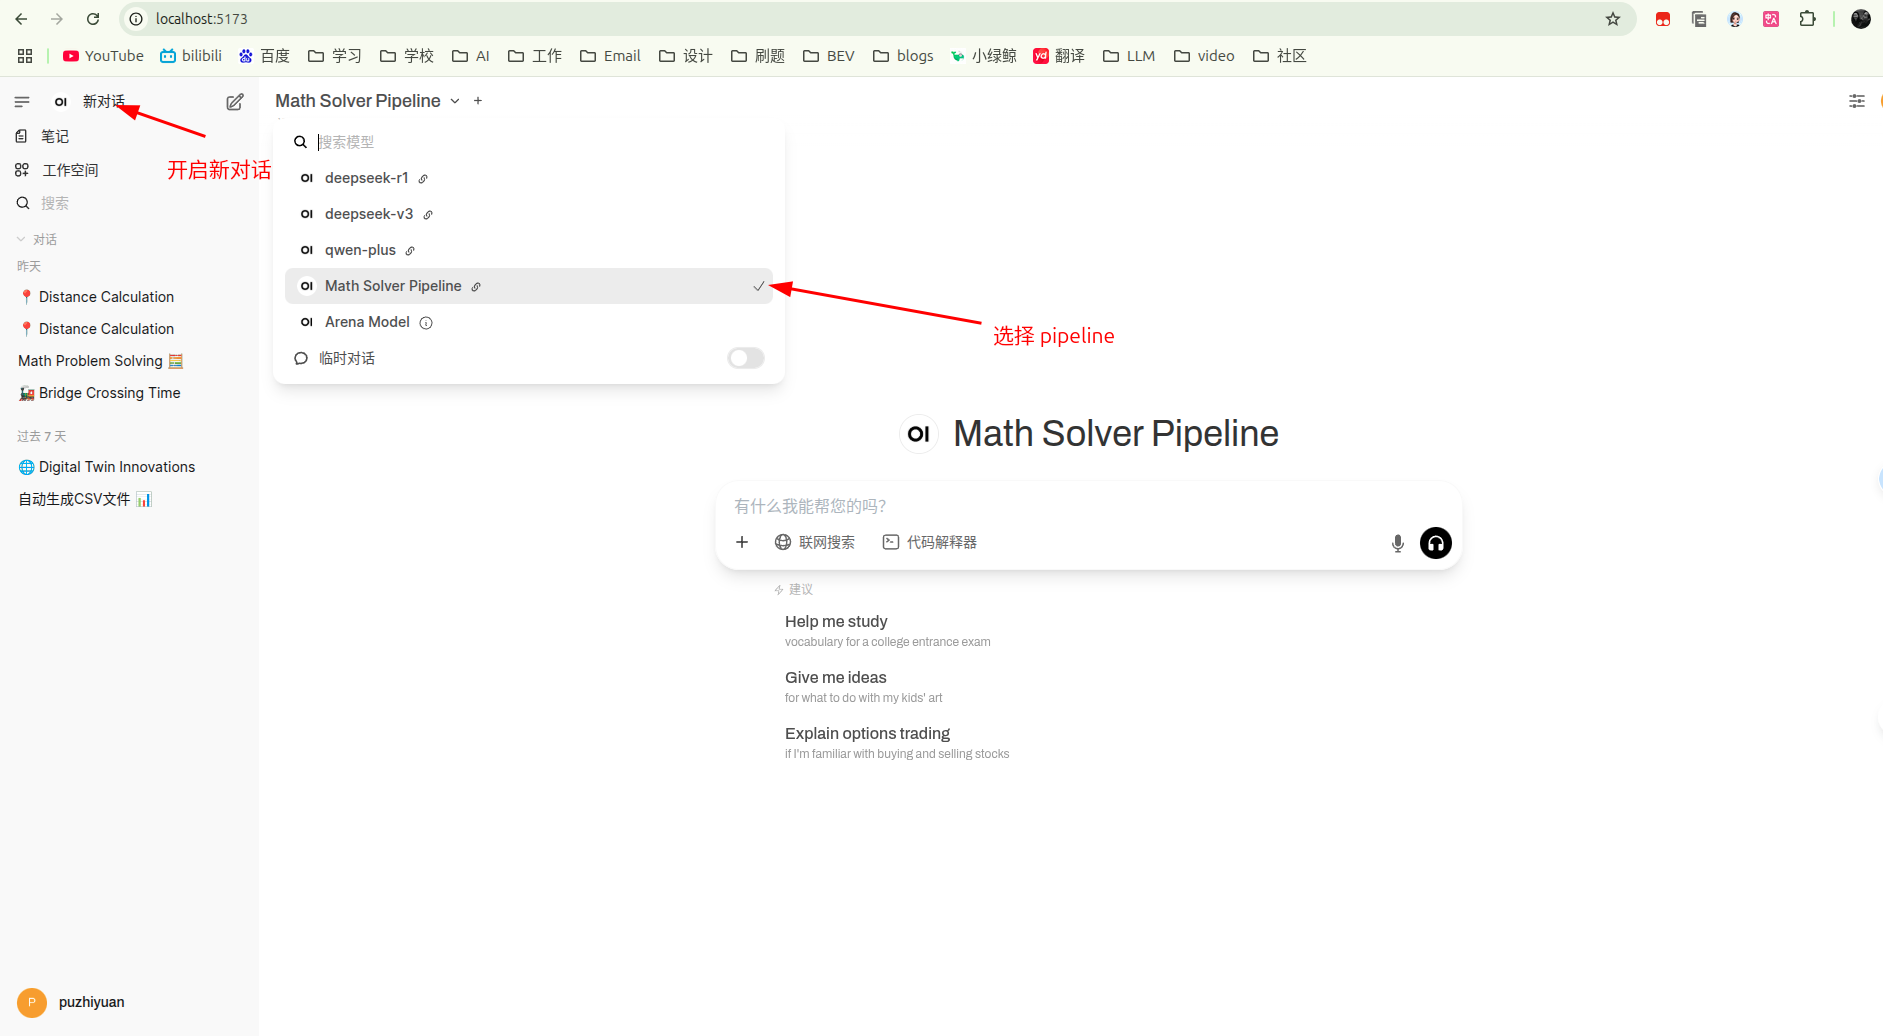
-
- 开启新对话并选择定义好的 pipeline ,此时就可以愉快的使用了。

有“AI”的1024 = 2048,欢迎大家加入2048 AI社区
更多推荐

 8
8 0
0- 0


 已为社区贡献2条内容

所有评论(0)