【必学收藏】阿里Qwen3模型完全解析:从架构到代码实现,带你深入理解大模型原理
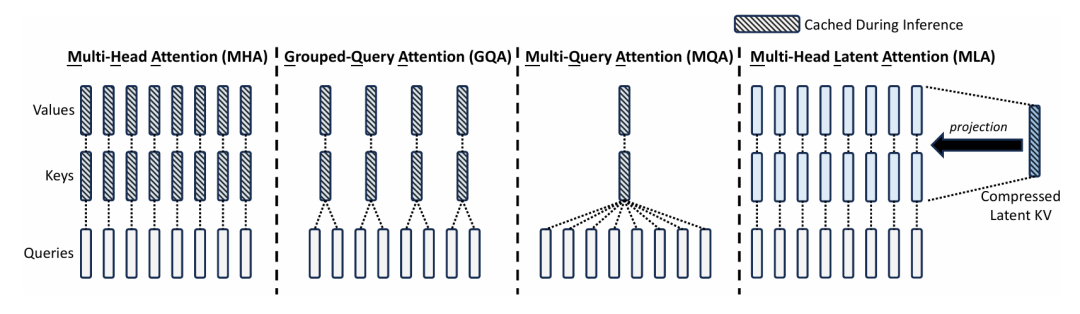
很多模型都会在这个基础去创新,比如最开始的MHA–>GQA–>MQA–>MLA,通过上图可以看到GQA核心是将KV进行分组,多个Q给到分组的KV(核心参数:num_kv_groups),从而减少计算和内存开销。在代码、数学、通用能力等基准测试中,与 DeepSeek-R1、o1、o3-mini、Grok-3 和 Gemini-2.5-Pro 等顶级模型相比,表现出极具竞争力的结果。整体的一个Qwe
【必学收藏】阿里Qwen3模型完全解析:从架构到代码实现,带你深入理解大模型原理
本文详细解析阿里Qwen3大模型的架构与实现。首先介绍Qwen3在代码、数学等领域的出色性能,然后深入解析其模型结构,包括输入处理、Transformer块、GQA注意力机制、前馈网络和RMSNorm归一化等。文章提供了完整的PyTorch代码实现,从Qwen3Model到各个组件,帮助读者理解大模型的工作原理和实现细节。
引言
2025年4月29号,阿里千问团队发表了Qwen3模型,这是 Qwen 系列大型语言模型的最新成员。他们的旗舰模型 Qwen3-235B-A22B 在代码、数学、通用能力等基准测试中,与 DeepSeek-R1、o1、o3-mini、Grok-3 和 Gemini-2.5-Pro 等顶级模型相比,表现出极具竞争力的结果。此外,小型 MoE 模型 Qwen3-30B-A3B 的激活参数数量是 QwQ-32B 的 10%,表现更胜一筹,甚至像 Qwen3-4B 这样的小模型也能匹敌 Qwen2.5-72B-Instruct 的性能。
Qwen3模型结构
1、输入处理:输入的文本首先被转换为token ID序列,通过嵌入层将token转换为向量表示。
2、核心Transformer块:Qwen3由多个相同的Transformer块堆叠而成,每个块包含以下组件:
3、自注意力机制:使用多头自注意力机制,能够捕捉输入序列中各个token之间的关系。
4、归一化层:采用RMSNorm替代LayerNorm,在每个自注意力层和前馈网络之后进行归一化处理。
5、前馈网络:使用GEGLU或SwiGLU激活函数,增强模型的表达能力。
输出层:通过RMSNorm后,使用QWenLMHead生成下一个token的预测概率分布。
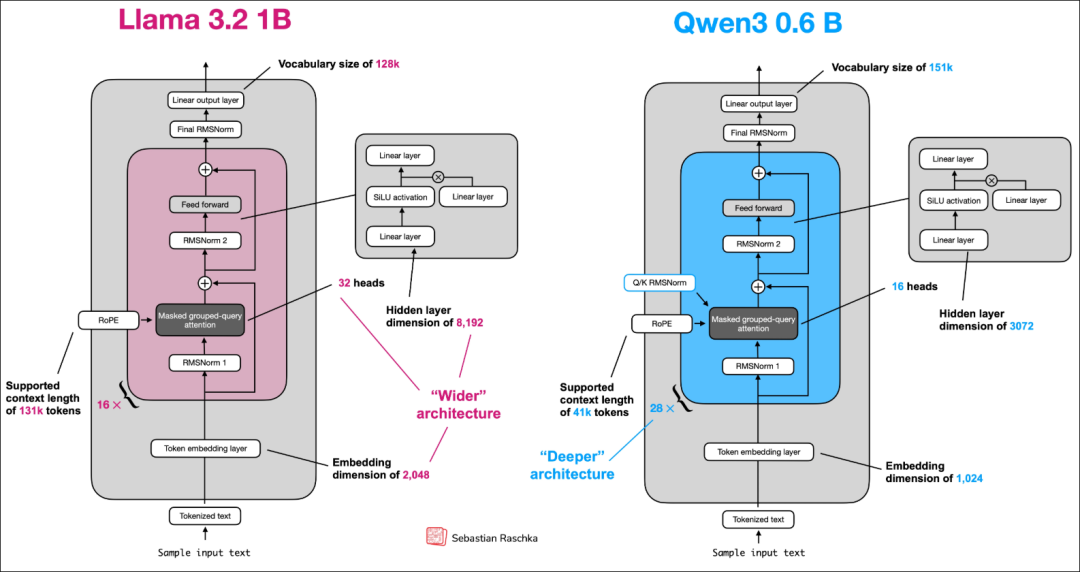
模型结构如下图所示:
整体实现
根据上面的五个组成部分,我们分别来进行一个实现。
1、数据输入处理,通过加载tokenizer,将输入的input text转为token_ids
device = torch.device("gpu")   # 这里根据实际情况选择,可以是cpu,也可以是gpu
tokenizer_file_path = Path("qwen3") / "tokenizer-base.json"
model_file = Path("qwen3") / "qwen3-0.6B-base.pth"
tokenizer = Qwen3Tokenizer(tokenizer_file_path=tokenizer_file_path)
model = Qwen3Model(QWEN_CONFIG_06_B)
model.load_state_dict(torch.load(model_file))
model.to(device)
prompt = "什么是大语言模型?"
input_token_ids_tensor = torch.tensor(
tokenizer.encode(prompt),
device=device
).unsqueeze(0)
接下来的代码都可以在这里获取:https://blog.csdn.net/python1222_/article/details/153068612?spm=1011.2415.3001.5331
接下来我们进行第二步,Qwen3网络结构整体编码。
2、Qwen3网络结构编码
class Qwen3Model(nn.Module):
def __init__(self, cfg):
super().__init__()
# 模型的主要参数, 开源模型一般就是config.json文件里面的参数
self.tok_emb = nn.Embedding(cfg["vocab_size"], cfg["emb_dim"],
dtype=cfg["dtype"])
# 大模型层数
self.trf_blocks = nn.ModuleList(
[TransformerBlock(cfg) for _ in range(cfg["n_layers"])]
)
self.final_norm = RMSNorm(cfg["emb_dim"])
self.out_head = nn.Linear(cfg["emb_dim"], cfg["vocab_size"], bias=False,
dtype=cfg["dtype"])
# rope 旋转位置编码
if cfg["head_dim"] is None:
head_dim = cfg["emb_dim"] // cfg["n_heads"]
else:
head_dim = cfg["head_dim"]
cos, sin = compute_rope_params(
head_dim=head_dim,
theta_base=cfg["rope_base"],
context_length=cfg["context_length"]
)
self.register_buffer("cos", cos, persistent=False)
self.register_buffer("sin", sin, persistent=False)
self.cfg = cfg
self.current_pos = 0  # kvcache使用
def forward(self, in_idx, cache=None):
tok_embeds = self.tok_emb(in_idx)
x = tok_embeds
num_tokens = x.shape[1]
if cache is not None: # kvcache
pos_start = self.current_pos
pos_end = pos_start + num_tokens
self.current_pos = pos_end
mask = torch.triu(
torch.ones(pos_end, pos_end, device=x.device, dtype=torch.bool),
diagonal=1
)[pos_start:pos_end, :pos_end]
else:
pos_start = 0  # Not strictly necessary but helps torch.compile
mask = torch.triu(
torch.ones(num_tokens, num_tokens, device=x.device,
dtype=torch.bool),
diagonal=1
)
# Shape (1, 1, num_tokens, num_tokens) to broadcast across batch and heads
mask = mask[None, None, :, :]
for i, block in enumerate(self.trf_blocks):
blk_cache = cache.get(i) if cache else None
x, new_blk_cache = block(x, mask, self.cos, self.sin,
start_pos=pos_start,
cache=blk_cache)
if cache is not None:
cache.update(i, new_blk_cache)
x = self.final_norm(x)
logits = self.out_head(x.to(self.cfg["dtype"]))
return logits
def reset_kv_cache(self):
self.current_pos = 0
这部分代码就是整个Qwen3 核心所在:
第一步:完成了了input text 到token ids的过程;
第二步(看结构图): Token embedding layer ,通过nn.embedding将token ids 转为embedding
第三步(看图,红色块): Transfomer Block,通过trf_blocks封装包含RMSNorm、GQA、FFN
第四步:Final RMSNorm , 对应代码中的 self.final_norm(x)
最后:Linear output layer, 对应 self.out_head
3、Transformer Block 编码
class TransformerBlock(nn.Module):
def __init__(self, cfg):
super().__init__()
self.att = GroupedQueryAttention( # GQA实现
d_in=cfg["emb_dim"],
num_heads=cfg["n_heads"],
head_dim=cfg["head_dim"],
num_kv_groups=cfg["n_kv_groups"],
qk_norm=cfg["qk_norm"],
dtype=cfg["dtype"]
)
self.ff = FeedForward(cfg)
self.norm1 = RMSNorm(cfg["emb_dim"], eps=1e-6)
self.norm2 = RMSNorm(cfg["emb_dim"], eps=1e-6)
def forward(self, x, mask, cos, sin, start_pos=0, cache=None):
# Shortcut connection ,一种特殊的残差连接
shortcut = x
x = self.norm1(x)
x, next_cache = self.att(
x, mask, cos, sin, start_pos=start_pos,cache=cache
)  # Shape [batch_size, num_tokens, emb_size]
x = x + shortcut
# Shortcut connection for feed-forward block
shortcut = x
x = self.norm2(x)
x = self.ff(x)
x = x + shortcut  # Add the original input back
return x, next_cache
这部分代码是Transformer Block核心(看途中红色或蓝色框):
第一步: self.norm1(x) 参数归一化,后面紧跟着GQA
第二步:GQA,GQA是什么结构,可以参考下图
第三步:shortcut connnection
第四步: self.norm2(x)
第五步:self.ff(x)
第六步:shortcut connnection
4、GQA的编码
很多模型都会在这个基础去创新,比如最开始的MHA–>GQA–>MQA–>MLA,通过上图可以看到GQA核心是将KV进行分组,多个Q给到分组的KV(核心参数:num_kv_groups),从而减少计算和内存开销。
class GroupedQueryAttention(nn.Module):
def __init__(self,d_in, num_heads , num_kv_groups ,head_dim =None,qk_norm=False,dtype=None):
super().__init__()
assert num_heads % num_kv_groups == 0
self.num_heads = num_heads
self.num_kv_groups = num_kv_groups
self.group_size = num_heads // num_kv_groups
if head_dim is None:
assert  d_in % num_heads ==0
head_dim = d_in // num_heads
self.head_dim = head_dim
self.d_out = num_heads * head_dim
self.W_query = nn.Linear(d_in, self.d_out,bias=False,dtype=dtype)
self.W_key = nn.Linear(d_in,num_kv_groups * head_dim , bias=False,dtype=dtype)
self.W_value = nn.Linear(d_in,num_kv_groups * head_dim,bias=False,dtype=dtype)
self.out_proj = nn.Linear(self.d_out,d_in,bias=False,dtype=dtype)
if qk_norm:
self.q_norm = RMSNorm(head_dim,eps=1e-6)
self.k_norm = RMSNorm(head_dim, eps=1e-6)
else:
self.q_norm = self.k_norm = None
def forward(self,x,mask,cos,sin,start_pos=0,cache=None):
b, num_tokens,_ = x.shape
queries = self.W_query(x)
keys = self.W_key(x)
values = self.W_value(x)
queries = queries.view(b,num_tokens,self.num_heads,self.head_dim).transpose(1,2)
keys_new = keys.view(b,num_tokens,self.num_kv_groups,self.head_dim).transpose(1,2)
values_new = values.view(b,num_tokens,self.num_kv_groups,self.head_dim).transpose(1,2)
if self.q_norm:
queries =self.q_norm(queries)
if self.k_norm:
keys_new = self.k_norm(keys)
queries = apply_rope(queries,cos,sin,offset=start_pos)
keys_new = apply_rope(keys_new,cos,sin,offset=start_pos)
if cache is not None:
prev_k , prev_v = cache
keys = torch.cat([prev_k,keys_new],dim=2)
values = torch.cat([prev_v,values_new],dim=2)
else:
start_pos = 0
keys ,values = keys_new,values_new
next_cache = (keys, values)
keys = keys.repeat_interleave(self.group_size,dim=1)
values = values.repeat_interleave(self.group_size,dim=1)
attn_scores = queries @ keys.transpose(2, 3)
attn_scores = attn_scores.masked_fill(mask, -torch.inf)
attn_weights = torch.softmax(attn_scores / self.head_dim**0.5, dim=-1)
context = (attn_weights @ values).transpose(1,2)
context = context.reshape(b,num_tokens,self.d_out)
return self.out_proj(context),next_cache
这里整个代码就是GQA的实现逻辑,核心还是QKV分组、维度对齐、计算的过程。接下来我们看看FFN
5、FFN实现
class FeedForward(nn.Module):
def __init__(self,cfg):
super().__init__()
self.fc1 = nn.Linear(cfg["emb_dim"],cfg["hidden_dim"],dtype=cfg["dtype"],bias=False)
self.fc2 = nn.Linear(cfg["emb_dim"],cfg["hidden_dim"],dtype=cfg["dtype"],bias=False)
self.fc3 = nn.Linear(cfg["emb_dim"],cfg["hidden_dim"],dtype=cfg["dtype"],bias=False)
def forward(self,x):
x_fc1 = self.fc1(x)
x_fc2 = self.fc2(x)
x = nn.functional.silu(x_fc1) * x_fc2
return self.fc3(x)
FFN实现相对简单,一个多层感知机,通过三个线性层以及激活函数完成,
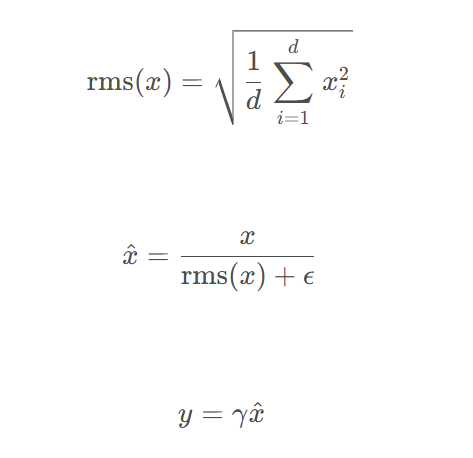
6、RMSNorm归一化
归一化是为了让参数在某一个范围内,以致模型训练过程比较稳定
class RMSNorm(nn.Module):
def __init__(self,emb_dim, eps=1e-6, bias =False, qwen3_compatible=True):
super().__init__()
self.eps = eps
self.qwen3_compatible = qwen3_compatible
self.scale = nn.Parameter(torch.ones(emb_dim))
self.shift = nn.Parameter(torch.zeros(emb_dim)) if bias else None
def forward(self,x):
input_dtype = x.dtype
if self.qwen3_compatible:
x = x.to(torch.float32)
variance = x.pow(2).mean(dim=-1, keepdim=True)
norm_x = x * torch.rsqrt(variance + self.eps)
norm_x = norm_x * self.scale
if self.shift is not None:
norm_x = norm_x + self.shift
return  norm_x.to(input_dtype)
具体公式可参考:
整体的一个Qwen3的网络结构代码完成了,至于更深层次的一些隐藏原理和训练过程,后续可以一起探讨。
阿里Qwen3 blog:https://qwenlm.github.io/zh/blog/qwen3/
相关学习资料分享:https://blog.csdn.net/python1222_/article/details/153068612?spm=1011.2415.3001.5331

有“AI”的1024 = 2048,欢迎大家加入2048 AI社区
更多推荐
 11
11 0
0- 0


 已为社区贡献1条内容

所有评论(0)