Coze平台全面解析:测试工程师的AI智能体开发指南
Coze是字节跳动推出的新一代AI智能体开发平台,支持以低代码方式构建、部署和管理AI智能体。它不仅仅是另一个聊天机器人平台,而是完整的智能体开发生态系统。🧠科普小知识:什么是AI智能体?AI智能体是能够感知环境、做出决策并执行动作的软件实体。与传统程序不同,智能体具有自主性反应能力主动性和社交能力,能够根据目标灵活调整行为。Coze平台为测试工程师提供了强大的AI能力,能够显著提升测试效率和质
深入探索字节跳动Coze平台如何重塑测试工作流程,从零开始构建智能测试助手
一、引言:测试工程师面临的新挑战与机遇
在快速迭代的软件开发环境中,测试工程师经常面临这样的困境:
-
需求文档频繁变更,测试用例维护成本高
-
复杂系统难以全面覆盖,边缘场景易遗漏
-
缺陷分析依赖个人经验,排查效率低下
-
重复性工作占用大量时间,难以专注价值提升
传统的自动化测试工具虽然提高了执行效率,但在智能分析和自适应能力方面仍有局限。这就是Coze平台发挥作用的地方——它将AI能力引入测试全流程,让测试工程师能够构建专属的智能助手。
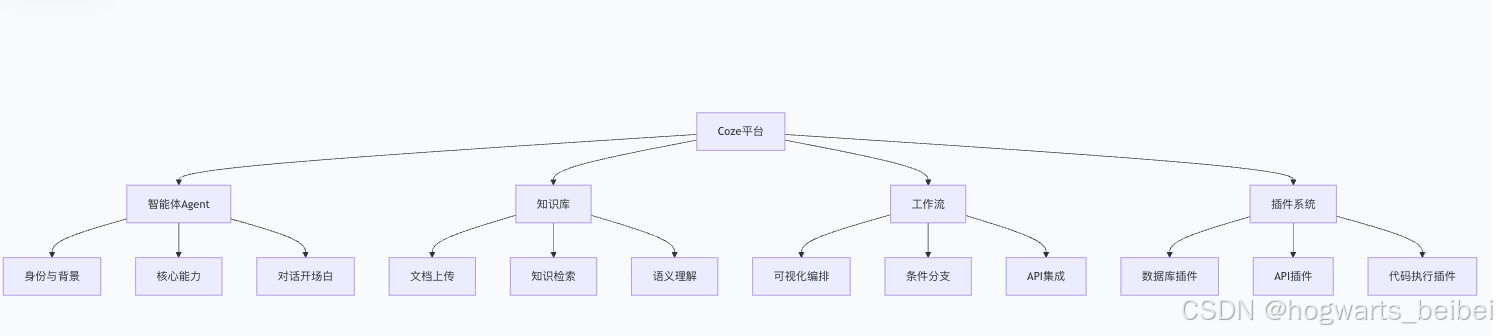
二、Coze平台核心架构解析
2.1 什么是Coze?
Coze是字节跳动推出的新一代AI智能体开发平台,支持以低代码方式构建、部署和管理AI智能体。它不仅仅是另一个聊天机器人平台,而是完整的智能体开发生态系统。
🧠 科普小知识:什么是AI智能体?
AI智能体是能够感知环境、做出决策并执行动作的软件实体。与传统程序不同,智能体具有自主性、反应能力、主动性和社交能力,能够根据目标灵活调整行为。
2.2 Coze的核心优势
与传统自动化工具相比,Coze具有明显优势:
| 特性 | 传统自动化工具 | Coze平台 |
|---|---|---|
| 学习曲线 | 需要编程技能 | 低代码/零代码 |
| 集成能力 | 需要单独开发集成 | 内置丰富插件和API |
| 适应性 | 规则固定,难适应变化 | AI驱动,适应新场景 |
| 维护成本 | 变更需要修改脚本 | 通过训练自动适应 |
| 分析能力 | 有限的数据分析 | 深度学习和模式识别 |
三、Coze在测试领域的应用场景
3.1 智能测试用例生成
传统测试用例设计依赖工程师经验,Coze可以分析需求文档自动生成测试场景:
python
# 测试用例生成工作流示例
def generate_test_cases(requirement_doc, testing_standard):
    """
    基于需求文档和测试标准生成测试用例
    """
    # 1. 需求分析
    requirements = analyze_requirements(requirement_doc)

    # 2. 提取测试关键点
    test_points = extract_test_points(requirements, testing_standard)

    # 3. 应用测试设计方法
    test_cases = []
    for point in test_points:
        # 等价类划分
        eq_classes = generate_equivalence_classes(point)
        # 边界值分析
        boundary_values = generate_boundary_values(point)
        # 场景法
        scenarios = generate_scenarios(point)

        test_cases.extend(combine_test_cases(eq_classes, boundary_values, scenarios))

    # 4. 格式化为标准模板
    formatted_cases = format_to_template(test_cases)

    return formatted_cases

# 使用示例
requirement = "用户登录功能,支持用户名密码和手机验证码两种方式"
test_standard = "需要覆盖正常流程、异常情况和安全测试"
cases = generate_test_cases(requirement, test_standard)
3.2 智能缺陷分析与管理
Coze可以改变缺陷管理方式,提供智能分析能力:
python
def intelligent_defect_analysis(new_bug_report):
    """
    智能缺陷分析工作流
    """
    # 1. 分析缺陷描述和上下文
    bug_analysis = analyze_bug_description(new_bug_report)

    # 2. 在知识库中搜索相似缺陷
    similar_bugs = search_similar_bugs(bug_analysis.features)

    if similar_bugs:
        # 3. 提供可能的解决方案
        solutions = extract_solutions(similar_bugs)
        # 4. 推荐相关负责人员
        recommended_assignee = recommend_assignee(similar_bugs)
        result = {
            "type": "known_issue",
            "solutions": solutions,
            "recommended_assignee": recommended_assignee
        }
    else:
        # 5. 为新缺陷分类和优先级评估
        category = categorize_bug(bug_analysis)
        priority = assess_priority(bug_analysis)
        result = {
            "type": "new_issue",
            "category": category,
            "priority": priority,
            "suggested_actions": ["详细日志分析", "环境对比测试"]
        }

    return result

# 使用示例
bug_report = {
    "title": "登录页面点击提交后无响应",
    "description": "在Chrome浏览器中,输入正确凭证后点击登录按钮,页面无任何反应",
    "environment": "Chrome 115, Windows 10"
}

analysis_result = intelligent_defect_analysis(bug_report)
print(f"缺陷分析结果: {analysis_result}")
3.3 测试数据智能生成
测试数据准备是测试过程中的常见瓶颈,Coze可以智能生成和管理测试数据:
python
def generate_test_data(data_schema, constraints=None):
    """
    根据数据模式和约束生成测试数据
    """
    if constraints is None:
        constraints = {}

    test_data = []

    # 生成正常数据
    normal_data = generate_normal_data(data_schema)
    test_data.extend(normal_data)

    # 生成边界值数据
    boundary_data = generate_boundary_data(data_schema, constraints)
    test_data.extend(boundary_data)

    # 生成异常数据
    abnormal_data = generate_abnormal_data(data_schema)
    test_data.extend(abnormal_data)

    return test_data

# 使用示例
user_schema = {
    "username": {"type": "string", "min_len": 6, "max_len": 20},
    "password": {"type": "string", "min_len": 8, "patterns": ["[A-Z]", "[a-z]", "[0-9]"]},
    "email": {"type": "string", "format": "email"},
    "age": {"type": "integer", "min": 18, "max": 100}
}

constraints = {
    "username": ["unique"],
    "email": ["unique", "valid_format"]
}

test_users = generate_test_data(user_schema, constraints)
print(f"生成{len(test_users)}条测试数据")
四、实战:创建测试工程师智能体
4.1 环境准备与初始化
首先访问Coze官网注册账号,然后创建第一个测试智能体:
python
# Coze API客户端示例
class CozeClient:
    def __init__(self, api_key):
        self.api_key = api_key
        self.base_url = "https://api.coze.cn/v1"

    def create_agent(self, agent_config):
        """创建智能体"""
        headers = {
            "Authorization": f"Bearer {self.api_key}",
            "Content-Type": "application/json"
        }

        response = requests.post(
            f"{self.base_url}/agents",
            json=agent_config,
            headers=headers
        )

        return response.json()

    def upload_knowledge(self, agent_id, files):
        """上传知识库文档"""
        # 实现文件上传逻辑
        pass

# 智能体配置示例
test_agent_config = {
    "name": "QA测试助手",
    "description": "专注于软件测试的智能助手",
    "role": "你是一名专业的测试工程师助手,擅长测试用例设计、缺陷分析和测试策略制定。",
    "capabilities": [
        "测试用例生成",
        "缺陷分析",
        "测试数据生成",
        "测试报告分析"
    ],
    "settings": {
        "temperature": 0.3,
        "max_tokens": 2000,
        "context_rounds": 10
    }
}

# 创建智能体
client = CozeClient("your_api_key")
agent_info = client.create_agent(test_agent_config)
print(f"智能体创建成功: {agent_info['id']}")
4.2 知识库构建与优化
为测试智能体上传专业知识文档:
python
def build_qa_knowledge_base(agent_id, documents):
    """
    构建测试知识库
    """
    knowledge_base = []

    for doc in documents:
        if doc['type'] == 'requirement':
            # 处理需求文档
            processed = process_requirement_doc(doc['content'])
            knowledge_base.extend(processed)
        elif doc['type'] == 'test_case':
            # 处理测试用例
            processed = process_test_cases(doc['content'])
            knowledge_base.extend(processed)
        elif doc['type'] == 'bug_report':
            # 处理缺陷报告
            processed = process_bug_reports(doc['content'])
            knowledge_base.extend(processed)

    # 上传到Coze知识库
    upload_success = upload_to_coze_kb(agent_id, knowledge_base)
    return upload_success

# 示例文档
documents = [
    {
        "type": "requirement",
        "name": "用户管理系统需求文档",
        "content": "用户管理系统需要支持用户注册、登录、个人信息管理等功能..."
    },
    {
        "type": "test_case",
        "name": "登录功能测试用例",
        "content": "测试用例ID: LOGIN-001, 名称: 有效用户名密码登录..."
    },
    {
        "type": "bug_report",
        "name": "历史缺陷报告",
        "content": "缺陷ID: BUG-1234, 标题: 登录页面XSS漏洞..."
    }
]

# 构建知识库
success = build_qa_knowledge_base(agent_info['id'], documents)
print(f"知识库构建{'成功' if success else '失败'}")
4.3 工作流设计与集成
创建测试相关的工作流:
python
def create_test_workflow(workflow_config):
    """
    创建测试工作流
    """
    workflow = {
        "name": workflow_config["name"],
        "description": workflow_config["description"],
        "steps": []
    }

    # 添加工作流步骤
    for step in workflow_config["steps"]:
        workflow["steps"].append({
            "name": step["name"],
            "action": step["action"],
            "parameters": step.get("parameters", {}),
            "conditions": step.get("conditions", [])
        })

    return workflow

# 测试用例生成工作流配置
test_case_workflow_config = {
    "name": "测试用例生成工作流",
    "description": "根据需求描述自动生成测试用例",
    "steps": [
        {
            "name": "需求分析",
            "action": "analyze_requirements",
            "parameters": {"detail_level": "high"}
        },
        {
            "name": "测试点提取",
            "action": "extract_test_points",
            "conditions": ["previous_step_success"]
        },
        {
            "name": "用例生成",
            "action": "generate_test_cases",
            "parameters": {"techniques": ["equivalence", "boundary", "scenario"]}
        },
        {
            "name": "用例优化",
            "action": "optimize_cases",
            "conditions": ["has_test_cases"]
        },
        {
            "name": "格式输出",
            "action": "format_output",
            "parameters": {"template": "standard_test_case"}
        }
    ]
}

# 创建工作流
workflow = create_test_workflow(test_case_workflow_config)
print(f"工作流创建成功: {workflow['name']}")
五、Coze与现有测试工具集成
5.1 与测试管理系统集成
python
def integrate_with_test_management(coze_agent, tm_system):
    """
    与测试管理系统集成
    """
    integration_config = {
        "jira": {
            "api_endpoint": tm_system["url"] + "/rest/api/2",
            "auth_type": "basic",
            "mappings": {
                "test_case": {"create": "/testcase", "update": "/testcase/{id}"},
                "defect": {"create": "/issue", "update": "/issue/{id}"}
            }
        },
        "testrail": {
            "api_endpoint": tm_system["url"] + "/index.php?/api/v2",
            "auth_type": "basic",
            "mappings": {
                "test_case": {"create": "/add_case/{section_id}", "get": "/get_case/{id}"},
                "test_run": {"create": "/add_run/{project_id}", "get": "/get_run/{id}"}
            }
        }
    }

    # 配置Webhook和API连接
    setup_integration(coze_agent, integration_config[tm_system["type"]])

    return True

# 使用示例
tm_system = {
    "type": "jira",
    "url": "https://your-company.atlassian.net",
    "credentials": {"username": "user", "password": "pass"}
}

integrate_with_test_management(agent_info['id'], tm_system)
print("测试管理系统集成完成")
5.2 与CI/CD管道集成
python
def integrate_with_ci_cd(coze_agent, ci_system):
    """
    与CI/CD系统集成
    """
    integration_points = {
        "jenkins": {
            "webhook_url": f"{ci_system['url']}/generic-webhook-trigger/invoke",
            "triggers": {
                "on_build_start": "触发测试分析",
                "on_build_complete": "生成测试报告",
                "on_deployment": "执行冒烟测试"
            }
        },
        "gitlab": {
            "webhook_url": f"{ci_system['url']}/api/v4/projects/{ci_system['project_id']}/hooks",
            "triggers": {
                "on_push": "代码变更分析",
                "on_merge_request": "差异测试评估"
            }
        }
    }

    # 设置CI/CD集成
    setup_ci_cd_integration(coze_agent, integration_points[ci_system["type"]])

    return True

# 使用示例
ci_system = {
    "type": "jenkins",
    "url": "https://jenkins.your-company.com",
    "project_id": "test-automation"
}

integrate_with_ci_cd(agent_info['id'], ci_system)
print("CI/CD集成完成")
六、最佳实践与优化建议
6.1 提示词工程优化
python
def optimize_prompt_for_testing(base_prompt, testing_domain):
    """
    为测试领域优化提示词
    """
    domain_specific_additions = {
        "web_testing": """
        你专注于Web应用测试,特别关注:
        - 跨浏览器兼容性问题
        - 响应式设计测试
        - 前端性能问题
        - Web安全漏洞(XSS、CSRF等)
        """,
        "api_testing": """
        你专注于API测试,特别关注:
        - HTTP状态码和错误处理
        - 请求/响应格式验证
        - 性能和安全测试
        - 接口契约一致性
        """,
        "mobile_testing": """
        你专注于移动应用测试,特别关注:
        - 设备兼容性问题
        - 触摸交互测试
        - 电池和性能优化
        - 移动网络适应性
        """
    }

    optimized_prompt = base_prompt + domain_specific_additions.get(testing_domain, "")

    # 添加测试特定约束
    constraints = """
    Constraints:
    - 优先考虑测试覆盖率和缺陷发现能力
    - 提供的解决方案需要可执行和可验证
    - 对于不确定的领域,建议进一步测试方案
    - 始终保持客观和基于证据的分析
    """

    return optimized_prompt + constraints

# 使用示例
base_prompt = "你是一名专业的测试工程师助手,擅长分析测试需求和设计测试用例。"
optimized_prompt = optimize_prompt_for_qa(base_prompt, "web_testing")
print("优化后的提示词长度:", len(optimized_prompt))
6.2 性能监控与优化
python
def monitor_agent_performance(agent_id, time_window="7d"):
    """
    监控智能体性能指标
    """
    performance_metrics = {
        "response_times": get_response_times(agent_id, time_window),
        "accuracy_rates": get_accuracy_rates(agent_id, time_window),
        "user_satisfaction": get_user_feedback(agent_id, time_window),
        "resource_usage": get_resource_usage(agent_id, time_window)
    }

    # 分析性能问题
    issues = analyze_performance_issues(performance_metrics)

    # 生成优化建议
    recommendations = generate_optimization_recommendations(issues)

    return {
        "metrics": performance_metrics,
        "issues": issues,
        "recommendations": recommendations
    }

# 使用示例
performance_report = monitor_agent_performance(agent_info['id'])
print("性能监控报告生成完成")
七、总结与展望
Coze平台为测试工程师提供了强大的AI能力,能够显著提升测试效率和质量。通过本文介绍的方法和实践,你可以:
-
快速构建测试智能体:利用低代码平台创建专属测试助手
-
智能生成测试用例:基于需求文档自动生成全面测试场景
-
高效分析缺陷:利用AI能力快速定位和解决质量问题
-
无缝集成现有工具:连接测试管理系统和CI/CD管道
随着AI技术的不断发展,Coze在测试领域的应用前景包括:
-
自适应测试策略:根据系统变更自动调整测试重点
-
预测性质量分析:提前识别潜在质量风险
-
自然语言测试:使用自然语言描述生成可执行测试
-
全自动测试运维:实现测试环境的自维护和自优化
🚀 现在就开始你的Coze智能体开发之旅,体验AI带来的测试革命吧!

---人工智能学习交流群----
推荐阅读
* https://blog.csdn.net/chengzi_beibei/article/details/150393633?spm=1001.2014.3001.5501
* https://blog.csdn.net/chengzi_beibei/article/details/150393354?spm=1001.2014.3001.5501
* https://blog.csdn.net/chengzi_beibei/article/details/150393354?spm=1001.2014.3001.5501
学社精选
- 测试开发之路 大厂面试总结 - 霍格沃兹测试开发学社 - 爱测-测试人社区
- 【面试】分享一个面试题总结,来置个顶 - 霍格沃兹测试学院校内交流 - 爱测-测试人社区
- 测试人生 | 从外包菜鸟到测试开发,薪资一年翻三倍,连自己都不敢信!(附面试真题与答案) - 测试开发 - 爱测-测试人社区
- 人工智能与自动化测试结合实战-探索人工智能在测试领域中的应用
- 爱测智能化测试平台
- 自动化测试平台
- 精准测试平台
- AI测试开发企业技术咨询服务
技术成长路线
系统化进阶路径与学习方案
- 人工智能测试开发路径
- 名企定向就业路径
- 测试开发进阶路线
- 测试开发高阶路线
- 性能测试进阶路径
- 测试管理专项提升路径
- 私教一对一技术指导
- 全日制 / 周末学习计划
- 公众号:霍格沃兹测试学院
- 视频号:霍格沃兹软件测试
- ChatGPT体验地址:霍格沃兹测试开发学社
- 霍格沃兹测试开发学社
企业级解决方案
测试体系建设与项目落地
- 全流程质量保障方案
- 按需定制化测试团队
- 自动化测试框架构建
- AI驱动的测试平台实施
- 车载测试专项方案
- 测吧(北京)科技有限公司
技术平台与工具
自研工具与开放资源
- 爱测智能化测试平台 - 测吧(北京)科技有限公司
- ceshiren.com 技术社区
- 开源工具 AppCrawler
- AI测试助手霍格沃兹测试开发学社
- 开源工具Hogwarts-Browser-Use
人工智能测试开发学习专区

有“AI”的1024 = 2048,欢迎大家加入2048 AI社区
更多推荐


 12
12 0
0- 0


 已为社区贡献17条内容

所有评论(0)