LangChain4j 终章
本文介绍了LangChain4j中的几个核心技术模块:1. Tools(Function Calling) - 让大模型能够调用外部工具类,通过案例演示了发票开具和天气查询功能。2. 向量数据库 - 使用Qdrant实现文本向量化存储和语义搜索。3. RAG(检索增强生成) - 通过外部知识库增强大模型回答能力。4. MCP(模型上下文协议) - 类似OpenFeign的统一模型调用协议,演示了调
十一、LangChain4j之Tools (Function Calling)
11.1 是什么?
给大模型配一个调用其它外部Util工具类
11.2 案例开发1 (低阶)
11.2.1 建Module
langchain4j-11chat-functioncalling
11.2.2 改POM
<dependencies>
        <dependency>
            <groupId>org.springframework.boot</groupId>
            <artifactId>spring-boot-starter-web</artifactId>
        </dependency>
        <!--langchain4j-open-ai-->
        <dependency>
            <groupId>dev.langchain4j</groupId>
            <artifactId>langchain4j-open-ai</artifactId>
        </dependency>
        <!--langchain4j-->
        <dependency>
            <groupId>dev.langchain4j</groupId>
            <artifactId>langchain4j</artifactId>
        </dependency>
        <!--langchain4j-reactor-->
        <dependency>
            <groupId>dev.langchain4j</groupId>
            <artifactId>langchain4j-reactor</artifactId>
        </dependency>
        <!--httpclient5-->
        <dependency>
            <groupId>org.apache.httpcomponents.client5</groupId>
            <artifactId>httpclient5</artifactId>
            <version>5.5</version>
        </dependency>
        <!--lombok-->
        <dependency>
            <groupId>org.projectlombok</groupId>
            <artifactId>lombok</artifactId>
            <optional>true</optional>
        </dependency>
        <!--hutool-->
        <dependency>
            <groupId>cn.hutool</groupId>
            <artifactId>hutool-all</artifactId>
            <version>5.8.22</version>
        </dependency>
        <dependency>
            <groupId>org.springframework.boot</groupId>
            <artifactId>spring-boot-starter-test</artifactId>
            <scope>test</scope>
        </dependency>
    </dependencies>

    <build>
        <plugins>
            <plugin>
                <groupId>org.springframework.boot</groupId>
                <artifactId>spring-boot-maven-plugin</artifactId>
            </plugin>
        </plugins>
    </build>
11.2.3 写YML
server.port=9011

spring.application.name=langchain4j-11chat-functioncalling
11.2.4 主启动
11.2.5 业务类
public interface FunctionAssistant
{
    //客户指令:出差住宿发票开票,
    // 开票信息:    公司名称xxx
    // 税号序列:    xx
    // 开票金额:    xxx.00元
    String chat(String message);
}
@Configuration
public class LLMConfig
{
@Bean
public ChatModel chatModel()
{
return OpenAiChatModel.builder()
.apiKey(System.getenv("aliQwen-api"))
.modelName("qwen-plus")
.baseUrl("https://dashscope.aliyuncs.com/compatible-mode/v1")
.build();
}
@Bean
public FunctionAssistant functionAssistant(ChatModel chatModel)
{
// 工具说明 ToolSpecification
ToolSpecification toolSpecification = ToolSpecification.builder()
.name("开具发票助手")
.description("根据用户提交的开票信息,开具发票")
.parameters(JsonObjectSchema.builder()
.addStringProperty("companyName", "公司名称")
.addStringProperty("dutyNumber", "税号序列")
.addStringProperty("amount", "开票金额,保留两位有效数字")
.build())
.build();
// 业务逻辑 ToolExecutor
ToolExecutor toolExecutor = (toolExecutionRequest, memoryId) -> {
System.out.println(toolExecutionRequest.id());
System.out.println(toolExecutionRequest.name());
String arguments1 = toolExecutionRequest.arguments();
System.out.println("arguments1****》 " + arguments1);
return "开具成功";
};
return AiServices.builder(FunctionAssistant.class)
.chatModel(chatModel)
.tools(Map.of(toolSpecification, toolExecutor)) // Tools (Function Calling)
.build();
}
}controller
@RestController
@Slf4j
public class ChatFunctionCallingController
{
    @Resource
    private FunctionAssistant functionAssistant;

    //  http://localhost:9011/chatfunction/test1
    @GetMapping(value = "/chatfunction/test1")
    public String test1()
    {
        String chat = functionAssistant.chat("开张发票,公司:996公司 税号:atguigu533 金额:668.12");

        System.out.println(chat);

        return "success : "+ DateUtil.now() + "\t"+chat;
    }
}
测试结果

11.3 案例开发2 (高阶)
使用注解 @Tool,可以更方便地集成函数调用,只需将Java方法标注为 @Tool,LangChain4j 就会自动将其转换为ToolSpecification
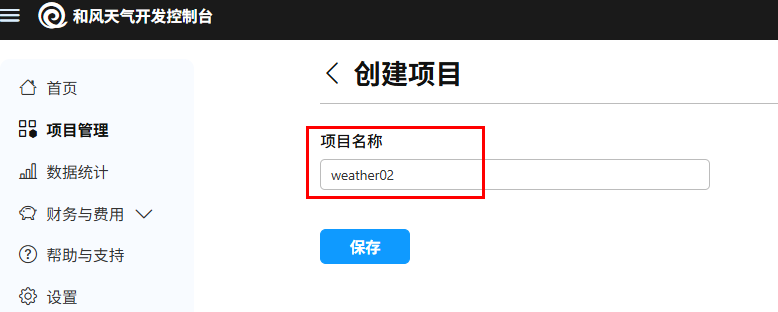
11.3.1 第三方接口:
创建项目:
创建凭证:
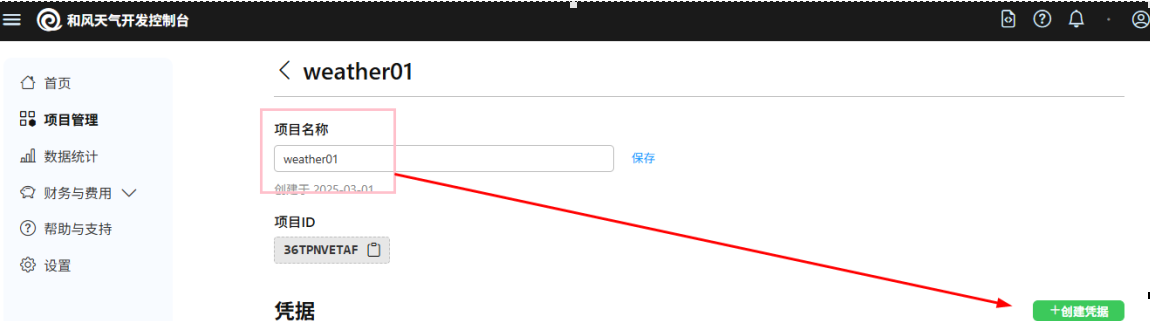
API地址与参数:

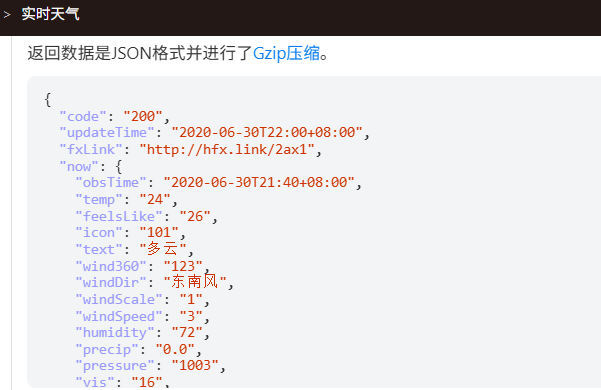
返回结果:
新建天气查询业务类:
@Service
public class WeatherService
{
    //和风天气开发服务 https://dev.qweather.com/

    // 替换成你自己的和风天气API密钥
    private static final String API_KEY = System.getenv("weatherAPI");
    // 调用的url地址和指定的城市,本案例以北京为例
    private static final String BASE_URL = "https://devapi.qweather.com/v7/weather/now?location=%s&key=%s";

    public JsonNode getWeatherV2(String city) throws Exception
    {
        //1 传入调用地址url和apikey
        String url = String.format(BASE_URL, city, API_KEY);

        //2 使用默认配置创建HttpClient实例
        var httpClient = HttpClients.createDefault();

        //3 创建请求工厂并将其设置给RestTemplate,开启微服务调用和风天气开发服务
        HttpComponentsClientHttpRequestFactory factory = new HttpComponentsClientHttpRequestFactory(httpClient);
        //4 RestTemplatew微服务调用
        String response = new RestTemplate(factory).getForObject(url, String.class);

        //5 解析JSON响应获得第3方和风天气返回的天气预报信息
        JsonNode jsonNode = new ObjectMapper().readTree(response);

        //6 想知道具体信息和结果请查看https://dev.qweather.com/docs/api/weather/weather-now/#response
        return jsonNode;
    }
}
配置类:
@Configuration
public class LLMConfig
{
    @Bean
    public ChatModel chatModel()
    {
        return OpenAiChatModel.builder()
                .apiKey(System.getenv("aliQwen-api"))
                .modelName("qwen-plus")
                .baseUrl("https://dashscope.aliyuncs.com/compatible-mode/v1")
                .build();
    }

    @Bean
    public FunctionAssistant functionAssistant(ChatModel chatModel)
    {
        return AiServices.builder(FunctionAssistant.class)
                    .chatModel(chatModel)
                    .tools(new InvoiceHandler())
                .build();
    }
}
新建类InvoiceHandler
@Slf4j
public class InvoiceHandler
{

    @Tool("根据用户提交的开票信息进行开票")
    public String handle(@P("公司名称") String companyName,
                         @P("税号") String dutyNumber,
                         @P("金额保留两位有效数字") String amount) throws Exception
    {
        log.info("companyName =>>>> {} dutyNumber =>>>> {} amount =>>>> {}", companyName, dutyNumber, amount);
        //----------------------------------
        // 这块写自己的业务逻辑,调用redis/rabbitmq/kafka/mybatis/顺丰单据/医疗化验报告/支付接口等第3方
        //----------------------------------
        System.out.println(new WeatherService().getWeatherV2("101010100"));

        return "开票成功";
    }
}
十二、LangChain4j之向量数据库
12.1 是什么?

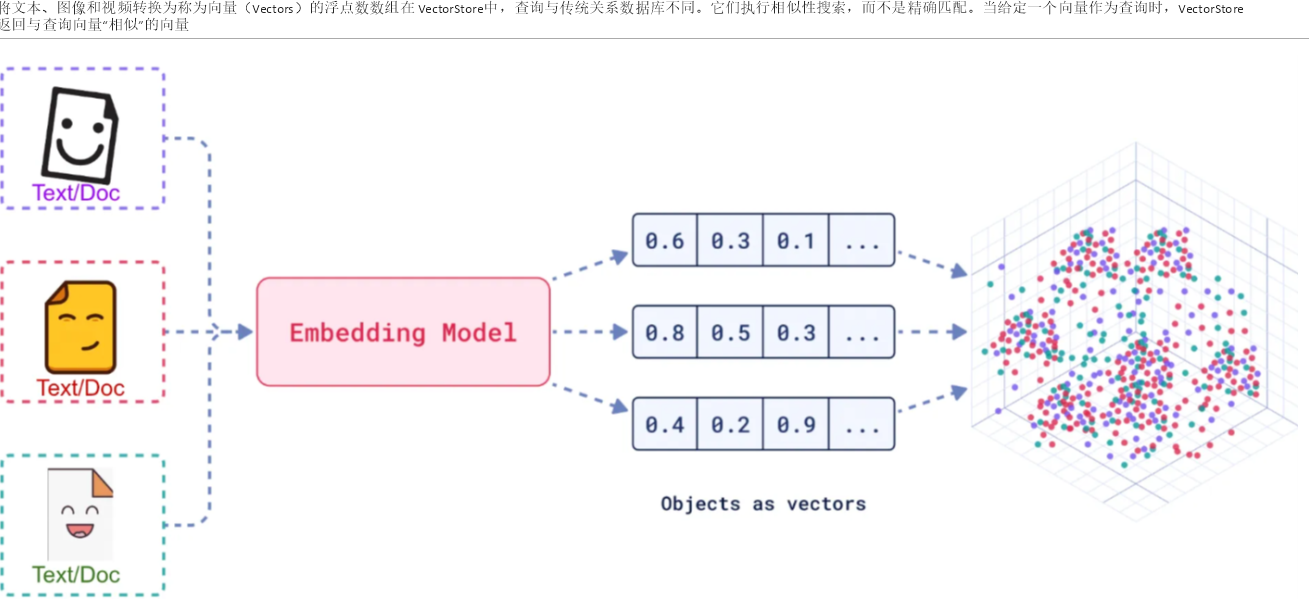
例如,“肯德基”和”麦当劳”的向量可能会比”肯德基”和”新疆大盘鸡”的向量更接近
12.2 简单使用:
Text search -- 文本搜索
Recommend movies -- 推荐电影
Match images and captions -- 匹配图片和标题
Group similar items -- 将相似项目归类
12.3 开发步骤
12.3.1 建Module
langchain4j-10chat-embedding
12.3.2 改POM
<dependencies>
        <dependency>
            <groupId>org.springframework.boot</groupId>
            <artifactId>spring-boot-starter-web</artifactId>
        </dependency>
        <dependency>
            <groupId>dev.langchain4j</groupId>
            <artifactId>langchain4j</artifactId>
        </dependency>
        <dependency>
            <groupId>dev.langchain4j</groupId>
            <artifactId>langchain4j-open-ai</artifactId>
        </dependency>
        <!--qdrant-->
        <dependency>
            <groupId>dev.langchain4j</groupId>
            <artifactId>langchain4j-qdrant</artifactId>
        </dependency>
        <!--lombok-->
        <dependency>
            <groupId>org.projectlombok</groupId>
            <artifactId>lombok</artifactId>
            <optional>true</optional>
        </dependency>
        <dependency>
            <groupId>org.springframework.boot</groupId>
            <artifactId>spring-boot-starter-test</artifactId>
            <scope>test</scope>
        </dependency>
    </dependencies>

    <build>
        <plugins>
            <plugin>
                <groupId>org.springframework.boot</groupId>
                <artifactId>spring-boot-maven-plugin</artifactId>
            </plugin>
        </plugins>
    </build>
12.3.3 写YML
server.port=9012

spring.application.name=langchain4j-12chat-embedding
12.3.4 主启动
12.3.5 业务类
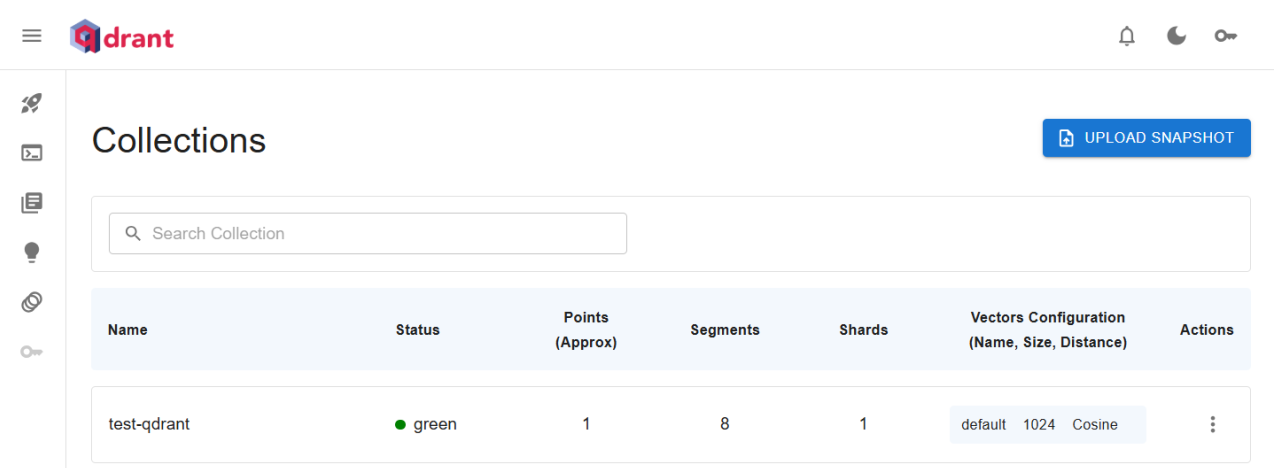
使用Qdrant向量数据库:
docker 安装
①、docker run -p 6333:6333 -p 6334:6334 qdrant/qdrant
②、端口6333:用于HTTP API,浏览器web界面
③、 端口6334:用于gRPC API
安装成功测试
http://localhost:6333/dashboard#/collections
阿里云百炼平台向量大模型
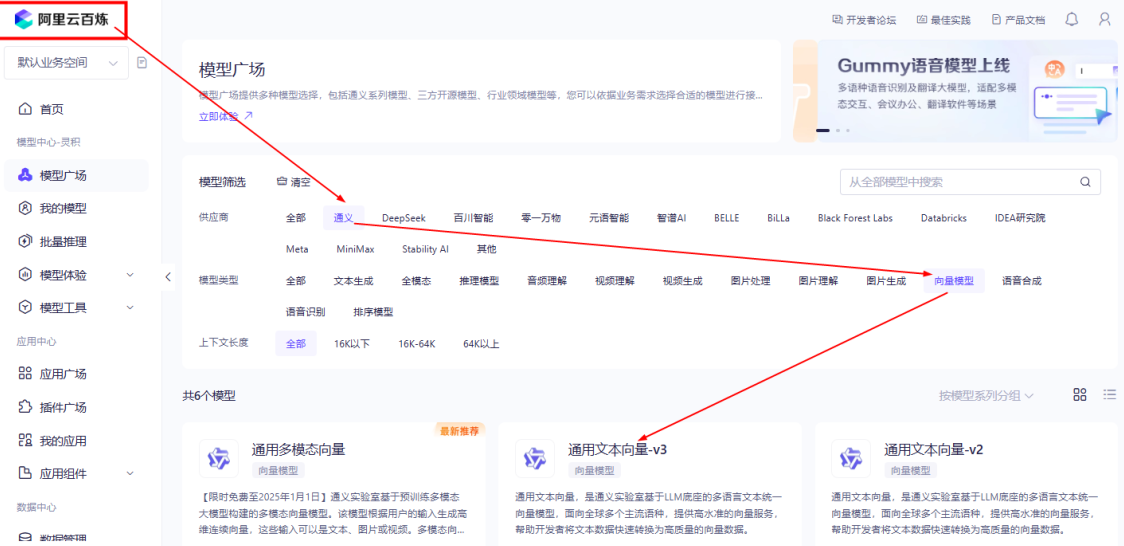
LLMConfig 配置类:
@Configuration
public class LLMConfig
{
    @Bean
    public EmbeddingModel embeddingModel()
    {
        return OpenAiEmbeddingModel.builder()
                    .apiKey(System.getenv("aliQwen-api"))
                    .modelName("text-embedding-v3")
                    .baseUrl("https://dashscope.aliyuncs.com/compatible-mode/v1")
                .build();
    }

    @Bean
    public QdrantClient qdrantClient() {
        QdrantGrpcClient.Builder grpcClientBuilder =
                QdrantGrpcClient.newBuilder("127.0.0.1", 6334, false);
        return new QdrantClient(grpcClientBuilder.build());
    }

    @Bean
    public EmbeddingStore<TextSegment> embeddingStore() {
        return QdrantEmbeddingStore.builder()
                .host("127.0.0.1")
                .port(6334)
                .collectionName("test-qdrant")
                .build();
    }
}
Controller
@RestController
@Slf4jpublic
class FunctionChatModelController {

@Resource
private EmbeddingModel embeddingModel;

@Resource
private QdrantClient qdrantClient;

@Resource
private EmbeddingStore<TextSegment> embeddingStore;


// http://localhost:9012/embedding/embed    @GetMapping("/embedding/embed")
public String embed() {

        String prompt = """                快跑,速度要快!                """;
        Response<Embedding> embeddingResponse = embeddingModel.embed(prompt);

        System.out.println(embeddingResponse);

return embeddingResponse.content().toString();
    }

@GetMapping("/embedding/collection")
public void createCollection() {

var vectorParam = Collections.VectorParams.
newBuilder().
                setDistance(Collections.Distance.Cosine).
                setSize(1024).
                build();

qdrantClient.createCollectionAsync("test-qdrant",vectorParam);
    }

@GetMapping("/embedding/add")
public String add() {

        String prompt = "以坚定信念前行。";
        TextSegment segment1 = TextSegment.from(prompt);
        segment1.metadata().put("author","llyb");
        Embedding content = embeddingModel.embed(segment1).content();
        String result = embeddingStore.add(content, segment1);

        System.out.println(result);
return result;
    }

@GetMapping("/embedding/query1")
public String query1() {

        Embedding content = embeddingModel.embed("跑的很快").content();

        EmbeddingSearchRequest embeddingSearchRequest  = EmbeddingSearchRequest.builder().
                                                queryEmbedding(content).
                                                maxResults(3).
                                                build();

        EmbeddingSearchResult<TextSegment> searchResult = embeddingStore.search(embeddingSearchRequest);

        System.out.println(searchResult.matches().get(0).embedded().text());
        System.out.println(searchResult.matches().get(1).embedded().text());
        System.out.println(searchResult.matches().get(2).embedded().text());
return searchResult.matches().get(0).embedded().text();
    }

@GetMapping(value = "/embedding/query2")
public void query2(){
        Embedding queryEmbedding = embeddingModel.embed("慢").content();

        EmbeddingSearchRequest embeddingSearchRequest = EmbeddingSearchRequest.builder()
                .queryEmbedding(queryEmbedding)
                .filter(metadataKey("author").isEqualTo("llyb"))
                .maxResults(1)
                .build();

        EmbeddingSearchResult<TextSegment> searchResult = embeddingStore.search(embeddingSearchRequest);

        System.out.println(searchResult.matches().get(0).embedded().text());
    }

}
十三、LangChain4j之检索增强生成RAG
13.1 是什么?
RAG技术就像给AI大模型装上了「实时百科大脑」,为了让大模型获取足够的上下文,以便获得更加广泛的信息源,通过先查资料后回答的机制,让AI摆脱传统模型的”知识遗忘和幻觉回复”困境
一句话:类似考试时有不懂的,给你准备了小抄。
13.2 作用
通过引入外部知识源来增强LLM的输出能力,传统的LLM通常基于其训练数据生成响应,但这些数据可能过时或不够全面。RAG允许模型在生成答案之前,从特定的知识库中检索相关信息,从而提供更准确和上下文相关的回答
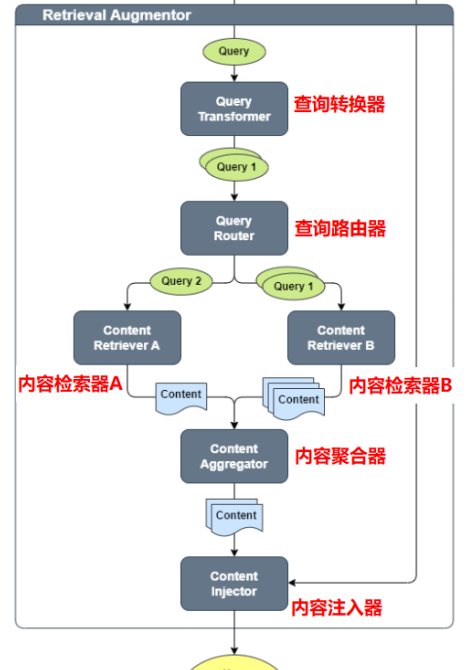
13.3 怎么使用?
RAG 流程分为两个不同的阶段:索引和检索
https://docs.langchain4j.dev/tutorials/rag#indexing
https://docs.langchain4j.dev/tutorials/rag#retrieval
13.4 案例开发
13.4.1 需求说明
某系统涉及后续自动化维护,需要根据响应码让大模型启动自迭代/自维护模式
《alibaba-java.docx》(运维文档,只能运维)
13.4.2 建Module
langchain4j-13chat-rag01
13.4.3 改pom
<dependencies>
        <dependency>
            <groupId>org.springframework.boot</groupId>
            <artifactId>spring-boot-starter-web</artifactId>
        </dependency>
        <dependency>
            <groupId>dev.langchain4j</groupId>
            <artifactId>langchain4j</artifactId>
        </dependency>
        <dependency>
            <groupId>dev.langchain4j</groupId>
            <artifactId>langchain4j-open-ai</artifactId>
        </dependency>
        <!--qdrant-->
        <dependency>
            <groupId>dev.langchain4j</groupId>
            <artifactId>langchain4j-qdrant</artifactId>
        </dependency>
        <!--easy-rag-->
        <dependency>
            <groupId>dev.langchain4j</groupId>
            <artifactId>langchain4j-easy-rag</artifactId>
        </dependency>
        <!--lombok-->
        <dependency>
            <groupId>org.projectlombok</groupId>
            <artifactId>lombok</artifactId>
            <optional>true</optional>
        </dependency>
        <dependency>
            <groupId>org.springframework.boot</groupId>
            <artifactId>spring-boot-starter-test</artifactId>
            <scope>test</scope>
        </dependency>
    </dependencies>

    <build>
        <plugins>
            <plugin>
                <groupId>org.springframework.boot</groupId>
                <artifactId>spring-boot-maven-plugin</artifactId>
            </plugin>
        </plugins>
    </build>
13.4.4 写yml
server.port=9013

spring.application.name=langchain4j-13chat-rag01
13.4.5 主启动
13.4.6 业务类
①、 新建接口ChatAssistant
public interface ChatAssistant {

    /**
     * 聊天
     * @param message 消息
     * @return {@link String }
     */
    String chat(String message);
}
②、 LLMConfig配置类
@Configuration
public class LLMConfig
{
    @Bean
    public ChatModel chatModel()
    {
        return OpenAiChatModel.builder()
                    .apiKey(System.getenv("aliQwen-api"))
                    .modelName("qwen-plus")
                    .baseUrl("https://dashscope.aliyuncs.com/compatible-mode/v1")
                .build();
    }

    /**
     * 需要预处理文档并将其存储在专门的嵌入存储(也称为矢量数据库)中。当用户提出问题时,这对于快速找到相关信息是必要的。
     * 我们可以使用我们支持的 15 多个嵌入存储中的任何一个,但为了简单起见,我们将使用内存中的嵌入存储:
      * https://docs.langchain4j.dev/integrations/embedding-stores/in-memory
     * @return
     */
    @Bean
    public InMemoryEmbeddingStore<TextSegment> embeddingStore() {
        return new InMemoryEmbeddingStore<>();
    }


    @Bean
    public ChatAssistant assistant(ChatModel chatModel, EmbeddingStore<TextSegment> embeddingStore)
    {
        return AiServices.builder(ChatAssistant.class)
                    .chatModel(chatModel)
                    .chatMemory(MessageWindowChatMemory.withMaxMessages(50))
                    .contentRetriever(EmbeddingStoreContentRetriever.from(embeddingStore))
                .build();
    }
}
③、 controller
@RestController
@Slf4j
public class RAGController
{
    @Resource
    InMemoryEmbeddingStore<TextSegment> embeddingStore;

    @Resource
    ChatAssistant chatAssistant;

    // http://localhost:9013/rag/add
    @GetMapping(value = "/rag/add")
    public String testAdd()
    {
        Document document = FileSystemDocumentLoader.loadDocument("D:\\44\\alibaba-java.docx");

        EmbeddingStoreIngestor.ingest(document, embeddingStore);

        String result = chatAssistant.chat("错误码00000和A0001分别是什么");

        System.out.println(result);

        return result;
    }
}
十四、MCP(模型上下文协议Model Context Protocol)
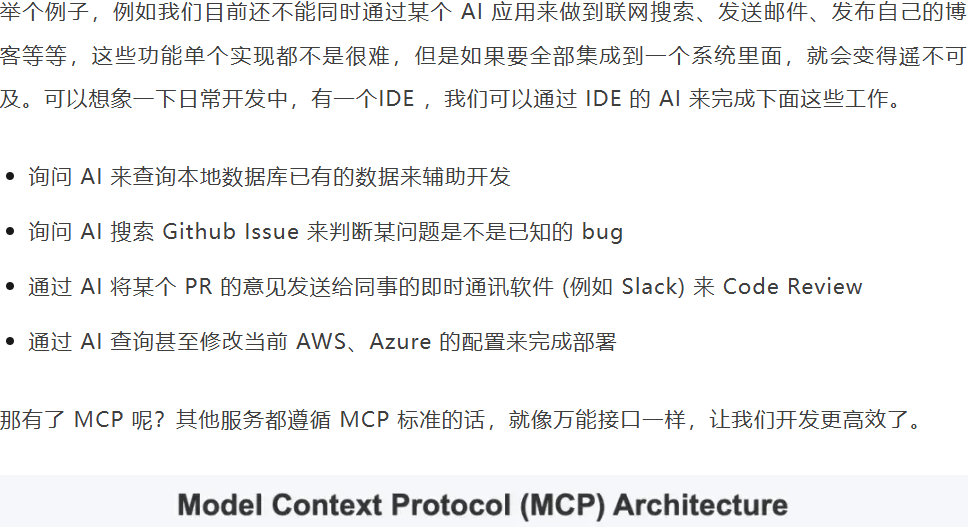
14.1 why为什么需要?
14.2 是什么?
大模型版的OpenFeign,OpenFeign用于微服务之间通讯,MCP用于大模型之间通讯
14.3 能干吗?
MCP 厉害的地方在于,不用重复造轮子。
过去每个软件(比如微信、Excel)都要单独给 AI 做接口,
现在 MCP 统一了标准,就像所有电器都用 USB-C 充电口,AI 一个接口就能连接所有工具
14.4 怎么玩?
https://mcp.so/zh mcp的多个模型网站
14.5 案例开发
14.5.1 需求说明
本地调用MCPServer百度地图
14.5.2 环境配置
①、下载NodeJS
②、注册百度地图账号+申请API-key
官网:https://lbsyun.baidu.com/apiconsole/key
申请步骤:
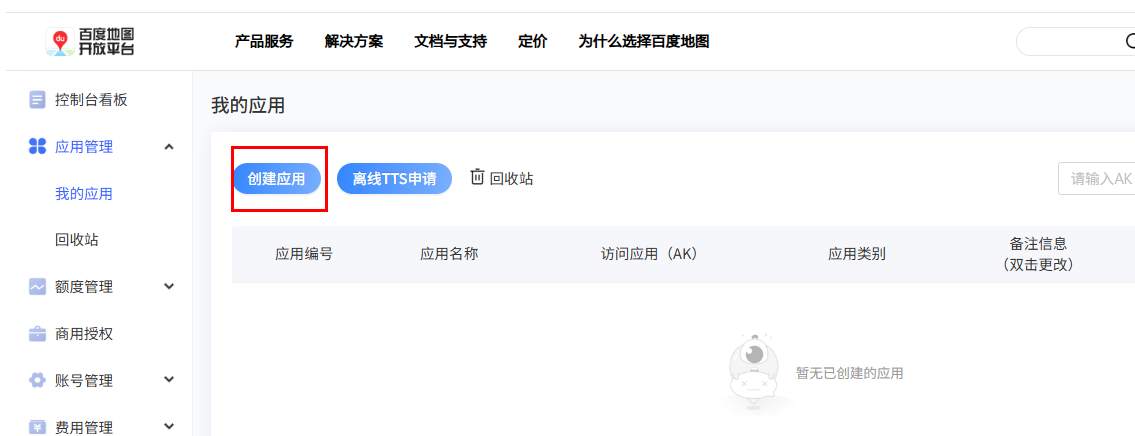
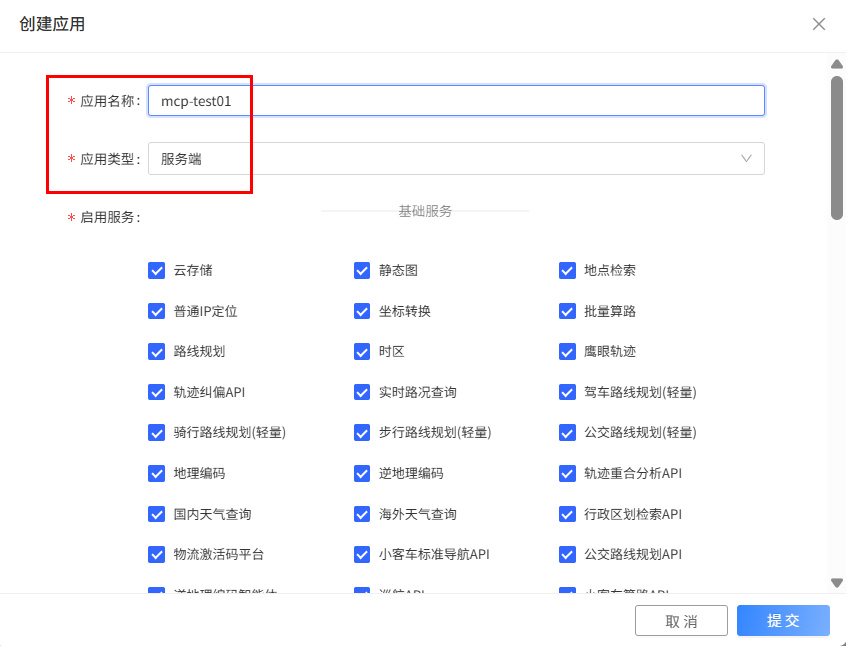
创建应用
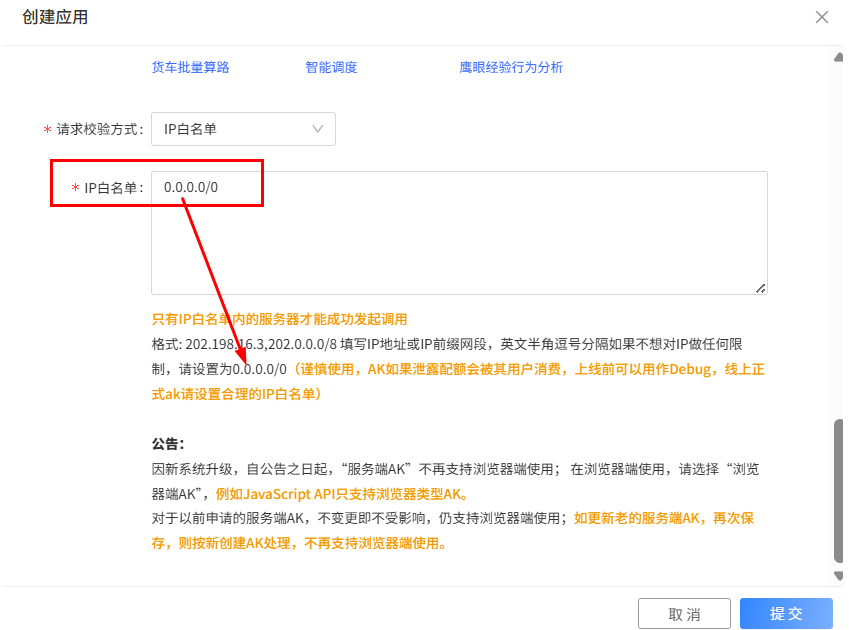
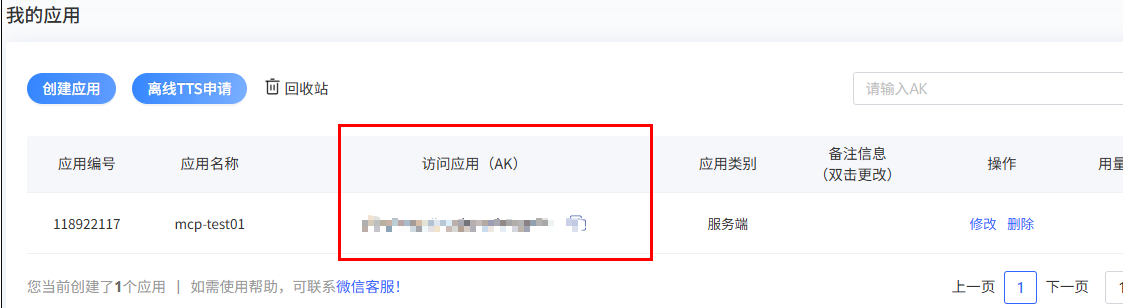
调用方式:
14.5.3 开发步骤
① 编写mcp调用程序
② 建Module
langchain4j-14chat-mcp
③ 改POM
<dependencies>
        <dependency>
            <groupId>org.springframework.boot</groupId>
            <artifactId>spring-boot-starter-web</artifactId>
        </dependency>
        <!--langchain4j-open-ai 基础-->
        <dependency>
            <groupId>dev.langchain4j</groupId>
            <artifactId>langchain4j-open-ai</artifactId>
        </dependency>
        <!--langchain4j 高阶-->
        <dependency>
            <groupId>dev.langchain4j</groupId>
            <artifactId>langchain4j</artifactId>
        </dependency>
        <!-- langchain4j-reactor实现流式输出 -->
        <dependency>
            <groupId>dev.langchain4j</groupId>
            <artifactId>langchain4j-reactor</artifactId>
        </dependency>
        <!--DashScope (Qwen)接入阿里云百炼平台
            https://docs.langchain4j.dev/integrations/language-models/dashscope
        -->
        <dependency>
            <groupId>dev.langchain4j</groupId>
            <artifactId>langchain4j-community-dashscope-spring-boot-starter</artifactId>
        </dependency>
        <!-- MCP Client 依赖 -->
        <dependency>
            <groupId>dev.langchain4j</groupId>
            <artifactId>langchain4j-mcp</artifactId>
        </dependency>
        <!--lombok-->
        <dependency>
            <groupId>org.projectlombok</groupId>
            <artifactId>lombok</artifactId>
            <optional>true</optional>
        </dependency>
        <!--hutool-->
        <dependency>
            <groupId>cn.hutool</groupId>
            <artifactId>hutool-all</artifactId>
            <version>5.8.22</version>
        </dependency>
        <!--test-->
        <dependency>
            <groupId>org.springframework.boot</groupId>
            <artifactId>spring-boot-starter-test</artifactId>
            <scope>test</scope>
        </dependency>
    </dependencies>

    <build>
        <plugins>
            <plugin>
                <groupId>org.springframework.boot</groupId>
                <artifactId>spring-boot-maven-plugin</artifactId>
            </plugin>
        </plugins>
    </build>
④ 写YML
server:
  port: 9014
  servlet:
    encoding:
      charset: UTF-8
      enabled: true
      force: true

spring:
  application:
    name: langchain4j-14chat-mcp

langchain4j:
  community:
    dashscope:
      streaming-chat-model:
        api-key: ${aliQwen-api}
        model-name: qwen-plus
      chat-model:
        api-key: ${aliQwen-api}
        model-name: qwen-plus

# 只有日志级别调整为debug级别,同时配置以上 langchain 日志输出开关才有效
logging:
  level:
    dev:
      langchain4j: DEBUG
⑤ 主启动
⑥ 业务类
public interface McpService
{
    Flux<String> chat(String question);
}
/**
*
* 第1步,如何进行mcp编码
* https://docs.langchain4j.dev/tutorials/mcp#creating-an-mcp-tool-provider
*
* 第2步,如何使用baidu map mcp,它提供了哪些功能对外服务
* https://mcp.so/zh/server/baidu-map/baidu-maps?tab=tools
*
* http://localhost:9014/mcp/chat?question=查询61.149.121.66归属地
* http://localhost:9014/mcp/chat?question=查询北京天气
* http://localhost:9014/mcp/chat?question=查询昌平到天安门路线规划
*/
@RestController
public class McpCallServerController
{
@Autowired
private StreamingChatModel streamingChatModel;
@GetMapping("/mcp/chat")
public Flux<String> chat(@RequestParam("question") String question)
{
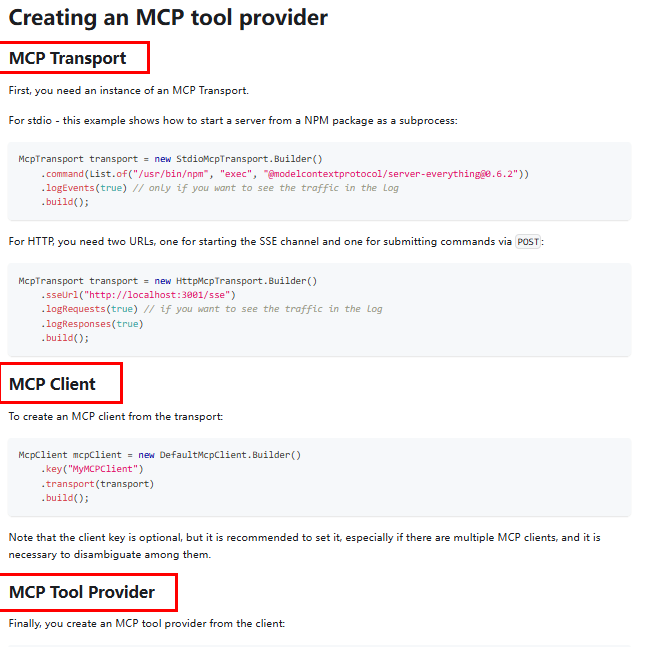
/**1.构建McpTransport协议
*
* 1.1 cmd:启动 Windows 命令行解释器。
* 1.2 /c:告诉 cmd 执行完后面的命令后关闭自身。
* 1.3 npx:npx = npm execute package,Node.js 的一个工具,用于执行 npm 包中的可执行文件。
* 1.4 -y 或 --yes:自动确认操作(类似于默认接受所有提示)。
* 1.5 @baidumap/mcp-server-baidu-map:要通过 npx 执行的 npm 包名
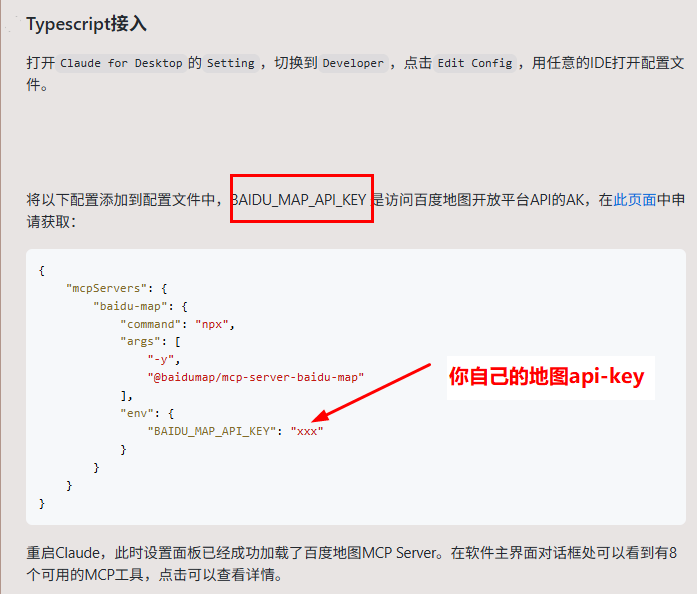
* 1.6 BAIDU_MAP_API_KEY 是访问百度地图开放平台API的AK
*/
McpTransport transport = new StdioMcpTransport.Builder()
.command(List.of("cmd", "/c", "npx", "-y", "@baidumap/mcp-server-baidu-map"))
.environment(Map.of("BAIDU_MAP_API_KEY", System.getenv("BAIDU_MAP_API_KEY")))
.build();
// 2.构建McpClient客户端
McpClient mcpClient = new DefaultMcpClient.Builder()
.transport(transport)
.build();
// 3.创建工具集和原生的FunctionCalling类似
ToolProvider toolProvider = McpToolProvider.builder()
.mcpClients(mcpClient)
.build();
// 4.通过AiServivces给我们自定义接口McpService构建实现类并将工具集和大模型赋值给AiService
McpService mcpService = AiServices.builder(McpService.class)
.streamingChatModel(streamingChatModel)
.toolProvider(toolProvider)
.build();
// 5.调用我们定义的HighApi接口,通过大模型对百度mcpserver调用
return mcpService.chat(question);
}
}小总结:
Function Calling,为了让大模型使用Util工具
RAG,为了让大模型获取足够的上下文
MCP,为了让大模型之间的调用
后续需要springAi的总结,继续关注,尽情期待。

有“AI”的1024 = 2048,欢迎大家加入2048 AI社区
更多推荐


 28
28 0
0- 0


 已为社区贡献3条内容

所有评论(0)