第12章 IoT产品设备管理
IoT:物联网是指通过信息传感设备,按约定的协议,将任何物体与网络相连接,物体通过信息传播媒介进行信息交换和通信,以实现智能化识别、定位、跟踪、监管等功能。共享充电宝智能音箱智能家居智能农耕智能医疗IoTDA(Internet of Thing Device Access):是一种物联网的设备接入服务,是华为云的物联网平台。将用户的设备数据进行安全、可靠、高效的运输。将设备集中管理,数据采集和分析
第12章 IoT产品设备管理
学习目标
- 能够熟悉华为云IoTDA平台的特点
- 能够掌握华为云IoTDA平台的一些概念,如:产品、设备、物模型等
- 能够掌握使用华为云IoTDA平台提供的接口创建设备,并绑定业务数据(老人、位置)
- 能够熟悉智能设备对接华为云IoTDA平台上报数据的方式
华为云IoTDA平台概述
IoT简介
IoT:物联网是指通过信息传感设备,按约定的协议,将任何物体与网络相连接,物体通过信息传播媒介进行信息交换和通信,以实现智能化识别、定位、跟踪、监管等功能。
IoT常见的应用场景:
- 共享充电宝
- 智能音箱
- 智能家居
- 智能农耕
- 智能医疗
华为云IoTDA平台简介
IoTDA(Internet of Thing Device Access):是一种物联网的设备接入服务,是华为云的物联网平台。
IoTDA的作用:
- 将用户的设备数据进行安全、可靠、高效的运输。
- 将设备集中管理,数据采集和分析来支撑上层应用。
华为云官网:行业AI先锋-华为云
IoTDA平台的概念(产品、设备、物模型)
下面的图展示了 freeStandardInstance平台实例、产品、设备、物模型、服务、属性及命令之间的层级和包含关系。
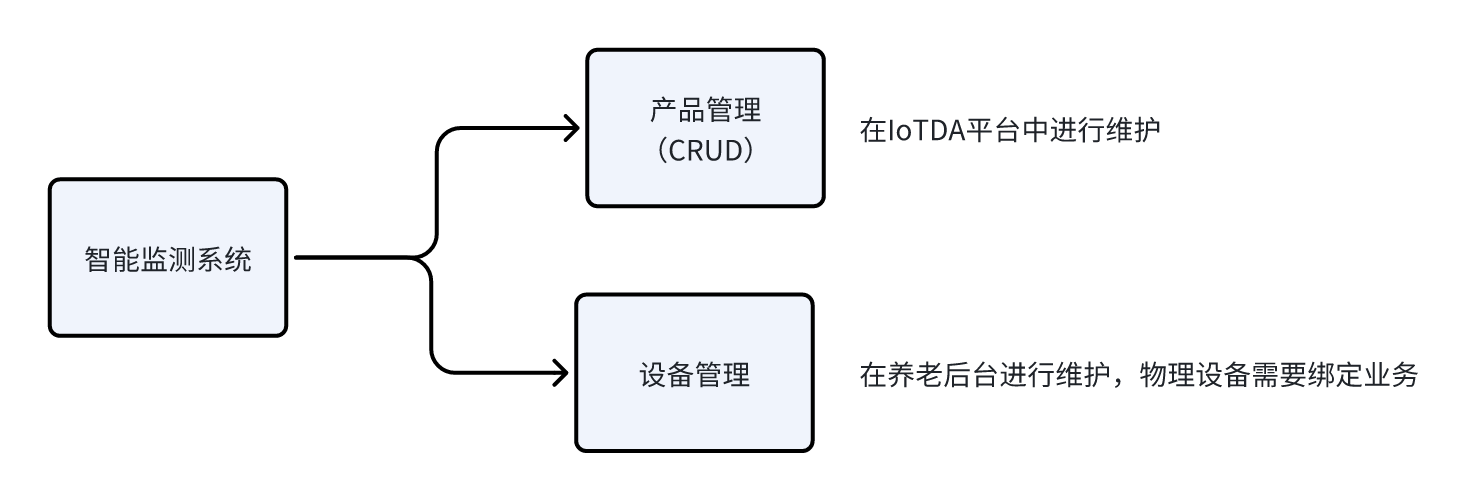
如何创建设备并绑定业务数据
后台管理系统中,需要咱们自己维护设备,不需要创建产品,因为产品直接在物联网平台创建添加即可。
需要单独维护设备的原因是:设备需要与业务对象进行绑定。
如下图所示:
如何上报数据(虚拟IoT设备)
1)在开发阶段可以使用联网的电脑,来模拟设备的数据上报,官方sdk下载(github远程仓库)
2)解压之后,使用idea打开,找到iot-device-demo模块中的PropertySample类
3)修改代码中的接入地址、设备id、设备密钥、物模型属性数据设置、物模型serviceId,即可上报数据。
package com.huaweicloud.sdk.iot.device.demo.device;

import com.huaweicloud.sdk.iot.device.IoTDevice;
import com.huaweicloud.sdk.iot.device.client.requests.ServiceProperty;
import com.huaweicloud.sdk.iot.device.transport.ActionListener;

import org.apache.logging.log4j.LogManager;
import org.apache.logging.log4j.Logger;

import java.io.File;
import java.io.IOException;
import java.io.InputStream;
import java.nio.file.Files;
import java.security.SecureRandom;
import java.util.Arrays;
import java.util.HashMap;
import java.util.List;
import java.util.Map;
import java.util.Random;

import static java.nio.file.StandardCopyOption.REPLACE_EXISTING;

/**
 * 演示如何直接使用DeviceClient进行设备属性的上报和读写
 */
public class PropertySample {

    private static final String IOT_ROOT_CA_RES_PATH = "ca.jks";

    private static final String IOT_ROOT_CA_TMP_PATH = "huaweicloud-iotda-tmp-" + IOT_ROOT_CA_RES_PATH;

    private static final Logger log = LogManager.getLogger(PropertySample.class);

    public static void main(String[] args) throws InterruptedException, IOException {

        // 加载iot平台的ca证书,进行服务端校验
        File tmpCAFile = new File(IOT_ROOT_CA_TMP_PATH);
        try (InputStream resource = CommandSample.class.getClassLoader().getResourceAsStream(IOT_ROOT_CA_RES_PATH)) {
            Files.copy(resource, tmpCAFile.toPath(), REPLACE_EXISTING);
        }

        // 创建设备并初始化. 用户请替换为自己的接入地址。-->watch01
        IoTDevice device = new IoTDevice(
            // 接入地址获取方式:登录华为云IoTDA控制台左侧导航栏“总览”页签,在选择的实例基本信息中,单击“接入信息”-->设备接入-->MQTT。选择8883端
            "ssl://230590aa95.st1.iotda-device.cn-east-3.myhuaweicloud.com:8883",
            // 设备id
            "67ab39f1bab900244b1e64a6_watch01",
            // 设备秘钥  设备创建成功后会自动生成
            "5f71b853642b8ccab767890a5b148f02", tmpCAFile);
        if (device.init() != 0) {
            return;
        }

        /*// 接收平台下发的属性读写     注释掉,用不到
        device.getClient().setPropertyListener(new PropertyListener() {
            // 处理写属性
            @Override
            public void onPropertiesSet(String requestId, List<ServiceProperty> services) {
                // 遍历service
                for (ServiceProperty serviceProperty : services) {
                    log.info("OnPropertiesSet, serviceId is {}", serviceProperty.getServiceId());
                    // 遍历属性
                    for (String name : serviceProperty.getProperties().keySet()) {
                        log.info("property name is {}", name);
                        log.info("set property value is {}", serviceProperty.getProperties().get(name));
                    }
                }
                // 修改本地的属性值
                device.getClient().respondPropsSet(requestId, IotResult.SUCCESS);
            }

            *//**
             * 处理读属性。多数场景下,用户可以直接从平台读设备影子,此接口不用实现。
             * 但如果需要支持从设备实时读属性,则需要实现此接口。
             *//*
            @Override
            public void onPropertiesGet(String requestId, String serviceId) {
                log.info("OnPropertiesGet, the serviceId is {}", serviceId);
                Map<String, Object> json = new HashMap<>();
                Random rand = new SecureRandom();
                json.put("alarm", 1);
                json.put("temperature", rand.nextFloat() * 100.0f);
                json.put("humidity", rand.nextFloat() * 100.0f);
                json.put("smokeConcentration", rand.nextFloat() * 100.0f);

                ServiceProperty serviceProperty = new ServiceProperty();
                serviceProperty.setProperties(json);
                serviceProperty.setServiceId("smokeDetector");

                device.getClient().respondPropsGet(requestId, Arrays.asList(serviceProperty));
            }
        });*/

        // 定时上报属性
        while (true) {

            Map<String, Object> json = new HashMap<>();
            Random rand = new SecureRandom();

            // 按照物模型设置属性,根据实际情况设置,下面是智能报警手表的物模型
            json.put("BodyTemp", 36);
            json.put("xueyang", rand.nextFloat()*100.0f);
            json.put("HeartRate", rand.nextFloat()*100.0f);
            json.put("BatteryPercentage", rand.nextFloat() * 100.0f);

            ServiceProperty serviceProperty = new ServiceProperty();
            serviceProperty.setProperties(json);
            serviceProperty.setServiceId("watch_services"); // serviceId要和物模型一致

            device.getClient().reportProperties(Arrays.asList(serviceProperty), new ActionListener() {
                @Override
                public void onSuccess(Object context) {
                    log.info("pubMessage success");
                }

                @Override
                public void onFailure(Object context, Throwable var2) {
                    log.error("reportProperties failed" + var2.toString());
                }
            });

            Thread.sleep(10000);
        }
    }
}
数据库表设计-设备表
因为需要在本地维护设备数据,所以创建设备表。
设备表的表结构如下:
接口设计-设备管理
依据需求分析和页面原型,在养老系统中需要维护设备数据,咱们需要开发以下接口:
- 从物联网平台同步产品列表
- 查询所有产品列表
- 注册设备
- 分页查询设备列表
- 查询设备详细数据
- 查看设备上报的数据
- 修改设备备注名称
- 删除设备
- 分页查询设备服务调用数据
分析完大概有这些接口之后,就进行接口文档的详细编写。
功能实现-设备管理
环境集成-IoT平台
集成方式:官方说明
在zzyl-framework模块导入依赖
<dependency>
    <groupId>com.huaweicloud.sdk</groupId>
    <artifactId>huaweicloud-sdk-core</artifactId>
    <version>3.1.76</version>
</dependency>
<dependency>
    <groupId>com.huaweicloud.sdk</groupId>
    <artifactId>huaweicloud-sdk-iotda</artifactId>
    <version>3.1.76</version>
</dependency>
在zzyl-admin模块中的application-dev.yml文件中添加关于IOT的配置如下:
huaweicloud:
  ak: UTVLYVJKFVGYVEFFWG
  sk: WkEWqfwZoFlLwbR5Kq5NmWTLmj71WhRXe
  #如果是上海一,请填写"cn-east-3";如果是北京四,请填写"cn-north-4";
  regionId: cn-east-3
  endpoint: 38e7abf.st1.iotda-app.cn-east-3.myhuaweicloud.com
  projectId: 57ee9b4c827a44cb94319a077f0fe7cb
  #amqp相关配置 下一章课程接收设备数据使用
  host: 38e7abedbf.st1.iotda-app.cn-east-3.myhuaweicloud.com
  accessKey: S25ZeTC5
  accessCode: a4fKpE5zbk0nbGNJU0d1bKkJNRZxQzlp
  queueName: DefaultQueue   #默认无需改动

在zzyl-framework中新增HuaWeiIotConfigProperties 来读取配置文件
package com.zzyl.framework.config.properties;

import lombok.Data;
import lombok.NoArgsConstructor;
import org.springframework.boot.context.properties.ConfigurationProperties;
import org.springframework.context.annotation.Configuration;

import java.util.Map;

/**
 * @author peterpeng
 */

@Data
@NoArgsConstructor
@Configuration
@ConfigurationProperties(prefix = "huaweicloud")
public class HuaWeiIotConfigProperties {

    /**
     * 访问Key
     */
    private String ak;

    /**
     * 访问秘钥
     */
    private String sk;

    /**
     * 区域id
     */
    private String regionId;

    /**
     * 应用侧https接入地址
     */
    private String endpoint;

    /**
     * 项目id
     */
    private String projectId;

    /**
     * 应用侧amqp接入地址
     */
    private String host;

    /**
     * amqp连接端口
     */
    private int port = 5671;

    /**
     * amqp接入凭证键值
     */
    private String accessKey;

    /**
     * amqp接入凭证密钥
     */
    private String accessCode;

    // 指定单个进程启动的连接数
    // 单个连接消费速率有限,请参考使用限制,最大64个连接
    // 连接数和消费速率及rebalance相关,建议每500QPS增加一个连接
    //可根据实际情况自由调节,目前测试和正式环境资源有限,限制更改为4
    private int connectionCount = 4;

    /**
     * 队列名称
     */
    private String queueName;

    /**
     * 开门命令所属服务id
     */
    private String smartDoorServiceId;

    /**
     * 开门记录属性
     */
    private String doorOpenPropertyName;

    /**
     * 开门命令
     */
    private String doorOpenCommandName;

    /**
     * 设置临时密码命令
     */
    private String passwordSetCommandName;

    /**
     * 仅支持true
     */
    private boolean useSsl = true;

    /**
     * IoTDA仅支持default
     */
    private String vhost = "default";

    /**
     * IoTDA仅支持PLAIN
     */
    private String saslMechanisms = "PLAIN";

    /**
     * true: SDK自动ACK(默认)
     * false:收到消息后,需要手动调用message.acknowledge()
     */
    private boolean isAutoAcknowledge = true;

    /**
     * 重连时延(ms)
     */
    private long reconnectDelay = 3000L;

    /**
     * 最大重连时延(ms),随着重连次数增加重连时延逐渐增加
     */
    private long maxReconnectDelay = 30 * 1000L;

    /**
     * 最大重连次数,默认值-1,代表没有限制
     */
    private long maxReconnectAttempts = -1;

    /**
     * 空闲超时,对端在这个时间段内没有发送AMQP帧则会导致连接断开。默认值为30000。单位:毫秒。
     */
    private long idleTimeout = 30 * 1000L;

    /**
     * The values below control how many messages the remote peer can send to the client and be held in a pre-fetch buffer for each consumer instance.
     */
    private int queuePrefetch = 1000;

    /**
     * 扩展参数
     */
    private Map<String, String> extendedOptions;
}
在zzyl-framework中添加如下配置:
package com.zzyl.framework.config;

import com.huaweicloud.sdk.core.auth.BasicCredentials;
import com.huaweicloud.sdk.core.auth.ICredential;
import com.huaweicloud.sdk.core.region.Region;
import com.huaweicloud.sdk.iotda.v5.IoTDAClient;
import com.zzyl.framework.config.properties.HuaWeiIotConfigProperties;
import org.springframework.beans.factory.annotation.Autowired;
import org.springframework.context.annotation.Bean;
import org.springframework.context.annotation.Configuration;

@Configuration
public class IotClientConfig {

    @Autowired
    private HuaWeiIotConfigProperties huaWeiIotConfigProperties;

    @Bean
    public IoTDAClient huaWeiIotInstance() {
        ICredential auth = new BasicCredentials()
                .withAk(huaWeiIotConfigProperties.getAk())
                .withSk(huaWeiIotConfigProperties.getSk())
                // 标准版/企业版需要使用衍生算法,基础版请删除配置"withDerivedPredicate"
                .withDerivedPredicate(BasicCredentials.DEFAULT_DERIVED_PREDICATE)
                .withProjectId(huaWeiIotConfigProperties.getProjectId());

        return IoTDAClient.newBuilder()
                .withCredential(auth)
                // 标准版/企业版:需自行创建Region对象,基础版:请使用IoTDARegion的region对象,如"withRegion(IoTDARegion.CN_NORTH_4)"
                .withRegion(new Region(huaWeiIotConfigProperties.getRegionId(), huaWeiIotConfigProperties.getEndpoint()))
                // .withRegion(IoTDARegion.CN_NORTH_4)
                .build();
    }
}
测试,在zzyl-admin模块下创建单元测试,查询产品列表,接口说明
详细代码如下:
package com.zzyl.test;

import com.huaweicloud.sdk.iotda.v5.IoTDAClient;
import com.huaweicloud.sdk.iotda.v5.model.ListProductsRequest;
import com.huaweicloud.sdk.iotda.v5.model.ListProductsResponse;
import com.huaweicloud.sdk.iotda.v5.model.Page;
import com.huaweicloud.sdk.iotda.v5.model.ProductSummary;
import org.junit.jupiter.api.Test;
import org.springframework.beans.factory.annotation.Autowired;
import org.springframework.boot.test.context.SpringBootTest;

import java.util.List;

@SpringBootTest
public class IoTDeviceTest {


    @Autowired
    private IoTDAClient client;

    /**
     * 查询公共实例下的所有产品
     * @throws Exception
     */
    @Test
    public void selectProduceList() throws Exception {
        ListProductsRequest listProductsRequest = new ListProductsRequest();
        listProductsRequest.setLimit(50);
        ListProductsResponse response = client.listProducts(listProductsRequest);
        List<ProductSummary> products = response.getProducts();
        System.out.println(products);
    }

}
环境集成-Redis
若依框架一般都集成了Redis相关依赖
<dependency>
    <groupId>org.springframework.boot</groupId>
    <artifactId>spring-boot-starter-test</artifactId>
</dependency>
在目前的若依框架中,就是使用Redis来作为缓存的,核心配置类如下:
- 在zzyl-framework模块中的com.zzyl.framework.config.RedisConfig类
- 作用:配置类,开启了缓存注解、对象序列化和反序列化
package com.zzyl.framework.config;

import org.springframework.cache.annotation.CachingConfigurerSupport;
import org.springframework.cache.annotation.EnableCaching;
import org.springframework.context.annotation.Bean;
import org.springframework.context.annotation.Configuration;
import org.springframework.data.redis.connection.RedisConnectionFactory;
import org.springframework.data.redis.core.RedisTemplate;
import org.springframework.data.redis.core.script.DefaultRedisScript;
import org.springframework.data.redis.serializer.StringRedisSerializer;

/**
 * redis配置
 *
 * @author ruoyi
 */
@Configuration
@EnableCaching
public class RedisConfig extends CachingConfigurerSupport
{
    @Bean
    @SuppressWarnings(value = { "unchecked", "rawtypes" })
    public RedisTemplate<Object, Object> redisTemplate(RedisConnectionFactory connectionFactory)
    {
        RedisTemplate<Object, Object> template = new RedisTemplate<>();
        template.setConnectionFactory(connectionFactory);

        FastJson2JsonRedisSerializer serializer = new FastJson2JsonRedisSerializer(Object.class);

        // 使用StringRedisSerializer来序列化和反序列化redis的key值
        template.setKeySerializer(new StringRedisSerializer());
        template.setValueSerializer(serializer);

        // Hash的key也采用StringRedisSerializer的序列化方式
        template.setHashKeySerializer(new StringRedisSerializer());
        template.setHashValueSerializer(serializer);

        template.afterPropertiesSet();
        return template;
    }
}
基础代码准备
按照之前的思路,咱们使用代码生成的功能来生成代码
- 包名:
com.zzyl.nursing - 模块名:
nursing
1)跟据表结构和代码模板进行基础代码的生成,只拷贝后端代码到idea中。
2)同时删除Controller层中除了list方法之外的其他方法,代码如下:
/**
 * 智能设备Controller
 *
 * @author peterpeng
 * @date 2025-06-20
 */
@RestController
@RequestMapping("/nursing/device")
@Api(tags = "智能设备的接口")
public class DeviceController extends BaseController
{
    @Autowired
    private IDeviceService deviceService;

    /**
     * 查询设备列表
     */
    @PreAuthorize("@ss.hasPermi('elder:device:list')")
    @GetMapping("/list")
    @ApiOperation("查询设备列表")
    public TableDataInfo list(Device device) {
        startPage();
        List<Device> list = deviceService.selectDeviceList(device);
        return getDataTable(list);
    }


}
修改设备
思路分析
- 先修改IoTDA平台上的设备名称
- 再修改本地存储的设备信息
- 注意:修改之后,不能在同一个位置绑定同一个产品
可在
Sevice层进行校验逻辑 或者 数据库层面用唯一索引达成校验:不能在同一个位置绑定同一个产品。
编码实现
Controller层:
@ApiOperation("修改设备")
@PutMapping
public AjaxResult editDevice(@RequestBody Device device){
    return toAjax(deviceService.updateDeviceWithIoT(device));
}
Service层:
	/**
     * 修改设备信息
     *
     * @param device
     */
@Override
public int updateDeviceWithIoT(Device device) {
    // 0、不能在同一位置绑定多个设备(同一产品) --> 数据库层面建立的唯一索引达到了相同的效果
    //        long count = count(Wrappers.<Device>lambdaQuery()
    //                .eq(Device::getProductKey, device.getProductKey())
    //                .eq(Device::getBindingLocation, device.getBindingLocation())
    //                .eq(Device::getLocationType, device.getLocationType())
    //                .eq(device.getPhysicalLocationType() != null, Device::getPhysicalLocationType, device.getPhysicalLocationType()));
    //        if(count > 0){
    //            throw new BaseException("该老人/位置已绑定该产品,请重新选择");
    //        }

    // 1、修改IoTDA的设备信息
    UpdateDeviceRequest request = new UpdateDeviceRequest();
    request.withDeviceId(device.getIotId());

    UpdateDevice body = new UpdateDevice();
    AuthInfoWithoutSecret authInfobody = new AuthInfoWithoutSecret();
    authInfobody.withSecureAccess(true);
    body.withAuthInfo(authInfobody);
    body.withDeviceName(device.getDeviceName());
    request.withBody(body);
    try {
        client.updateDevice(request);
    } catch (Exception e) {
        e.printStackTrace();
        throw new BaseException("调用IoTDA平台 - 修改设备失败");
    }

    // 2、修改本地存储的设备信息
    int flag;
    try {
        flag = updateDevice(device);
    } catch (Exception e) {
        throw new BaseException("该老人/位置已绑定该类型产品,请重新选择绑定位置");
    }
    return flag;
}
删除设备
思路分析
- 先从IoTDA平台删除设备
- 再删除本地存储的设备
参考接口文档和华为云官方的第三方的接口调用文档
编码实现
Controller层:
@ApiOperation("删除设备")
@DeleteMapping("/{iotId}")
public AjaxResult deleteDevice(@PathVariable("iotId") String iotId){
    return toAjax(deviceService.deleteDevice(iotId));
}
Service层:
	/**
     * 删除设备信息
     *
     * @param iotId
     * @return
     */
@Override
public int deleteDevice(String iotId) {
    // 1、删除 IoTDA 上的设备信息
    DeleteDeviceRequest request = new DeleteDeviceRequest();
    request.withDeviceId(iotId);
    try {
        DeleteDeviceResponse response = client.deleteDevice(request);
        System.out.println(response.toString());
    } catch (Exception e) {
        e.printStackTrace();
        throw new BaseException("调用IoT平台 - 设备删除失败");
    }

    // 2、删除本地的设备信息
    return remove(Wrappers.<Device>lambdaUpdate().eq(Device::getIotId, iotId)) ? 1 : 0;
}
总结
Controller 层的 tips
查询的接口返回交互数据用 return AjavResult.success(data); 。
新增、删除、修改的接口返回交互数据用 return AjaxResult.toAjax(row);
HTTP请求
一个HTTP请求(请求标头)包含以下部分:
- 请求行:
- 请求方法:GET、POST、DELETE、PUT等。
- 请求url
- 请求版本:HTTP/1.1
- 请求头:元数据信息。
- 请求体(可选):包含实际数据(表单数据、JSON数据等)。

有“AI”的1024 = 2048,欢迎大家加入2048 AI社区
更多推荐

 15
15 0
0- 0


 已为社区贡献9条内容

所有评论(0)