Linux入门3.1(日志管理、时间管理和网络管理)
SSH常见错误及解决方法摘要 本文总结了SSH连接过程中常见的四种错误及其解决方法: 权限错误:出现Bad owner or permissions提示时,需修改.ssh/config文件权限为600。 服务未启动:当显示Connection refused时,检查并启动目标主机的sshd服务。 账户不可用:若提示account is currently not available,需修改用户sh
ssh错误解决示例
1.错误现象
[root@client ~ 09:29:12]# ssh server
Bad owner or permissions on /root/.ssh/config
解决方法
[root@client ~ 09:31:27]# chmod 600 .ssh/config
2.错误现象
[root@client ~ 09:32:44]# ssh server
ssh: connect to host server port 22: Connection refused
解决方法
[root@server ~ 09:34:02]# systemctl is-active sshd
inactive
[root@server ~ 09:34:18]# systemctl start sshd
[root@server ~ 09:34:30]# systemctl is-active sshd
active
3.错误现象
[root@client ~ 09:32:47]# ssh server
Last login: Fri Sep 12 16:15:55 2025 from 10.1.8.1
This account is currently not available.
Connection to server closed.
解决方法
[root@server ~ 09:34:33]# cat /etc/passwd | grep wsf
wsf:x:1000:1000:wsf:/home/wsf:/sbin/nologin
[root@server ~ 09:36:33]# usermod -s /bin/bash wsf
[root@server ~ 09:36:44]# cat /etc/passwd | grep wsf
wsf:x:1000:1000:wsf:/home/wsf:/bin/bash
4.错误现象:
[laoma@client ~ 09:10:50]$ ssh server
No ECDSA host key is known for server and you have requested strict checking.
Host key verification failed.
处理方法:
[laoma@client ~ 09:19:33]$ vim ~/.ssh/config
Host *
User zhangsan
#StrictHostKeyChecking yes
StrictHostKeyChecking no
1. Linux 日志管理
操作系统内核和程序记录了发生的事件日志,这些日志用于审核系统并解决问题。日志以文本方式保存在/var/log目录中。可以使用普通文本实用程序(如less和tail)检查这些日志。
Linux 内置了基于Syslog协议的标准日志记录系统。许多程序使用此系统记录事件并将其组织到日志文件中。CentOS 7 中systemd-journald和rsyslog服务负责处理syslog消息。
- systemd-journald 服务,是操作系统事件记录体系结构的核心,收集系统各方面事件消息,包括内核、引导过程早期阶段的输出、守护程序启动和运行时的输出、syslog事件,然后将它们重组为标准格式,并写入结构化的索引系统日志中。
- rsyslog 服务,读取systemd-journald日志,然后记录到日志文件,或根据自己的配置将日志保存到不同的文件中,以及转发给其他程序。
rsyslog 日志配置
rsyslog 服务配置
配置文件位置
- 主配置: /etc/rsyslog.conf。主配置文件中以下配置作用是引入从配置目录中配置文件。·
# Include all config files in /etc/rsyslog.d/
include(file="/etc/rsyslog.d/*.conf" mode="optional")
- 从配置:/etc/rsyslog.d/*.conf。
日志记录规则
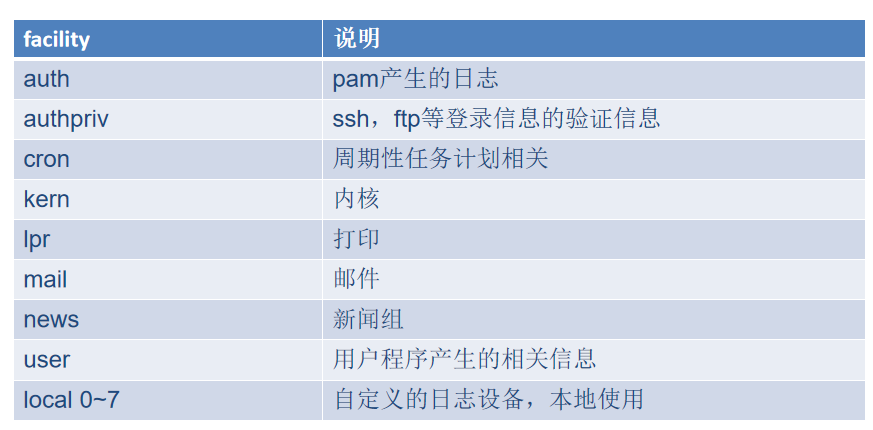
每一条日志消息都可以通过消息类型facility和priority分类,参考rsyslog.conf(5)。
日志记录规则格式: facility+连接符号+priority 处理方式
facility(设备类型)
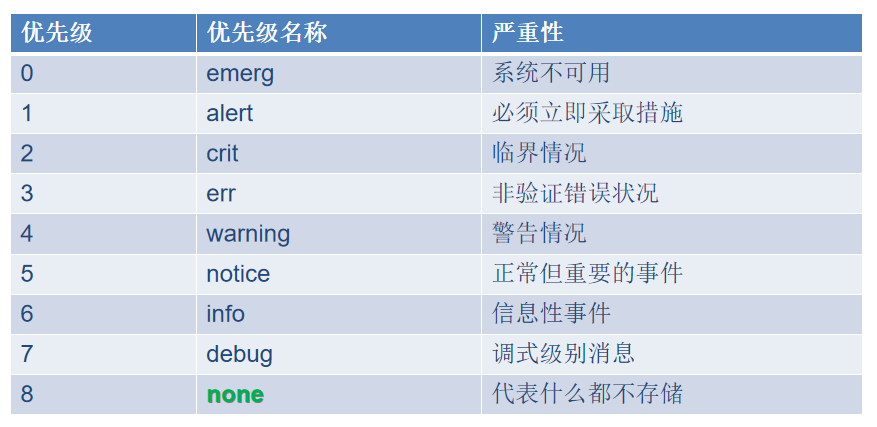
priority(优先级)
连接符

处理方式
- 记录到文件
- 发送到终端
- 转发给其他服务器
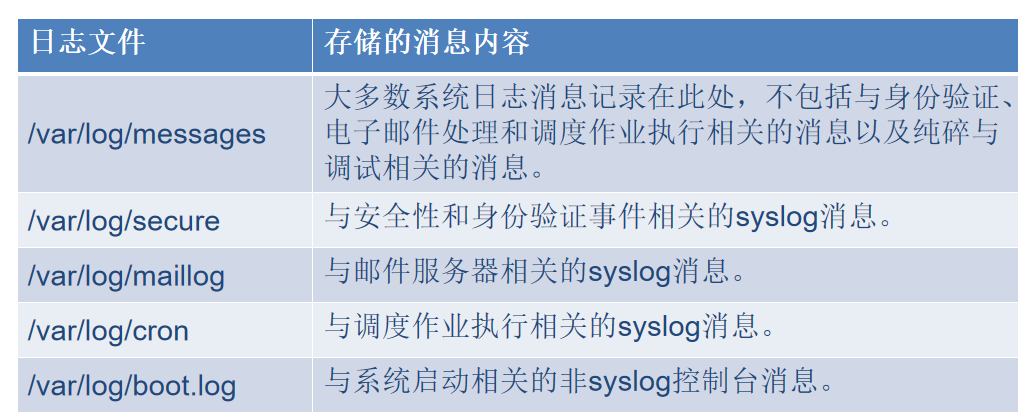
配置文件内容
/etc/rsyslog.conf中部分内容如下:
### RULES ####
# Log all kernel messages to the console.
#kern.*                                                 /dev/console
*.info;mail.none;authpriv.none;cron.none                /var/log/messages
authpriv.*                                              /var/log/secure
mail.*                                                  -/var/log/maillog
cron.*                                                  /var/log/cron
# Everybody gets emergency messages
*.emerg                                                 :omusrmsg:*
# Save news errors of level crit and higher in a special file.
uucp,news.crit                                          /var/log/spooler
# Save boot messages also to boot.log
local7.*                                                /var/log/boot.log
查看日志内容
[root@client ~ 16:55:33]# tail -f /var/log/messages
Sep 15 16:47:49 client NetworkManager[771]: <info>  [1757926069.4313] dhcp4 (ens37):   nameserver '10.1.8.2'
Sep 15 16:47:49 client NetworkManager[771]: <info>  [1757926069.4313] dhcp4 (ens37):   domain name 'localdomain'
Sep 15 16:47:49 client NetworkManager[771]: <info>  [1757926069.4313] dhcp4 (ens37): state changed bound -> bound
日志内容说明:
- Nov 10 10:23:34,代表日志产生时间。
- centos7,产生日志的主机名。
- systemd-logind,产生日志的进程。
- 最后一个区域是日志内容,例如,“Removed session 15.”。
[root@client ~ 16:55:50]# tail -f /var/log/secure
Sep 19 00:19:55 client sshd[40752]: Received disconnect from 10.1.8.11 port 52350:11: disconnected by user
Sep 19 00:19:55 client sshd[40752]: Disconnected from 10.1.8.11 port 52350
Sep 19 00:19:55 client sshd[40689]: pam_unix(sshd:session): session closed for user wsf
Sep 19 00:22:44 client sshd[33174]: pam_unix(sshd:session): session closed for user root
Sep 19 00:22:45 client sshd[45243]: Accepted password for root from 10.1.8.
自定义日志记录规则
[root@client ~ 16:58:56]# vim /etc/rsyslog.d/wsf.conf
[root@client ~ 16:59:35]# systemctl restart rsyslog.service
[root@client ~ 16:59:46]# ls /var/log/wsf.log
ls: 无法访问/var/log/wsf.log: 没有那个文件或目录
[root@client ~ 17:00:06]# ssh client
wsf@client's password:
Last failed login: Mon Sep 15 09:39:27 CST 2025 from 10.1.8.11 on ssh:notty
There were 2 failed login attempts since the last successful login.
Last login: Tue Sep 19 00:19:11 2023 from 10.1.8.11
-bash: vim:ts=4:sw=4: 未找到命令
[wsf@client ~ 17:00:26]$ logger -p local5.info "test my log"
[wsf@client ~ 17:00:35]$ exit
登出
Connection to client closed.
[root@client ~ 17:00:39]# cat /var/log/laoma.log
Sep 15 17:00:35 client wsf: test my log
补充
-
虽然系统提供了日志服务,但并不会记录所有内容。
-
系统中的应用程序是否使用 rsyslog 服务记录日志,取决于应用程序设计。
例如:
-
httpd 服务使用自己的日志记录。
-
sshd 服务使用 rsyslog 服务记录登录和退出日志。
rsyslog 日志集中管理
多个客户端将日志发给服务端,由服务端统计记录。
服务端配置
# 启用 tcp 监听
[root@server ~ 16:26:15]# vim /etc/rsyslog.conf

# 取消如下两行记录注释
module(load="imtcp") # needs to be done just once
input(type="imtcp" port="514")

# 重启服务
[root@server ~ 17:04:20]# systemctl restart rsyslog.service

# 关闭防火墙:停止并禁止开机自动启动
[root@server ~ 17:04:32]# systemctl disable firewalld.service --now
客户端配置
# 将本机所有日志通过tcp协议发送给远端服务器10.1.8.10 [root@client ~ 17:00:46]# echo '*.* @@10.1.8.10' >/etc/rsyslog.d/remote.conf [root@client ~ 17:09:55]# systemctl restart rsyslog.service -
故障模拟
故障1:配置文件丢失
处理过程:通过日志发现 /etc/ssh/sshd_config: No such file or directory,文件丢失。
[root@server ~ 11:23:39]# mv /etc/ssh/sshd_config .
[root@server ~ 11:24:26]# systemctl restart sshd
Job for sshd.service failed because the control process exited with error code. See "systemctl status sshd.service" and "journalctl -xe" for details.
[root@server ~ 11:22:51]# tail -f /var/log/messages
Sep 15 11:26:01 server sshd: /etc/ssh/sshd_config: No such file or directory
Sep 15 11:26:01 server systemd: sshd.service: main process exited, code=exited, status=1/FAILURE
[root@server ~ 11:24:37]# mv sshd_config /etc/ssh/
[root@server ~ 11:26:06]# systemctl restart sshd
2. Linux 时间管理
系统时间设置
date 命令
[root@server ~ 17:13:53]# LANG=en_US.utf8 date
Mon Sep 15 17:15:01 CST 2025
[root@server ~ 17:15:01]# date -s '2025-9-16 13:00:30'
2025年 09月 16日 星期二 13:00:30 CST
[root@server ~ 13:00:30]# date -s 'Thu Nov 11 11:30:30 CST 2026'
2026年 11月 11日 星期三 11:30:30 CST
hwclock 命令
# 读取硬件时钟
[root@server ~ 11:30:30]# hwclock -r
2025年09月15日 星期一 17时17分06秒  -1.027144 秒

# 将硬件时钟时间设置与系统时间一致
[root@server ~ 11:31:23]# hwclock -w
# 将系统时间设置与硬件时钟时间一致
[root@server ~ 11:31:28]# hwclock -s
[root@server ~ 11:31:37]# date
2026年 11月 11日 星期三 11:31:47 CST
timedatectl 命令
[root@server ~ 11:31:47]# timedatectl
      Local time: 三 2026-11-11 11:32:48 CST
  Universal time: 三 2026-11-11 03:32:48 UTC
        RTC time: 三 2026-11-11 03:32:48
       Time zone: Asia/Shanghai (CST, +0800)
     NTP enabled: yes
NTP synchronized: no
 RTC in local TZ: no
      DST active: n/a
[root@server ~ 11:32:48]# timedatectl set-ntp no
[root@server ~ 11:33:26]# timedatectl
      Local time: 三 2026-11-11 11:33:29 CST
  Universal time: 三 2026-11-11 03:33:29 UTC
        RTC time: 三 2026-11-11 03:33:29
       Time zone: Asia/Shanghai (CST, +0800)
     NTP enabled: no
NTP synchronized: no
 RTC in local TZ: no
      DST active: n/a
[root@server ~ 11:33:29]# LANG=en_US.utf8
[root@server ~ 11:34:07]# timedatectl set-time '2022-11-10 11:42:54'
[root@server ~ 11:42:54]# date
Thu Nov 10 11:43:00 CST 2022
[root@server ~ 11:43:00]# timedatectl set-timezone Asia/Shanghai
tzselect 命令
查询时区名称。
[root@server ~ 17:21:28]# tzselect
Please identify a location so that time zone rules can be set correctly.
Please select a continent or ocean.
 1) Africa
 2) Americas
 3) Antarctica
 4) Arctic Ocean
 5) Asia
 6) Atlantic Ocean
 7) Australia
 8) Europe
 9) Indian Ocean
10) Pacific Ocean
11) none - I want to specify the time zone using the Posix TZ format.
#? 5
Please select a country.
 1) Afghanistan           18) Israel                35) Palestine
 2) Armenia               19) Japan                 36) Philippines
 3) Azerbaijan            20) Jordan                37) Qatar
 4) Bahrain               21) Kazakhstan            38) Russia
 5) Bangladesh            22) Korea (North)         39) Saudi Arabia
 6) Bhutan                23) Korea (South)         40) Singapore
 7) Brunei                24) Kuwait                41) Sri Lanka
 8) Cambodia              25) Kyrgyzstan            42) Syria
 9) China                 26) Laos                  43) Taiwan
10) Cyprus                27) Lebanon               44) Tajikistan
11) East Timor            28) Macau                 45) Thailand
12) Georgia               29) Malaysia              46) Turkmenistan
13) Hong Kong             30) Mongolia              47) United Arab Emirates
14) India                 31) Myanmar (Burma)       48) Uzbekistan
15) Indonesia             32) Nepal                 49) Vietnam
16) Iran                  33) Oman                  50) Yemen
17) Iraq                  34) Pakistan
#? 9
Please select one of the following time zone regions.
1) Beijing Time
2) Xinjiang Time
#? 1

The following information has been given:

        China
        Beijing Time

Therefore TZ='Asia/Shanghai' will be used.
Local time is now:      Mon Sep 15 17:22:10 CST 2025.
Universal Time is now:  Mon Sep 15 09:22:10 UTC 2025.
Is the above information OK?
1) Yes
2) No
#? 1

You can make this change permanent for yourself by appending the line
        TZ='Asia/Shanghai'; export TZ
to the file '.profile' in your home directory; then log out and log in again.

Here is that TZ value again, this time on standard output so that you
can use the /usr/bin/tzselect command in shell scripts:
Asia/Shanghai
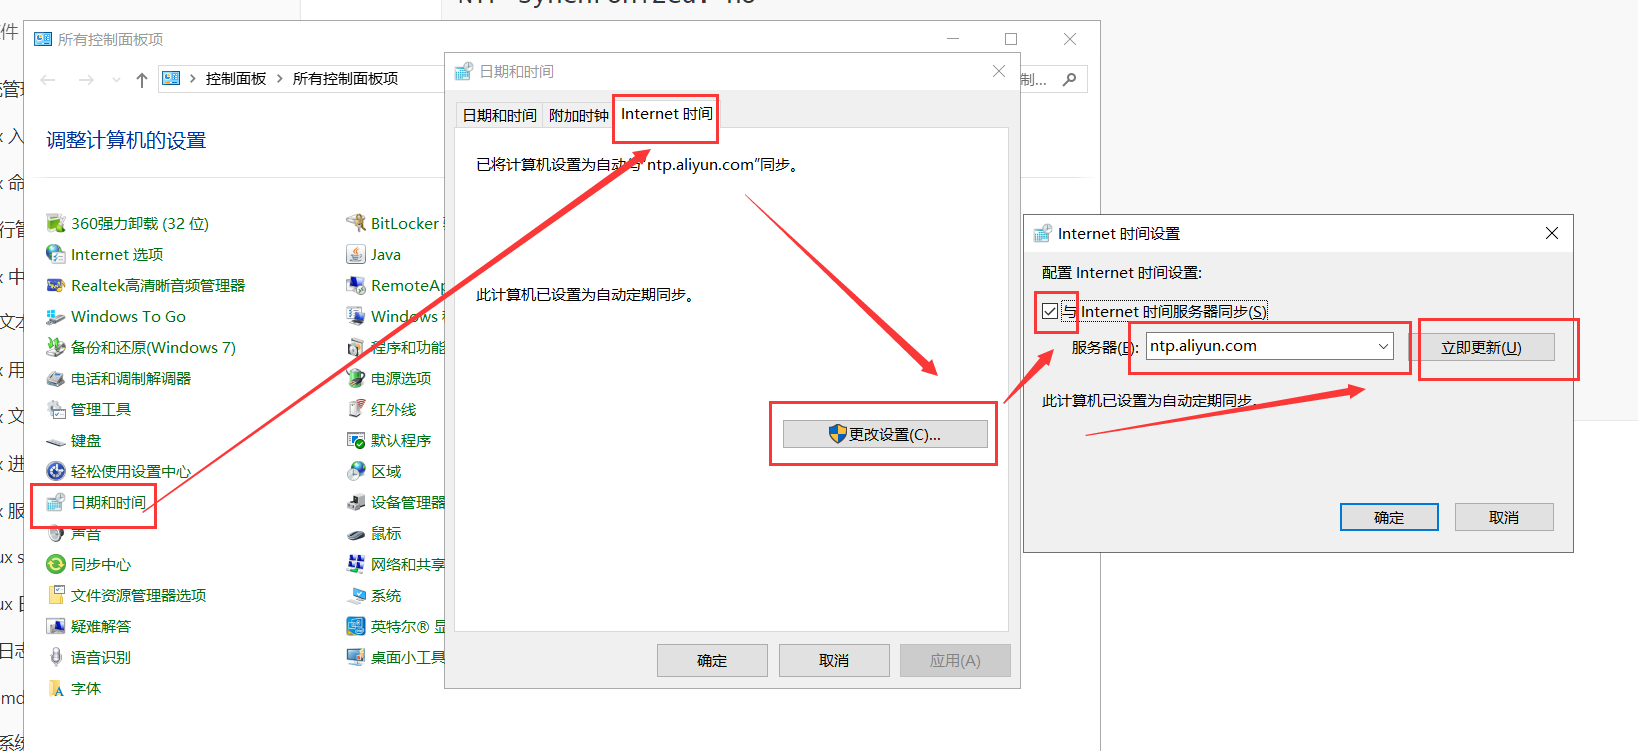
windows 自动对时
自动对时-chronyd 服务
[root@server ~ 14:01:31]# vim /etc/chrony.conf
[root@server ~ 14:02:05]# head /etc/chrony.conf
# Use public servers from the pool.ntp.org project.
# Please consider joining the pool (http://www.pool.ntp.org/join.html).
#server 0.centos.pool.ntp.org iburst
#server 1.centos.pool.ntp.org iburst
#server 2.centos.pool.ntp.org iburst
#server 3.centos.pool.ntp.org iburst
server ntp.aliyun.com iburst
# Record the rate at which the system clock gains/losses time.
driftfile /var/lib/chrony/drift

[root@server ~ 14:02:11]# ping ntp.aliyun.com
PING ntp.aliyun.com (203.107.6.88) 56(84) bytes of data.
64 bytes from 203.107.6.88 (203.107.6.88): icmp_seq=1 ttl=128 time=132 ms
64 bytes from 203.107.6.88 (203.107.6.88): icmp_seq=2 ttl=128 time=127 ms
64 bytes from 203.107.6.88 (203.107.6.88): icmp_seq=3 ttl=128 time=133 ms
64 bytes from 203.107.6.88 (203.107.6.88): icmp_seq=4 ttl=128 time=128 ms
64 bytes from 203.107.6.88 (203.107.6.88): icmp_seq=5 ttl=128 time=125 ms
^C
--- ntp.aliyun.com ping statistics ---
5 packets transmitted, 5 received, 0% packet loss, time 4007ms
rtt min/avg/max/mdev = 125.345/129.375/133.299/2.991 ms
[root@server ~ 14:02:34]# chronyc sources -v
210 Number of sources = 4

  .-- Source mode  '^' = server, '=' = peer, '#' = local clock.
 / .- Source state '*' = current synced, '+' = combined , '-' = not combined,
| /   '?' = unreachable, 'x' = time may be in error, '~' = time too variable.
||                                                 .- xxxx [ yyyy ] +/- zzzz
||      Reachability register (octal) -.           |  xxxx = adjusted offset,
||      Log2(Polling interval) --.      |          |  yyyy = measured offset,
||                                \     |          |  zzzz = estimated error.
||                                 |    |           \
MS Name/IP address         Stratum Poll Reach LastRx Last sample
===============================================================================
^+ time.cloudflare.com           3   6   373     5  -4021us[-4021us] +/-  142ms
^* time.neu.edu.cn               2   6   377     9    +10ms[  +10ms] +/-   71ms
^+ ntp1.flashdance.cx            2   6   375    66    -22ms[  -23ms] +/-  174ms
^- tick.ntp.infomaniak.ch        1   7   200   717    +17ms[+6497us] +/-  147ms
[root@server ~ 14:03:37]# systemctl restart chronyd
[root@server ~ 14:05:11]# chronyc sources -v
210 Number of sources = 1

  .-- Source mode  '^' = server, '=' = peer, '#' = local clock.
 / .- Source state '*' = current synced, '+' = combined , '-' = not combined,
| /   '?' = unreachable, 'x' = time may be in error, '~' = time too variable.
||                                                 .- xxxx [ yyyy ] +/- zzzz
||      Reachability register (octal) -.           |  xxxx = adjusted offset,
||      Log2(Polling interval) --.      |          |  yyyy = measured offset,
||                                \     |          |  zzzz = estimated error.
||                                 |    |           \
MS Name/IP address         Stratum Poll Reach LastRx Last sample
===============================================================================
^? 203.107.6.88                  2   6     3     2    +11ms[  +11ms] +/-   75ms
部署时间服务器
chrony既可以作为客户端,也可以作为服务端(为客户端提供对时服务)。
[root@server ~ 14:26:23]# vim /etc/chrony.conf
[root@server ~ 14:34:37]# systemctl stop firewalld.service
[root@server ~ 14:50:09]# systemctl restart chronyd
[root@client ~ 14:20:35]# vim /etc/chrony.conf
[root@client ~ 14:21:36]# systemctl restart chronyd
[root@client ~ 14:22:13]# date -s '2023-09-19'
2023年 09月 19日 星期二 00:00:00 CST
[root@client ~ 00:00:03]# chronyc sources -v
210 Number of sources = 1

  .-- Source mode  '^' = server, '=' = peer, '#' = local clock.
 / .- Source state '*' = current synced, '+' = combined , '-' = not combined,
| /   '?' = unreachable, 'x' = time may be in error, '~' = time too variable.
||                                                 .- xxxx [ yyyy ] +/- zzzz
||      Reachability register (octal) -.           |  xxxx = adjusted offset,
||      Log2(Polling interval) --.      |          |  yyyy = measured offset,
||                                \     |          |  zzzz = estimated error.
||                                 |    |           \
MS Name/IP address         Stratum Poll Reach LastRx Last sample
===============================================================================
^? server.wsf.cloud              0   6     0     -     +0ns[   +0ns] +/-    0ns
[root@client ~ 00:24:41]# systemctl restart chronyd
[root@client ~ 00:28:12]# date
2025年 09月 15日 星期一 14:50:48 CST
3 . Linux 网络管理
网络基础回顾
OSI 模型
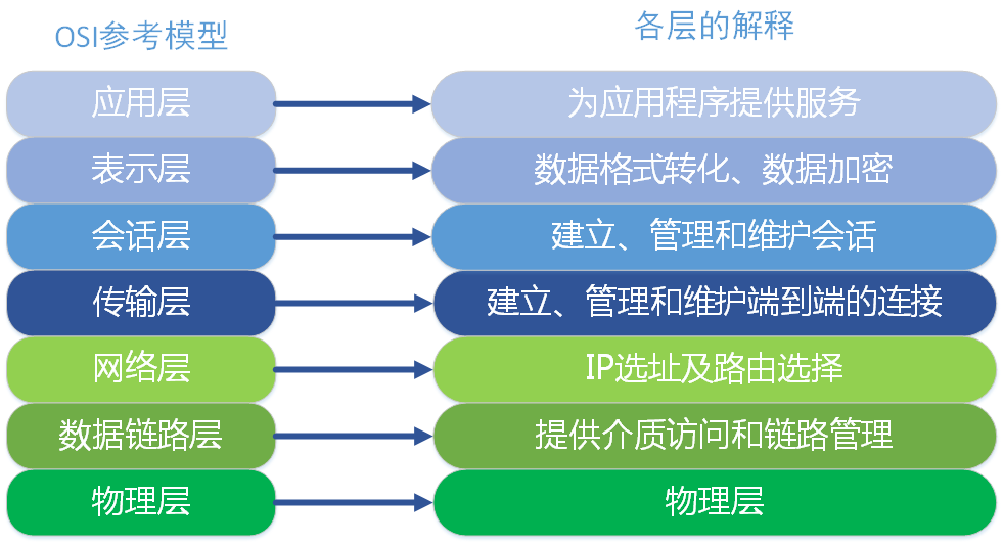
- 物理层:提供为建立、维护和拆除物理链路所需要的机械的、电气的、功能的和规程的特性;有关的物理链路上传输非结构的位流以及故障检测指示。
- 数据链路层:在网络层实体间提供数据发送和接收的功能和过程;提供数据链路的流控。
- 网络层:控制分组传送系统的操作、路由选择、拥护控制、网络互连等功能,它的作用是将具体的物理传送对高层透明。
- 传输层:提供建立、维护和拆除传送连接的功能;选择网络层提供最合适的服务;在系统之间提供可靠的透明的数据传送,提供端到端的错误恢复和流量控制。
- 会话层:提供两进程之间建立、维护和结束会话连接的功能;提供交互会话的管理功能,如三种数据流方向的控制,即一路交互、两路交替和两路同时会话模式 。
- 表示层:代表应用进程协商数据表示;完成数据转换、格式化和文本压缩。
- 应用层:提供OSI用户服务,例如事务处理程序、文件传送协议和网络管理等。
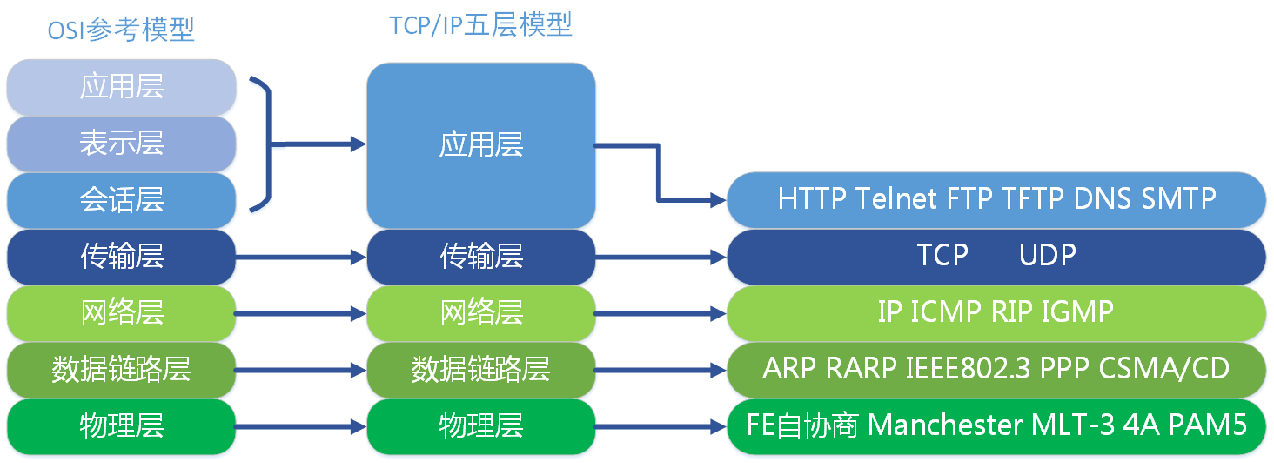
TCP/IP 模型

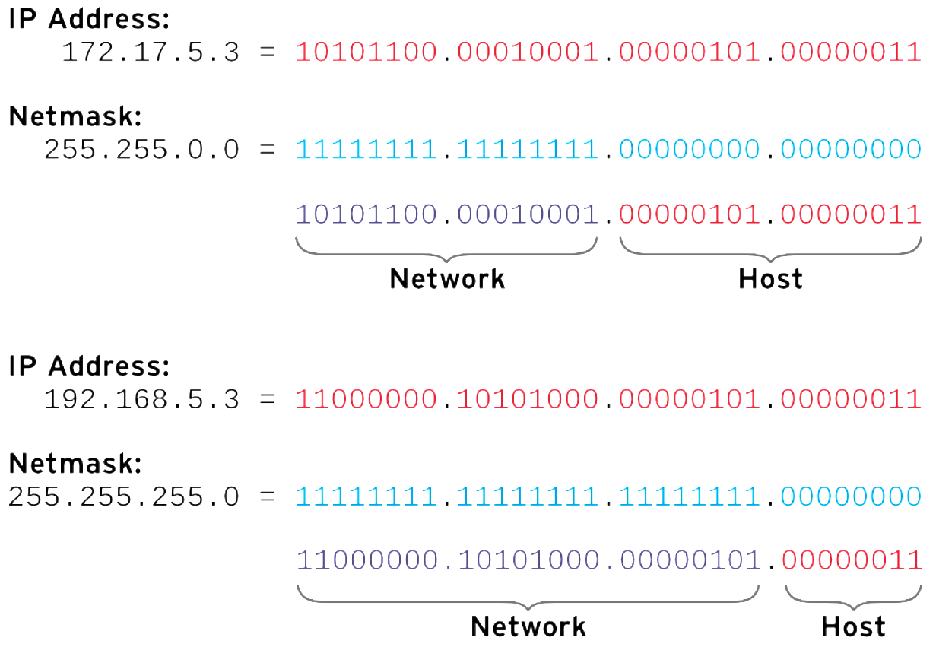
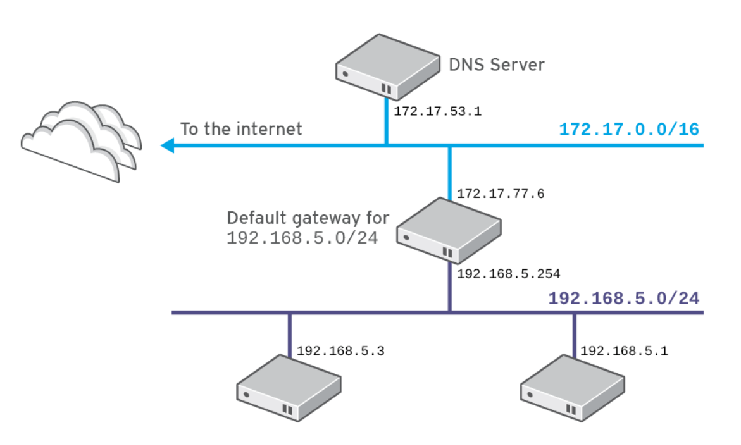
IPV4 地址
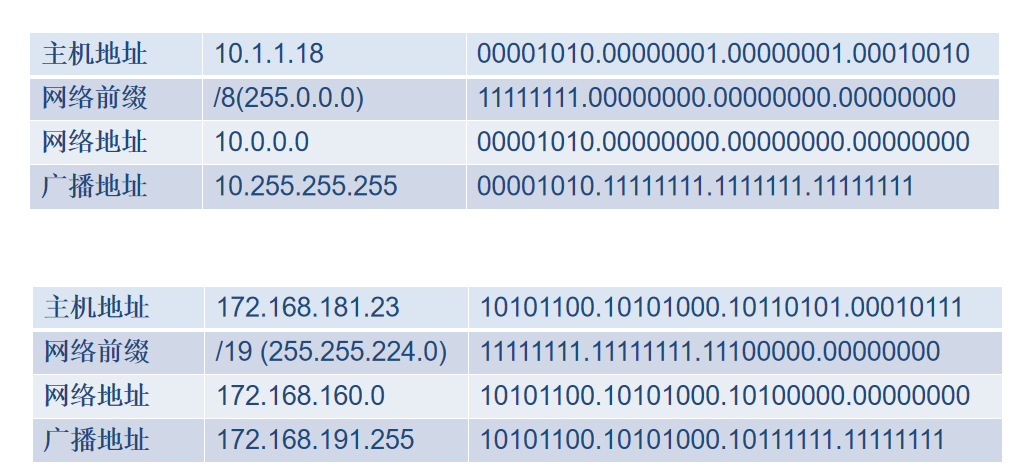
IPV4 路由
查看网络配置
网卡信息
网卡名称:
- 旧名称,eth0 eth1 (Ethernet)
- 新名称,根据网卡的拓扑类型命名。例如ens192,eno4。
**linux网络接口传统的名称为eth0 eth1 eth2 …ethN。**然而这种机制会引起一些问题,例如网络接口的增加和删除。
在rhel7或者更高版本中,接口命名规则如下:
- 前2个字符:Ethernet 接口以en开头,WLAN接口以wl开头,WWAN接口以ww开头。
- 下一个字符:o(onboard)代表板载设备,s(slot)代表PCI热插拔,p代表pci接口网卡。
- 最后N表示index ID或者port。
例如
-
eno1,代表Ethernet 类型、板载设备、端口号是1的网卡。
-
wlp4s0,代表位于PCI总线4上插槽0中的WLAN卡。如果该卡是一个多功能设备(具有多个端口或者具有一些其他功能)。示例,enp0s1f0代表位于PCI总线0上插槽1中的以太网卡的功能0。
-
如果无法分配固定接口名,将使用传统方式ethN命名。
查看 link
关注mac地址。
[root@server ~ 14:58:48]# ip -br link
lo               UNKNOWN        00:00:00:00:00:00 <LOOPBACK,UP,LOWER_UP>
ens33            UP             00:0c:29:3f:da:10 <BROADCAST,MULTICAST,UP,LOWER_UP>
[root@server ~ 15:01:57]# ip link show ens33
2: ens33: <BROADCAST,MULTICAST,UP,LOWER_UP> mtu 1500 qdisc pfifo_fast state UP mode DEFAULT group default qlen 1000
    link/ether 00:0c:29:3f:da:10 brd ff:ff:ff:ff:ff:ff
查看 IP
关注IP地址和掩码位数:10.1.8.10/24。
[root@server ~ 15:02:34]# ip -br a
lo               UNKNOWN        127.0.0.1/8 ::1/128
ens33            UP             10.1.8.10/24 fe80::20c:29ff:fe3f:da10/64
[root@server ~ 15:02:59]# ip addr show ens33
2: ens33: <BROADCAST,MULTICAST,UP,LOWER_UP> mtu 1500 qdisc pfifo_fast state UP group default qlen 1000
    link/ether 00:0c:29:3f:da:10 brd ff:ff:ff:ff:ff:ff
    inet 10.1.8.10/24 brd 10.1.8.255 scope global noprefixroute ens33
       valid_lft forever preferred_lft forever
    inet6 fe80::20c:29ff:fe3f:da10/64 scope link
       valid_lft forever preferred_lft forever
查看路由
default代表主机的网关,也就是10.1.8.2。
[root@server ~ 15:03:10]# ip route
default via 10.1.8.2 dev ens33 proto static metric 100
10.1.8.0/24 dev ens33 proto kernel scope link src 10.1.8.10 metric 100
[root@server ~ 15:03:34]# route -n
Kernel IP routing table
Destination     Gateway         Genmask         Flags Metric Ref    Use Iface
0.0.0.0         10.1.8.2        0.0.0.0         UG    100    0        0 ens33
10.1.8.0        0.0.0.0         255.255.255.0   U     100    0        0 ens33
[root@server ~ 15:03:46]# netstat -nr
Kernel IP routing table
Destination     Gateway         Genmask         Flags   MSS Window  irtt Iface
0.0.0.0         10.1.8.2        0.0.0.0         UG        0 0          0 ens33
10.1.8.0        0.0.0.0         255.255.255.0   U         0 0          0 ens33
说明:
- 直连网络10.1.8.0/24和192.168.122.0/24,可以 直接通信。
- 其他网络中主机,通过默认路由发送到目标,这里是default对应的条目,也就是10.1.8.2。
查看 dns
/etc/resolv.conf 文件中nameserver指明服务想哪个DNS服务器查询域名对应IP。
[root@server ~ 15:03:58]# cat /etc/resolv.conf
# Generated by NetworkManager
search wsf.cloud
nameserver 223.5.5.5
nameserver 223.6.6.6
网络连通性测试
ping 测试
[root@server ~ 15:50:42]# ping baidu.com
PING baidu.com (220.181.7.203) 56(84) bytes of data.
64 bytes from 220.181.7.203 (220.181.7.203): icmp_seq=1 ttl=128 time=139 ms
64 bytes from 220.181.7.203 (220.181.7.203): icmp_seq=2 ttl=128 time=138 ms
64 bytes from 220.181.7.203 (220.181.7.203): icmp_seq=3 ttl=128 time=139 ms
64 bytes from 220.181.7.203 (220.181.7.203): icmp_seq=4 ttl=128 time=137 ms
64 bytes from 220.181.7.203 (220.181.7.203): icmp_seq=5 ttl=128 time=43.5 ms
^C
--- baidu.com ping statistics ---
5 packets transmitted, 5 received, 0% packet loss, time 4006ms
rtt min/avg/max/mdev = 43.503/119.546/139.493/38.028 ms
mtr 路由跟踪
[root@server ~ 15:50:13]# mtr -n 1.1.1.1
ss 工具
/etc/services 文件存储常见端口和服务对应关系。
ss 命令用于查看系统中网络状态信息。
以前使用 **netstat **查看网络状态信息,使用方法等效与 ss 命令。
[root@server ~ 15:51:13]# ss | grep :ssh
tcp    ESTAB      0      0      10.1.8.10:ssh                  10.1.8.1:58661
[root@server ~ 15:52:09]# ss -l | grep :ssh
tcp    LISTEN     0      128     *:ssh                   *:*
tcp    LISTEN     0      128      [::]:ssh                    [::]:*
[root@server ~ 15:52:25]# ss | grep :ssh
tcp    ESTAB      0      52     10.1.8.10:ssh                  10.1.8.1:58661
tcp    ESTAB      0      0      10.1.8.10:ssh                  10.1.8.11:44994
[root@server ~ 15:52:44]# ss -l | grep :ssh
tcp    LISTEN     0      128     *:ssh                   *:*
tcp    LISTEN     0      128      [::]:ssh                    [::]:*
[root@server ~ 15:52:47]# ss -a4|grep :ssh
tcp    LISTEN     0      128     *:ssh                   *:*
tcp    ESTAB      0      52     10.1.8.10:ssh                  10.1.8.1:58661
tcp    ESTAB      0      0      10.1.8.10:ssh                  10.1.8.11:44994
[root@server ~ 15:53:08]# ss -an4|grep :22
tcp    LISTEN     0      128       *:22                    *:*
tcp    ESTAB      0      68     10.1.8.10:22                 10.1.8.1:58661
tcp    ESTAB      0      0      10.1.8.10:22                 10.1.8.11:44994
[root@server ~ 15:53:25]# ss -lnp4|grep :22
tcp    LISTEN     0      128       *:22                    *:*                   users:(("sshd",pid=96442,fd=3))
模拟环境
[root@server ~ 15:53:58]# yum install -y nginx
[root@server ~ 15:54:40]# systemctl start nginx.service
[root@server ~ 15:55:14]# cd /usr/share/nginx/heml/
bash: cd: /usr/share/nginx/heml/: 没有那个文件或目录
[root@server ~ 15:55:35]# cd /usr/share/nginx/html/
[root@server html 15:55:52]# ls
404.html  50x.html  en-US  icons  img  index.html  nginx-logo.png  poweredby.png
[root@server html 15:55:55]# mv index.html index.html.ori
[root@server html 15:56:16]# echo "hello world" > index.html
[root@server html 15:56:45]# curl http://10.1.8.10
hello world
[root@server html 15:57:00]# yum install -y httpd
[root@server html 15:57:48]# systemctl start httpd
Job for httpd.service failed because the control process exited with error code. See "systemctl status httpd.service" and "journalctl -xe" for details.
[root@server html 15:58:16]# systemctl status httpd.service
● httpd.service - The Apache HTTP Server
   Loaded: loaded (/usr/lib/systemd/system/httpd.service; disabled; vendor preset: disabled)
   Active: failed (Result: exit-code) since 一 2025-09-15 15:58:16 CST; 22s ago
     Docs: man:httpd(8)
           man:apachectl(8)
  Process: 41312 ExecStart=/usr/sbin/httpd $OPTIONS -DFOREGROUND (code=exited, status=1/FAILURE)
 Main PID: 41312 (code=exited, status=1/FAILURE)

9月 15 15:58:16 server.wsf.cloud systemd[1]: Starting The Apache HTTP Server...
9月 15 15:58:16 server.wsf.cloud httpd[41312]: (98)Address already in use: A...0
9月 15 15:58:16 server.wsf.cloud httpd[41312]: (98)Address already in use: A...0
9月 15 15:58:16 server.wsf.cloud httpd[41312]: no listening sockets availabl...n
9月 15 15:58:16 server.wsf.cloud httpd[41312]: AH00015: Unable to open logs
9月 15 15:58:16 server.wsf.cloud systemd[1]: httpd.service: main process exi...E
9月 15 15:58:16 server.wsf.cloud systemd[1]: Failed to start The Apache HTTP....
9月 15 15:58:16 server.wsf.cloud systemd[1]: Unit httpd.service entered fail....
9月 15 15:58:16 server.wsf.cloud systemd[1]: httpd.service failed.
Hint: Some lines were ellipsized, use -l to show in full.
#查找端口被哪个程序使用
[root@server html 15:58:38]# ss -lnp4|grep :80
tcp    LISTEN     0      128       *:80                    *:*                   users:(("nginx",pid=37467,fd=6),("nginx",pid=37466,fd=6))
[root@server html 15:59:09]# systemctl stop nginx
[root@server html 15:59:26]# systemctl start httpd
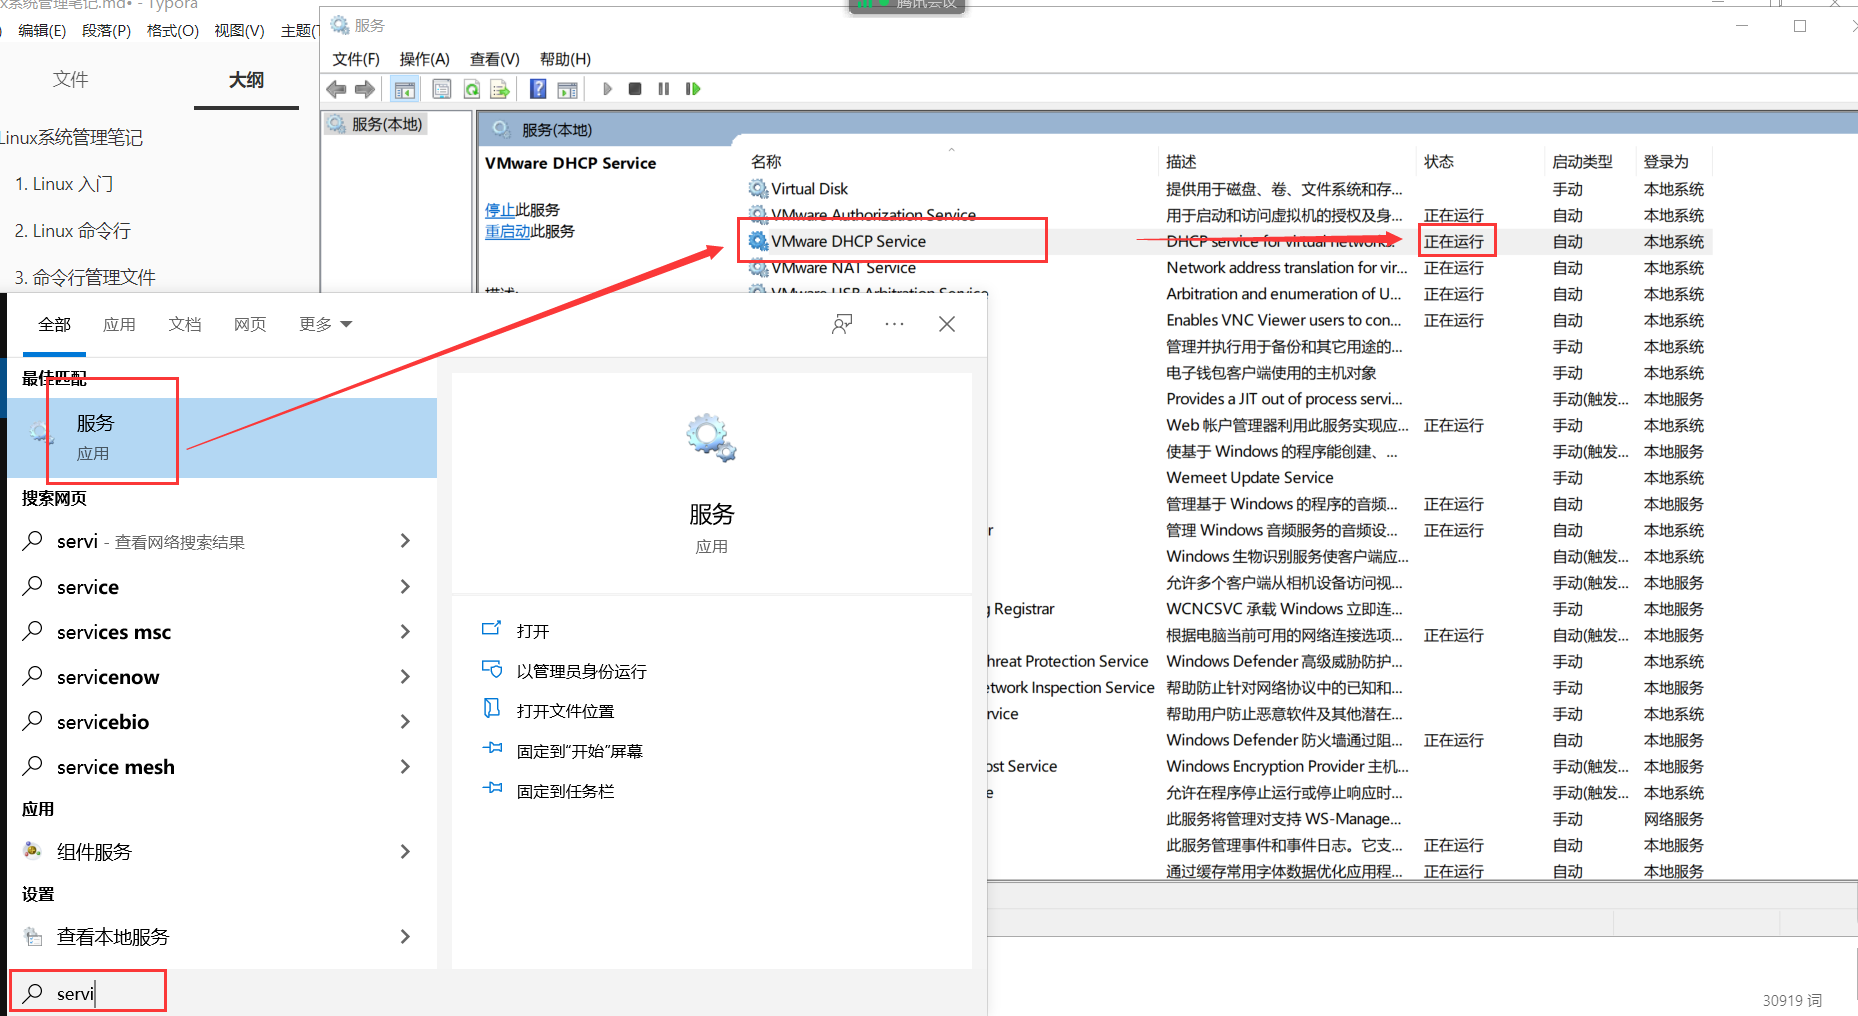
配置网络
网络配置是由 NetworkManager 服务管理的,确保该服务开机自启。
环境准备
-
虚拟机新增加一个NAT网卡。
-
自动获取的前提条件是直连的网络中有dhcp服务器。
对于 vmware workstations:
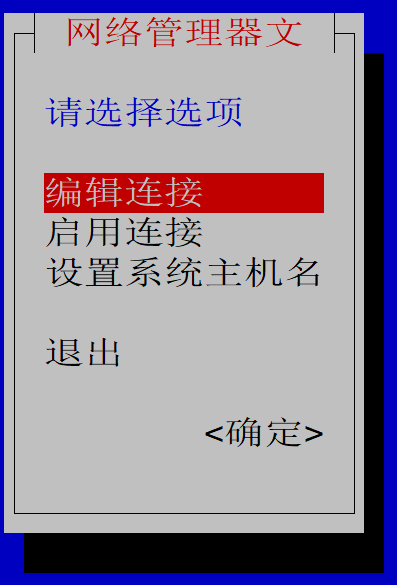
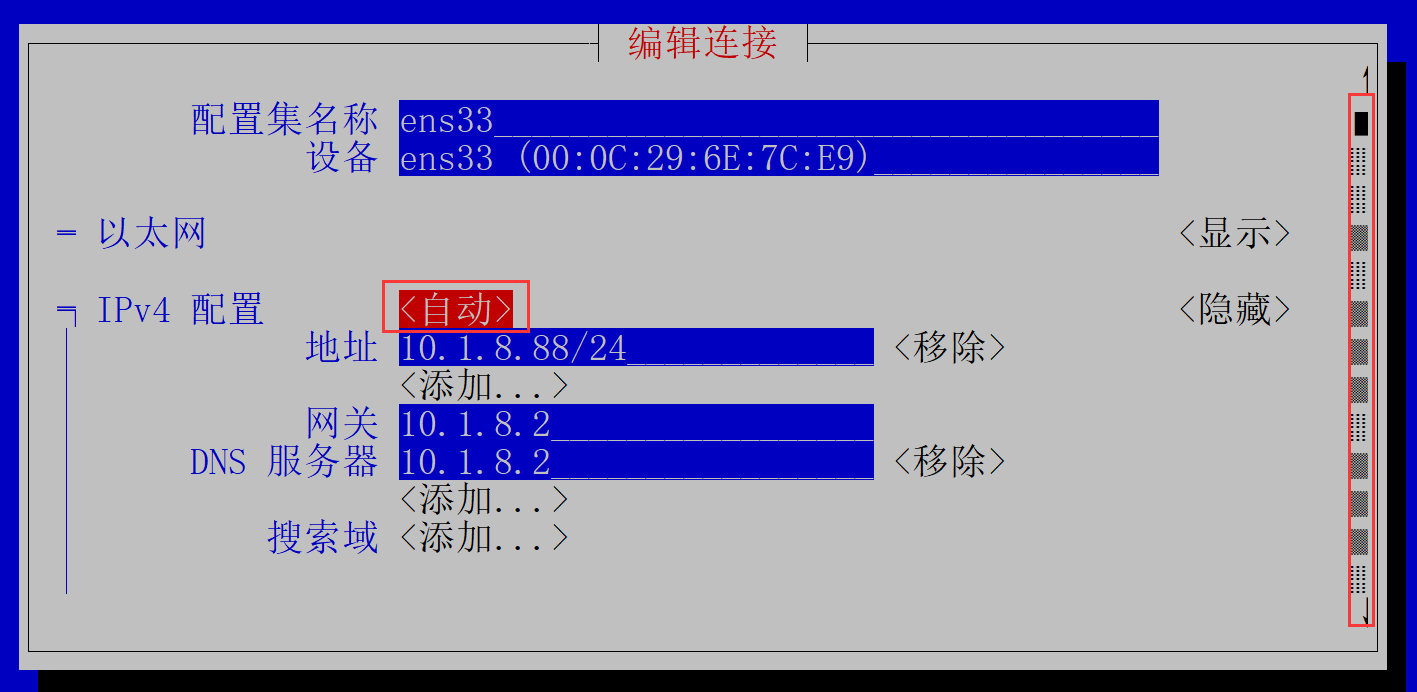
nmtui 命令
自动配置
# 服务器配置
[root@server ~ 17:22:15]# nmtui
使用上下键、tab进行移动,回车选中条目。
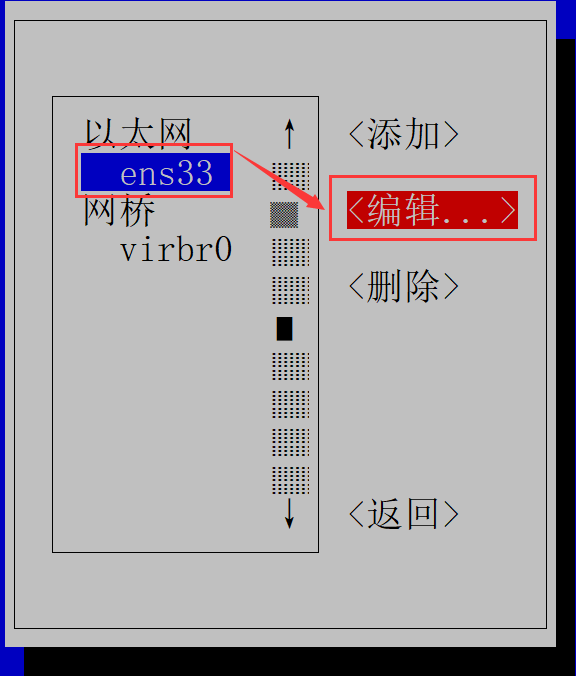
使用方向键,下移到最下面
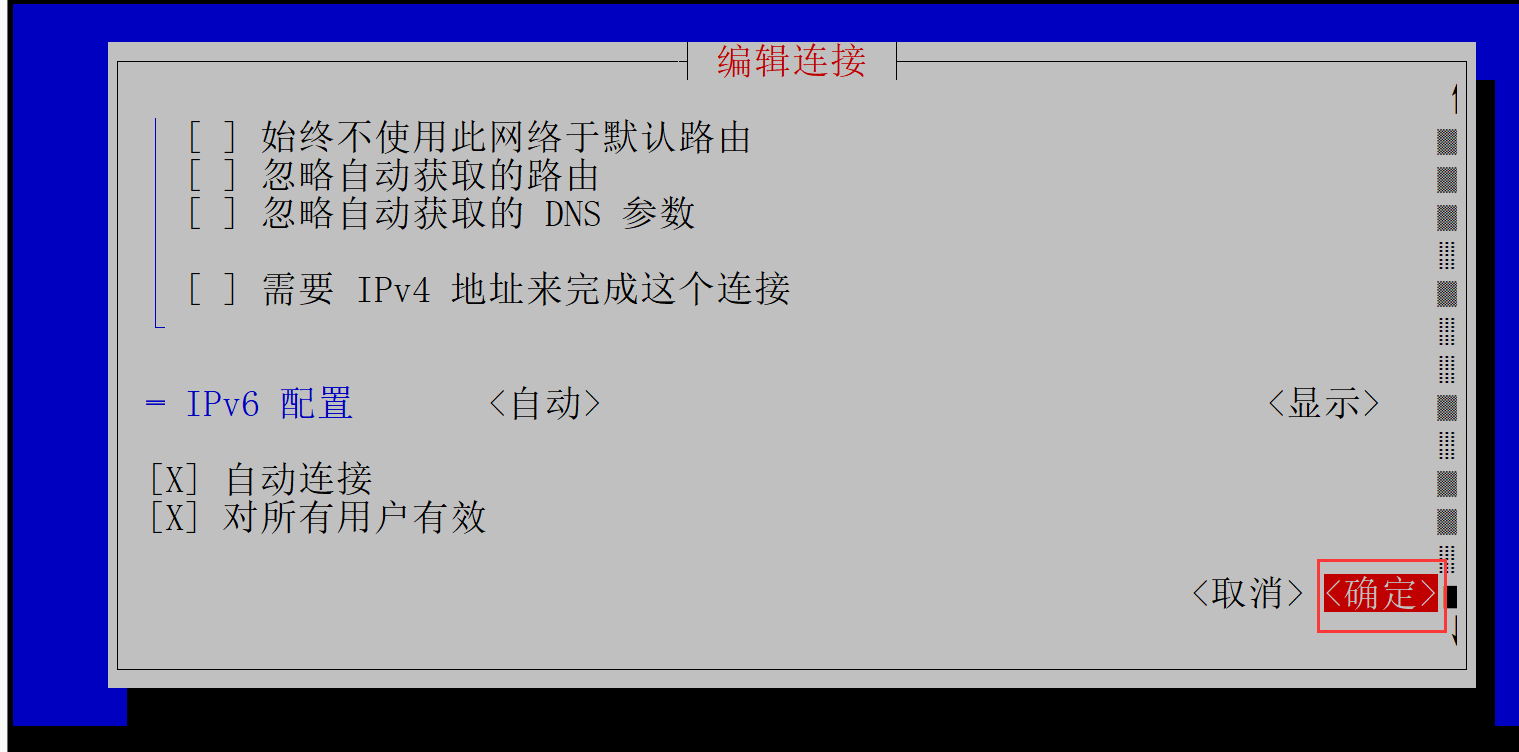
返回
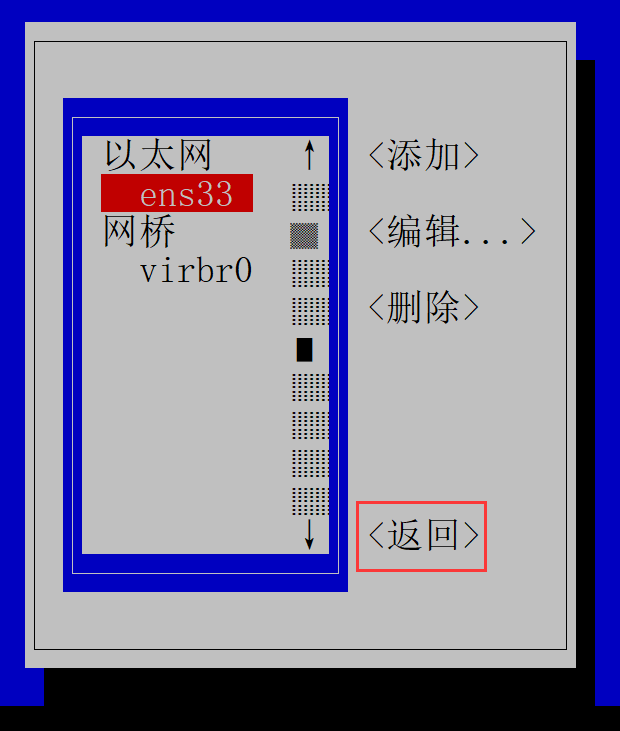
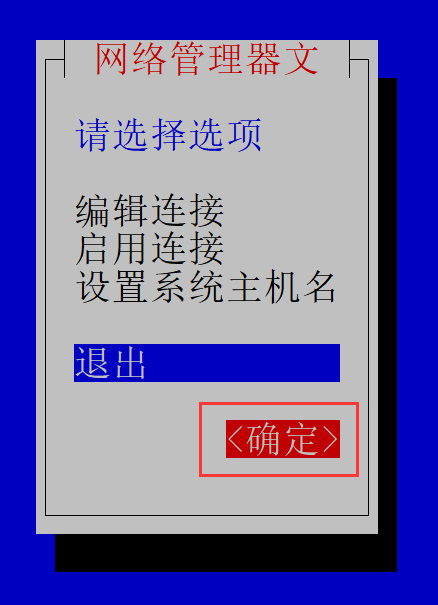
更改完成后,选择启用连接,重新激活ens192。
手动配置
部分截图
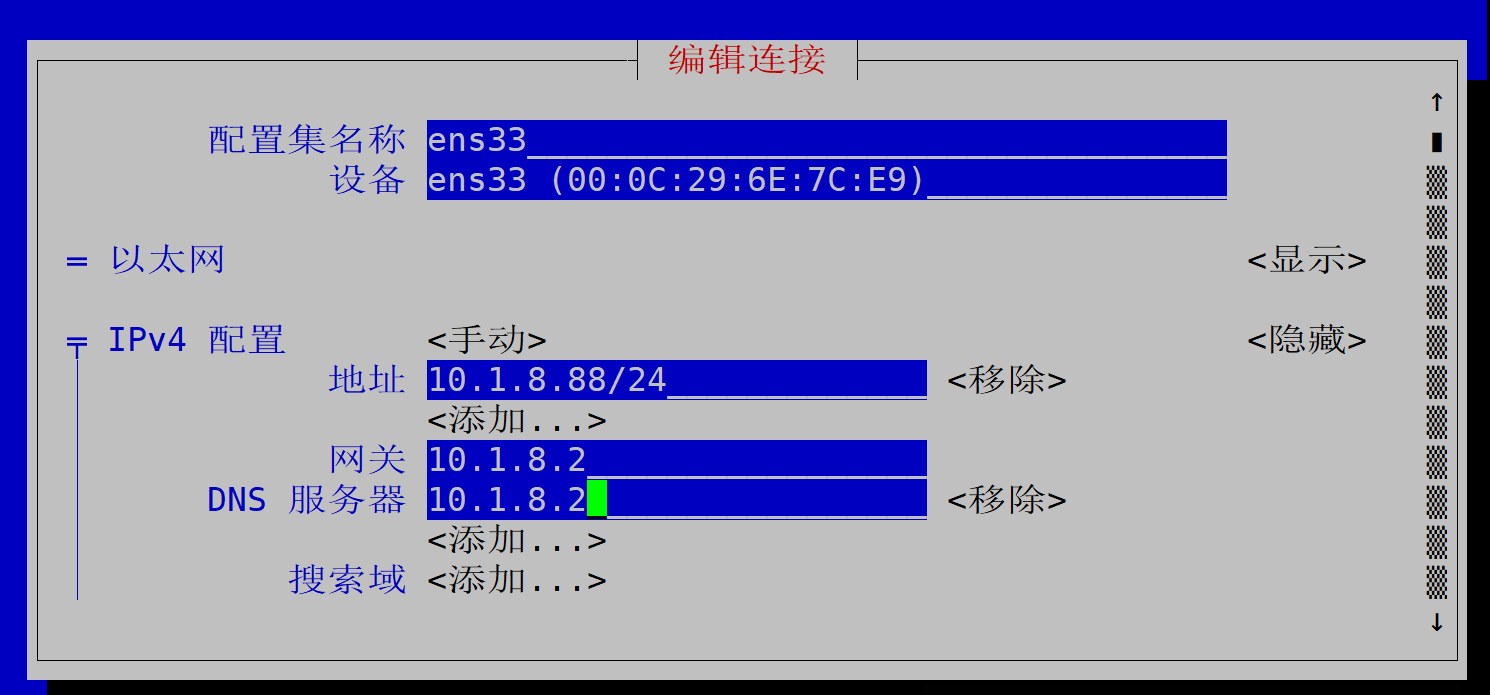
更改完成后,重新激活ens192。
**思考:**什么情况下用自动配置和手动配置?
- 自动配置:无静态IP地址需求的其他情况。例如:办公环境员工的电脑,公共场所无线。
- 手动配置:需要一个静态IP地址,例如:对外提供服务的数据库服务器,需要一个静态的IP地址。

有“AI”的1024 = 2048,欢迎大家加入2048 AI社区
更多推荐

 14
14 0
0- 0


 已为社区贡献4条内容

所有评论(0)