【大模型记忆-Mem0详解-3】安装和设置
Mem0 提供了两种不同的部署路径,具有不同的安装要求和设置过程:两个部署路径都使用相同的核心包,但需要不同的配置方法。JavaScript/TypeScript 安装该包为平台与开源使用提供了不同的导入路径:托管平台只需要一个 API 密钥,并使用或类。开源设置开源部署使用 Memory 类,需要配置 LLM 和嵌入提供程序。提供程序配置架构不同的提供程序需要配置特定的环境变量。配置示例Anth
·
安装选项概述
Mem0 提供了两种不同的部署路径,具有不同的安装要求和设置过程:
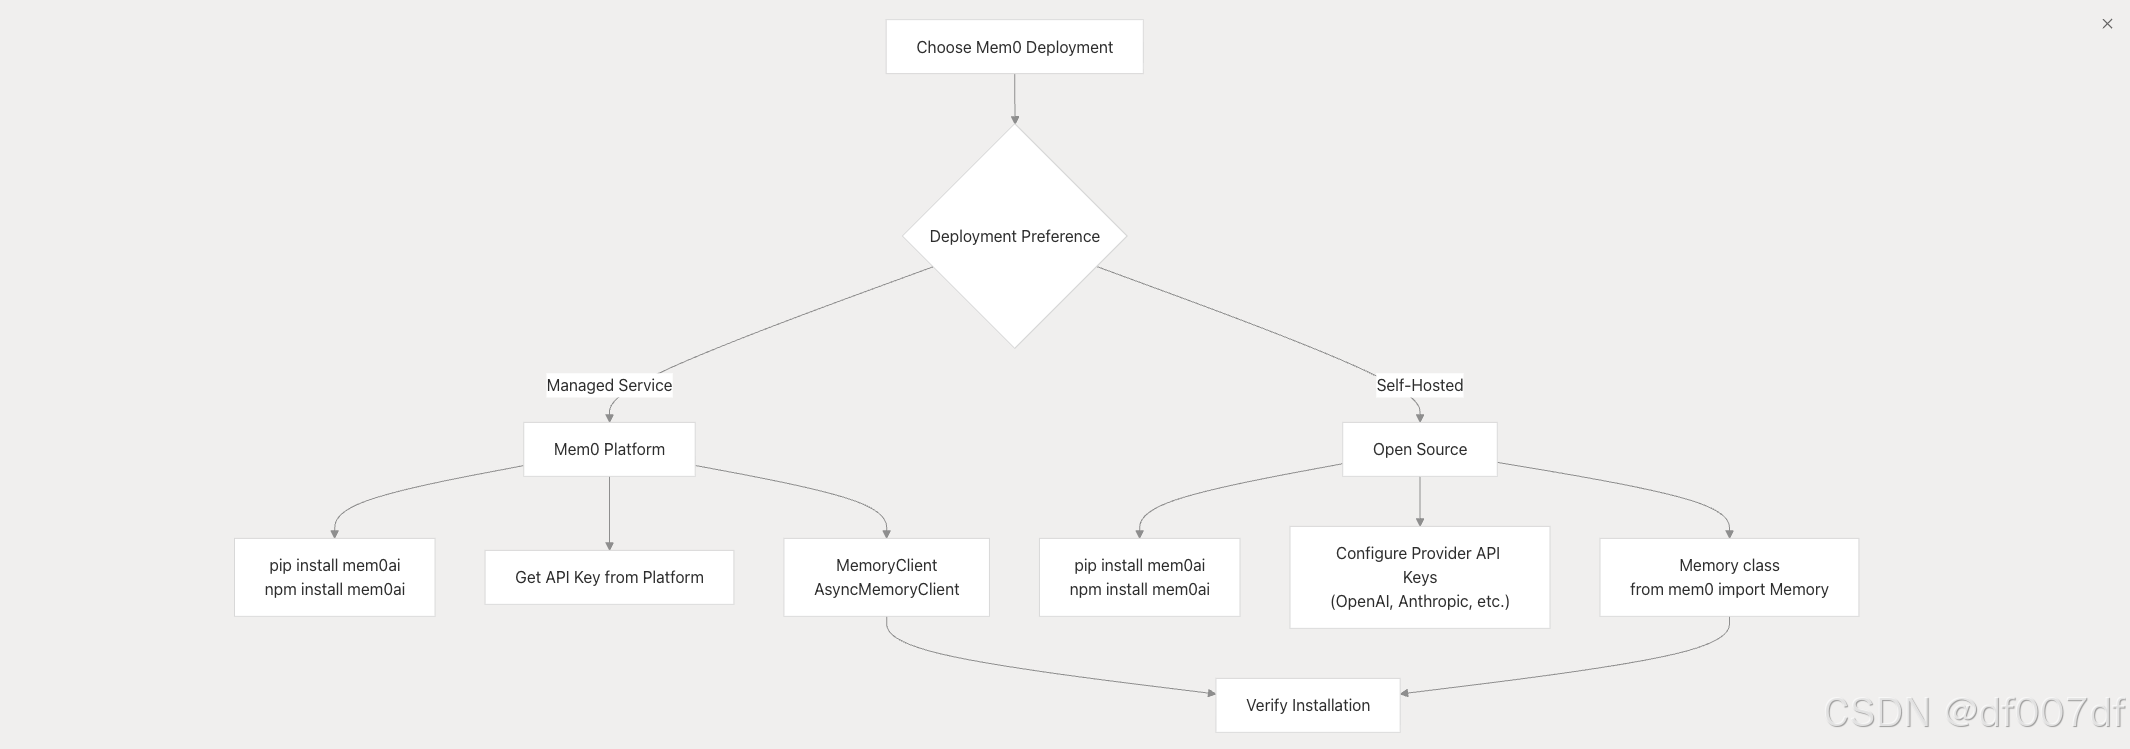
包安装
两个部署路径都使用相同的核心包,但需要不同的配置方法。
Python 安装
pip install mem0ai
JavaScript/TypeScript 安装
npm install mem0ai
该包为平台与开源使用提供了不同的导入路径:
| 使用类型 | Python 导入 | JavaScript 导入 |
|---|---|---|
| 平台 | from mem0 import MemoryClient | import MemoryClient from ‘mem0ai’ |
| 开源 | from mem0 import Memory | import { Memory } from ‘mem0ai/oss’ |
托管平台设置
托管平台只需要一个 API 密钥,并使用 MemoryClient 或 AsyncMemoryClient 类。
API 密钥配置
- 在 Mem0 平台注册
- 导航到仪表板中的 API 密钥部分
- 复制您的 API 密钥
环境设置
import os
from mem0 import MemoryClient

os.environ["MEM0_API_KEY"] = "your-api-key"
client = MemoryClient()
import MemoryClient from 'mem0ai';
const client = new MemoryClient({ apiKey: 'your-api-key' });
开源设置
开源部署使用 Memory 类,需要配置 LLM 和嵌入提供程序。
基本内存配置
from mem0 import Memory

# Default configuration (uses OpenAI)
m = Memory()

# Custom configuration
config = {
    "llm": {
        "provider": "anthropic",
        "config": {
            "model": "claude-sonnet-4-20250514",
            "temperature": 0.1,
            "max_tokens": 2000,
        }
    }
}
m = Memory.from_config(config)
import { Memory } from 'mem0ai/oss';

// Default configuration
const memory = new Memory();

// Custom configuration
const config = {
  llm: {
    provider: 'anthropic',
    config: {
      apiKey: process.env.ANTHROPIC_API_KEY || '',
      model: 'claude-sonnet-4-20250514',
      temperature: 0.1,
      maxTokens: 2000,
    },
  },
};
const memory = new Memory(config);
提供程序配置架构
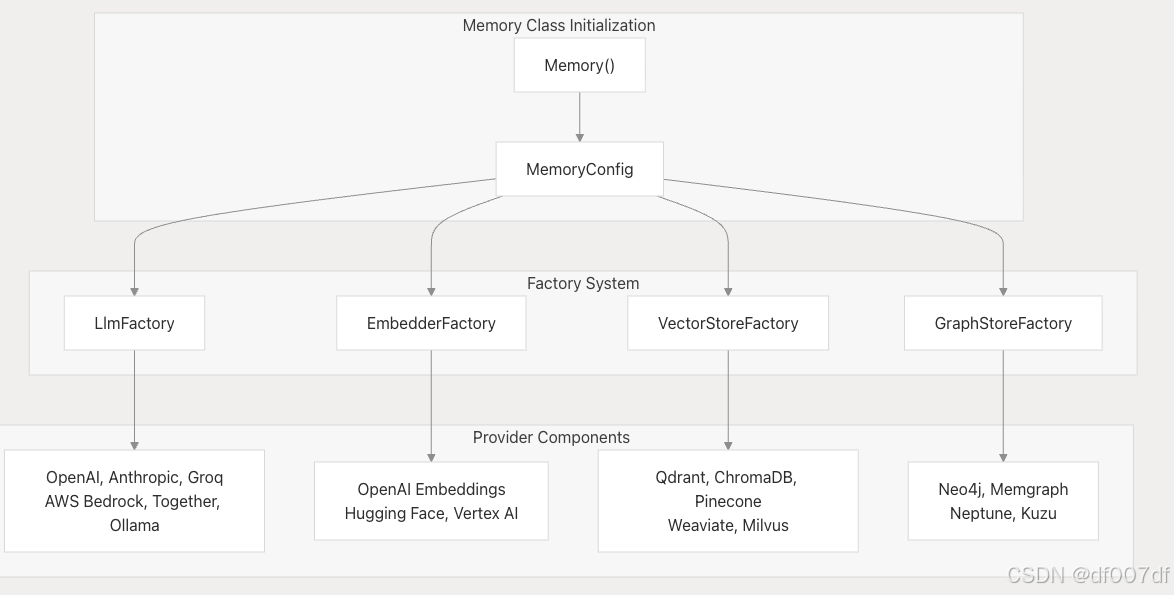
环境变量和 API 密钥
不同的提供程序需要配置特定的环境变量。
按提供程序划分的必需环境变量
| 供应商 | 环境变量 | 描述 |
|---|---|---|
| 开放人工智能 | OPENAI_API_KEY | 用于 LLM 和嵌入模型 |
| 人为的 | ANTHROPIC_API_KEY | Claude 模型访问 |
| 熟练 | GROQ_API_KEY | Groq LPU 推理 |
| AWS 基岩 | AWS_REGION、AWS_ACCESS_KEY_ID、AWS_SECRET_ACCESS_KEY AWS | 身份验证 |
| 米斯特拉尔 | MISTRAL_API_KEY | Mistral AI 模型 |
| 一起 | TOGETHER_API_KEY | 共同 AI 模型 |
通用环境设置
import os

# For open source with OpenAI (most common)
os.environ["OPENAI_API_KEY"] = "your-openai-key"

# For anthropic LLM + OpenAI embeddings
os.environ["OPENAI_API_KEY"] = "your-openai-key"  # for embeddings
os.environ["ANTHROPIC_API_KEY"] = "your-anthropic-key"  # for LLM

# For AWS Bedrock
os.environ["AWS_REGION"] = "us-west-2"
os.environ["AWS_ACCESS_KEY_ID"] = "your-access-key"
os.environ["AWS_SECRET_ACCESS_KEY"] = "your-secret-key"
配置示例
Anthropic Claude 与 OpenAI 嵌入
config = {
    "llm": {
        "provider": "anthropic",
        "config": {
            "model": "claude-sonnet-4-20250514",
            "temperature": 0.1,
            "max_tokens": 2000,
        }
    }
    # embeddings default to OpenAI if OPENAI_API_KEY is set
}
使用 Ollama 进行本地设置
config = {
    "llm": {
        "provider": "ollama",
        "config": {
            "model": "mixtral:8x7b",
            "temperature": 0.1,
            "max_tokens": 2000,
        }
    }
}
AWS 基岩配置
config = {
    "llm": {
        "provider": "aws_bedrock",
        "config": {
            "model": "anthropic.claude-3-5-haiku-20241022-v1:0",
            "temperature": 0.2,
            "max_tokens": 2000,
        }
    }
}
安装验证
平台验证
使用简单的内存作测试平台连接:
from mem0 import MemoryClient
import os

os.environ["MEM0_API_KEY"] = "your-api-key"
client = MemoryClient()

# Test adding a memory
messages = [
    {"role": "user", "content": "I like coffee in the morning"},
    {"role": "assistant", "content": "I'll remember your coffee preference"}
]
result = client.add(messages, user_id="test_user")
print("Platform connection successful:", result)
开源验证
使用基本内存作测试开源设置:
from mem0 import Memory
import os

os.environ["OPENAI_API_KEY"] = "your-openai-key"
m = Memory()

# Test adding a memory
messages = [
    {"role": "user", "content": "I like coffee in the morning"}
]
result = m.add(messages, user_id="test_user")
print("Open source setup successful:", result)

# Test searching memories
search_result = m.search("coffee preferences", user_id="test_user")
print("Search results:", search_result)
TypeScript/JavaScript 设置
JavaScript SDK 遵循类似的模式,用于基于 promise 的异步作:
平台设置
import MemoryClient from 'mem0ai';

const client = new MemoryClient({ apiKey: 'your-api-key' });

const messages = [
    {"role": "user", "content": "I like coffee in the morning"},
    {"role": "assistant", "content": "I'll remember that"}
];

client.add(messages, { user_id: "test_user" })
    .then(response => console.log(response))
    .catch(error => console.error(error));
开源设置
import { Memory } from 'mem0ai/oss';

const memory = new Memory();

const messages = [
    {
        role: "user",
        content: "I like coffee in the morning"
    }
];

const result = await memory.add(messages, {
    userId: "test_user",
    metadata: { category: "preferences" }
});
后续步骤
安装验证成功后:
- 对于平台用户: 浏览 REST API 参考和 MemoryClient 文档
- 对于开源用户: 查看内存类文档和配置选项
- 对于集成 :请参阅框架集成以连接 AI 框架
- 对于高级功能: 探索图形内存和高级检索

有“AI”的1024 = 2048,欢迎大家加入2048 AI社区
更多推荐

 13
13 0
0- 0


 已为社区贡献10条内容

所有评论(0)