Mybatis 黑马webai
整个“Spring Boot + MyBatis 快速启动”流程可以总结成 5 张图 + 5 句话,跟着走一遍就能永远记住。1 建库建表(一次性)sql把 5 条 INSERT 跑完,数据库准备 OK。2 实体类 ←→ 表字段(一一对应)Lombok 三件套()只是帮你生成 get/set/构造器,无业务逻辑。3 写 Mapper(只声明,不实现)没有 XML,没有实现类;MyBatis 会在启动
整个“Spring Boot + MyBatis 快速启动”流程可以总结成 5 张图 + 5 句话,跟着走一遍就能永远记住。
1 建库建表(一次性)
sql
CREATE DATABASE web01 DEFAULT CHARSET utf8mb4;
USE web01;
CREATE TABLE user(
  id       INT PRIMARY KEY AUTO_INCREMENT,
  username VARCHAR(50),
  password VARCHAR(50),
  name     VARCHAR(50),
  age      INT
);
把 5 条 INSERT 跑完,数据库准备 OK。
2 实体类 ←→ 表字段(一一对应)
User.java 字段  ↔  user 表列名
id              ↔  id
username        ↔  username
...
Lombok 三件套(@Data @NoArgsConstructor @AllArgsConstructor)只是帮你生成 get/set/构造器,无业务逻辑。
3 写 Mapper(只声明,不实现)
@Mapper                 // 告诉 MyBatis“这是 DAO”
public interface UserMapper {
    @Select("select * from user")
    List<User> findAll();
}-
没有 XML,没有实现类;
-
MyBatis 会在启动时利用 JDK 动态代理自动生成实现类并注册成 Spring Bean。
4 启动类(扫包 + 启动容器)
@SpringBootApplication      // 自动配置 + 组件扫描
@MapperScan("com.itheima.mapper")   // 额外告诉 MyBatis 去哪里找 Mapper
public class SpringMybatisquickApplication { … }
执行 main 方法后:
-
Spring Boot 启动 → 2. 读取
application.properties→ 3. 创建DataSource→ 4. 扫描 Mapper → 5. 把代理对象放进 IOC。
5 单元测试(验证一条龙)
@SpringBootTest        // 启动完整 Spring 容器(内嵌数据库不用)
class SpringMybatisquickApplicationTests {
    @Autowired
    private UserMapper userMapper;

    @Test
    void testFindAll() {
        userMapper.findAll().forEach(System.out::println);
    }
}-
@SpringBootTest会真正连数据库; -
@MapperScan在测试类上再写一次也行,但推荐只在启动类写一次,测试类会继承扫描路径。
一句话记忆
“表 → 实体 → Mapper → 启动类扫包 → 测试”
五步走完,Spring Boot + MyBatis 链路就通了。
1.准备工作
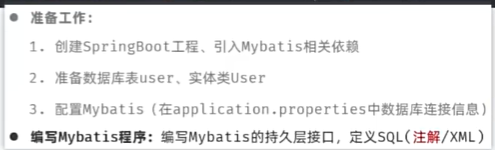
User实体类代码:
package com.itheima.pojo;

import lombok.AllArgsConstructor;
import lombok.Data;
import lombok.NoArgsConstructor;

@Data
@AllArgsConstructor
@NoArgsConstructor
public class User {
    private Integer id;
    private String username;
    private String password;
    private String name;
    private Integer age;
}
mybatis配置
spring.application.name=spring-mybatisquick
#配置连接信息
spring.datasource.url=jdbc:mysql://localhost:3306/web01
spring.datasource.driver-class-name=com.mysql.cj.jdbc.Driver
spring.datasource.username=root
spring.datasource.password=1234
//UserMapper接口
package com.itheima.mapper;

import com.itheima.pojo.User;
import org.apache.ibatis.annotations.Mapper;
import org.apache.ibatis.annotations.Select;
import org.w3c.dom.stylesheets.LinkStyle;

import java.util.List;

@Mapper//自动创建实现类对象,自动存入ioc,成为bean对象
public interface UserMapper {
    /**
     * 查询所有用户
     */
    @Select("select * from user")
    public List<User> findall();


}
单元测试
package com.itheima.springmybatisquick;

import com.itheima.mapper.UserMapper;
import com.itheima.pojo.User;
import org.junit.jupiter.api.Test;
import org.mybatis.spring.annotation.MapperScan;
import org.springframework.beans.factory.annotation.Autowired;
import org.springframework.boot.test.context.SpringBootTest;

import java.util.List;

@MapperScan("com.itheima.mapper")
@SpringBootTest//单元测试 测试类测试方法运行时启动springboot方法
class SpringMybatisquickApplicationTests {
    @Autowired
    private UserMapper userMapper;
    @Test
    public void testFindAll(){
        List<User> userlists = userMapper.findall();
        userlists.forEach(System.out::println);
    }


}
quickstart applications
package com.itheima.springmybatisquick;

import org.mybatis.spring.annotation.MapperScan;
import org.springframework.boot.SpringApplication;
import org.springframework.boot.autoconfigure.SpringBootApplication;

@SpringBootApplication
@MapperScan("com.itheima.mapper")

public class SpringMybatisquickApplication {

    public static void main(String[] args) {
        SpringApplication.run(SpringMybatisquickApplication.class, args);
    }

}

有“AI”的1024 = 2048,欢迎大家加入2048 AI社区
更多推荐
 8
8 0
0- 0


 已为社区贡献2条内容

所有评论(0)