IOS -【UITableView的headerView悬停】OC实现
本文介绍了实现UITableView悬停效果的方法。通过设置tableView为Plain模式,并实现viewForHeaderInSection和heightForHeaderInSection代理方法,指定黄色视图为悬停视图。同时解决了iOS15以上版本出现的悬停顶部间距问题,提供了两种去除灰色间隔的方案:直接设置tableView的sectionHeaderTopPadding为0,或全局设
今天分享一个UITableView悬停的方法,希望对大家有帮助,若有不足也希望评论区指出。
// SMTableViewDemoCell.h
#import <UIKit/UIKit.h>

@interface SMTableViewDemoCell : UITableViewCell

@property (nonatomic, strong) UILabel *titleLabel;

@end


//SMTableViewDemoCell.m
#import "SMTableViewDemoCell.h"

@implementation SMTableViewDemoCell

- (instancetype)initWithStyle:(UITableViewCellStyle)style reuseIdentifier:(NSString *)reuseIdentifier {
    if (self = [super initWithStyle:style reuseIdentifier:reuseIdentifier]) {
        [self setupUI];
    }
    return self;
}

- (void)setupUI {
    self.backgroundColor = [UIColor whiteColor];
    self.selectionStyle = UITableViewCellSelectionStyleNone;

    // 标题标签
    self.titleLabel = [[UILabel alloc] init];
    self.titleLabel.font = [UIFont systemFontOfSize:16];
    self.titleLabel.textColor = [UIColor blackColor];
    [self.contentView addSubview:self.titleLabel];

    // 设置约束
    self.titleLabel.translatesAutoresizingMaskIntoConstraints = NO;
    [NSLayoutConstraint activateConstraints:@[
        [self.titleLabel.leadingAnchor constraintEqualToAnchor:self.contentView.leadingAnchor constant:20],
        [self.titleLabel.centerYAnchor constraintEqualToAnchor:self.contentView.centerYAnchor],
        [self.titleLabel.trailingAnchor constraintEqualToAnchor:self.contentView.trailingAnchor constant:-20]
    ]];
}

@end
// ViewController.h
#import <UIKit/UIKit.h>
@interface ViewController : UIViewController
@end这里只用最简单的内容填充cell,就一行文字。
// ViewController.m
#import "ViewController.h"
#import "SMTableViewDemoCell.h"
@interface ViewController () <UITableViewDelegate, UITableViewDataSource>
@property (nonatomic, strong) UITableView *tableView;
@property (nonatomic, strong) UIView *headerView; // 蓝色头部视图
@property (nonatomic, strong) UIView *redView; // 红色视图
@property (nonatomic, strong) UIView *sectionHeaderView; // 黄色悬停视图
@end
@implementation ViewController
- (void)viewDidLoad {
[super viewDidLoad];
self.view.backgroundColor = [UIColor whiteColor];
self.title = @"TableView Demo";
[self setupUI];
}
- (void)setupUI {
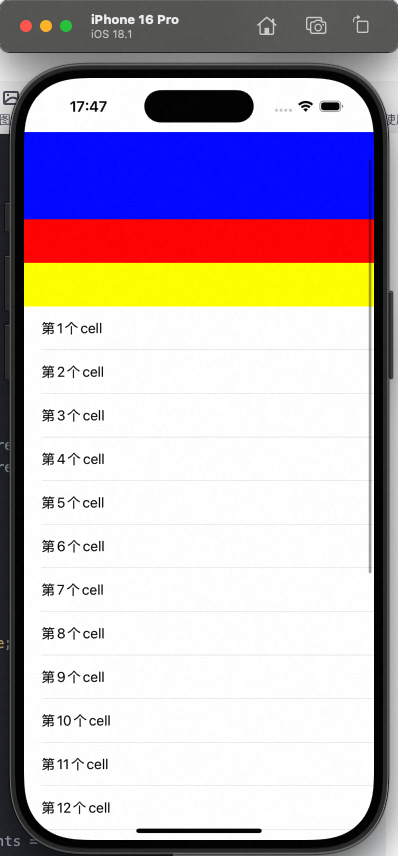
// 创建蓝色头部视图
self.headerView = [[UIView alloc] init];
self.headerView.backgroundColor = [UIColor blueColor];
self.headerView.frame = CGRectMake(0, 0, self.view.frame.size.width, 100);
// 创建红色视图,紧贴在蓝色视图下面
self.redView = [[UIView alloc] init];
self.redView.backgroundColor = [UIColor redColor];
self.redView.frame = CGRectMake(0, 100, self.view.frame.size.width, 50);
// 创建黄色section header视图
self.sectionHeaderView = [[UIView alloc] init];
self.sectionHeaderView.backgroundColor = [UIColor yellowColor];
// 创建tableView
self.tableView = [[UITableView alloc] initWithFrame:CGRectZero style:UITableViewStylePlain];
self.tableView.delegate = self;
self.tableView.dataSource = self;
self.tableView.backgroundColor = [UIColor lightGrayColor];
self.tableView.translatesAutoresizingMaskIntoConstraints = NO;
[self.view addSubview:self.tableView];
if (@available(iOS 15.0, *)) {
self.tableView.sectionHeaderTopPadding = 0;
}
// 创建一个容器视图,包含蓝色和红色视图
UIView *containerView = [[UIView alloc] init];
containerView.frame = CGRectMake(0, 0, self.view.frame.size.width, 150); // 100 + 50 = 150
// 将蓝色和红色视图添加到容器中
[containerView addSubview:self.headerView];
[containerView addSubview:self.redView];
// 设置容器视图为tableHeaderView,这样蓝色和红色都会一起滑动
self.tableView.tableHeaderView = containerView;
// 注册cell
[self.tableView registerClass:[SMTableViewDemoCell class] forCellReuseIdentifier:@"SMTableViewDemoCell"];
// 设置约束 - 现在tableView直接占满整个view
[NSLayoutConstraint activateConstraints:@[
[self.tableView.topAnchor constraintEqualToAnchor:self.view.safeAreaLayoutGuide.topAnchor],
[self.tableView.leadingAnchor constraintEqualToAnchor:self.view.leadingAnchor],
[self.tableView.trailingAnchor constraintEqualToAnchor:self.view.trailingAnchor],
[self.tableView.bottomAnchor constraintEqualToAnchor:self.view.bottomAnchor]
]];
}
#pragma mark - UITableViewDataSource
- (NSInteger)numberOfSectionsInTableView:(UITableView *)tableView {
return 1;
}
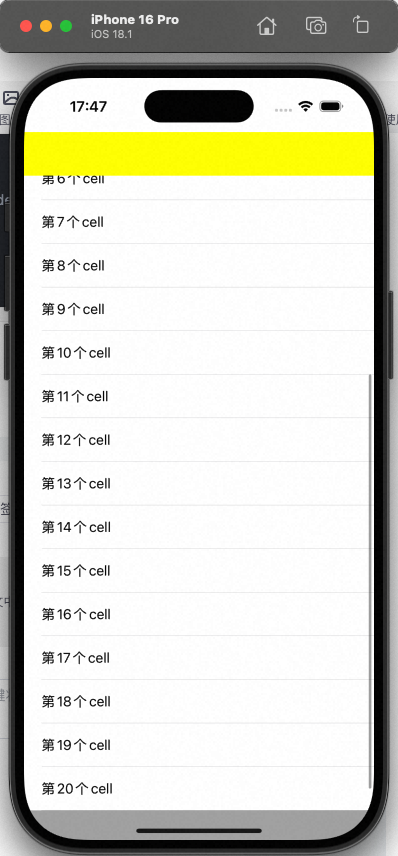
// 20个cell
- (NSInteger)tableView:(UITableView *)tableView numberOfRowsInSection:(NSInteger)section {
return 20;
}
- (UITableViewCell *)tableView:(UITableView *)tableView cellForRowAtIndexPath:(NSIndexPath *)indexPath {
SMTableViewDemoCell *cell = [tableView dequeueReusableCellWithIdentifier:@"SMTableViewDemoCell" forIndexPath:indexPath];
cell.titleLabel.text = [NSString stringWithFormat:@"第%d个cell", (int)indexPath.row + 1];
return cell;
}
#pragma mark - UITableViewDelegate
//cell高度
- (CGFloat)tableView:(UITableView *)tableView heightForRowAtIndexPath:(NSIndexPath *)indexPath {
return 50;
}
//悬停视图
- (UIView *)tableView:(UITableView *)tableView viewForHeaderInSection:(NSInteger)section {
return self.sectionHeaderView;
}
// 悬停高度
- (CGFloat)tableView:(UITableView *)tableView heightForHeaderInSection:(NSInteger)section {
return 40;
}
@end要想实现悬停,首先
self.tableView = [[UITableView alloc] initWithFrame:CGRectZero style:UITableViewStylePlain];
tableView得设置成Plain模式,
第2,代理方法要把你想停的那个视图,并且指定其悬停的高度,比如说我想悬停在黄色视图上
- (UIView *)tableView:(UITableView *)tableView viewForHeaderInSection:(NSInteger)section {
return self.sectionHeaderView;
}
- (CGFloat)tableView:(UITableView *)tableView heightForHeaderInSection:(NSInteger)section {
return 50;
}
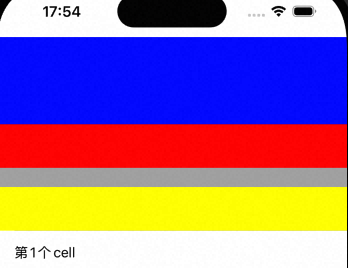
但是UITableView有一个缺陷,就是你想悬停的时候会多出一个间隔可以看下图,那个灰色的就是间隔出来的,透过去直接看到背景了,想去掉也简单
if (@available(iOS 15.0, *)) {
self.tableView.sectionHeaderTopPadding = 0;
}
但是在实际开发的时候可能这个间隔去除不起作用,可以换成底下
if (@available(iOS 15.0, *)) {
UITableView.appearance.sectionHeaderTopPadding = 0;
}

有“AI”的1024 = 2048,欢迎大家加入2048 AI社区
更多推荐
 3
3 0
0- 0


 已为社区贡献1条内容

所有评论(0)