【多模态&LLM】Reyes:一个从0到1开始训练的多模态大模型(技术报告)
选项: {‘A’: ‘120 m’, ‘B’: ‘122 m’, ‘C’: ‘123 m’, ‘D’: ‘121 m’}预测的答案: A正确的答案: A。
最近,笔者系统的看了下一些比较经典的多模态大模型实现思路,本着动手实践的态度,从零到一实现了一个多模态大模型,并命名为Reyes(睿视),R:睿,eyes:眼。Reyes的参数量为8B,视觉编码器使用的是InternViT-300M-448px-V2_5,语言模型侧使用的是Qwen2.5-7B-Instruct,与NVLM-1.0等相关多模态大模型一样,Reyes也通过一个两层MLP投影层连接视觉编码器与语言模型。最终,Reyes-8B(0.447分)以更小的参数量在MMMU-benchmark得分超越llava1.5-13B(0.367分)。
- 模型权重开源地址:https://modelscope.cn/models/yujunhuinlp/Reyes-8B
- github:https://github.com/yujunhuics/Reyes
 Reyes模型大体架构
Reyes模型架构
- 视觉编码器:InternViT-300M-448px-V2_5(https://modelscope.cn/models/OpenGVLab/InternViT-300M-448px-V2_5)
- LLM侧:Qwen2.5-7B-Instruct(https://modelscope.cn/models/Qwen/Qwen2.5-7B-Instruct)
模型实现:ReyesModel
class ReyesModel(PreTrainedModel):
    config_class = ReyesConfig
    main_input_name = 'pixel_values'
    _supports_flash_attn_2 = True
    _no_split_modules = ['InternVisionModel', 'Qwen2DecoderLayer']

    def __init__(self, config: ReyesConfig, vision_model=None, language_model=None, use_flash_attn=True):
        super().__init__(config)

        assert version_cmp(transformers.__version__, '4.44.2', 'ge')
        image_size = config.force_image_size or config.vision_config.image_size
        patch_size = config.vision_config.patch_size
        self.patch_size = patch_size
        self.select_layer = config.select_layer
        self.llm_arch_name = config.llm_config.architectures[0]
        self.template = config.template
        self.num_image_token = int((image_size // patch_size) ** 2 * (config.downsample_ratio ** 2))
        self.downsample_ratio = config.downsample_ratio
        self.ps_version = config.ps_version
        use_flash_attn = use_flash_attn if has_flash_attn elseFalse
        config.vision_config.use_flash_attn = Trueif use_flash_attn elseFalse
        config.llm_config._attn_implementation = 'flash_attention_2'if use_flash_attn else'eager'

        logger.info(f'num_image_token: {self.num_image_token}')
        logger.info(f'ps_version: {self.ps_version}')
        if vision_model isnotNone:
            self.vision_model = vision_model
        else:
            self.vision_model = InternVisionModel(config.vision_config)
        if language_model isnotNone:
            self.language_model = language_model
        else:
            if config.llm_config.architectures[0] == 'Qwen2ForCausalLM':
                self.language_model = Qwen2ForCausalLM(config.llm_config)
                # self.language_model = AutoLigerKernelForCausalLM(config.llm_config)
            else:
                raise NotImplementedError(f'{config.llm_config.architectures[0]} is not implemented.')

        vit_hidden_size = config.vision_config.hidden_size
        llm_intermediate_size = config.llm_config.intermediate_size
        llm_hidden_size = config.llm_config.hidden_size

        self.mlp1 = nn.Sequential(
            nn.LayerNorm(vit_hidden_size * int(1 / self.downsample_ratio) ** 2),
            nn.Linear(vit_hidden_size * int(1 / self.downsample_ratio) ** 2, llm_intermediate_size, bias=False),
            nn.GELU(),
            nn.Linear(llm_intermediate_size, llm_hidden_size, bias=False)
        )

        self.img_context_token_id = None
        self.conv_template = get_conv_template(self.template)
        self.system_message = self.conv_template.system_message

        if config.use_backbone_lora:
            self.wrap_backbone_lora(r=config.use_backbone_lora, lora_alpha=2 * config.use_backbone_lora)

        if config.use_llm_lora:
            self.wrap_llm_lora(r=config.use_llm_lora, lora_alpha=2 * config.use_llm_lora)

    def wrap_backbone_lora(self, r=128, lora_alpha=256, lora_dropout=0.05):
        lora_config = LoraConfig(
            r=r,
            target_modules=['attn.qkv', 'attn.proj', 'mlp.fc1', 'mlp.fc2'],
            lora_alpha=lora_alpha,
            lora_dropout=lora_dropout,
        )
        self.vision_model = get_peft_model(self.vision_model, lora_config)
        self.vision_model.print_trainable_parameters()

    def wrap_llm_lora(self, r=128, lora_alpha=256, lora_dropout=0.05):
        # Determine the target modules based on the architecture of the language model
        if self.llm_arch_name in ['Qwen2ForCausalLM', 'LlamaForCausalLM']:
            target_modules = ['self_attn.q_proj', 'self_attn.k_proj', 'self_attn.v_proj', 'self_attn.o_proj',
                              'mlp.gate_proj', 'mlp.down_proj', 'mlp.up_proj']
        else:
            raiseNotImplemented
        lora_config = LoraConfig(
            r=r,
            target_modules=target_modules,
            lora_alpha=lora_alpha,
            lora_dropout=lora_dropout,
            task_type='CAUSAL_LM'
        )
        self.language_model = get_peft_model(self.language_model, lora_config)
        self.language_model.enable_input_require_grads()
        self.language_model.print_trainable_parameters()

    def forward(
            self,
            pixel_values: torch.FloatTensor,
            input_ids: torch.LongTensor = None,
            attention_mask: Optional[torch.Tensor] = None,
            position_ids: Optional[torch.LongTensor] = None,
            image_flags: Optional[torch.LongTensor] = None,
            past_key_values: Optional[List[torch.FloatTensor]] = None,
            labels: Optional[torch.LongTensor] = None,
            use_cache: Optional[bool] = None,
            output_attentions: Optional[bool] = None,
            output_hidden_states: Optional[bool] = None,
            return_dict: Optional[bool] = None,
    ) -> Union[Tuple, CausalLMOutputWithPast]:
        return_dict = return_dict if return_dict isnotNoneelse self.config.use_return_dict

        # image_flags = image_flags.squeeze(-1)
        input_embeds = self.language_model.get_input_embeddings()(input_ids)

        vit_embeds = self.extract_feature(pixel_values)
        # vit_embeds = vit_embeds[image_flags == 1]
        vit_batch_size = pixel_values.shape[0]

        B, N, C = input_embeds.shape
        input_embeds = input_embeds.reshape(B * N, C)

        # if torch.distributed.get_rank() == 0:
        #     print(f'dynamic ViT batch size: {vit_batch_size}, images per sample: {vit_batch_size / B}, dynamic token length: {N}')

        input_ids = input_ids.reshape(B * N)
        selected = (input_ids == self.img_context_token_id)
        try:
            input_embeds[selected] = input_embeds[selected] * 0.0 + vit_embeds.reshape(-1, C)
        except Exception as e:
            vit_embeds = vit_embeds.reshape(-1, C)
            print(f'warning: {e}, input_embeds[selected].shape={input_embeds[selected].shape}, '
                  f'vit_embeds.shape={vit_embeds.shape}')
            n_token = selected.sum()
            input_embeds[selected] = input_embeds[selected] * 0.0 + vit_embeds[:n_token]

        input_embeds = input_embeds.reshape(B, N, C)

        outputs = self.language_model(
            inputs_embeds=input_embeds,
            attention_mask=attention_mask,
            position_ids=position_ids,
            past_key_values=past_key_values,
            use_cache=use_cache,
            output_attentions=output_attentions,
            output_hidden_states=output_hidden_states,
            return_dict=return_dict,
        )
        logits = outputs.logits

        loss = None
        if labels isnotNone:
            # Shift so that tokens < n predict n
            shift_logits = logits[..., :-1, :].contiguous()
            shift_labels = labels[..., 1:].contiguous()
            # Flatten the tokens
            loss_fct = CrossEntropyLoss()
            shift_logits = shift_logits.view(-1, self.language_model.config.vocab_size)
            shift_labels = shift_labels.view(-1)

            # Enable model parallelism
            shift_labels = shift_labels.to(shift_logits.device)
            loss = loss_fct(shift_logits, shift_labels)

        ifnot return_dict:
            output = (logits,) + outputs[1:]
            return (loss,) + output if loss isnotNoneelse output

        return CausalLMOutputWithPast(
            loss=loss,
            logits=logits,
            past_key_values=outputs.past_key_values,
            hidden_states=outputs.hidden_states,
            attentions=outputs.attentions,
        )
数据引擎
-
预训练数据(558k):https://huggingface.co/datasets/liuhaotian/LLaVA-Pretrain
-
SFT数据(665k,其实笔者没使用这么多,大概使用了430K左右):https://huggingface.co/datasets/liuhaotian/LLaVA-Instruct-150K/blob/main/llava_v1_5_mix665k.json
图片放置方式:
├── coco
│   └── train2017
├── gqa
│   └── images
├── ocr_vqa
│   └── images
├── textvqa
│   └── train_images
└── vg
    ├── VG_100K
    └── VG_100K_2
数据格式
-
预训练数据格式:
<Image><image></Image> Give a brief description of the image. A group of airplanes flying through the sky.<|im_end|> -
SFT数据格式(chatml格式)
<|im_start|>system
Follow the user's instruction and answer questions.<|im_end|>
<|im_start|>user
<Image><image></lmage>
What activity are the people engaged in on the green field?<|im_end|>
<|im_start|>assistant
The people are engaged in playing a game of frisbee on the lush green field.<|im_end|>
<|im_start|>user
Is there a person wearing a fairy outfit in the image? If so, what are they doing?<|im_end|>
<|im_start|>assistant
Yes, there is a person wearing a fairy outfit in the image. They are walking in the field, likely
participating in the fun activities along with the other people.<|im_end|>
<|im_start|>user
What can you say about the spectator's location in relation to the houses?<|im_end|>
<|im_start|>assistant
The spectators are watching a match being played in a location close to the houses, possibly indicating that the field is within a residential area or park.<|im_end|>
动态高分辨率
在数据处理阶段,采用动态高分辨率(DHR)方法来处理不同分辨率的图像输入。具体的如下图,图像被分割成最多6个瓦片(tile):


上述两张图都是动态DHR的处理过程,围绕图像的预处理,包括归一化、缩放、裁剪、根据宽高比动态处理等操作,构建了一套完整的流程,代码逻辑如下:
import torch
from PIL import Image
import torchvision.transforms as T
from torchvision.transforms.functional import InterpolationMode

IMAGENET_MEAN = (0.485, 0.456, 0.406)
IMAGENET_STD = (0.229, 0.224, 0.225)


def build_transform(input_size):
    MEAN, STD = IMAGENET_MEAN, IMAGENET_STD
    transform = T.Compose([
        T.Lambda(lambda img: img.convert('RGB') if img.mode != 'RGB'else img),
        T.Resize((input_size, input_size), interpolation=InterpolationMode.BICUBIC),
        T.ToTensor(),
        T.Normalize(mean=MEAN, std=STD)
    ])
    return transform


def find_closest_aspect_ratio(aspect_ratio, target_ratios, width, height, image_size):
    best_ratio_diff = float('inf')
    best_ratio = (1, 1)
    area = width * height
    for ratio in target_ratios:
        target_aspect_ratio = ratio[0] / ratio[1]
        ratio_diff = abs(aspect_ratio - target_aspect_ratio)
        if ratio_diff < best_ratio_diff:
            best_ratio_diff = ratio_diff
            best_ratio = ratio
        elif ratio_diff == best_ratio_diff:
            if area > 0.5 * image_size * image_size * ratio[0] * ratio[1]:
                best_ratio = ratio
    return best_ratio


def dynamic_preprocess(image, min_num=1, max_num=6, image_size=448, use_thumbnail=True):
    orig_width, orig_height = image.size
    aspect_ratio = orig_width / orig_height

    target_ratios = set(
        (i, j) for n in range(min_num, max_num + 1) for i in range(1, n + 1) for j in range(1, n + 1) if
        i * j <= max_num and i * j >= min_num)
    target_ratios = sorted(target_ratios, key=lambda x: x[0] * x[1])

    target_aspect_ratio = find_closest_aspect_ratio(
        aspect_ratio, target_ratios, orig_width, orig_height, image_size)

    target_width = image_size * target_aspect_ratio[0]
    target_height = image_size * target_aspect_ratio[1]
    blocks = target_aspect_ratio[0] * target_aspect_ratio[1]

    resized_img = image.resize((target_width, target_height))
    processed_images = []
    for i in range(blocks):
        box = (
            (i % (target_width // image_size)) * image_size,
            (i // (target_width // image_size)) * image_size,
            ((i % (target_width // image_size)) + 1) * image_size,
            ((i // (target_width // image_size)) + 1) * image_size
        )
        split_img = resized_img.crop(box)
        processed_images.append(split_img)
    assert len(processed_images) == blocks
    if use_thumbnail and len(processed_images) != 1:
        thumbnail_img = image.resize((image_size, image_size))
        processed_images.append(thumbnail_img)
    return processed_images


def load_image(image_file, input_size=448, max_num=6):
    image = Image.open(image_file).convert('RGB')
    transform = build_transform(input_size=input_size)
    images = dynamic_preprocess(image, image_size=input_size, use_thumbnail=True, max_num=max_num)
    pixel_values = [transform(image) for image in images]
    pixel_values = torch.stack(pixel_values)
    return pixel_values
loss效果
-
预训练loss
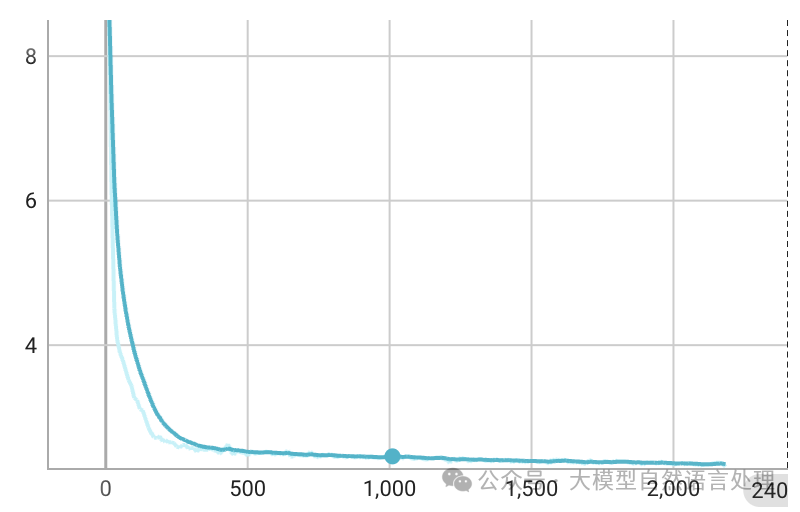 预训练loss,epoch=1
 -
SFT loss
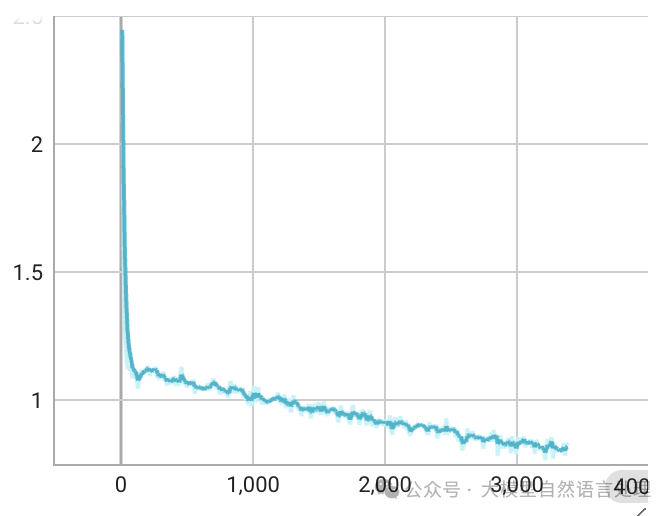 SFT loss,epoch=1
训练配置
为了与llava1.5-13B公平对比,笔者在训练数据上和一些训练参数上进行了对齐。
- pretrain阶段:冻结视觉侧和LLM侧,只训练MLP对齐,max-len=2048,gradient_accumulation_steps=4,单卡batch-size=8,8xH100,所有batch-size=8x4x8=256。
- SFT阶段:继续保持视觉侧冻结,放开LLM,与MLP一起训练,max-len=2048,gradient_accumulation_steps=2,单卡batch-size=8,8xH100,所有batch-size=8x2x8=128。
推理
import torch
from modelscope import AutoTokenizer, AutoModel
from PIL import Image
import torchvision.transforms as T
from torchvision.transforms.functional import InterpolationMode

IMAGENET_MEAN = (0.485, 0.456, 0.406)
IMAGENET_STD = (0.229, 0.224, 0.225)


def build_transform(input_size):
    MEAN, STD = IMAGENET_MEAN, IMAGENET_STD
    transform = T.Compose([
        T.Lambda(lambda img: img.convert('RGB') if img.mode != 'RGB'else img),
        T.Resize((input_size, input_size), interpolation=InterpolationMode.BICUBIC),
        T.ToTensor(),
        T.Normalize(mean=MEAN, std=STD)
    ])
    return transform


def find_closest_aspect_ratio(aspect_ratio, target_ratios, width, height, image_size):
    best_ratio_diff = float('inf')
    best_ratio = (1, 1)
    area = width * height
    for ratio in target_ratios:
        target_aspect_ratio = ratio[0] / ratio[1]
        ratio_diff = abs(aspect_ratio - target_aspect_ratio)
        if ratio_diff < best_ratio_diff:
            best_ratio_diff = ratio_diff
            best_ratio = ratio
        elif ratio_diff == best_ratio_diff:
            if area > 0.5 * image_size * image_size * ratio[0] * ratio[1]:
                best_ratio = ratio
    return best_ratio


def dynamic_preprocess(image, min_num=1, max_num=12, image_size=448, use_thumbnail=False):
    orig_width, orig_height = image.size
    aspect_ratio = orig_width / orig_height

    # calculate the existing image aspect ratio
    target_ratios = set(
        (i, j) for n in range(min_num, max_num + 1) for i in range(1, n + 1) for j in range(1, n + 1) if
        i * j <= max_num and i * j >= min_num)
    target_ratios = sorted(target_ratios, key=lambda x: x[0] * x[1])

    # find the closest aspect ratio to the target
    target_aspect_ratio = find_closest_aspect_ratio(
        aspect_ratio, target_ratios, orig_width, orig_height, image_size)

    # calculate the target width and height
    target_width = image_size * target_aspect_ratio[0]
    target_height = image_size * target_aspect_ratio[1]
    blocks = target_aspect_ratio[0] * target_aspect_ratio[1]

    # resize the image
    resized_img = image.resize((target_width, target_height))
    processed_images = []
    for i in range(blocks):
        box = (
            (i % (target_width // image_size)) * image_size,
            (i // (target_width // image_size)) * image_size,
            ((i % (target_width // image_size)) + 1) * image_size,
            ((i // (target_width // image_size)) + 1) * image_size
        )
        # split the image
        split_img = resized_img.crop(box)
        processed_images.append(split_img)
    assert len(processed_images) == blocks
    if use_thumbnail and len(processed_images) != 1:
        thumbnail_img = image.resize((image_size, image_size))
        processed_images.append(thumbnail_img)
    return processed_images


def load_image(image_file, input_size=448, max_num=12):
    image = Image.open(image_file).convert('RGB')
    transform = build_transform(input_size=input_size)
    images = dynamic_preprocess(image, image_size=input_size, use_thumbnail=True, max_num=max_num)
    pixel_values = [transform(image) for image in images]
    pixel_values = torch.stack(pixel_values)
    return pixel_values


def preprocess_image(file_path, dynamic=True, max_num=6, image_size=448):
    try:
        if dynamic:
            return load_image(file_path, max_num=max_num).to(torch.bfloat16).cuda()
        else:
            img = Image.open(file_path).convert('RGB')
            transform = build_transform(image_size)
            pixel_values = transform(img)
            return torch.stack([pixel_values]).to(torch.bfloat16).cuda()
    except Exception as e:
        raise RuntimeError(f"Error processing image: {e}")


path = "Reyes-8B"

model = AutoModel.from_pretrained(
    path,
    torch_dtype=torch.bfloat16,
    trust_remote_code=True,
).eval().cuda()

# print(model)

tokenizer = AutoTokenizer.from_pretrained(path, trust_remote_code=True, use_fast=False)
generation_config = dict(max_new_tokens=2048, do_sample=False)

# single-image single-round conversation
file_path = 'tmp.png'
pixel_values = preprocess_image(file_path, dynamic=True)
question = '<image>\nPlease describe the image shortly.'
response = model.chat(tokenizer, pixel_values, question, generation_config)
print(f'User: {question}\nAssistant: {response}')

# pure-text conversation
question = 'Hello, who are you?'
response, history = model.chat(tokenizer, None, question, generation_config, history=None, return_history=True)
print(f'User: {question}\nAssistant: {response}')
评测
-
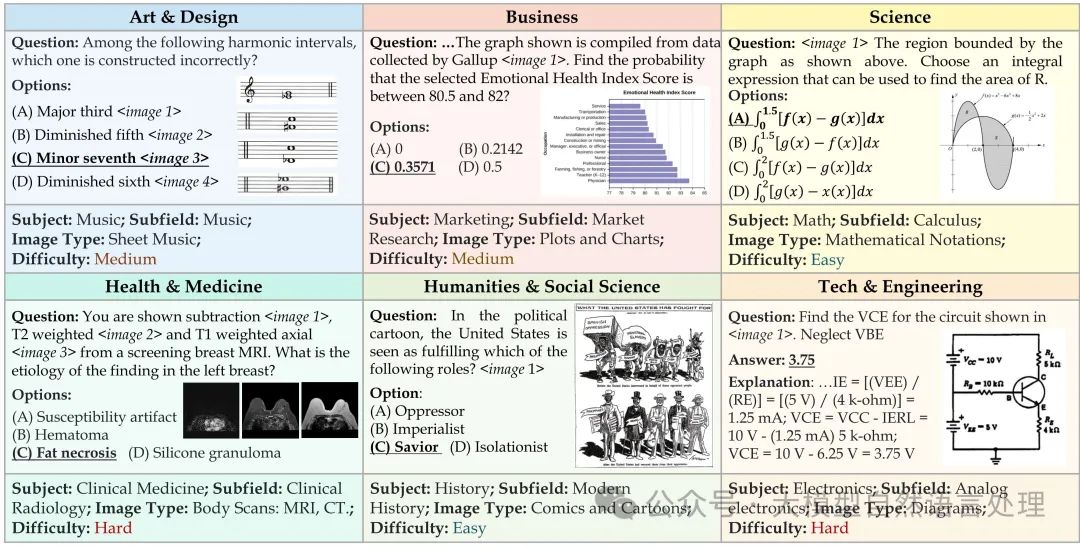
MMMU评测(MMMU: A Massive Multi-discipline Multimodal Understanding and Reasoning Benchmark for Expert AGI)
简介:MMMU 是一种新的基准,旨在评估多模态模型在需要大学水平的学科知识和深思熟虑的推理的大规模多学科任务中的表现。MMMU 包含11.5K 个精心收集的来自大学考试、测验和教科书的多模态问题,涵盖六个核心学科:艺术与设计、商业、科学、健康与医学、人文与社会科学以及技术与工程。这些问题涵盖30 个学科和183 个子领域,包含32 种高度异构的图像类型,如图表、图解、地图、表格、乐谱和化学结构。与现有基准不同,MMMU 专注于使用领域特定知识进行高级感知和推理,挑战模型执行类似于专家面临的任务。
**评测结果显示:Reyes-8b比llava1.5-13b取得了更先进的结果。**详细评分如下:
-
llava1.5-13b得分:0.367

-
Reyes-8b得分:0.447

- 一些测试case
-
case1
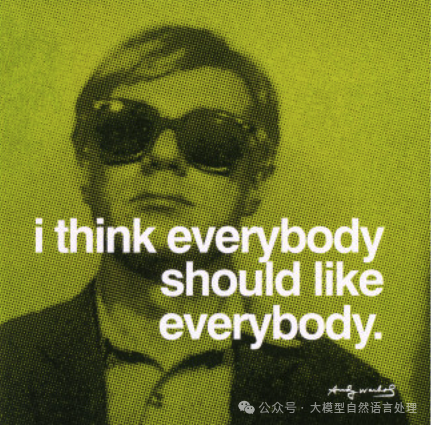
问题: Who painted <image 1>? 选项: {'A':'Claude Monet', 'B':'Henri Matisse', 'C':'Andy Warhol','D': "Georgia O'Keefe"] 预测的答案: C 正确的答案: C -
case2

问题: Each situation below relates to an independent company's Owners' Equity. <image 1> Calculate the missing values of company 2. 选项: {'A': '$1,620', 'B': '$12,000', 'C': '$51,180', 'D': '$0'} 预测的答案: D 正确的答案: D -
case3
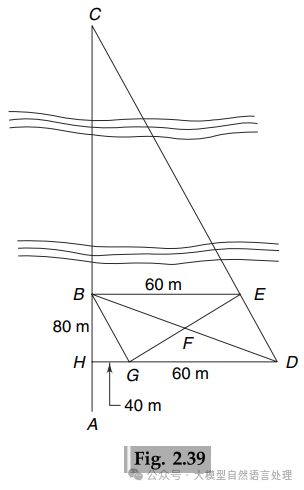
问题: A survey line ABC crossing a river at right angles cut its banks at B and C, as shown in Fig. 2.39. To determine the width BC of the river, the following operation was carried out.A 60 m long line BE was set out roughly parallel to the river. Line CE was extended to D and mid-point F of DB was established. Then EF was extended to G such that FG = EF. Line DG was extended to cut the survey line ABC at H. GH and HB were measured and found to be 40 m and 80 m, respectively.Find the width of the river.<image 1>
选项: {'A': '120 m', 'B': '122 m', 'C': '123 m', 'D': '121 m'}
预测的答案: A
正确的答案: A
总结
. To determine the width BC of the river, the following operation was carried out.A 60 m long line BE was set out roughly parallel to the river. Line CE was extended to D and mid-point F of DB was established. Then EF was extended to G such that FG = EF. Line DG was extended to cut the survey line ABC at H. GH and HB were measured and found to be 40 m and 80 m, respectively.Find the width of the river.<image 1>
选项: {‘A’: ‘120 m’, ‘B’: ‘122 m’, ‘C’: ‘123 m’, ‘D’: ‘121 m’}
预测的答案: A
正确的答案: A
总结
本文记录了从0到1实现一个多模态大模型的过程,包括模型结构、数据引擎、评测全流程。当前模型训练数据与llava1.5-13b对齐,并且在MMMU评测上以更小的模型参数量超越了llava1.5-13b,当前训练数据因为只采用了图文多模态数据,在SFT阶段,并未加入text-only数据,因此,语言模型端会出现一些退化。将来若有时间,会考虑加入更多的多模态数据及笔者私有数据进行训练,打造更强的Reyes模型。
零基础如何高效学习大模型?
你是否懂 AI,是否具备利用大模型去开发应用能力,是否能够对大模型进行调优,将会是决定自己职业前景的重要参数。
为了帮助大家打破壁垒,快速了解大模型核心技术原理,学习相关大模型技术。从原理出发真正入局大模型。在这里我和鲁为民博士系统梳理大模型学习脉络,这份 LLM大模型资料 分享出来:包括LLM大模型书籍、640套大模型行业报告、LLM大模型学习视频、LLM大模型学习路线、开源大模型学习教程等, 😝有需要的小伙伴,可以 扫描下方二维码免费领取🆓**⬇️⬇️⬇️

【大模型全套视频教程】
教程从当下的市场现状和趋势出发,分析各个岗位人才需求,带你充分了解自身情况,get 到适合自己的 AI 大模型入门学习路线。
从基础的 prompt 工程入手,逐步深入到 Agents,其中更是详细介绍了 LLM 最重要的编程框架 LangChain。最后把微调与预训练进行了对比介绍与分析。
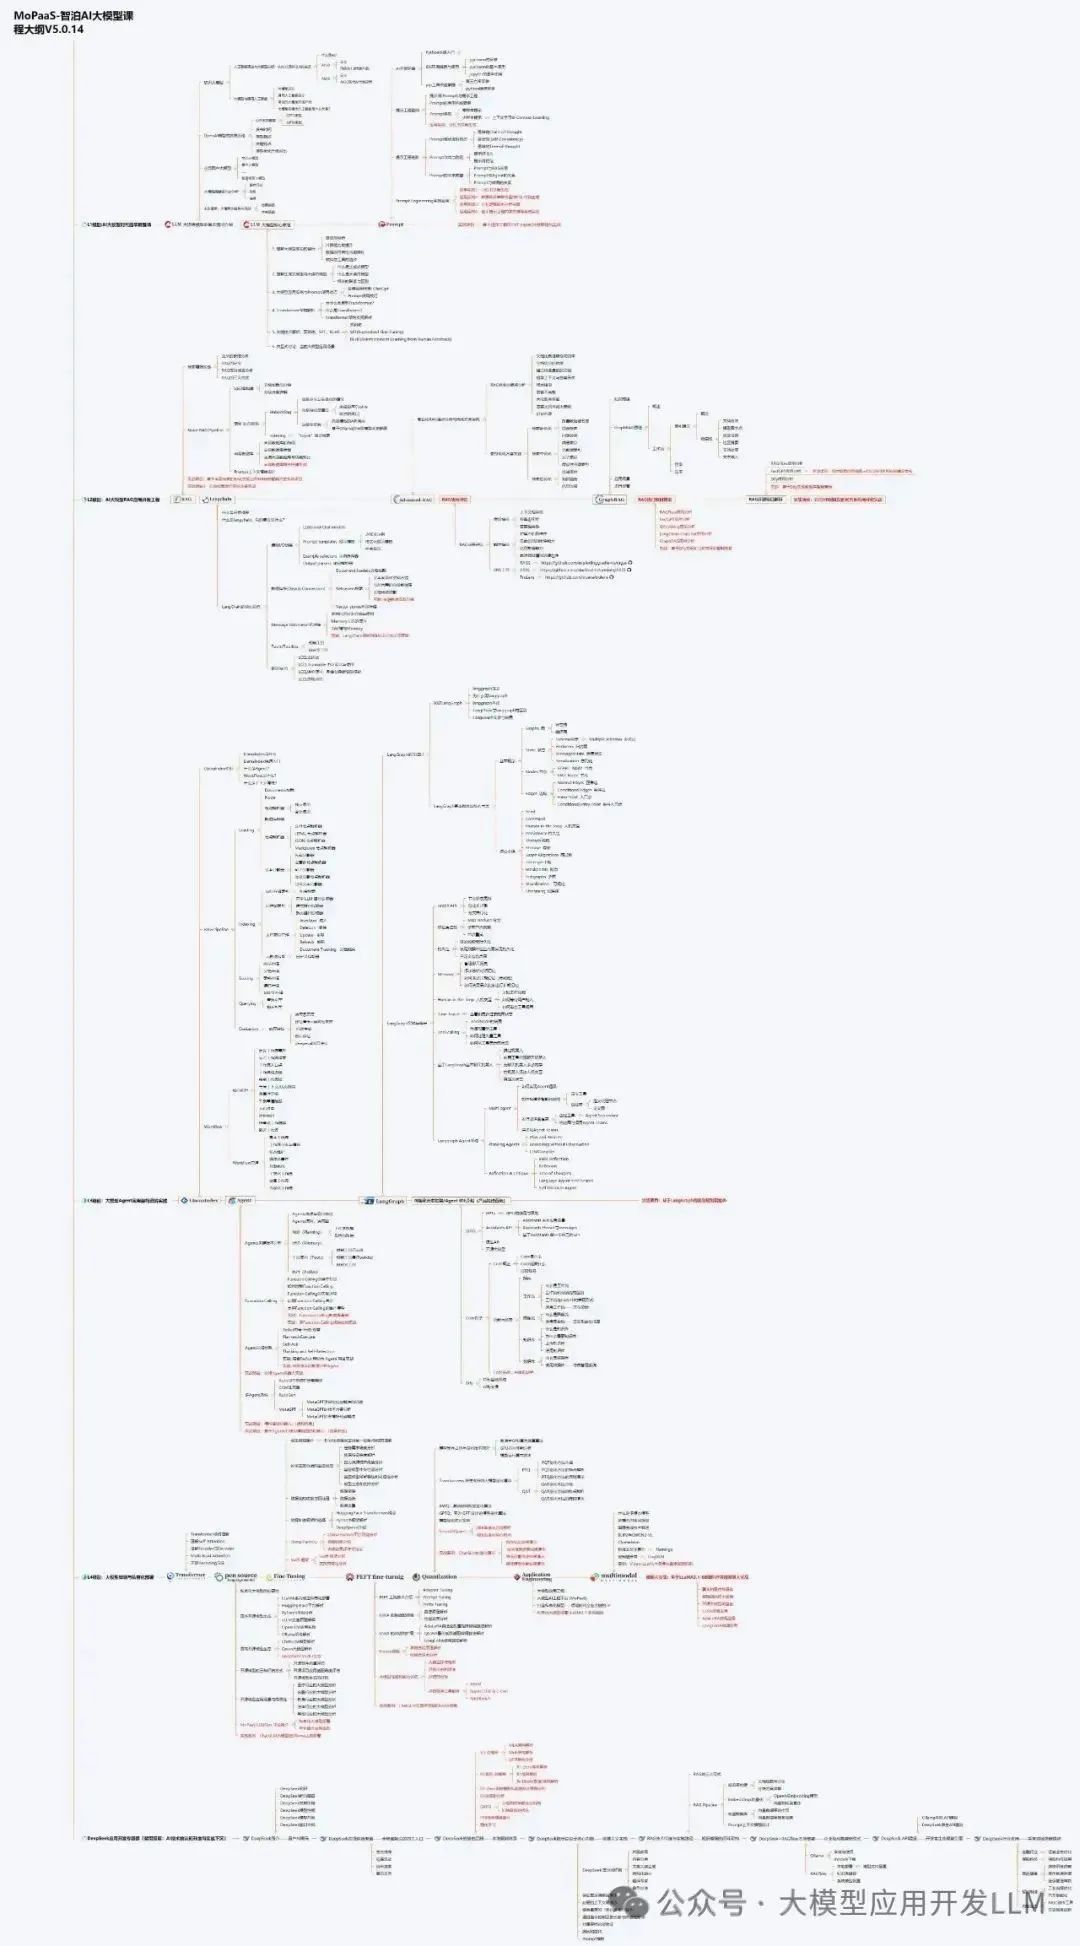
同时课程详细介绍了AI大模型技能图谱知识树,规划属于你自己的大模型学习路线,并且专门提前收集了大家对大模型常见的疑问,集中解答所有疑惑!
深耕 AI 领域技术专家带你快速入门大模型
跟着行业技术专家免费学习的机会非常难得,相信跟着学习下来能够对大模型有更加深刻的认知和理解,也能真正利用起大模型,从而“弯道超车”,实现职业跃迁!
【AI 大模型面试题 】
除了 AI 入门课程,我还给大家准备了非常全面的**「AI 大模型面试题」,**包括字节、腾讯等一线大厂的 AI 岗面经分享、LLMs、Transformer、RAG 面试真题等,帮你在面试大模型工作中更快一步。
【大厂 AI 岗位面经分享(92份)】
【AI 大模型面试真题(102 道)】
【LLMs 面试真题(97 道)】
【640套 AI 大模型行业研究报告】

【AI大模型完整版学习路线图(2025版)】
明确学习方向,2025年 AI 要学什么,这一张图就够了!
👇👇点击下方卡片链接免费领取全部内容👇👇
抓住AI浪潮,重塑职业未来!
科技行业正处于深刻变革之中。英特尔等巨头近期进行结构性调整,缩减部分传统岗位,同时AI相关技术岗位(尤其是大模型方向)需求激增,已成为不争的事实。具备相关技能的人才在就业市场上正变得炙手可热。
行业趋势洞察:
- 转型加速: 传统IT岗位面临转型压力,拥抱AI技术成为关键。
- 人才争夺战: 拥有3-5年经验、扎实AI技术功底和真实项目经验的工程师,在头部大厂及明星AI企业中的薪资竞争力显著提升(部分核心岗位可达较高水平)。
- 门槛提高: “具备AI项目实操经验”正迅速成为简历筛选的重要标准,预计未来1-2年将成为普遍门槛。
与其观望,不如行动!
面对变革,主动学习、提升技能才是应对之道。掌握AI大模型核心原理、主流应用技术与项目实战经验,是抓住时代机遇、实现职业跃迁的关键一步。

01 为什么分享这份学习资料?
当前,我国在AI大模型领域的高质量人才供给仍显不足,行业亟需更多有志于此的专业力量加入。
因此,我们决定将这份精心整理的AI大模型学习资料,无偿分享给每一位真心渴望进入这个领域、愿意投入学习的伙伴!
我们希望能为你的学习之路提供一份助力。如果在学习过程中遇到技术问题,也欢迎交流探讨,我们乐于分享所知。
*02 这份资料的价值在哪里?*
专业背书,系统构建:
-
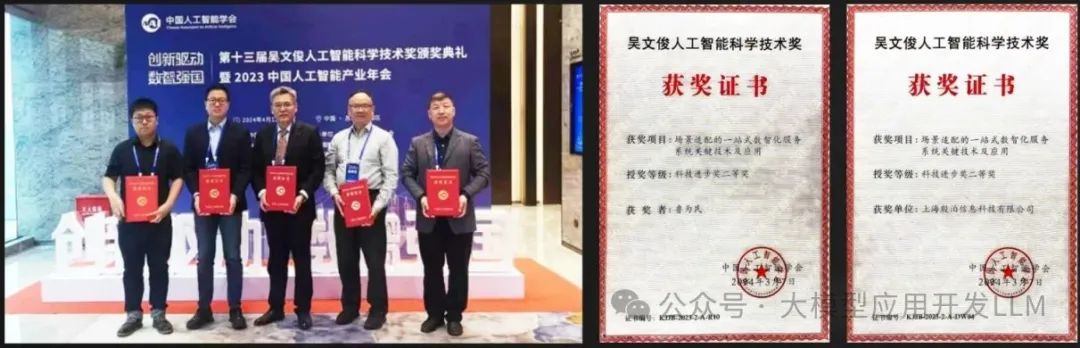
本资料由我与鲁为民博士共同整理。鲁博士拥有清华大学学士和美国加州理工学院博士学位,在人工智能领域造诣深厚:
-
- 在IEEE Transactions等顶级学术期刊及国际会议发表论文超过50篇。
- 拥有多项中美发明专利。
- 荣获吴文俊人工智能科学技术奖(中国人工智能领域重要奖项)。
-
目前,我有幸与鲁博士共同进行人工智能相关研究。
内容实用,循序渐进:
-
资料体系化覆盖了从基础概念入门到核心技术进阶的知识点。
-
包含丰富的视频教程与实战项目案例,强调动手实践能力。
-
无论你是初探AI领域的新手,还是已有一定技术基础希望深入大模型的学习者,这份资料都能为你提供系统性的学习路径和宝贵的实践参考,助力你提升技术能力,向大模型相关岗位转型发展。

抓住机遇,开启你的AI学习之旅!

有“AI”的1024 = 2048,欢迎大家加入2048 AI社区
更多推荐
 31
31 0
0- 0


 已为社区贡献89条内容

所有评论(0)