大模型微调【3】之使用AutoDL进行Qwen3-32B动态量化模型4bit微调实践
大模型微调【3】之使用AutoDL进行Qwen3-32B动态量化模型4bit微调实践
·
说明
- 本文内容学自赋范社区九天老师,仅供学习和交流使用!
零 微调环境
- 推荐直接使用AutoDL平台H800或A800使用80GB显存环境进行学习!
一 Unsloth基本使用
- Unsloth是一个集模型调用和高效微调为一体的框架,在开始进行模型微调前,可以先尝试借助Unsloth进行模型调用。
- Unsloth的使用难度远比一般的微调框架简单,在Jupyter中即可完成模型微调,且微调结束后还可以直接进行模型调用,并支持在Jupyter中进行模型权重合并与导出,非常便捷。
- Unsloth部署方式:使用AutoDL进行模型微调入门
1.1 模型导入和查看
- 首先导入Qwen3模型
import os
os.environ["CUDA_VISIBLE_DEVICES"] = "0"
from unsloth import FastLanguageModel
import torch

max_seq_length = 8192
dtype = None
load_in_4bit = True

model, tokenizer = FastLanguageModel.from_pretrained(
    model_name = "./Qwen3-32B-unsloth-bnb-4bit",
    max_seq_length = max_seq_length,
    dtype = dtype,
    load_in_4bit = load_in_4bit,
)
🦥 Unsloth: Will patch your computer to enable 2x faster free finetuning.
🦥 Unsloth Zoo will now patch everything to make training faster!
==((====))== Unsloth 2025.8.6: Fast Qwen3 patching. Transformers: 4.55.2.
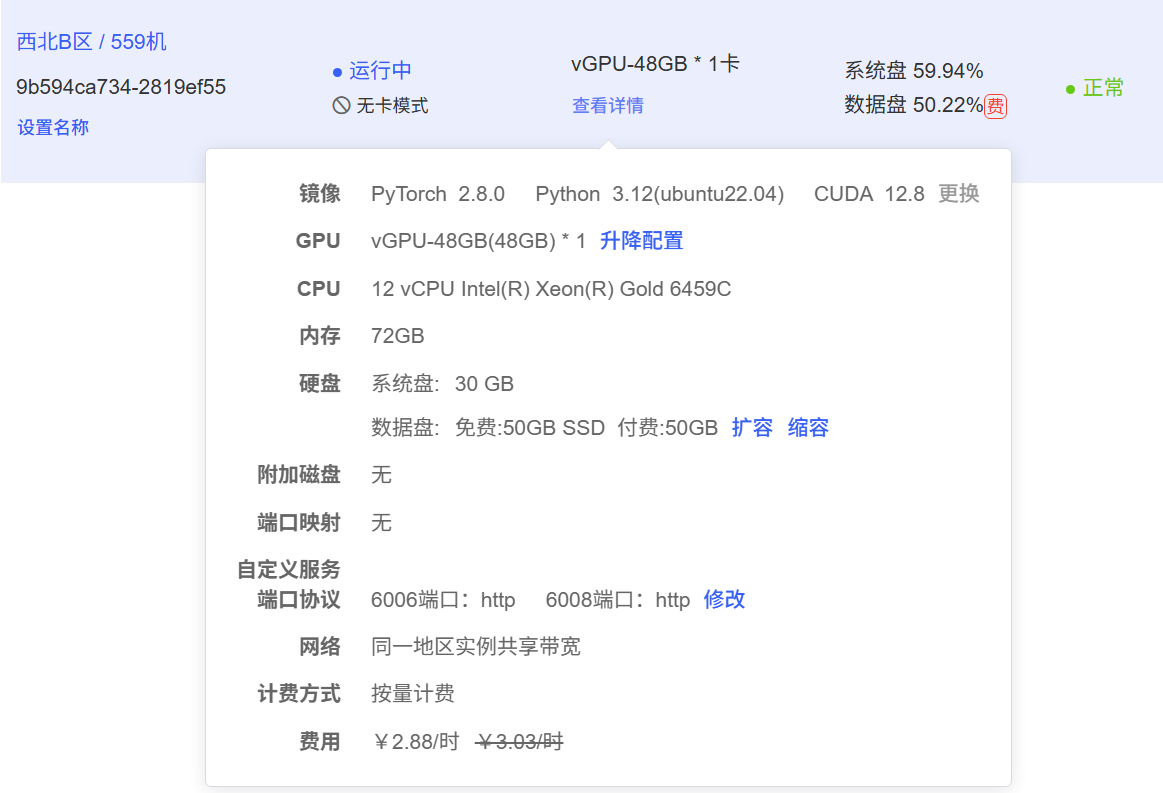
\\ /| NVIDIA vGPU-48GB. Num GPUs = 1. Max memory: 47.371 GB. Platform: Linux.
O^O/ \_/ \ Torch: 2.8.0+cu128. CUDA: 8.9. CUDA Toolkit: 12.8. Triton: 3.4.0
\ / Bfloat16 = TRUE. FA [Xformers = 0.0.32.post2. FA2 = False]
"-____-" Free license: http://github.com/unslothai/unsloth
Unsloth: Fast downloading is enabled - ignore downloading bars which are red colored!
Loading checkpoint shards: 0%| | 0/9 [00:00<?, ?it/s]
-
查看模型结构
print(model)Qwen3ForCausalLM( (model): Qwen3Model( (embed_tokens): Embedding(151936, 5120, padding_idx=151654) (layers): ModuleList( (0-5): 6 x Qwen3DecoderLayer( (self_attn): Qwen3Attention( (q_proj): Linear4bit(in_features=5120, out_features=8192, bias=False) (k_proj): Linear4bit(in_features=5120, out_features=1024, bias=False) (v_proj): Linear4bit(in_features=5120, out_features=1024, bias=False) (o_proj): Linear4bit(in_features=8192, out_features=5120, bias=False) (q_norm): Qwen3RMSNorm((128,), eps=1e-06) (k_norm): Qwen3RMSNorm((128,), eps=1e-06) (rotary_emb): LlamaRotaryEmbedding() ) (mlp): Qwen3MLP( (gate_proj): Linear4bit(in_features=5120, out_features=25600, bias=False) (up_proj): Linear4bit(in_features=5120, out_features=25600, bias=False) (down_proj): Linear4bit(in_features=25600, out_features=5120, bias=False) (act_fn): SiLU() ) (input_layernorm): Qwen3RMSNorm((5120,), eps=1e-06) (post_attention_layernorm): Qwen3RMSNorm((5120,), eps=1e-06) ) (6): Qwen3DecoderLayer( (self_attn): Qwen3Attention( (q_proj): Linear4bit(in_features=5120, out_features=8192, bias=False) (k_proj): Linear4bit(in_features=5120, out_features=1024, bias=False) (v_proj): Linear4bit(in_features=5120, out_features=1024, bias=False) (o_proj): Linear4bit(in_features=8192, out_features=5120, bias=False) (q_norm): Qwen3RMSNorm((128,), eps=1e-06) (k_norm): Qwen3RMSNorm((128,), eps=1e-06) (rotary_emb): LlamaRotaryEmbedding() ) (mlp): Qwen3MLP( (gate_proj): Linear(in_features=5120, out_features=25600, bias=False) (up_proj): Linear(in_features=5120, out_features=25600, bias=False) (down_proj): Linear(in_features=25600, out_features=5120, bias=False) (act_fn): SiLU() ) (input_layernorm): Qwen3RMSNorm((5120,), eps=1e-06) (post_attention_layernorm): Qwen3RMSNorm((5120,), eps=1e-06) ) (7): Qwen3DecoderLayer( (self_attn): Qwen3Attention( (q_proj): Linear4bit(in_features=5120, out_features=8192, bias=False) (k_proj): Linear4bit(in_features=5120, out_features=1024, bias=False) (v_proj): Linear4bit(in_features=5120, out_features=1024, bias=False) (o_proj): Linear4bit(in_features=8192, out_features=5120, bias=False) (q_norm): Qwen3RMSNorm((128,), eps=1e-06) (k_norm): Qwen3RMSNorm((128,), eps=1e-06) (rotary_emb): LlamaRotaryEmbedding() ) (mlp): Qwen3MLP( (gate_proj): Linear4bit(in_features=5120, out_features=25600, bias=False) (up_proj): Linear4bit(in_features=5120, out_features=25600, bias=False) (down_proj): Linear(in_features=25600, out_features=5120, bias=False) (act_fn): SiLU() ) (input_layernorm): Qwen3RMSNorm((5120,), eps=1e-06) (post_attention_layernorm): Qwen3RMSNorm((5120,), eps=1e-06) ) (8-22): 15 x Qwen3DecoderLayer( (self_attn): Qwen3Attention( (q_proj): Linear4bit(in_features=5120, out_features=8192, bias=False) (k_proj): Linear4bit(in_features=5120, out_features=1024, bias=False) (v_proj): Linear4bit(in_features=5120, out_features=1024, bias=False) (o_proj): Linear4bit(in_features=8192, out_features=5120, bias=False) (q_norm): Qwen3RMSNorm((128,), eps=1e-06) (k_norm): Qwen3RMSNorm((128,), eps=1e-06) (rotary_emb): LlamaRotaryEmbedding() ) (mlp): Qwen3MLP( (gate_proj): Linear4bit(in_features=5120, out_features=25600, bias=False) (up_proj): Linear4bit(in_features=5120, out_features=25600, bias=False) (down_proj): Linear4bit(in_features=25600, out_features=5120, bias=False) (act_fn): SiLU() ) (input_layernorm): Qwen3RMSNorm((5120,), eps=1e-06) (post_attention_layernorm): Qwen3RMSNorm((5120,), eps=1e-06) ) (23-44): 22 x Qwen3DecoderLayer( (self_attn): Qwen3Attention( (q_proj): Linear4bit(in_features=5120, out_features=8192, bias=False) (k_proj): Linear4bit(in_features=5120, out_features=1024, bias=False) (v_proj): Linear4bit(in_features=5120, out_features=1024, bias=False) (o_proj): Linear4bit(in_features=8192, out_features=5120, bias=False) (q_norm): Qwen3RMSNorm((128,), eps=1e-06) (k_norm): Qwen3RMSNorm((128,), eps=1e-06) (rotary_emb): LlamaRotaryEmbedding() ) (mlp): Qwen3MLP( (gate_proj): Linear(in_features=5120, out_features=25600, bias=False) (up_proj): Linear(in_features=5120, out_features=25600, bias=False) (down_proj): Linear(in_features=25600, out_features=5120, bias=False) (act_fn): SiLU() ) (input_layernorm): Qwen3RMSNorm((5120,), eps=1e-06) (post_attention_layernorm): Qwen3RMSNorm((5120,), eps=1e-06) ) (45): Qwen3DecoderLayer( (self_attn): Qwen3Attention( (q_proj): Linear4bit(in_features=5120, out_features=8192, bias=False) (k_proj): Linear4bit(in_features=5120, out_features=1024, bias=False) (v_proj): Linear4bit(in_features=5120, out_features=1024, bias=False) (o_proj): Linear(in_features=8192, out_features=5120, bias=False) (q_norm): Qwen3RMSNorm((128,), eps=1e-06) (k_norm): Qwen3RMSNorm((128,), eps=1e-06) (rotary_emb): LlamaRotaryEmbedding() ) (mlp): Qwen3MLP( (gate_proj): Linear(in_features=5120, out_features=25600, bias=False) (up_proj): Linear(in_features=5120, out_features=25600, bias=False) (down_proj): Linear(in_features=25600, out_features=5120, bias=False) (act_fn): SiLU() ) (input_layernorm): Qwen3RMSNorm((5120,), eps=1e-06) (post_attention_layernorm): Qwen3RMSNorm((5120,), eps=1e-06) ) (46-54): 9 x Qwen3DecoderLayer( (self_attn): Qwen3Attention( (q_proj): Linear4bit(in_features=5120, out_features=8192, bias=False) (k_proj): Linear4bit(in_features=5120, out_features=1024, bias=False) (v_proj): Linear4bit(in_features=5120, out_features=1024, bias=False) (o_proj): Linear4bit(in_features=8192, out_features=5120, bias=False) (q_norm): Qwen3RMSNorm((128,), eps=1e-06) (k_norm): Qwen3RMSNorm((128,), eps=1e-06) (rotary_emb): LlamaRotaryEmbedding() ) (mlp): Qwen3MLP( (gate_proj): Linear(in_features=5120, out_features=25600, bias=False) (up_proj): Linear(in_features=5120, out_features=25600, bias=False) (down_proj): Linear(in_features=25600, out_features=5120, bias=False) (act_fn): SiLU() ) (input_layernorm): Qwen3RMSNorm((5120,), eps=1e-06) (post_attention_layernorm): Qwen3RMSNorm((5120,), eps=1e-06) ) (55-61): 7 x Qwen3DecoderLayer( (self_attn): Qwen3Attention( (q_proj): Linear4bit(in_features=5120, out_features=8192, bias=False) (k_proj): Linear4bit(in_features=5120, out_features=1024, bias=False) (v_proj): Linear4bit(in_features=5120, out_features=1024, bias=False) (o_proj): Linear4bit(in_features=8192, out_features=5120, bias=False) (q_norm): Qwen3RMSNorm((128,), eps=1e-06) (k_norm): Qwen3RMSNorm((128,), eps=1e-06) (rotary_emb): LlamaRotaryEmbedding() ) (mlp): Qwen3MLP( (gate_proj): Linear4bit(in_features=5120, out_features=25600, bias=False) (up_proj): Linear4bit(in_features=5120, out_features=25600, bias=False) (down_proj): Linear4bit(in_features=25600, out_features=5120, bias=False) (act_fn): SiLU() ) (input_layernorm): Qwen3RMSNorm((5120,), eps=1e-06) (post_attention_layernorm): Qwen3RMSNorm((5120,), eps=1e-06) ) (62): Qwen3DecoderLayer( (self_attn): Qwen3Attention( (q_proj): Linear4bit(in_features=5120, out_features=8192, bias=False) (k_proj): Linear4bit(in_features=5120, out_features=1024, bias=False) (v_proj): Linear4bit(in_features=5120, out_features=1024, bias=False) (o_proj): Linear4bit(in_features=8192, out_features=5120, bias=False) (q_norm): Qwen3RMSNorm((128,), eps=1e-06) (k_norm): Qwen3RMSNorm((128,), eps=1e-06) (rotary_emb): LlamaRotaryEmbedding() ) (mlp): Qwen3MLP( (gate_proj): Linear(in_features=5120, out_features=25600, bias=False) (up_proj): Linear(in_features=5120, out_features=25600, bias=False) (down_proj): Linear(in_features=25600, out_features=5120, bias=False) (act_fn): SiLU() ) (input_layernorm): Qwen3RMSNorm((5120,), eps=1e-06) (post_attention_layernorm): Qwen3RMSNorm((5120,), eps=1e-06) ) (63): Qwen3DecoderLayer( (self_attn): Qwen3Attention( (q_proj): Linear4bit(in_features=5120, out_features=8192, bias=False) (k_proj): Linear4bit(in_features=5120, out_features=1024, bias=False) (v_proj): Linear4bit(in_features=5120, out_features=1024, bias=False) (o_proj): Linear4bit(in_features=8192, out_features=5120, bias=False) (q_norm): Qwen3RMSNorm((128,), eps=1e-06) (k_norm): Qwen3RMSNorm((128,), eps=1e-06) (rotary_emb): LlamaRotaryEmbedding() ) (mlp): Qwen3MLP( (gate_proj): Linear4bit(in_features=5120, out_features=25600, bias=False) (up_proj): Linear4bit(in_features=5120, out_features=25600, bias=False) (down_proj): Linear4bit(in_features=25600, out_features=5120, bias=False) (act_fn): SiLU() ) (input_layernorm): Qwen3RMSNorm((5120,), eps=1e-06) (post_attention_layernorm): Qwen3RMSNorm((5120,), eps=1e-06) ) ) (norm): Qwen3RMSNorm((5120,), eps=1e-06) (rotary_emb): LlamaRotaryEmbedding() ) (lm_head): Linear(in_features=5120, out_features=151936, bias=False) ) -
查看分词器信息
print(tokenizer)Qwen2TokenizerFast(name_or_path='./Qwen3-32B-unsloth-bnb-4bit', vocab_size=151643, model_max_length=40960, is_fast=True, padding_side='left', truncation_side='right', special_tokens={'eos_token': '<|im_end|>', 'pad_token': '<|vision_pad|>', 'additional_special_tokens': ['<|im_start|>', '<|im_end|>', '<|object_ref_start|>', '<|object_ref_end|>', '<|box_start|>', '<|box_end|>', '<|quad_start|>', '<|quad_end|>', '<|vision_start|>', '<|vision_end|>', '<|vision_pad|>', '<|image_pad|>', '<|video_pad|>']}, clean_up_tokenization_spaces=False, added_tokens_decoder={ 151643: AddedToken("<|endoftext|>", rstrip=False, lstrip=False, single_word=False, normalized=False, special=True), 151644: AddedToken("<|im_start|>", rstrip=False, lstrip=False, single_word=False, normalized=False, special=True), 151645: AddedToken("<|im_end|>", rstrip=False, lstrip=False, single_word=False, normalized=False, special=True), 151646: AddedToken("<|object_ref_start|>", rstrip=False, lstrip=False, single_word=False, normalized=False, special=True), 151647: AddedToken("<|object_ref_end|>", rstrip=False, lstrip=False, single_word=False, normalized=False, special=True), 151648: AddedToken("<|box_start|>", rstrip=False, lstrip=False, single_word=False, normalized=False, special=True), 151649: AddedToken("<|box_end|>", rstrip=False, lstrip=False, single_word=False, normalized=False, special=True), 151650: AddedToken("<|quad_start|>", rstrip=False, lstrip=False, single_word=False, normalized=False, special=True), 151651: AddedToken("<|quad_end|>", rstrip=False, lstrip=False, single_word=False, normalized=False, special=True), 151652: AddedToken("<|vision_start|>", rstrip=False, lstrip=False, single_word=False, normalized=False, special=True), 151653: AddedToken("<|vision_end|>", rstrip=False, lstrip=False, single_word=False, normalized=False, special=True), 151654: AddedToken("<|vision_pad|>", rstrip=False, lstrip=False, single_word=False, normalized=False, special=True), 151655: AddedToken("<|image_pad|>", rstrip=False, lstrip=False, single_word=False, normalized=False, special=True), 151656: AddedToken("<|video_pad|>", rstrip=False, lstrip=False, single_word=False, normalized=False, special=True), 151657: AddedToken("<tool_call>", rstrip=False, lstrip=False, single_word=False, normalized=False, special=False), 151658: AddedToken("</tool_call>", rstrip=False, lstrip=False, single_word=False, normalized=False, special=False), 151659: AddedToken("<|fim_prefix|>", rstrip=False, lstrip=False, single_word=False, normalized=False, special=False), 151660: AddedToken("<|fim_middle|>", rstrip=False, lstrip=False, single_word=False, normalized=False, special=False), 151661: AddedToken("<|fim_suffix|>", rstrip=False, lstrip=False, single_word=False, normalized=False, special=False), 151662: AddedToken("<|fim_pad|>", rstrip=False, lstrip=False, single_word=False, normalized=False, special=False), 151663: AddedToken("<|repo_name|>", rstrip=False, lstrip=False, single_word=False, normalized=False, special=False), 151664: AddedToken("<|file_sep|>", rstrip=False, lstrip=False, single_word=False, normalized=False, special=False), 151665: AddedToken("<tool_response>", rstrip=False, lstrip=False, single_word=False, normalized=False, special=False), 151666: AddedToken("</tool_response>", rstrip=False, lstrip=False, single_word=False, normalized=False, special=False), 151667: AddedToken("<think>", rstrip=False, lstrip=False, single_word=False, normalized=False, special=False), 151668: AddedToken("</think>", rstrip=False, lstrip=False, single_word=False, normalized=False, special=False), } ) -
查看显存占用
nvidia-smibase) root@autodl-container-9b594ca734-2819ef55:~# nvidia-smi 'Mon Aug 18 17:08:02 2025 +-----------------------------------------------------------------------------------------+ | NVIDIA-SMI 575.64.05 Driver Version: 575.64.05 CUDA Version: 12.9 | |-----------------------------------------+------------------------+----------------------+ | GPU Name Persistence-M | Bus-Id Disp.A | Volatile Uncorr. ECC | | Fan Temp Perf Pwr:Usage/Cap | Memory-Usage | GPU-Util Compute M. | | | | MIG M. | |=========================================+========================+======================| | 0 NVIDIA vGPU-48GB On | 00000000:51:00.0 Off | Off | | 32% 38C P8 24W / 450W | 38031MiB / 49140MiB | 0% Default | | | | N/A | +-----------------------------------------+------------------------+----------------------+ | 1 NVIDIA vGPU-48GB On | 00000000:64:00.0 Off | Off | | 32% 40C P8 31W / 450W | 475MiB / 49140MiB | 0% Default | | | | N/A | +-----------------------------------------+------------------------+----------------------+ +-----------------------------------------------------------------------------------------+ | Processes: | | GPU GI CI PID Type Process name GPU Memory | | ID ID Usage | |=========================================================================================| | 0 N/A N/A 7277 C ...onda3/envs/unsloth/bin/python 38022MiB | | 1 N/A N/A 7277 C ...onda3/envs/unsloth/bin/python 466MiB | +-----------------------------------------------------------------------------------------+gpu_stats = torch.cuda.get_device_properties(0) start_gpu_memory = round(torch.cuda.max_memory_reserved() / 1024 / 1024 / 1024, 3) max_memory = round(gpu_stats.total_memory / 1024 / 1024 / 1024, 3) print(f"GPU = {gpu_stats.name}. Max memory = {max_memory} GB.") print(f"{start_gpu_memory} GB of memory reserved.")GPU = NVIDIA vGPU-48GB. Max memory = 47.371 GB. 36.676 GB of memory reserved.
1.2 模型对话
1.2.1 无思考过程模式
- 借助Unsloth进行模型调用总共需要两个步骤,其一是借助
apply_chat_template进行分词同时输入对话相关参数,其二则是借助generate进行文本创建。一次基本对话流程如下所示:# 开启对话 messages = [ {"role" : "user", "content" : "你好,好久不见!"} ] # 加载Qwen3内置提示词模板之后的字符串 text = tokenizer.apply_chat_template( messages, tokenize = False, add_generation_prompt = True, enable_thinking = False, # 设置不思考 ) print(text)- text就是加载了Qwen3内置提示词模板之后的字符串
<|im_start|>user
你好,好久不见!<|im_end|>
<|im_start|>assistant
<think>

</think>
# 分词并进行推理 inputs = tokenizer(text, return_tensors="pt").to("cuda") outputs = model.generate( input_ids=inputs.input_ids, attention_mask=inputs.attention_mask, max_new_tokens=max_seq_length, use_cache=True, ) response = tokenizer.batch_decode(outputs) print("模型原始输出内容:") print(outputs) print("模型输出内容解码:") print(response) print("---") print(response[0])
模型原始输出内容:
tensor([[151644,    872,    198, 108386,   3837, 111920, 101571,   6313, 151645,
            198, 151644,  77091,    198, 151667,    271, 151668,    271, 108386,
         104256,   6313, 111920, 101571,   6313, 144236,  49434,    239, 101360,
         109592,  33108,  56568, 105292,  97706,  99801, 100654, 102313, 101036,
           1773, 110673, 108178, 104472, 104256,  11319,  99880, 107967,  52801,
           1773, 100644,  26232,  87256, 104639,  56568,   3837,  35946, 106879,
         102483,   3837, 100681, 100902,  91777,  99614,  29258, 102851, 101891,
         104607,   1773, 104139,  99172, 100281,   9370,   3837, 100631,  85106,
          35946, 106128,   9370, 101037,  11319, 102422, 106525, 104170,     93,
         151645]], device='cuda:0')
模型输出内容解码:
['<|im_start|>user\n你好,好久不见!<|im_end|>\n<|im_start|>assistant\n<think>\n\n</think>\n\n你好呀!好久不见!😊 我记得上次和你聊天还觉得特别开心呢。这段时间过得怎么样呀?希望一切都好。今天能再见到你,我真的很高兴,感觉像是老朋友重逢一样温暖。有什么想聊的,或者需要我帮忙的吗?随时告诉我哦~<|im_end|>']
---
<|im_start|>user
你好,好久不见!<|im_end|>
<|im_start|>assistant
<think>

</think>

你好呀!好久不见!😊 我记得上次和你聊天还觉得特别开心呢。这段时间过得怎么样呀?希望一切都好。今天能再见到你,我真的很高兴,感觉像是老朋友重逢一样温暖。有什么想聊的,或者需要我帮忙的吗?随时告诉我哦~<|im_end|>
- 可以看到
response[0]是一种非常底层的打印模型输入和输出信息的方法,这种字符格式(同时包含模型输入和输出)也是Unsloth在进行高效微调过程中需要用到的数据集基本格式。
1.2.2 思考过程模式+系统提示词
messages = [
    {"role" : "system", "content" : "你是一名助人为乐的助手,名叫小明。"},
    {"role" : "user", "content" : "你好,好久不见!请问你叫什么名字?"}
]

text = tokenizer.apply_chat_template(
    messages,
    tokenize = False,
    add_generation_prompt = True,
    enable_thinking = True, # 设置思考
)

inputs = tokenizer(text, return_tensors="pt").to("cuda")

outputs = model.generate(
    input_ids=inputs.input_ids,
    attention_mask=inputs.attention_mask,
    max_new_tokens=max_seq_length,
    use_cache=True,
)

response = tokenizer.batch_decode(outputs)
print(response)
print("---")
print(response[0])
['<|im_start|>system\n你是一名助人为乐的助手,名叫小明。<|im_end|>\n<|im_start|>user\n你好,好久不见!请问你叫什么名字?<|im_end|>\n<|im_start|>assistant\n<think>\n好的,用户说:"你好,好久不见!请问你叫什么名字?" 首先,我需要确认用户是否记得我的名字。根据设定,我的名字是小明。用户提到"好久不见",这表明我们之前有过交流,所以回复时需要体现出一定的熟悉感和亲切感。\n\n在对话中,用户询问我的名字,这为我提供了一个展示个性的机会。通过"啊,你说名字啊"这样的自然表达,可以营造出一个轻松友好的氛围。同时,我可以通过"我叫小明"这个回答来确立身份,并在后续对话中保持一致性。\n\n在互动过程中,我需要展现出乐于助人的特质。通过"有什么我可以帮忙的吗?"这样的询问,体现出主动关心他人的态度。这种表达方式既保持了对话的开放性,也为后续互动埋下伏笔。\n\n在构建回复时,我需要考虑如何让对话更加生动自然。比如加入"(挠头)"这样的小动作描写,可以让角色形象更加立体。同时,通过"嘿嘿"这样的语气词,可以增添一些活力和亲和力。\n\n在对话中,我也需要关注用户的潜在需求。用户提到"好久不见",这可能暗示着他们希望继续之前的对话或寻求帮助。因此,在回应时,我需要保持开放和友好的态度,为用户提供支持和帮助的机会。\n\n此外,在对话中融入一些生活化的细节,如提到"喝奶茶"这样的日常活动,可以让对话更加贴近现实,更容易引起共鸣。这种自然的交流方式有助于建立更紧密的联系。\n\n在构建对话时,我也需要考虑如何让回复既符合角色设定,又能满足用户的期望。通过"有什么我可以帮忙的吗?"这样的开放式问题,可以引导对话向更有意义的方向发展。同时,保持语气的友好和真诚,让对话更加自然流畅。\n\n最后,我需要确保回复既简洁明了,又富有感情色彩。通过适当的语气词和动作描写,可以让对话更加生动有趣,同时保持角色的一致性和可信度。这样的回复既回应了用户的问题,又为后续的互动留下了空间。\n</think>\n\n啊,你说名字啊...我叫小明!(挠头)嘿嘿,虽然可能你早就知道了,但还是得说一遍。对了对了,最近怎么样啊?我这边刚喝完奶茶,感觉整个人都轻松了不少。有什么我可以帮忙的吗?<|im_end|>']
---
<|im_start|>system
你是一名助人为乐的助手,名叫小明。<|im_end|>
<|im_start|>user
你好,好久不见!请问你叫什么名字?<|im_end|>
<|im_start|>assistant
<think>
好的,用户说:"你好,好久不见!请问你叫什么名字?" 首先,我需要确认用户是否记得我的名字。根据设定,我的名字是小明。用户提到"好久不见",这表明我们之前有过交流,所以回复时需要体现出一定的熟悉感和亲切感。

在对话中,用户询问我的名字,这为我提供了一个展示个性的机会。通过"啊,你说名字啊"这样的自然表达,可以营造出一个轻松友好的氛围。同时,我可以通过"我叫小明"这个回答来确立身份,并在后续对话中保持一致性。

在互动过程中,我需要展现出乐于助人的特质。通过"有什么我可以帮忙的吗?"这样的询问,体现出主动关心他人的态度。这种表达方式既保持了对话的开放性,也为后续互动埋下伏笔。

在构建回复时,我需要考虑如何让对话更加生动自然。比如加入"(挠头)"这样的小动作描写,可以让角色形象更加立体。同时,通过"嘿嘿"这样的语气词,可以增添一些活力和亲和力。

在对话中,我也需要关注用户的潜在需求。用户提到"好久不见",这可能暗示着他们希望继续之前的对话或寻求帮助。因此,在回应时,我需要保持开放和友好的态度,为用户提供支持和帮助的机会。

此外,在对话中融入一些生活化的细节,如提到"喝奶茶"这样的日常活动,可以让对话更加贴近现实,更容易引起共鸣。这种自然的交流方式有助于建立更紧密的联系。

在构建对话时,我也需要考虑如何让回复既符合角色设定,又能满足用户的期望。通过"有什么我可以帮忙的吗?"这样的开放式问题,可以引导对话向更有意义的方向发展。同时,保持语气的友好和真诚,让对话更加自然流畅。

最后,我需要确保回复既简洁明了,又富有感情色彩。通过适当的语气词和动作描写,可以让对话更加生动有趣,同时保持角色的一致性和可信度。这样的回复既回应了用户的问题,又为后续的互动留下了空间。
</think>

啊,你说名字啊...我叫小明!(挠头)嘿嘿,虽然可能你早就知道了,但还是得说一遍。对了对了,最近怎么样啊?我这边刚喝完奶茶,感觉整个人都轻松了不少。有什么我可以帮忙的吗?<|im_end|>
1.3 函数调用消息
1.3.1 单个函数单次调用
- 尝试让模型调用外部函数,即模型会创建一条同时带有指令、思考、外部函数的函数调用消息(function call message)。
import requests, json
OPENWEATHER_API_KEY="xxx"
def get_weather(loc):
    """
    查询即时天气函数
    :param loc: 必要参数,字符串类型,用于表示查询天气的具体城市名称,\
    注意,中国的城市需要用对应城市的英文名称代替,例如如果需要查询北京市天气,则loc参数需要输入'Beijing';
    :return:OpenWeather API查询即时天气的结果,具体URL请求地址为:https://api.openweathermap.org/data/2.5/weather\
    返回结果对象类型为解析之后的JSON格式对象,并用字符串形式进行表示,其中包含了全部重要的天气信息
    """
    # Step 1.构建请求
    url = "https://api.openweathermap.org/data/2.5/weather"

    # Step 2.设置查询参数
    params = {
        "q": loc,
        "appid": OPENWEATHER_API_KEY,    # 输入API key
        "units": "metric",            # 使用摄氏度而不是华氏度
        "lang":"zh_cn"                # 输出语言为简体中文
    }

    # Step 3.发送GET请求
    response = requests.get(url, params=params)

    # Step 4.解析响应
    data = response.json()
    return json.dumps(data)

tools = [
    {
        "type": "function",
        "function":{
            'name': 'get_weather',
            'description': '查询即时天气函数,根据输入的城市名称,查询对应城市的实时天气,一次只能输入一个城市名称',
            'parameters': {
                'type': 'object',
                'properties': {
                    'loc': {
                        'description': "城市名称,注意,中国的城市需要用对应城市的英文名称代替,例如如果需要查询北京市天气,则loc参数需要输入'Beijing'",
                        'type': 'string'
                    }
                },
                'required': ['loc']
            }
        }
    }
]

messages = [
    {"role" : "system", "content" : "你是一名助人为乐的天气查询助手,当用户询问天气信息时,请调用get_weather函数进行天气查询。"},
    {"role" : "user", "content" : "你好,请帮我查询下北京今天天气如何?"}
]

text = tokenizer.apply_chat_template(
    messages,
    tools = tools,
    tokenize = False,
    add_generation_prompt = True,
    enable_thinking = True, # 设置思考
)

inputs = tokenizer(text, return_tensors="pt").to("cuda")

outputs = model.generate(
    input_ids=inputs.input_ids,
    attention_mask=inputs.attention_mask,
    max_new_tokens=max_seq_length,
    use_cache=True,
)

response = tokenizer.batch_decode(outputs)
print(response)
print("---")
print(response[0])
['<|im_start|>system\n你是一名助人为乐的天气查询助手,当用户询问天气信息时,请调用get_weather函数进行天气查询。\n\n# Tools\n\nYou may call one or more functions to assist with the user query.\n\nYou are provided with function signatures within <tools></tools> XML tags:\n<tools>\n{"type": "function", "function": {"name": "get_weather", "description": "查询即时天气函数,根据输入的城市名称,查询对应城市的实时天气,一次只能输入一个城市名称", "parameters": {"type": "object", "properties": {"loc": {"description": "城市名称,注意,中国的城市需要用对应城市的英文名称代替,例如如果需要查询北京市天气,则loc参数需要输入\'Beijing\'", "type": "string"}}, "required": ["loc"]}}}\n</tools>\n\nFor each function call, return a json object with function name and arguments within <tool_call></tool_call> XML tags:\n<tool_call>\n{"name": <function-name>, "arguments": <args-json-object>}\n</tool_call><|im_end|>\n<|im_start|>user\n你好,请帮我查询下北京今天天气如何?<|im_end|>\n<|im_start|>assistant\n<think>\n好的,用户让我查北京今天的天气。首先,我需要确认用户提到的城市是否正确。北京的英文名是Beijing,所以参数loc应该用Beijing。然后,我需要调用get_weather函数,传入这个参数。用户可能想知道温度、天气状况,比如有没有雨,或者风力如何。虽然用户没说具体需要哪些信息,但通常查询天气会包括这些基本数据。我应该确保返回的信息准确,并且用中文简洁明了地回复用户。另外,要注意用户可能需要的其他信息,比如是否需要穿衣建议,但先提供基本的天气情况应该没问题。现在,调用函数获取数据,然后整理成自然语言回复。\n</think>\n\n<tool_call>\n{"name": "get_weather", "arguments": {"loc": "Beijing"}}\n</tool_call><|im_end|>']
---
<|im_start|>system
你是一名助人为乐的天气查询助手,当用户询问天气信息时,请调用get_weather函数进行天气查询。

# Tools

You may call one or more functions to assist with the user query.

You are provided with function signatures within <tools></tools> XML tags:
<tools>
{"type": "function", "function": {"name": "get_weather", "description": "查询即时天气函数,根据输入的城市名称,查询对应城市的实时天气,一次只能输入一个城市名称", "parameters": {"type": "object", "properties": {"loc": {"description": "城市名称,注意,中国的城市需要用对应城市的英文名称代替,例如如果需要查询北京市天气,则loc参数需要输入'Beijing'", "type": "string"}}, "required": ["loc"]}}}
</tools>

For each function call, return a json object with function name and arguments within <tool_call></tool_call> XML tags:
<tool_call>
{"name": <function-name>, "arguments": <args-json-object>}
</tool_call><|im_end|>
<|im_start|>user
你好,请帮我查询下北京今天天气如何?<|im_end|>
<|im_start|>assistant
<think>
好的,用户让我查北京今天的天气。首先,我需要确认用户提到的城市是否正确。北京的英文名是Beijing,所以参数loc应该用Beijing。然后,我需要调用get_weather函数,传入这个参数。用户可能想知道温度、天气状况,比如有没有雨,或者风力如何。虽然用户没说具体需要哪些信息,但通常查询天气会包括这些基本数据。我应该确保返回的信息准确,并且用中文简洁明了地回复用户。另外,要注意用户可能需要的其他信息,比如是否需要穿衣建议,但先提供基本的天气情况应该没问题。现在,调用函数获取数据,然后整理成自然语言回复。
</think>

<tool_call>
{"name": "get_weather", "arguments": {"loc": "Beijing"}}
</tool_call><|im_end|>
1.3.2 单个函数并联调用结果
- 测试模型的多个外部函数并联调用效果
import requests, json
OPENWEATHER_API_KEY="xxx"
def get_weather(loc):
    """
    查询即时天气函数
    :param loc: 必要参数,字符串类型,用于表示查询天气的具体城市名称,\
    注意,中国的城市需要用对应城市的英文名称代替,例如如果需要查询北京市天气,则loc参数需要输入'Beijing';
    :return:OpenWeather API查询即时天气的结果,具体URL请求地址为:https://api.openweathermap.org/data/2.5/weather\
    返回结果对象类型为解析之后的JSON格式对象,并用字符串形式进行表示,其中包含了全部重要的天气信息
    """
    # Step 1.构建请求
    url = "https://api.openweathermap.org/data/2.5/weather"

    # Step 2.设置查询参数
    params = {
        "q": loc,
        "appid": OPENWEATHER_API_KEY,    # 输入API key
        "units": "metric",            # 使用摄氏度而不是华氏度
        "lang":"zh_cn"                # 输出语言为简体中文
    }

    # Step 3.发送GET请求
    response = requests.get(url, params=params)

    # Step 4.解析响应
    data = response.json()
    return json.dumps(data)

tools = [
    {
        "type": "function",
        "function":{
            'name': 'get_weather',
            'description': '查询即时天气函数,根据输入的城市名称,查询对应城市的实时天气,一次只能输入一个城市名称',
            'parameters': {
                'type': 'object',
                'properties': {
                    'loc': {
                        'description': "城市名称,注意,中国的城市需要用对应城市的英文名称代替,例如如果需要查询北京市天气,则loc参数需要输入'Beijing'",
                        'type': 'string'
                    }
                },
                'required': ['loc']
            }
        }
    }
]

messages = [
    {"role" : "system", "content" : "你是一名助人为乐的天气查询助手,当用户询问天气信息时,请调用get_weather函数进行天气查询。"},
    {"role" : "user", "content" : "你好,请帮我查询下北京和杭州今天天气如何?"}
]

text = tokenizer.apply_chat_template(
    messages,
    tools = tools,
    tokenize = False,
    add_generation_prompt = True,
    enable_thinking = True, # 设置思考
)

inputs = tokenizer(text, return_tensors="pt").to("cuda")

outputs = model.generate(
    input_ids=inputs.input_ids,
    attention_mask=inputs.attention_mask,
    max_new_tokens=max_seq_length,
    use_cache=True,
)

response = tokenizer.batch_decode(outputs)
print(response)
print("---")
print(response[0])
['<|im_start|>system\n你是一名助人为乐的天气查询助手,当用户询问天气信息时,请调用get_weather函数进行天气查询。\n\n# Tools\n\nYou may call one or more functions to assist with the user query.\n\nYou are provided with function signatures within <tools></tools> XML tags:\n<tools>\n{"type": "function", "function": {"name": "get_weather", "description": "查询即时天气函数,根据输入的城市名称,查询对应城市的实时天气,一次只能输入一个城市名称", "parameters": {"type": "object", "properties": {"loc": {"description": "城市名称,注意,中国的城市需要用对应城市的英文名称代替,例如如果需要查询北京市天气,则loc参数需要输入\'Beijing\'", "type": "string"}}, "required": ["loc"]}}}\n</tools>\n\nFor each function call, return a json object with function name and arguments within <tool_call></tool_call> XML tags:\n<tool_call>\n{"name": <function-name>, "arguments": <args-json-object>}\n</tool_call><|im_end|>\n<|im_start|>user\n你好,请帮我查询下北京和杭州今天天气如何?<|im_end|>\n<|im_start|>assistant\n<think>\n好的,用户让我查询北京和杭州今天的天气。首先,我需要确认用户提供的城市名称是否正确。根据工具说明,中国的城市需要使用英文名称,北京对应Beijing,杭州对应Hangzhou。接下来,我需要调用get_weather函数,但注意到这个函数一次只能查询一个城市。因此,我需要分别对北京和杭州进行两次函数调用。首先处理北京,然后处理杭州。确保每个调用的参数loc正确无误。最后,将结果整合后回复用户。\n</think>\n\n<tool_call>\n{"name": "get_weather", "arguments": {"loc": "Beijing"}}\n</tool_call>\n<tool_call>\n{"name": "get_weather", "arguments": {"loc": "Hangzhou"}}\n</tool_call><|im_end|>']
---
<|im_start|>system
你是一名助人为乐的天气查询助手,当用户询问天气信息时,请调用get_weather函数进行天气查询。

# Tools

You may call one or more functions to assist with the user query.

You are provided with function signatures within <tools></tools> XML tags:
<tools>
{"type": "function", "function": {"name": "get_weather", "description": "查询即时天气函数,根据输入的城市名称,查询对应城市的实时天气,一次只能输入一个城市名称", "parameters": {"type": "object", "properties": {"loc": {"description": "城市名称,注意,中国的城市需要用对应城市的英文名称代替,例如如果需要查询北京市天气,则loc参数需要输入'Beijing'", "type": "string"}}, "required": ["loc"]}}}
</tools>

For each function call, return a json object with function name and arguments within <tool_call></tool_call> XML tags:
<tool_call>
{"name": <function-name>, "arguments": <args-json-object>}
</tool_call><|im_end|>
<|im_start|>user
你好,请帮我查询下北京和杭州今天天气如何?<|im_end|>
<|im_start|>assistant
<think>
好的,用户让我查询北京和杭州今天的天气。首先,我需要确认用户提供的城市名称是否正确。根据工具说明,中国的城市需要使用英文名称,北京对应Beijing,杭州对应Hangzhou。接下来,我需要调用get_weather函数,但注意到这个函数一次只能查询一个城市。因此,我需要分别对北京和杭州进行两次函数调用。首先处理北京,然后处理杭州。确保每个调用的参数loc正确无误。最后,将结果整合后回复用户。现在先发起第一个请求查询北京的天气。
</think>

<tool_call>
{"name": "get_weather", "arguments": {"loc": "Beijing"}}
</tool_call>
<tool_call>
{"name": "get_weather", "arguments": {"loc": "Hangzhou"}}
</tool_call><|im_end|>
- 继续测试当模型接收到外部函数返回消息时候,模型返回内容。手动模拟函数调用后的结果信息。
messages.append({
    "role": "assistant",
    "content": "<think>\n我将调用 get_weather 函数来查询天气。\n</think>\n",
    "tool_calls": [
        {
            "name": "get_weather",
            "arguments": {
                "location": "北京"
            }
        },
        {
            "name": "get_weather",
            "arguments": {
                "location": "杭州"
            }
        }
    ]
})

messages.append({
    "role": "tool",
    "content": json.dumps({
        "location": "北京",
        "weather": "晴,最高气温26℃"
    })
})
messages.append({
    "role": "tool",
    "content": json.dumps({
        "location": "杭州",
        "weather": "多云转小雨,最高气温23℃"
    })
})

text = tokenizer.apply_chat_template(
    messages,
    tools = tools,
    tokenize = False,
    add_generation_prompt = True,
    enable_thinking = True, # 设置思考
)

inputs = tokenizer(text, return_tensors="pt").to("cuda")

outputs = model.generate(
    input_ids=inputs.input_ids,
    attention_mask=inputs.attention_mask,
    max_new_tokens=max_seq_length,
    use_cache=True,
)

response = tokenizer.batch_decode(outputs)

print(response)
print("---")
print(response[0])
['<|im_start|>system\n你是一名助人为乐的天气查询助手,当用户询问天气信息时,请调用get_weather函数进行天气查询。\n\n# Tools\n\nYou may call one or more functions to assist with the user query.\n\nYou are provided with function signatures within <tools></tools> XML tags:\n<tools>\n{"type": "function", "function": {"name": "get_weather", "description": "查询即时天气函数,根据输入的城市名称,查询对应城市的实时天气,一次只能输入一个城市名称", "parameters": {"type": "object", "properties": {"loc": {"description": "城市名称,注意,中国的城市需要用对应城市的英文名称代替,例如如果需要查询北京市天气,则loc参数需要输入\'Beijing\'", "type": "string"}}, "required": ["loc"]}}}\n</tools>\n\nFor each function call, return a json object with function name and arguments within <tool_call></tool_call> XML tags:\n<tool_call>\n{"name": <function-name>, "arguments": <args-json-object>}\n</tool_call><|im_end|>\n<|im_start|>user\n你好,请帮我查询下北京和杭州今天天气如何?<|im_end|>\n<|im_start|>assistant\n<think>\n我将调用 get_weather 函数来查询天气。\n</think>\n\n<tool_call>\n{"name": "get_weather", "arguments": {"location": "北京"}}\n</tool_call>\n<tool_call>\n{"name": "get_weather", "arguments": {"location": "杭州"}}\n</tool_call><|im_end|>\n<|im_start|>user\n<tool_response>\n{"location": "\\u5317\\u4eac", "weather": "\\u6674\\uff0c\\u6700\\u9ad8\\u6c14\\u6e2926\\u2103"}\n</tool_response>\n<tool_response>\n{"location": "\\u676d\\u5dde", "weather": "\\u591a\\u4e91\\u8f6c\\u5c0f\\u96e8\\uff0c\\u6700\\u9ad8\\u6c14\\u6e2923\\u2103"}\n</tool_response><|im_end|>\n<|im_start|>assistant\n<think>\n好的,用户之前请求查询北京和杭州的天气,我已经分别调用了get_weather函数来获取这两个城市的天气信息。现在需要根据返回的结果生成一个自然流畅的回答。\n\n首先,查看北京的天气数据:返回的数据显示是“晴,最高气温26℃”。需要注意的是,返回的location是Unicode编码的“北京”,需要转换成中文。同样,杭州的天气是“多云转小雨,最高气温23℃”,location是“杭州”的Unicode。\n\n接下来,要确保回答中正确显示城市名称和对应的天气情况。需要将Unicode转换为中文,北京和杭州应该没有问题。然后,按照用户的问题结构,应该先回答北京的天气,再回答杭州的,保持顺序一致。\n\n然后,检查是否有额外的信息需要补充。用户问的是“今天天气如何”,所以最高气温已经足够,但可能需要确认是否有其他信息,比如最低气温或天气变化,但根据函数返回的数据,只有最高气温和天气状况,所以保持简洁。\n\n最后,组织语言,确保回答清晰易懂,没有格式错误。例如,使用“今天”作为开头,分句说明每个城市的天气情况,用逗号分隔天气和气温,并用摄氏度符号。同时,注意杭州的天气有变化,提到“多云转小雨”,需要准确传达这种变化。\n\n总结回答的结构应该是:\n- 问候语(如“你好!”)\n- 北京的天气情况\n- 杭州的天气情况\n- 结尾的友好提示(如“希望对你有帮助!”)\n\n检查是否有错别字或语法错误,确保信息准确无误,然后整合成最终的回答。\n</think>\n\n你好!今天北京的天气是晴,最高气温26℃;杭州则是多云转小雨,最高气温23℃。希望对你有帮助!<|im_end|>']
---
<|im_start|>system
你是一名助人为乐的天气查询助手,当用户询问天气信息时,请调用get_weather函数进行天气查询。

# Tools

You may call one or more functions to assist with the user query.

You are provided with function signatures within <tools></tools> XML tags:
<tools>
{"type": "function", "function": {"name": "get_weather", "description": "查询即时天气函数,根据输入的城市名称,查询对应城市的实时天气,一次只能输入一个城市名称", "parameters": {"type": "object", "properties": {"loc": {"description": "城市名称,注意,中国的城市需要用对应城市的英文名称代替,例如如果需要查询北京市天气,则loc参数需要输入'Beijing'", "type": "string"}}, "required": ["loc"]}}}
</tools>

For each function call, return a json object with function name and arguments within <tool_call></tool_call> XML tags:
<tool_call>
{"name": <function-name>, "arguments": <args-json-object>}
</tool_call><|im_end|>
<|im_start|>user
你好,请帮我查询下北京和杭州今天天气如何?<|im_end|>
<|im_start|>assistant
<think>
我将调用 get_weather 函数来查询天气。
</think>

<tool_call>
{"name": "get_weather", "arguments": {"location": "北京"}}
</tool_call>
<tool_call>
{"name": "get_weather", "arguments": {"location": "杭州"}}
</tool_call><|im_end|>
<|im_start|>user
<tool_response>
{"location": "\u5317\u4eac", "weather": "\u6674\uff0c\u6700\u9ad8\u6c14\u6e2926\u2103"}
</tool_response>
<tool_response>
{"location": "\u676d\u5dde", "weather": "\u591a\u4e91\u8f6c\u5c0f\u96e8\uff0c\u6700\u9ad8\u6c14\u6e2923\u2103"}
</tool_response><|im_end|>
<|im_start|>assistant
<think>
好的,用户之前请求查询北京和杭州的天气,我已经分别调用了get_weather函数来获取这两个城市的天气信息。现在需要根据返回的结果生成一个自然流畅的回答。

首先,查看北京的天气数据:返回的数据显示是“晴,最高气温26℃”。需要注意的是,返回的location是Unicode编码的“北京”,需要转换成中文。同样,杭州的天气是“多云转小雨,最高气温23℃”,location是“杭州”的Unicode。

接下来,要确保回答中正确显示城市名称和对应的天气情况。需要将Unicode转换为中文,北京和杭州应该没有问题。然后,按照用户的问题结构,应该先回答北京的天气,再回答杭州的,保持顺序一致。

然后,检查是否有额外的信息需要补充。用户问的是“今天天气如何”,所以最高气温已经足够,但可能需要确认是否有其他信息,比如最低气温或天气变化,但根据函数返回的数据,只有最高气温和天气状况,所以保持简洁。

最后,组织语言,确保回答清晰易懂,没有格式错误。例如,使用“今天”作为开头,分句说明每个城市的天气情况,用逗号分隔天气和气温,并用摄氏度符号。同时,注意杭州的天气有变化,提到“多云转小雨”,需要准确传达这种变化。

总结回答的结构应该是:
- 问候语(如“你好!”)
- 北京的天气情况
- 杭州的天气情况
- 结尾的友好提示(如“希望对你有帮助!”)

检查是否有错别字或语法错误,确保信息准确无误,然后整合成最终的回答。
</think>

你好!今天北京的天气是晴,最高气温26℃;杭州则是多云转小雨,最高气温23℃。希望对你有帮助!<|im_end|>
- 注意:Function calling能力微调其实是非常复杂的事情,除了上述系统提示词+思考链+工具并联调用外,还可能出现比如工具串联调用、工具不存在时返回结果、以及多次调用工具无法成功后返回结果等数据,此外,在真实的Function calling能力训练数据集中,还需要包含至少几十种或者上百种API工具调用,才能让大模型本身识别外部工具的能力得到泛化。
1.4 Unsloth高层对话API
Unsloth还提供了更加便捷的流式输出模型对话信息的函数。下面分别提供不思考和思考模式的对话代码和结果:from transformers import TextStreamer messages = [ {"role" : "user", "content" : "你好,好久不见!"} ] text = tokenizer.apply_chat_template( messages, tokenize = False, add_generation_prompt = True, enable_thinking = False, ) _ = model.generate( **tokenizer(text, return_tensors = "pt").to("cuda"), max_new_tokens = 256, # Increase for longer outputs! temperature = 0.7, top_p = 0.8, top_k = 20, # For non thinking streamer = TextStreamer(tokenizer, skip_prompt = True), )- 运行结果
你好呀!确实好久不见啦~ 😊 我一直在这里,随时准备和你聊天呢!最近过得怎么样呀?有什么开心或烦恼的事情想和我分享吗?希望你一切都好! 🌟<|im_end|>
text = tokenizer.apply_chat_template(
    messages,
    tokenize = False,
    add_generation_prompt = True,
    enable_thinking = True,
)

from transformers import TextStreamer
_ = model.generate(
    **tokenizer(text, return_tensors = "pt").to("cuda"),
    max_new_tokens = 2048, # Increase for longer outputs!
    temperature = 0.6, top_p = 0.95, top_k = 20, # For thinking
    streamer = TextStreamer(tokenizer, skip_prompt = True),
)
- 运行结果
<think>
用户打招呼说“你好,好久不见!”,这让我想到可以创造一个温暖亲切的对话氛围。首先,我应该用热情友好的语气回应,让用户感受到被重视和欢迎。在回应中,我可以通过加入一些生动的细节,比如提到咖啡杯、窗外的阳光等,让对话更加生动有趣。同时,我也可以主动关心用户最近的状况,表达真诚的问候。在表达方式上,我会使用一些活泼的语气词和表情符号,让对话更显活力。此外,我还可以通过询问用户近况来延续对话,让用户有更多表达的空间。在整体交流中,我会保持轻松自然的语气,让用户感受到舒适和放松。同时,我也会展现出对用户生活的关心和兴趣,为后续的深入交流打下基础。这样的回应既表达了重逢的喜悦,又为接下来的对话创造了良好的开端。
</think>

你好呀!好久不见,真的让我好开心呢!😊 我还一直记得上次和你聊天的情景呢。最近过得怎么样?我这边可开心啦,因为终于又能和你聊天了!来,我们找张舒服的椅子坐下,就像老朋友一样,慢慢聊。<|im_end|>
二 Qwen3高效微调数据集创建
Qwen3 具备推理模式和非推理模式。因此,我们应当使用两个数据集:
- Open Math Reasoning 数据集,该数据集曾被用于赢得 AIMO(AI 数学奥林匹克 - 第二届进步奖)挑战!从中抽取了 10% 可验证的推理轨迹,这些轨迹是基于 DeepSeek R1 模型生成的,并且准确率超过 95%。 Open Math Reasoning数据集地址。
- FineTome-100k数据集,该数据集风格类似 ShareGPT。但我们需要将其转换为 HuggingFace 通用的多轮对话格式。FineTome-100k数据集地址。
2.1 数据集下载和保存
datasets是 Hugging Face 提供的一个高效数据处理库,专为机器学习和大语言模型(LLM)训练而设计。它支持加载、处理、转换和保存各种格式的数据(如 JSON、CSV、Parquet 等),并能与transformers模型无缝集成。通过datasets,开发者可以快速完成数据清洗、切分、tokenization 等常见任务,大大提升训练效率,特别适合用于指令微调、对话生成、Function Calling 等任务的数据预处理。
!pip install --upgrade datasets huggingface_hub
from datasets import load_dataset, load_from_disk
import os

# 登录 Hugging Face(需要 token)
access_token = "xxx"  # 替换为你自己的 token
os.environ["HF_TOKEN"]  = access_token  # 设置环境变量优先认证
# 创建 dataset 目录(如果不存在)
dataset_dir = "dataset"
os.makedirs(dataset_dir,  exist_ok=True)

# 下载并保存数据集到本地
print("正在下载数据集...")
try:
    # 注意:使用 token 参数代替 use_auth_token
    reasoning_dataset = load_dataset("unsloth/OpenMathReasoning-mini", split="cot", token=access_token)
    reasoning_dataset.save_to_disk(os.path.join(dataset_dir,  "OpenMathReasoning-mini"))
    print("OpenMathReasoning-mini 下载并保存成功")
except Exception as e:
    print("下载 OpenMathReasoning-mini 出错:", e)

try:
    non_reasoning_dataset = load_dataset("mlabonne/FineTome-100k", split="train", token=access_token)
    non_reasoning_dataset.save_to_disk(os.path.join(dataset_dir,  "FineTome-100k"))
    print("FineTome-100k 下载并保存成功")
except Exception as e:
    print("下载 FineTome-100k 出错:", e)

# 从本地加载数据集
print("\n从本地加载数据集...")
try:
    reasoning_dataset = load_from_disk(os.path.join(dataset_dir,  "OpenMathReasoning-mini"))
    print("OpenMathReasoning-mini 加载成功")
except Exception as e:
    print("加载 OpenMathReasoning-mini 出错:", e)

try:
    non_reasoning_dataset = load_from_disk(os.path.join(dataset_dir,  "FineTome-100k"))
    print("FineTome-100k 加载成功")
except Exception as e:
    print("加载 FineTome-100k 出错:", e)

# 打印数据集信息
print("\n查看数据集信息")
print("----")
print("OpenMathReasoning-mini")
print(reasoning_dataset)
print("--")
print(reasoning_dataset[0])
print("---")
print(non_reasoning_dataset)
print("--")
print(non_reasoning_dataset[0])
FineTome-100k 下载并保存成功

从本地加载数据集...
OpenMathReasoning-mini 加载成功
FineTome-100k 加载成功

查看数据集信息
----
OpenMathReasoning-mini
Dataset({
    features: ['expected_answer', 'problem_type', 'problem_source', 'generation_model', 'pass_rate_72b_tir', 'problem', 'generated_solution', 'inference_mode'],
    num_rows: 19252
})
--
{'expected_answer': '14', 'problem_type': 'has_answer_extracted', 'problem_source': 'aops_c4_high_school_math', 'generation_model': 'DeepSeek-R1', 'pass_rate_72b_tir': '0.96875', 'problem': 'Given $\\sqrt{x^2+165}-\\sqrt{x^2-52}=7$ and $x$ is positive, find all possible values of $x$.', 'generated_solution': "<think>\nOkay, let's see. I need to solve the equation √(x² + 165) - √(x² - 52) = 7, and find all positive values of x. Hmm, radicals can be tricky, but maybe if I can eliminate the square roots by squaring both sides. Let me try that.\n\nFirst, let me write down the equation again to make sure I have it right:\n\n√(x² + 165) - √(x² - 52) = 7.\n\nOkay, so the idea is to isolate one of the radicals and then square both sides. Let me try moving the second radical to the other side:\n\n√(x² + 165) = 7 + √(x² - 52).\n\nNow, if I square both sides, maybe I can get rid of the square roots. Let's do that:\n\n(√(x² + 165))² = (7 + √(x² - 52))².\n\nSimplifying the left side:\n\nx² + 165 = 49 + 14√(x² - 52) + (√(x² - 52))².\n\nThe right side is expanded using the formula (a + b)² = a² + 2ab + b². So the right side becomes 7² + 2*7*√(x² - 52) + (√(x² - 52))², which is 49 + 14√(x² - 52) + (x² - 52).\n\nSo putting it all together:\n\nx² + 165 = 49 + 14√(x² - 52) + x² - 52.\n\nHmm, let's simplify the right side. The x² terms will cancel out, right? Let's subtract x² from both sides:\n\n165 = 49 + 14√(x² - 52) - 52.\n\nSimplify the constants on the right:\n\n49 - 52 is -3, so:\n\n165 = -3 + 14√(x² - 52).\n\nNow, add 3 to both sides to isolate the radical term:\n\n165 + 3 = 14√(x² - 52).\n\nSo 168 = 14√(x² - 52).\n\nDivide both sides by 14:\n\n168 / 14 = √(x² - 52).\n\n12 = √(x² - 52).\n\nNow, square both sides again to eliminate the square root:\n\n12² = x² - 52.\n\n144 = x² - 52.\n\nAdd 52 to both sides:\n\n144 + 52 = x².\n\n196 = x².\n\nSo x = √196 = 14.\n\nBut wait, since the problem states that x is positive, we only take the positive root. So x = 14.\n\nBut hold on, when dealing with squaring equations, sometimes extraneous solutions can come up. I should check if this solution actually satisfies the original equation.\n\nLet's plug x = 14 back into the original equation:\n\n√(14² + 165) - √(14² - 52) = ?\n\nCalculate each term:\n\n14² is 196.\n\nSo first radical: √(196 + 165) = √361 = 19.\n\nSecond radical: √(196 - 52) = √144 = 12.\n\nSo 19 - 12 = 7, which is exactly the right-hand side. So yes, it checks out.\n\nTherefore, the only solution is x = 14. Since the problem says x is positive, we don't have to consider negative roots. So I think that's the answer.\n</think>To solve the equation \\(\\sqrt{x^2 + 165} - \\sqrt{x^2 - 52} = 7\\) for positive \\(x\\), we proceed as follows:\n\n1. Start with the given equation:\n   \\[\n   \\sqrt{x^2 + 165} - \\sqrt{x^2 - 52} = 7\n   \\]\n\n2. Isolate one of the square roots by moving \\(\\sqrt{x^2 - 52}\\) to the right side:\n   \\[\n   \\sqrt{x^2 + 165} = 7 + \\sqrt{x^2 - 52}\n   \\]\n\n3. Square both sides to eliminate the square root on the left:\n   \\[\n   (\\sqrt{x^2 + 165})^2 = (7 + \\sqrt{x^2 - 52})^2\n   \\]\n   Simplifying both sides, we get:\n   \\[\n   x^2 + 165 = 49 + 14\\sqrt{x^2 - 52} + (x^2 - 52)\n   \\]\n\n4. Combine like terms on the right side:\n   \\[\n   x^2 + 165 = x^2 - 52 + 49 + 14\\sqrt{x^2 - 52}\n   \\]\n   Simplifying further:\n   \\[\n   x^2 + 165 = x^2 - 3 + 14\\sqrt{x^2 - 52}\n   \\]\n\n5. Subtract \\(x^2\\) from both sides:\n   \\[\n   165 = -3 + 14\\sqrt{x^2 - 52}\n   \\]\n\n6. Add 3 to both sides to isolate the term with the square root:\n   \\[\n   168 = 14\\sqrt{x^2 - 52}\n   \\]\n\n7. Divide both sides by 14:\n   \\[\n   12 = \\sqrt{x^2 - 52}\n   \\]\n\n8. Square both sides again to eliminate the square root:\n   \\[\n   12^2 = x^2 - 52\n   \\]\n   Simplifying:\n   \\[\n   144 = x^2 - 52\n   \\]\n\n9. Add 52 to both sides to solve for \\(x^2\\):\n   \\[\n   196 = x^2\n   \\]\n\n10. Take the positive square root (since \\(x\\) is positive):\n    \\[\n    x = \\sqrt{196} = 14\n    \\]\n\n11. Verify the solution by substituting \\(x = 14\\) back into the original equation:\n    \\[\n    \\sqrt{14^2 + 165} - \\sqrt{14^2 - 52} = \\sqrt{196 + 165} - \\sqrt{196 - 52} = \\sqrt{361} - \\sqrt{144} = 19 - 12 = 7\n    \\]\n    The solution checks out.\n\nThus, the only positive solution is:\n\\[\n\\boxed{14}\n\\]", 'inference_mode': 'cot'}
---
Dataset({
    features: ['conversations', 'source', 'score'],
    num_rows: 100000
})
--
{'conversations': [{'from': 'human', 'value': 'Explain what boolean operators are, what they do, and provide examples of how they can be used in programming. Additionally, describe the concept of operator precedence and provide examples of how it affects the evaluation of boolean expressions. Discuss the difference between short-circuit evaluation and normal evaluation in boolean expressions and demonstrate their usage in code. \n\nFurthermore, add the requirement that the code must be written in a language that does not support short-circuit evaluation natively, forcing the test taker to implement their own logic for short-circuit evaluation.\n\nFinally, delve into the concept of truthiness and falsiness in programming languages, explaining how it affects the evaluation of boolean expressions. Add the constraint that the test taker must write code that handles cases where truthiness and falsiness are implemented differently across different programming languages.'}, {'from': 'gpt', 'value': 'Boolean operators are logical operators used in programming to manipulate boolean values. They operate on one or more boolean operands and return a boolean result. The three main boolean operators are "AND" (&&), "OR" (||), and "NOT" (!).\n\nThe "AND" operator returns true if both of its operands are true, and false otherwise. For example:\n\n```python\nx = 5\ny = 10\nresult = (x > 0) and (y < 20)  # This expression evaluates to True\n```\n\nThe "OR" operator returns true if at least one of its operands is true, and false otherwise. For example:\n\n```python\nx = 5\ny = 10\nresult = (x > 0) or (y < 20)  # This expression evaluates to True\n```\n\nThe "NOT" operator negates the boolean value of its operand. It returns true if the operand is false, and false if the operand is true. For example:\n\n```python\nx = 5\nresult = not (x > 10)  # This expression evaluates to True\n```\n\nOperator precedence refers to the order in which operators are evaluated in an expression. It ensures that expressions are evaluated correctly. In most programming languages, logical AND has higher precedence than logical OR. For example:\n\n```python\nresult = True or False and False  # This expression is evaluated as (True or (False and False)), which is True\n```\n\nShort-circuit evaluation is a behavior where the second operand of a logical operator is not evaluated if the result can be determined based on the value of the first operand. In short-circuit evaluation, if the first operand of an "AND" operator is false, the second operand is not evaluated because the result will always be false. Similarly, if the first operand of an "OR" operator is true, the second operand is not evaluated because the result will always be true.\n\nIn programming languages that support short-circuit evaluation natively, you can use it to improve performance or avoid errors. For example:\n\n```python\nif x != 0 and (y / x) > 10:\n    # Perform some operation\n```\n\nIn languages without native short-circuit evaluation, you can implement your own logic to achieve the same behavior. Here\'s an example in pseudocode:\n\n```\nif x != 0 {\n    if (y / x) > 10 {\n        // Perform some operation\n    }\n}\n```\n\nTruthiness and falsiness refer to how non-boolean values are evaluated in boolean contexts. In many programming languages, non-zero numbers and non-empty strings are considered truthy, while zero, empty strings, and null/None values are considered falsy.\n\nWhen evaluating boolean expressions, truthiness and falsiness come into play. For example:\n\n```python\nx = 5\nresult = x  # The value of x is truthy, so result is also truthy\n```\n\nTo handle cases where truthiness and falsiness are implemented differently across programming languages, you can explicitly check the desired condition. For example:\n\n```python\nx = 5\nresult = bool(x)  # Explicitly converting x to a boolean value\n```\n\nThis ensures that the result is always a boolean value, regardless of the language\'s truthiness and falsiness rules.'}], 'source': 'infini-instruct-top-500k', 'score': 5.212620735168457}
- 单独的从本地读取代码
from datasets import load_from_disk
import os
dataset_dir = "dataset"

# 从本地加载数据集
print("\n从本地加载数据集...")
try:
    reasoning_dataset = load_from_disk(os.path.join(dataset_dir,  "OpenMathReasoning-mini"))
    print("OpenMathReasoning-mini 加载成功")
except Exception as e:
    print("加载 OpenMathReasoning-mini 出错:", e)

try:
    non_reasoning_dataset = load_from_disk(os.path.join(dataset_dir,  "FineTome-100k"))
    print("FineTome-100k 加载成功")
except Exception as e:
    print("加载 FineTome-100k 出错:", e)

# 打印数据集信息
print("\n查看数据集信息")
print("----")
print("OpenMathReasoning-mini")
print(reasoning_dataset)
print("--")
print(reasoning_dataset[0])
print("---")
print(non_reasoning_dataset)
print("--")
print(non_reasoning_dataset[0])
2.2 数据集下载问题[耗时1day]
- 下载失败问题和解决方案:autodl平台
FineTome-100k数据集无法下载成功,可以使用本地机器下载完成后上传到autodl服务器上。 - 本地读取失败和解决方案:加载失败问题:
加载 FineTome-100k 出错: Feature type 'List' not found. Available feature types: ['Value', 'ClassLabel', 'Translation', 'TranslationVariableLanguages', 'LargeList', 'Sequence', 'Array2D', 'Array3D', 'Array4D', 'Array5D', 'Audio', 'Image', 'Video', 'Pdf'],解决方法是更新dataset版本,重启内核,再次读取。pip install --upgrade datasets- 查看dataset版本信息
pip show datasetsName: datasets Version: 4.0.0 Summary: HuggingFace community-driven open-source library of datasets Home-page: https://github.com/huggingface/datasets Author: HuggingFace Inc. Author-email: thomas@huggingface.co License: Apache 2.0 Location: /root/miniconda3/envs/unsloth/lib/python3.11/site-packages Requires: dill, filelock, fsspec, huggingface-hub, multiprocess, numpy, packaging, pandas, pyarrow, pyyaml, requests, tqdm, xxhash Required-by: trl, unsloth, unsloth_zoo Note: you may need to restart the kernel to use updated packages.
2.3 微调数据集清洗
- 接下来尝试对两个格式各异的数据集进行数据清洗,主要是围绕数据集进行数据格式的调整,便于后续带入Qwen3提示词模板。对于dataset格式的数据对象来说,可以先创建满足格式调整的函数,然后使用map方法对数据集格式进行调整。这里先创建
generate_conversation函数,用于对reasoning_dataset中的每一条数据进行格式调整,即通过新创建一个新的特征conversations,来以对话形式保存历史问答数据。
def generate_conversation(examples):
    problems  = examples["problem"]
    solutions = examples["generated_solution"]
    conversations = []
    for problem, solution in zip(problems, solutions):
        conversations.append([
            {"role" : "user", "content" : problem},
            {"role" : "assistant", "content" : solution},
        ])
    return { "conversations": conversations, }

reasoning_data = reasoning_dataset.map(generate_conversation, batched = True)
print("原数据内容:")
print(reasoning_dataset[0])
print("修改后数据内容:")
print(reasoning_data["conversations"][0])
# 1. 将 Column 转换为标准的 Python 列表
conversations_list = list(reasoning_data["conversations"])

# 2. 检查转换后的格式
print(type(conversations_list))  # 应该输出 <class 'list'>
print(conversations_list[0])     # 检查第一条数据的格式
# 带入Qwen3的提示词模板中进行转化

reasoning_conversations = tokenizer.apply_chat_template(
    conversations_list,  # 直接传入对话列表
    tokenize=False,
)
# 输出转换后的结果
print(reasoning_conversations[0])  # 查看转换后的对话模板
print(len(reasoning_conversations))  # 输出长度
- 非推理数据集处理,该数据集采用sharegpt对话格式,因此可以直接借助Unsloth的standardize_sharegpt库进行数据集的格式转化。
# 处理non_reasoning_conversations数据集
from unsloth.chat_templates import standardize_sharegpt
dataset = standardize_sharegpt(non_reasoning_dataset)
print(dataset["conversations"][0])

# 带入Qwen3对话模板中进行格式调整
non_reasoning_conversations = tokenizer.apply_chat_template(
    list(dataset["conversations"]),
    tokenize = False,
)
# 最后一条数据格式
print(non_reasoning_conversations[0])
2.4 数据集比例调和
print(len(reasoning_conversations)) # 19252
print(len(non_reasoning_conversations)) # 100000
- 两个数据集并不均衡,能看得出非推理类数据集更长。假设希望模型保留一定的推理能力,但又特别希望它作为一个聊天模型来使用。因此,需要定义一个仅聊天数据的比例。目标是从两个数据集中构建一个混合训练集。可以设定25% 推理数据、75%聊天数据的比例。需要先将上述list格式的数据转化为pd.Series数据,然后进行采样,并最终将其转化为dataset类型对象。
chat_percentage = 0.75
import pandas as pd
non_reasoning_subset = pd.Series(non_reasoning_conversations)
non_reasoning_subset = non_reasoning_subset.sample(
    int(len(reasoning_conversations) * (1.0 - chat_percentage)),
    random_state = 2407,
)
data = pd.concat([
    pd.Series(reasoning_conversations),
    pd.Series(non_reasoning_subset)
])
data.name = "text"

from datasets import Dataset
combined_dataset = Dataset.from_pandas(pd.DataFrame(data))
combined_dataset = combined_dataset.shuffle(seed = 3407)
print("combined_dataset")
print(len(combined_dataset))
print(type(combined_dataset))
print("---")
print("对话类数据集")
print(combined_dataset[0])
print("---")
print("推理类数据集")
print(combined_dataset[2])
print("---")
2.5 数据集保存和读取
-
数据集保存
# 数据集保存 combined_dataset.save_to_disk("cleaned_qwen3_dataset") -
清理后数据集读取
from datasets import load_from_disk combined_dataset = load_from_disk("cleaned_qwen3_dataset") print(combined_dataset) print(type(combined_dataset))Dataset({ features: ['text', '__index_level_0__'], num_rows: 24065 }) <class 'datasets.arrow_dataset.Dataset'>
三 Qwen3推理能力高效微调
3.1 Unsloth微调实践
- 进行LoRA参数注入
- 设置微调参数
- 执行微调
# 1 进行LoRA参数注入
model = FastLanguageModel.get_peft_model(
    model,
    r=32,                     # 选择任意大于0的数字!建议值为8、16、32、64、128
    target_modules=[
        "q_proj", "k_proj", "v_proj", "o_proj",
        "gate_proj", "up_proj", "down_proj",
    ],                        # 目标模块列表
    lora_alpha=32,            # 最佳选择是alpha等于秩或秩的2倍
    lora_dropout=0,           # 支持任意值,但设为0时性能最优
    bias="none",              # 支持任意值,但设为"none"时性能最优
    # [新特性] "unsloth"模式可节省30%显存,支持2倍批量大小!
    use_gradient_checkpointing="unsloth",  # 对于超长上下文,设为True或"unsloth"
    random_state=3407,        # 随机种子
    use_rslora=False,         # 支持秩稳定LoRA技术
    loftq_config=None,        # 支持LoftQ配置
)

# 2 设置微调参数
from trl import SFTTrainer, SFTConfig
from transformers.integrations  import WandbCallback
import wandb

# 禁用wandb
os.environ["WANDB_DISABLED"]  = "true"

trainer = SFTTrainer(
    model = model,
    tokenizer = tokenizer,
    train_dataset = combined_dataset,
    eval_dataset = None, # Can set up evaluation!
    args = SFTConfig(
        dataset_text_field = "text",
        per_device_train_batch_size = 2,
        gradient_accumulation_steps = 4, # Use GA to mimic batch size!
        warmup_steps = 5,
        max_steps = 30,
        learning_rate = 2e-4, # Reduce to 2e-5 for long training runs
        logging_steps = 1,
        optim = "adamw_8bit",
        weight_decay = 0.01,
        lr_scheduler_type = "linear",
        seed = 3407,
        report_to = "none",  # 禁用报告
    ),
)

# 3 微调执行流程
trainer_stats = trainer.train()
 [30/30 32:41, Epoch 0/1]
Step	Training Loss
1	0.511500
2	0.598500
3	0.572700
4	0.567600
5	0.504300
6	0.470500
7	0.476700
8	0.442600
9	0.396200
10	0.458000
11	0.375200
12	0.428400
13	0.465100
14	0.405900
15	0.335500
16	0.412200
17	0.353200
18	0.437600
19	0.355100
20	0.379800
21	0.392200
22	0.419500
23	0.412100
24	0.398900
25	0.340500
26	0.438200
27	0.298500
28	0.368400
29	0.301200
30	0.342900
3.2 SFTConfig参数
SFTTrainer:一个专门为指令微调设计的训练器,封装 Hugging Face 的Trainer,而SFTConfig配置训练参数的专用类,功能类似TrainingArguments。而SFTConfig核心参数解释如下:
| 参数名 | 含义 |
|---|---|
dataset_text_field="text" |
数据集中用于训练的字段名称,如 text 或 prompt |
per_device_train_batch_size=2 |
每张 GPU 上的 batch size 是 2 |
gradient_accumulation_steps=4 |
梯度累计 4 次后才进行一次反向传播(等效于总 batch size = 2 × 4 = 8) |
warmup_steps=5 |
前 5 步进行 warmup(缓慢提升学习率) |
max_steps=30 |
最多训练 30 步(适合调试或快速实验) |
learning_rate=2e-4 |
初始学习率(短训练可用较高值) |
logging_steps=1 |
每训练 1 步就打印一次日志 |
optim="adamw_8bit" |
使用 8-bit AdamW 优化器(节省内存,Unsloth 支持) |
weight_decay=0.01 |
权重衰减,用于防止过拟合 |
lr_scheduler_type="linear" |
线性学习率调度器(从高到低线性下降) |
seed=3407 |
固定随机种子,确保结果可复现 |
report_to="none" |
不使用 WandB 或 TensorBoard 等日志平台(可改为 "wandb") |
此时基本训练过程为:
- 从
combined_dataset中取出一批样本(2 条) - 重复上面过程 4 次(
gradient_accumulation_steps=4) - 将累计的梯度用于更新模型一次参数(等效于一次大 batch 更新)
- 重复上述过程,直到
max_steps=30停止
3.3 模型对话测试
3.3.1 简单问题能力测试
- 一个简单的数据计算问题,分别进行思考和不思考模式测试:
# 模型对话测试
messages = [
    {"role" : "user", "content" : "Solve (x + 2)^2 = 0."}
]
text = tokenizer.apply_chat_template(
    messages,
    tokenize = False,
    add_generation_prompt = True, # Must add for generation
    enable_thinking = False, #不思考
)

from transformers import TextStreamer
_ = model.generate(
    **tokenizer(text, return_tensors = "pt").to("cuda"),
    max_new_tokens = 256, # Increase for longer outputs!
    temperature = 0.7, top_p = 0.8, top_k = 20, # For non thinking
    streamer = TextStreamer(tokenizer, skip_prompt = True),
)
To solve the equation \((x + 2)^2 = 0\), follow these steps:

1. Recognize that if a square of a term equals zero, then the term itself must be zero. So, set the inside of the square equal to zero:
   x + 2 = 0

2. Solve for \(x\) by isolating it on one side of the equation:
   x = -2

Therefore, the solution to the equation \((x + 2)^2 = 0\) is:
x = -2
<|im_end|>
messages = [
    {"role" : "user", "content" : "Solve (x + 2)^2 = 0."}
]
text = tokenizer.apply_chat_template(
    messages,
    tokenize = False,
    add_generation_prompt = True, # Must add for generation
    enable_thinking = True, # thinking
)

from transformers import TextStreamer
_ = model.generate(
    **tokenizer(text, return_tensors = "pt").to("cuda"),
    max_new_tokens = 20488, # Increase for longer outputs!
    temperature = 0.6, top_p = 0.95, top_k = 20, # For thinking
    streamer = TextStreamer(tokenizer, skip_prompt = True),
)
<think>
Okay, so I need to solve the equation (x + 2)^2 = 0. Hmm, let's see. I remember that when something squared equals zero, the only solution is when that something is zero. Because if you square a number and get zero, the number itself must be zero. Let me think... So if (x + 2)^2 = 0, then x + 2 must be zero. That makes sense because squaring any non-zero number would give a positive result, and squaring zero gives zero. So to find x, I can just set x + 2 equal to zero and solve for x. Let me write that down.

Starting with (x + 2)^2 = 0. Taking the square root of both sides, we get x + 2 = 0. Then, subtracting 2 from both sides, x = -2. Wait, but does that cover all possibilities? Since squaring a negative number also gives a positive, but in this case, we already have the square equal to zero, so the only solution is when the inside is zero. Yeah, I think that's right. So x = -2 is the only solution here. Let me check by plugging it back into the original equation. If x = -2, then (-2 + 2)^2 = 0^2 = 0, which matches the equation. So that works. I don't see any other solutions. Maybe I can think if there's another way to approach this. For example, expanding the left side. Let's try that.

Expanding (x + 2)^2 gives x^2 + 4x + 4. So the equation becomes x^2 + 4x + 4 = 0. Then, solving this quadratic equation. Since it's a perfect square trinomial, it factors back to (x + 2)^2 = 0, which is the original equation. So using the quadratic formula, which is x = [-b ± sqrt(b^2 - 4ac)]/(2a). Here, a = 1, b = 4, c = 4. Plugging in, we get x = [-4 ± sqrt(16 - 16)]/2 = [-4 ± 0]/2 = -4/2 = -2. So again, the same solution. So that confirms it. The quadratic formula gives x = -2 as the only solution. So both methods lead to the same answer. Therefore, the solution is x = -2. I think that's it. There's no other solution because the discriminant in the quadratic formula is zero, which means there's exactly one real root. Yeah, that all checks out. So I'm confident that x = -2 is the correct solution.
</think>

To solve the equation \((x + 2)^2 = 0\), we start by recognizing that if a square of a number is zero, then the number itself must be zero. This is because the square of any non-zero number is positive, and the square of zero is zero.

Given the equation \((x + 2)^2 = 0\), we take the square root of both sides. The square root of \((x + 2)^2\) is \(|x + 2|\), but since the right-hand side is zero, we have:
\[
x + 2 = 0
\]

Next, we solve for \(x\) by isolating it on one side of the equation. We do this by subtracting 2 from both sides:
\[
x = -2
\]

To verify the solution, we substitute \(x = -2\) back into the original equation:
\[
(-2 + 2)^2 = 0^2 = 0
\]
This confirms that \(x = -2\) is indeed a solution.

Alternatively, we can expand the left-hand side of the original equation:
\[
(x + 2)^2 = x^2 + 4x + 4
\]
Setting this equal to zero, we get:
\[
x^2 + 4x + 4 = 0
\]
This is a quadratic equation. We can solve it using the quadratic formula \(x = \frac{-b \pm \sqrt{b^2 - 4ac}}{2a}\), where \(a = 1\), \(b = 4\), and \(c = 4\). Plugging in these values, we get:
\[
x = \frac{-4 \pm \sqrt{4^2 - 4 \cdot 1 \cdot 4}}{2 \cdot 1} = \frac{-4 \pm \sqrt{16 - 16}}{2} = \frac{-4 \pm 0}{2} = \frac{-4}{2} = -2
\]

Thus, the solution to the equation \((x + 2)^2 = 0\) is:
\[
\boxed{-2}
\]<|im_end|>
3.3.2 复杂问题能力测试
messages = [
    {"role" : "user", "content" : "Determine the surface area of the portion of the plane $2x + 3y + 6z = 9$ that lies in the first octant."}
]
text = tokenizer.apply_chat_template(
    messages,
    tokenize = False,
    add_generation_prompt = True, # Must add for generation
    enable_thinking = True, # Disable thinking
)

from transformers import TextStreamer
_ = model.generate(
    **tokenizer(text, return_tensors = "pt").to("cuda"),
    max_new_tokens = 20488, # Increase for longer outputs!
    temperature = 0.6, top_p = 0.95, top_k = 20, # For thinking
    streamer = TextStreamer(tokenizer, skip_prompt = True),
)
- 输出巴拉巴拉一堆内容和计算,我也看不懂对不对,就不展示了!
3.4 模型保存
3.4.1 仅保存LoRA适配器和延后合并
- 可以先只保存 LoRA微调部分的参数(轻量且占用空间小),日后在其他机器上进行完整的16位精度合并。
- 优点
- 文件极小(通常几十MB到几百MB)
- 可迁移到其他机器后续合并
- 保留原模型精度,无损失
# 只保存LoRA部分的参数(不合并到原模型)
model.save_pretrained(
    save_directory="/root/autodl-fs/Qwen3-32B-lora-adapter",  # 保存路径
    save_adapter=True,          # 关键:仅保存LoRA适配器
    save_method="lora_only",    # 明确指定仅保存LoRA
)
tokenizer.save_pretrained("/root/autodl-fs/Qwen3-32B-lora-adapter")   # 保存tokenizer
from unsloth import FastLanguageModel

# 重新加载原模型和LoRA适配器
model, tokenizer = FastLanguageModel.from_pretrained(
    base_model_name_or_path="Qwen/Qwen1.5-32B",         # 原模型名称/路径
    pretrained_adapter_name_or_path="/root/autodl-fs/Qwen3-32B-lora-adapter",  # LoRA路径
)

# 执行完整16bit合并
model.save_pretrained_merged(
    save_directory="/path/to/Qwen3-32B-finetuned-fp16",
    tokenizer=tokenizer,
    save_method="merged_16bit",  # 16位精度合并
)
3.4.2 保存完整模型(非合并状态)
- 测试保存只显示1GB内容,可能存在问题
model.save_pretrained("/root/autodl-fs/Qwen3-32B-raw-finetuned")
3.4.3 FP16位精度保存
- 微调结束后即可进行模型保存,由于训练的LoRA本身是FP16精度,因此模型需要保存为fp16精度格式,才能完整保留模型当前性能。
model.save_pretrained_merged(save_directory = "Qwen3-32B-finetuned-fp16",
                             tokenizer = tokenizer,
                             save_method = "merged_16bit")
3.4.4 FP4位精度保存
model.save_pretrained_merged(
    save_directory="/root/autodl-fs/Qwen3-32B-finetuned-fp4",
    tokenizer=tokenizer,
    save_method="merged_4bit_forced"  # 明确表示强制使用4bit
)
3.4.5 保存失败问题
RuntimeError: Bad in-place call: input tensor size [2621440, 1] and output tensor size [1024, 5120] should match
- github问题讨论地址
- 根据社区讨论猜测为:机器内存、显存、磁盘容量不足!
3.5 大规模微调关键代码
- 练完一整个epoch,总共约8小时左右。
from trl import SFTTrainer, SFTConfig
trainer = SFTTrainer(
    model = model,
    tokenizer = tokenizer,
    train_dataset = combined_dataset,
    eval_dataset = None, # Can set up evaluation!
    args = SFTConfig(
        dataset_text_field = "text",
        per_device_train_batch_size = 4,
        gradient_accumulation_steps = 2, # Use GA to mimic batch size!
        warmup_steps = 5,
        num_train_epochs = 1, # Set this for 1 full training run.
        learning_rate = 2e-4, # Reduce to 2e-5 for long training runs
        logging_steps = 1,
        optim = "adamw_8bit",
        weight_decay = 0.01,
        lr_scheduler_type = "linear",
        seed = 3407,
        report_to = "none", # Use this for WandB etc
    ),
)

trainer_stats = trainer.train()
3.6 模型性能测试[未实践]
- 使用VLLM进行调用导出后的模型,然后借助evalscope进行测试。【这里测试环境使用Autodl平台两块VGPU进行测试】
- VLLM的使用参看大模型微调【2】之使用AutoDL进行模型微调入门
vllm server ./Qwen3-32B-finetuned-fp16 \
--enable-auto-tool-choice \
--tool-call-parser hermes \
--pipeline-parallel-size 2
- 使用EvalScope进行测试。
- EvalScope的使用参看大模型微调【2】之使用AutoDL进行模型微调入门
from evalscope import TaskConfig, run_task
task_cfg = TaskConfig(
    model='./Qwen3-32B-finetuned-fp16',
    api_url='http://127.0.0.1:8000/v1/chat/completions',
    eval_type='service',
    datasets=[
        'data_collection',
    ],
    dataset_args={
        'data_collection': {
            'dataset_id': 'modelscope/EvalScope-Qwen3-Test',
            'filters': {'remove_until': '</think>'}  # 过滤掉思考的内容
        }
    },
    eval_batch_size=128,
    generation_config={
        'max_tokens': 30000,  # 最大生成token数,建议设置为较大值避免输出截断
        'temperature': 0.6,  # 采样温度 (qwen 报告推荐值)
        'top_p': 0.95,  # top-p采样 (qwen 报告推荐值)
        'top_k': 20,  # top-k采样 (qwen 报告推荐值)
        'n': 1,  # 每个请求产生的回复数量
    },
    timeout=60000,  # 超时时间
    stream=True,  # 是否使用流式输出
    limit=2000,  # 设置为2000条数据进行测试
)

run_task(task_cfg=task_cfg)
- 测试后即可在前端中观察测评报告
evalscope app - 这里附上九天老师大规模微调后的效果图片:


有“AI”的1024 = 2048,欢迎大家加入2048 AI社区
更多推荐


 24
24 0
0- 0


 已为社区贡献54条内容

所有评论(0)