Lunix操作命令2-适合新手小白
目录
一、前言
Linux 以开源、高可定制、极致稳定的内核,成为云时代从底层虚拟化、容器到上层编排、自动化运维的通用底座,决定了云的规模、性能与安全。本次围绕这一核心需求展开:从认知各标准目录的职能,到掌握 find、cat、more、grep、tar、vi 等日常高频命令;从理解“打包+压缩”的备份思想,到熟练运用 vi 的三大模式完成配置变更——循序渐进、手脑并用,帮助读者在字符界面下建立起“文件即运维”的思维框架。
二、命令
查找文件find
格式:
-name 按名称查找:
-size 按大小查找:
-user 按文件属主:
-type 按类型查找:普通文件(f)、目录(d)、块设备文件(b)、字符设备文件(c)、链接(l)
name:find [路径] -name “名称”
find /etc -name "resol*.conf"
find /data/ -name "*.txt" #查找/data/目录以.txt结尾的文件;
find /data/ -name "[A-Z]*" #查找/data/目录以大写字母开头的文件;
find /data/ -name "test*" #查找/data/目录以test开头的文件;
[root@localhost Y]# find ./etc -name "*.conf"
./etc/resolv.conf
./etc/fonts/conf.d/31-cantarell.conf
./etc/fonts/conf.d/59-liberation-sans.conf
./etc/fonts/conf.d/65-0-lohit-devanagari.conf
./etc/fonts/conf.d/20-unhint-small-dejavu-sans.conf
...(此处省略)
size:find [路径] -size 大小
find /data/ -size +1M #查文件大小大于1Mb的文件;
find /data/ -size 10M #查文件大小为10M的文件;
find /data/ -size -1M #查文件大小小于1Mb的文件;
[root@localhost Y]# find /boot -size +10M
/boot/initramfs-0-rescue-e99979156ab64027b0d2ea333f9fa67e.img
/boot/initramfs-3.10.0-1160.el7.x86_64.img
/boot/initramfs-3.10.0-1160.el7.x86_64kdump.img
type:find [路径] -type [文件类型]
[root@localhost Y]# ls ./D
A  A.txt  B  B.txt  C  C.txt  D  D.txt
[root@localhost Y]# find ./D -type d       #寻找文件类型
./D
./D/A
./D/B
./D/C
./D/D
多条件查找
-a:并且
-o:或者
[root@localhost Y]# ls -lh
总用量 22M
-rw-r--r--.   1 root root   66 8月  12 06:50 demo.txt
-rw-r--r--.   1 root root    0 8月  11 21:46 D.txt
drwxr-xr-x. 145 root root 8.0K 8月  11 21:39 etc
-rw-r--r--.   1 root root  11M 8月  12 08:14 etc.tar.bz2     #注意这个文件
-rw-r--r--.   1 root root  12M 8月  12 08:09 etc.tar.gz      #注意这个文件
drwxr-xr-x.   5 root root   92 8月  11 20:49 opt
drwxr-xr-x.  21 root root 4.0K 8月   7 08:06 var
[root@localhost Y]# find ./ -size +10M -a -name "etc.*"     # 大于10M,并且名字中带有etc的文件
./etc.tar.gz
./etc.tar.bz2
[root@localhost Y]# find ./ -size +20M -o -name "etc.*"      # 小于20M,并且名字中带有etc的文件
./var/lib/rpm/Packages
./etc.tar.gz
./etc.tar.bz2
显示内容cat
cat可以读取1个文件,也可以读取多个文件
[root@localhost Y]# cat demo.txt               #读取一个文件
Many people read on digital devices like cell phones and e-books.
[root@localhost Y]# cat demo2.txt  demo.txt     #读取多个文件
Plastic surgery makes people more confident and gives them advantages.
Many people read on digital devices like cell phones and e-books.
分页查看文件内容more和less
使用 cat 命令最后一部分信息,文件前面的大部分使用 cat 命令可以非常简单地直接显示整个文件的内容,但是当文件中的内容较多时, 很可能只能看到最后一部分信息,文件前面的大部分内容都来不及看到。
more :使用 more 命令查看超过一屏的文件内容时,将进行分屏显示,并在左下角显示当前内容在整个文件中的百分比。
[root@localhost Y]# more ./etc/usb_modeswitch.conf
# Configuration for the usb_modeswitch package, a mode switching tool for
# USB devices providing multiple states or modes
#
# Evaluated by the wrapper script /usr/sbin/usb_modeswitch_dispatcher
#
# To enable an option, set it to "1", "yes" or "true" (case doesn't matter)
# Everything else counts as "disable"


# Disable automatic mode switching globally (e.g. to access the original
# install storage)
...(此处省略)
--More--(44%)
Enter 键向下逐行滚动查看,按 Space 键可以向下翻一屏,按 b 键向上翻一屏,按 q 键退出并返回原来的命令环境
less:less 命令使用方法与 more 命令基本类似,但是比 more 更好的是,less 命令结合管道符号“|”分屏查看执行命令时输出的信息时,既可以向下翻页,也可以向上翻页。而 more 命令只能向下翻页,不能向上翻页。
[root@localhost ~]# less ./Y/etc/wgetrc
###
### Sample Wget initialization file .wgetrc
###

## You can use this file to change the default behaviour of wget or to
###

## You can use this file to change the default behaviour of wget or to
## avoid having to type many many command-line options. This file does
## not contain a comprehensive list of commands -- look at the manual
## to find out what you can put into this file.
...(省略)
:
page up(向上箭头)上翻页,page down(向下箭头)下翻页,/查找内容,n下一个内容,N上一个内容,q退出
查看文件开头或末尾的部分内容head和tail
head:head -[数字] [文件及路径]
[root@localhost ~]# head -4 ./Y/etc/passwd   # passwd的前四行
root:x:0:0:root:/root:/bin/bash
bin:x:1:1:bin:/bin:/sbin/nologin
daemon:x:2:2:daemon:/sbin:/sbin/nologin
adm:x:3:4:adm:/var/adm:/sbin/nologin
tail:tail -[数字] [文件及路径]
[root@localhost ~]# tail -4 ./Y/etc/passwd     #passwd的最后4行
avahi:x:70:70:Avahi mDNS/DNS-SD Stack:/var/run/avahi-daemon:/sbin/nologin
postfix:x:89:89::/var/spool/postfix:/sbin/nologin
tcpdump:x:72:72::/:/sbin/nologin
zard2:x:1000:1000:ZARD2:/home/zard2:/bin/bash
-f 对尾部的文件动态追踪
[root@localhost ~]# tail -f /var/log/messages
Aug 12 12:50:01 localhost systemd: Started Session 40 of user root.
Aug 12 13:00:01 localhost systemd: Started Session 41 of user root.
Aug 12 13:01:01 localhost systemd: Started Session 42 of user root.
Aug 12 13:10:01 localhost systemd: Started Session 43 of user root.
Aug 12 13:20:01 localhost systemd: Started Session 44 of user root.
Aug 12 13:30:01 localhost systemd: Started Session 45 of user root.
Aug 12 13:40:01 localhost systemd: Started Session 46 of user root.
Aug 12 13:50:01 localhost systemd: Started Session 47 of user root.
Aug 12 14:00:01 localhost systemd: Started Session 48 of user root.
Aug 12 14:01:01 localhost systemd: Started Session 49 of user root.

# 此处并未结束
以下操作可以查看系统公共日志文件/var/log/messages 的最后十行内容,并在末尾跟踪显示该文件中新记录的内容(按 Ctrl+C 组合键终止)
检索过滤文件内容grep
grep 命令用于在文件中查找并显示包含指定字符串的行,可以直接指定关键字符串作为查找条件,也可以使用复杂的条件表达式
grep [关键词] [文件路径和文件名]
[root@localhost Y]# grep FTP ./etc/wgetrc
# By default Wget uses "passive FTP" transfer where the client
# firewalls software explicitly supports active FTP and in fact has
# environment, use "passive_ftp = off" to revert to active FTP.
# To have Wget follow FTP links from HTML files by default, set this
-i 不区分大小写
[root@localhost Y]# grep -i Ftp ./etc/wgetrc
# By default Wget uses "passive FTP" transfer where the client
# firewalls software explicitly supports active FTP and in fact has
# environment, use "passive_ftp = off" to revert to active FTP.
#passive_ftp = off
# You can set the default proxies for Wget to use for http, https, and ftp.
#ftp_proxy = http://proxy.yoyodyne.com:18023/
# To have Wget follow FTP links from HTML files by default, set this
#follow_ftp = off
grep 命令用于在文件中查找并显示包含指定字符串的行,可以直接指定关键字符串作为查找条件,也可以使用复杂的条件表达式(例如,“^word”表示以 word 开头,“word$”表示以 word 结尾,“^$”表示空行)。使用 grep 命令的基本格式如下:
[root@localhost Y]# grep "^why" A.txt   # 开头why会高亮
why is there never a bus when they want one? Good question, there are not enough
why is there never a bus when they want one? Good question, there are not enough
why is there never a bus when they want one? Good question, there are not enough
[root@localhost Y]# grep "enough$" A.txt   # 结尾enough会高亮
why is there never a bus when they want one? Good question, there are not enough
why is there never a bus when they want one? Good question, there are not enough
[root@localhost Y]# cat A.txt # 这里有两行空着
why is there never a bus when they want one? Good question, there are not enough
why is there never a bus when they want one? Good question, there are not enough
why is there never a bus when they want one? Good question, there are not enough
[root@localhost Y]# grep "^$" A.txt #捕捉空着的两行
[root@localhost Y]#统计文件内容中的单词数量行数等信息wc
-l:统计文件内容中的行数。
-w:统计文件内容中的单词个数(以空格或制表位作为分隔)。
-c:统计文件内容中的字节数。
[root@localhost Y]# wc ./A.txt
  5  48 246 ./A.txt
[root@localhost Y]# wc -l ./A.txt
5 ./A.txt
压缩包和解压包
gzip和gunzip
制作压缩文件时,使用“-9”选项可以提高压缩的比率,但文件较大时会需要更多的时间。例如,以下操作将对/root/public_html 目录下的 mkfile 文件进行压缩,生成压缩文件 mkfile.gz(原始文件 mkfile 不再保留),压缩后的文件大小变为 30KB(未压缩时为 62KB)。gzip -1 使用一级别压缩 压缩比例最少 压缩速度最快 -9 压缩比例最大 压缩速度最慢 默认1-9 不加级别默认是6级别。
当需要解压缩经gzip 压缩的文件时,只需使用带“-d”选项的gzip 命令即可,或者直接使用
gunzip 命令。例如,若将压缩文件 mkfile.gz 进行解压缩,可执行以下操作。
[root@localhost Y]# ls ./   # 当前文件夹下面的文件
demo2.txt
[root@localhost Y]# gzip ./demo2.txt  # 压缩后的文件
[root@localhost Y]# ls
demo2.txt.gz
[root@localhost Y]# gunzip ./demo2.txt.gz   # 解压后
[root@localhost Y]# ls ./   # 当前文件夹下面的文件
demo2.txt
bzip2 和bunzip2
[root@localhost Y]# bzip2 -9 ./demo2.txt
[root@localhost Y]# ls ./
demo2.txt.bz2
[root@localhost Y]# bunzip2 ./demo2.txt.bz2
[root@localhost Y]# ls
demo2.txt
归档和释放工具tar
tar 命令主要用于对目录和文件进行归档。在实际的备份工作中,通常在归档的同时也会将包文件进行压缩(需要调用前面的 gzip 或 bzip2 命令),以节省磁盘空间。使用 tar 命令时,选项前的“-”号可以省略。常用的几个选项如下所述。
-c:创建(Create).tar 格式的包文件。
-C:解压时指定释放的目标文件夹。
-f:表示使用归档文件。
-j:调用 bzip2 程序进行压缩或解压。
-p:打包时保留文件及目录的权限。
-P:打包时保留文件及目录的绝对路径。
-t:列表查看包内的文件。
-v:输出详细信息(Verbose)。
-x:解开.tar 格式的包文件。
-z:调用 gzip 程序进行压缩或解压。
czvf xzvf
cjvf xjvf
czf xzf
cjf xjf
gz的压缩和解压
[root@localhost Y]# tar czvf etc.tar.gz etc #压缩etc文件夹
# 压缩过程 略
[root@localhost Y]# ls
etc.tar.gz
[root@localhost Y]# tar xzvf etc.tar.gz #解压到当前文件夹下
etc
[root@localhost Y]#tar xzvf etc.tar.gz -C ./A # 解压到其子文件下
[root@localhost Y]# ls ./A
etc
bz2的压缩和解压
[root@localhost Y]#tar cjvf etc.tar.bz2 etc #压缩etc文件夹
# 压缩过程 略
[root@localhost Y]# ls
etc.tar.bz2
[root@localhost Y]# tar xjvf etc.tar.bz2 #解压到当前文件夹下
etc
[root@localhost Y]#tar jzvf etc.tar.bz2 -C ./A # 解压到其子文件下
[root@localhost Y]# ls ./A
etc
vim的编辑器
vim有三种工作模式
-
入口
命令行输入vi filename即进入 Vim,默认落在“命令模式”。 -
三大模式
-
命令模式(方框):所有浏览、复制、删除、移动操作都在这里完成。
-
输入模式(方框):按
i / a / o等键进入,可正常打字编辑;按Esc回到命令模式。 -
底线(末行)命令模式(方框):在命令模式下按
:进入,可执行:wq保存退出、:q!强制退出等;回车执行后自动回到命令模式。
-
-
出口
在底线命令模式下输入:wq回车 → 结束运行并退出 Vim。
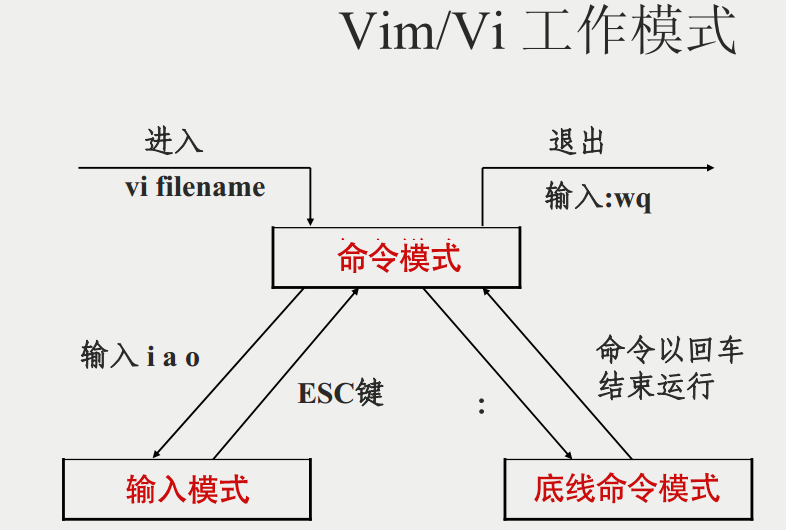
命令模式 → 输入模式
vim demo.txt
i    # 在光标前插入
I    # 在行首插入
a    # 在光标后插入
A    # 在行尾插入
o    # 在下一行开新行
O    # 在上一行开新行
输入模式 → 命令模式
<Esc>
命令模式 → 末行模式
: # 出现 : 提示符
退出 Vim(末行模式)
:wq          # 保存并退出
:q           # 退出(未改)
:q!          # 强制退出
ZZ           # 命令模式保存+退出
移动光标(命令模式)
h j k l      # 左 下 上 右
gg           # 文件首
G            # 文件尾
10G          # 第 10 行
^ / 0        # 行首
$            # 行尾
Ctrl+f       # 下一屏
Ctrl+b       # 上一屏
行号开关(末行模式)
:set nu      # 显示行号
:set nonu    # 取消行号
复制 / 粘贴 / 删除(命令模式)
yy           # 复制当前行
3yy          # 复制 3 行
dd           # 删除当前行
5dd          # 删除 5 行
p            # 粘到光标后
P            # 粘到光标前
x            # 删除字符
u            # 撤销
Ctrl+r       # 反撤销
查找与替换
/word        # 向下找 word
?word        # 向上找 word
n            # 下一个
N            # 上一个

:%s/old/new/g        # 全局替换
:5,10s/old/new/g     # 仅 5–10 行替换
:%s/old/new/gc       # 每次替换前确认
打开/插入外部文件(末行模式)
:e ~/other.txt       # 打开新文件
:r /etc/hosts        # 将 hosts 内容读入当前光标处
:w /root/bak.txt     # 另存为
批量注释(实战组合)
Ctrl+v               # 进入可视块
j j                  # 向下选 2 行
I                    # 块前插入
# <Esc>              # 批量加 #
一键设置 alias(Shell)
echo "alias vi='vim'" >> ~/.bashrc
source ~/.bashrc
配置示例:统一缩进与语法高亮(末行或 ~/.vimrc)
:set tabstop=4
:set shiftwidth=4
:set expandtab
:syntax on
最小实战脚本
#!/bin/bash
# 创建并编辑 demo
cat <<EOF > demo.txt
Hello
World
EOF
vi demo.txt
# 在 Vim 中:
#   :%s/World/Vim/g
#   :wq
三、总结
本章内容可归纳为“看、管、改、备”四个字:
-
看——通过find、cat、more/less、head/tail、wc、grep、vim 等命令,实现对目录与文本内容的快速浏览与精准检索;
-
管——理解 /etc、/var、/home 等目录的职责,学会用绝对路径与相对路径准确“定位”文件;
-
备——利用 gzip/bzip2 与 tar 组合,完成“归档+压缩”的一体化备份与恢复,真正做到“数据在、心不慌”。
掌握上述技能后,读者便能在任何一台 Linux 服务器上迅速“摸清家底”、精确定位问题、安全修改配置,并在灾难来临前留下可靠备份,为后续深入服务部署与自动化运维奠定坚实基础。
记得点个小红心关注一下

有“AI”的1024 = 2048,欢迎大家加入2048 AI社区
更多推荐

 16
16 0
0- 0


 已为社区贡献2条内容

所有评论(0)