Jetson AGX Orin部署Qwen2.5-VL-7B并实现物体检测
在NVIDIA Jetson AGX Orin上部署千问多模态大模型Qwen2.5-vl,并利用其进行对画面中的目标物体的检查及位置返回。
该文章旨在提供稳定可复现的在Jetson AGX Orin部署Qwen2.5-VL-7B并实现物体检测的方式。
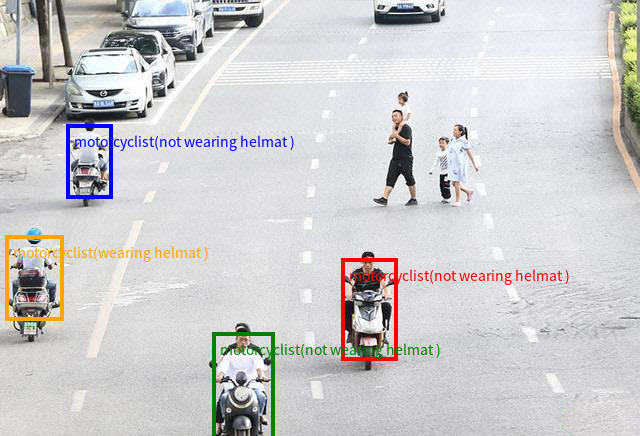
由于Qwen2.5-VL系列具备识别图像中的物体位置并返回bounding box(目标左上及右下的像素点坐标)的功能(如Qwen官方页面及图1所示),因而将VLM部署于Jetson这类边缘设备上,则可令其拥有更多在现实场景中解决有意义的问题的能力。

图1. Qwen2.5-VL识别、理解、返回物体坐标的能力应用实例
希望这篇文章可以帮到大家。
一、模型的下载
安装git相关指令,在hugging face官网下载Qwen2.5-VL-7B-Instruction模型:
#更新apt
sudo apt update

#安装git相关的命令
sudo apt install git

#安装git-lfs,允许大文件(模型本体)被下载
git lfs install

#下载模型
git clone https://huggingface.co/Qwen/Qwen2.5-VL-72B-Instruct-AWQ
等待再次允许命令行操作时,表明模型下载完毕。
二、环境配置
推荐使用anaconda虚拟环境。已经配置过conda环境或信心爆棚不怕环境出错的话可以跳过步骤1。
1.anaconda安装及配置
下载并安装轻装版anaconda:miniconda。
在terminal界面中执行以下指令:
mkdir -p ~/miniconda3
wget https://repo.anaconda.com/miniconda/Miniconda3-latest-Linux-aarch64.sh -O ~/miniconda3/miniconda.sh
bash ~/miniconda3/miniconda.sh -b -u -p ~/miniconda3
rm ~/miniconda3/miniconda.sh
安装完成后执行以下环境以在所有窗口激活conda环境:
source ~/miniconda3/bin/activate
conda init --all
2.创建项目所需虚拟环境
使用以下指令创建并激活虚拟环境:
conda create -n VLM01 python=3.10 -y
conda activate VLM01
使用以下指令配置CUDA环境并刷新环境(重新读取配置文件)以应用更改:
export PATH=/usr/local/cuda-12.6/bin:$PATH
export LD_LIBRARY_PATH=/usr/local/cuda-12.6/lib64:$LD_LIBRARY_PATH
source ~/.bashrc
conda activate VLM01访问https://pypi.jetson-ai-lab.dev/jp6/cu126或https://pypi.jetson-ai-lab.io/jp6/cu126(弱智NVIDIA网站总崩,哪个能上用哪个,两个都不能的话只能再等等),并下载torch、torchaudio、torchvision、vllm、triton、xformers对应的whl文件。笔者环境中所用的版本如下,仅供参考:
torch 2.7.0
torchaudio 2.7.0
torchvision 0.22.0vllm 0.8.6+cu126
triton 3.3.0xformers 0.0.30+56be3b5.d20250310
在文件下载到的文件夹右键打开terminal,或使用cd命令移动到文件下载到的位置。使用pip install <whl文件的名字>将下载下来的文件逐个安装上。在输入文件的名字时,输入完前几个字母然后按tab可以自动补全,快速又能避免出错。
然后使用如下命令安装qwen2.5vl所需的额外依赖:
pip install qwen-vl-utils至此为止,所有比较特殊的依赖都安装完毕了。之后运行时如果提示缺依赖的话,查缺补漏即可(没有什么module,pip install或conda install一下就行)。
可选:使用以下命令
sudo /usr/sbin/nvpmodel -m 0可以切换到MAX模式,理论来说可以提高jetson的表现。
三、调用模型完成任务
新建python文件VLM_test.py,使用如下代码即可:
import os
import sys
import time
import shlex
import argparse
import tempfile
import base64
from io import BytesIO
import numpy as np
import cv2
import torch
from PIL import Image, ImageFont, ImageDraw, ImageOps
from transformers import Qwen2_5_VLForConditionalGeneration, AutoProcessor

MODEL_PATH = "<把这里改成你下载Qwen2.5-VL模型的路径>"
PRE_PROMPT_FIND = """
【任务】
从指令中提取出目标物体,并检测图像中的目标物体,以坐标的形式返回其位置。

【回复示例】
如果我的指令是“查找橙子”,
假如你找到了橙子,你输出这样的格式:
x1, y1, x2, y2

假如你找不到这个物体,你输出:
0, 0, 0, 0

【格式强调】
不要弄乱格式。
只回复坐标即可。不要回复其它任何内容,不要输出包含```json的开头或结尾,不要输出label等文字。

【指令】
我现在的指令是:
"""

class VLModel:
    _instance = None

    def __new__(cls):
        if cls._instance is None:
            cls._instance = super().__new__(cls)
            cls._instance._load()
        return cls._instance

    def _load(self):
        print("模型加载路径:", MODEL_PATH)
        self.model = Qwen2_5_VLForConditionalGeneration.from_pretrained(
            MODEL_PATH,
            torch_dtype=torch.float16,
            device_map="auto",
            trust_remote_code=True,
            local_files_only=True,
        )
        self.processor = AutoProcessor.from_pretrained(
            MODEL_PATH, trust_remote_code=True
        )

    @torch.inference_mode()
    def generate(self, prompt: str, image_b64: str, max_new_tokens: int = 16) -> str:
        image = Image.open(BytesIO(base64.b64decode(image_b64))).convert("RGB")
        messages = [
            {
                "role": "user",
                "content": [
                    {"type": "image", "image": image},
                    {"type": "text", "text": prompt},
                ],
            }
        ]
        text = self.processor.apply_chat_template(
            messages, tokenize=False, add_generation_prompt=True
        )
        inputs = self.processor(
            text=[text], images=[image], padding=True, return_tensors="pt"
        ).to(self.model.device)

        generated_ids = self.model.generate(
            **inputs, max_new_tokens=max_new_tokens, do_sample=False
        )
        generated = generated_ids[:, inputs.input_ids.shape[1] :]
        return self.processor.batch_decode(
            generated, skip_special_tokens=True, clean_up_tokenization_spaces=False
        )[0].strip()

vl = VLModel()

def run_once(prompt: str, img_path: str):
   # 1. 读图、编码
    orig = cv2.imread(img_path)
    if orig is None:
        raise FileNotFoundError(img_path)

    with tempfile.NamedTemporaryFile(suffix=".jpg", delete=False) as tmp:
        tmp_path = tmp.name
    cv2.imwrite(tmp_path, orig)
    with open(tmp_path, "rb") as f:
        img_b64 = base64.b64encode(f.read()).decode()
    os.remove(tmp_path)

    # 2. 推理
    raw = vl.generate(PRE_PROMPT_FIND + prompt, img_b64, max_new_tokens=16)
    print(f"模型原始输出: {raw}")

    # 3. 解析坐标
    parts = [int(v) for v in raw.replace(",", ",").split(",") if v.strip().lstrip("-").isdigit()]
    while len(parts) < 4:
        parts.append(0)
    x1, y1, x2, y2 = parts[:4]

    # 4. 可视化
    cx, cy = (x1 + x2) // 2, (y1 + y2) // 2
    vis = cv2.rectangle(orig.copy(), (x1, y1), (x2, y2), (0, 0, 255), 3)
    vis = cv2.circle(vis, (cx, cy), 6, (0, 0, 255), -1)

    # 中文字体:如系统无 SimHei.ttf,可换成路径或删除文字
    try:
        font = ImageFont.truetype("asset/SimHei.ttf", 26)
    except OSError:
        font = ImageFont.load_default()
    img_pil = Image.fromarray(cv2.cvtColor(vis, cv2.COLOR_BGR2RGB))
    draw = ImageDraw.Draw(img_pil)
    label = prompt.replace("查找", "").strip() if parts != [0, 0, 0, 0] else "NONE"
    draw.text((x1, y1 - 32), label, font=font, fill=(255, 0, 0))
    vis = cv2.cvtColor(np.array(img_pil), cv2.COLOR_RGB2BGR)

    os.makedirs("results", exist_ok=True)
    save_path = f"results/vlm_{int(time.time())}.jpg"
    cv2.imwrite(save_path, vis)
    print(f"可视化结果已保存: {save_path}")
    print(f"识别中心点: X={cx}, Y={cy}")


def repl():
    print("--------------------------------------------------")
    print("输入命令,例如:")
    print("  --command find orange --pic test.jpg")
    print("  --command locate 药盒 --pic ./desk.png")
    print("按下 Ctrl+C 或 输入 q 或 quit 退出")
    print("--------------------------------------------------")
    while True:
        try:
            line = input(">>> ").strip()
        except (KeyboardInterrupt, EOFError):
            print("\nBye~")
            break
        if line.lower() in {"q", "quit", "exit"}:
            print("Bye~")
            break
        if not line:
            continue

        # 使用 argparse 解析用户输入
        try:
            argv = shlex.split(line)
        except ValueError as e:
            print("解析错误:", e)
            continue

        parser = argparse.ArgumentParser()
        parser.add_argument("--command", nargs="+", required=True)
        parser.add_argument("--pic", required=True)
        try:
            args = parser.parse_args(argv)
        except SystemExit:
            continue

        prompt = " ".join(args.command)
        img_path = args.pic
        try:
            #cost = run_once(prompt, img_path)
            run_once(prompt, img_path)
            print(f"运行成功")
        except Exception as e:
            print("运行出错:", e)
        print("--------------------------------------------------")


if __name__ == "__main__":

    repl()
在terminal中进入python文件所在路径,输入命令行python VLM_test.py即可运行。在--command后输入命令,在--pic后输入图片所在路径,生成的识别结果会存储在python文件所在的目录下的results文件夹内。
值得一提的是,这里使用的prompt与官方用于视觉定位任务的prompt不完全一样,舍弃了官方的标准的json格式。理由是在jetson上大模型输出速度极慢(约为5 tokens/秒),因此过多的输出将极大增加延迟。
这是本人第一次写较为完整的项目复现类文章。欢迎大家指正与共同探讨。
更多推荐
 已为社区贡献1条内容


所有评论(0)