Prometheus 监控平台部署与应用
一、Prometheus的架构介绍
1.起源
Prometheus 起源于 Soundcloud ,因为微服务迅速发展,导致实例数量以几何倍数递增,不得不考虑设计一个符合以下几个功能的监控系统:
多维数据模型,可以按照实例,服务,端点和方法之类的维度随意对数据进行切片和切块。
操作简单,可以随时随地部署监控服务,甚至在本地工作站上,而无需设置分布式存储后端或重新配置环境。
可扩展的数据收集和分散的架构,以便于可以可靠的监控服务的许多实例,独立团队可以部署独立的监控服务。
转化为一种查询语言,可以利用数据模型进行有效的警报和图形展示。
但是,当时的情况是,以上的功能都分散在各个系统之中,直到2012年 Soundcloud 某位大神启动了一个孵化项目,Soundcloud 才把所有功能集合到一起,这时也就有了 Prometheus。 Prometheus是用 Go 语言编写,从一开始就是开源的。 尽管一直很低调,一开始还是获得了很多粉丝与贡献者; 2016年 Prometheus 成为继 Kubernetes 之后,成为 CNCF(cloud Native computing Foundation)第二个成员。
2.什么是 Prometheus
Prometheus 具有足够的通用性,可以监控各个级别的实例:你自己的应用程序、第三方服务、主机或网络设备等等。此外 Prometheus 特别适用于监控动态云环境和 Kubernetes 云原生环境。
但是也需要注意的是 Prometheus 并不是万能的,目前并没有解决下面的一些问题:
日志和追踪(Prometheus 只处理指标,也称为时间序列)
基于机器学习或 AI 的异常检测
水平扩展、集群化的存储
3.Prometheus 的运行原理
通过 Http 协议周期性抓取被监控组件的状态。输出被监控组件信息的 Http 接口称为 exporter。常用组件大部分都有 exporter 可以直接使用,比如 haproxy,Nginx,MySQL,Linux 系统信息(磁盘、内存、CPU、网络等)
4.Prometheus组件构成
Prometheus生态系统由多个组件构成,其架构如下图所示:
(1)Prometheus server
服务核心组件,采用 pu11 方式收集数据, 通过 http 协议传输。并存储时间序列数据
(2)Exporters/Jobs
负责收集不支持 Instrumentation 的目标对象的性能数据,并通过 HTTP 接口供 PrometheusServer 获取。
(3)Node-Exporter
用于收集各 node 节点的物理指标状态数据,如平均负载、CPU、内存、磁盘、网络等资源信息的指标数据,需要部署到所有运算节点。
(4)Kube-state-Metrics
为 prometheus 采集 k8s 资源数据的 exporter,通过监听 APIServer 收集 kubernetes 集群内资源对象的状态指标数据,例如 pod、deployment、service 等等。同时它也提供自己的数据,主要是资源采集个数和采集发生的异常次数统计。 需要注意的是 kube-state-metrics 只是简单的提供一个metrics 数据,并不会存储这些指标数据,所以可以使用 Prometheus 来抓取这些数据然后存储,主要关注的是业务相关的一些元数据,比如 Deployment、Pod、副本状态等;调度了多少个replicas?现在可用的有几个?多少个 Pod是running/stopped/terminated 状态?Pod 重启了多少次?有多少 job 在运行中。
(5)cadvisor
用来监控容器内部使用资源的信息,比如CPU、内存、网络 I/0、磁盘 I/0。
(6)blackbox-exporter
监控业务容器存活性。
(7)Service Discovery
服务发现,Prometheus 支持多种服务发现机制:文件,DNS,Consul,Kubernetes,openstackEC2等等。基于服务发现的过程并不复杂,通过第三方提供的接口,Prometheus 查询到需要监控的Target列表,然后轮训这些 Target 获取监控数据。
(8)Alertmanager
是一个独立的告警模块,从 Prometheus server 端接收到 alerts 后,会进行去重、分组, 并路由到相应的接收方,发出报警,常见的接收方式有:电子邮件,微信,钉钉等。
(9)Pushgateway
类似一个中转站,Prometheus 的 server 端只会使用 pu11 方式拉取数据,但是某些节点因为某些原因只能使用 push 方式推送数据,那么它就是用来接收 push 而来的数据并暴露给 Prometheus 的server 拉取的中转站。 可以理解成目标主机可以上报短期任务的数据到 Pushgateway,然后Prometheus server 统一从Pushgateway 拉取数据
(10)Grafana
是一个跨平台的开源的度量分析和可视化工具,可以将采集的数据可视化的展示,并及时通知给告警接收方。其官方库中具有丰富的仪表盘插件。
5.Prometheus 的特性
(1)提供多维度数据模型和灵活的査询语言:通过将监控指标关联多个Tag,来将监控数据进行任意维度的组合;提供 HTTP 查询接口;可以很方便的结合 Grafana等组件展示数据
(2)支持服务器节点的本地存储,通过 prometheus 自带的时序数据库,可以完成每秒千万级的数据存储。不仅如此,在保存大量历史数据的场景中,prometheus 还可以对接第三方时序数据库如 OpenTSDB等
(3)定义了开放指标数据标准,以基于 HTTP 的 Pu11 方式采集时序数据,只有实现了 prometheus 监控数据格式的监控数据才可以被 prometheus 采集:并支持以 Push 方式向中间网关推送时序数据,能更灵活地应对各种监控场景。
(4)支持通过静态文件配置和动态发现机制发现监控对象,自动完成数据采集。prometheus 目前已经支持 Kubernetes、consul 等多种服务发现机制,可以减少运维人员的手动配置环节。
(5)支持多种多样的图表和界面展示,比如 Grafana 等。
6.Prometheus 的工作流程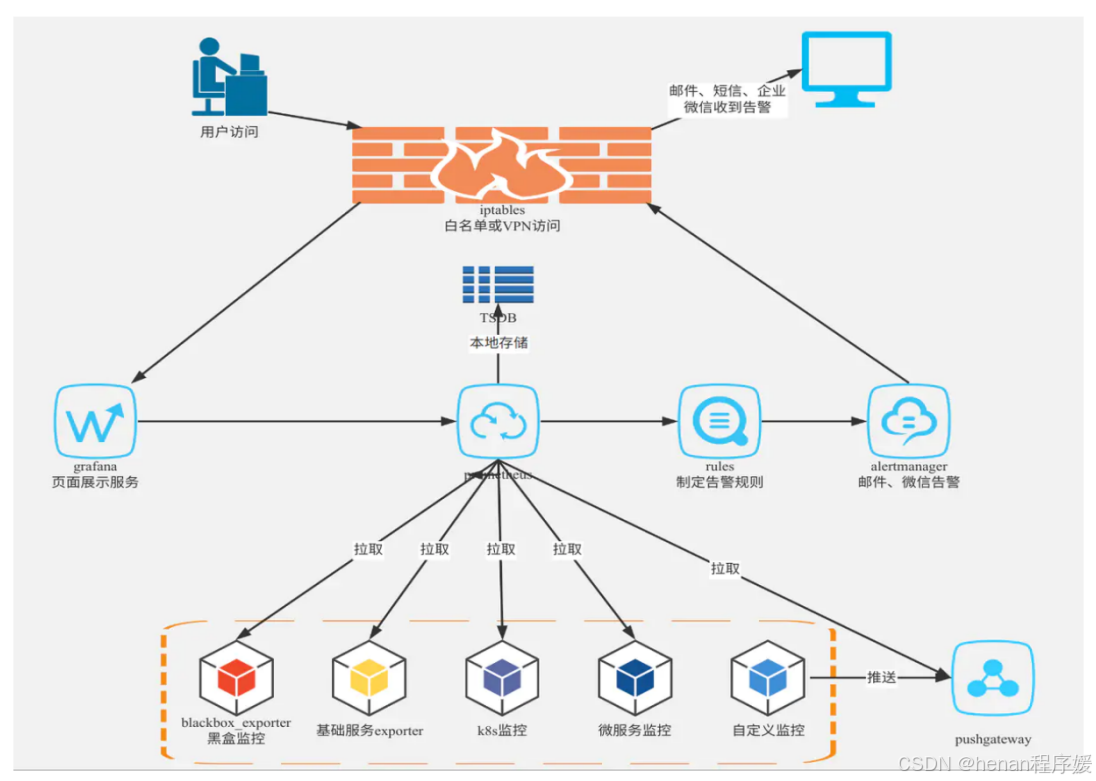
(1)配置监控目标:在 Prometheus 配置文件中定义监控目标及其相应的指标。
(2)拉取指标数据:Prometheus 会定期从监控目标拉取指标数据,并将数据存储到本地存储中。
(3)存储指标数据:Prometheus 会使用一种自定义的时间序列数据库(TSDB)存储指标数据,以便进行分析和查询。
(4)分析指标数据:Prometheus 提供了一个表达式语言,可以基于时间序列数据进行数据处理和分析操作,比如计算归一化指标、统计分位数、处理异常值等。
(5)查询指标数据:Prometheus 提供了一个基于 HTTP 的査询 API,可以用来执行査询操作和获取查询结果,获取到的查询数据可以通过图表和仪表盘的方式进行展示。
7.Grafana 介绍
Grafana 是一款用 Go 语言开发的开源数据可视化工具,可以做数据监控和说几句统计,带有告警功能。其特点如下:
可视化:快速和灵活的客户端图形具有多种选项,面板插件为许多不同的方式可视化指标和日志。
报警:可视化地为最重要的指标定义警报规则,Granfana将持续评估他们,并发送通知。
通知:警报更改状态时,他会发出通知,接受电子邮件通知。
动态仪表盘:使用模板变量创建动态和可重用的仪表盘,这些模板变量作为下拉菜单出现在仪表板顶部。
混合数据源:在同一个图中混合不同的数据源,可以根据每个查询指定数据源,这甚至适用于自定义数据源。
注释:注释来自不同数据源图标,将鼠标悬停在事件上可以显示完整的事件元数据和标记。
过滤器:过滤器允许您动态创建新的键~值,这些过滤器将自动应用于该数据源的所有查询。
二、Prometheus 的安装
1.资源配置
2.部署Prometheus
Prometheus 的安装包可以前往官网下载:https://prometheus,io/download/
(1)Prometheus 的安装
[root@localhost ~]# hostnamectl set-hostname prometheus
[root@localhost ~]# bash
[root@prometheus ~]# setenforce 0
[root@prometheus ~]# systemctl stop firewalld
[root@prometheus ~]# systemctl disable firewalld
Removed symlink /etc/systemd/system/multi-user.target.wants/firewalld.service.
Removed symlink /etc/systemd/system/dbus-org.fedoraproject.FirewallD1.service.
[root@prometheus ~]# vim /etc/selinux/config
[root@prometheus ~]# tar zxvf prometheus-2.48.0.linux-amd64.tar.gz
prometheus-2.48.0.linux-amd64/
prometheus-2.48.0.linux-amd64/prometheus
prometheus-2.48.0.linux-amd64/promtool
prometheus-2.48.0.linux-amd64/LICENSE
prometheus-2.48.0.linux-amd64/consoles/
prometheus-2.48.0.linux-amd64/consoles/node-overview.html
prometheus-2.48.0.linux-amd64/consoles/node-disk.html
prometheus-2.48.0.linux-amd64/consoles/prometheus-overview.html
prometheus-2.48.0.linux-amd64/consoles/prometheus.html
prometheus-2.48.0.linux-amd64/consoles/node.html
prometheus-2.48.0.linux-amd64/consoles/node-cpu.html
prometheus-2.48.0.linux-amd64/consoles/index.html.example
prometheus-2.48.0.linux-amd64/console_libraries/
prometheus-2.48.0.linux-amd64/console_libraries/menu.lib
prometheus-2.48.0.linux-amd64/console_libraries/prom.lib
prometheus-2.48.0.linux-amd64/prometheus.yml
prometheus-2.48.0.linux-amd64/NOTICE
[root@prometheus ~]# mv prometheus-2.48.0.linux-amd64 /usr/local/prometheus
[root@prometheus prometheus]# ln -s /usr/local/prometheus/prometheus /usr/local/bin
[root@prometheus prometheus]# ln -s /usr/local/prometheus/promtool /usr/local/bin
[root@prometheus prometheus]# prometheus --version
prometheus, version 2.48.0 (branch: HEAD, revision: 6d80b30990bc297d95b5c844e118c4011fad8054)
  build user:       root@26117804242c
  build date:       20231116-04:35:21
  go version:       go1.21.4
  platform:         linux/amd64
  tags:             netgo,builtinassets,stringlabels
(2)注册Prometheus的系统服务
[root@prometheus ~]# vim /usr/lib/systemd/system/prometheus.service

[Unit]
Description=https://prometheus.io

[Service]
Restart=on-failure
ExecStart=/usr/local/prometheus/prometheus --config.file=/usr/local/prometheus/prometheus.yml --web.listen-address=:9090

[Install]
WantedBy=multi-user.target
(3)启动服务
[root@prometheus ~]# systemctl daemon-reload
[root@prometheus ~]# systemctl enable --now prometheus
3.访问测试
(1)访问Prometheus首页
http://192.168.10.108:9090/

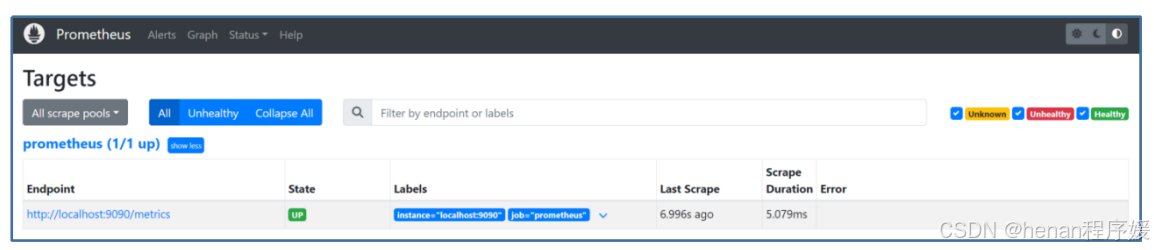
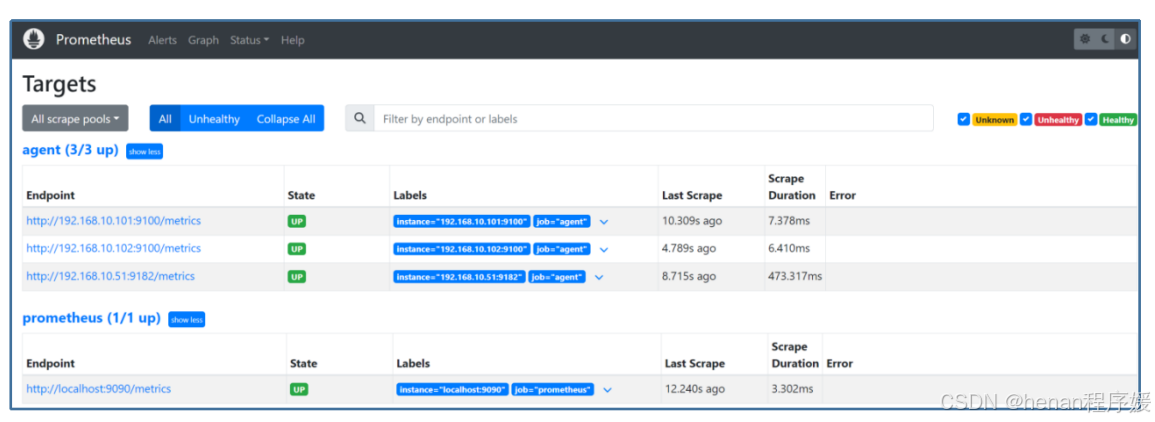
(2)查看被监控端的状态
点击stats-Targets
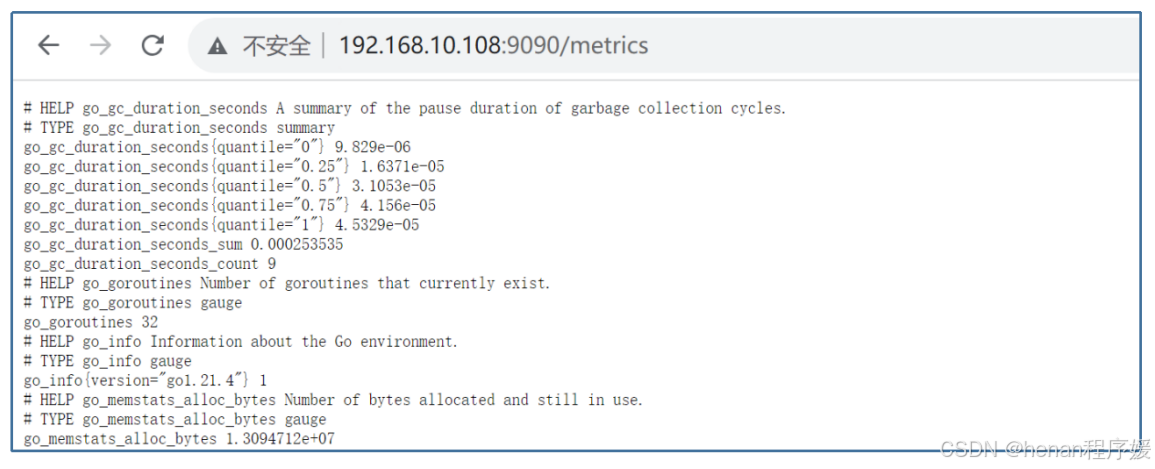
(3)查看详细监控信息
http://192.168.10.108:9090/metrics
三、部署node_exporter
Exporter 是 Prometheus 的指标数据收集组件。它负责从目标 Jobs 收集数据,并把收集到的数据转换为 Prometheus 支持的时序数据格式。 和传统的指标数据收集组件不同的是,他只负责收集,并不向Server 端发送数据,而是等待 Prometheus Server 主动抓取,node-exporter 默认的抓取 url 地址:http://ip:9100/metrics
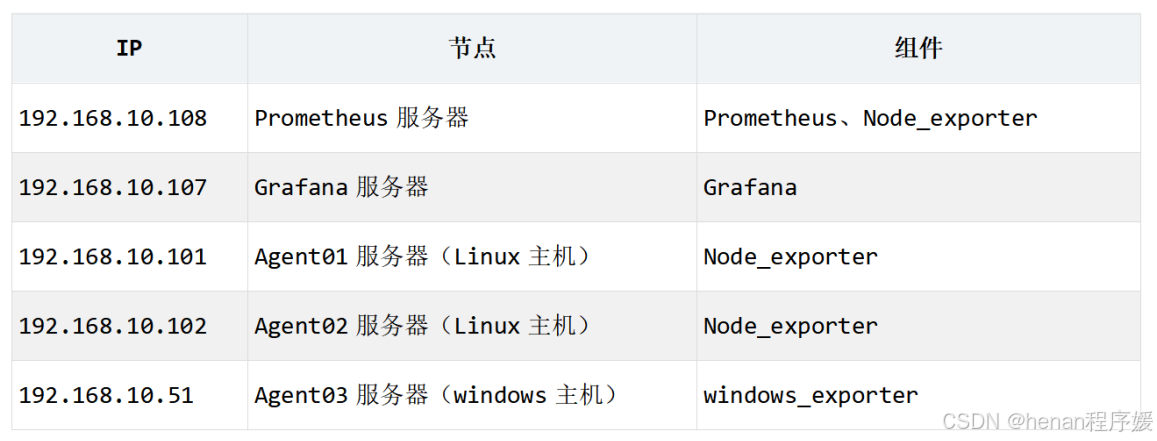
1.agent 服务器端(被监控端)安装 node exporter
(1)安装node exporter
[root@localhost ~]# hostnamectl set-hostname agent01
[root@localhost ~]# bash
[root@agent01 ~]# setenforce 0
[root@agent01 ~]# vim /etc/selinux/config
[root@agent01 ~]# systemctl stop firewalld
[root@agent01 ~]# systemctl disable firewalld
Removed symlink /etc/systemd/system/multi-user.target.wants/firewalld.service.
Removed symlink /etc/systemd/system/dbus-org.fedoraproject.FirewallD1.service.
root@agent01 ~]# tar zxvf node_exporter-1.7.0.linux-amd64.tar.gz
node_exporter-1.7.0.linux-amd64/
node_exporter-1.7.0.linux-amd64/LICENSE
node_exporter-1.7.0.linux-amd64/node_exporter
node_exporter-1.7.0.linux-amd64/NOTICE
[root@agent01 ~]# mv node_exporter-1.7.0.linux-amd64 /usr/local/node_exporter(2)添加服务为系统服务
[root@agent01 ~]# vim /usr/lib/systemd/system/node_exporter.service

[Unit]
Description=node_exporter
After=network.target

[Service]
ExecStart=/usr/local/node_exporter/node_exporter
Restart=on-failure

[Install]
WantedBy=multi-user.target
(3)启动
[root@agent01 ~]# systemctl daemon-reload
[root@agent01 ~]# systemctl enable node_exporter
Created symlink from /etc/systemd/system/multi-user.target.wants/node_exporter.service to /usr/lib/systemd/system/node_exporter.service.
[root@agent01 ~]# systemctl start node_exporter
(4)查看端口
[root@agent01 ~]# netstat -anpt | grep 9100
tcp6       0      0 :::9100                 :::*                    LISTEN      2503/node_exporter
备注:windows主机的exporter程序监听的9182端口
2.在Prometheus服务端配置文件添加监控项
(1)进入Prometheus配置文件添加target
[root@prometheus ~]# vim /usr/local/prometheus/prometheus.yml

# my global config
global:
  scrape_interval: 15s # Set the scrape interval to every 15 seconds. Default is every 1 minute.
  evaluation_interval: 15s # Evaluate rules every 15 seconds. The default is every 1 minute.
  # scrape_timeout is set to the global default (10s).

# Alertmanager configuration
alerting:
  alertmanagers:
    - static_configs:
        - targets:
          # - alertmanager:9093

# Load rules once and periodically evaluate them according to the global 'evaluation_interval'.
rule_files:
  # - "first_rules.yml"
  # - "second_rules.yml"

# A scrape configuration containing exactly one endpoint to scrape:
# Here it's Prometheus itself.
scrape_configs:
  # The job name is added as a label `job=<job_name>` to any timeseries scraped from this config.
  - job_name: "prometheus"
    # metrics_path defaults to '/metrics'
    # scheme defaults to 'http'.
    static_configs:
      - targets: ["localhost:9090"]
  - job_name: 'agent'
    static_configs:
      - targets: ['192.168.10.101:9100','192.168.10.102:9100','192.168.10.50:9182']
备注
Linux 主机的exporter 进程监听的是 TCP 9100 端口,windows 主机的exporter 进程监听的TCP9182 端口。
(2)重启 Prometheus 服务
[root@prometheus ~l# systemctl restart prometheus.service重启完浏览器刷新访问 192.168.10.108:9090,打开普罗米修斯的监控页面 status-Targets 查看有没有添加成功。如下图所示。
四、Grafana的部署与应用
1.部署Grafana
(1)安装Grafana
[root@localhost ~]# hostnamectl set-hostname Grafana
[root@localhost ~]# bash
[root@grafana ~]# yum -y install grafana-enterprise-10.2.2-1.x86_64.rpm
(2)启动服务
[root@grafana ~]# systemctl start grafana-server
[root@grafana ~]# systemctl enable grafana-server
Created symlink from /etc/systemd/system/multi-user.target.wants/grafana-server.service to /usr/lib/systemd/system/grafana-server.service.
(3)关闭防火墙
[root@grafana ~]# systemctl stop firewalld
[root@grafana ~]# systemctl disable firewalld
Removed symlink /etc/systemd/system/multi-user.target.wants/firewalld.service.
Removed symlink /etc/systemd/system/dbus-org.fedoraproject.FirewallD1.service.
[root@grafana ~]# setenforce 0
[root@grafana ~]# vim /etc/selinux/config
2.浏览器访问Grafana
(1)登录
http://192.168.10.107:3000/login
默认端口为 3000
初始账号和密码都是 admin

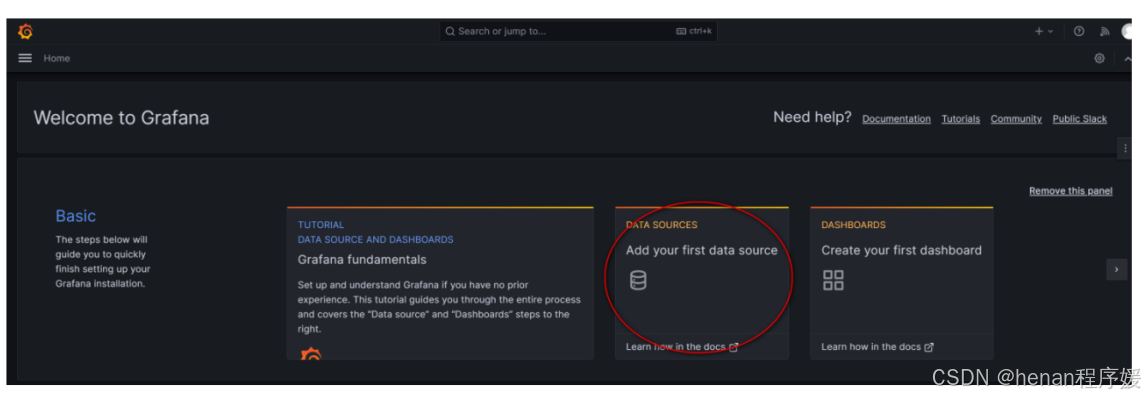
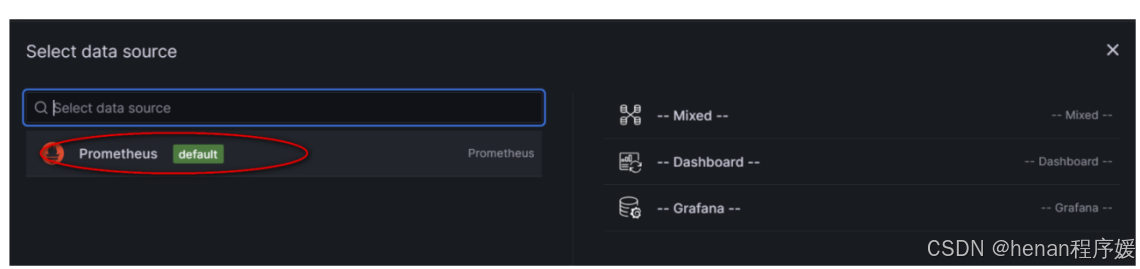
(2)设置数据源
第一次登录进入后让你设置新的密码,进入Granfana,点击DATA SOURCRE添加数据源。
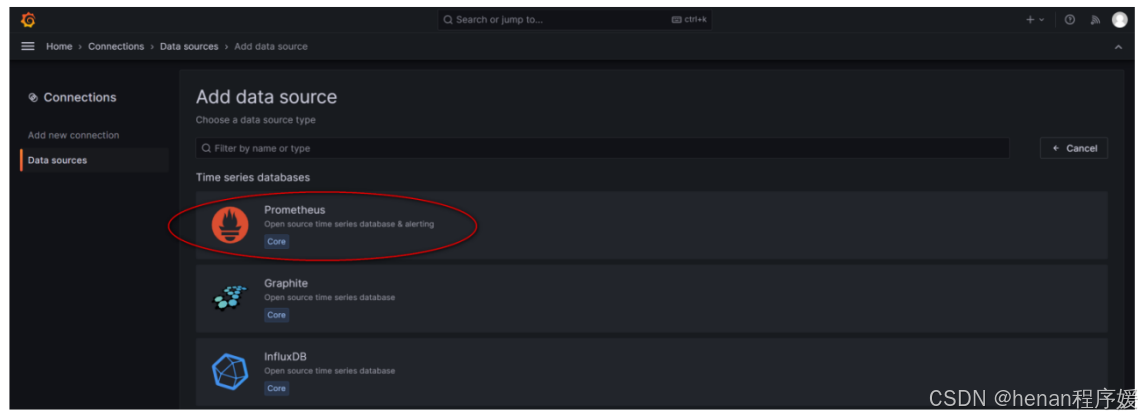
 (2)设置Prometheus为数据源
 (3)填写连接信息

(4)在页面底端点击保存并测试的按钮

(5)查看添加的数据源
点击“Connections”--->"Data sources",查看已添加的数据源。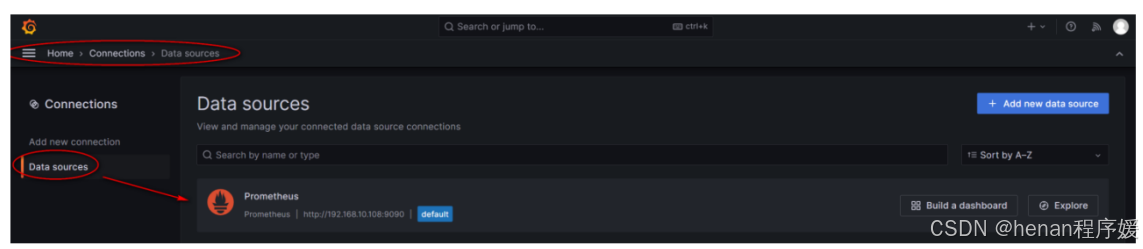
3.用导入模块的方式添加Grafana监控面板
(1)在home页面点击添加dashboard 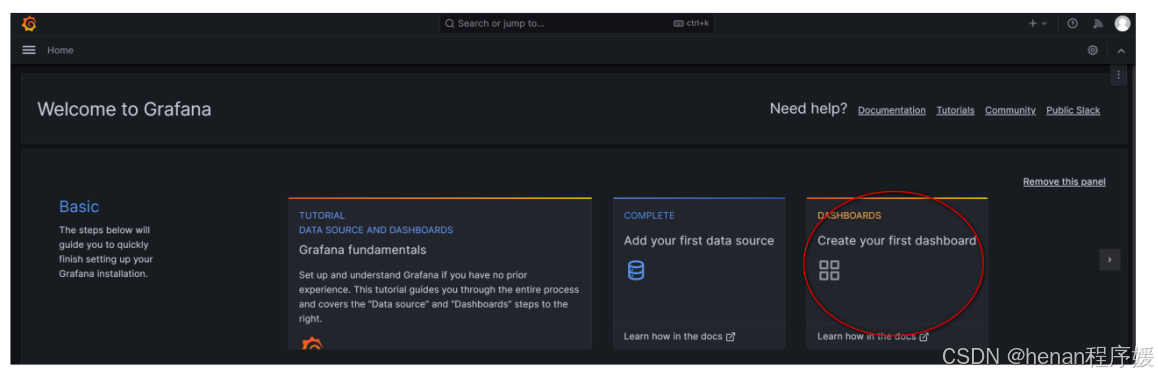
(2)选择导入模块的方法 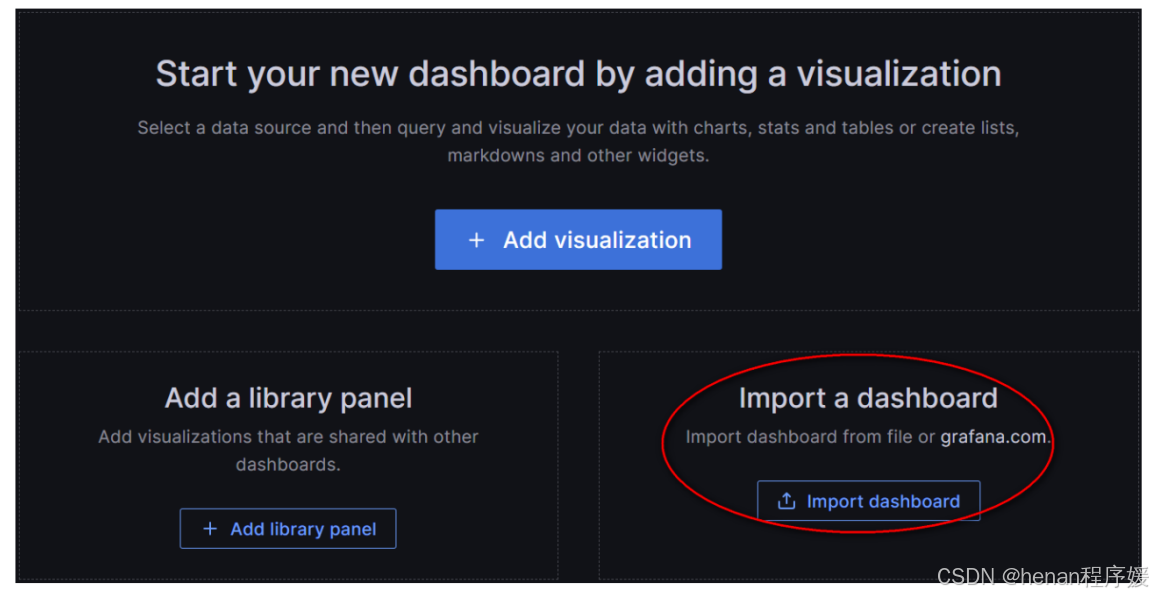
(3)指定模板 ID
模板 ID 可以从 Grafana 官网获得,Grafana为用户提供了大量的模板,简化了用户的管理难度。本案例中使用的模板 ID 为 12633,填写好 ID 后点击“Load”按钮。https://grafana.com/grafana/dashboards/
注意:
12633:针对 Linux 的节点进行监控的模板
14694:针对 windows 的节点进行监控的模板
用户也可以选择其他对应的模板进行创建。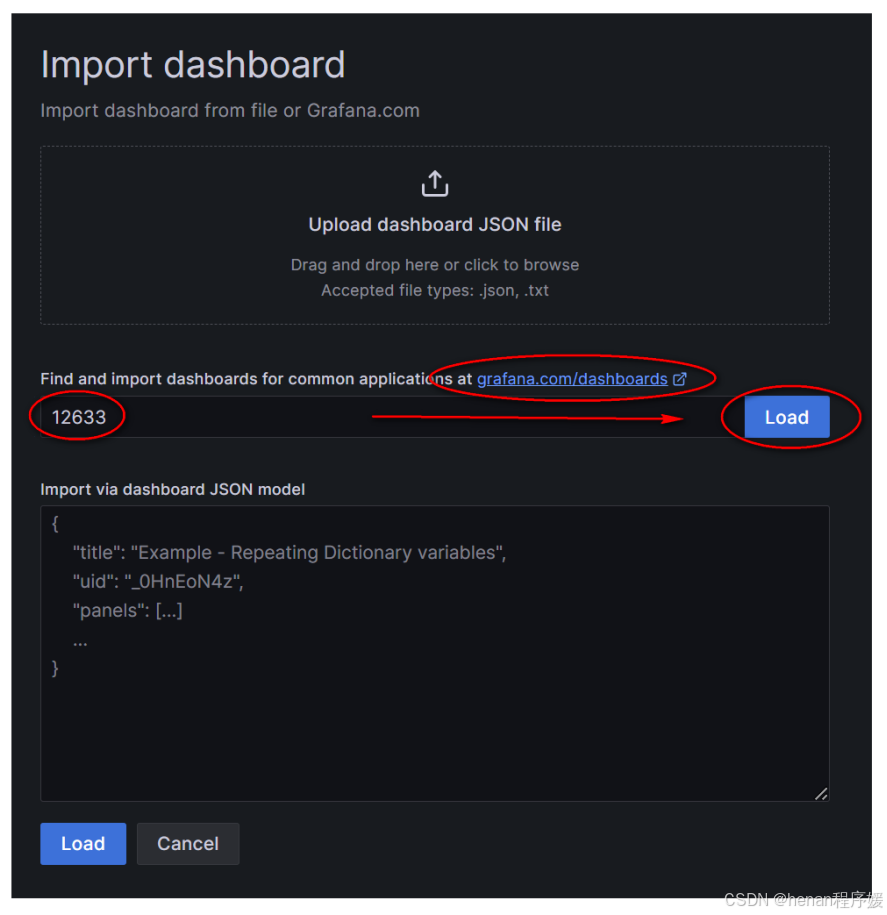
(4)选择数据源
在下拉菜单中选择对应的数据源,再点击“Import”按钮进入导入。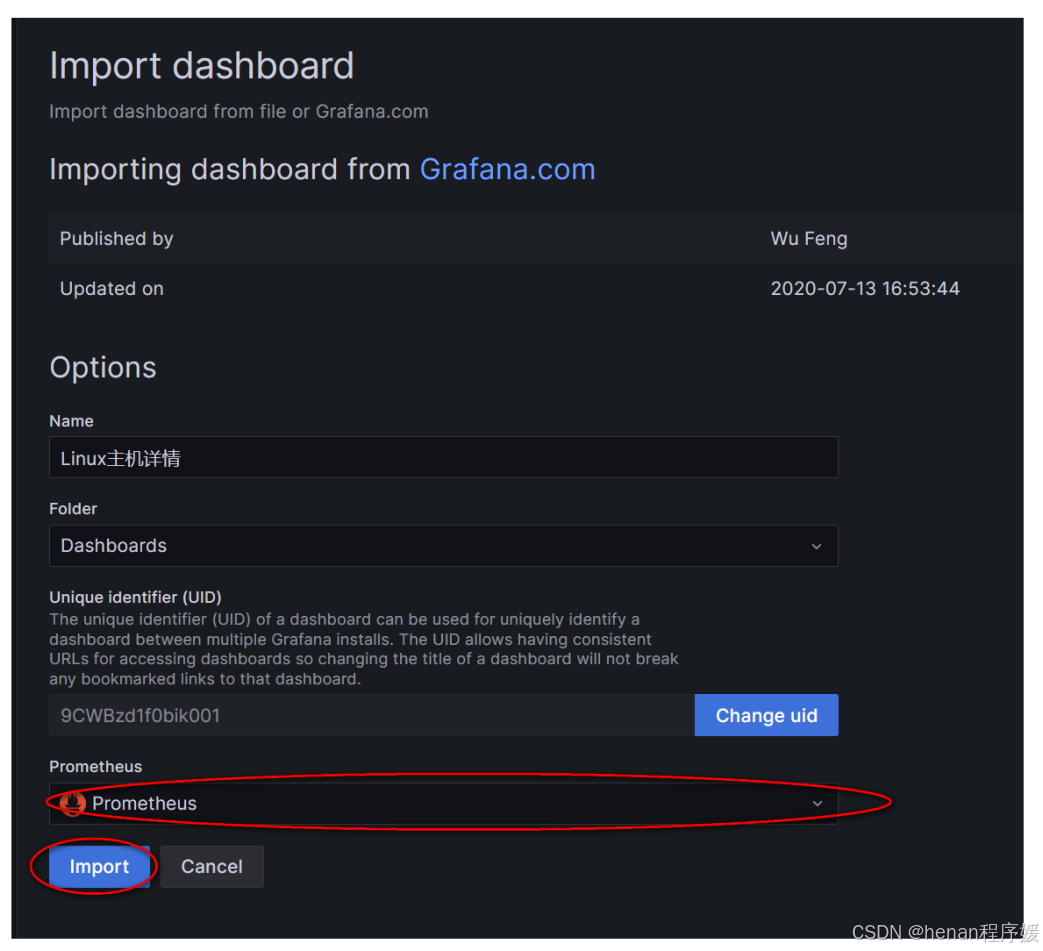
(5)导入后查看监控图像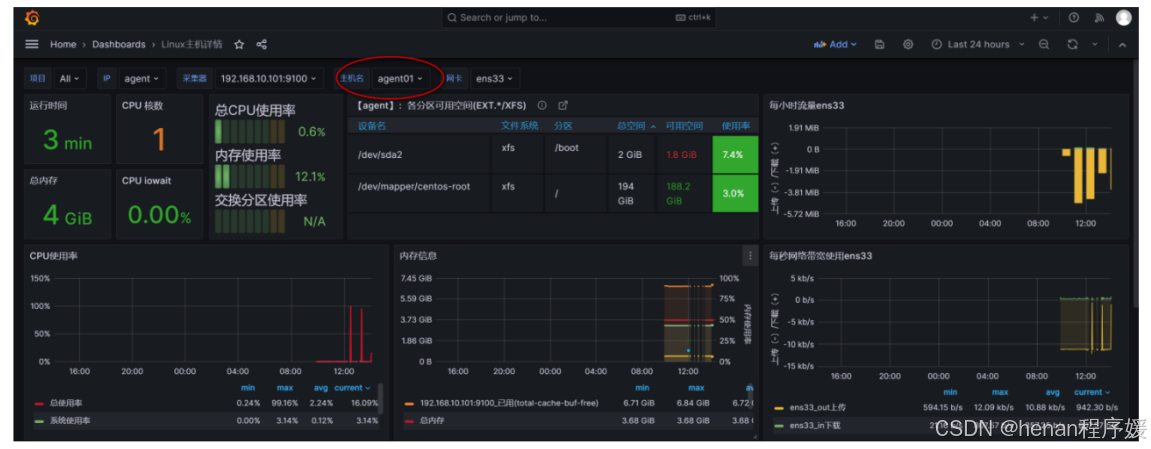
4.自定义dashboard监控面板
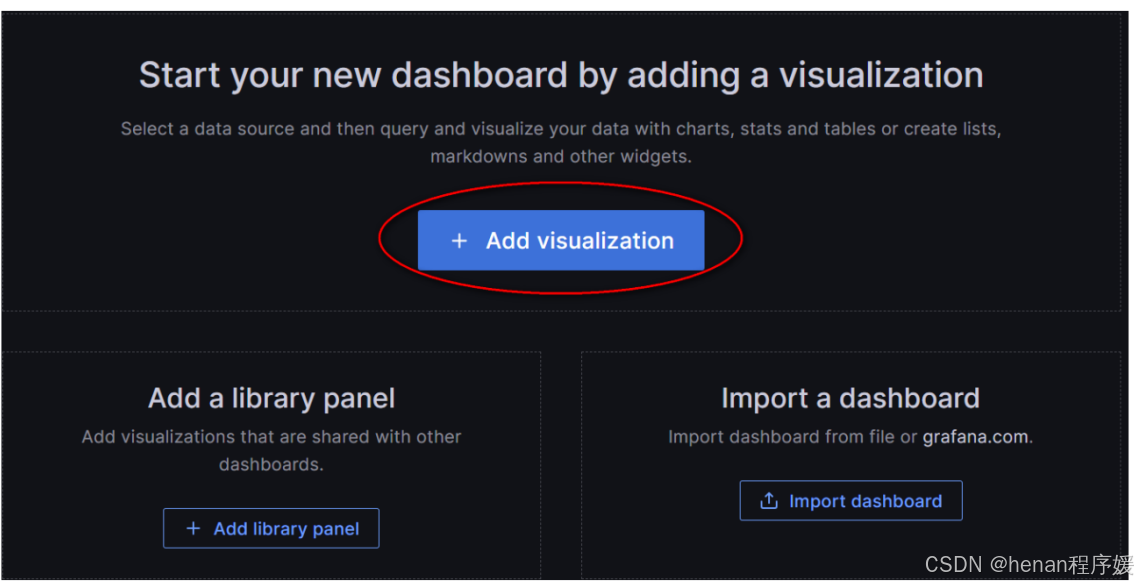
(1)在home页面点击添加dashboard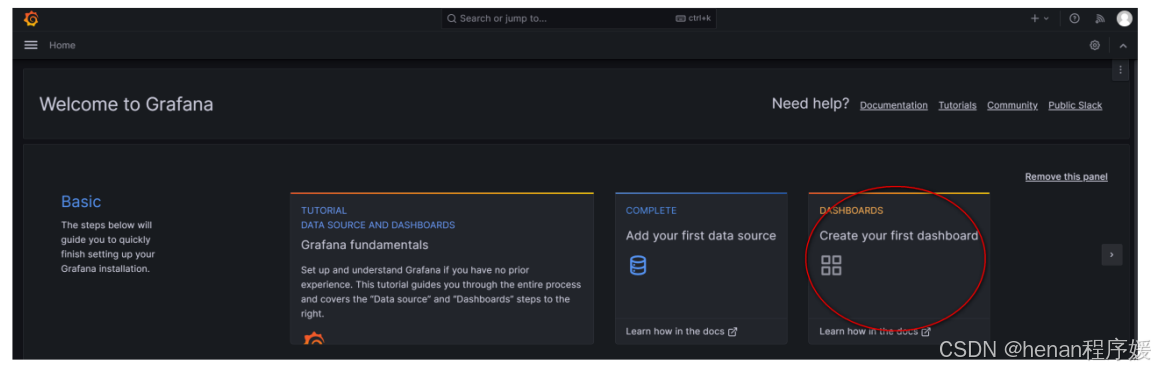
(2)选择“ADD visualization” 方式添加dashboard
visualizaiton:可视化
此方法需要用户手动对dashboard面板进行布局,监控参数也需要用户自行设置。
(2)选择Prometheus数据源
(3)设置查询规则
Metric:选择监控项
Label filters:设置过滤规则,表示要监控哪台主机。
Instance:表示使用被监控主机的 IP 地址选择
Job:表示使用主机名进行选择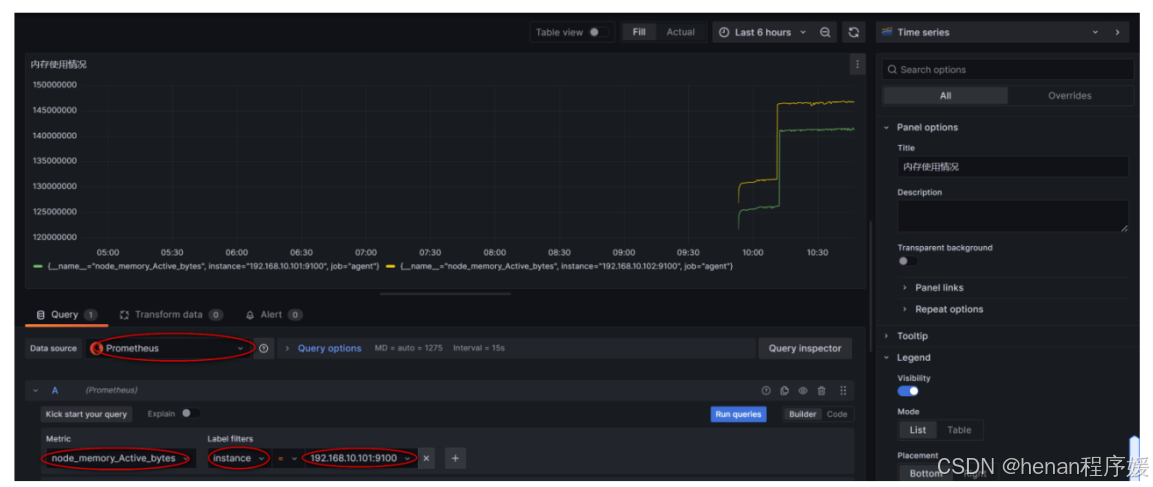
五、Prometheus告警
1.安装告警组件alertmanager
(1)安装alertmanager
[root@prometheus ~]# tar zxvf alertmanager-0.26.0.linux-amd64.tar.gz
alertmanager-0.26.0.linux-amd64/
alertmanager-0.26.0.linux-amd64/alertmanager.yml
alertmanager-0.26.0.linux-amd64/NOTICE
alertmanager-0.26.0.linux-amd64/amtool
alertmanager-0.26.0.linux-amd64/alertmanager
alertmanager-0.26.0.linux-amd64/LICENSE
[root@prometheus ~]# mv alertmanager-0.26.0.linux-amd64 /usr/local/alertmanager
(2)添加alertmanager服务
[root@prometheus ~]# vim /usr/lib/systemd/system/alertmanager.service

[Unit]
Description=alertmanager project
After=network.target

Type=simple
ExecStart=/usr/local/alertmanager/alertmanager --config.file=/usr/local/alertmanager/alertmanager.yml --storage.path=/usr/local/alertmanager --web.listen-address=0.0.0.0:9093
Restart=on-failure

[Install]
WantedBy=multi-user.target
[root@prometheus ~]# systemctl daemon-reload
[root@prometheus ~]# systemctl start alertmanager
[root@prometheus ~]# systemctl enable alertmanager
Created symlink from /etc/systemd/system/multi-user.target.wants/alertmanager.service to /usr/lib/systemd/system/alertmanager.service.(3)访问alertmanager 的 WEB 页面
alertmanager 的 web 界面使用 9093 的端口,
登录的 url 如下http://192.168.10.108:9093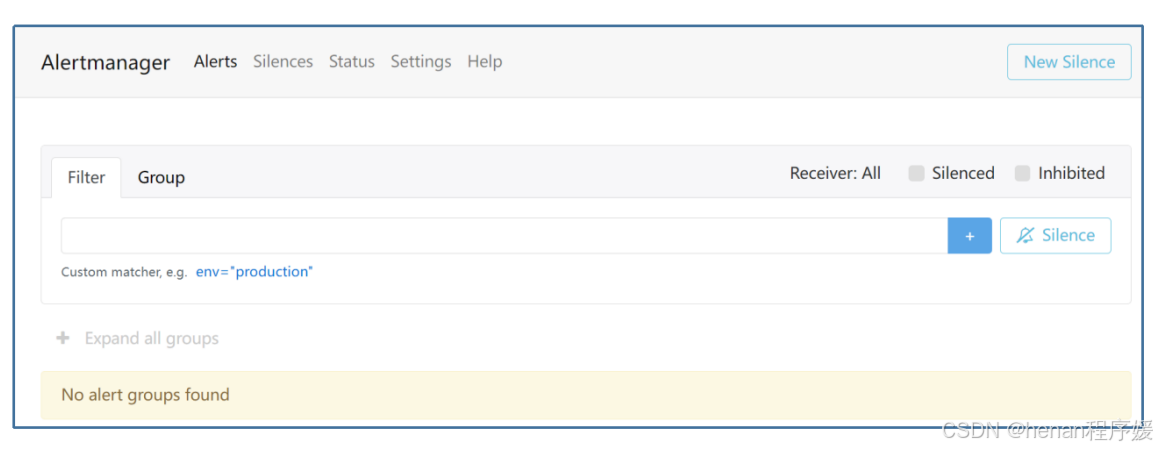
(5)将alertmanager增加到 prometheus
[root@prometheus ~]# vim /usr/local/prometheus/prometheus.yml

#修改 targets 对应的地址为 Prometheus 的地址

alerting:
  alertmanagers:
    - static configs:
        - targets:
          - 192.168.10.108:9093
(6)检查 Prometheus 配置文件的语法
[root@prometheus ~]# promtool check config /usr/local/prometheus/prometheus.yml
Checking /usr/local/prometheus/prometheus.yml
SUCCESS:1 rule files found
SUCCESS: /usr/local/prometheus/prometheus.yml is valid prometheus config file syntax
Checking /usr/local/prometheus/rules/hoststats-alert.rules
SUCCEss:3 rules found
(7)重启Prometheus
[root@prometheus ~]# systemctl restart prometheus
[root@prometheus ~]# netstat -anpt | grep 9090
tcp6       0      0 :::9090                 :::*                    LISTEN      2125/prometheus
tcp6       0      0 ::1:56030               ::1:9090                ESTABLISHED 2125/prometheus
tcp6       0      0 ::1:60742               ::1:9090                TIME_WAIT   -
tcp6       0      0 ::1:9090                ::1:56030               ESTABLISHED 2125/prometheus
tcp6       0      0 192.168.10.108:9090     192.168.10.1:55723      FIN_WAIT2   -
2.添加邮箱告警媒介
[root@prometheus ~]# vim /usr/local/alertmanager/alertmanager.yml

global:
  resolve_timeout: 5m
  smtp_smarthost: 'smtp.qq.com:25'
  smtp_from: '3315715079@qq.com'
  smtp_auth_username: '3315715079@qq.com'
  smtp_auth_password: 'sxjusuhrtidwdaej'
  smtp_hello: 'qq.com'
  smtp_require_tls: false

# 路由配置
route:
  group_by: ['alertname', 'cluster']
  group_wait: 10s
  group_interval: 10s
  repeat_interval: 10s
  receiver: 'email'

# 收信人员
receivers:
- name: 'email'
  email_configs:
  - to: '3315715079@qq.com'
    send_resolved: true

# 规则主动失效措施,如果不想用的话可以取消掉
inhibit_rules:
  - source_match:
      severity: 'critical'
    target_match:
      severity: 'warning'
    equal: ['alertname', 'dev', 'instance']
备注:
配置说明
global:
resolve timeout:5m#当告警的状态由"firing"变为"resolve"的以后还要呆多长时间,才宣布告警解除
smtp from:'xxxxxxxxxx@gq.com' #发件人邮箱
smtp_smarthost:'smtp.qq.com:25 #qq 邮箱 smtp 端口端囗
smtp auth username:xxxxxxxxx@qq.com #邮箱地址
smtp auth password:"'pcmibkzsdrfefcaha'' #邮箱安全码
smtp require tls:false #不携带证书请求
smtp hello:'qq.com'
#路由配置
route:
group_by:['alertname'] #告警应该根据那些标签进行分组
#这里匹配的是 key,当相同标签的告警一起来的时候分为同一组
group wait:5s #一组的告警发出前要等待多少秒,这个是为了把更多的告警一个批次发出去
group interval:5s #同一组的多批次告警间隔多少秒后,才能发出
repeat interval:5m #重复的告警要等待多久后才能再次发出去
receiver:email #指定路由到 email 的路由
#发送配置
receivers: #定义谁接收告警,(接收路由的告警)
- name : 'email' #名称对应 route 中的 receiver 参数
email configs: #采用邮箱机制
- to: 'XXXXXXXXX@qq.com' #发送到那里的邮箱
send resolved:true #是否发送状态恢复的邮件
[root@prometheus ~]# systemctl restart alertmanager
[root@prometheus ~]# netstat -tunlp | grep alert
tcp6       0      0 :::9094                 :::*                    LISTEN      2165/alertmanager
tcp6       0      0 :::9093                 :::*                    LISTEN      2165/alertmanager
udp6       0      0 :::9094                 :::*                                2165/alertmanager
备注:
alertmanager 进程使用的是 TCP 9094 的端口。
3.配置 prometheus,添加告警规则
[root@prometheus ~]# vim /usr/local/prometheus/prometheus.yml
rule files:
  - /usr/local/prometheus/rules/*.rules
每个告警规则有五部分组成
- 名称(alert)
- 触发条件(expr),这是个PromQL 表达式,例如 CPU 使用率超过 58%,在触发条件被满足之前,告警的状态都是 Inactive
- 持续时间(for),例如 CPU 使用率超过 58%的时间持续 30 秒,在 30 秒之内,此告警状态为 pending,超过 30 秒就进入 firing 状态
- 标签(labels),给告警打上标签,在使用时可以根据标签定位到指定告警
- 注解(annotations),对告警的描述,这些内容可以用来详明告警时刻的详细情况
(1)向 Prometheus 中添加告警规则路径
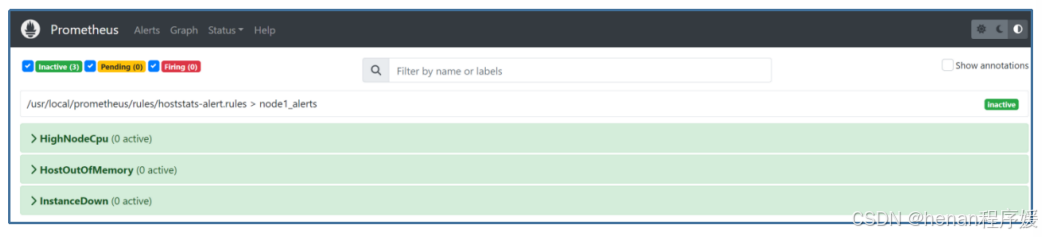
[root@prometheus ~]# mkdir /usr/local/prometheus/rules(2)添加告警规则
[root@prometheus ~# vim /usr/local/prometheus/rules/hoststats-alert,rules
groups:
- name: node1_alerts
rules:
- alert: HighNodeCpu
expr: instance:node_cpu:avg_rate1m > 10
for: 1m
labels:
severity: warning
annotations:
summary: Hgih Node CPU for 1 hour
console: This is a Test
- alert: HostOutOfMemory
expr: node_memory_MemAvailable_bytes / node_memory_MemTotal_bytes * 100 < 10
for: 2m
labels:
severity: warning
annotations:
summary: Host out of memory (instance {{ $labels.instance }})
description: "Node memory is filling up (< 10% left)\n VALUE = {{ $value }}\n LABELS = {{ $labels }}"
- alert: InstanceDown
expr: up == 0
for: 10s
labels:
severity: critical
annotations:
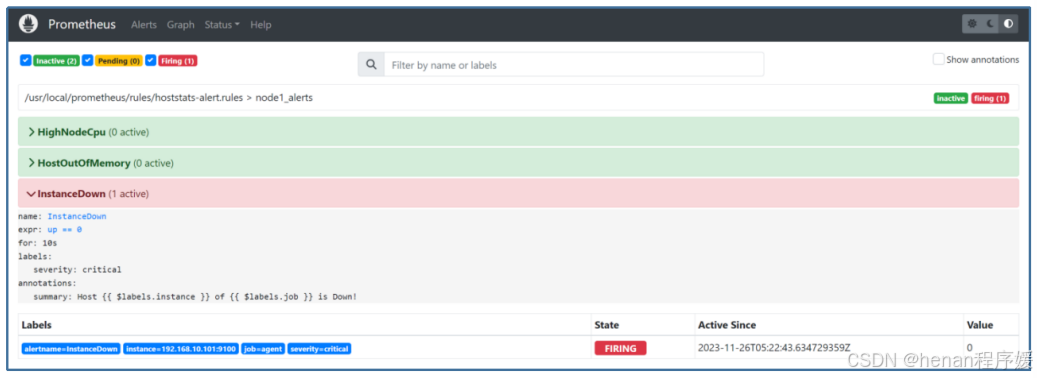
summary: Host {{ $labels.instance }} of {{ $labels.job }} is Down!该规则文件总共添加了三条规则,第一个规则是检测 CPU 负载,第二个是内存利用率的检测,第三个是主机 down 的检测。
(2)重启Prometheus
[root@prometheus rules]# systemctl restart prometheus(3)查看Prometheus 告警页面
(4)关闭掉 agent 端的主机查看 web 界面的告警信息
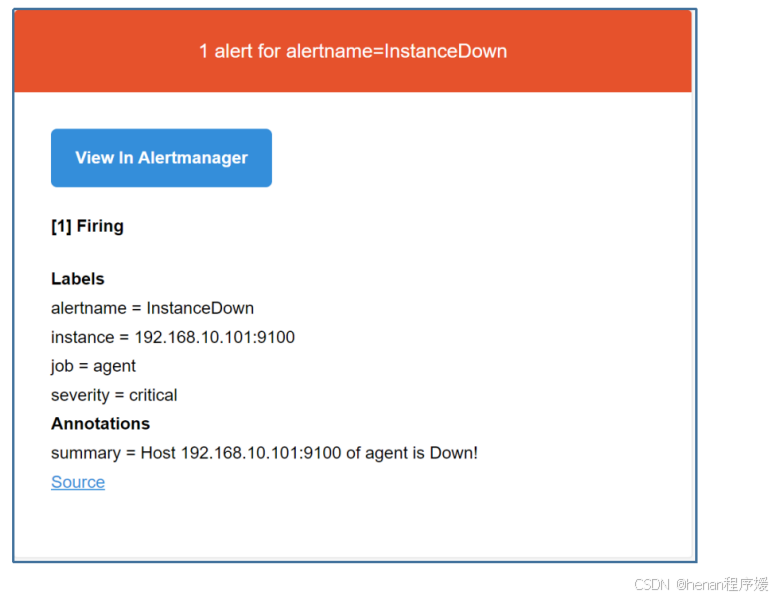
(5)查看邮箱接收到的异常告警邮件
 (6)将主机重新启动起来在


有“AI”的1024 = 2048,欢迎大家加入2048 AI社区
更多推荐


 14
14 0
0- 0


 已为社区贡献2条内容

所有评论(0)