50天50个小项目 (Vue3 + Tailwindcss V4) ✨ | QuizApp(交互式在线测验应用组件)
基于Vue 3和Tailwind CSS构建的在线测验应用(QuizApp)。该应用包含多道单选题,实现了题目展示、答案选择、提交验证、得分统计和重新开始等核心功能。技术亮点包括:使用Vue 3的<script setup>语法管理状态(ref和computed),通过v-if/v-else条件渲染不同界面,v-for动态生成选项,v-model实现双向绑定。应用数据采用quizDat
📅 我们继续 50 个小项目挑战!—— QuizApp组件
仓库地址:https://github.com/SunACong/50-vue-projects
项目预览地址:https://50-vue-projects.vercel.app/
使用 Vue 3 的 <script setup> 语法和 Tailwind CSS 实用优先的样式框架,从零开始构建一个现代化、响应式的在线测验(Quiz)应用。这个应用不仅界面美观,而且功能完整,包含了题目展示、答案选择、提交验证、得分统计和重新开始等核心功能。
准备好让你的前端技能更上一层楼了吗?让我们开始吧!✨
📝 应用目标
- 创建一个包含多道题目的交互式在线测验
- 实现单选题的答题、提交和得分逻辑
- 在所有题目完成后显示最终得分和重新开始按钮
- 使用 Vue 3 的响应式系统管理应用状态
- 利用 Tailwind CSS 快速构建现代化、响应式的 UI 界面
🔧 技术实现点
| 技术点 | 描述 |
|---|---|
Vue 3 <script setup> |
使用 ref 和 computed 创建响应式数据和计算属性 |
v-if / v-else |
根据 isQuizCompleted 状态条件渲染“问题页面”或“结果页面” |
v-for |
遍历 options 计算属性,动态生成单选题选项 |
v-model |
将单选按钮 (<input type="radio">) 与 selectedAnswer 双向绑定 |
@click 事件监听 |
监听“提交”和“重新开始”按钮的点击事件 |
:disabled |
根据 selectedAnswer 是否有值,动态禁用/启用“提交”按钮 |
computed 计算属性 |
动态计算 currentQuestion 和 options,确保视图随数据变化自动更新 |
ref 响应式变量 |
currentQuestionIndex, selectedAnswer, score, isQuizCompleted 共同管理应用状态 |
📚 核心数据与状态
1. 测验数据 (quizData)
这是一个包含所有题目信息的数组,每道题是一个对象,包含问题 (question)、四个选项 (a, b, c, d) 和正确答案 (correct)。
const quizData = [
{
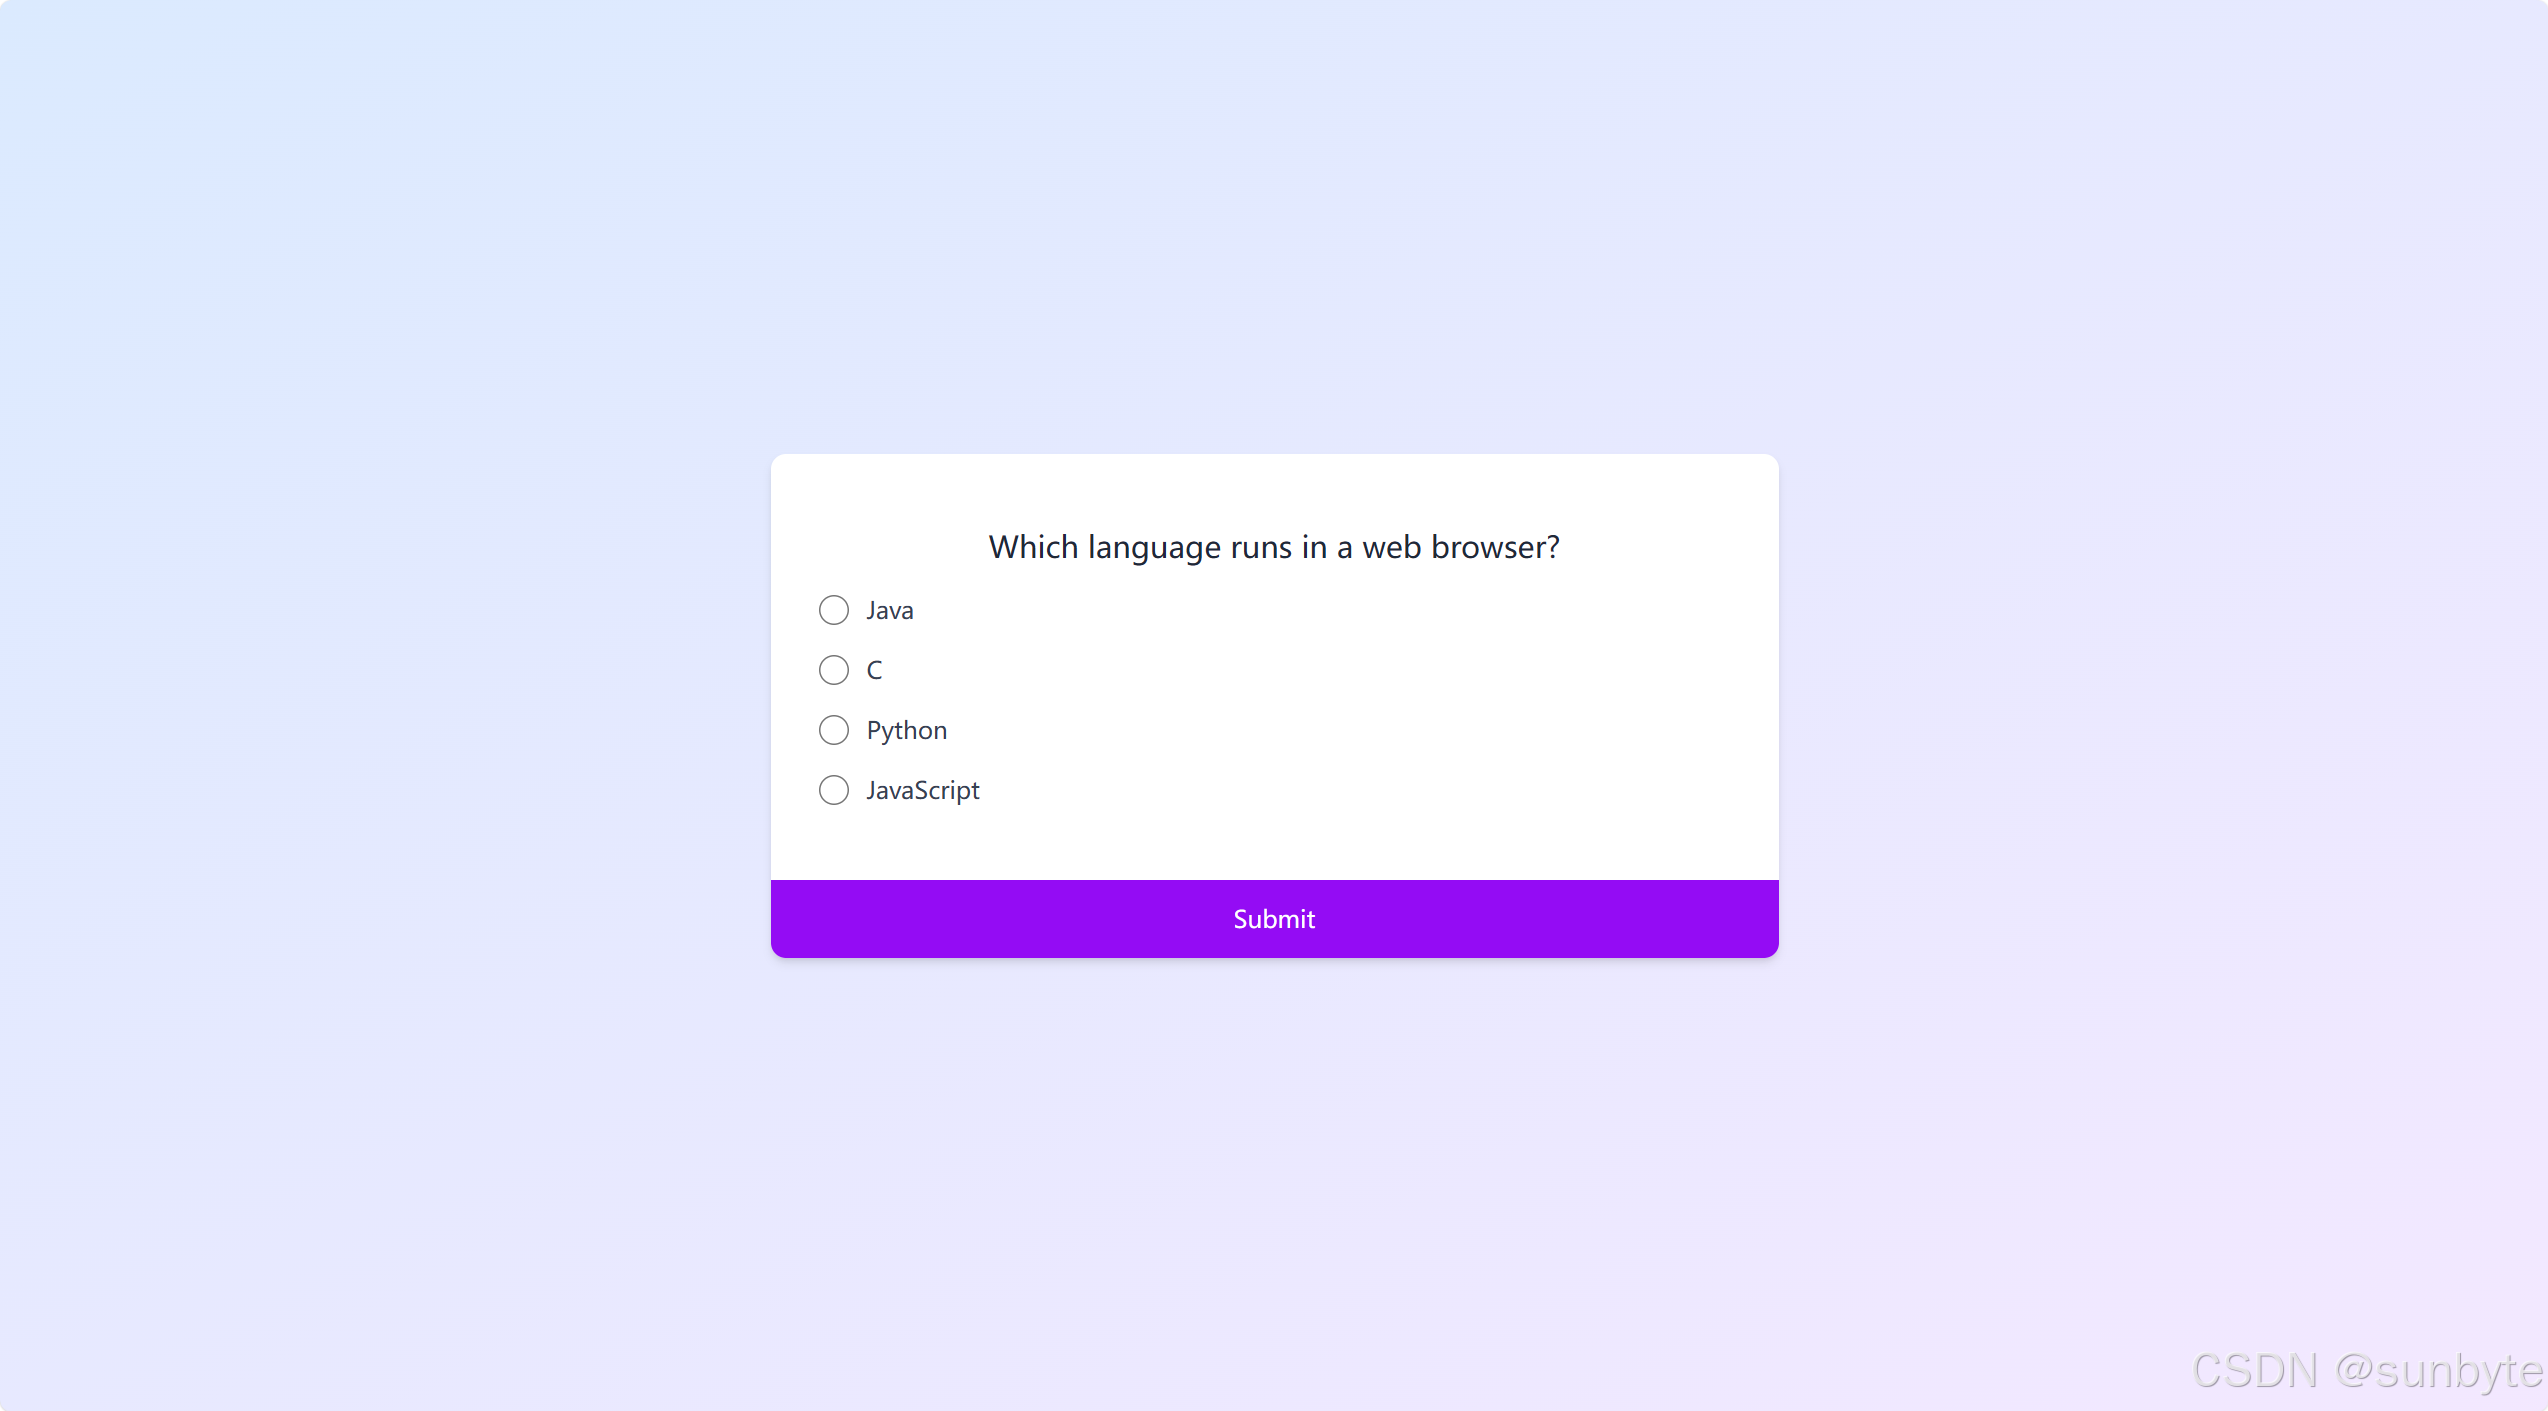
question: 'Which language runs in a web browser?',
a: 'Java',
b: 'C',
c: 'Python',
d: 'JavaScript',
correct: 'd', // 正确答案的键
},
// ... 其他题目
]
2. 响应式状态管理
| 状态变量 | 类型 | 初始值 | 作用 |
|---|---|---|---|
currentQuestionIndex |
ref(Number) |
0 |
当前显示题目的索引 |
selectedAnswer |
ref(String/null) |
null |
用户选择的答案 (a, b, c, d) |
score |
ref(Number) |
0 |
用户的当前得分 |
isQuizCompleted |
ref(Boolean) |
false |
测验是否已完成 |
3. 计算属性
| 计算属性 | 作用 |
|---|---|
currentQuestion |
返回 quizData[currentQuestionIndex.value],即当前题目对象 |
options |
将当前题目的 a, b, c, d 选项转换成 { key, text } 格式的数组,便于 v-for 渲染 |
🖌️ 组件实现
🎨 模板结构 <template>
<template>
    <div
        class="font-poppins m-0 flex min-h-screen items-center justify-center overflow-hidden bg-gradient-to-br from-blue-100 to-purple-100 p-4">
        <div
            class="w-full max-w-2xl overflow-hidden rounded-lg bg-white shadow-md transition-all duration-300">
            <!-- 问题页面 -->
            <div v-if="!isQuizCompleted" class="p-8">
                <h2 class="py-4 text-center text-xl font-medium text-gray-800">
                    {{ currentQuestion.question }}
                </h2>

                <ul class="list-none p-0">
                    <li v-for="(option, index) in options" :key="index" class="mb-4">
                        <label class="flex cursor-pointer items-center">
                            <input
                                type="radio"
                                name="answer"
                                :value="option.key"
                                v-model="selectedAnswer"
                                class="mr-3 h-5 w-5 text-purple-600" />
                            <span class="text-gray-700">{{ option.text }}</span>
                        </label>
                    </li>
                </ul>
            </div>

            <!-- 结果页面 -->
            <div v-else class="p-8 text-center">
                <h2 class="mb-6 text-2xl font-bold text-gray-800">
                    You answered {{ score }}/{{ quizData.length }} questions correctly
                </h2>
                <button
                    @click="restartQuiz"
                    class="w-full rounded-none bg-purple-600 px-6 py-3 font-medium text-white transition-colors duration-300 hover:bg-purple-700">
                    Restart
                </button>
            </div>

            <!-- 提交按钮 (仅在问题页面显示) -->
            <button
                v-if="!isQuizCompleted"
                @click="submitAnswer"
                class="w-full bg-purple-600 py-3.5 font-medium text-white transition-colors duration-300 hover:bg-purple-700"
                :disabled="!selectedAnswer">
                Submit
            </button>
        </div>
    </div>
</template>
模板结构清晰地分为三个逻辑区域:
-
外层容器 (
div):flex min-h-screen items-center justify-center:使用 Flexbox 将测验卡片在视口中水平和垂直居中。bg-gradient-to-br from-blue-100 to-purple-100:创建一个从左下到右上、由浅蓝到浅紫的渐变背景,美观且现代。font-poppins:使用 Poppins 字体(需在项目中引入)。p-4:内边距,确保在小屏幕上内容不会紧贴边缘。
-
测验卡片 (
div):max-w-2xl:限制卡片最大宽度,保证在大屏幕上不会过宽。bg-white:白色背景,与渐变背景形成对比。rounded-lg/shadow-md:圆角和阴影,提升卡片的立体感和美观度。transition-all duration-300:为卡片添加平滑的过渡效果(虽然本例中变化不明显,但为未来扩展留有余地)。
-
内容区域:
- 问题页面 (
v-if="!isQuizCompleted"):h2显示当前问题。ul和v-for遍历options,为每个选项创建一个label。label内包含input[type="radio"]和span,实现点击文字也能选中单选框的友好交互 (cursor-pointer)。v-model="selectedAnswer"将选中的值绑定到selectedAnswer。
- 结果页面 (
v-else):- 显示最终得分
You answered X/Y questions correctly。 - “重新开始”按钮调用
restartQuiz方法。
- 显示最终得分
- 提交按钮:
- 仅在问题页面显示 (
v-if="!isQuizCompleted")。 :disabled="!selectedAnswer":当selectedAnswer为null(即未选择任何选项)时,按钮为禁用状态,防止用户提交空答案。- 点击后触发
submitAnswer方法。
- 仅在问题页面显示 (
- 问题页面 (
💻 脚本逻辑 <script setup>
<script setup>
    import { ref, computed } from 'vue'

    // 测验数据
    const quizData = [
        // ... 题目数据
    ]

    // 响应式状态
    const currentQuestionIndex = ref(0)
    const selectedAnswer = ref(null)
    const score = ref(0)
    const isQuizCompleted = ref(false)

    // 计算属性 - 当前问题
    const currentQuestion = computed(() => quizData[currentQuestionIndex.value])

    // 计算属性 - 选项列表
    const options = computed(() => {
        if (!currentQuestion.value) return []
        return [
            { key: 'a', text: currentQuestion.value.a },
            { key: 'b', text: currentQuestion.value.b },
            { key: 'c', text: currentQuestion.value.c },
            { key: 'd', text: currentQuestion.value.d },
        ]
    })

    // 提交答案
    const submitAnswer = () => {
        if (!selectedAnswer.value) return // 防御性编程:未选择则不执行

        // 检查答案是否正确
        if (selectedAnswer.value === currentQuestion.value.correct) {
            score.value++
        }

        // 移动到下一题或结束测验
        if (currentQuestionIndex.value < quizData.length - 1) {
            currentQuestionIndex.value++
            selectedAnswer.value = null // 重置选择,为下一题准备
        } else {
            isQuizCompleted.value = true // 所有题目完成
        }
    }

    // 重新开始测验
    const restartQuiz = () => {
        currentQuestionIndex.value = 0
        selectedAnswer.value = null
        score.value = 0
        isQuizCompleted.value = false
    }
</script>
脚本部分是应用的“大脑”:
-
submitAnswer方法:- 首先检查是否有选择 (
selectedAnswer.value)。 - 比较
selectedAnswer与currentQuestion.correct,如果匹配则score加 1。 - 检查是否还有下一题 (
currentQuestionIndex < quizData.length - 1)。如果有,索引加 1 并重置selectedAnswer;如果没有,则将isQuizCompleted设为true,触发视图切换到结果页面。
- 首先检查是否有选择 (
-
restartQuiz方法:- 将所有状态变量重置为初始值,实现测验的重新开始。
-
computed属性的优势:currentQuestion和options会自动监听currentQuestionIndex的变化。当currentQuestionIndex改变时,这两个计算属性会立即重新计算,确保template中显示的是正确的题目和选项,无需手动更新。
🎨 Tailwind CSS 样式重点
| 类名 | 作用 |
|---|---|
font-poppins |
使用 Poppins 字体 |
m-0 / p-4 / p-8 / py-4 / px-6 / py-3.5 |
外边距和内边距 |
flex / items-center / justify-center |
Flexbox 布局 |
min-h-screen |
最小高度为视口高度 |
overflow-hidden |
隐藏溢出内容 |
bg-gradient-to-br from-blue-100 to-purple-100 |
渐变背景 |
w-full / max-w-2xl / min-w-[320px] |
宽度设置 |
overflow-hidden |
隐藏溢出 |
rounded-lg |
圆角 |
bg-white / bg-purple-600 |
背景颜色 |
shadow-md |
阴影 |
transition-all / transition-colors / duration-300 |
过渡效果和持续时间 |
text-center |
文字居中 |
text-xl / text-2xl / text-gray-800 / text-gray-700 / text-white |
文字大小和颜色 |
font-medium / font-bold / font-semibold |
字体粗细 |
list-none |
移除列表默认样式 |
cursor-pointer |
鼠标指针为手型 |
h-5 / w-5 |
固定单选框尺寸 |
text-purple-600 |
单选框选中颜色 |
mr-3 / mb-4 / mb-3 / mb-6 / mt-2 |
外边距 |
hover:bg-purple-700 |
悬停时背景色变深 |
rounded-none |
移除按钮圆角(可选) |
disabled:opacity-50 cursor-not-allowed |
(虽然代码中未显式写出,但通常会添加)禁用状态样式 |
📁 常量定义 + 组件路由
constants/index.js 添加组件预览常量:
{
        id: 46,
        title: 'QuizApp',
        image: 'https://50projects50days.com/img/projects-img/46-quiz-app.png',
        link: 'QuizApp',
    },
router/index.js 中添加路由选项:
{
        path: '/QuizApp',
        name: 'QuizApp',
        component: () => import('@/projects/QuizApp.vue'),
    },
🏁 总结
通过这篇教程,我们成功构建了一个功能完整、界面美观的在线测验应用。我们深入实践了 Vue 3 Composition API 的核心概念,如 ref、computed 和 <script setup>,并充分利用了 Tailwind CSS 的实用类来快速搭建 UI。
这个测验应用是一个很好的起点,可以在此基础上进行很多有趣的扩展:
- ✅ 加载动画:在题目切换时添加淡入淡出 (
fade-in) 或滑动动画。 - ✅ 反馈机制:提交答案后,立即显示“正确”或“错误”的反馈(例如,正确选项变绿,错误选项变红)。
- ✅ 计时器:为每道题或整个测验添加倒计时功能。
- ✅ 进度条:显示当前进度 (
Question 2 of 4)。 - ✅ 数据持久化:使用
localStorage保存用户的最高分。 - ✅ 动态数据源:从 API 接口动态获取题目数据,而不是硬编码在组件中。
- ✅ 多种题型:支持多选题、判断题等。
- ✅ 结果详情:在结果页面展示每道题的答题情况(正确/错误)。
👉 下一篇,我们将完成TestimonialBoxSwitcher组件,一个用于展示用户 testimonial(评价、推荐语)的组件,核心功能是实现不同评价内容的切换展示。。🚀
感谢阅读,欢迎点赞、收藏和分享 😊

有“AI”的1024 = 2048,欢迎大家加入2048 AI社区
更多推荐


 11
11 0
0- 0


 已为社区贡献9条内容

所有评论(0)