企业级高性能WEB服务器Nginx
什么是Nginx?
Nginx官网:http://nginx.org
Nginx的功能
通过对nginx的功能进行介绍来介绍什么是nginx
1. Web 服务器(静态资源服务)
Nginx 最基础、最常用的功能。
-
直接部署 HTML、CSS、JS、图片、视频等静态资源
-
处理静态请求速度极快,远超传统服务器
-
支持目录浏览、压缩、断点续传等
作用:做官网、博客、前端项目的直接入口。
2. 反向代理
这是 Nginx 最核心的能力之一。
-
统一接收用户请求,转发给后端服务(Java、PHP、Python、Go 等)
-
对用户隐藏后端真实地址,更安全
-
统一入口,方便管理、扩容、维护
作用:前后端分离架构的 “大门”。
3. 负载均衡
当业务量大、后端有多台服务器时:
-
Nginx 把流量均匀分发到多台后端
-
支持多种策略:轮询、加权轮询、IP 哈希、最少连接等
-
某台挂了自动剔除,保证服务高可用
作用:扛高并发、防单点故障。
4. 动静分离
把请求分成两类处理:
-
静态资源:直接由 Nginx 返回
-
动态接口:转发给后端应用
作用:提升整体速度,减轻后端压力。
5. HTTPS / SSL 配置
-
一键配置证书,实现
https访问 -
支持 HTTP/2、HTTP/3 加速
-
支持证书自动续期、安全优化
作用:网站加密、更安全、SEO 更友好。
6. 缓存加速
-
对后端接口、页面做本地缓存
-
减少重复请求,大幅提升响应速度
-
可自定义缓存时间、缓存规则
作用:高并发场景下的 “提速神器”。
7. 限流、防盗链、安全控制
-
限制单位时间内的请求数(防刷、防攻击)
-
限制并发连接
-
防盗链、黑白名单、跨域配置
-
屏蔽恶意 IP、过滤异常请求
作用:保护服务器,提升稳定性与安全性。
8. 灰度发布 / 流量切分
-
按比例把流量分到不同版本服务
-
不中断服务,平滑升级、回滚
-
适合线上无感知更新
作用:现代微服务、持续部署必备。
9. 高可用与热部署
-
支持 master-worker 多进程模型
-
配置文件热加载,不中断业务
-
配合 Keepalived 实现双机高可用
作用:保证服务 7×24 小时稳定运行。
Nginx的进程与架构
Nginx的高并发不仅得益于他的进程架构还有每个woker进程采用的I/O模型epoll实现单个子进程处理高并发请求。
Nginx是多进程组织模型,而且是一个由Master主进程和Worker工作进程组成。
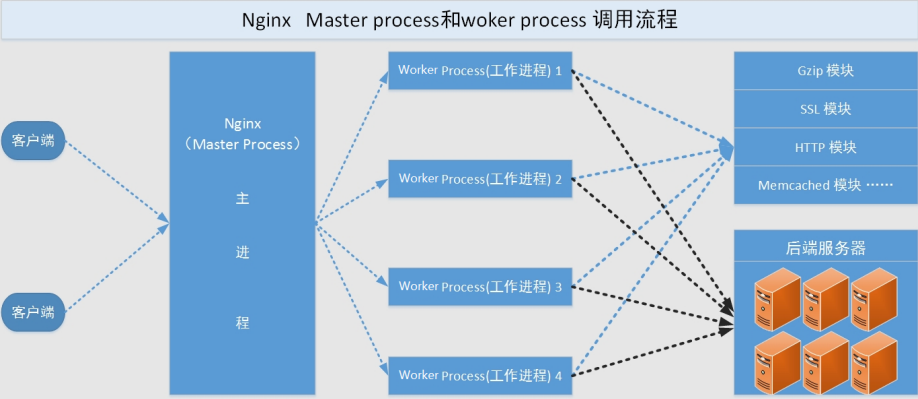
主进程(master process)的功能:
-
对外接口:接收外部的操作(信号)
-
对内转发:根据外部的操作的不同,通过信号管理 Worker
-
监控:监控 worker 进程的运行状态,worker 进程异常终止后,自动重启 worker 进程
-
读取Nginx 配置文件并验证其有效性和正确性
-
建立、绑定和关闭socket连接
-
按照配置生成、管理和结束工作进程
-
接受外界指令,比如重启、升级及退出服务器等指令
-
不中断服务,实现平滑升级,重启服务并应用新的配置
-
开启日志文件,获取文件描述符
-
不中断服务,实现平滑升级,升级失败进行回滚处理
-
编译和处理perl脚本
工作进程(worker process)的功能:
-
所有 Worker 进程都是平等的
-
实际处理:网络请求,由 Worker 进程处理
-
Worker进程数量:一般设置为核心数,充分利用CPU资源,同时避免进程数量过多,导致进程竞争 CPU资源
-
增加上下文切换的损耗
-
接受处理客户的请求
-
将请求依次送入各个功能模块进行处理
-
I/O调用,获取响应数据
-
与后端服务器通信,接收后端服务器的处理结果
-
缓存数据,访问缓存索引,查询和调用缓存数据
-
发送请求结果,响应客户的请求
-
接收主程序指令,比如重启、升级和退出等
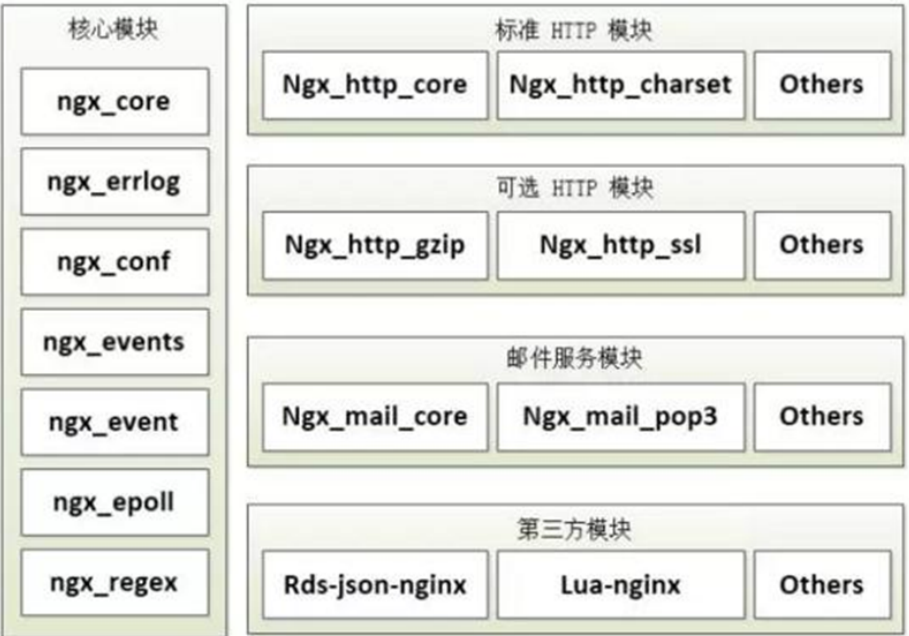
Nginx模块介绍
nginx 有多种模块
-
核心模块:是 Nginx 服务器正常运行必不可少的模块,提供错误日志记录 、配置文件解析 、事件 驱动机制 、进程管理等核心功能
-
标准HTTP模块:提供 HTTP 协议解析相关的功能,比如: 端口配置 、 网页编码设置 、 HTTP响应头设置 等等
-
可选HTTP模块:主要用于扩展标准的 HTTP 功能,让 Nginx 能处理一些特殊的服务,比如: Flash 多媒体传输 、解析 GeoIP 请求、 网络传输压缩 、 安全协议 SSL 支持等
-
邮件服务模块:主要用于支持 Nginx 的 邮件服务 ,包括对 POP3 协议、 IMAP 协议和 SMTP协议的支持
-
Stream服务模块: 实现反向代理功能,包括TCP协议代理
-
第三方模块:是为了扩展 Nginx 服务器应用,完成开发者自定义功能,比如: Json 支持、 Lua 支持等
网络I/O模型
在了解模型之前先了解网络I/O的处理过程
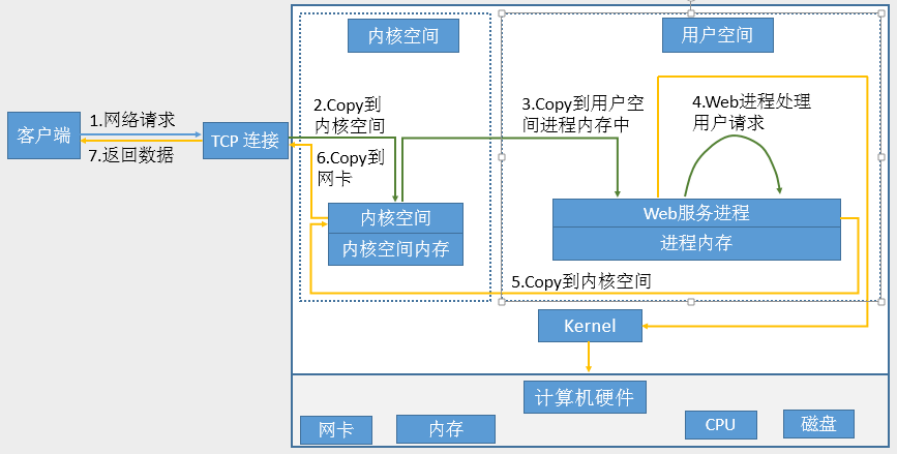
网络I/O 处理过程
-
获取请求数据,客户端与服务器建立连接发出请求,服务器接受请求(1-3)
-
构建响应,当服务器接收完请求,并在用户空间处理客户端的请求,直到构建响应完成(4)
-
返回数据,服务器将已构建好的响应再通过内核空间的网络 I/O 发还给客户端(5-7)
不论磁盘和网络I/O
I/O 统一分为两个阶段:
阶段 1:等待数据就绪(内核等待网络包)
阶段 2:数据从内核 → 用户空间(拷贝)
一次网络 I/O,本质分两步:数据从网络到内核(等待就绪)、数据从内核到用户进程(拷贝)。不同 I/O 模型,只是这两步的等待 / 通知方式不同。
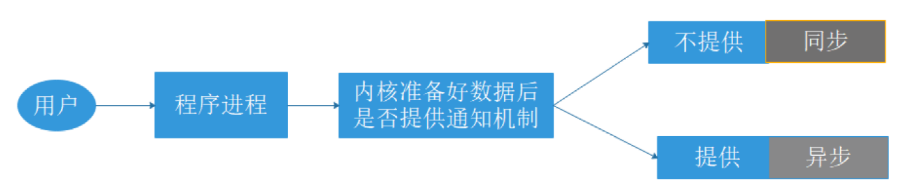
同步与异步
同步/异步:关注的是消息通信机制,即调用者在等待一件事情的处理结果时,被调用者是否提供完成状 态的通知。
-
同步:synchronous,被调用者并不提供事件的处理结果相关的通知消息,需要调用者主动询问事 情是否处理完成
-
异步:asynchronous,被调用者通过状态、通知或回调机制主动通知调用者被调用者的运行状态
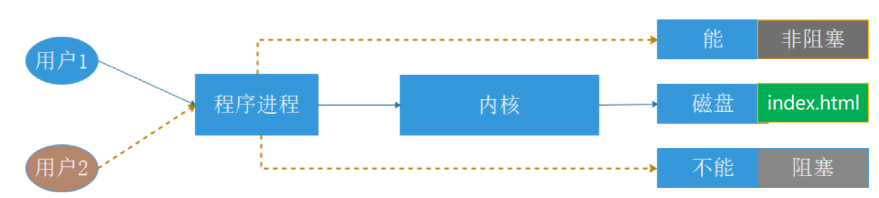
阻塞与非阻塞
阻塞/非阻塞:关注调用者在等待结果返回之前所处的状态
-
阻塞:blocking,指IO操作需要彻底完成后才返回到用户空间,调用结果返回之前,调用者被挂 起,干不了别的事情。
-
非阻塞:nonblocking,指IO操作被调用后立即返回给用户一个状态值,而无需等到IO操作彻底完 成,在最终的调用结果返回之前,调用者不会被挂起,可以去做别的事情。
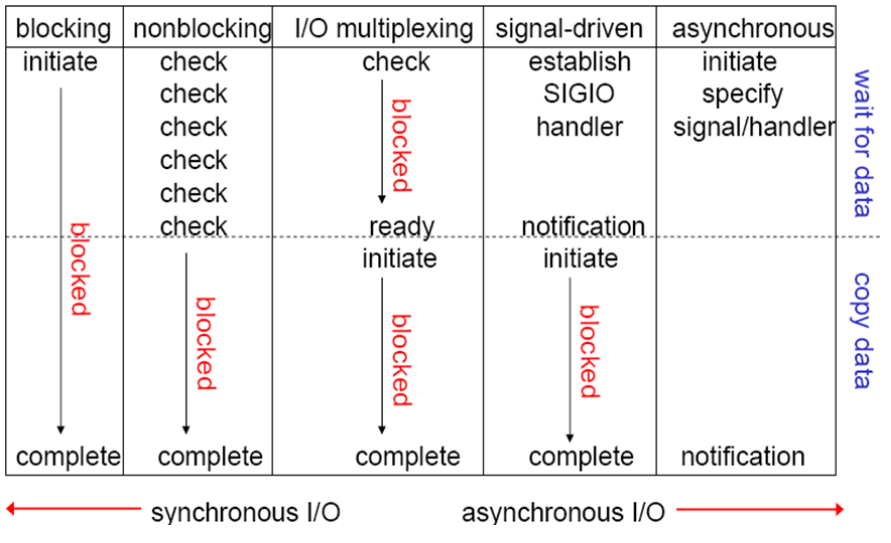
网络I/O模型有五种,五种都是基于阻塞/非阻塞与同步/异步实现;
阻塞型、非阻塞型、复用型、信号驱动型、异步;
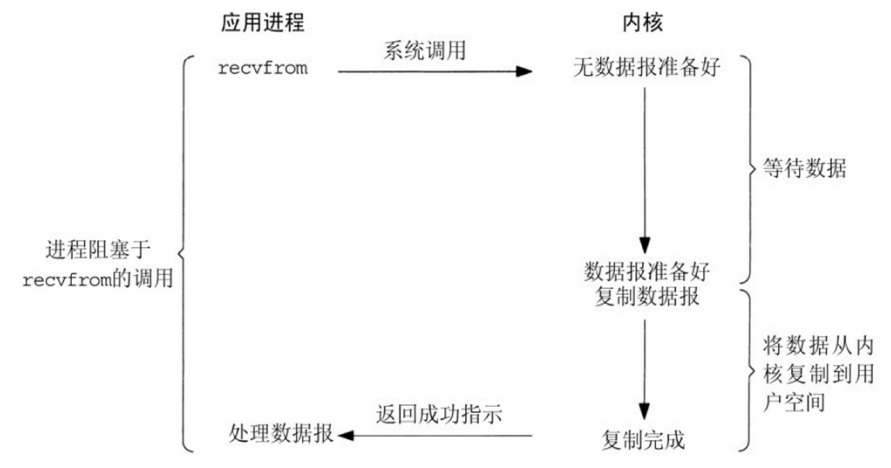
阻塞 I/O(Blocking I/O)
原理
调用 read/recv 后进程挂起,等内核数据就绪 + 拷贝完成才返回,全程阻塞。
大白话解读
“一件事没干完,啥也不干就死等”。进程发起 I/O 请求后,就暂停干活,直到数据准备好、拷贝完,才继续执行。
生活情景(点餐)
你去奶茶店点单,下单后站在柜台前一动不动,既不玩手机也不逛店,就等店员做好奶茶、递给你,全程盯着,啥别的事都不干。
优点
-
编程最简单,写代码不用考虑 “等不等” 的问题
-
系统开销小,不用频繁切换任务
缺点
-
效率极低,单线程只能处理一个请求(比如一个店员只能服务一个死等的顾客)
-
并发差,想服务多人就得雇很多店员(多进程 / 多线程),成本高
典型软件
早期 telnet、简单 echo 服务器、新手写的小脚本
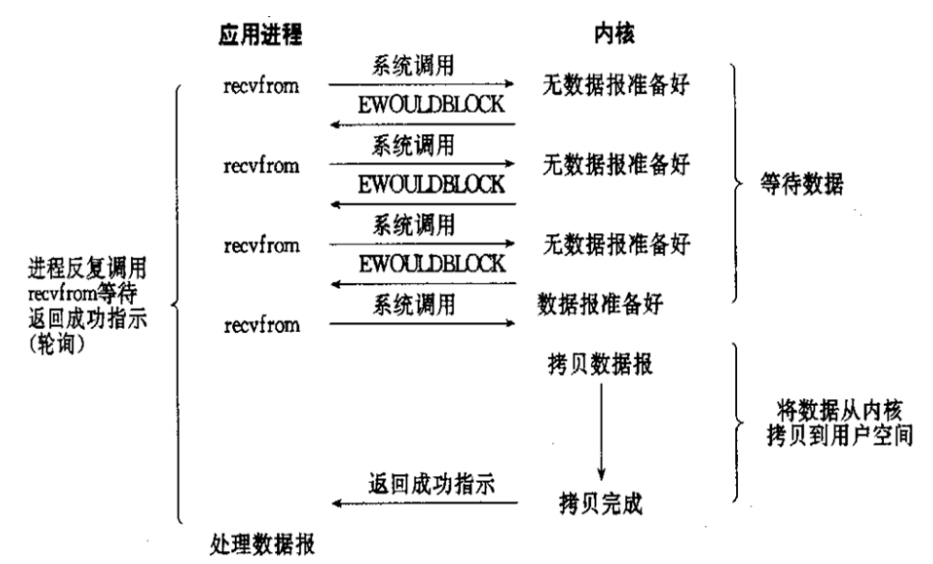
非阻塞 I/O(Non-blocking I/O)
原理
socket 设 O_NONBLOCK,调用 read 时数据未就绪就立刻返回 “没好”,进程需反复问(轮询)。
大白话解读
“不等,但会反复问”。进程发起 I/O 后,内核说 “没好” 就立刻走,过一会儿又回来问 “好了没?”,循环往复,直到数据就绪才拷贝。
生活情景(取快递)
你想拿快递,到驿站门口问 “我的快递到了吗?”,驿站说 “没到”,你不傻等,转头去旁边便利店买水,2 分钟后又回来问,5 分钟后再问…… 直到问到 “到了”,才拿快递。
优点
-
不会卡在一个 I/O 上,单线程能兼顾多个请求
-
不用一直挂起,能抽空做别的事
缺点
-
反复 “问”(轮询)特别耗精力(CPU),空转严重
-
高并发时越问越慢,纯属 “瞎忙活”
典型软件
极少直接用,仅作为 I/O 多路复用的基础、简单实时小工具
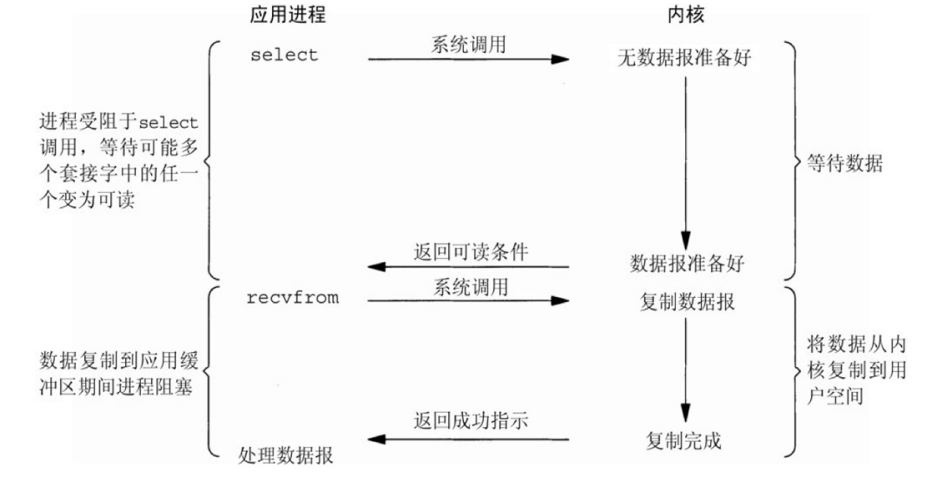
I/O 多路复用(I/O Multiplexing)
原理
用 select/poll/epoll 阻塞等待多个 fd 就绪,内核通知 “哪些好了”,再逐个处理拷贝。
| 特性 | select | poll | epoll |
|---|---|---|---|
| 最大连接数 | 有限(默认 1024) | 无上限 | 无上限 |
| 遍历方式 | 全量遍历 O (n) | 全量遍历 O (n) | 回调就绪 O (1) |
| 用户态→内核态拷贝 | 每次都全量拷贝 | 每次都全量拷贝 | 仅注册时拷贝,mmap 共享 |
| 触发模式 | 仅水平触发 LT | 仅水平触发 LT | LT + ET(边缘触发) |
| 性能(高并发) | 差 | 差 | 极高 |
| 跨平台 | 最好(全平台) | 较好(类 Unix) | Linux 专用 |
| 典型使用 | 老旧程序、简单场景 | 几乎不用 | Nginx/Redis/ 高并发服务器标配 |
大白话解读
“找个专人盯着所有事,谁好就处理谁”。进程不直接问每个 I/O,而是交给 “监工”(epoll/select),监工盯着所有请求,哪个数据就绪了,就告诉进程 “这个好了,快去处理”,进程只处理就绪的,其余继续让监工盯着。
生活情景(餐厅点餐)
餐厅老板(进程)不亲自盯每桌客人,雇了个大堂经理(epoll)。经理盯着所有桌:
-
A 桌喊 “要下单”(数据就绪),经理立刻告诉老板;
-
老板去给 A 桌下单(拷贝数据),同时经理继续盯 B/C/D 桌;
-
B 桌喊 “要结账”,经理再通知老板,全程老板只处理 “有需求” 的桌。
优点
-
单线程能管上千上万个请求(解决 C10K 问题)
-
不用反复轮询,CPU 开销极低
-
Linux 下 epoll 是高性能网络的 “标配”
缺点
-
编程比阻塞 I/O 复杂一点
-
仍是同步 I/O:拷贝数据时还是会短暂阻塞(但已经很快了)
典型软件
Nginx、Redis、Memcached、HAProxy、Go 网络底层、Java Netty
信号驱动 I/O(Signal-Driven I/O)
原理
进程注册信号处理函数,数据就绪时内核发 SIGIO 信号通知,进程再去拷贝数据。
大白话解读
“留个联系方式,好了叫我”。进程发起 I/O 后,告诉内核 “数据好了给我发个短信(信号)”,然后去干别的;内核数据就绪后,发信号通知进程,进程收到信号再去拷贝数据。
生活情景(取外卖)
你点了外卖,告诉骑手 “送到楼下给我打个电话(信号)”,然后你在家追剧(干别的);骑手到楼下打电话,你接完电话,下楼取外卖(拷贝数据)。
优点
-
不用等、不用反复问,CPU 利用率高
-
单线程能处理多个请求
缺点
-
“短信(信号)” 可能丢、可能乱序(比如同时收到 10 个信号,分不清先后)
-
高并发时容易出问题,调试难
-
不如 epoll 稳定好用
-
且在处理其他事(追剧),如果信号(短信)到了会中断手头的事(追加)
典型软件
极少用于生产环境,仅简单嵌入式、小众实时场景
异步 I/O(Asynchronous I/O,AIO)
原理
调用 aio_read 后立刻返回,内核全程包办 “等数据 + 拷贝数据”,完成后通知进程。
大白话解读
“全包给别人,完事通知我”。进程发起 I/O 后,啥都不管了,内核自己等数据、自己把数据拷贝到进程内存里,全部搞定后,告诉进程 “活干完了,你用数据吧”,全程进程不阻塞、不干活。
生活情景(寄快递)
你要寄快递,叫了顺丰的 “上门取件 + 打包 + 发货” 全包服务:
-
你打个电话(发起 I/O),挂了就去上班(干别的);
-
快递员自己上门取件、打包、送到快递站(内核等数据 + 拷贝数据);
-
顺丰 App 给你发消息 “快递已发出”(内核通知),你只用看结果就行,全程没管过快递的事。
优点
-
全程不阻塞,I/O 和计算完全不冲突,效率理论最高
-
真正的 “异步”,并发能力拉满
缺点
-
编程模型复杂,写代码、调试都难
-
Linux 原生 AIO 生态不如 epoll 成熟
-
网络场景用得少,主要用于磁盘 I/O
典型软件
MySQL InnoDB 异步磁盘 I/O、高性能文件存储系统、Windows IOCP(等价思想)
五种IO对比
| 模型 | 等待就绪 | 数据拷贝 | 同步 / 异步 | 单线程并发能力 | CPU 开销 | 特点 |
|---|---|---|---|---|---|---|
| 阻塞 I/O | 阻塞 | 阻塞 | 同步 | 极低 | 低 | 全程阻塞 |
| 非阻塞 I/O | 立即返回(需轮询) | 阻塞 | 同步 | 中 | 极高 | 轮询耗 CPU |
| I/O 多路复用 | 阻塞在多路函数 | 阻塞 | 同步 | 极高(epoll) | 低 | 高并发首选 |
| 信号驱动 I/O | 不阻塞,信号通知 | 阻塞 | 同步 | 高 | 低 | 信号易出问题 |
| 异步 I/O(AIO) | 不阻塞 | 不阻塞(内核完成) | 异步 | 极高 | 最低 | 全程不阻塞、最省心 |
Nginx源码编译安装
Nginx安装可以使用dnf或源码安装,但是推荐使用源码编译安装
-
dnf的版本比较旧
-
编译安装可以更方便自定义相关路径
-
使用源码编译可以自定义相关功能,更方便业务的上的使用
1.下载源码软件
[root@nginx ~]# wget https://nginx.org/download/nginx-1.28.1.tar.gz
2.解压
[root@nginx ~]# tar zxf nginx-1.28.1.tar.gz
[root@nginx ~]# cd nginx-1.28.1/
[root@nginx nginx-1.28.1]# ls
auto     CHANGES.ru          conf       contrib          html     man        SECURITY.md
CHANGES  CODE_OF_CONDUCT.md  configure  CONTRIBUTING.md  LICENSE  README.md  src
3.检测环境生成Makefile
pcre-devel #正则表达式开发库 openssl-devel #ssl开发库 zlib-devel #数据压缩库 #在编译过程会报出缺少依赖,根据提示安装需要的依赖 [root@nginx ~]# dnf install gcc pcre-devel zlib-devel openssl-devel -y #选择要添加使用的模块 [root@nginx nginx-1.28.1]# ./configure --prefix=/usr/local/nginx \ > --user=nginx \ > --group=nginx \ > --with-http_ssl_module \ > --with-http_v2_module \ > --with-http_realip_module \ > --with-http_stub_status_module \ > --with-http_gzip_static_module \ > --with-pcre \ > --with-stream \ > --with-stream_ssl_module \ > --with-stream_realip_module
4.编译
-
make 编译源码,生成目标文件在源码编译目录内
-
make install 复制文件到系统目录,完成安装
[root@nginx nginx-1.28.1]# make
[root@nginx nginx-1.28.1]# make install
补充
在编译安装前把debug下面那行注释了可以使编译出来的nginx更小
[root@nginx nginx-1.28.1]# vim auto/cc/gcc
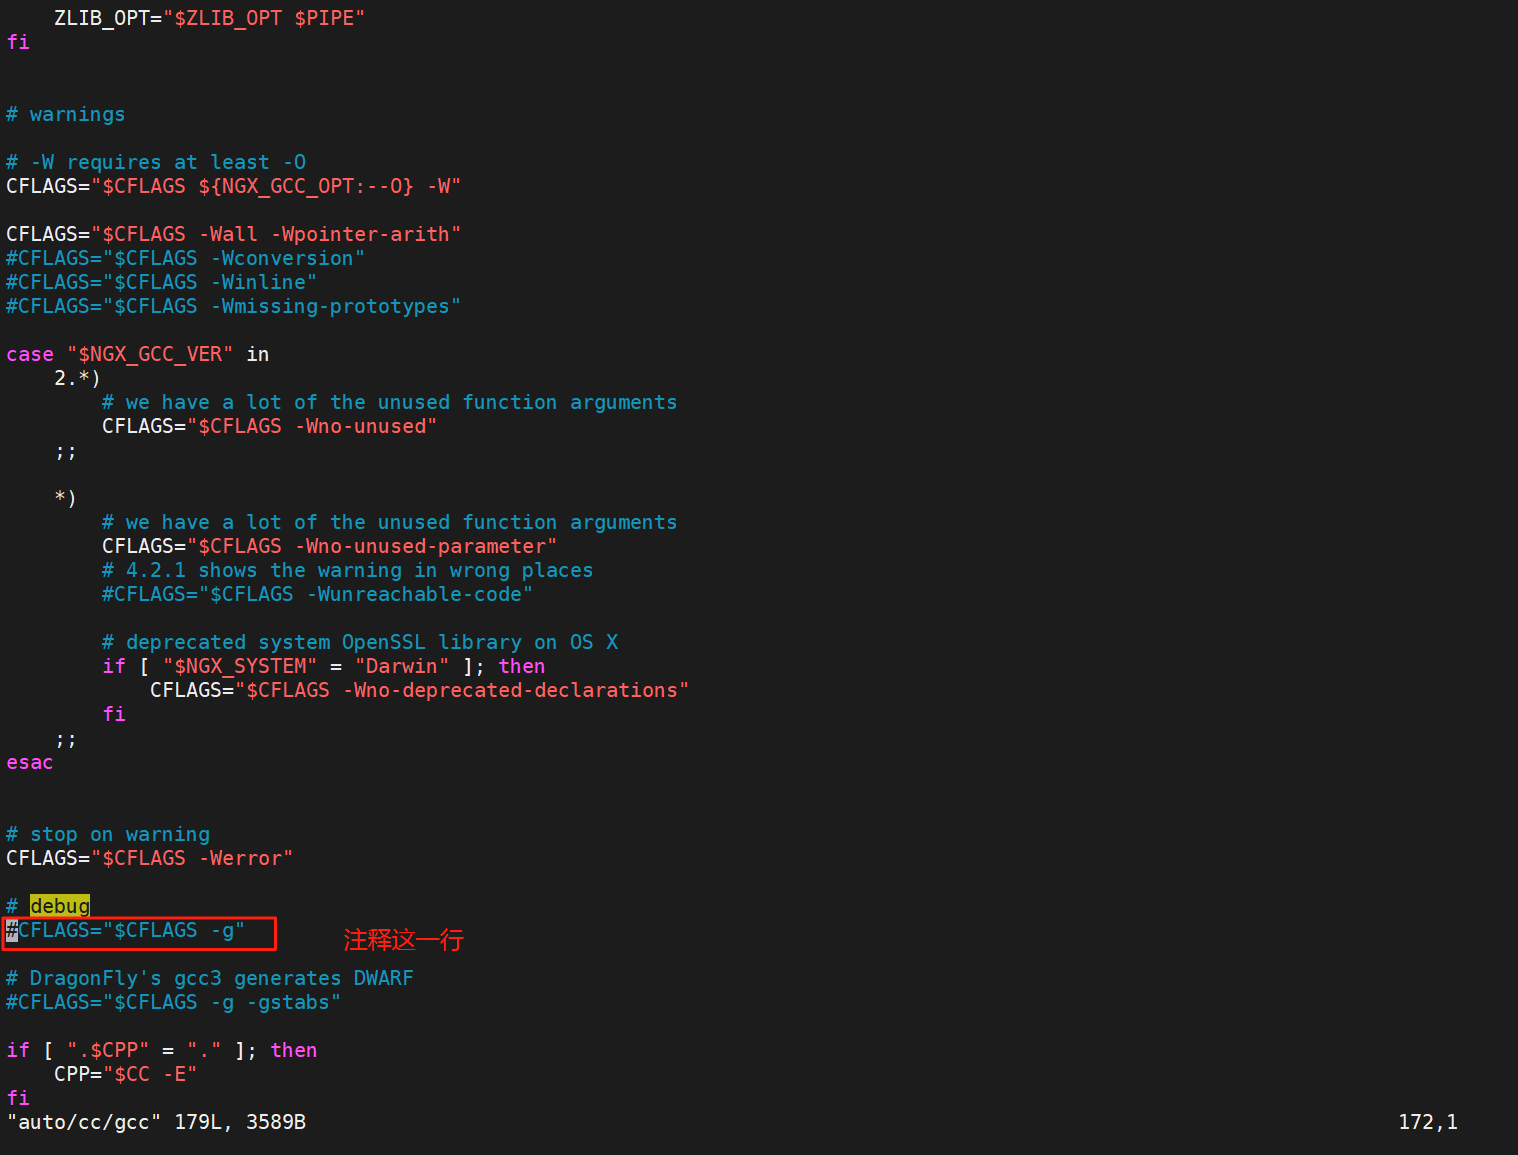
#编译完成后查看大小,原来5.5M左右
[root@nginx objs]# du -sh nginx
1.3M    nginx
5.启动nginx
创建运行用户
[root@nginx]# useradd -s /sbin/nologin -M nginx
设定环境变量
[root@nginx sbin]# vim ~/.bash_profile export PATH=$PATH:/usr/local/nginx/sbin [root@nginx sbin]# source ~/.bash_profile
启动并测试
[root@nginx ~]# nginx [root@nginx ~]# ps aux | grep nginx root 9908 0.0 0.0 11148 2072 ? Ss 13:42 0:00 nginx: master process ./nginx nginx 9909 0.0 0.1 15424 5400 ? S 13:42 0:00 nginx: worker process root 9996 0.0 0.0 6636 2176 pts/0 S+ 14:37 0:00 grep --color=auto nginx [root@nginx ~]# echo fjwyyy > /usr/local/nginx/html/index.html [root@nginx ~]# curl 172.25.254.100 fjwyyy
平滑升级与回滚
在进行之前先了解这三组信号的用途
| 信号 | 核心用途 | 作用对象 | 执行后关键结果 | 核心特性 |
|---|---|---|---|---|
| kill -USR2 | 启动新版本升级 | 旧 Nginx 主进程 | 新旧进程共存,新进程接管新请求 | 升级启动,不中断服务 |
| kill -WINCH | 平滑切流到新版本 | 旧 Nginx 主进程 | 旧 worker 优雅退出,新进程独占请求 | 切流核心,保留回滚兜底 |
| kill -HUP | 紧急回滚到旧版本 | 旧 Nginx 主进程 | 旧主进程重启旧 worker,接管所有请求 | 回滚核心,秒级切回,无中断 |
先下载高版本的nginx
[root@nginx ~]# wget https://nginx.org/download/nginx-1.29.4.tar.gz
隐藏版本并自定义名称
#编译nginx隐藏版本 [root@nginx ~]# tar zxf nginx-1.29.4.tar.gz [root@nginx ~]# cd nginx-1.29.4/src/core/ [root@nginx core]# vim nginx.h #define nginx_version 1029004 #define NGINX_VERSION "" #define NGINX_VER "牛逼哈拉少/" NGINX_VERSION #文件编辑完成后进行源码编译即可 [root@nginx core]# cd ../../ [root@nginx nginx-1.29.4]# ./configure --prefix=/usr/local/nginx --user=nginx --group=nginx --with-http_ssl_module --with-http_v2_module --with-http_realip_module --with-http_stub_status_module --with-http_gzip_static_module --with-pcre --with-stream --with-stream_ssl_module --with-stream_realip_module [root@nginx nginx-1.29.4]# make [root@nginx nginx-1.29.4]# cd objs/ [root@nginx objs]# ls autoconf.err nginx ngx_auto_config.h ngx_modules.c src Makefile nginx.8 ngx_auto_headers.h ngx_modules.o [root@Nginx objs]# cd /usr/local/nginx/sbin/ [root@Nginx sbin]# ls nginx #对旧版本进行备份 [root@nginx sbin]# cp nginx nginx.old [root@Nginx sbin]# \cp -f /root/nginx-1.29.4/objs/nginx /usr/local/nginx/sbin/nginx
升级
[root@nginx sbin]# ls /usr/local/nginx/logs/ access.log error.log nginx.pid [root@nginx sbin]# ps aux | grep nginx root 5577 0.0 0.0 11148 2072 ? Ss 10:19 0:00 nginx: master process /usr/local/nginx/sbin/nginx nginx 5578 0.0 0.1 15424 5016 ? S 10:19 0:00 nginx: worker process root 5649 0.0 0.0 6636 2176 pts/0 S+ 10:38 0:00 grep --color=auto nginx #开启新版本的进程,生成就进程pid的oldbin [root@nginx sbin]# kill -USR2 5577 [root@nginx sbin]# ps aux | grep nginx root 5577 0.0 0.0 11148 2456 ? Ss 10:19 0:00 nginx: master process /usr/local/nginx/sbin/nginx nginx 5578 0.0 0.1 15424 5016 ? S 10:19 0:00 nginx: worker process root 5650 0.0 0.1 11188 6656 ? S 10:38 0:00 nginx: master process /usr/local/nginx/sbin/nginx nginx 5651 0.0 0.1 15464 5280 ? S 10:38 0:00 nginx: worker process root 5653 0.0 0.0 6636 2176 pts/0 S+ 10:38 0:00 grep --color=auto nginx [root@nginx sbin]# ls /usr/local/nginx/logs/ access.log error.log nginx.pid nginx.pid.oldbin [root@nginx sbin]# nginx -V nginx version: 牛逼哈拉少/ ...... #回收旧版本的进程 [root@nginx sbin]# kill -WINCH 5577 [root@nginx sbin]# ps aux | grep nginx root 5577 0.0 0.0 11148 2456 ? Ss 10:19 0:00 nginx: master process /usr/local/nginx/sbin/nginx root 5650 0.0 0.1 11188 6656 ? S 10:38 0:00 nginx: master process /usr/local/nginx/sbin/nginx nginx 5651 0.0 0.1 15464 5280 ? S 10:38 0:00 nginx: worker process root 5660 0.0 0.0 6636 2176 pts/0 S+ 10:40 0:00 grep --color=auto nginx
回滚
[root@nginx sbin]# cp nginx nginx.new -p [root@nginx sbin]# \cp nginx.old nginx -pf [root@nginx sbin]# ps aux | grep nginx root 5577 0.0 0.0 11148 2456 ? Ss 10:19 0:00 nginx: master process /usr/local/nginx/sbin/nginx root 5650 0.0 0.1 11188 6656 ? S 10:38 0:00 nginx: master process /usr/local/nginx/sbin/nginx nginx 5651 0.0 0.1 15464 5280 ? S 10:38 0:00 nginx: worker process root 5679 0.0 0.0 6636 2176 pts/0 S+ 10:41 0:00 grep --color=auto nginx #唤醒旧版本的进程 [root@nginx sbin]# kill -HUP 5577 [root@nginx sbin]# nginx -V nginx version: nginx/1.28.1 ...... #回收新版本存在的进程 [root@nginx sbin]# kill -WINCH 5650 [root@nginx sbin]# ps aux | grep nginx root 5577 0.0 0.0 11148 2456 ? Ss 10:19 0:00 nginx: master process /usr/local/nginx/sbin/nginx root 5650 0.0 0.1 11188 6656 ? S 10:38 0:00 nginx: master process /usr/local/nginx/sbin/nginx nginx 5680 0.0 0.1 15424 5016 ? S 10:41 0:00 nginx: worker process root 5683 0.0 0.0 6636 2176 pts/0 S+ 10:42 0:00 grep --color=auto nginx #如果旧版本的进程没用的话就可以kill -9删除了 [root@nginx sbin]# kill -9 5650
编写Nginx启动文件systemd
#百度搜索模板 systemd site:nginx.org #搜索内容 site:搜索网址 [root@nginx ~]# cd /lib/systemd/system [root@nginx system]# vim nginx.service [Unit] Description=The NGINX HTTP and reverse proxy server After=syslog.target network.target remote-fs.target nss-lookup.target [Service] Type=forking PIDFile=/usr/local/nginx/logs/nginx.pid #指定nginx启动的pid ExecStartPre=/usr/local/nginx/sbin/nginx -t #指定nginx -t检查配置文件命令 ExecStart=/usr/local/nginx/sbin/nginx #指定nginx启动命令 ExecReload=/bin/kill -s HUP $MAINPID ExecStop=/bin/kill -s QUIT $MAINPID PrivateTmp=true [Install] WantedBy=multi-user.target #使编写的配置生效 [root@nginx system]# systemctl daemon-reload #在启动时要确保nginx已经关闭不然会冲突导致报错 [root@nginx system]# systemctl enable --now nginx
Nginx配置文件参数详解
1.nginx主配置文件说明
主配置文件结构:四部分
main block:主配置段,即全局配置段
#事件驱动相关的配置
event {
...
}
#http/https 作为web服务器相关配置段
http {
...
}
#默认配置文件不包括下面两个部分
#mail 作为邮件服务器相关配置段
mail {
...
}
#stream 反向代理相关配置段
stream {
...
}
2.全局配置块参数
默认打开全局配置参数
user nginx nginx; #启动Nginx工作进程的用户和组
worker_processes [number | auto]; #启动Nginx工作进程的数量,一般设为和CPU核心数相同,可以设置为auto同步cpu核心数
worker_cpu_affinity 00000001 00000010 00000100 00001000 | auto ; #将worker进程与cpu核数绑定,避免进程在不同核心上来回切换造成消耗
#示例
CPU MASK: 00000001:0号CPU
00000010:1号CPU
10000000:7号CPU
worker_cpu_affinity 0001 0010 0100 1000;第0号---第3号CPU
worker_cpu_affinity 0101 1010;
worker_rlimit_nofile 100000; # 所有worker最多打开100000个文件描述符
# 最好与ulimit -n 或者limits.conf的值保持一致
#错误日志记录配置,语法:error_log file [debug | info | notice | warn | error | crit
| alert | emerg]
#error_log logs/error.log;
#error_log logs/error.log notice;
#error_log logs/error.log info;
#pid文件保存路径
#pid logs/nginx.pid;
示例:cpu与核心绑定示例
worker_processes auto; worker_cpu_affinity 01 10; [root@nginx ~]# cat /proc/cpuinfo cpu cores : 6 [root@nginx ~]# vim /usr/local/nginx/conf/nginx.conf worker_processes auto; worker_cpu_affinity 000001 000010 000100 001000 010000 100000; [root@nginx ~]# nginx -t [root@nginx ~]# nginx -s reload [root@nginx ~]# ps aux | grep nginx root 881 0.0 0.0 11148 3352 ? Ss 15:18 0:00 nginx: master process /usr/local/nginx/sbin/nginx nginx 1450 0.0 0.1 15456 5132 ? S 15:20 0:00 nginx: worker process nginx 1451 0.0 0.1 15456 5004 ? S 15:20 0:00 nginx: worker process nginx 1452 0.0 0.1 15456 5132 ? S 15:20 0:00 nginx: worker process nginx 1453 0.0 0.1 15456 5004 ? S 15:20 0:00 nginx: worker process nginx 1454 0.0 0.1 15456 5004 ? S 15:20 0:00 nginx: worker process nginx 1455 0.0 0.1 15456 5004 ? S 15:20 0:00 nginx: worker process root 1457 0.0 0.0 6636 2304 pts/0 S+ 15:20 0:00 grep --color=auto nginx [root@nginx ~]# ps axo pid,cmd,psr | grep nginx 881 nginx: master process /usr/ 4 1450 nginx: worker process 0 1451 nginx: worker process 1 1452 nginx: worker process 2 1453 nginx: worker process 3 1454 nginx: worker process 4 1455 nginx: worker process 5 1459 grep --color=auto nginx 3
3.events块配置参数
[root@nginx ~]# vim /usr/local/nginx/conf/nginx.conf
events {
worker_connections 10000; #单个woker工作进程最大并发数
use epoll; #使用epoll机制来实现高并发
#Nginx支持众多的事件驱动,
#比如:select、poll、epoll,只能设置在events模块中设置
accept_mutex on; #同一时刻一个请求访问只激活一个work进程赖处理
#不开启则一个请求到来唤醒所有worker,称为“惊群”
#默认为off,on为开启
multi_accept on; #把数据缓存多个到一定程度,同时发送给worker处理
#不开启则实时发送,打开后worker进程可以同时接受多个网络请求
#默认为off,on为开启
}
示例:实现nginx高并发配置
[root@nginx ~]# vim /usr/local/nginx/conf/nginx.conf
worker_rlimit_nofile 100000;
events {
use epoll;
worker_connections 10000;
}
[root@nginx ~]# nginx -s reload
#测试并发
[root@nginx ~]# dnf install httpd-tools -y
[root@Nginx ~]# ab -n 100000 -c10000 http://172.25.254.100/index.html
This is ApacheBench, Version 2.3 <$Revision: 1913912 $>
Copyright 1996 Adam Twiss, Zeus Technology Ltd, http://www.zeustech.net/
Licensed to The Apache Software Foundation, http://www.apache.org/
Benchmarking 172.25.254.100 (be patient)
socket: Too many open files (24) #并发数量过多导致访问失败
#处理本地文件系统的并发文件数量
[root@nginx ~]# vim /etc/security/limits.conf #永久生效但要重启
* - nofile 100000 #打开文件最大个数
* - noproc 100000 #打开程序最大个数
[root@nginx ~]# ulimit -n 100000 #临时生效
[root@nginx ~]# ulimit -n
100000
[root@bginx ~]# ab -n 100000 -c10000 http://172.25.254.100/index.html
This is ApacheBench, Version 2.3 <$Revision: 1913912 $>
Copyright 1996 Adam Twiss, Zeus Technology Ltd, http://www.zeustech.net/
Licensed to The Apache Software Foundation, http://www.apache.org/
Benchmarking 172.25.254.100 (be patient)
Completed 10000 requests
Completed 20000 requests
Completed 30000 requests
Completed 40000 requests
Completed 50000 requests
4.http块配置参数
http块是Nginx服务器配置中的重要部分,缓存、代理和日志格式定义等绝大多数功能和第三方模块都可以在这设置,http块可以包含多个server块,而一个server块中又可以包含多个location块。
[root@nginx ~]# vim /usr/local/nginx/conf/nginx.conf
http {
#在响应报文中将指定的文件扩展名映射至MIME对应的类型
include mime.types; #可以识别文本,图像,音频,视频等其他的数据
default_type application/octet-stream; #没有识别的默认类型,例如php,ngxin不识别需要安装php才能渲染呈现
log_format main '$remote_addr - $remote_user [$time_local] "$request" '
'$status $body_bytes_sent "$http_referer" '
'"$http_user_agent" "$http_x_forwarded_for"';
access_log logs/access.log main; #使用定义为main的日志格式,存放在根目录的logs/access.log中
sendfile on; #零拷贝功能,sendfile系统调用在两个文件描述符之间直接传递数据(完全在内核中操作)
#tcp_nopush on;
#keepalive_timeout 0;
keepalive_timeout 65; #长连接超时时间,单位是s
#gzip on; #开启压缩功能
server {
#web服务配置
}
include "/usr/local/nginx/conf.d/*.conf"; #导入其他路径的配置文件,子配置文件
#要放在默认发布文件目录下,不然会覆盖默认
}
示例:识别php文件为text/html类型
[root@nginx ~]# vim /usr/local/nginx/html/index.php <?php phpinfo() ?> [root@nginx ~]# curl -I 172.25.254.100/index.php HTTP/1.1 200 OK Server: nginx/1.26.1 Date: Sun, 03 Aug 2025 12:31:48 GMT Content-Type: application/octet-stream #php不属于mime类型中,所以使用默认 Content-Length: 23 Last-Modified: Sun, 03 Aug 2025 11:17:36 GMT Connection: keep-alive ETag: "688f4550-17" Accept-Ranges: bytes [root@Nginx ~]# vim /usr/local/nginx/conf/nginx.conf default_type text/html; [root@nginx ~]# curl -I 172.25.254.100/index.php HTTP/1.1 200 OK Server: nginx/1.26.1 Date: Sun, 03 Aug 2025 12:35:22 GMT Content-Type: text/html #将识别类型改为text/html Content-Length: 23 Last-Modified: Sun, 03 Aug 2025 11:17:36 GMT Connection: keep-alive ETag: "688f4550-17" Accept-Ranges: bytes [root@Nginx ~]# vim /usr/local/nginx/conf/nginx.conf default_type test/php; [root@nginx ~]# curl -I 172.25.254.100/index.php HTTP/1.1 200 OK Server: nginx/1.26.1 Date: Sun, 03 Aug 2025 12:35:22 GMT Content-Type: test/php #可以自定义将识别不出来的设为想要的类型 Content-Length: 23 Last-Modified: Sun, 03 Aug 2025 11:17:36 GMT Connection: keep-alive ETag: "688f4550-17" Accept-Ranges: bytes
基于域名的web站点发布
#创建基于域名的发布根目录
[root@nginx ~]# mkdir /webdata/nginx/fjwyyy.org/fjw/html -p
#生成发布文件
[root@nginx ~]# echo fjw.fjwyyy.org > /webdata/nginx/fjwyyy.org/fjw/html/index.html
#创建子配置目录
[root@nginx ~]# mkdir /usr/local/nginx/conf.d
#创建子配置文件
[root@nginx ~]# vim /usr/local/nginx/conf.d/vhosts.conf
server {
listen 80;
server_name www.fjwyyy.org;
root /webdata/nginx/fjwyyy.org/fjw/html/;
}
[root@nginx ~]# vim /usr/local/nginx/conf/nginx.conf
http {
......
include "/usr/local/nginx/conf.d/*.conf"; #放在server{}下面防止识别有误
}
[root@nginx ~]# nginx -t
[root@nginx ~]# nginx -s reload
#添加本地解析
[root@nginx ~]# vim /etc/hosts
#测试
[root@nginx ~]# curl www.fjwyyy.org
fjw.fjwyyy.org
location中的root与alias
-
root:指定web的家目录,在定义location的时候,文件的绝对路径等于 root+location
-
alias:定义路径别名,会把访问的路径重新定义到其指定的路径,文档映射的另一种机制;
-
访问路径为文件指定路径也要为文件则相当于软连接
-
访问路径为指定路径也要为目录然后查看目录下的index.html
-
root示例
[root@nginx ~]# vim /usr/local/nginx/conf.d/vhosts.conf
server {
listen 80;
server_name www.fjw.org;
location / {
root /webdata/nginx/fjwyyy.org/fjw/html/;
}
location /login {
root /webdata/nginx/fjwyyy.org/fjw/html/;
}
}
[root@nginx ~]# nginx -t
[root@nginx ~]# nginx -s reload
#测试
[root@nginx ~]# curl www.fjw.org
www.fjwyyy.org
[root@nginx ~]# curl www.fjw.org/login/
login
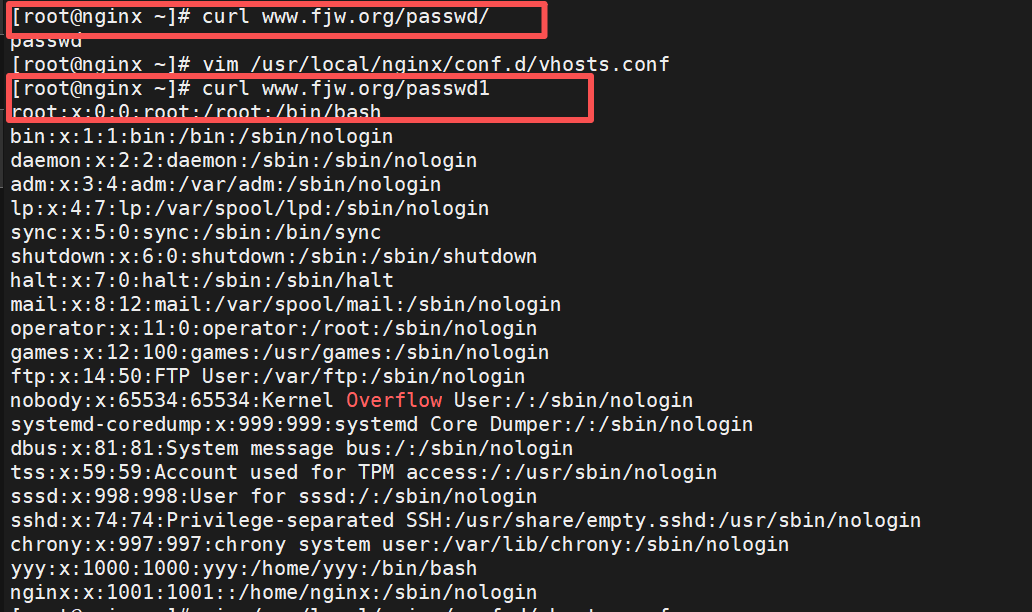
alias示例
[root@nginx ~]# vim /usr/local/nginx/conf.d/vhosts.conf
server {
listen 80;
server_name www.fjw.org;
location /passwd { #指定为文件下面路径也要为文件,相当于软连接
alias /etc/passwd;
}
location /passwd/ { #指定为目录下面也要为目录,/mnt/下的index.html,重定向到目录查找底下的默认发布文件
alias /mnt;
}
}
[root@nginx ~]# nginx -t
[root@nginx ~]# nginx -s reload
#测试
location字符匹配
location是用于匹配请求 URI(统一资源标识符)的核心配置指令,它可以根据不同的 URI 路径设置不同的处理规则(如反向代理、静态文件访问、重定向等)。
修饰符与匹配规则
Nginx 的location匹配遵循 “优先匹配特定规则,再匹配通用规则” 的原则,不同修饰符对应不同的优先级(从高到低排序):
| 修饰符 | 名称 | 匹配规则 | 优先级 |
|---|---|---|---|
= |
精确匹配 | 仅匹配与匹配路径完全一致的 URI。 |
最高 |
^~ |
前缀匹配(优先) | 匹配以匹配路径为前缀的 URI,且一旦匹配成功,不再检查其他正则匹配,区分大小写,也包含正则。 |
次高 |
| 无 | 一般匹配(普通) | 匹配以匹配路径为前缀的 URI,但优先级低于正则匹配,不识别正则表达式。 |
较低 |
~ |
正则匹配(区分大小写) | 按正则表达式匹配 URI,区分大小写。 | 较高 |
~* |
正则匹配(不区分大小写) | 按正则表达式匹配 URI,不区分大小写(如匹配.html和.HTML)。 |
较高 |
#匹配优先级从高到低:
"=" > "^~" > "~/~*",不带符号
1.示例-精准匹配
[root@nginx ~]# vim /usr/local/nginx/conf.d/vhosts.conf
server {
listen 80;
server_name www.fy.org;
root /web/html;
index index.html;
location = /test {
return 200 "punct = \n"; #returun 200.只要访问/test无论是否存在都会返回200存在成功,并输出"punct = \n"
}
}
#测试
[root@nginx ~]# curl www.fy.org/test
punct =
[root@nginx ~]# curl www.fy.org/test1
<html>
<head><title>404 Not Found</title></head>
[root@nginx ~]# curl www.fy.org/1test
<html>
<head><title>404 Not Found</title></head>
<body>
<center><h1>404 Not Found</h1></center>
2.示例-正则前缀匹配
[root@nginx ~]# vim /usr/local/nginx/conf.d/vhosts.conf
server {
listen 80;
server_name www.fy.org;
root /web/html;
index index.html;
# location = /test {
# return 200 "punct = \n";
# }
location ^~ /test {
return 200 "punct = ^~\n";
}
}
#测试
[root@nginx ~]# curl www.fy.org/test
punct = ^~
[root@nginx ~]# curl www.fy.org/test/a/b
punct = ^~
[root@nginx ~]# curl www.fy.org/testc
punct = ^~
[root@nginx ~]# curl www.fy.org/aatestc
\<html>
<head><title>404 Not Found</title></head>
<body>
<center><h1>404 Not Found</h1></center>
<hr><center>nginx/1.26.1</center>
</body>
</html>
[root@nginx ~]# curl www.fy.org/TEST #区分大小写
<html>
<head><title>404 Not Found</title></head>
<body>
<center><h1>404 Not Found</h1></center>
<hr><center>nginx/1.26.1</center>
</body>
</html>
3.示例-正则匹配(区分大小写)
[root@nginx ~]# vim /usr/local/nginx/conf.d/vhosts.conf
server {
listen 80;
server_name www.fy.org;
root /web/html;
index index.html;
# location = /test {
# return 200 "punct = \n";
# }
# location ^~ /test {
# return 200 "punct = ^~\n";
# }
location ~ /test {
return 200 "punct = ~\n";
}
}
#测试
[root@nginx ~]# curl www.fy.org/test
punct = ~
[root@nginx ~]# curl www.fy.org/testa
punct = ~
[root@nginx ~]# curl www.fy.org/test/a/
punct = ~
[root@nginx ~]# curl www.fy.org/atest
<html>
<head><title>404 Not Found</title></head>
<body>
<center><h1>404 Not Found</h1></center>
<hr><center>nginx/1.26.1</center>
</body>
</html>
[root@nginx ~]# curl www.fy.org/a/test #匹配的是url要加/
punct = ~
[root@nginx ~]# curl www.fy.org/a/TEST #也区分大小写
<html>
<head><title>404 Not Found</title></head>
4.示例-正则匹配(不区分大小写)
[root@nginx ~]# vim /usr/local/nginx/conf.d/vhosts.conf
server {
listen 80;
server_name www.fy.org;
root /web/html;
index index.html;
# location = /test {
# return 200 "punct = \n";
# }
# location ^~ /test {
# return 200 "punct = ^~\n";
# }
# location ~ /test {
# return 200 "punct = ~\n";
# }
location ~* /test {
return 200 "punct = ~*\n";
}
}
#测试
#效果基本与正则匹配一致,只是不区分大小写
[root@nginx ~]# curl www.fy.org/test
punct = ~*
[root@nginx ~]# curl www.fy.org/TEST
punct = ~*
[root@nginx ~]# curl www.fy.org/a/TEST
punct = ~*
[root@nginx ~]# curl www.fy.org/aTEST
<html>
<head><title>404 Not Found</title></head>
5.示例-一般匹配
[root@nginx ~]# vim /usr/local/nginx/conf.d/vhosts.conf
server {
listen 80;
server_name www.fy.org;
root /web/html;
index index.html;
# location = /test {
# return 200 "punct = \n";
# }
# location ^~ /test {
# return 200 "punct ^~\n";
# }
# location ~ /test {
# return 200 "punct ~\n";
# }
# location ~* /test {
# return 200 "punct ~*\n";
# }
location /test {
return 200 "punct \'\' \n";
}
}
#测试
#类似前缀匹配^~
[root@nginx ~]# curl www.fy.org/test
punct ''
[root@nginx ~]# curl www.fy.org/test/a
punct ''
[root@nginx ~]# curl www.fy.org/testa
punct ''
[root@nginx ~]# curl www.fy.org/atest
<html>
<head><title>404 Not Found</title></head>
[root@nginx ~]# curl www.fy.org/a/test/a
<html>
<head><title>404 Not Found</title></head>
6.示例-"\"的作用
[root@nginx ~]# vim /usr/local/nginx/conf.d/vhosts.conf
server {
listen 80;
server_name www.fy.org;
root /web/html;
index index.html;
# location = /test {
# return 200 "punct = \n";
# }
# location ^~ /test {
# return 200 "punct ^~\n";
# }
# location ~ /test {
# return 200 "punct ~\n";
# }
# location ~* /test {
# return 200 "punct ~*\n";
# }
# location /test {
# return 200 "punct \'\' \n";
# }
location ~* \.(png|JPG|CSS)$ { #命中结尾的文件,且不区分大小写
return 200 "punct ~\n";
}
}
#测试
[root@nginx ~]# curl www.fy.org/fjw.css
punct ~
[root@nginx ~]# curl www.fy.org/fjw.png
punct ~
[root@nginx ~]# curl www.fy.org/fjw.PNG
punct ~
[root@nginx ~]# curl www.fy.org/fjw
<html>
<head><title>404 Not Found</title></head>
7.示例-检测优先级
[root@nginx ~]# vim /usr/local/nginx/conf.d/vhosts.conf
server {
listen 80;
server_name www.fy.org;
root /web/html;
index index.html;
location = /test {
return 200 "=\n";
}
location ^~ /test {
return 200 "^~\n";
}
location ~* /test { #~*与~优先级一致,谁在上面谁优先级就高,区别就是~*区分大小写
return 200 "~*\n";
}
location ~ /test {
return 200 "~\n";
}
}
#测试
[root@nginx ~]# curl www.fy.org/test
=
[root@nginx ~]# curl www.fy.org/testa
^~
[root@nginx ~]# curl www.fy.org/a/test
~
[root@nginx ~]# curl www.fy.org/a/TEST
~*
[root@nginx ~]# curl www.fy.org/TEST
~*
补充
#^~ 与 无符号 不能同时存在不然会报错只能存在其一
#由于无符号的前缀匹配优先级最低
server {
listen 80;
server_name www.fy.org;
root /web/html;
index index.html;
location /test {
return 200 "haha\n"; #优先级最低
}
location = /test {
return 200 "=\n";
}
location ~ /test {
return 200 "~\n";
}
location ~* /test {
return 200 "~*\n";
}
}
#测试
[root@nginx ~]# curl www.fy.org/test
=
[root@nginx ~]# curl www.fy.org/testa
~
[root@nginx ~]# curl www.fy.org/Testa
~*
#当把其他location注释后剩下无符号的前缀匹配才能生效
[root@nginx ~]# curl www.fy.org/test
haha
长链接优化
长连接配置一般在主配置文件设置,在http块中设置,设置后子配置文件的全部站点都生效;
参数配置
#默认配置
http {
#keepalive_timeout 0; #长连接超时次数,在长连接期间发送三次请求就超时断开
keepalive_timeout 65; #长连接超时时间
}
#示例
keepalive_timeout 3;
keepalive_timeout 65 60;
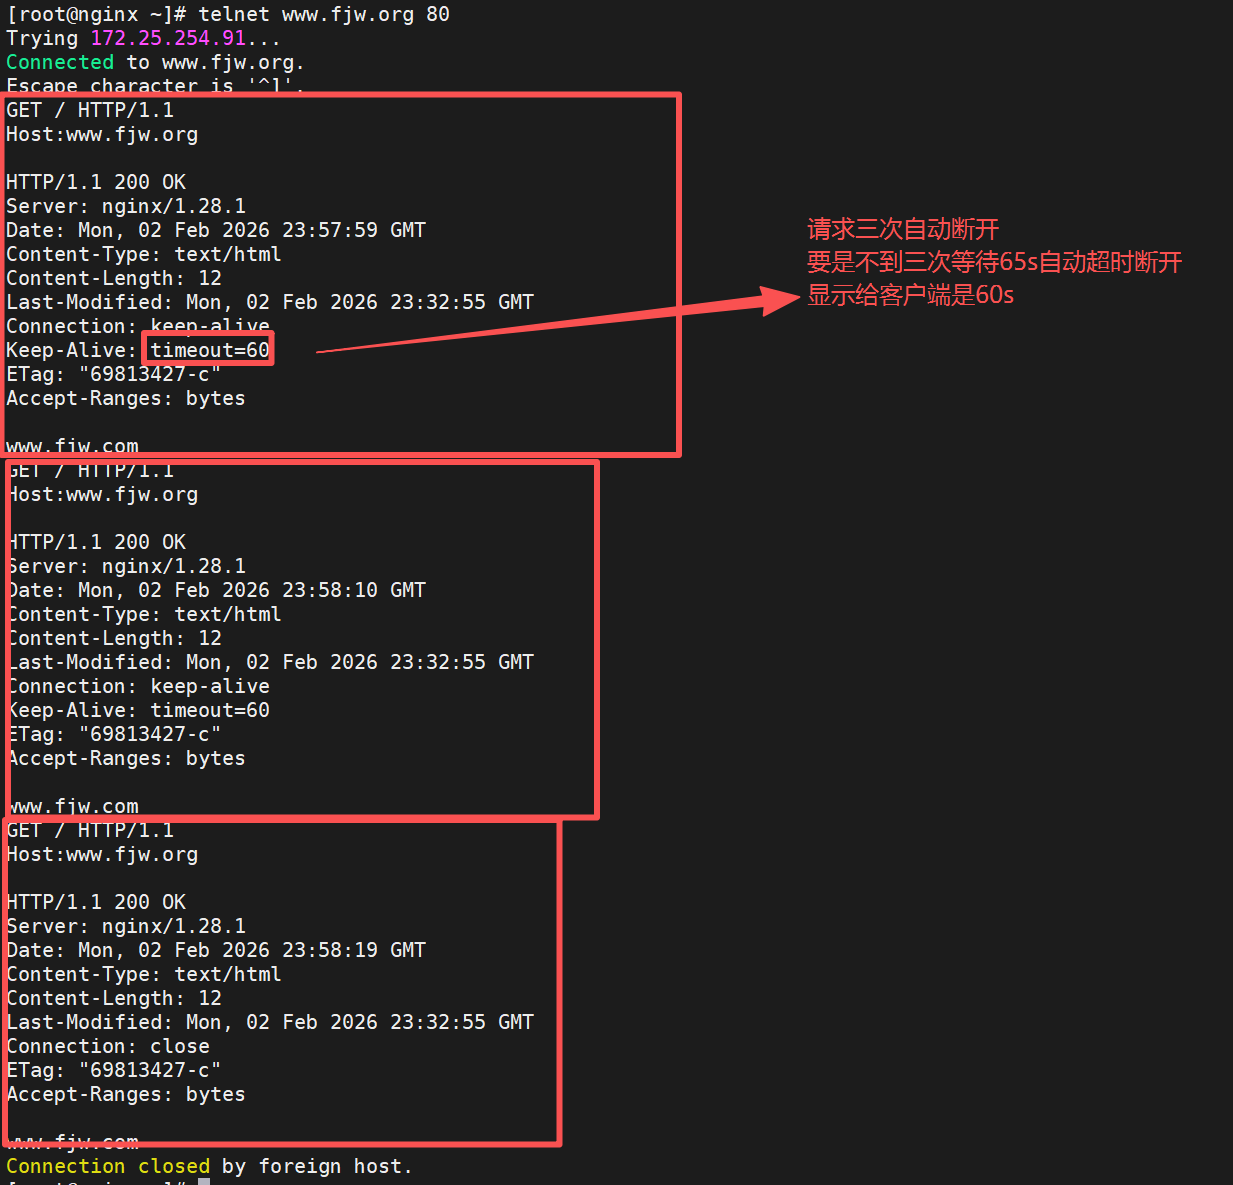
#开启长连接后,显示给客户端的会话保持时间为60s,单次长连接累计请求达到指定次数请求或65秒就会被断开,第二个数字60为发送给客户端应答报文头部中显示的超时时间设置为60s:如不设置客户端将不显示超时时间。
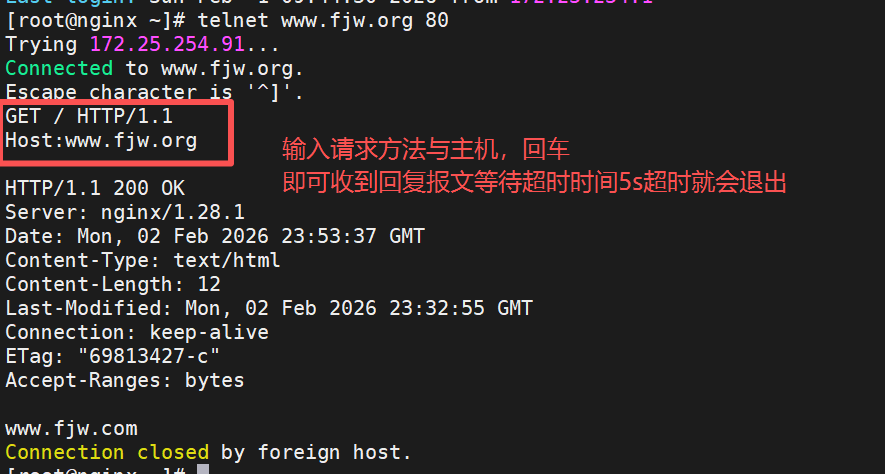
设定长连接时间
#安装测试软件
[root@nginx ~]# dnf install telnet -y

[root@nginx ~]# vim /usr/local/nginx/conf/nginx.conf
keepalive_timeout   5;
[root@Nginx ~]# nginx -s reload

#测试
[root@nginx ~]# telnet www.fjw.org 80
设定超时次数
[root@nginx ~]# vim /usr/local/nginx/conf/nginx.conf keepalive_requests 3; keepalive_timeout 65 60; [root@Nginx ~]# nginx -s reload #测试 [root@nginx ~]# telnet www.fjw.org 80
NginxWeb页面账户认证
由 ngx_http_auth_basic_module 模块提供此功能
创建加密信息
#使用不了htpasswd时要下载httpd-tools包 #创建加密信息,-c创建,-m使用md5加密,-b非交互生成 [root@nginx ~]# htpasswd -cmb /usr/local/nginx/.htpasswd fjw fjw #进行创建后,想要添加用户认证信息不用加-c,-c参数会覆盖 [root@nginx ~]# htpasswd -mb /usr/local/nginx/.htpasswd yyy yyy [root@nginx ~]# cat /usr/local/nginx/.htpasswd fjw:$apr1$rYDpBBuw$x701q1axSqvBDgXFV81QM/ yyy:$apr1$OZHKwo15$YKoStu20qFtVls5la9fz50
编辑配置文件
[root@nginx ~]# vim /usr/local/nginx/conf.d/vhosts.conf
server {
listen 80;
server_name www.fjwyyy.org;
root /webdata/nginx/fjwyyy.org/fjw/html;
location /admin {
root /usr/local/nginx/html;
auth_basic "login passwd";
auth_basic_user_file "/usr/local/nginx/.htpasswd";
}
}
[root@nginx ~]# systemctl restart nginx.service
[root@nginx ~]# mkdir /usr/local/nginx/html/admin/
[root@nginx ~]# echo admin > /usr/local/nginx/html/admin/index.html
测试
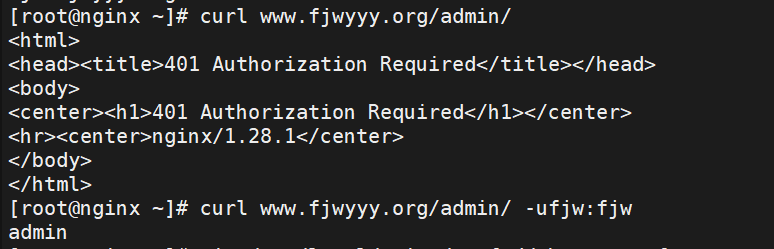
[root@nginx ~]# curl www.fjwyyy.org/admin/
[root@nginx ~]# curl www.fjwyyy.org/admin/ -ufjw:fjw
自定义错误页面
生成测试错误页面
[root@nginx ~]# mkdir  /usr/local/nginx/errorpage
[root@nginx ~]# echo "太不巧了,你要访问的页面辞职了!!" > /usr/local/nginx/errorpage/errormessage
编辑配置
[root@nginx ~]# vim /usr/local/nginx/conf.d/vhosts.conf
server {
listen 80;
server_name www.fjw.org;
error_page 404 405 503 502 /error; #指定location的位置
location /fjw/ { #不存在页面
root /usr/local/nginx/html;
}
location /error {
alias /usr/local/nginx/errorpage/errormessage;
}
}
#测试
[root@nginx ~]# curl www.fjw.org/fjw/
太不巧了,你要访问的页面辞职了!!
使用root的写法
[root@nginx ~]# vim /usr/local/nginx/conf.d/vhosts.conf
server {
listen 80;
server_name www.fjw.org;
error_page 404 405 503 502 /errorpage/errormessage;
location /fjw/ {
root /usr/local/nginx/html;
}
location /errorpage/ {
root /usr/local/nginx/;
}
}
#效果一致要注意对root与alias的理解
自定义错误日志
编辑配置参数
[root@nginx ~]# mkdir -p /usr/local/nginx/logs/fjw.org/
[root@nginx ~]# vim /usr/local/nginx/conf.d/vhosts.conf
server {
listen 80;
server_name www.fjw.org;
error_page 404 405 503 502 /errorpage/errormessage;
access_log logs/fjw.org/fjw.access; #这里的默认发布目录是主配置文件指定的默认发布目录,相对路径指定日志路径,可加main参数指定日志格式要在主配置文件开启日志格式参数
error_log logs/fjw.org/fjw.error error; #error为日志错误日志级别
location /fjw/ {
root /usr/local/nginx/html;
}
location /errorpage/ {
root /usr/local/nginx/;
}
}
#测试

Nginx的文件检测
-
try_files会按顺序检查文件是否存在,返回第一个找到的文件或文件夹(结尾加斜线表示为文件夹),如 果所有文件或文件夹都找不到,会进行一个内部重定向到最后一个参数。
-
只有最后一个参数可以引起一 个内部重定向,之前的参数只设置内部URI的指向。
-
最后一个参数是回退URI且必须存在,否则会出现内 部500错误。
-
一般为最后一个参数创建一个默认页面
创建测试页面
[root@nginx ~]# echo default > /usr/local/nginx/errorpage/default.html
编辑参数
[root@nginx ~]# vim /usr/local/nginx/conf.d/vhosts.conf
server {
listen 80;
server_name www.fjw.org;
root /webdata/nginx/fjw.org/fjw/html/;
error_page 404 405 503 502 /errorpage/errormessage;
access_log logs/fjw.org/fjw.access;
error_log logs/fjw.org/fjw.error error;
try_files $uri $uri.html $uri/index.html /errorpage/default.html; #如果都不存在就看default.html,而不是跳转到错误页面
location /errorpage/ {
root /usr/local/nginx/;
}
}
#测试
#随便访问不存在的路径不是跳转错误页面了
[root@nginx ~]# curl www.fjw.org/fjw
default
[root@nginx ~]# curl www.fjw.org/abcadad
default
Nginx中建立下载服务器
生成测试文件
[root@nginx ~]# mkdir  -p /usr/local/nginx/download
[root@nginx ~]# cp /etc/passwd  /usr/local/nginx/download/
[root@nginx ~]# dd if=/dev/zero of=/usr/local/nginx/download/bigfile bs=1M count=100
编辑配置参数
[root@nginx ~]# cat /usr/local/nginx/conf.d/vhosts.conf
server {
listen 80;
server_name www.fjw.org;
root /webdata/nginx/fjw.org/fjw/html/;
error_page 404 405 503 502 /errorpage/errormessage;
access_log logs/fjw.org/fjw.access;
error_log logs/fjw.org/fjw.error error;
try_files $uri $uri.html $uri/index.html /errorpage/default.html;
location /errorpage/ {
root /usr/local/nginx/;
}
location /download {
root /usr/local/nginx;
}
}
访问
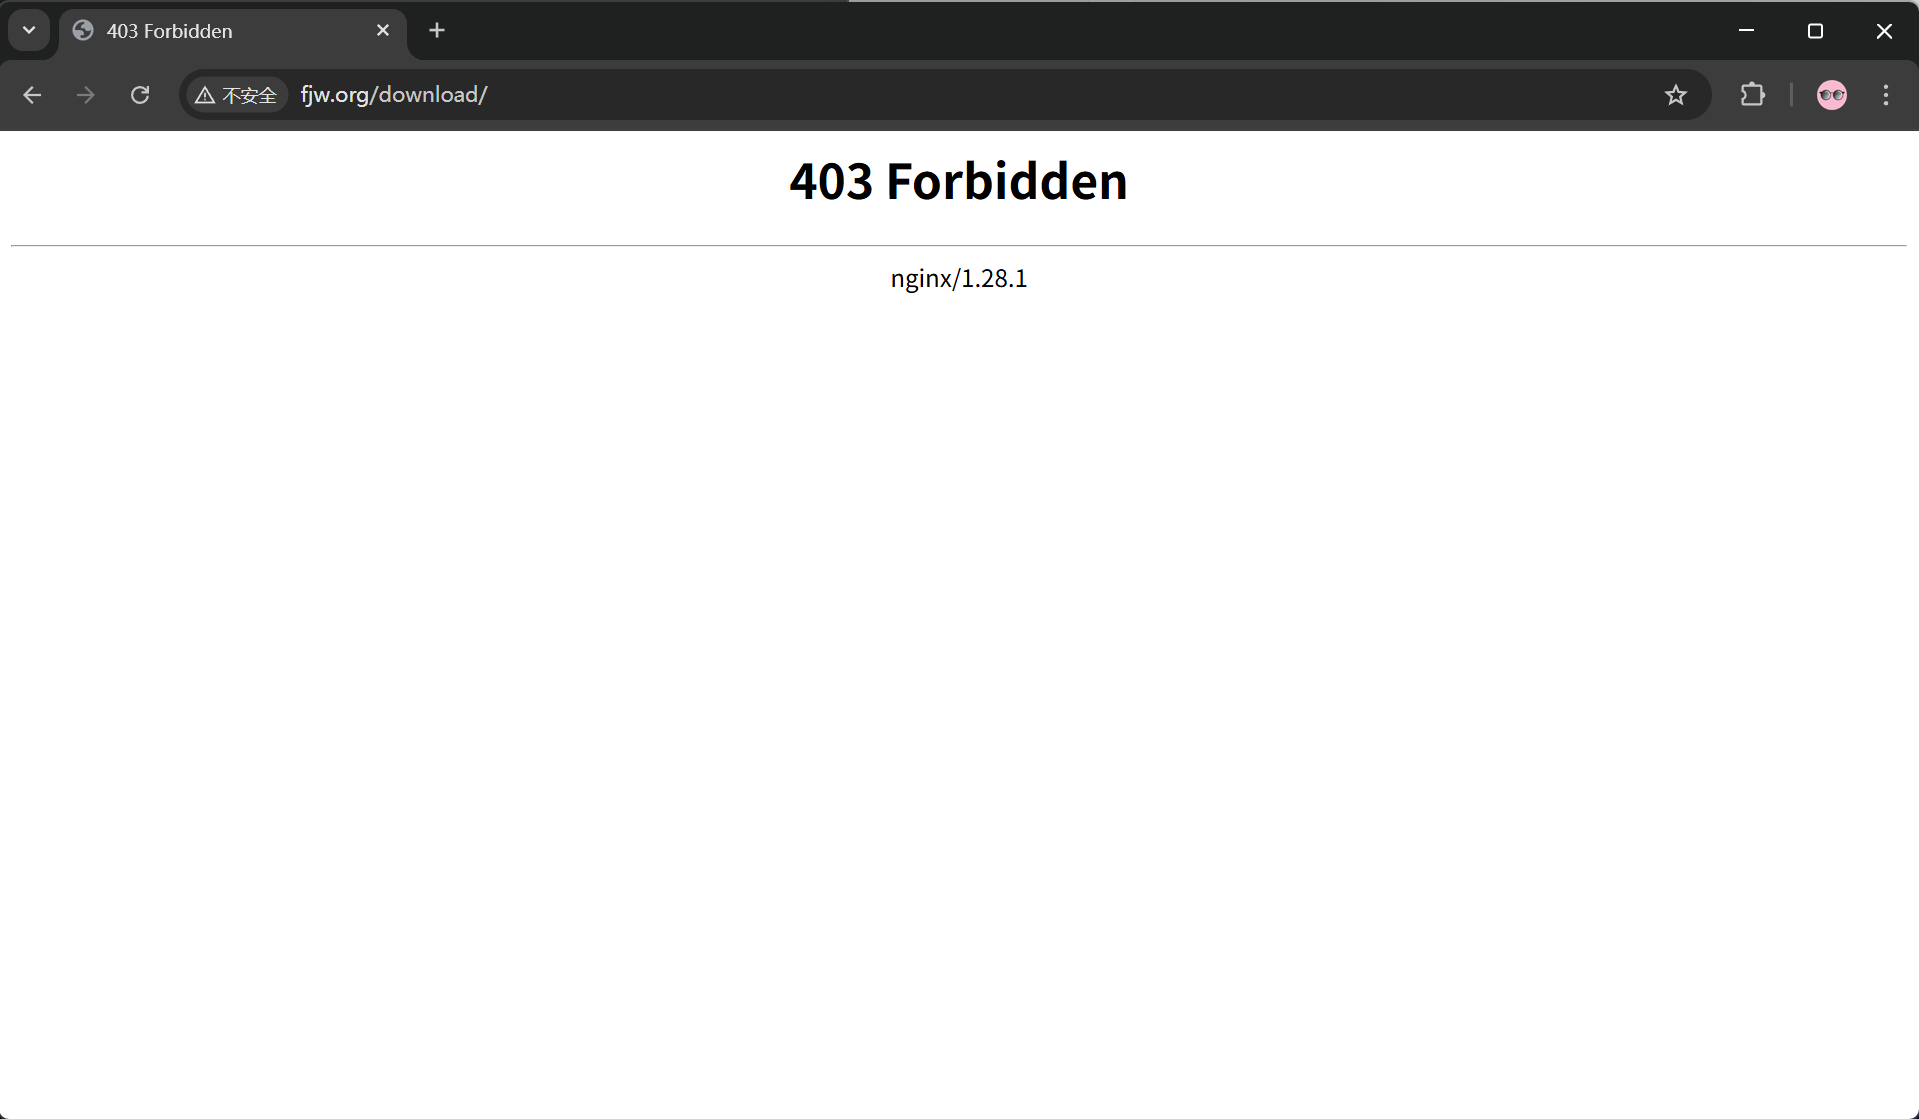
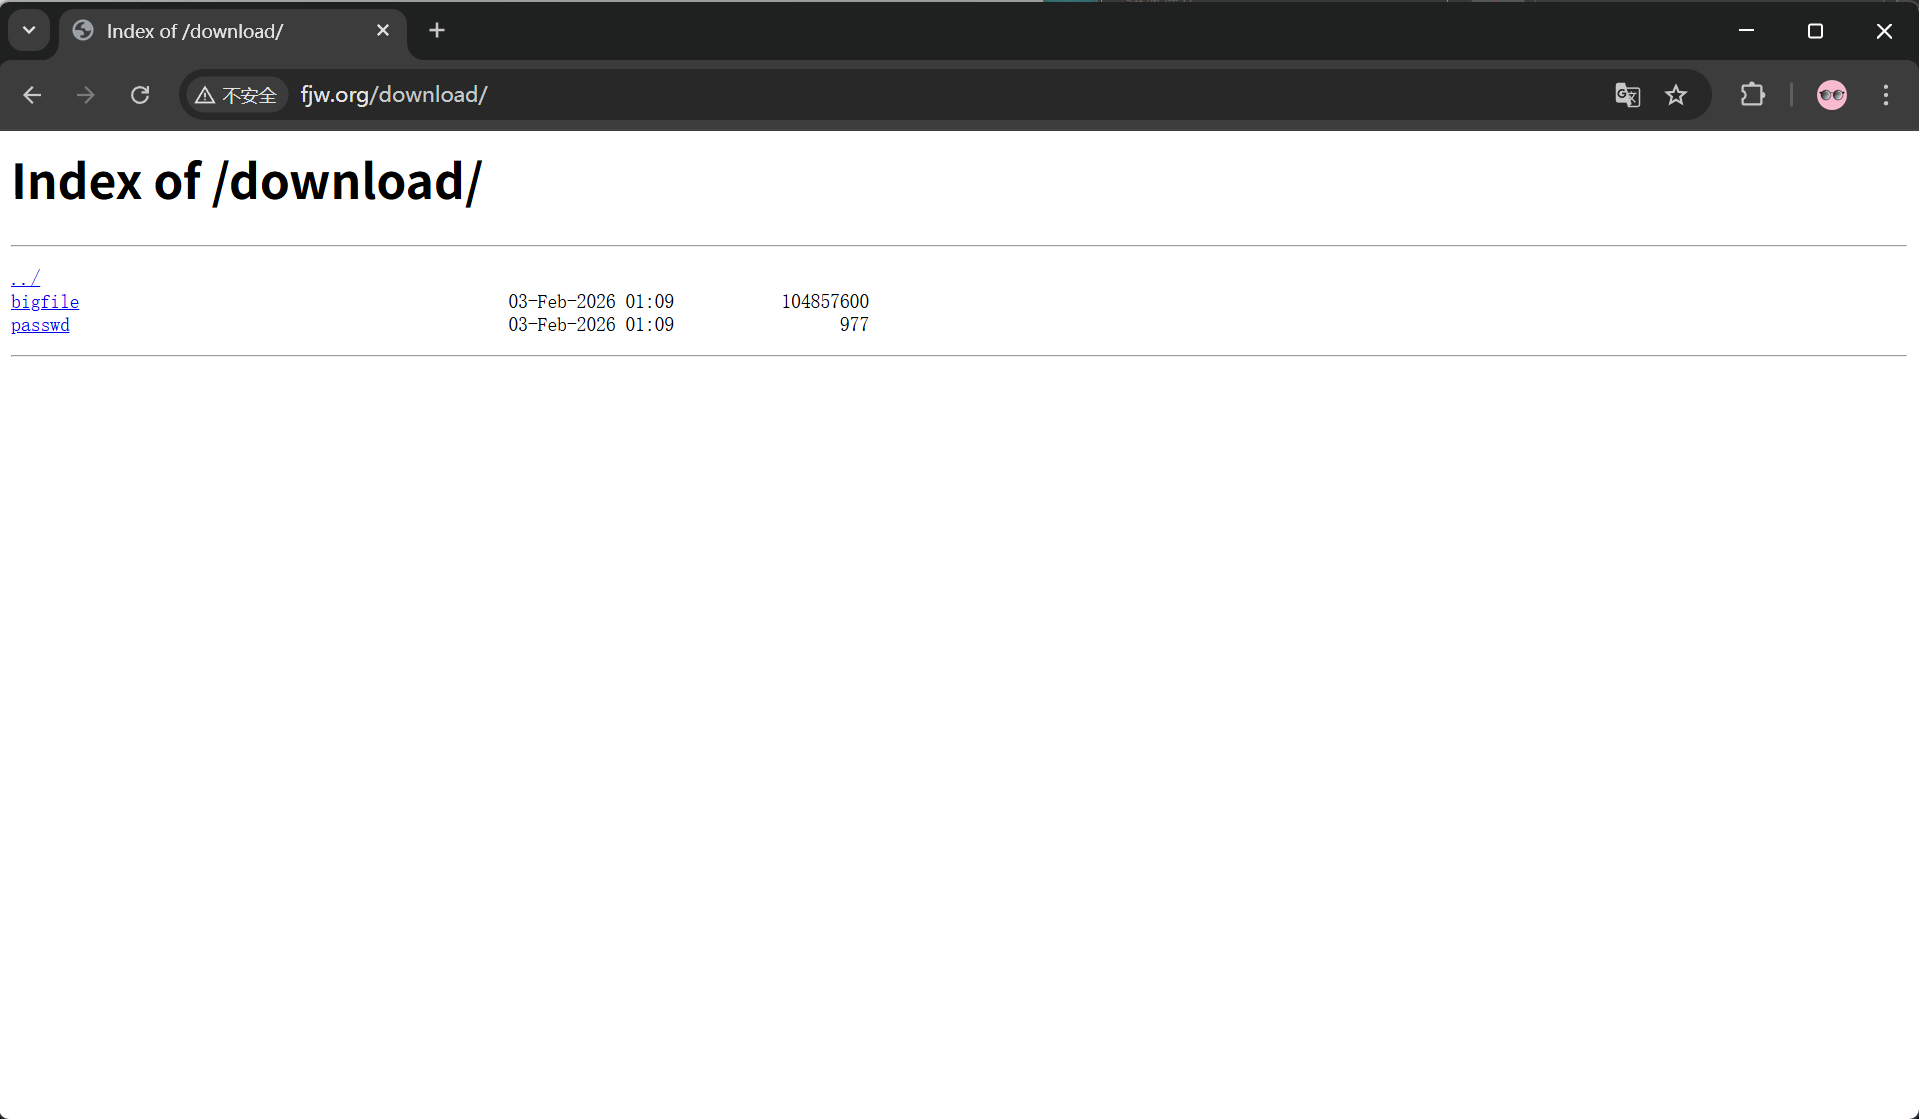
开启列表功能
[root@nginx ~]# vim /usr/local/nginx/conf.d/vhosts.conf
......
    location /download {
        root /usr/local/nginx;
        autoindex on;
        #开启自动索引功能,由于没默认发布文件,要想作为下载服务器就要自动索引存在的文件便于显示
    }
......
再次访问
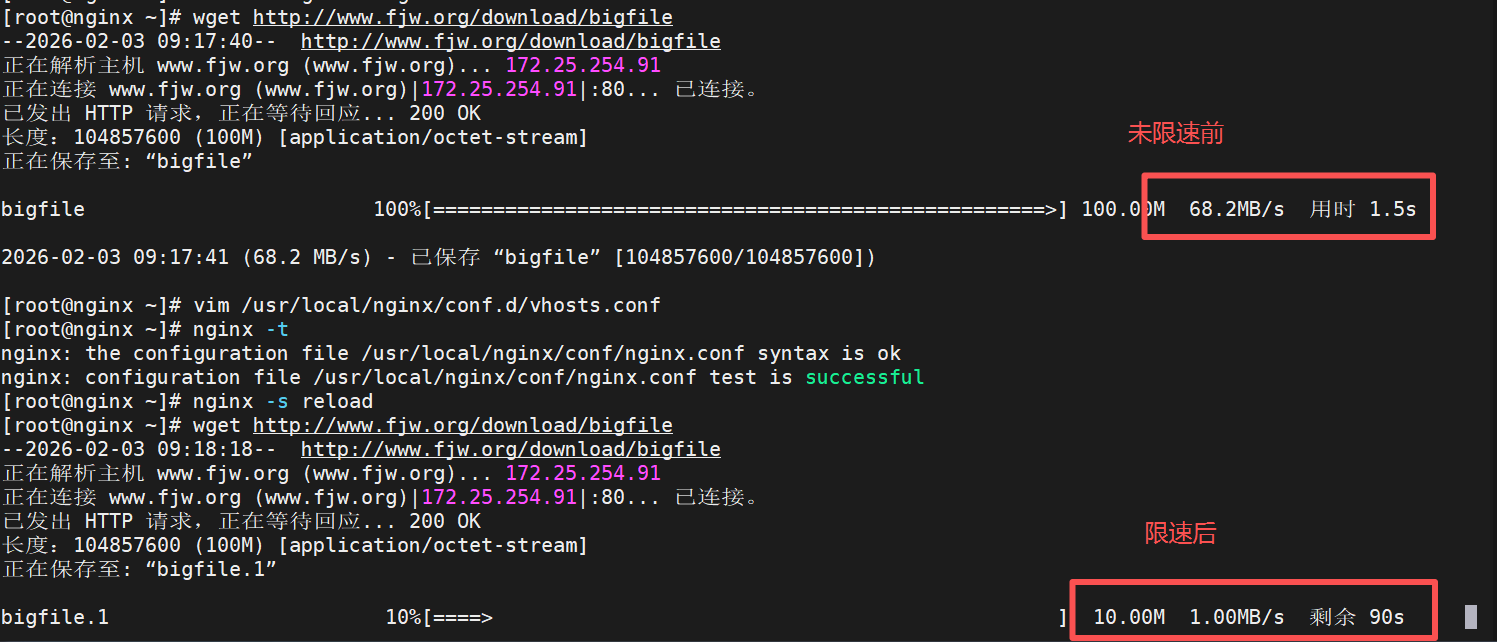
下载控速配置
[root@nginx ~]# vim /usr/local/nginx/conf.d/vhosts.conf
......
location /download {
        root /usr/local/nginx;
        autoindex on;
        limit_rate 1024k; #限制下载速度/s,默认不限速
    }
......
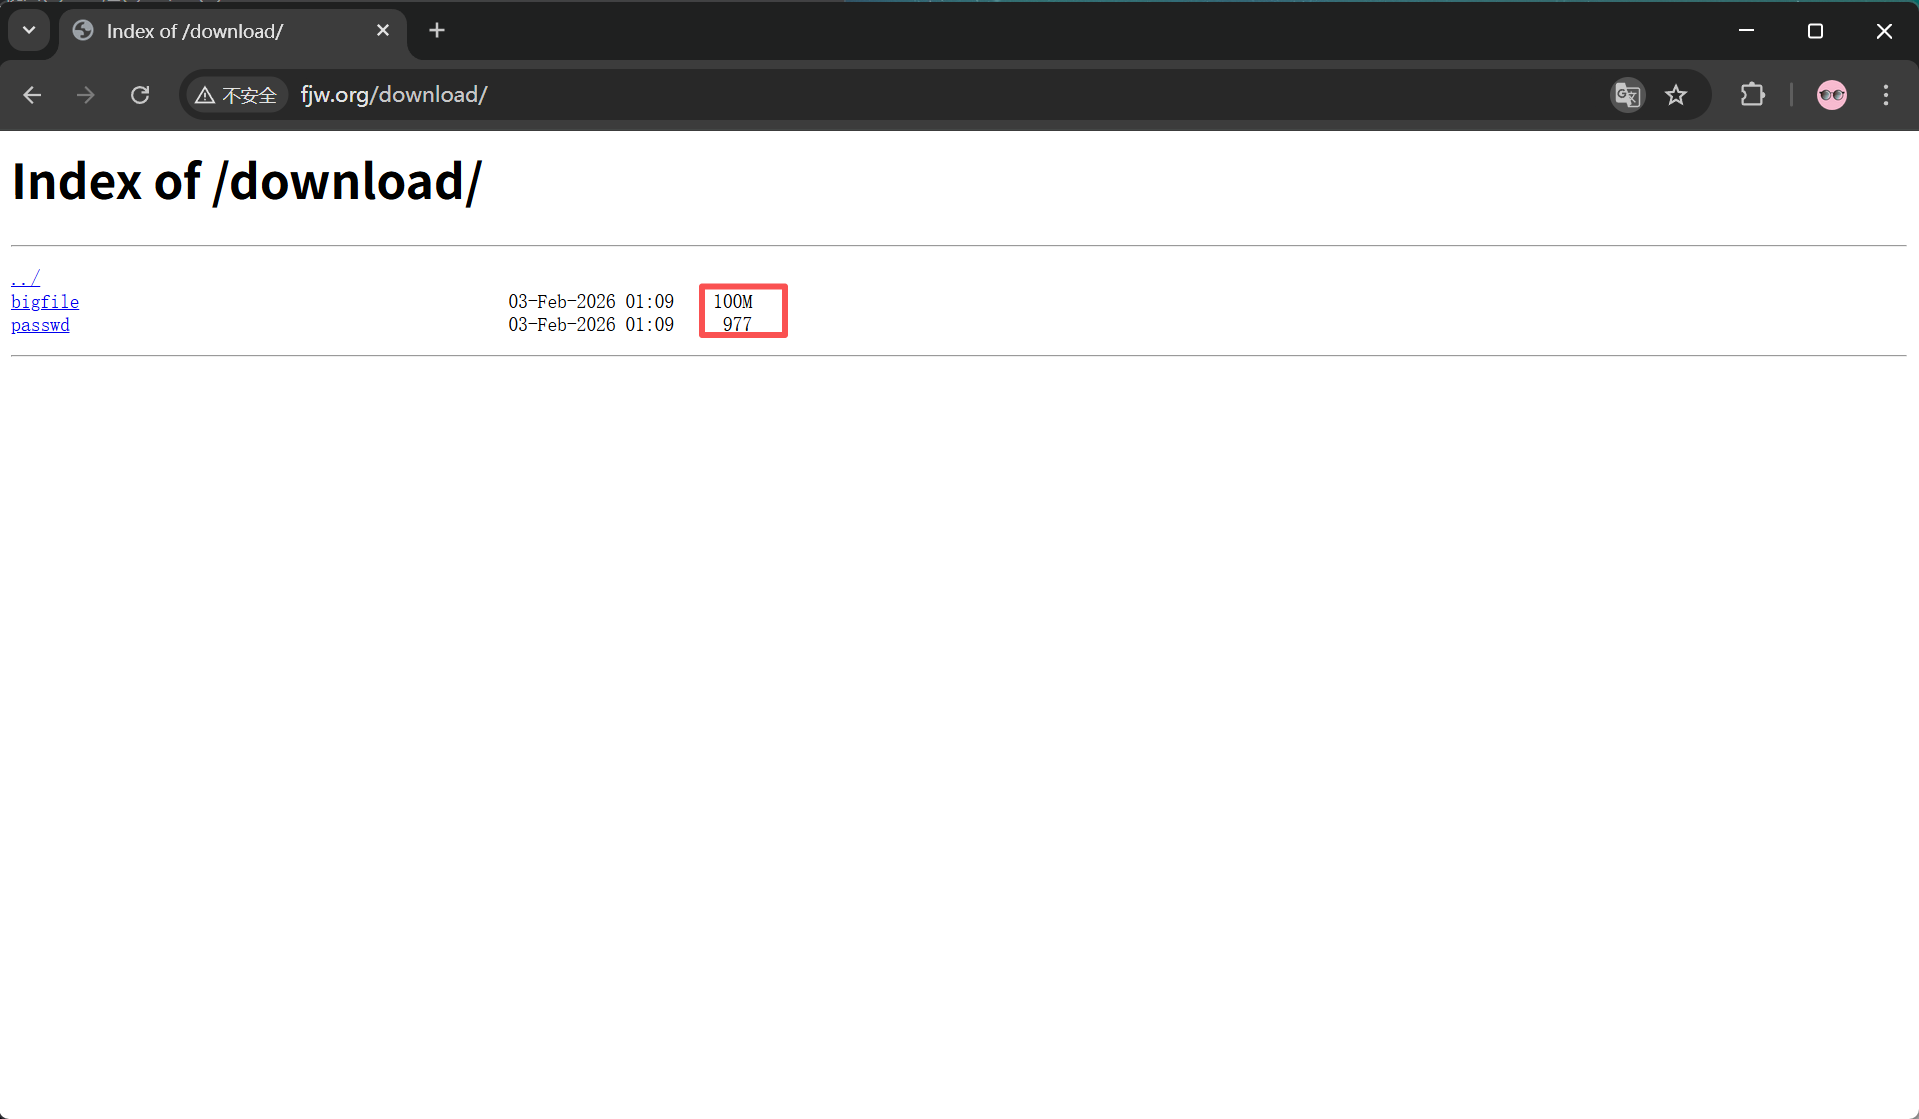
显示文件大小优化
[root@nginx ~]# vim /usr/local/nginx/conf.d/vhosts.conf
......
location /download {
        root /usr/local/nginx;
        autoindex on;
        limit_rate 1024k;
        autoindex_exact_size off;   #计算文件确切大小,off为显示大概大小(kb,mb,gb)
    }
......
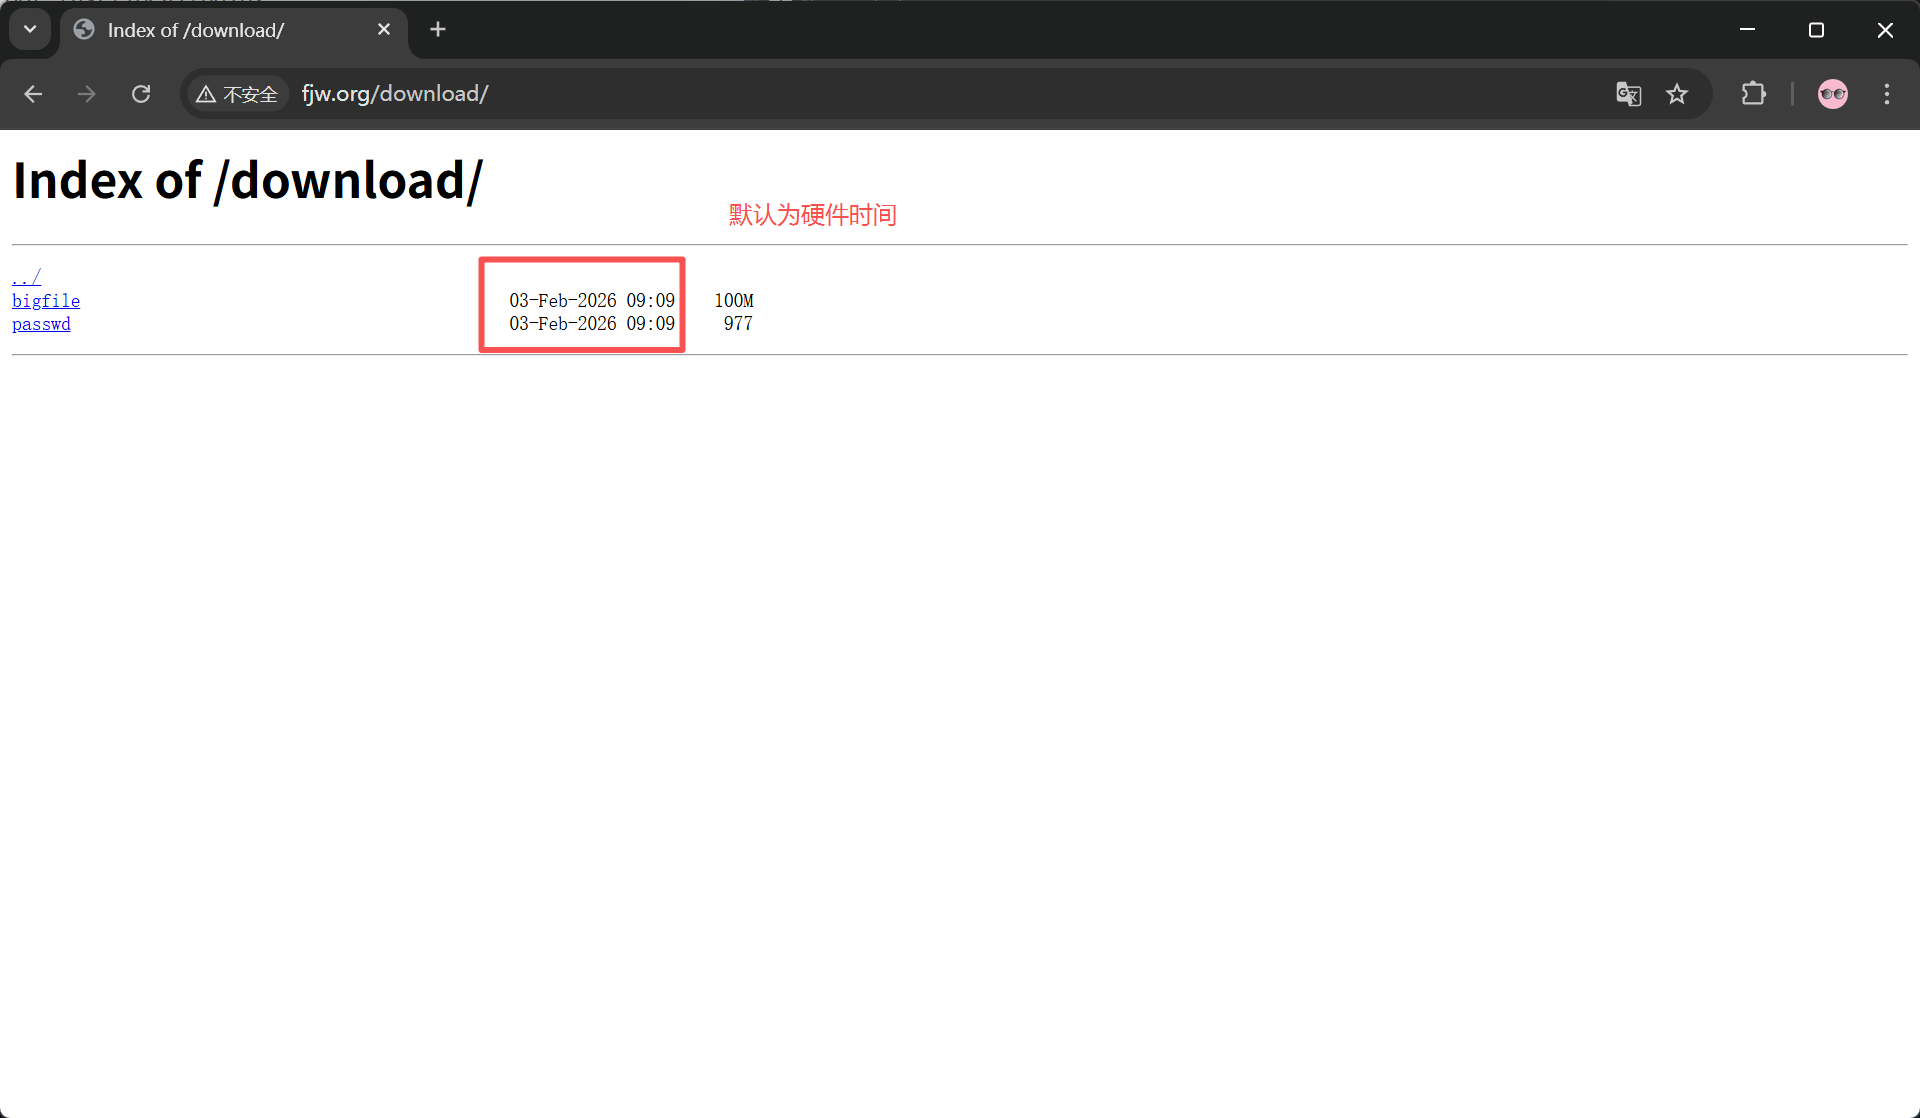
时间显示调整
[root@nginx ~]# vim /usr/local/nginx/conf.d/vhosts.conf
......
location /download {
        root /usr/local/nginx;
        autoindex on;
        limit_rate 1024k;
        autoindex_exact_size off;
        autoindex_localtime on;     #on显示本机时间而不是格林威治时间
    }
......
设定页面风格
[root@nginx ~]# vim /usr/local/nginx/conf.d/vhosts.conf
......
location /download {
        root /usr/local/nginx;
        autoindex on;
        limit_rate 1024k;
        autoindex_exact_size off;
        autoindex_localtime on;
        autoindex_format html | xml | json | jsonp; #设置网页显示风格,指定一种显示风格
    }
......
xml风格

json风格

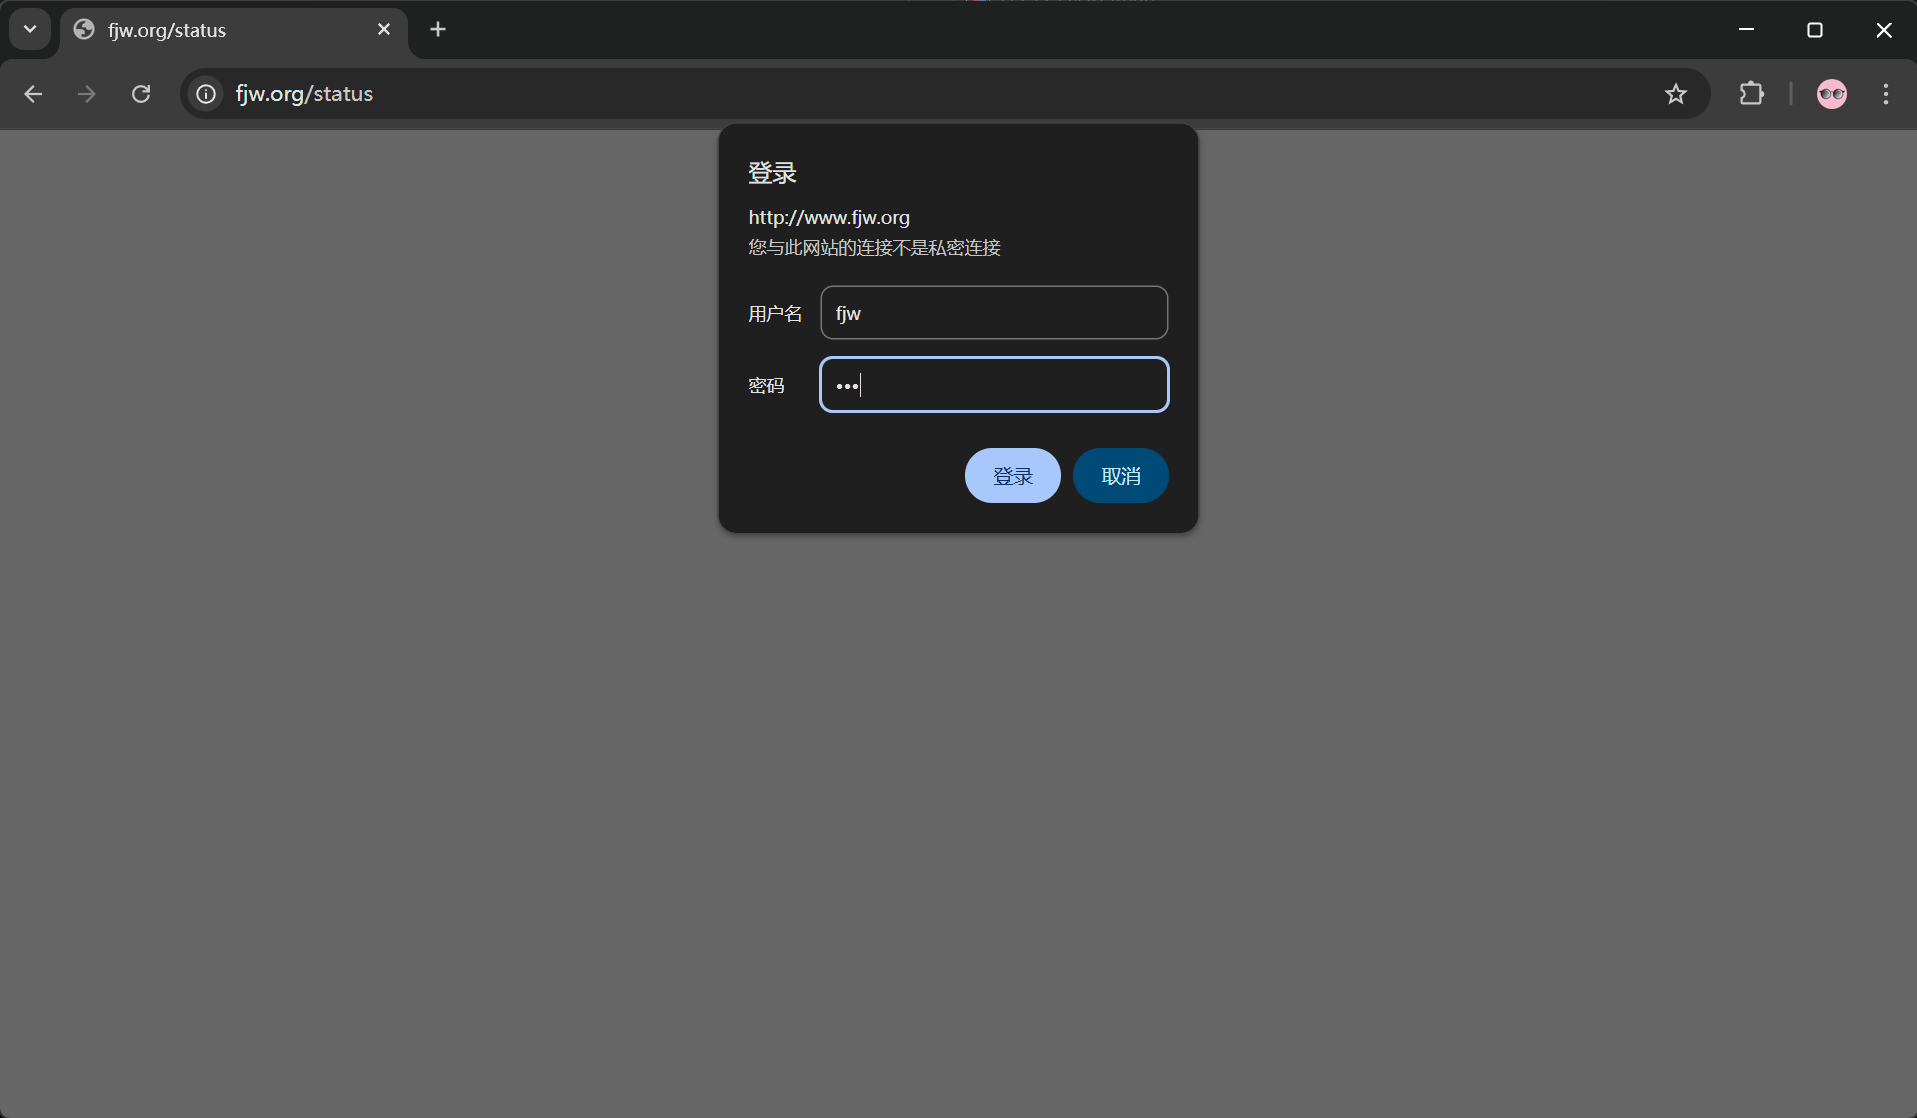
Nginx的状态页

#建议创建认证用户来访问,一般状态页要认证才能查看不是所有人都能看
[root@nginx ~]# htpasswd -cmb /usr/local/nginx/.htpasswd fjw fjw
[root@nginx ~]# vim /usr/local/nginx/conf.d/vhosts.conf
server {
listen 80;
server_name www.fjw.org;
location /status {
stub_status; #开启状态页功能
auth_basic "status page";
auth_basic_user_file "/usr/local/nginx/.htpasswd";
allow 172.25.254.0/24;
deny all;
}
}
[root@nginx ~]# nginx -t
[root@nginx ~]# nginx -s reload
在访问浏览器测试
状态页面
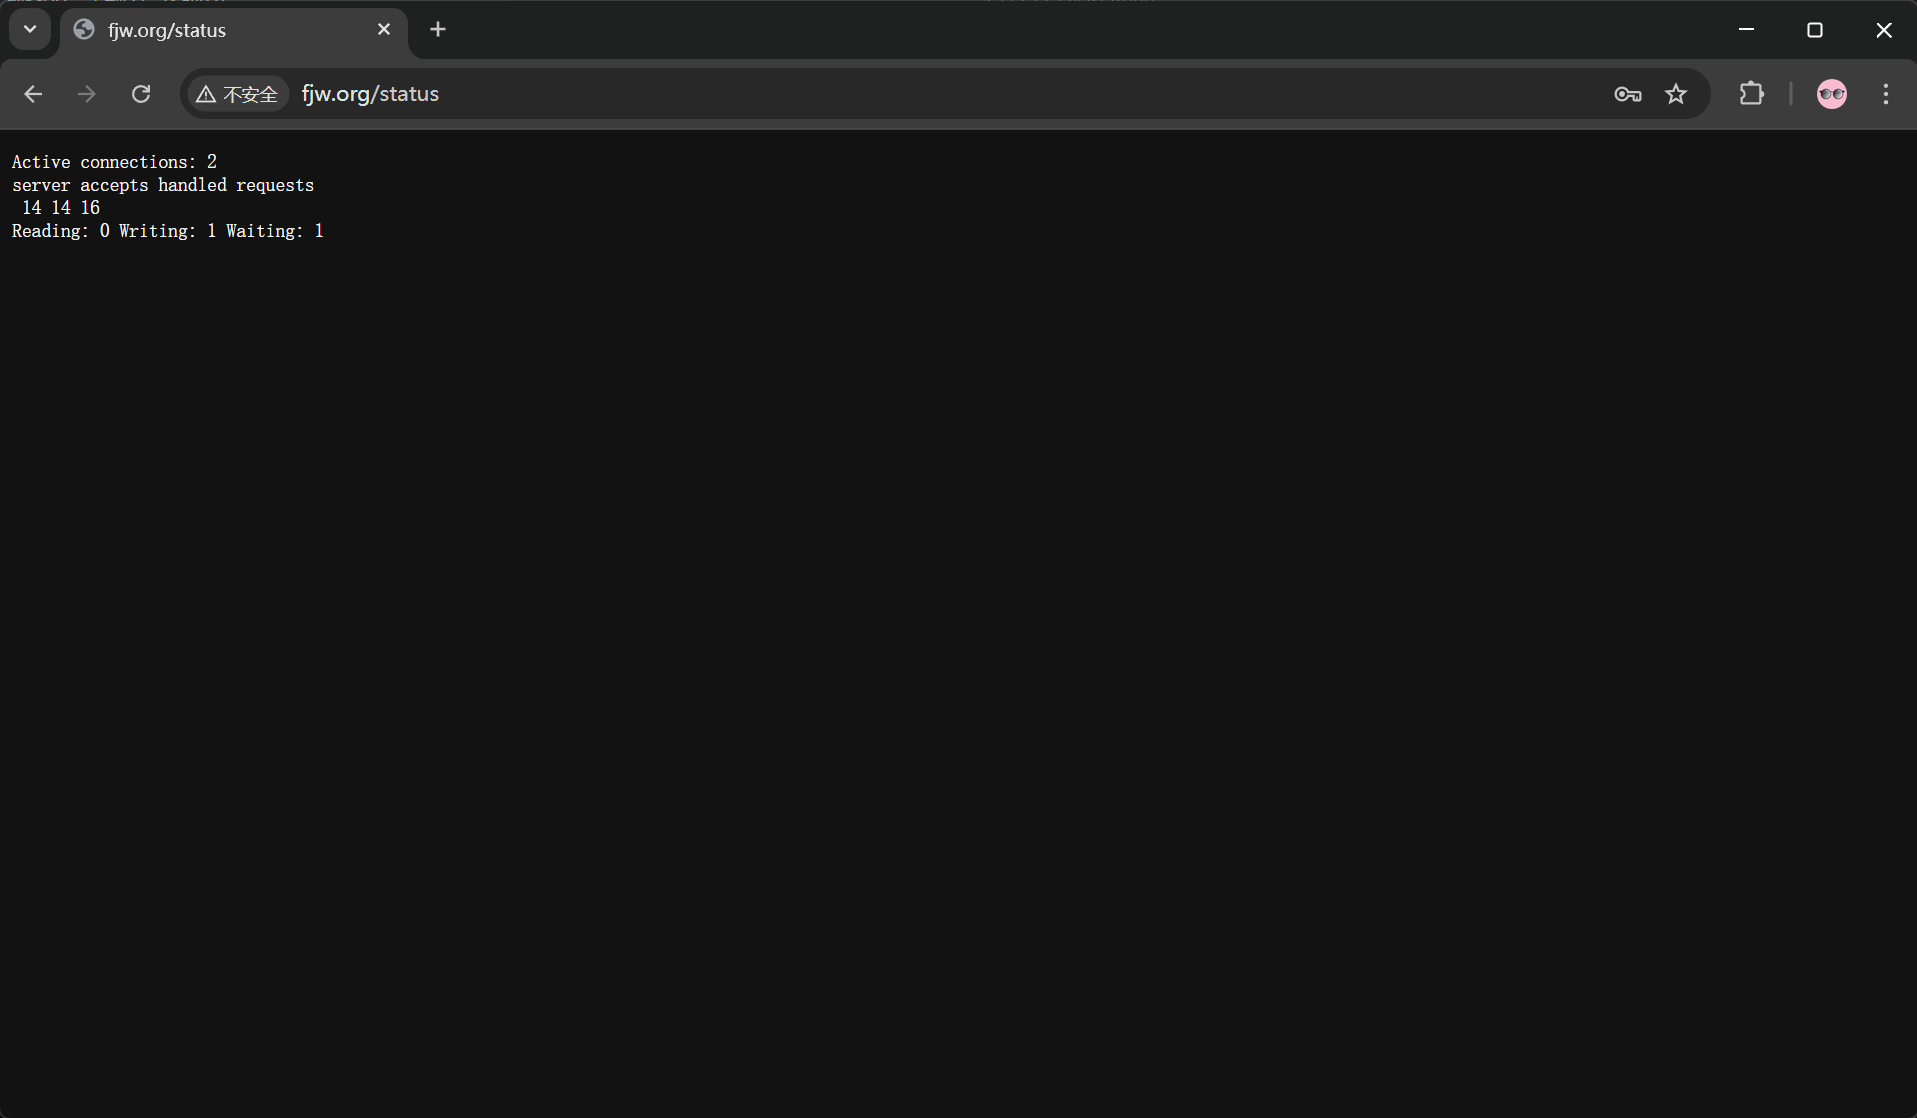
#状态页信息参数
Active connections: #当前处于活动状态的客户端连接数
#包括连接等待空闲连接数=reading+writing+waiting
accepts: #统计总值,Nginx自启动后已经接受的客户端请求连接的总数。
handled: #统计总值,Nginx自启动后已经处理完成的客户端请求连接总数
#通常等于accepts,除非有因worker_connections限制等被拒绝的连接
requests: #统计总值,Nginx自启动后客户端发来的总的请求数
Reading: #当前状态,正在读取客户端请求报文首部的连接的连接数
#数值越大,说明排队现象严重,性能不足
Writing: #当前状态,正在向客户端发送响应报文过程中的连接数,数值越大,说明访问量很大
Waiting: #当前状态,正在等待客户端发出请求的空闲连接数开启 keep-alive的情况下,这个值等于active – (reading+writing)
Nginx的压缩功能
Nginx支持对指定类型的文件进行压缩然后再传输给客户端,而且压缩还可以设置压缩比例,压缩后的文 件大小将比源文件显著变小,样有助于降低出口带宽的利用率,降低企业的IT支出,不过会占用相 应的CPU资源。
Nginx对文件的压缩功能是依赖于模块 ngx_http_gzip_module,默认是内置模块。
配置参数如下
#启用或禁用gzip压缩,默认关闭 gzip on | off; #压缩比由低到高从1到9,默认为1,值越高压缩后文件越小,但是消耗cpu比较高。基本设定未4或者5 gzip_comp_level 4; #禁用IE6 gzip功能,早期的IE6之前的版本不支持压缩 gzip_disable "MSIE [1-6]\."; #gzip压缩的最小文件,小于设置值的文件将不会压缩 gzip_min_length 1k; #启用压缩功能时,协议的最小版本,默认HTTP/1.1 gzip_http_version 1.0 | 1.1; #指定Nginx服务需要向服务器申请的缓存空间的个数和大小,平台不同,默认:32 4k或者16 8k; gzip_buffers number size; #指明仅对哪些类型的资源执行压缩操作;默认为gzip_types text/html,不用显示指定,否则出错 gzip_types mime-type ...; #如果启用压缩,是否在响应报文首部插入“Vary: Accept-Encoding”,一般建议打开 gzip_vary on | off; #预压缩,即直接从磁盘找到对应文件的gz后缀的式的压缩文件返回给用户,无需消耗服务器CPU #注意: 来自于ngx_http_gzip_static_module模块 gzip_static on | off;
生成测试文件
[root@nginx ~]# echo smallfile > /usr/local/nginx/html/small.html
[root@nginx ~]# cp /usr/local/nginx/logs/access.log /usr/local/nginx/html/bigfile.txt       #大文件后缀为txt才能被识别
开启压缩功能
[root@nginx ~]# vim /usr/local/nginx/conf/nginx.conf
......
gzip on;
gzip_comp_level 4;
gzip_disable "MSIE [1-6]\.";
gzip_min_length 1024k;
gzip_buffers 32 1024k;
gzip_types text/plain application/javascript application/x-javascript text/css application/xml text/javascript application/x-httpd-php image/gif image/png;
gzip_vary on;
gzip_static on;
......
[root@nginx ~]# nginx -t
[root@nginx ~]# nginx -s reload
#做好主机的解析
[root@nginx ~]# vim /etc/hosts
测试
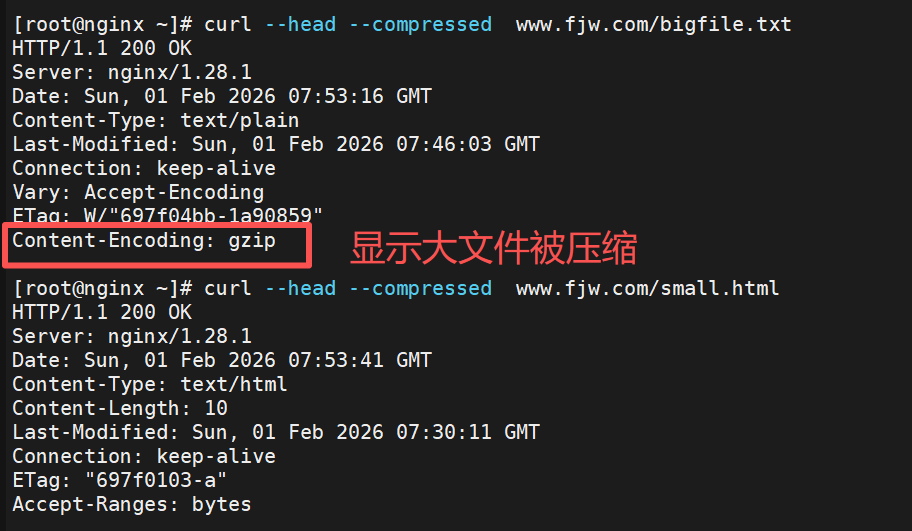
#--head 仅获取响应头,不下载正文    --compressed告知服务器可接受压缩格式的响应
[root@nginx ~]# curl --head --compressed  www.fjw.com/bigfile.txt
[root@nginx ~]# curl --head --compressed  www.fjw.com/small.html
Nginx变量使用
引用nginx的变量需要添加模块
-
nginx的变量可以在配置文件中引用,作为功能判断或者日志等场景使用
-
变量可以分为内置变量和自定义变量
-
内置变量是由nginx模块自带,通过变量可以获取到众多的与客户端访问相关的值。
升级Nginx支持echo模块
模块获取方法
https://github.com/openresty/echo-nginx-module/tags
添加之前

[root@Nginx ~]# systemctl stop nginx.service [root@Nginx ~]# tar zxf echo-nginx-module-0.64.tar.gz [root@Nginx ~]# cd nginx-1.28.1/ [root@Nginx nginx-1.28.1]# make clean #清理已经生成的Makefile rm -rf Makefile objs #重新检测并编译生成Makefile [root@Nginx nginx-1.28.1]# ./configure --prefix=/usr/local/nginx --user=nginx --group=nginx --with-http_ssl_module --with-http_v2_module --with-http_realip_module --with-http_stub_status_module --with-http_gzip_static_module --with-pcre --with-stream --with-stream_ssl_module --with-stream_realip_module --add-module=/root/echo-nginx-module-0.64 [root@Nginx nginx-1.28.1]# make [root@Nginx nginx-1.28.1]# rm -rf /usr/local/nginx/sbin/nginx [root@Nginx nginx-1.28.1]# cp objs/nginx /usr/local/nginx/sbin/ -p #测试是否成功添加

[root@nginx nginx-1.28.1]# vim /usr/local/nginx/conf.d/vhosts.conf
......
location /vars {
default_type text/html;
echo $remote_addr;
}
......
[root@nginx nginx-1.28.1]# nginx -s reload
[root@nginx nginx-1.28.1]# curl www.fjw.org/vars
172.25.254.100
内置变量
以下是常用的内置变量
$remote_addr; #存放了客户端的地址,注意是客户端的公网IP $args; #变量中存放了URL中的所有参数 #例如:https://search.jd.com/Search?keyword=手机&enc=utf-8 #返回结果为: keyword=手机&enc=utf-8 $is_args #如果有参数为? 否则为空 $document_root; #保存了针对当前资源的请求的系统根目录,例如:/webdata/nginx/timinglee.org/lee。 $document_uri; #保存了当前请求中不包含参数的URI,注意是不包含请求的指令 #比如:http://lee.timinglee.org/var?\id=11111会被定义为/var #返回结果为:/var $host; #存放了请求的host名称 limit_rate 10240; echo $limit_rate; #如果nginx服务器使用limit_rate配置了显示网络速率,则会显示,如果没有设置, 则显示0 $remote_port; #客户端请求Nginx服务器时随机打开的端口,这是每个客户端自己的端口 $remote_user; #已经经过Auth Basic Module验证的用户名 $request_body_file; #做反向代理时发给后端服务器的本地资源的名称 $request_method; 示例: #请求资源的方式,GET/PUT/DELETE等 $request_filename; #当前请求的资源文件的磁盘路径,由root或alias指令与URI请求生成的文件绝对路径, #如:webdata/nginx/timinglee.org/lee/var/index.html $request_uri; #包含请求参数的原始URI,不包含主机名,相当于:$document_uri?$args, #例如:/main/index.do?id=20190221&partner=search $scheme; #请求的协议,例如:http,https,ftp等 $server_protocol; #保存了客户端请求资源使用的协议的版本,例如:HTTP/1.0,HTTP/1.1,HTTP/2.0等 $server_addr; #保存了服务器的IP地址 $server_name; #虚拟主机的主机名 $server_port; #虚拟主机的端口号 $http_user_agent; #客户端浏览器的详细信息 $http_cookie; #客户端的所有cookie信息 $cookie_<name> #name为任意请求报文首部字部cookie的key名 $http_<name> #name为任意请求报文首部字段,表示记录请求报文的首部字段,name的对应的首部字段名需要为小写,如果有横线需要替换为下划线 $http_<name>的示例 echo $http_user_agent; echo $http_host; $sent_http_<name> #name为响应报文的首部字段,name的对应的首部字段名需要为小写,如果有横线需要替换为下划线,此变量有问题 $arg_<name> #此变量存放了URL中的指定参数,name为请求url中指定的参数
实验配置
[root@nginx ~]# vim /usr/local/nginx/conf.d/vhosts.conf
server {
listen 80;
server_name www.fy.org;
root /web/html;
location /vars {
default_type text/html;
echo $remote_addr;
echo $args;
echo $is_args;
echo $document_root;
echo $document_uri;
echo $host;
echo $remote_port;
echo $remote_user;
echo $request_method;
echo $request_filename;
echo $request_url;
echo $scheme;
echo $server_protocol;
echo $server_addr;
echo $server_name;
echo $server_port;
echo $server_user_agent;
echo $http_cookie;
echo $cookie_key1;
echo $http_Accept;
echo $arg_name;
}
}
#测试
[root@nginx ~]# curl -A "fjwyyy" -b "fjw=a,key1=2" -ufjw:fjw www.fy.org/vars?name=fjw
172.25.254.10
name=fjw
?
/web/html
/vars
www.fy.org
41430
fjw
GET
/web/html/vars
/vars?name=fjw
http
HTTP/1.1
172.25.254.10
www.fy.org
80
fjwyyy
fjw=a,key1=2
2
*/*
fjw
自定义变量
[root@nginx ~]# vim /usr/local/nginx/conf.d/vhosts.conf
server {
listen 80;
server_name www.fy.org;
root /web/html;
location /var {
default_type text/html;
set $name fjwyyy;
echo $name;
set $tomcat_port 8080; #手动设定
echo $tomcat_port;
set $web_port $server_port #变量传递
}
}
#测试
[root@nginx ~]# curl www.fy.org/var
fjwyyy
8080
80
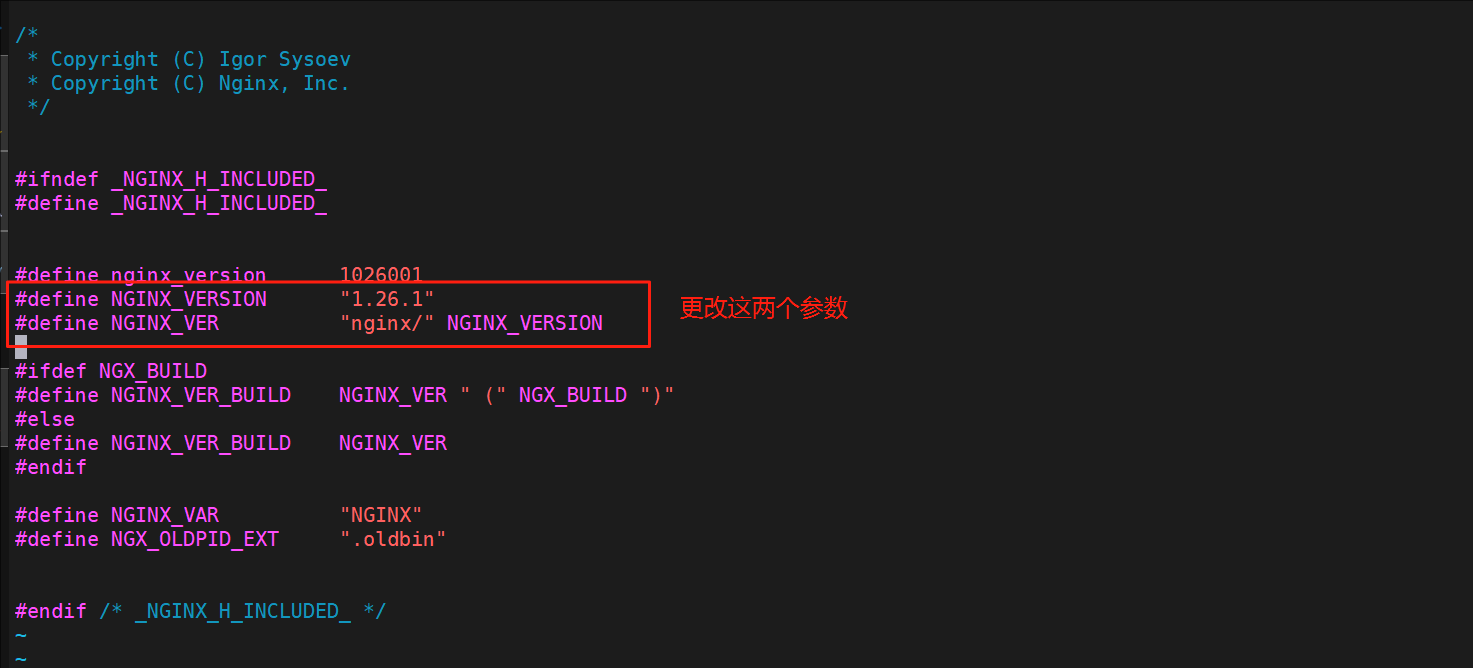
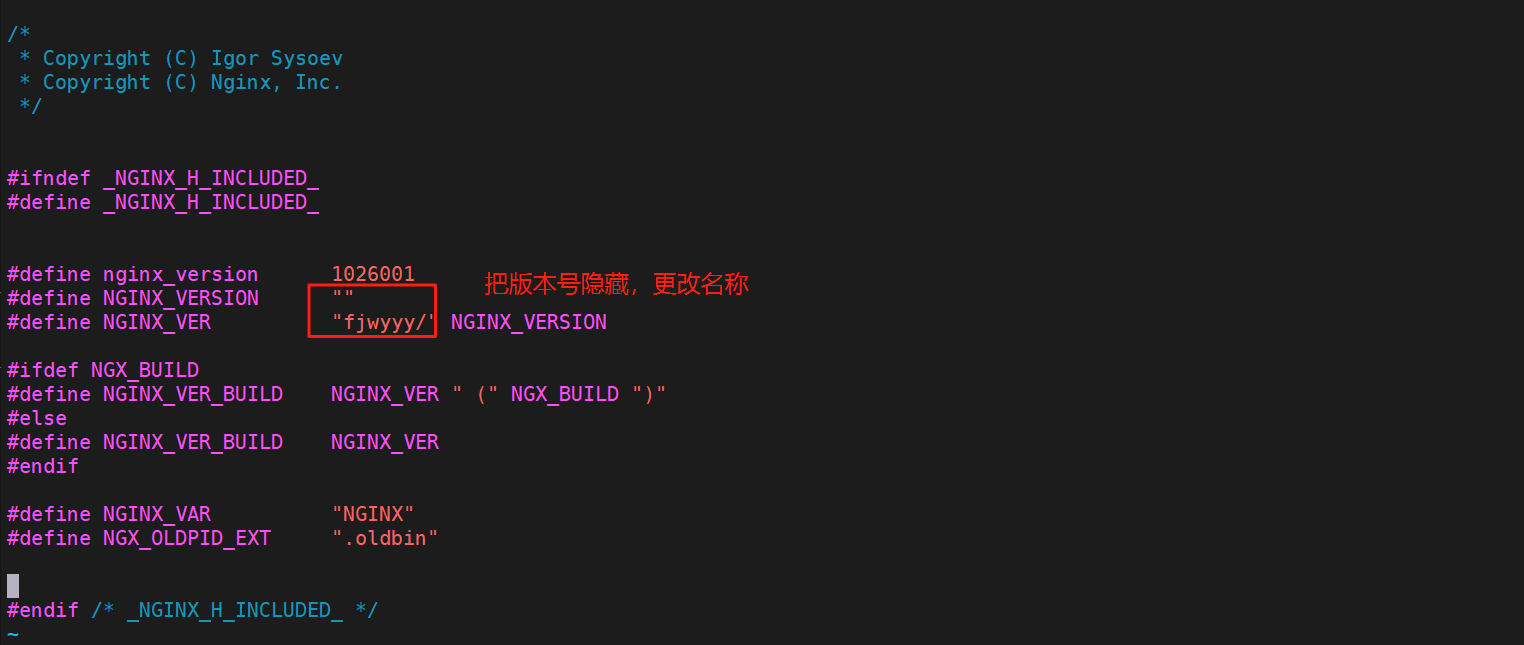
Nginx版本隐藏
编译前可以对其进行版本隐藏并自定义nginx
[root@nginx nginx-1.26.1]# vim src/core/nginx.h
测试
Nginx Rewrite相关功能
什么是rewrite
-
Nginx服务器利用 ngx_http_rewrite_module 模块解析和处理rewrite请求
-
此功能依靠 PCRE(perl compatible regular expression),因此编译之前要安装PCRE库
-
rewrite是nginx服务器的重要功能之一,用于实现URL的重写,URL的重写是非常有用的功能
-
比如它可以在我们改变网站结构之后,不需要客户端修改原来的书签,也无需其他网站修改我们的 链接,就可以设置为访问
-
另外还可以在一定程度上提高网站的安全性。
if指令
用于条件匹配判断,并根据条件判断结果选择不同的Nginx配置,可以配置在server或location块中进行 配置,Nginx的if语法仅能使用if做单次判断,不支持使用if else或者if elif这样的多重判断
使用正则表达式对变量进行匹配,匹配成功时if指令认为条件为true,否则认为false,变量与表达式之间 使用以下符号链接:
=           #比较变量和字符串是否相等,相等时if指令认为该条件为true,反之为false
!=          #比较变量和字符串是否不相等,不相等时if指令认为条件为true,反之为false
~           #区分大小写字符,可以通过正则表达式匹配,满足匹配条件为真,不满足匹配条件为假
!~          #区分大小写字符,判断是否匹配,不满足匹配条件为真,满足匹配条件为假
~*          #不区分大小写字符,可以通过正则表达式匹配,满足匹配条件为真,不满足匹配条件为假
!~*         #不区分大小字符,判断是否匹配,满足匹配条件为假,不满足匹配条件为真
-f 和 !-f    #判断请求的文件是否存在和是否不存在
-d 和 !-d    #判断请求的目录是否存在和是否不存在
-x 和 !-x    #判断文件是否可执行和是否不可执行
-e 和 !-e    #判断请求的文件或目录是否存在和是否不存在(包括文件,目录,软链接)
#注意:
#如果$变量的值为空字符串或0,则if指令认为该条件为false,其他条件为true
用法示例
[root@nginx nginx-1.28.1]# mkdir /webdir/fjw.org/fjw/html -p
[root@nginx nginx-1.28.1]# echo fjw test > /webdir/fjw.org/fjw/html/index.html
[root@nginx nginx-1.28.1]# vim /usr/local/nginx/conf.d/vhosts.conf
server {
listen 80;
server_name www.fjw.org;
root /webdata/nginx/fjw.org/fjw/html/;
location / {
root /webdir/fjw.org/fjw/html;
if ( $http_user_agent ~ firefox ) {
return 200 "test if messages";
}
}
}
[root@nginx nginx-1.28.1]# nginx -s reload
#测试
[root@nginx nginx-1.28.1]# curl -A "firefox" www.fjw.org
test if messages
[root@nginx nginx-1.28.1]# curl www.fjw.org
fjw test
set指令
指定key并给其定义一个变量,变量可以调用Nginx内置变量赋值给key 另外set定义格式为set $key value,value可以是text, variables和两者的组合,可以用于自定义变量。
用法如下:
[root@nginx nginx-1.28.1]# vim /usr/local/nginx/conf.d/vhosts.conf
server {
listen 80;
server_name www.fjw.org;
root /webdata/nginx/fjw.org/fjw/html/;
location / {
set $testname fjw;
echo $testname;
}
}
[root@nginx nginx-1.28.1]# nginx -s reload
#测试
[root@nginx nginx-1.28.1]# curl www.fjw.org
fjw
break指令
-
用于中断当前相同作用域(location)中的其他Nginx配置
-
与该指令处于同一作用域的Nginx配置中,位于它前面的配置生效
-
位于后面的 ngx_http_rewrite_module 模块中指令就不再执行
注意: 如果break指令在location块中后续指令还会继续执行,只是不执行 ngx_http_rewrite_module 模块的指令,其它指令还会执行
用法如下:
[root@nginx ~]# vim /usr/local/nginx/conf.d/vhosts.conf
server {
listen 80;
server_name www.fjw.org;
root /webdata/nginx/fjw.org/fjw/html/;
location / {
set $test1 fjw1;
set $test2 fjw2;
if ($http_user_agent = firefox){
break;
}
set $test3 fjw3;
echo $test1 $test2 $test3;
}
}
[root@nginx ~]# nginx -s reload
#测试
[root@nginx ~]# curl www.fjw.org
fjw1 fjw2 fjw3
[root@nginx ~]# curl -A "firefox" www.fjw.org
fjw1 fjw2
return指令
return用于完成对请求的处理,并直接向客户端返回响应状态码,比如:可以指定重定向URL(对于特殊重 定向状态码,301/302等) 或者是指定提示文本内容(对于特殊状态码403/500等),处于此指令后的所有配 置都将不被执行。
[root@nginx ~]# vim /usr/local/nginx/conf.d/vhosts.conf
server {
listen 80;
server_name www.fjw.org;
root /webdata/nginx/fjw.org/fjw/html/;
location / {
return 200 "hello world";
}
}
[root@nginx ~]# nginx -s reload
[root@nginx ~]# curl www.fjw.org
hello worl
rewrite指令
通过正则表达式的匹配来改变URI,可以同时存在一个或多个指令,按照顺序依次对URI进行匹配, rewrite主要是针对用户请求的URL或者是URI做具体处理
正则表达式格式
. #匹配除换行符以外的任意字符
\w #匹配字母或数字或下划线或汉字
\s #匹配任意的空白符
\d #匹配数字
\b #匹配单词的开始或结束
^ #匹配字符串的开始
$ #匹配字符串的结束
* #匹配重复零次或更多次
+ #匹配重复一次或更多次
? #匹配重复零次或一次
(n) #匹配重复n次
{n,} #匹配重复n次或更多次
{n,m} #匹配重复n到m次
*? #匹配重复任意次,但尽可能少重复
+? #匹配重复1次或更多次,但尽可能少重复
?? #匹配重复0次或1次,但尽可能少重复
{n,m}? #匹配重复n到m次,但尽可能少重复
{n,}? #匹配重复n次以上,但尽可能少重复
\W #匹配任意不是字母,数字,下划线,汉字的字符
\S #匹配任意不是空白符的字符
\D #匹配任意非数字的字符
\B #匹配不是单词开头或结束的位置
[^x] #匹配除了x以外的任意字符
[^fjw] #匹配除了fjw 这几个字母以外的任意字符
rewrite flag
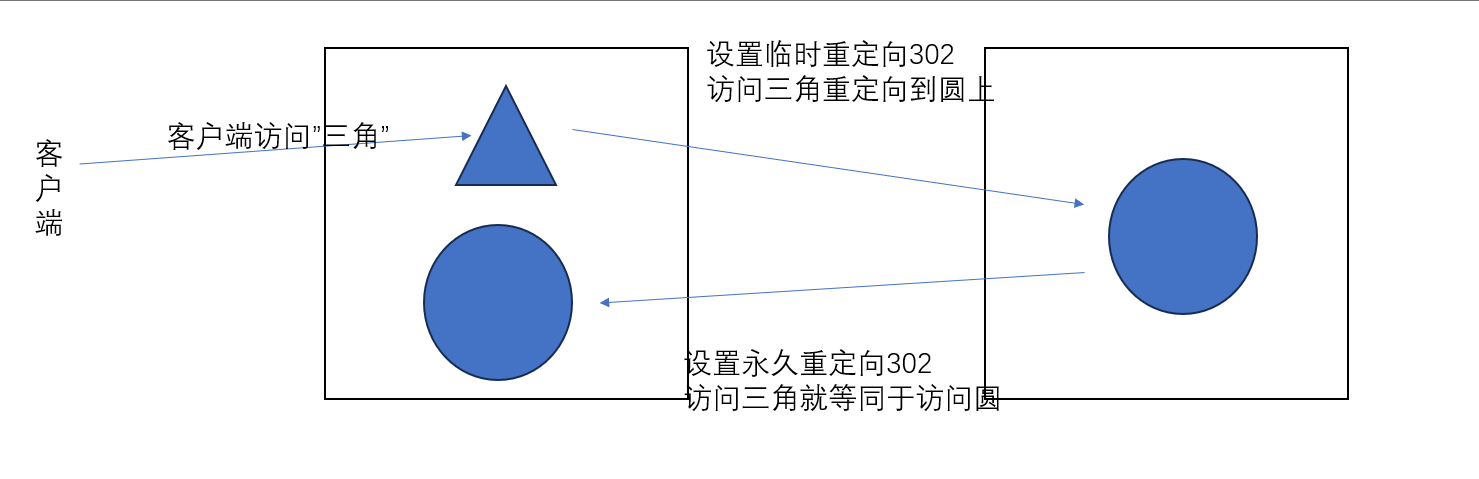
利用nginx的rewrite的指令,可以实现url的重新跳转,rewrite有四种不同的flag,分别是redirect(临时 重定向302)、permanent(永久重定向301)、break和last。其中前两种是跳转型的flag,后两种是代理型
-
跳转型指由客户端浏览器重新对新地址进行请求
-
代理型是在WEB服务器内部实现跳转
flag 说明
redirect; #临时重定向,重写完成后以临时重定向方式直接返回重写后生成的新URL给客户端 #由客户端重新发起请求;使用相对路径,或者http://或https://开头,状态码:302 permanent; #重写完成后以永久重定向方式直接返回重写后生成的新URL给客户端 #由客户端重新发起请求,状态码:301 break; #重写完成后,停止对当前URL在当前location中后续的其它重写操作 #而后直接跳转至重写规则配置块之后的其它配置,结束循环,建议在location中使用 #适用于一个URL一次重写 last; #重写完成后,停止对当前URI在当前location中后续的其它重写操作, #而后对新的URL启动新一轮重写检查,不建议在location中使用 #适用于一个URL多次重写,要注意避免出现超过十次以及URL重写后返回错误的给用户
redirect与permanent
区别:
redirect
[root@nginx ~]# vim /usr/local/nginx/conf.d/vhosts.conf
server {
listen 80;
server_name www.fjw.org;
root /webdata/nginx/fjw.org/fjw/html/;
location / {
rewrite / http://www.baidu.com redirect;
}
}
[root@nginx ~]# nginx -s reload
#测试
[root@nginx ~]# curl -I www.fjw.org
HTTP/1.1 302 Moved Temporarily #定向方式返回值
Server: nginx/1.28.1
Date: Sat, 07 Feb 2026 07:08:13 GMT
Content-Type: text/html
Content-Length: 145
Connection: keep-alive
Keep-Alive: timeout=60
Location: http://www.baidu.com #定向效果
permanent
[root@nginx ~]# vim /usr/local/nginx/conf.d/vhosts.conf
server {
listen 80;
server_name www.fjw.org;
root /webdata/nginx/fjw.org/fjw/html/;
location / {
rewrite / http://www.baidu.com permanent;
}
}
[root@nginx ~]# nginx -s reload
#测试
[root@nginx ~]# curl -I www.fjw.org
HTTP/1.1 301 Moved Permanently
Server: nginx/1.28.1
Date: Sat, 07 Feb 2026 07:10:44 GMT
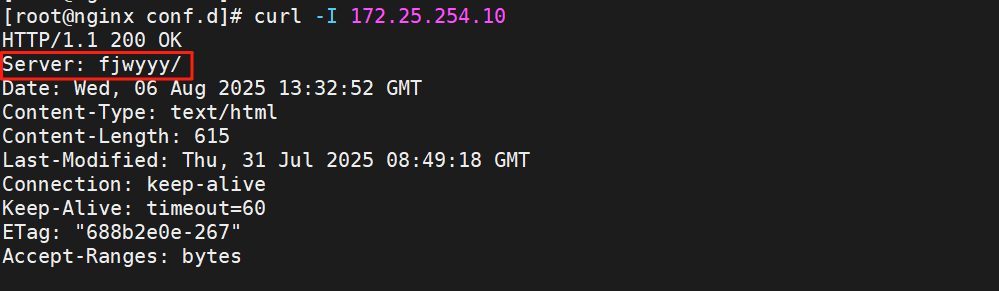
Content-Type: text/html
Content-Length: 169
Connection: keep-alive
Keep-Alive: timeout=60
Location: http://www.baidu.com
break与last
-
无 break/last:默认执行完当前 location 所有 rewrite,有return则执行无则匹配 location,URL 是所有 rewrite 叠加结果;
-
break:终止后续 rewrite,不重匹配 location,停在当前 location 处理,且不执行return;
-
last:终止后续 rewrite,重匹配 location,跳转到新的 location 处理,可以执行return。
生成测试文件,主要为break做对照
[root@nginx ~]# echo old page > /webdata/nginx/fjw.org/fjw/html/old
[root@nginx ~]# echo new page > /webdata/nginx/fjw.org/fjw/html/new
[root@nginx ~]# echo final page > /webdata/nginx/fjw.org/fjw/html/final
1.无 break/last(对照组)
配置:rewrite ^/old /new;(无任何终止指令)
执行流程:
-
执行第一条 rewrite:
/old→/new; -
继续执行第二条 rewrite:
/new→/final(因为没有终止指令,会执行完所有 rewrite); -
不触发重新匹配 location,留在
/old这个 location; -
执行
return指令,返回响应。 -
因为return存在导致不会跳转到/final这个location,被return响应了正常return不存在会重定向跳转至/final的location中。
[root@nginx ~]# vim /usr/local/nginx/conf.d/vhosts.conf
server {
listen 80;
server_name www.fjw.org;
root /webdata/nginx/fjw.org/fjw/html/;
location /old {
rewrite ^/old /new;
#rewrite ^/old /new break;
#rewrite ^/old /new last;
rewrite ^/new /final;
return 200 "未跳出 /old location,rewrite后内部URI:$uri\n";
}
location /new {
return 200 "匹配到 /new location,rewrite后内部URI:$uri\n";
}
location /final {
return 200 "匹配到 /final location,rewrite后内部URI:$uri\n";
}
}
[root@nginx ~]# nginx -t
[root@nginx ~]# nginx -s reload
#测试
[root@nginx ~]# curl www.fjw.org/old
未跳出 /old location,rewrite后内部URI:/final
2.加 break(对比组 1)
配置:rewrite ^/old /new break;
执行流程:
-
执行第一条 rewrite:
/old→/new; -
遇到
break,终止当前 location 内后续所有 rewrite 规则(第二条rewrite ^/new /final不执行); -
不触发重新匹配 location,留在
/old这个 location; -
不执行
return指令,开始查找/new文件或目录下的默认发布文件 -
break特性优先查找文件/目录,查找不到返回404,不会运行return
[root@nginx ~]# vim /usr/local/nginx/conf.d/vhosts.conf
server {
listen 80;
server_name www.fjw.org;
root /webdata/nginx/fjw.org/fjw/html/;
location /old {
#rewrite ^/old /new;
rewrite ^/old /new break;
#rewrite ^/old /new last;
rewrite ^/new /final;
return 200 "未跳出 /old location,rewrite后内部URI:$uri\n";
}
location /new {
return 200 "匹配到 /new location,rewrite后内部URI:$uri\n";
}
location /final {
return 200 "匹配到 /final location,rewrite后内部URI:$uri\n";
}
}
[root@nginx ~]# nginx -t
[root@nginx ~]# nginx -s reload
#测试
[root@nginx ~]# curl www.fjw.org/old
new page
3.加 last(对比组 2)
配置:rewrite ^/old /new last;
执行流程:
-
执行第一条 rewrite:
/old→/new; -
遇到
last,终止当前 location 内后续所有 rewrite 规则(第二条rewrite ^/new /final不执行); -
触发重新匹配 location:用新 URL
/new匹配到location /new; -
执行
location /new内的return指令,返回响应。
server {
listen 80;
server_name www.fjw.org;
root /webdata/nginx/fjw.org/fjw/html/;
location /old {
#rewrite ^/old /new;
#rewrite ^/old /new break;
rewrite ^/old /new last;
rewrite ^/new /final;
return 200 "未跳出 /old location,rewrite后内部URI:$uri\n";
}
location /new {
return 200 "匹配到 /new location,rewrite后内部URI:$uri\n";
}
location /final {
return 200 "匹配到 /final location,rewrite后内部URI:$uri\n";
}
}
[root@nginx ~]# nginx -t
[root@nginx ~]# nginx -s reload
#测试
[root@nginx ~]# curl www.fjw.org/old
匹配到 /new location,rewrite后内部URI:/new
三者核心差异对照表
| 指令情况 | 是否执行完当前 location 所有 rewrite | 是否触发重新匹配 location | 最终匹配的 location | 最终 URL | 是否执行return |
|---|---|---|---|---|---|
| 无 break/last | ✅ 是(执行全部) | ✅ 是 | /old | /final | ✅ 是 |
| 加 break | ❌ 否(执行到 break 终止) | ❌ 否 | /old | /new | ❌ 否 |
| 加 last | ❌ 否(执行到 last 终止) | ✅ 是 | /new | /new | ✅ 是 |
break不跳转location但也不执行return,会直接查找匹配到的uri进行查找文件/目录下的发布文件,查找不到返回404
全站加密https
制作key
[root@nginx ~]# mkdir /usr/local/nginx/certs/ [root@nginx ~]# openssl req -newkey rsa:2048 \ > -nodes -sha256 -keyout /usr/local/nginx/certs/fjw.org.key \ > -x509 -days 365 -out /usr/local/nginx/certs/fjw.org.crt
编辑配置文件
[root@nginx ~]# vim /usr/local/nginx/conf.d/vhosts.conf
server {
listen 80;
listen 443 ssl;
server_name www.fjw.org;
root /webdata/nginx/fjw.org/fjw/html/;
ssl_certificate /usr/local/nginx/certs/fjw.org.crt;
ssl_certificate_key /usr/local/nginx/certs/fjw.org.key;
ssl_session_cache shared:sslcache:20m;
ssl_session_timeout 10m;
location / {
if ($scheme = http ){
rewrite /(.*) https://$host/$1 redirect;
#return 301 https://$host$request_uri; #也可以直接使用return直接返回
}
}
}
[root@nginx ~]# nginx -s reload
#测试
[root@nginx ~]# curl -kIL www.fjw.org
HTTP/1.1 302 Moved Temporarily
Server: nginx/1.28.1
Date: Sat, 07 Feb 2026 20:40:30 GMT
Content-Type: text/html
Content-Length: 145
Connection: keep-alive
Keep-Alive: timeout=60
Location: https://www.fjw.org/
HTTP/1.1 200 OK
Server: nginx/1.28.1
Date: Sat, 07 Feb 2026 20:40:30 GMT
Content-Type: text/html
Content-Length: 12
Last-Modified: Tue, 03 Feb 2026 00:47:36 GMT
Connection: keep-alive
Keep-Alive: timeout=60
ETag: "698145a8-c"
Accept-Ranges: bytes
判断文件是否存在
[root@nginx ~]# vim /usr/local/nginx/conf.d/vhosts.conf
server {
listen 80;
listen 443 ssl;
server_name www.fjw.org;
root /webdata/nginx/fjw.org/fjw/html/;
ssl_certificate /usr/local/nginx/certs/fjw.org.crt;
ssl_certificate_key /usr/local/nginx/certs/fjw.org.key;
ssl_session_cache shared:sslcache:20m;
ssl_session_timeout 10m;
location / {
if ($scheme = http ){
rewrite ^/(.*) https://$host/$1 redirect;
}
if ( !-e $request_filename ){
rewrite ^/(.*) /index.html;
}
}
}
[root@nginx ~]# nginx -s reload
#测试
[root@nginx ~]# curl -Lk www.fjw.org
www.fjw.org
[root@nginx ~]# curl -Lk www.fjw.org/fjw
www.fjw.org
[root@nginx ~]# curl -Lk www.fjw.org/666
www.fjw.org
防盗链
防盗链基于客户端携带的referer实现,referer是记录打开一个页面之前记录是从哪个页面跳转过来的标 记信息,如果别人只链接了自己网站图片或某个单独的资源,而不是打开了网站的整个页面,这就是盗 链,referer就是之前的那个网站域名,正常的referer信息有以下几种:
none: #请求报文首部没有referer首部,
#比如用户直接在浏览器输入域名访问web网站,就没有referer信息。
blocked: #请求报文有referer首部,但无有效值,比如为空。
server_names: #referer首部中包含本主机名及即nginx 监听的server_name。
arbitrary_string: #自定义指定字符串,但可使用*作通配符。示例: *.fjw.org
www.fjw.*
regular expression: #被指定的正则表达式模式匹配到的字符串,要使用~开头,例如:
~*\.baidu\.com
实现盗链
[root@nginx ~]# mkdir /webdata/nginx/fjw.org/fjw/html/img [root@nginx ~]# mkdir /webdata/nginx/fjw.org/fjw/html/daolian #在img与daolian目录下放下测试图片 #生成一个测试主机下载httpd服务,导入一个盗链主页 [root@RS1 ~]# dnf install httpd -y [root@RS1 ~]# systemctl start httpd [root@RS1 ~]# vim /var/www/html/index.html <html> <head> <meta http-equiv=Content-Type content="text/html;charset=utf-8"> <title>盗链</title> </head> <body> <img src="http://www.fjw.org/img/linux.jpg" > <h1 style="color:red">欢迎大家</h1> <p><a href=http://www.fjw.org>点击点击点击</a>出门见喜</p> </body> </html>
在浏览器测试访问
访问的图片是别的主机的图片

点击后是www.fjw.org域名的默认发布页

查看nginx日志
[root@nginx ~]# > /usr/local/nginx/logs/access.log
[root@nginx ~]# cat /usr/local/nginx/logs/access.log
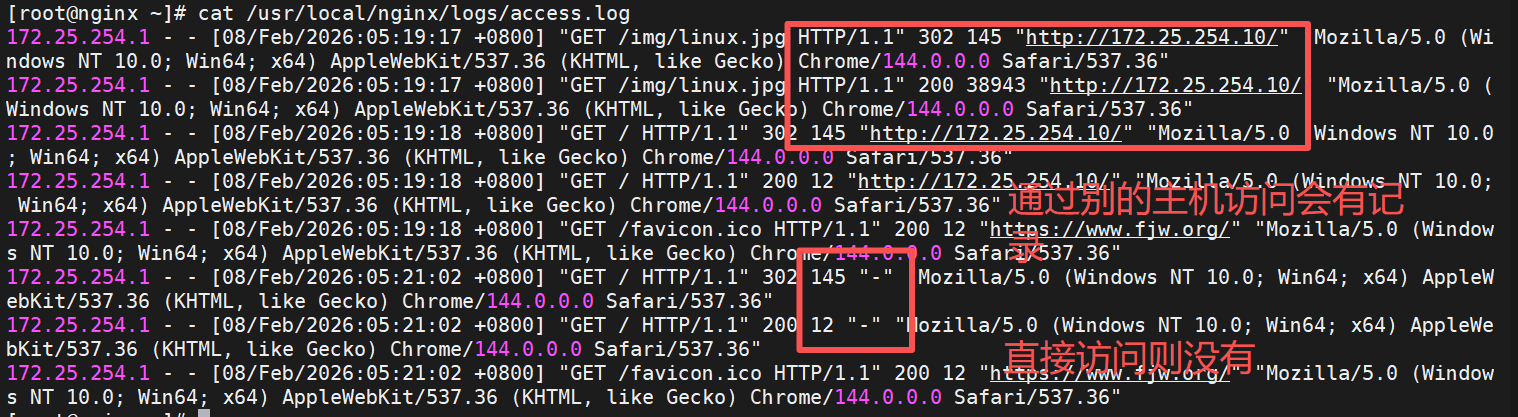
可以查看到http_referer值如果有盗链情况的话
实现防盗链
[root@nginx ~]# vim /usr/local/nginx/conf.d/vhosts.conf
server {
listen 80;
server_name www.fjw.org;
root /webdata/nginx/fjw.org/fjw/html/;
location / {
valid_referers none blocked server_names *.fjw.org ~/.baidu/.;
if ($invalid_referer){
return 404;
}
}
location /img {
valid_referers none blocked server_names *.fjw.org ~/.baidu/.;
if ($invalid_referer){
rewrite ^/ http://www.fjw.org/daolian/yaya.jpg;
}
}
}
使用浏览器访问测试

Nginx反向代理功能
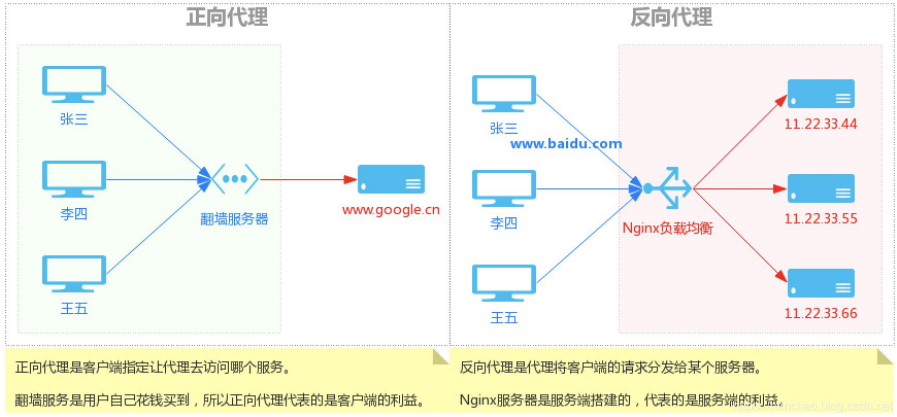
反向代理:reverse proxy,指的是代理外网用户的请求到内部的指定的服务器,并将数据返回给用户的 一种方式,这是用的比较多的一种方式。
Nginx 除了可以在企业提供高性能的web服务之外,另外还可以将 nginx 本身不具备的请求通过某种预 定义的协议转发至其它服务器处理,不同的协议就是Nginx服务器与其他服务器进行通信的一种规范,主 要在不同的场景使用以下模块实现不同的功能
| 模块名称 | 核心定位 | 协议 / 场景 | 对接服务类型 |
|---|---|---|---|
ngx_http_proxy_module |
HTTP/HTTPS 反向代理(最常用) | HTTP 协议 | 后端 HTTP 服务(Tomcat/Java/Node.js) |
ngx_http_upstream_module |
配置后端服务集群(负载均衡) | HTTP 协议 | 配合 ngx_http_proxy_module 使用 |
ngx_stream_proxy_module |
TCP/UDP 四层反向代理 | TCP/UDP 协议(四层) | 非 HTTP 服务(MySQL/Redis/SSH) |
ngx_http_fastcgi_module |
对接 FastCGI 协议服务 | FastCGI 协议 | PHP-FPM(PHP 解析服务) |
ngx_http_uwsgi_module |
对接 uWSGI 协议服务 | uWSGI 协议 | Python WSGI 应用(Django/Flask) |
同构与异构
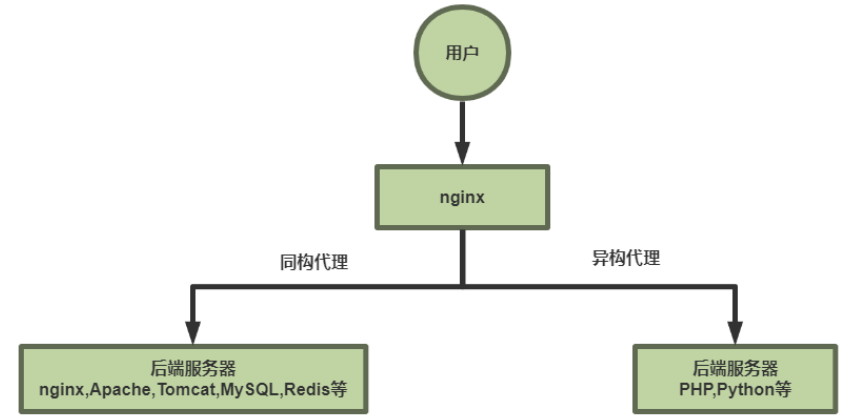
-
同构代理:用户不需要其他程序的参与,直接通过http协议或者tcp协议访问后端服务器
-
异构代理:用户访问的资源时需要经过处理后才能返回的,比如php,python,等等,这种访问资源需 要经过处理才能被访问
七层反向代理
基于ngx_http_proxy_module模块实现
配置简单的代理
实验环境
#172.25.254.10 RS1 172.25.254.20 RS2 [root@RSX ~]# dnf install httpd -y [root@RSX ~]# systemctl enable --now httpd [root@RSX ~]# echo RS2 - 172.25.254.20 > /var/www/html/index.html #测试 在Nginx主机中 [root@nginx ~]# curl 172.25.254.10 RS1 - 172.25.254.10 [root@nginx ~]# curl 172.25.254.20 RS2 - 172.25.254.20
配置反向代理
[root@RS2 ~]# mkdir /var/www/html/web
[root@RS2 ~]# echo 172.25.254.20 web > /var/www/html/web/index.html
[root@nginx ~]# vim /usr/local/nginx/conf.d/vhosts.conf
server {
listen 80;
server_name www.fjw.org;
location / {
proxy_pass http://172.25.254.10:80;
}
location /web {
proxy_pass http://172.25.254.20:80;
}
}
[root@nginx ~]# nginx -s reload
#测试
[root@nginx ~]# curl 172.25.254.20/web/
172.25.254.20 web
[root@nginx ~]# curl 172.25.254.10
RS1 - 172.25.254.10
配置参数
| 参数名 | 默认值 | 核心作用 | 关键说明 / 示例 |
|---|---|---|---|
proxy_pass |
无(必填) | 定义客户端请求转发的后端服务器地址 / 集群 | 1. 后端地址末尾无 /:追加location路径(如location /web + proxy_pass http://172.25.254.30:8080 → 转发到http://172.25.254.30:8080/web),类比root;2. 后端地址末尾有 /:替换location路径(如location /web + proxy_pass http://172.25.254.40:8080/ → 转发到http://172.25.254.40:8080/),类比alias;3. location用正则匹配(~/*)时,proxy_pass后不能加 / |
proxy_hide_header field |
无(默认不隐藏) | 隐藏后端服务器返回的指定响应头,不传递给客户端 | 示例:proxy_hide_header ETag;(隐藏后端的 ETag 响应头) |
proxy_pass_header field |
无(默认不透传 Date/Server 等) | 强制透传后端服务器的指定响应头给客户端 | 示例:proxy_pass_header Server;(透传后端的 Server 响应头) |
proxy_pass_request_body |
on |
控制是否向后端服务器发送 HTTP 请求的实体部分(如 POST 的表单数据) | 默认开启,关闭(off)会导致后端无法接收 POST 数据 |
proxy_pass_request_headers |
on |
控制是否将客户端的请求头转发给后端服务器 | 默认开启,关闭(off)会导致后端丢失 Cookie/Referer 等关键头信息 |
proxy_set_header field value |
无(按需配置) | 修改 / 新增客户端请求头,转发给后端服务器 | 核心场景:proxy_set_header X-Forwarded-For $remote_addr;(传递客户端真实 IP);proxy_set_header Host $host;(传递客户端访问的域名) |
proxy_connect_timeout |
60s |
Nginx 与后端服务器建立 TCP 连接的超时时间 | 超时返回 504 错误,建议调小(如6s),示例:proxy_connect_timeout 6s; |
proxy_read_timeout |
60s |
Nginx 向后端发请求后,等待后端返回响应的超时时间 | 后端处理慢(如大数据查询)可调大,示例:proxy_read_timeout 120s; |
proxy_send_timeout |
60s |
Nginx 向后端发送请求数据的超时时间 | 大文件上传场景可调大,示例:proxy_send_timeout 120s; |
proxy_http_version |
1.0 |
设置 Nginx 代理使用的 HTTP 协议版本 | 长连接场景建议设为1.1(需配合proxy_set_header Connection "";),示例:proxy_http_version 1.1; |
proxy_ignore_client_abort |
off |
客户端中断请求时,是否继续等待后端响应 | off(默认):客户端中断→Nginx 立即中断后端请求,记录 499 日志;on:忽略客户端中断,等待后端响应完成 |
总结
-
核心转发控制:
proxy_pass是基础,重点关注末尾/的拼接规则,正则匹配场景需禁用/; -
头信息管理:
proxy_hide_header隐藏后端响应头,proxy_pass_header透传关键头,proxy_set_header传递客户端真实信息(如 IP / 域名); -
超时配置:三个超时参数默认 60s,需按后端服务性能调整(短连接调小,长处理调大);
-
默认行为:请求体 / 请求头默认转发,客户端中断请求默认终止后端处理,无需额外配置即可满足大部分场景。
以下为部分参数的实验
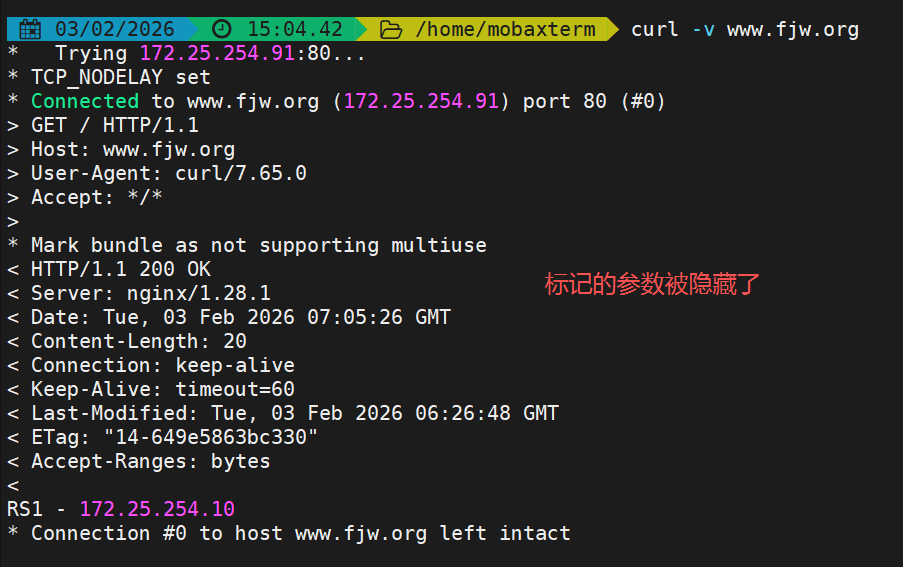
proxy_hide_header filed
[root@nginx ~]# vim /usr/local/nginx/conf.d/vhosts.conf
server {
listen 80;
server_name www.fjw.org;
location / {
proxy_pass http://172.25.254.10:80;
proxy_hide_header Content-Type;
}
location /web/ {
proxy_pass http://172.25.254.20:80;
}
}
[root@nginx ~]# nginx -s reload
#测试
配置访问前
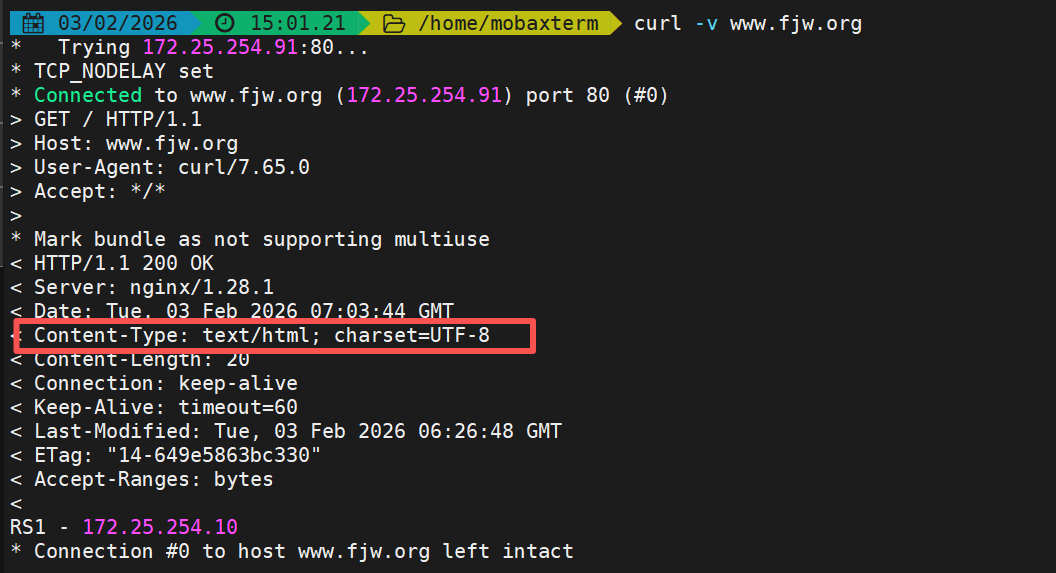
配置访问后
proxy_pass_header field
[root@nginx ~]# vim /usr/local/nginx/conf.d/vhosts.conf
server {
listen 80;
server_name www.fjw.org;
location / {
proxy_pass http://172.25.254.10:80;
proxy_pass_header Server;
}
location /web/ {
proxy_pass http://172.25.254.20:80;
}
}
[root@nginx ~]# nginx -s reload
配置访问前
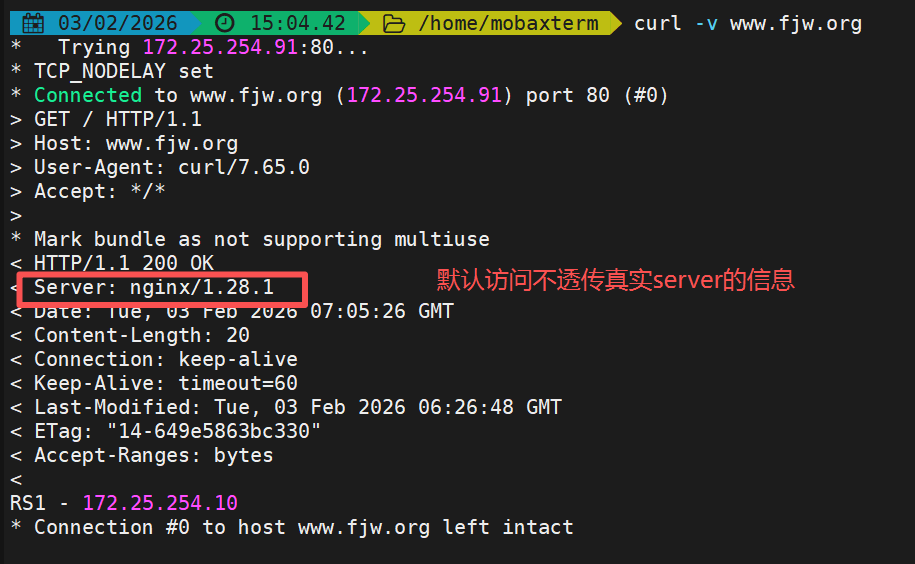
配置访问后
proxy_set_header
[root@RS1 ~]# vim /etc/httpd/conf/httpd.conf
LogFormat "%h %l %u %t \"%r\" %>s %b \"%{Referer}i\" \"%{User-Agent}i\" \"%{X-Forwarded-For}i\"" combined
[root@RS1 ~]# systemctl restart httpd
[root@nginx ~]# vim /usr/local/nginx/conf.d/vhosts.conf
server {
listen 80;
server_name www.fjw.org;
location / {
proxy_pass http://172.25.254.10:80;
proxy_set_header X-Forwarded-For $remote_addr; #开启IP透传参数
}
location /web/ {
proxy_pass http://172.25.254.20:80;
}
}
[root@nginx ~]# nginx -s reload
#测试
[Administrator.DESKTOP-VJ307M3] ➤ curl www.fjw.org
RS1 - 172.25.254.10
#查看RS日志
[root@RS1 ~]# cat /etc/httpd/logs/access_log
172.25.254.100 - - [03/Feb/2026:15:12:49 +0800] "GET / HTTP/1.0" 200 20 "-" "curl/7.65.0" "172.25.254.1"
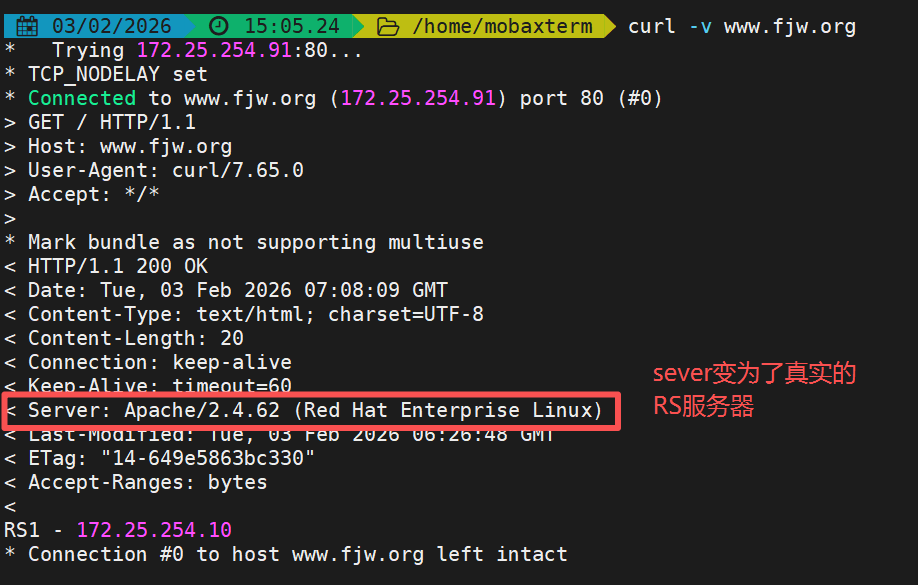
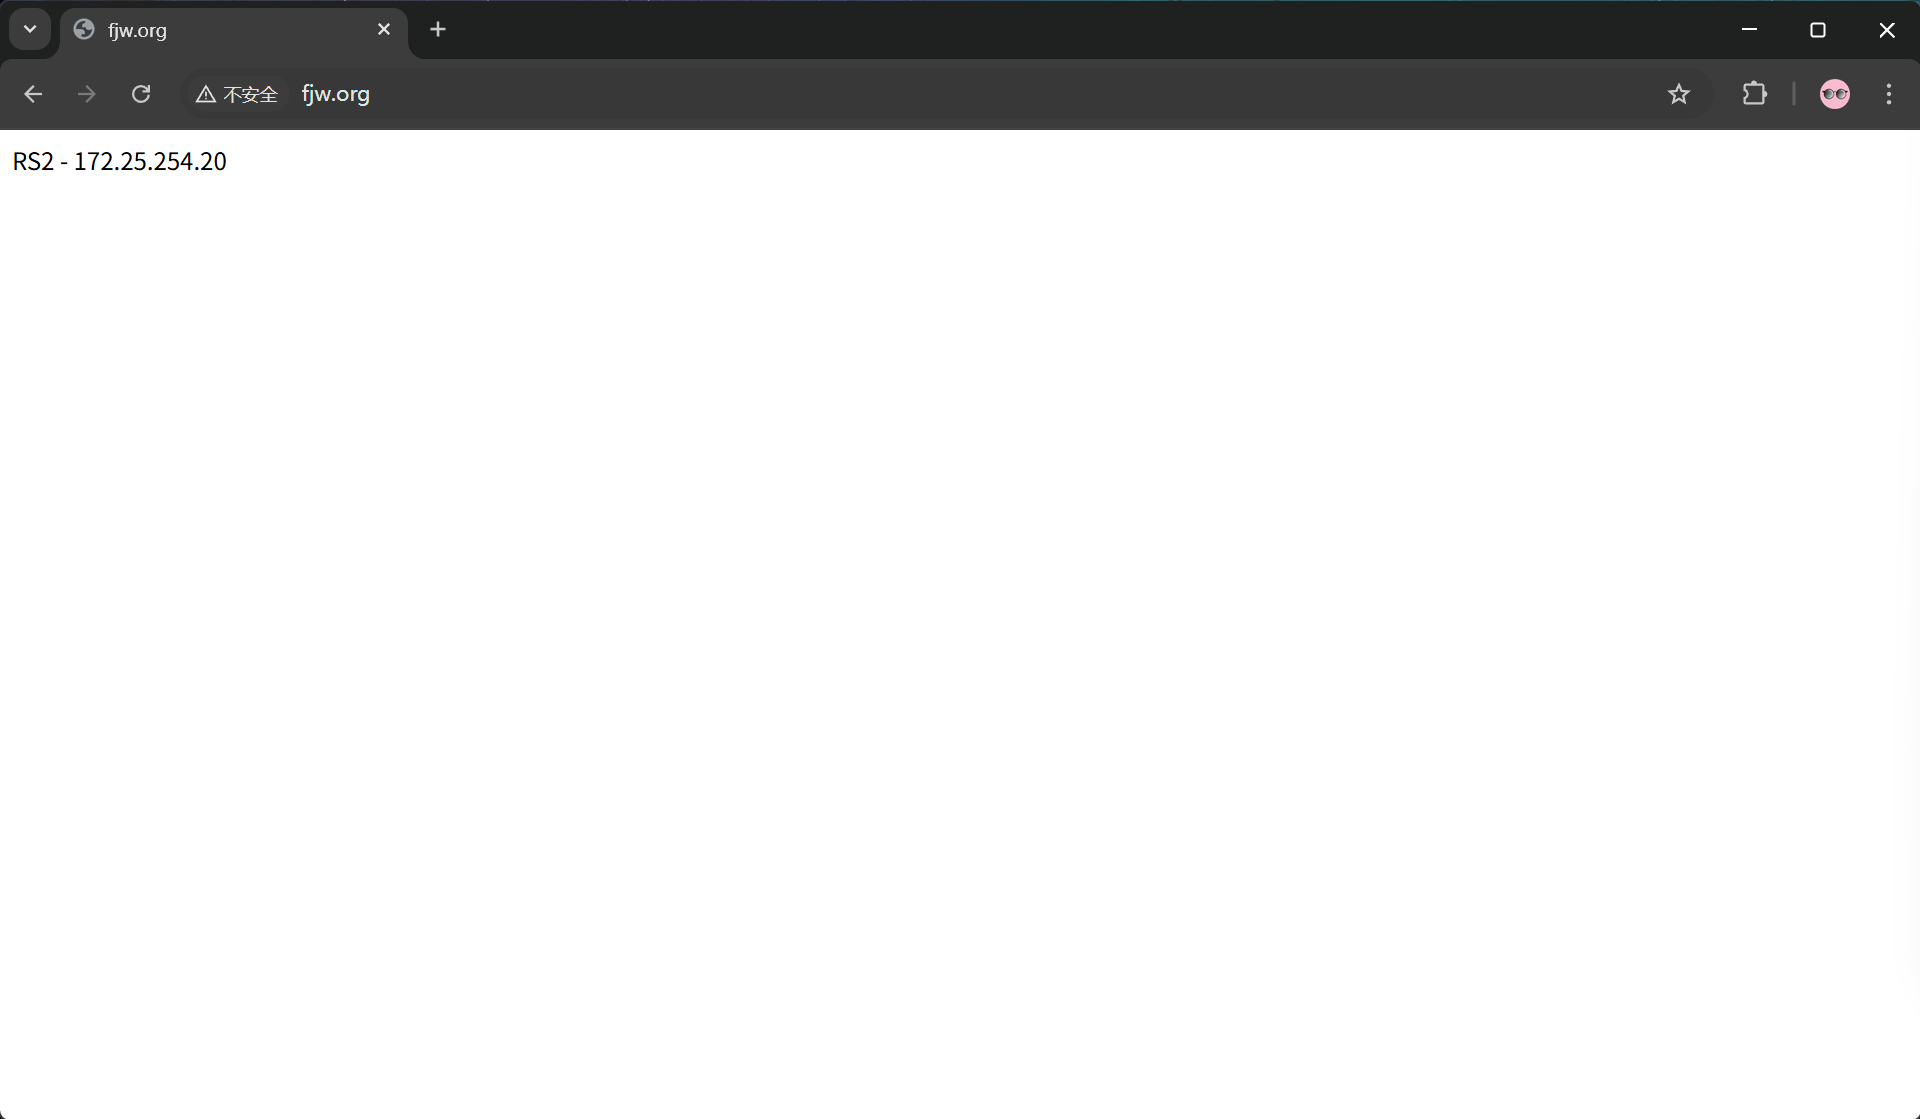
实现动静分离
[root@RS1 ~]# dnf install php -y
[root@RS1 ~]# vim /var/www/html/index.php
<?php
echo RS1 - 172.25.254.10
phpinfo()
?>
[root@RS1 ~]# systemctl enable --now php-fpm
[root@nginx ~]# vim /usr/local/nginx/conf.d/vhosts.conf
server {
listen 80;
server_name www.fjw.org;
location ~* \.(php|js)$ {
proxy_pass http://172.25.254.10:80;
}
location / {
proxy_pass http://172.25.254.20:80;
}
}
[root@nginx ~]# nginx -s reload
测试
访问静态网页
访问动态网页

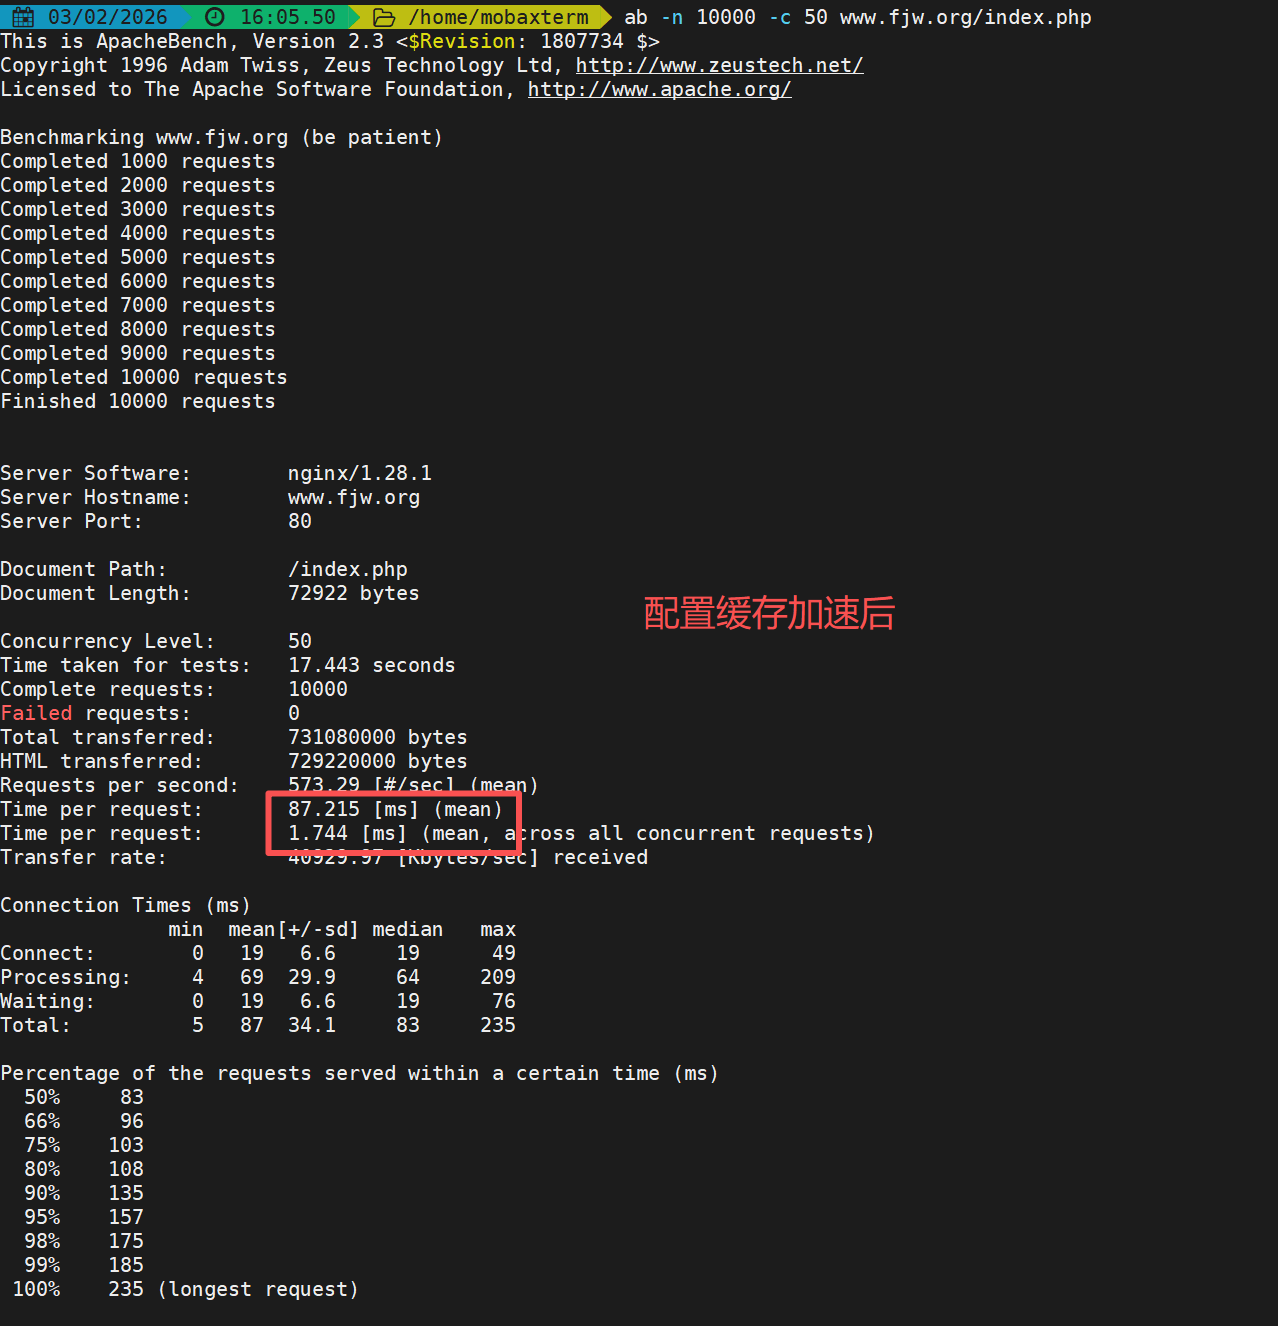
缓存后端动态资源实现加速
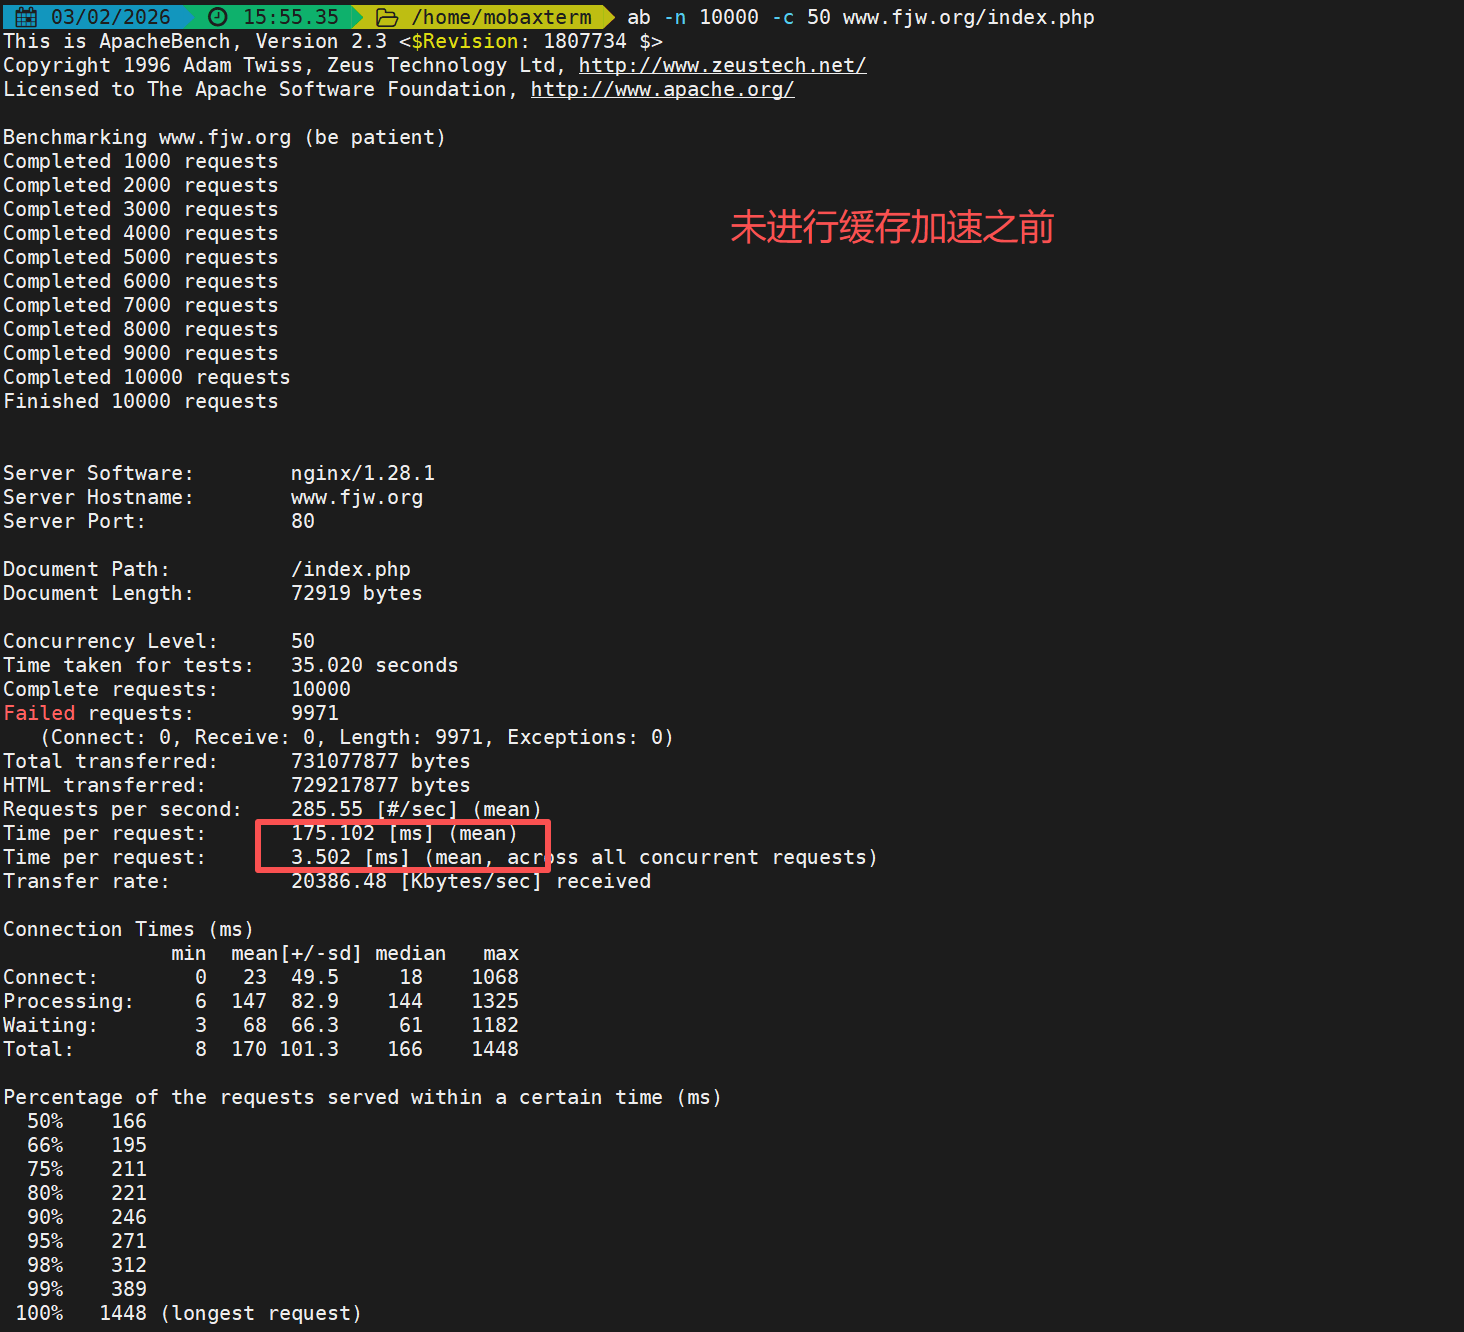
配置缓存加速
[root@nginx ~]# vim /usr/local/nginx/conf/nginx.conf
proxy_cache_path /usr/local/nginx/proxy_cache levels=1:2:2 keys_zone=proxycache:20m inactive=120s max_size=1g;
[root@nginx ~]# vim /usr/local/nginx/conf.d/vhosts.conf
server {
listen 80;
server_name www.fjw.org;
location ~* \.(php|js)$ {
proxy_pass http://172.25.254.10:80;
proxy_cache proxycache;
proxy_cache_key $request_uri;
proxy_cache_valid 200 302 301 10m;
proxy_cache_valid any 1m;
}
location / {
proxy_pass http://172.25.254.20:80;
}
}
[root@nginx ~]# systemctl restart nginx.service
#缓存之前的目录
[root@nginx ~]# tree /usr/local/nginx/proxy_cache/
/usr/local/nginx/proxy_cache/
0 directories, 0 files
#进行缓存后查看缓存目录
[root@nginx ~]# tree /usr/local/nginx/proxy_cache/
/usr/local/nginx/proxy_cache/
└── 1
└── af
└── 15
└── e251273eb74a8ee3f661a7af00915af1
3 directories, 1 file
七层反向代理负载均衡
基于ngx_http_proxy_module与ngx_http_upstream_module模块实现
实验环境
172.25.254.100          #Nginx 代理服务器
172.25.254.10           #后端web A,Apache部署
172.25.254.20           #后端web B,Apache部署
配置参数
server 节点核心参数(功能 + 默认值 + 关键说明)
| 参数名 | 默认值 | 核心作用 | 关键说明 |
|---|---|---|---|
weight=number |
1 | 权重控制 | 数值越大,被分配的请求越多,实现加权轮询(类似 LVS 的 WRR/WLC);例如weight=5表示该节点优先级更高 |
max_conns=number |
0(无限制) | 并发连接限制 | 限制当前后端服务器的最大活动连接数,避免单节点过载,Nginx 1.11.5 + 支持 |
max_fails=number |
1 | 故障判定阈值 | 客户端访问时,对选中的后端服务器连续检测失败次数达到该值,即标记为不可用;仅在有客户端请求时触发检测,非周期性探测 |
fail_timeout=time |
10s | 故障恢复检测间隔 | 对已标记为不可用的后端服务器,每隔该时间重试检测;若恢复可用,则重新参与调度 |
backup |
未启用 | 备份服务器 | 所有主服务器不可用时,才会启用该节点,用于容灾兜底 |
down |
未启用 | 手动下线 | 标记服务器为 down 状态,实现平滑下线(维护时使用),不参与请求调度 |
resolve |
未启用 | 域名解析更新 | 当server地址为域名时,域名 A 记录变化后自动应用新 IP,无需重启 Nginx |
实现负载均衡
[root@nginx ~]# vim /usr/local/nginx/conf/nginx.conf
server {
......
include "/usr/local/nginx/conf.d/*.conf";
}
[root@nginx ~]# vim /usr/local/nginx/conf.d/up.conf
upstream webserver {
server 172.25.254.10:80 weight=1 fail_timeout=15s max_fails=3;
server 172.25.254.20:80 weight=1 fail_timeout=15s max_fails=3;
server 172.25.254.100:8888 backup;
}
server {
listen 80;
server_name www.fjw.org;
location ~ / {
proxy_pass http://webserver; #反向代理负载均衡集群
}
}
[root@nginx ~]# vim /usr/local/nginx/conf.d/vhosts.conf
server {
listen 8888;
root /usr/local/nginx/errorpage;
index errormessage;
}
[root@nginx ~]# nginx -s reload
测试
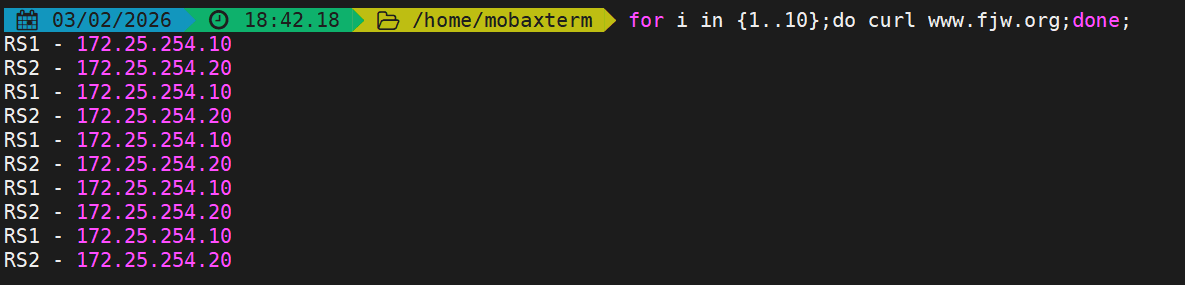
#停止后端RS服务使其访问备用网页 [root@RS1 ~]# systemctl stop httpd.service [root@RS2 ~]# systemctl stop httpd.service 03/02/2026 18:46.50 /home/mobaxterm curl www.fjw.org 太不巧了,你要访问的页面辞职了!!
算法
负载均衡算法(调度策略 + 适用场景)
| 算法语法 | 核心规则 | 适用场景 | 补充特性 |
|---|---|---|---|
| 默认轮询(无显式配置) | 按节点顺序依次分配请求,结合weight实现加权轮询 |
后端节点性能一致、无会话保持需求 | 配置最简单,无需额外声明 |
ip_hash; |
基于客户端remote_addr(IPv4 前 24 位 / 完整 IPv6)哈希,固定请求到同一节点 |
需会话保持(如后端本地 Session、无分布式缓存) | 实现会话绑定,同一局域网 IP 可能集中到同一节点 |
hash KEY [consistent]; |
基于指定 KEY(如$request_uri/$cookie_sessionid)哈希,固定请求到同一节点;加consistent启用 ketama 一致性哈希 |
1. 自定义会话保持(如按 URI/Cookie 绑定);2. 后端为缓存服务器(如 varnish) | 一致性哈希可减少节点变化时的请求重分配,降低缓存失效概率 |
least_conn; |
优先将请求分配给当前并发连接数最少的后端服务器 | 后端请求处理时间差异大(如长连接、慢查询场景) | 负载更均衡,避免单节点过载,类似 LVS 的 WLC 算法 |
以下为算法的实验
ip_hash
[root@nginx ~]# vim /usr/local/nginx/conf.d/up.conf
upstream webserver {
ip_hash;
server 172.25.254.10:80 weight=1 fail_timeout=15s max_fails=3;
server 172.25.254.20:80 weight=1 fail_timeout=15s max_fails=3;
#server 172.25.254.100:8888 backup;
}
server {
listen 80;
server_name www.fjw.org;
location ~ / {
proxy_pass http://webserver;
}
}
[root@nginx ~]# nginx -s reload
#测试
[root@nginx ~]# curl www.fjw.org
RS1 - 172.25.254.10
[root@nginx ~]# curl www.fjw.org
RS1 - 172.25.254.10
[root@nginx ~]# curl www.fjw.org
RS1 - 172.25.254.10
[root@nginx ~]# curl www.fjw.org
RS1 - 172.25.254.10
hash $request_uri consistent;
[root@nginx ~]# vim /usr/local/nginx/conf.d/up.conf
upstream webserver {
#ip_hash;
hash $request_uri consistent;
server 172.25.254.10:80 weight=1 fail_timeout=15s max_fails=3;
server 172.25.254.20:80 weight=1 fail_timeout=15s max_fails=3;
#server 172.25.254.100:8888 backup;
}
server {
listen 80;
server_name www.fjw.org;
location ~ / {
proxy_pass http://webserver;
}
}
[root@nginx ~]# nginx -s reload
#测试
[root@nginx ~]# curl www.fjw.org/web1/index.html
RS1
[root@nginx ~]# curl www.fjw.org/web2/index.html
RS2
[root@nginx ~]# curl www.fjw.org/web3/index.html
RS2
least_conn;
[root@nginx ~]# vim /usr/local/nginx/conf.d/up.conf
upstream webserver {
#ip_hash;
#hash $request_uri consistent;
least_conn;
server 172.25.254.10:80 weight=1 fail_timeout=15s max_fails=3;
server 172.25.254.20:80 weight=1 fail_timeout=15s max_fails=3;
#server 172.25.254.100:8888 backup;
}
server {
listen 80;
server_name www.fjw.org;
location ~ / {
proxy_pass http://webserver;
}
}
[root@nginx ~]# nginx -s reload
#测试
[root@nginx ~]# curl www.fjw.org
RS1 - 172.25.254.10
[root@nginx ~]# curl www.fjw.org
RS2 - 172.25.254.20
[root@nginx ~]# curl www.fjw.org
RS1 - 172.25.254.10
[root@nginx ~]# curl www.fjw.org
RS2 - 172.25.254.20
hash $cookie_value;
[root@nginx ~]# vim /usr/local/nginx/conf.d/up.conf
upstream webserver {
#ip_hash;
#hash $request_uri consistent;
#least_conn;
hash $cookie_fjw;
server 172.25.254.10:80 weight=1 fail_timeout=15s max_fails=3;
server 172.25.254.20:80 weight=1 fail_timeout=15s max_fails=3;
#server 172.25.254.100:8888 backup;
}
server {
listen 80;
server_name www.fjw.org;
location ~ / {
proxy_pass http://webserver;
}
}
[root@nginx ~]# nginx -s reload
#测试
[root@nginx ~]# curl -b fjw=1 www.fjw.org
RS1 - 172.25.254.10
[root@nginx ~]# curl -b fjw=2 www.fjw.org
RS2 - 172.25.254.20
[root@nginx ~]# curl -b fjw=3 www.fjw.org
RS1 - 172.25.254.10
[root@nginx ~]# curl -b fjw=4 www.fjw.org
RS1 - 172.25.254.10
[root@nginx ~]# curl -b fjw=5 www.fjw.org
RS2 - 172.25.254.20
七层与四层的参数对比
| 配置维度 | 七层反向代理(HTTP/HTTPS) | 四层反向代理(TCP/UDP) |
|---|---|---|
| 核心配置块 | ✅ 放在 http {} 内部 |
✅ 放在 stream {} 内部(与http平级) |
| 内部配置结构 | ✅ 有 server {} → location {}(多层嵌套) |
✅ 只有 server {},无location(关键差异) |
| 依赖模块 | ✅ ngx_http_proxy_module、ngx_http_upstream_module | ✅ ngx_stream_proxy_module |
| 监听指令(listen) | ✅ 支持:listen 80;、listen 443 ssl;、http2;支持多域名区分 |
✅ 支持:listen 3306;、listen 6379 udp;;❌ 不支持ssl、server_name |
| 转发指令(proxy_pass) | ✅ 支持:加/不加 /(路径替换/追加);支持代理到http/https;可配合location路由 |
✅ 仅支持:IP:端口 或 upstream集群名;❌ 不能带路径、不能加/;只做透传 |
| upstream集群(共有参数) | ✅ 支持:server、weight、max_fails、fail_timeout、backup、down、least_conn、hash $remote_addr | ✅ 支持:与七层完全一致(上述共有参数) |
| upstream集群(独有参数) | ✅ 独有:ip_hash;、hash $cookie_xxx;、hash $request_uri;(依赖HTTP解析) |
❌ 无独有参数;❌ 不支持ip_hash、cookie/URI哈希(无法解析HTTP) |
| 请求头/响应头操作 | ✅ 独有:proxy_set_header、proxy_hide_header、proxy_pass_header、proxy_pass_request_headers/body | ❌ 完全不支持(无法解析HTTP头信息) |
| 超时参数 | ✅ 支持:proxy_connect_timeout、proxy_read_timeout、proxy_send_timeout、proxy_http_version(独有) |
✅ 支持:proxy_connect_timeout、proxy_read_timeout、proxy_send_timeout、proxy_timeout(独有,会话空闲超时);❌ 无proxy_http_version |
| SSL卸载(解密) | ✅ 支持:可配置ssl_certificate、ssl_certificate_key,实现HTTPS解密 | ❌ 不支持(仅透传TCP流,不解密SSL) |
| 路由能力 | ✅ 支持:按路径(/api)、后缀(.php)、正则路由(location匹配) | ❌ 不支持路由;一个server对应一个端口,无法按路径拆分 |
| 支持协议 | ✅ 仅支持:HTTP、HTTPS | ✅ 支持:所有TCP、UDP协议(MySQL、Redis、SSH等) |
四层反向代理
基于ngx_stream_proxy_module模块实现
建立子配置文件避免主配置文件杂乱
[root@nginx ~]# vim /usr/local/nginx/conf/nginx.conf
include "/usr/local/nginx/conf.d/tcp/*.conf";   #与http同级
四层反向代理配置示例
[root@nginx ~]# vim /usr/local/nginx/conf.d/tcp/proxy.conf
# 四层代理需放在stream块中(和http块同级)
stream {
    # MySQL代理
    server {
        listen 3306; # 监听本机3306端口
        # 转发到后端MySQL服务器
        proxy_pass 172.25.254.50:3306;
        # 四层超时配置
        proxy_connect_timeout 5s;
        proxy_timeout 300s;
    }

    # Redis代理(UDP示例)
    server {
        listen 6379 udp; # 监听UDP 6379
        proxy_pass 172.25.254.60:6379;
    }
}
四层反向代理负载均衡
基于ngx_stream_proxy_module和ngx_http_upstream_module模块实现
[root@nginx ~]# vim /usr/local/nginx/conf/nginx.conf
include "/usr/local/nginx/conf.d/tcp/*.conf";   #与http同级
tcp四层负载-mysql
配置后端实验环境
[root@RS1 ~]# dnf install mariadb-server -y [root@RS2 ~]# dnf install mariadb-server -y [root@RS1 ~]# vim /etc/my.cnf.d/mariadb-server.cnf server-id=10 [root@RS2 ~]# vim /etc/my.cnf.d/mariadb-server.cnf server-id=20 [root@RS1 ~]# systemctl enable --now mariadb [root@RS2 ~]# systemctl enable --now mariadb [root@RS1 ~]# mysql -e "CREATE USER fjw@'%' IDENTIFIED BY 'fjw';" [root@RS1 ~]# mysql -e "GRANT ALL ON *.* TO fjw@'%'; [root@RS2 ~]# mysql -e "CREATE USER fjw@'%' IDENTIFIED BY 'fjw';" [root@RS2 ~]# mysql -e "GRANT ALL ON *.* TO fjw@'%';"
配置tcp负载
[root@nginx ~]# vim /usr/local/nginx/conf.d/tcp/up.conf
stream {
upstream mysql_server {
server 172.25.254.10:3306 max_fails=3 fail_timeout=30s;
server 172.25.254.20:3306 max_fails=3 fail_timeout=30s;
}
server {
listen 172.25.254.100:3306;
proxy_pass mysql_server;
proxy_connect_timeout 30s; # 连接后端超时时间
proxy_timeout 300s; # 长连接空闲超时(适配MySQL)
proxy_socket_keepalive on; # 启用TCP keepalive,避免长连接断开
}
}
[root@nginx ~]# nginx -s reload
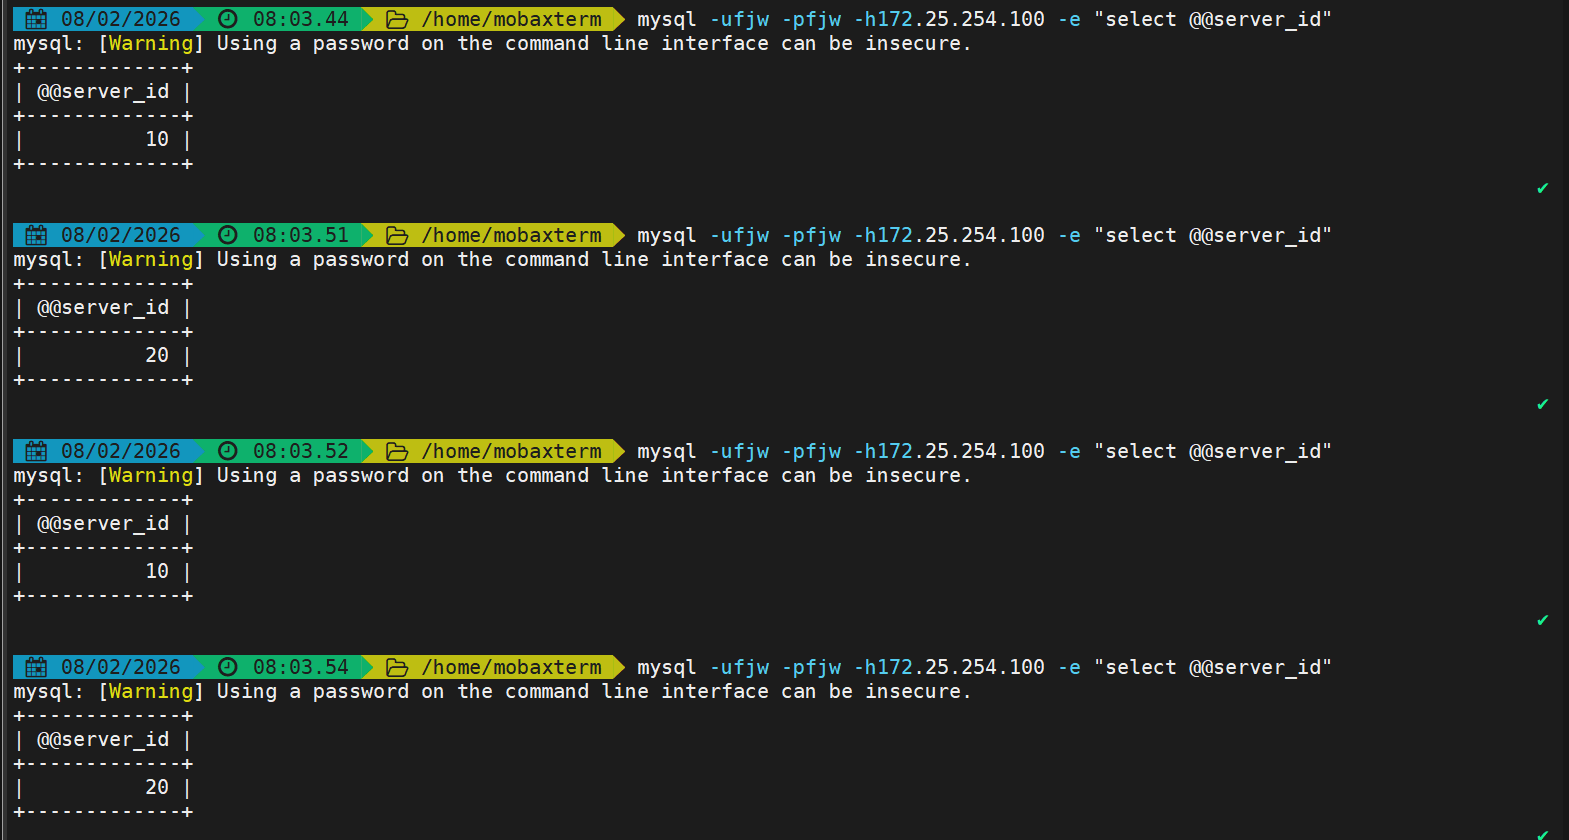
在客户端进行测试
udp四层负载-dns
配置后端实验环境
[root@RS1 ~]# dnf install bind -y
[root@RS2 ~]# dnf install bind -y
[root@RS1 ~]# vim /etc/named.conf
[root@RS2 ~]# vim /etc/named.conf
options {
// listen-on port 53 { 127.0.0.1; }; #注释掉使用默认参数
// listen-on-v6 port 53 { ::1; };
directory "/var/named";
dump-file "/var/named/data/cache_dump.db";
statistics-file "/var/named/data/named_stats.txt";
memstatistics-file "/var/named/data/named_mem_stats.txt";
secroots-file "/var/named/data/named.secroots";
recursing-file "/var/named/data/named.recursing";
// allow-query { localhost; };
dnssec-validation no;
[root@RS1 ~]# vim /etc/named.rfc1912.zones
[root@RS2 ~]# vim /etc/named.rfc1912.zones
#在末尾添加
zone "fjw.org" IN {
type master;
file "fjw.org.zone";
allow-update { none; };
};
[root@RS1 ~]# cd /var/named/
[root@RS2 ~]# cd /var/named/
[root@RS1 named]# cp -p named.localhost fjw.org.zone
[root@RS2 named]# cp -p named.localhost fjw.org.zone
[root@RS1 named]# vim fjw.org.zone
$TTL 1D
@ IN SOA dns.fjw.org rname.invalid. (
0 ; serial
1D ; refresh
1H ; retry
1W ; expire
3H ) ; minimum
NS dns.fjw.org
dns A 172.25.254.10
test A 172.25.254.66
[root@RS1 named]# systemctl enable --now named
[root@RS2 named]# vim fjw.org.zone
$TTL 1D
@ IN SOA dns.fjw.org rname.invalid. (
0 ; serial
1D ; refresh
1H ; retry
1W ; expire
3H ) ; minimum
NS dns.fjw.org
dns A 172.25.254.20
test A 172.25.254.66
[root@RS2 named]# systemctl enable --now named
配置udp负载
[root@nginx ~]# vim /usr/local/nginx/conf.d/tcp/up.conf
stream {
upstream mysql_server {
server 172.25.254.10:3306 max_fails=3 fail_timeout=30s;
server 172.25.254.20:3306 max_fails=3 fail_timeout=30s;
}
upstream dns_server{
server 172.25.254.10:53 max_fails=3 fail_timeout=30s;
server 172.25.254.20:53 max_fails=3 fail_timeout=30s;
}
server {
listen 172.25.254.100:3306;
proxy_pass mysql_server;
proxy_connect_timeout 30s;
proxy_timeout 300s;
proxy_socket_keepalive on;
}
server {
listen 172.25.254.100:53 udp;
proxy_pass dns_server;
proxy_timeout 1s; # DNS请求超时时间(1s适配DNS快速响应特性)
proxy_responses 1; # UDP必配:等待后端1个响应后关闭连接
error_log logs/dns.log;
}
}
[root@nginx ~]# nginx -s reload
测试

FastCGI
Nginx基于模块ngx_http_fastcgi_module实现通过fastcgi协议将指定的客户端请求转发至php-fpm处理,其配置指令参数如下:
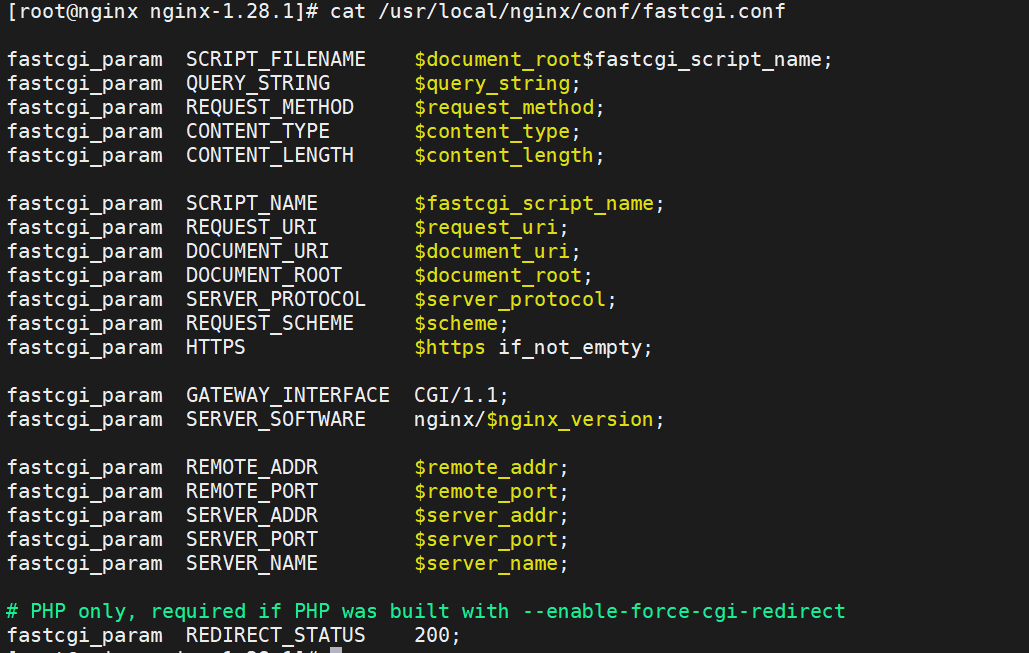
fastcgi_pass address:port; #转发请求到后端服务器,address为后端的fastcgi server的地址,可用位置:localhost, if in localhost fastcgi_index name; #fastcgi默认的主页资源,示例:fastcgi_index index.php; fastcgi_param value; #设置传递给FastCGI服务器的参数值,可以是文本,变量或组合,可用于将Nginx的内置变量赋值给自定义key 有以下值等; fastcgi_param REMOTE_ADDR $remote_addr; #客户端源IP fastcgi_param REMOTE_PORT $remote_port; #客户端源端口 fastcgi_param SERVER_ADDR $server_addr; #请求的服务器IP地址 fastcgi_param SERVER_PORT $server_port; #请求的服务器端口 fastcgi_param SERVER_NAME $server_name; #请求的server name #可以通过include fastcgi.conf;参数来作为环境配置参数 #fastcgi.conf此文件都包含了预设的FastCGI环境变量
以下为简洁的默认配置示例
server {
        listen 80;
        server_name php.fjw.org;
        root /webdir/fjw.org/php/html;
        location ~ \.php$ {
        fastcgi_pass 127.0.0.1:9000;
        fastcgi_index index.php;
        include fastcgi.conf;
        }
}
php源码编译安装
1.下载源码包
[root@nginx ~]# wget https://www.php.net/distributions/php-8.3.30.tar.gz
[root@nginx ~]# wget https://mirrors.aliyun.com/rockylinux/9.7/devel/x86_64/os/Packages/o/oniguruma-devel-6.9.6-1.el9.6.x86_64.rpm     #下载依赖包
2.解压并编译
[root@nginx ~]# tar zxf php-8.3.30.tar.gz #下载依赖包 [root@nginx ~]# dnf install gcc systemd-devel-252-51.el9.x86_64 libxml2-devel.x86_64 sqlite-devel.x86_64 libcurl-devel.x86_64 libpng-devel.x86_64 oniguruma-devel-6.9.6-1.el9.6.x86_64.rpm -y [root@nginx php-8.3.30]# ./configure \ --prefix=/usr/local/php \ #安装路径 --with-config-file-path=/usr/local/php/etc \ #指定配置路径 --enable-fpm \ #用cgi方式启动程序 --with-fpm-user=nginx \ #指定运行用户身份 --with-fpm-group=nginx \ --with-curl \ #打开curl浏览器支持 --with-iconv \ #启用iconv函数,转换字符编码 --with-mhash \ #mhash加密方式扩展库 --with-zlib \ #支持zlib库,用于压缩http压缩传输 --with-openssl \ #支持ssl加密 --enable-mysqlnd \ #mysql数据库 --with-mysqli \ --with-pdo-mysql \ --disable-debug \ #关闭debug功能 --enable-sockets \ #支持套接字访问 --enable-soap \ #支持soap扩展协议 --enable-xml \ #支持xml --enable-ftp \ #支持ftp --enable-gd \ #支持gd库 --enable-exif \ #支持图片元数据 --enable-mbstring \ #支持多字节字符串 --enable-bcmath \ #打开图片大小调整,用到zabbix监控的时候用到了这个模块 --with-fpm-systemd #支持systemctl 管理cgi [root@nginx php-8.3.30]# make && make instsall
3.配置优化php
[root@nginx ~]# cd /usr/local/php/etc [root@nginx etc]# cp php-fpm.conf.default php-fpm.conf #复制模板 [root@nginx etc]# vim php-fpm.conf #去掉注释 pid = run/php-fpm.pid #指定pid文件存放位置 [root@nginx etc]# cd php-fpm.d/ [root@nginx php-fpm.d]# cp www.conf.default www.conf [root@nginx php-fpm.d]# vim www.conf 41 listen = 0.0.0.0:9000 #可以修改端口 #生成主配置文件 [root@nginx php-8.3.30]# cp php.ini-production /usr/local/php/etc/php.ini [root@nginx ~]# vim /usr/local/php/etc/php.ini 989 date.timezone = Asia/Shanghai #修改时区 #生成启动文件 [root@nginx etc]# cp ~/php-8.3.30/sapi/fpm/php-fpm.service /lib/systemd/system/ [root@nginx etc]# vim /lib/systemd/system/php-fpm.service #ProtectSystem=full #注释该内容 [root@nginx etc]# systemctl daemon-reload [root@nginx etc]# systemctl enable --now php-fpm.service [root@nginx etc]# netstat -antlupe | grep php tcp 0 0 127.0.0.1:9000 0.0.0.0:* LISTEN 0 120615 147595/php-fpm: mas
Nginx整合php
生成默认发布目录与默认发布文件
[root@nginx ~]# mkdir /webdir/fjw.org/php/html -p
[root@nginx ~]# echo php.fjw.org > /webdir/fjw.org/php/html/index.html
[root@nginx ~]# cat > /webdir/fjw.org/php/html/index.php << eof
> <?php
>     phpinfo();
> ?>
> eof
编辑配置文件
[root@nginx ~]# vim /usr/local/nginx/conf/nginx.conf
server {
......
include "/usr/local/nginx/conf.d/*.conf";
}
[root@nginx ~]# vim /usr/local/nginx/conf.d/php.conf
server {
listen 80;
server_name php.fjw.org;
root /webdir/fjw.org/php/html;
location ~ \.php$ {
fastcgi_pass 127.0.0.1:9000;
fastcgi_index index.php;
include fastcgi.conf;
}
}
[root@nginx ~]# nginx -s reload
测试
访问默认静态页面

访问动态php页面

php扩展缓存模块
软件下载:http://pecl.php.net/package/memcache
架构图
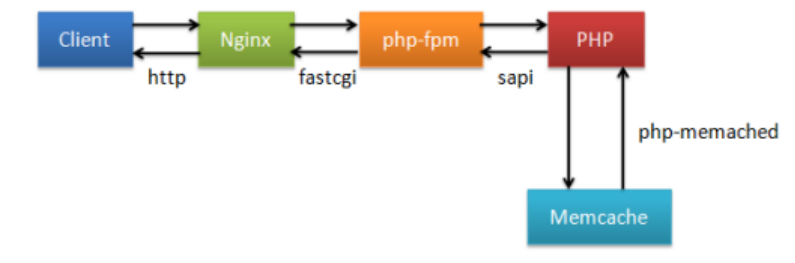
原理是利用利用memcache实现php的缓存加速,memcache可替换为任意nosql数据库例如redis
安装php扩展模块memcache
#下载软件包后进行解压 [root@nginx ~]# tar zxf memcache-8.2.tgz #安装php扩展编译软件,生产编译配置 [root@nginx ~]# cd memcache-8.2/ [root@nginx memcache-8.2]# dnf install autoconf -y [root@nginx memcache-8.2]# phpize [root@nginx memcache-8.2]# ./configure && make && make install #编译完成后查看是否有插件存在 [root@nginx memcache-8.2]# ls /usr/local/php/lib/php/extensions/no-debug-non-zts-20230831/ memcache.so opcache.so #编辑php配置文件 [root@nginx memcache-8.2]# vim /usr/local/php/etc/php.ini 939 extension=memcache #开启支持memcache #重启服务并查看是否支持memcache模块 [root@Nginx memcache-8.2]# systemctl restart php-fpm.service [root@Nginx memcache-8.2]# php -m | grep memcache memcache
安装memcached
[root@nginx ~]# dnf install memcached.x86_64 -y.配置memcache
配置memcached
[root@nginx nginx-1.28.1]# cat /etc/sysconfig/memcached PORT="11211" USER="memcached" MAXCONN="1024" CACHESIZE="64" OPTIONS="-l 127.0.0.1,::1" [root@nginx ~]# systemctl enable --now memcached.service [root@nginx ~]# netstat -antlupe | grep memcache tcp 0 0 0.0.0.0:11211 0.0.0.0:* LISTEN 991 437305 166169/memcached tcp6 0 0 ::1:11211 :::* LISTEN 991 437306 166169/memcached
测试缓存
[root@nginx memcache-8.2]# vim memcache.php #memcache缓存状态页
define('ADMIN_USERNAME','admin'); // Admin Username
define('ADMIN_PASSWORD','fjw'); // Admin Password
$MEMCACHE_SERVERS[] = '172.25.254.100:11211'; // add more as an array
#$MEMCACHE_SERVERS[] = 'mymemcache-server2:11211'; // add more as an array
[root@nginx memcache-8.2]# cp -p memcache.php /webdir/fjw.org/php/html/
[root@nginx memcache-8.2]# cp -p example.php /webdir/fjw.org/php/html/ #缓存测试文件
#测试
http://php.fjw.org/memcache.php #数据页面,在浏览器中可以直接访问
[root@nginx memcache-8.2]# ab -n 1000 -c 300 php.fjw.org/example.php
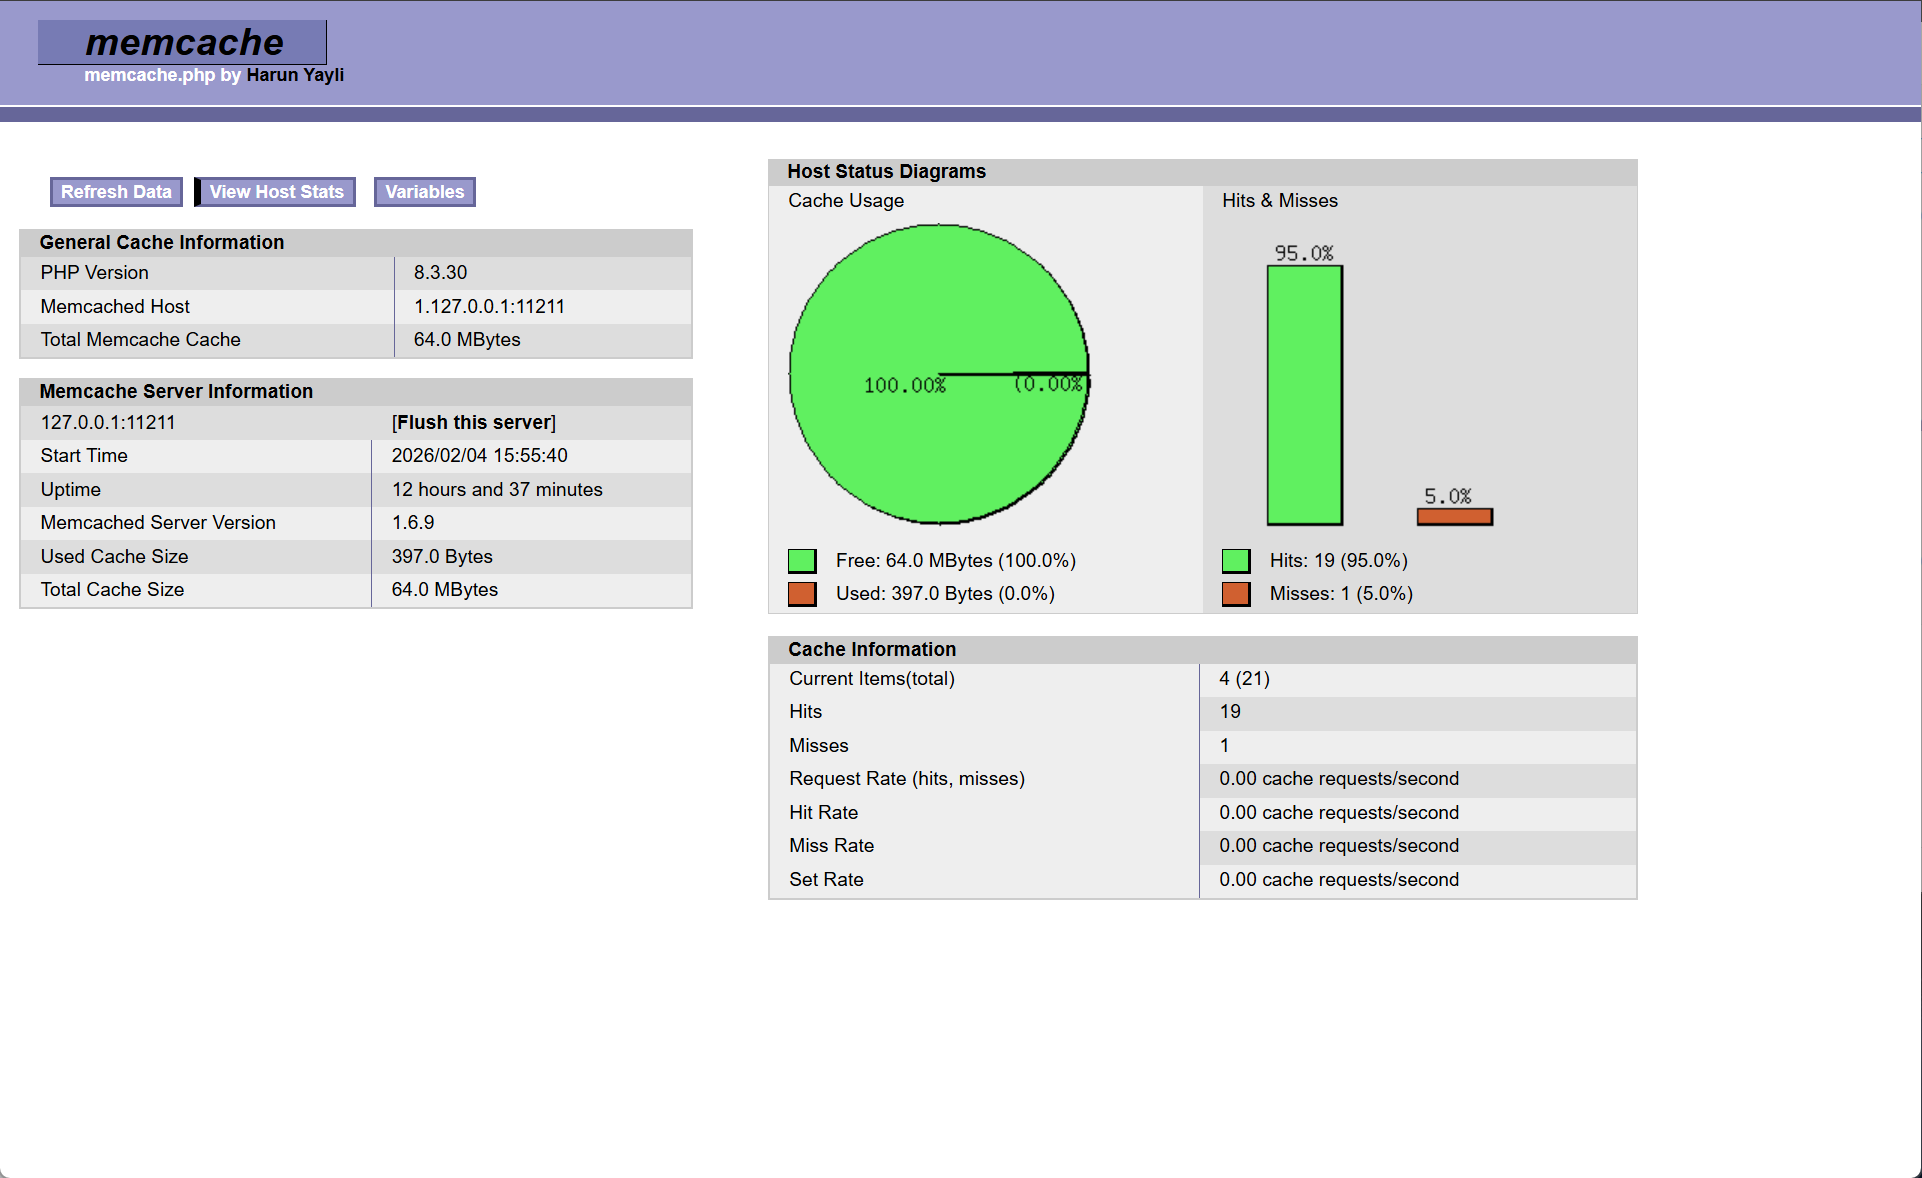
可以看到被缓存后的文件都是直接走缓存而不会再次处理php文件
测试性能
[root@nginx ~]# ab -n 1000 -c 200 php.fjw.org/index.php #未连接缓存的文件 @@@内容忽略@@@ Complete requests: 1000 Failed requests: 107 [root@nginx ~]# ab -n 1000 -c 200 php.fjw.org/example.php #连接缓存的文件 @@@内容忽略@@@ Complete requests: 1000 Failed requests: 0
php高速缓存
-
由于php扩展缓存是通过php配置来实现缓存,可以通过nginx直接对接memcache来实现缓存节省开销当有缓存时直接访问memcahe而不走php;
-
利用memcache实现php的缓存加速;
-
原理是让nginx直接取访问memcache的缓存如果存在缓存而不去访问php-fpm再访问memcache,当memcache没有缓存才访问php-fpm处理文件后存入缓存返回给nginx。
架构图
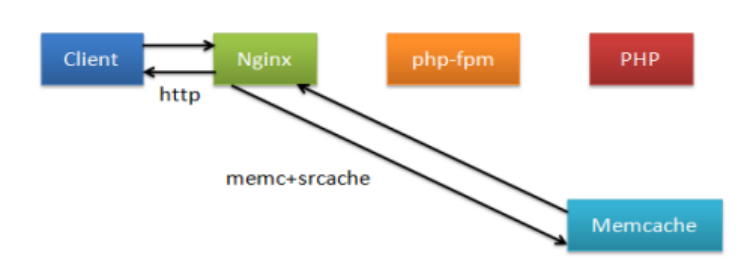
实现nginx直接访问memcache需要两个模块
-
srcache-nginx-module 缓存获取
-
memc-nginx-module memcache读写
重新编译nginx添加模块
[root@nginx ~]# systemctl stop nginx.service [root@nginx ~]# tar zxf memc-nginx-module-0.20.tar.gz [root@nginx ~]# tar zxf srcache-nginx-module-0.33.tar.gz #切换到nginx源码包清除Makefile [root@nginx ~]# cd nginx-1.28.1/ [root@nginx nginx-1.28.1]# make clean #添加模块重新编译 [root@nginx nginx-1.28.1]# ./configure --prefix=/usr/local/nginx --user=nginx --group=nginx --with-http_ssl_module --with-http_v2_module --with-http_realip_module --with-http_stub_status_module --with-http_gzip_static_module --with-pcre --with-stream --with-stream_ssl_module --with-stream_realip_module --add-module=/root/echo-nginx-module-0.64 --add-module=/root/memc-nginx-module-0.20 --add-module=/root/srcache-nginx-module-0.33 #编译但不拷贝文件到系统路径 [root@nginx nginx-1.28.1]# make
更换二进制文件
[root@nginx nginx-1.28.1]# rm -rf /usr/local/nginx/sbin/nginx [root@nginx nginx-1.28.1]# cp -p objs/nginx /usr/local/nginx/sbin/ #查看是否添加成功

编辑nginx整合memcache
[root@nginx ~]# vim /usr/local/nginx/conf.d/php.conf
upstream memcache {
server 127.0.0.1:11211;
keepalive 512;
}
server {
listen 80;
server_name php.fjw.org;
root /webdir/fjw.org/php/html;
location /memc {
internal; # 标记该 location 仅能被 Nginx 内部调用,不接受外部直接访问
# Memcache 连接/读写超时时间(均为 100 毫秒)
memc_connect_timeout 100ms;
memc_send_timeout 100ms;
memc_read_timeout 100ms;
# 设置 Memcache 的缓存键:值为请求的查询字符串(如 ?id=1 的部分)
set $memc_key $query_string;
# 设置缓存过期时间:300 秒(5 分钟)
set $memc_exptime 300;
# 将请求转发到上面定义的 memcache 上游服务
memc_pass memcache;
}
location ~ \.php$ {
# 定义缓存键:URL 路径 + 查询参数(比如 /index.php?id=1)
set $key $uri$args;
# 读取缓存:从 /memc 接口获取 $key 对应的缓存数据
srcache_fetch GET /memc $key;
# 写入缓存:将 PHP 解析后的响应结果通过 /memc 接口存入 $key
srcache_store PUT /memc $key;
fastcgi_pass 127.0.0.1:9000;
fastcgi_index index.php;
include fastcgi.conf;
}
}
[root@nginx ~]# nginx -s reload
参数详解
set $key $uri$args:定义最终的缓存键 = 访问路径($uri,如 /index.php) + 查询参数($args,如 id=1),确保不同页面 / 参数的缓存唯一。 srcache_fetch GET /memc $key:读取缓存:请求 PHP 文件时,先通过 /memc 接口从 Memcache 读取 $key 对应的缓存,如果缓存存在,直接返回缓存内容,不走 PHP-FPM 解析。 srcache_store PUT /memc $key:写入缓存:如果缓存不存在,Nginx 会先让 PHP-FPM 解析 PHP 文件,然后将解析后的响应结果通过 /memc 接口存入 Memcache,供后续请求使用。
测试
#重启memcache并访问没有缓存的php文件查看缓存命中
[root@nginx ~]# systemctl restart memcached.service
[root@nginx ~]# ab -n 1000 -c 100 php.fjw.org/index.php
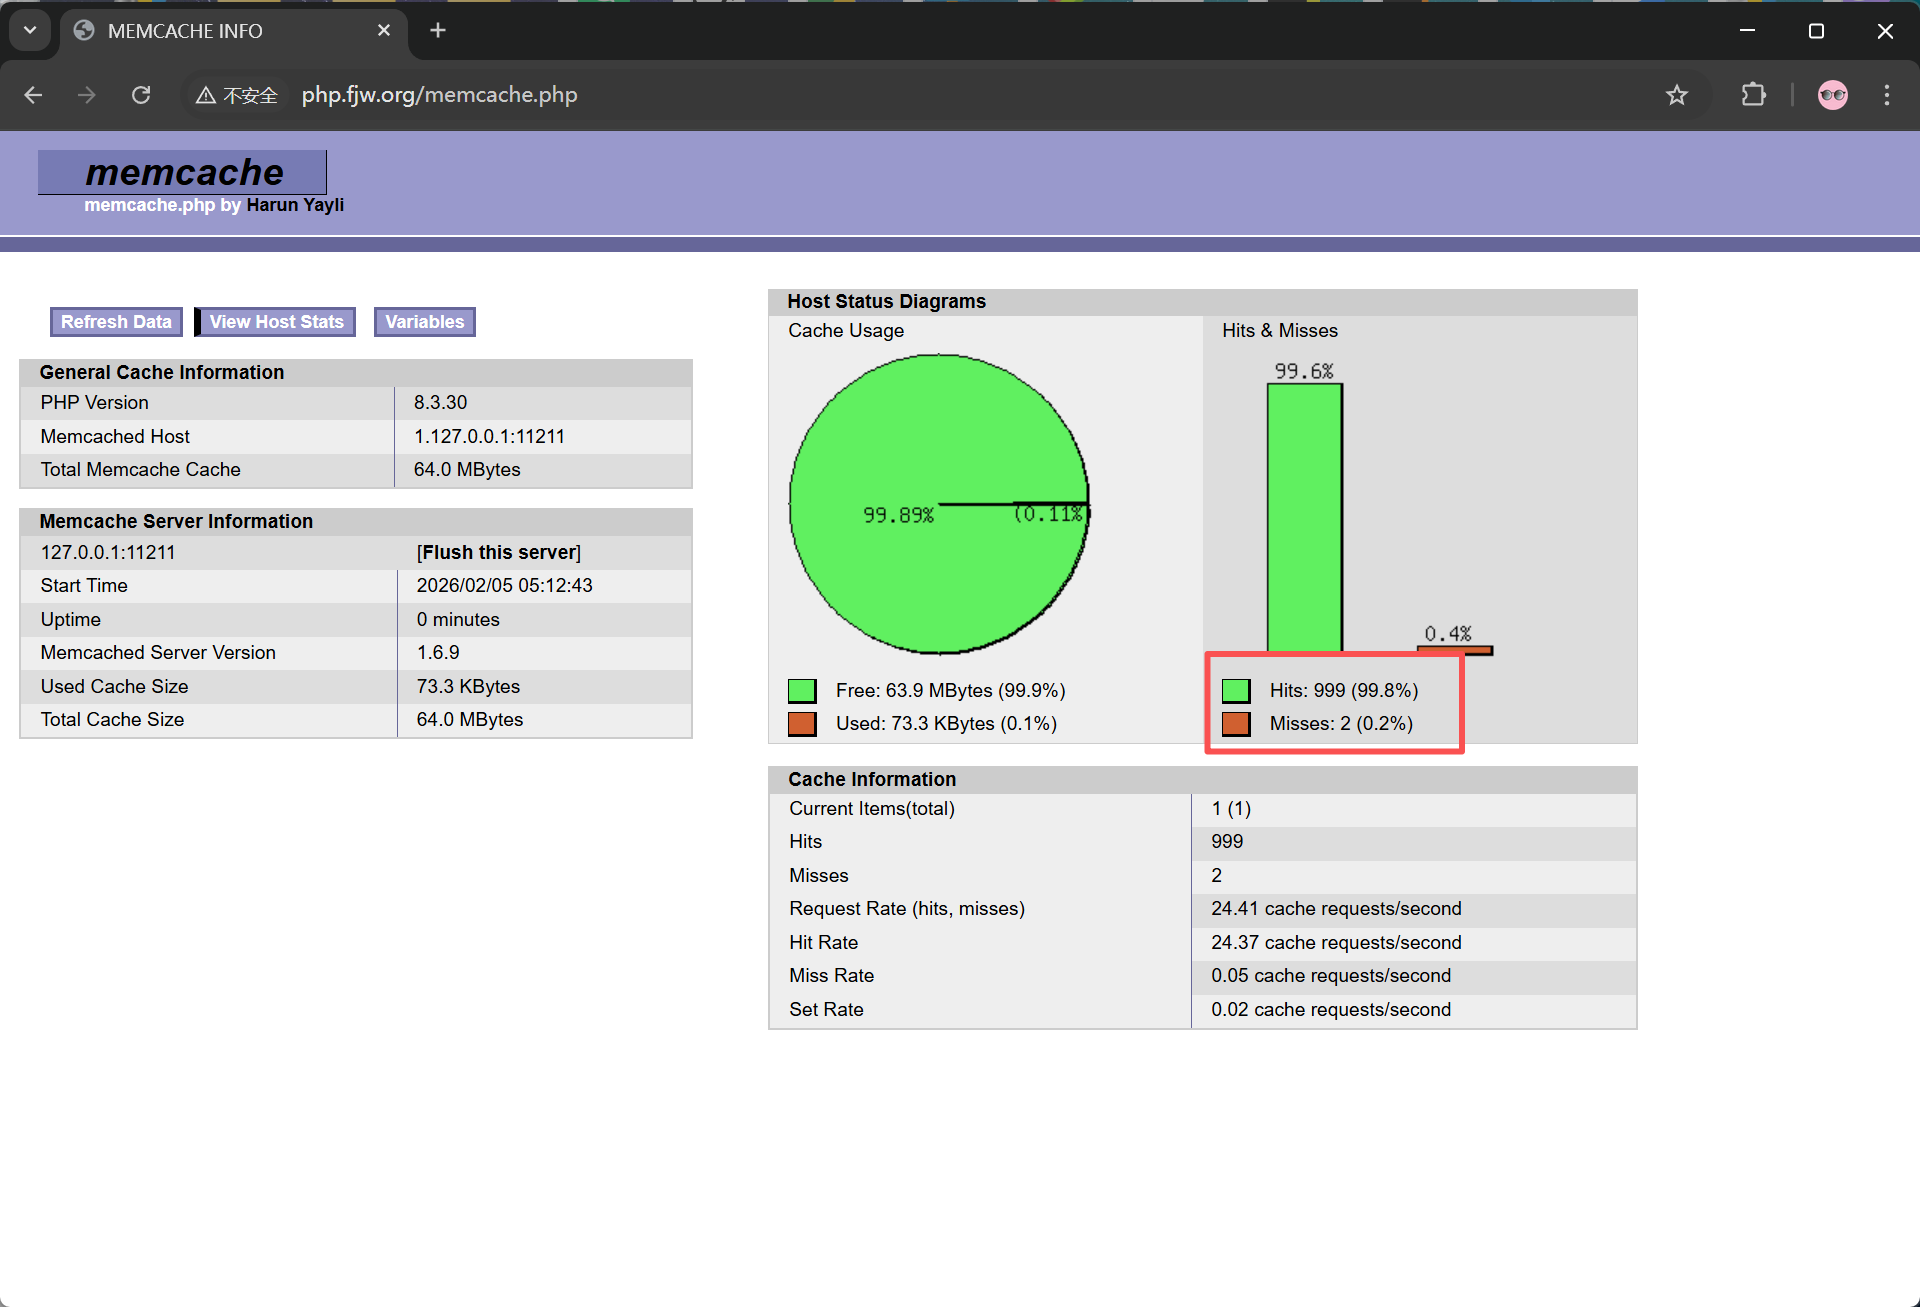
如图所示只有第一次访问未命中缓存后续缓存后都走缓存
Nginx二开版本openresty
OpenResty® 是一个基于 Nginx 与 Lua 的高性能 Web 平台,其内部集成了大量精良的 Lua 库、第三方 模块以及大多数的依赖项。用于方便地搭建能够处理超高并发、扩展性极高的动态 Web 应用、Web 服 务和动态网关。
nginx的其它的二次发行版:
Tengine:由淘宝网发起的Web服务器项目。它在Nginx的基础上,针对大访问量网站的需求,添加 了很多高级功能和特性。Tengine的性能和稳定性已经在大型的网站如淘宝网,天猫商城等得到了 很好的检验。它的最终目标是打造一个高效、稳定、安全、易用的Web平台。从2011年12月开始, Tengine成为一个开源项目官网: http://tengine.taobao.org/
编译安装openresty
安装依赖
[root@webserver ~]# dnf install gcc pcre-devel openssl-devel perl zlib-devel -y
编译安装
[root@webserver ~]# wget https://openresty.org/download/openresty-1.27.1.2.tar.gz [root@webserver ~]# tar zxf openresty-1.27.1.2.tar.gz [root@webserver ~]# cd openresty-1.27.1.2/ [root@webserver ~]# useradd -r -s /sbin/nologin nginx #检查环境 [root@webserver openresty-1.27.1.2]# ./configure --prefix=/usr/local/openresty --user=nginx --group=nginx --with-http_ssl_module --with-http_v2_module --with-http_realip_module --with-http_stub_status_module --with-http_gzip_static_module --with-pcre --with-stream --with-stream_ssl_module --with-stream_realip_module [root@webserver openresty-1.27.1.2]# gmake && gmake install
添加PATH环境变量
[root@webserver openresty-1.27.1.2]# vim ~/.bash_profile export PATH=$PATH:/usr/local/openresty/bin [root@webserver openresty-1.27.1.2]# source ~/.bash_profile [root@webserver openresty-1.27.1.2]# openresty -v nginx version: openresty/1.27.1.2
发布测试页面
[root@webserver openresty-1.27.1.2]# echo hello openresty > /usr/local/openresty/nginx/html/index.html
[root@webserver openresty-1.27.1.2]# curl 172.25.254.200
hello openresty
默认测试页

有“AI”的1024 = 2048,欢迎大家加入2048 AI社区
更多推荐


 4
4 0
0- 0


 已为社区贡献4条内容

所有评论(0)