centos7安装
1. 安装
K8s安装部署--超级详细(无坑,v1.23)_kubernetes 1.23-CSDN博客
基于以上文章进行安装,并编写的文章
文档摘要
1.1 安装环境准备
虚拟机环境 3 三台
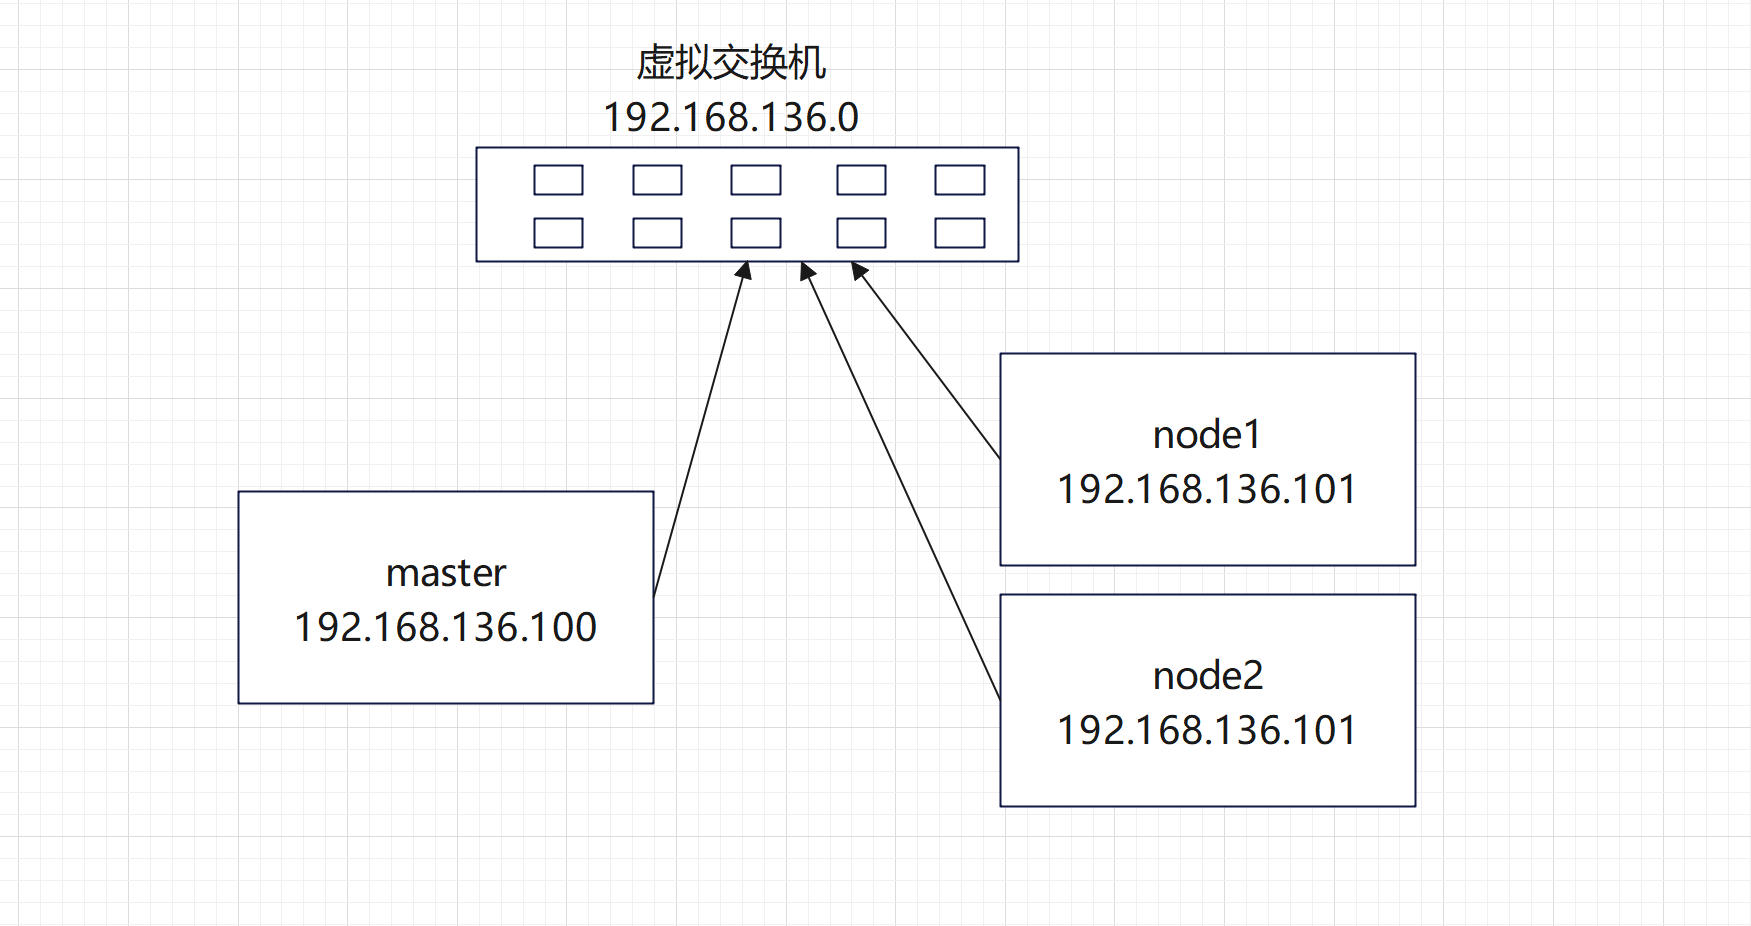
设置网络ip地址
到 /etc/sysconfig/network-scripts/ifcfg-ens33 进行修改,以master节点修改ip为示例
[root@node1 ~]# cat /etc/sysconfig/network-scripts/ifcfg-ens33
TYPE="Ethernet"
PROXY_METHOD="none"
BROWSER_ONLY="no"
# 将 none 修改为 static
BOOTPROTO="static"
DEFROUTE="yes"
IPV4_FAILURE_FATAL="no"
IPV6INIT="yes"
IPV6_AUTOCONF="yes"
IPV6_DEFROUTE="yes"
IPV6_FAILURE_FATAL="no"
IPV6_ADDR_GEN_MODE="stable-privacy"
NAME="ens33"
UUID="c6604760-d8c4-4542-a328-4d2d53299c2a"
DEVICE="ens33"
ONBOOT="yes"
# 设置ip地址
IPADDR=192.168.136.100
NETMASK=255.255.255.0
修改完成后进行重启网络
systemctl restart network修改完成后使用 ip a 查看是否正常修改
[root@master ~]# ip a
1: lo: <LOOPBACK,UP,LOWER_UP> mtu 65536 qdisc noqueue state UNKNOWN group default qlen 1000
    link/loopback 00:00:00:00:00:00 brd 00:00:00:00:00:00
    inet 127.0.0.1/8 scope host lo
       valid_lft forever preferred_lft forever
    inet6 ::1/128 scope host
       valid_lft forever preferred_lft forever
2: ens33: <BROADCAST,MULTICAST,UP,LOWER_UP> mtu 1500 qdisc pfifo_fast state UP group default qlen 1000
    link/ether 00:0c:29:c9:04:d6 brd ff:ff:ff:ff:ff:ff
    inet 192.168.136.100/24 brd 192.168.136.255 scope global noprefixroute ens33
       valid_lft forever preferred_lft forever
    inet6 fe80::ead6:6956:e82c:6bef/64 scope link tentative noprefixroute dadfailed
       valid_lft forever preferred_lft forever
    inet6 fe80::c59b:b601:a14a:8b8a/64 scope link noprefixroute
       valid_lft forever preferred_lft forever
    inet6 fe80::3ba:5e05:7d01:7eb8/64 scope link tentative noprefixroute dadfailed
       valid_lft forever preferred_lft forever
修改主机名称
hostnamectl set-hostname master
hostnamectl set-hostname node1
hostnamectl set-hostname node2
关闭每个节点机器的
- firewalld 防火墙
- setLiunx
- 交换分区
- 加载模块br_netfilter
- 修改内核参数
关闭脚本
vi close.sh
------------------------------------
#!/bash
# 关闭防火墙
echo "关闭firewalld--------------"
systemctl stop firewalld
if [ $? -ne 0 ]
then
        echo "临时关闭防火墙失败"
else
        echo "临时关闭防火墙成功"
fi
systemctl disable firewalld
if [ $? -ne 0 ]
then
        echo "永久关闭防火墙失败"
else
        echo "永久关闭防火墙成功"
fi
sleep 1
echo -e " \r "

echo "关闭setliunx--------------"
#临时关闭sellinux
setenforce 0
if [ $? -ne 0 ]
then
        echo "临时关闭selinux失败"
else
        echo "临时关闭selinux成功"
fi
#禁用selinux(永久修改),在文件/etc/sysconfig/selinux改变了selinux的状态,重启虚拟机后生效
sed -i 's/SELINUX=.*/SELINUX=disabled/' /etc/sysconfig/selinux
if [ $? -ne 0 ]
then
        echo "selinux关闭失败"
else
        echo "selinux关闭成功(永久修改,需要重启虚拟机)"
fi
sleep 1
echo -e " \r "
echo "清楚iptables 表--------------"
iptables -F -t nat
iptables -F -t filter
iptables -F -t raw
iptables -F -t mangle

sleep 1
echo -e " \r "

echo "关闭交换分区--------------"
# 临时关闭
swapoff -a
if [ $? -ne 0 ]
then
        echo "临时关闭交换分区失败"
else
        echo "临时关闭交换分区成功"
fi


# 修改/etc/fstab文件永久关闭,将文件中/dev/mapper/centos-swap swap行注释即可,也可以直接运行下面这条命令
sed -i '/swap/ s/^\(.*\)$/#\1/g' /etc/fstab
if [ $? -ne 0 ]
then
        echo "修改交换分区配置失败"
else
        echo "修改交换分区配置成功"
fi

sleep 1
echo -e " \r "

echo "加载模块br_netfilter--------------"
# 临时加载
modprobe br_netfilter
if [ $? -ne 0 ]
then
        echo "临时加载模块失败(k8s无法正常启动)"
else
        echo "临时加载模块成功"
fi


touch  /etc/modules-load.d/k8s.conf
echo "br_netfilter" >> /etc/modules-load.d/k8s.conf
systemctl restart systemd-modules-load.service

if [ $? -ne 0 ]
then
        echo "修改配置文件,永久加载模块br_netfilter 执行(systemctl restart systemd-modules-load.service) 失败"
else
       echo "修改配置文件,永久加载模块br_netfilter 执行(systemctl restart systemd-modules-load.service) 成功"
fi


sleep 1
echo -e " \r "
echo "修改内核参数--------------"

cat <<EOF >> /etc/sysctl.conf
net.bridge.bridge-nf-call-ip6tables = 1
net.bridge.bridge-nf-call-iptables = 1
net.ipv4.ip_nonlocal_bind = 1
net.ipv4.ip_forward = 1
vm.swappiness=0
EOF

sysctl -p
if [ $? -ne 0 ]
then
        echo "修改内核参数,进行重新加载(sysctl -p) 失败"
else
        echo "修改内核参数,进行重新加载(sysctl -p) 成功"
fi

------------------------------------

# 执行
bash close.sh
1.2 安装docker
配置yum源 aliyun
vi /etc/yum.repos.d/Aliyun.repo# CentOS-Base.repo
#
# The mirror system uses the connecting IP address of the client and the
# update status of each mirror to pick mirrors that are updated to and
# geographically close to the client. You should use this for CentOS updates
# unless you are manually picking other mirrors.
#
# If the mirrorlist= does not work for you, as a fall back you can try the
# remarked out baseurl= line instead.
[base]
name=CentOS-$releasever - Base - mirrors.aliyun.com
failovermethod=priority
baseurl=http://mirrors.aliyun.com/centos/$releasever/os/$basearch/
http://mirrors.aliyuncs.com/centos/$releasever/os/$basearch/
http://mirrors.cloud.aliyuncs.com/centos/$releasever/os/$basearch/
gpgcheck=1
gpgkey=http://mirrors.aliyun.com/centos/RPM-GPG-KEY-CentOS-7
#released updates
[updates]
name=CentOS-$releasever - Updates - mirrors.aliyun.com
failovermethod=priority
baseurl=http://mirrors.aliyun.com/centos/$releasever/updates/$basearch/
http://mirrors.aliyuncs.com/centos/$releasever/updates/$basearch/
http://mirrors.cloud.aliyuncs.com/centos/$releasever/updates/$basearch/
gpgcheck=1
gpgkey=http://mirrors.aliyun.com/centos/RPM-GPG-KEY-CentOS-7
#additional packages that may be useful
[extras]
name=CentOS-$releasever - Extras - mirrors.aliyun.com
failovermethod=priority
baseurl=http://mirrors.aliyun.com/centos/$releasever/extras/$basearch/
http://mirrors.aliyuncs.com/centos/$releasever/extras/$basearch/
http://mirrors.cloud.aliyuncs.com/centos/$releasever/extras/$basearch/
gpgcheck=1
gpgkey=http://mirrors.aliyun.com/centos/RPM-GPG-KEY-CentOS-7
#additional packages that extend functionality of existing packages
[centosplus]
name=CentOS-$releasever - Plus - mirrors.aliyun.com
failovermethod=priority
baseurl=http://mirrors.aliyun.com/centos/$releasever/centosplus/$basearch/
http://mirrors.aliyuncs.com/centos/$releasever/centosplus/$basearch/
http://mirrors.cloud.aliyuncs.com/centos/$releasever/centosplus/$basearch/
gpgcheck=1
enabled=0
gpgkey=http://mirrors.aliyun.com/centos/RPM-GPG-KEY-CentOS-7
#contrib - packages by Centos Users
[contrib]
name=CentOS-$releasever - Contrib - mirrors.aliyun.com
failovermethod=priority
baseurl=http://mirrors.aliyun.com/centos/$releasever/contrib/$basearch/
http://mirrors.aliyuncs.com/centos/$releasever/contrib/$basearch/
http://mirrors.cloud.aliyuncs.com/centos/$releasever/contrib/$basearch/
gpgcheck=1
enabled=0
gpgkey=http://mirrors.aliyun.com/centos/RPM-GPG-KEY-CentOS-7echo "清除 yum 缓存"
yum clean all
echo "创建新的缓存"
yum makecache
echo "测试yum 源"
yum list下载工具
yum install -y net-tools
yum install -y yum-utils
使用工具包自动下载docker,这是官方的源 使用yum-config-manager 命令需要下载yum-utils
yum-config-manager --add-repo https://download.docker.com/linux/centos/docker-ce.repo可以使用阿里云镜像替换官方源,官方源下载速度慢
yum-config-manager --add-repo http://mirrors.aliyun.com/docker-ce/linux/centos/docker-ce.repo安装指定版本的docker
yum install -y docker-ce-20.10.0 docker-ce-cli-20.10.0 containerd.io启动docker
systemctl start docker设置开机启动
systemctl enable docker配置docker的源和守护进程的引擎,docker源随时无法使用 2024.8.27 暂时可以使用
vi /etc/docker/daemon.json
-----------------------------
{
    "registry-mirrors": [
    "https://docker.registry.cyou",
    "https://docker-cf.registry.cyou",
    "https://dockercf.jsdelivr.fyi",
    "https://docker.jsdelivr.fyi",
    "https://dockertest.jsdelivr.fyi",
    "https://mirror.aliyuncs.com",
    "https://dockerproxy.com",
    "https://mirror.baidubce.com",
    "https://docker.m.daocloud.io",
    "https://docker.nju.edu.cn",
    "https://docker.mirrors.sjtug.sjtu.edu.cn",
    "https://docker.mirrors.ustc.edu.cn",
    "https://mirror.iscas.ac.cn",
    "https://docker.rainbond.cc"
    ],
    "exec-opts": ["native.cgroupdriver=systemd"]
}
-----------------------------
重启 docker
systemctl restart docker1.3 安装k8s
添加k8s源
cat <<EOF > /etc/yum.repos.d/kubernetes.repo
[kubernetes]
name=Kubernetes
baseurl=https://mirrors.aliyun.com/kubernetes/yum/repos/kubernetes-el7-x86_64/
enabled=1
gpgcheck=1
repo_gpgcheck=1
gpgkey=https://mirrors.aliyun.com/kubernetes/yum/doc/yum-key.gpg https://mirrors.aliyun.com/kubernetes/yum/doc/rpm-package-key.gpg
EOF
下载k8s
yum install -y kubelet-1.23.6 kubeadm-1.23.6 kubectl-1.23.6设置开机启动
systemctl enable kubelet安装CoreDNS容器(k8s集群运行时需要CoreDNS提供DNS解析服务)
# 拉取镜像,如果拉取不下来大概率是docker源无法使用
docker pull coredns/coredns:1.8.4

# 将镜像改名(master必须操作,后面master节点初始了使用了这个改名后的镜像)
docker tag coredns/coredns:1.8.4 registry.aliyuncs.com/google_containers/coredns:v1.8.4
1.3.1 master节点操作
master节点操作,其他节点不需要操作
# 记得改变IP,只要改第一行的IP地址,一般改为master节点地址
kubeadm init \
--apiserver-advertise-address=172.28.18.246 \
--image-repository registry.aliyuncs.com/google_containers \
--service-cidr=10.1.0.0/16 \
--pod-network-cidr=10.244.0.0/16
#--pod-network-cidr=192.168.0.0/16
执行完成初始化后出现以下提示就表示安装成功了
Your Kubernetes control-plane has initialized successfully!

To start using your cluster, you need to run the following as a regular user:

  mkdir -p $HOME/.kube
  sudo cp -i /etc/kubernetes/admin.conf $HOME/.kube/config
  sudo chown $(id -u):$(id -g) $HOME/.kube/config

Alternatively, if you are the root user, you can run:

  export KUBECONFIG=/etc/kubernetes/admin.conf

You should now deploy a pod network to the cluster.
Run "kubectl apply -f [podnetwork].yaml" with one of the options listed at:
  https://kubernetes.io/docs/concepts/cluster-administration/addons/

Then you can join any number of worker nodes by running the following on each as root:

kubeadm join 192.168.136.100:6443 --token odd276.k027ty2px9dqy5qm \
        --discovery-token-ca-cert-hash sha256:3015024b7d2db8f3b523f502bc60cb04f02998935b5f6421896b1b9b78a1c0c6
[root@master docker]# #--pod-network-cidr=192.168.0.0/16
1.3.2 node1 节点操作
master节点搭建完成后,需要让从节点加入到主节点。
node节点的安装按照以上文档,安装到初始化master节点的前一步
node1 节点在安装完成k8s后进行加入master节点
执行
kubeadm join 192.168.136.100:6443 --token odd276.k027ty2px9dqy5qm \
        --discovery-token-ca-cert-hash sha256:3015024b7d2db8f3b523f502bc60cb04f02998935b5f6421896b1b9b78a1c0c6
显示以下操作,表示node1节点加入到master的管理
[preflight] Running pre-flight checks
        [WARNING Hostname]: hostname "node1" could not be reached
        [WARNING Hostname]: hostname "node1": lookup node1 on 192.168.136.2:53: no such host
        [WARNING Service-Kubelet]: kubelet service is not enabled, please run 'systemctl enable kubelet.service'
[preflight] Reading configuration from the cluster...
[preflight] FYI: You can look at this config file with 'kubectl -n kube-system get cm kubeadm-config -o yaml'
[kubelet-start] Writing kubelet configuration to file "/var/lib/kubelet/config.yaml"
[kubelet-start] Writing kubelet environment file with flags to file "/var/lib/kubelet/kubeadm-flags.env"
[kubelet-start] Starting the kubelet
[kubelet-start] Waiting for the kubelet to perform the TLS Bootstrap...

This node has joined the cluster:
* Certificate signing request was sent to apiserver and a response was received.
* The Kubelet was informed of the new secure connection details.

Run 'kubectl get nodes' on the control-plane to see this node join the cluster.
1.3.3 node2 节点操作
kubeadm join 192.168.136.100:6443 --token odd276.k027ty2px9dqy5qm \
        --discovery-token-ca-cert-hash sha256:3015024b7d2db8f3b523f502bc60cb04f02998935b5f6421896b1b9b78a1c0c6
显示以下操作,表示node1节点加入到master的管理
This node has joined the cluster:
* Certificate signing request was sent to apiserver and a response was received.
* The Kubelet was informed of the new secure connection details.

Run 'kubectl get nodes' on the control-plane to see this node join the cluster.
当node节点都加入的master完成后,master节点执行操作
  # 创建目录
  mkdir -p $HOME/.kube
  # 复制配置文件
  sudo cp -i /etc/kubernetes/admin.conf $HOME/.kube/config
  # 授权
  sudo chown $(id -u):$(id -g) $HOME/.kube/config
查看节点。
- 到这里发现所有节点为NotReady状态,这是因为完成互通还需要安装CNI(Container Networking Interface)网络插件
[root@master .kube]# kubectl get node
NAME     STATUS     ROLES                  AGE   VERSION
master   NotReady   control-plane,master   48m   v1.23.6
node1    NotReady   <none>                 19m   v1.23.6
node2    NotReady   <none>                 85s   v1.23.6
1.3.4 安装网络插件
CNI 全称是“Container Networking Interface”,即容器网络接口,它提供了一种标准的插件机制,用于连接容器到底层网络中。CNI 插件是一种可执行程序,它将实现容器网络连接的一些逻辑打包在一起,允许容器使用不同的网络模型,并提供了一组网络抽象接口。在 Kubernetes 等容器编排平台中,CNI 插件被广泛使用来实现容器网络。
CNI 插件可以由第三方厂商开发和维护,因此,可以选择最适合自己的插件。CNI 插件通常运行在主机上,并由容器运行时调用,例如 Docker、rkt 等。当容器需要连接到主机网络时,CNI 插件将会为其创建必要的网络接口和路由规则。
一些常用的 CNI 插件包括:
Flannel:一个简单易用的网络解决方案,支持多种部署模式。
Calico:一个高度可扩展的容器网络方案,旨在为大规模生产环境提供网络和安全性。
Weave Net:一个分布式的容器网络方案,具有良好的可扩展性和高度自动化的管理。
Cilium:一个基于 eBPF 的容器网络和安全解决方案,提供强大的流量控制和安全性。
安装命令(只要在master节点运行)
flannel
kubectl apply -f https://raw.githubusercontent.com/coreos/flannel/master/Documentation/kube-flannel.yml calico
# 这两条命令不一样,别看错了
kubectl create -f https://raw.githubusercontent.com/projectcalico/calico/v3.26.0/manifests/tigera-operator.yaml

kubectl create -f https://raw.githubusercontent.com/projectcalico/calico/v3.26.0/manifests/custom-resources.yaml

# 查看部署进度
watch kubectl get pods -n calico-system
一般这里执行会卡住,这两条kubectl create -f命令要先去外网下载相关的yaml文件,需要挂代理(有时在虚拟机用wget命令也能下载下来),但是虚拟机不好代理,可以在实体机上将yaml文件(迅雷等软件可以下载)下载下来再使用xftp等软件传给虚拟机,然后执行下列命令
kubectl create -f tigera-operator.yaml
kubectl create -f custom-resources.yaml安装完之后,再运行kubectl get node查看(一般要等一下,不会立马就改变状态)
一下显示节点就表示正常了
[root@master ~]# kubectl get node
NAME     STATUS   ROLES                  AGE   VERSION
master   Ready    control-plane,master   57m   v1.23.6
node1    Ready    <none>                 28m   v1.23.6
node2    Ready    <none>                 10m   v1.23.6
1.3.5 使用kubectl 创建 3个nginx容器
kubectl create deployment k8s-nginx --image=nginx -r 3[root@master ~]# kubectl get pod
NAME READY STATUS RESTARTS AGE
k8s-nginx-6d779d947c-2zwcc 1/1 Running 0 2m16s
k8s-nginx-6d779d947c-m7mch 1/1 Running 0 2m16s
k8s-nginx-6d779d947c-vtp74 1/1 Running 0 2m16s 
有“AI”的1024 = 2048,欢迎大家加入2048 AI社区
更多推荐

 30
30 0
0- 0


 已为社区贡献1条内容

所有评论(0)