Python安装
Anaconda会默认安装Jupyter Notebook,自行安装可。::: details (windows GPU版本)安装指南。中选择相应GPU版本和系统Python对应版本的安装文件,如。打开安装包,对于已经安装的版本,可以看到卸载的选项。Anaconda官方的源访问比较慢,可以设置成国内的。::: details (windows)安装指南。目录下,在如下目录中运行查看,Pass即为成
Python安装
1.Python官方
Python官方安装(推荐Anaconda)
- 下载可执行程序后运行,选择添加到路径。默认安装到C盘,也可以选择自定义安装,组件一般默认就行。
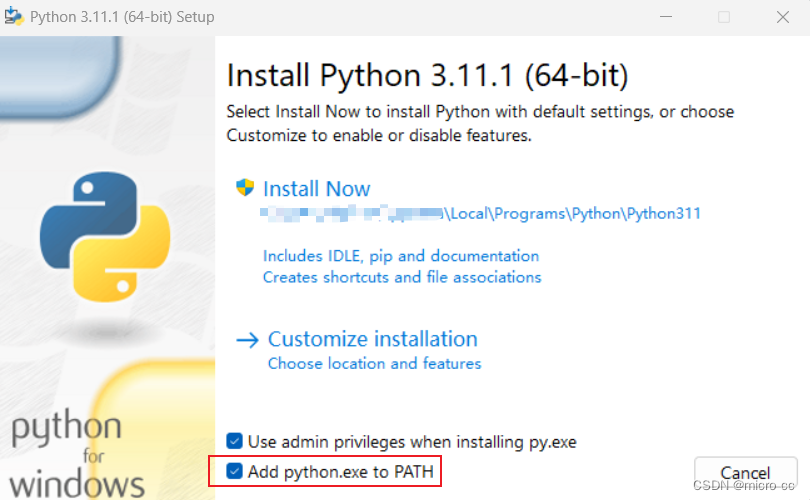
- 若之前没有选择将Python添加到环境变量,需手动添加。
Python卸载
打开安装包,对于已经安装的版本,可以看到卸载的选项。
⭐Pip
更改pip国内镜像源
- 临时
pip install -i https://pypi.tuna.tsinghua.edu.cn/simple + Pkg
- 全局配置
pip config set global.index-url https://pypi.tuna.tsinghua.edu.cn/simple
2.Pycharm_python编辑器
- 安装过程中也建议勾选添加
选择项: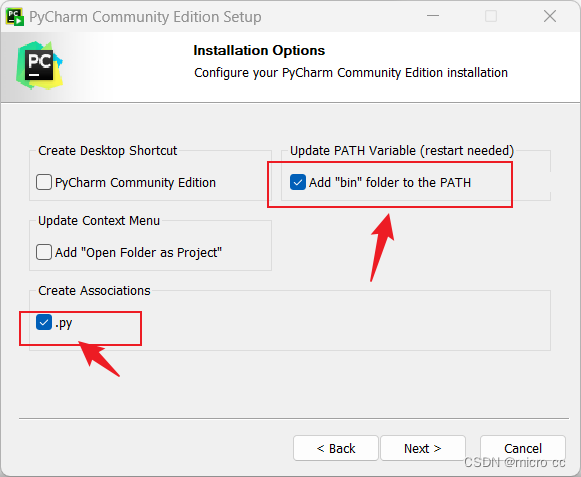
3.Anaconda
安装Anaconda
国内推荐使用镜像:注意按时间选择新版本
::: details (windows)安装指南
- 运行安装软件后默认下一步
- 选择路径
D:\Anaconda3\ - 打勾红框框里的内容,第一项官方建议手动添加,如果怕麻烦可以勾选。
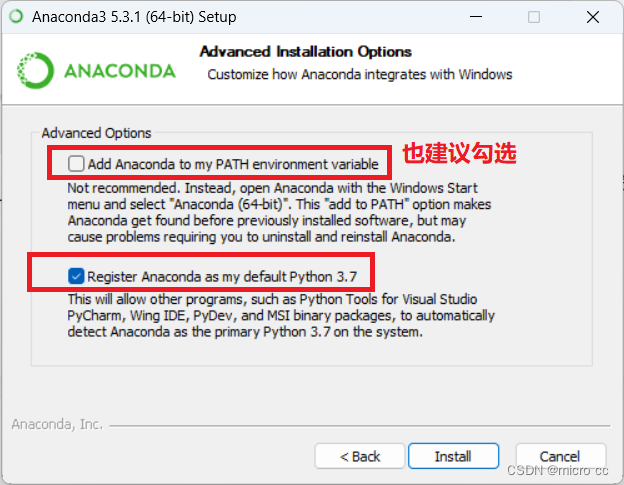
- 取消红框中的勾勾后,点
finish

- CMD输入
conda,若没有信息要添加环境变量,在系统变量的Path中添加如下:
D:\Anaconda3
D:\Anaconda3\Scripts
D:\Anaconda3\Library\bin
D:\Anaconda3\Library\mingw-w64\bin
:::
设置镜像源
Anaconda官方的源访问比较慢,可以设置成国内的
conda config --add channels https://pypi.tuna.tsinghua.edu.cn/simple #清华源
conda config --add channels https://mirrors.tuna.tsinghua.edu.cn/anaconda/pkgs/main/
conda config --add channels https://mirrors.tuna.tsinghua.edu.cn/anaconda/pkgs/free/
conda config --add channels https://mirrors.tuna.tsinghua.edu.cn/anaconda/cloud/conda-forge/
conda config --add channels https://mirrors.tuna.tsinghua.edu.cn/anaconda/cloud/msys2/
conda config --add channels https://mirrors.tuna.tsinghua.edu.cn/anaconda/cloud/bioconda/
conda config --add channels https://mirrors.tuna.tsinghua.edu.cn/anaconda/cloud/menpo/
# 在下载的时候显示下载源的地址
conda config --set show_channel_urls yes
conda config --show-sources # 查看源
conda config --remove channels https://pypi.tuna.tsinghua.edu.cn/simple # 删除一个源
conda config --remove-key channels # 重置源配置
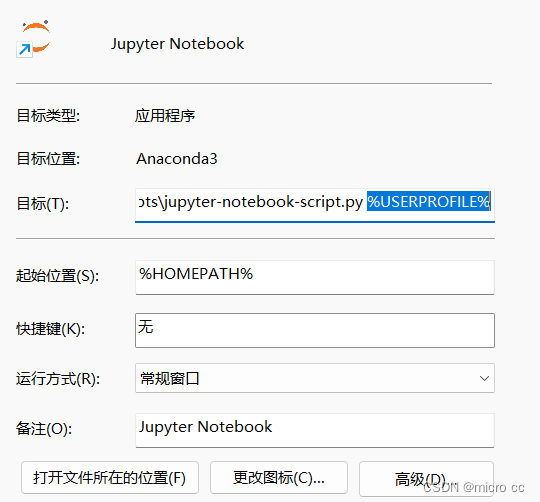
配置Jupyter Notebook
Anaconda会默认安装Jupyter Notebook,自行安装可参考
::: details 配置方法
一般Jupyter的启动路径在 C:\Users\xxx\AppData\Roaming\jupyter\runtime\notebook_cookie_secret
修改到工程路径:
- CMD键入
jupyter notebook --generate-config,Y进行Overwrite

- 打开刚刚的文件,路径为
C:\Users\xxx\.jupyter
查找参数c.NotebookApp.notebook_dir,去掉前面的#,然后添加工程的路径。

- 右键打开Jupyter Notebook快捷方式的属性,删除
%USERPROFILE%。设置完毕,打开验证。
:::
常用命令
conda activate + VirtualEnvName
conda deactivate
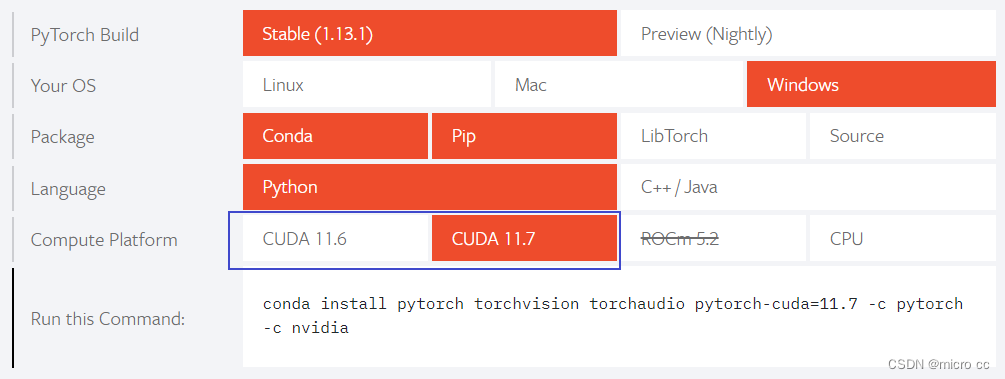
3.安装Pytorch
::: details (windows GPU版本)安装指南
- 对于GPU版本,首先去官网查看python支持的cuda版本,然后下载相应版本的cuda Toolkit

安装之后,将相应的文件路径添加到环境变量
C:\Program Files\NVIDIA GPU Computing Toolkit\CUDA\v11.x\bin
CMD使用nvcc -V查看正确安装。
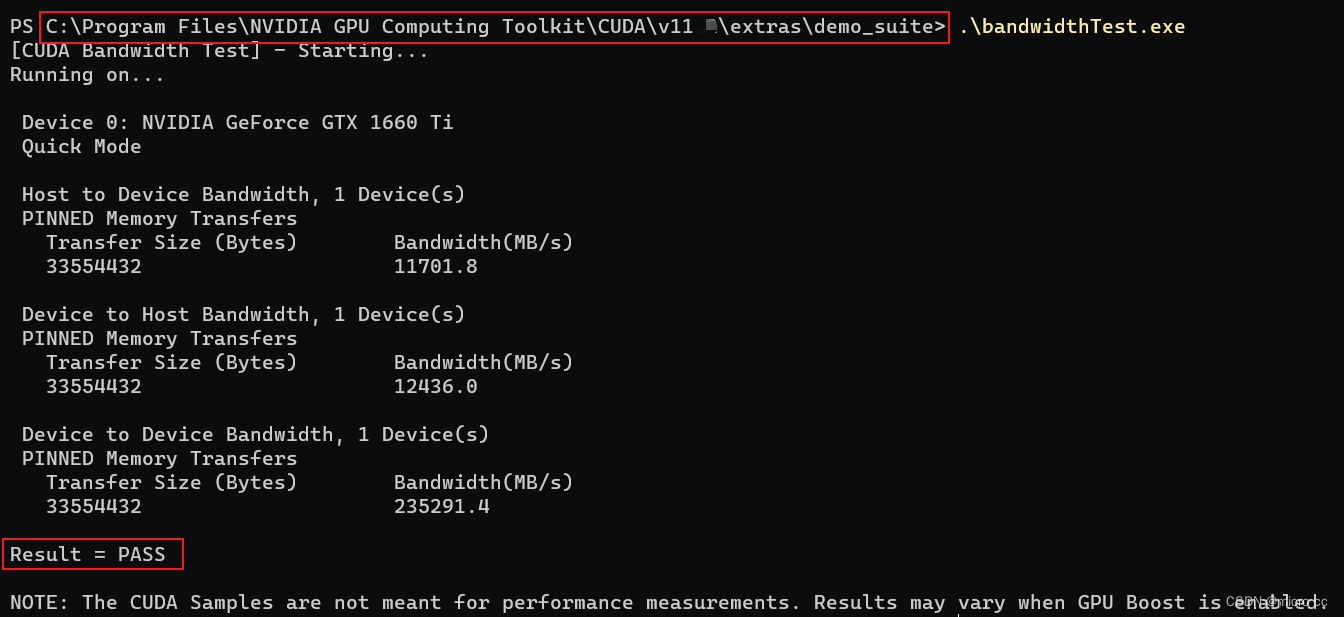
- 下载cudnn ,需要登录账号
将解压后的文件夹(bin、include、lib)复制到C:\Program Files\NVIDIA GPU Computing Toolkit\CUDA\v11.x目录下,在如下目录中运行查看,Pass即为成功。
 .\deviceQuery.exe # 1
 .\bandwidthTest.exe # 2
- 安装pytorch
在仓库中选择相应GPU版本和系统Python对应版本的安装文件,如cu117/torch-1.13.1%2Bcu117-cp310-cp310-win_amd64.whl
选择最新版本的torchvision,如cu117/torchvision-0.14.0%2Bcu117-cp310-cp310-win_amd64.whl
- 使用conda创建虚拟环境
conda create -n HelloPytorch python=3.10
conda activate HelloPytorch

# 在虚拟环境中,使用pip安装以上两个下载的文件

# 在项目解释器中添加conda环境中,刚刚添加的虚拟环境的文件夹中的python.exe
:::

有“AI”的1024 = 2048,欢迎大家加入2048 AI社区
更多推荐

 0
0 0
0- 0


 已为社区贡献1条内容

所有评论(0)