windows系统复现gauhuman
克隆代码
git clone https://github.com/skhu101/GauHuman.git
环境配置
如果没有安装过vs2019,需要安装,并且将其添加在系统环境变量path中。
另外,以防万一还是安装好ninja windows版本(用pip install ninja命令大概率还是会出错)。在这里Releases · ninja-build/ninja · GitHub下载windows版本(我用的1.11.1版本),解压后同样添加E:/ninja类似这样的路径到系统环境变量path中。
新建conda环境:
conda create --name gauhuman python=3.8
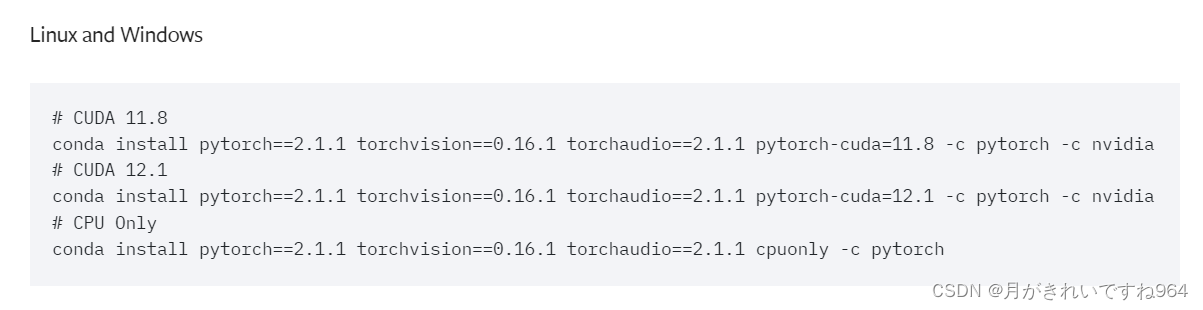
conda activate gauhuman安装torch要注意和cuda版本兼容的问题,我这里CUDA版本12.1,所以使用这个命令:
conda install pytorch==2.1.1 torchvision==0.16.1 torchaudio==2.1.1 pytorch-cuda=12.1 -c pytorch -c nvidia官网链接:
https://pytorch.org/get-started/previous-versions/
接下来安装这两个库:
    pip install submodules/diff-gaussian-rasterization
    pip install submodules/simple-knn
然后安装knn_cuda,这里千万不能使用给的命令,需要自己下载windows版本,过程如下:
1.在官网上克隆windows版本
https://github.com/unlimblue/KNN_CUDA/tree/windows
命令:
git clone --branch windows https://github.com/blukaz/KNN_CUDA2.以管理员身份打开windows PowerShell输入下面的命令,以下载Chocolatey与make:
Get-ExecutionPolicy会返回一个字符串:Restricted 。然后输入:
Set-ExecutionPolicy Bypass -Scope Process -Force; [System.Net.ServicePointManager]::SecurityProtocol = [System.Net.ServicePointManager]::SecurityProtocol -bor 3072; iex ((New-Object System.Net.WebClient).DownloadString('https://community.chocolatey.org/install.ps1'))没有出现报错Chocolatey就下载好了;windows PowerShell可以关掉。
以管理员身份打开cmd,切换到KNN_CUDA目录,激活gauhuman环境:
(cd命令切换目录,activate gauhuman激活)
在KNN_CUDA目录下,输入命令:
make这里可能会报错,复制文件时出错,解决办法是:打开makefile文件,找到这块代码:
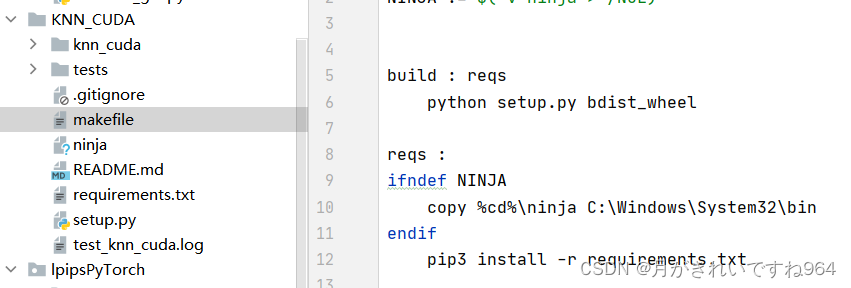
把copy这一行代码注释掉,自己去复制ninja文件到C:\Windows\System32\bin(或者C:\Windows\System32)目录下。然后重新make。
完成后输入:
make install
到这里,knn_cuda库就下载完成了。
然后是另一个不太一样的库安装,mmhuman3d。直接下载会出错。
这里可以先去requirement.txt文件中,把mmhuman3d这一行删掉。
安装命令:
git clone https://github.com/Wei-Chen-hub/mmhuman3d.git
cd mmhuman3d
pip install -r requirements.txt -i https://pypi.tuna.tsinghua.edu.cn/simple
pip install -v -e . -i https://pypi.tuna.tsinghua.edu.cn/simple  # or "python setup.py develop"
安装完成后,现在可以输入命令:
pip install -r requirement.txt数据集和SMPL Model准备
数据集下载按照github的提示就可以了。

这里要注意一下smpl模型的下载:
解压后修改models/basic...pkl模型名字:SMPL_NEUTRAL.pkl
还需要一个步骤,才能把模型放进assets中:
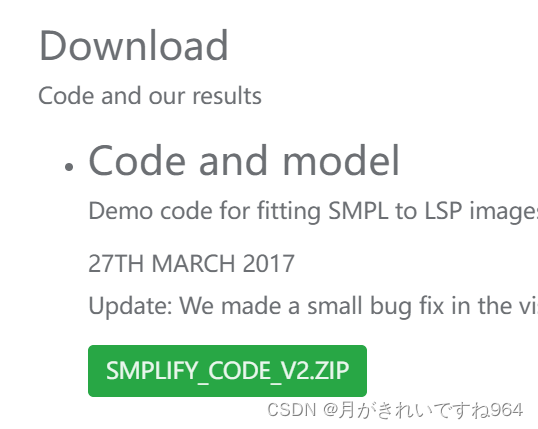
https://github.com/vchoutas/smplx
git clone https://github.com/vchoutas/smplx.git按照这里的步骤移除Chumpy objects。具体过程(可以在其他环境中进行):
pip install chumpy
python tools/clean_ch.py --input-models path-to-models/*.pkl --output-folder output-folder
path-to-models/*.pkl替换为SMPL_NEUTRAL.pkl的路径。
缺什么库就pip install;由于clean_ch.py是python 2.x,因此如果环境是python 3.x则需要简单改动clean_ch.py代码,具体改动:
![]()
加了encoding关键字。
然后把output出来的文件复制到GauHuman/assets就好啦!
执行文件修改
把.sh文件修改为.bat,就可以在windows系统上执行了。以train_zju_mocap_refine.sh为例:
train_zju_mocap_refine.bat

@echo off
setlocal enabledelayedexpansion

REM Define sequences
set "SEQUENCES=my_377 my_386 my_387 my_392 my_393 my_394"

REM Loop through sequences
for %%S in (%SEQUENCES%) do (
    set "SEQUENCE=%%S"
    set "dataset=data\zju_mocap_refine\!SEQUENCE!"
    python train.py -s !dataset! --eval --exp_name zju_mocap_refine\!SEQUENCE!_100_pose_correction_lbs_offset_split_clone_merge_prune --motion_offset_flag --smpl_type smpl --actor_gender neutral --iterations 1200
)

endlocal
在终端输入train_zju_mocap_refine.bat就可以执行了!
参考
论文复现--关于单视角动作捕捉工具箱--MMHuman3d的研究(基于Windows10和Linux18.04中配置)-CSDN博客

有“AI”的1024 = 2048,欢迎大家加入2048 AI社区
更多推荐
 24
24 0
0- 0


 已为社区贡献1条内容

所有评论(0)