Win11-Xinference安装+pytorch下载缓慢解决方式+RAGflow和Dify安装(2025年-新)
一、本地安装Anaconda,Xinference运行在conda创建的虚拟环境当中。D:\“替换成自己Anaconda的目录”\Library\mingw-w64\bin。D:\“替换成自己Anaconda的目录”\Library\usr\bin。D:\“替换成自己Anaconda的目录”\Library\bin。D:\“替换成自己Anaconda的目录”\Scripts。1、进入项目文件,co
本文主要使用Xinference来部署大模型,使用RAGflow/Dify来构建本地知识库定制化AI助手。
推荐使用Docker一键式部署。
一、本地安装Anaconda,Xinference运行在conda创建的虚拟环境当中。
1、安装conda
anaconda官网:https://www.anaconda.com/
2、配置环境变量(系统环境)
D:\“替换成自己Anaconda的目录”
D:\“替换成自己Anaconda的目录”\Scripts
D:\“替换成自己Anaconda的目录”\Library\bin
D:\“替换成自己Anaconda的目录”\Library\mingw-w64\bin
D:\“替换成自己Anaconda的目录”\Library\usr\bin
3、校验
conda --version
4、换源
conda config --add channels https://mirrors.tuna.tsinghua.edu.cn/anaconda/pkgs/free/
conda config --add channels https://mirrors.tuna.tsinghua.edu.cn/anaconda/cloud/conda-forge
conda config --add channels https://mirrors.tuna.tsinghua.edu.cn/anaconda/cloud/msys2/

//设置搜索时显示通道地址
conda config --set show_channel_urls yes
1、 使用conda创建环境
1、进入项目文件,conda创建环境
conda create --name 【你的项目名称】 python=3.122、激活conda环境
conda activate 【你的项目名称】3、conda其它相关命令
1、创建虚拟环境
conda create --name ******** python=3.12
2、初始化环境,完成后重启终端!!!!
conda init
3、激活环境
conda activate ********
4、停止虚拟环境
conda deactivate
5、重启虚拟环境(先停止,再激活)
conda deactivate
conda activate ********
6、删除环境
conda remove --name ******** --all
7、已经创建的环境进行查看
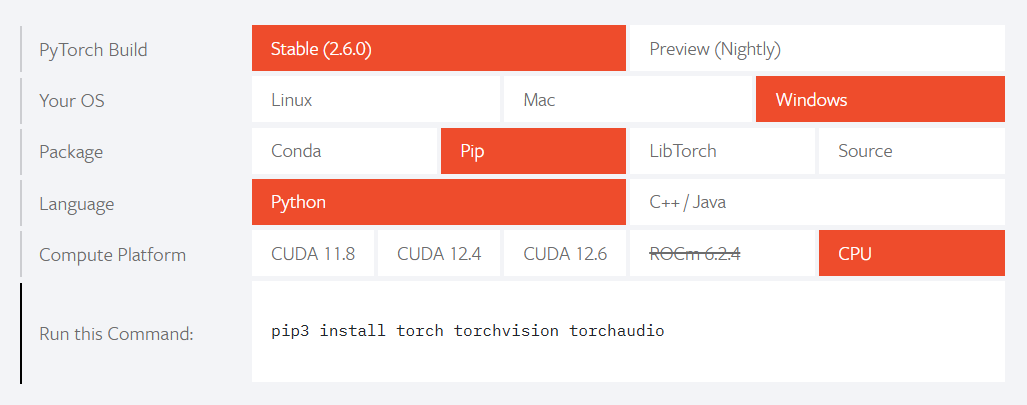
conda env list2、安装Pytorch(没有魔法下载超级慢,可以去官方的库下载对应的版本,或者参考第五点解决方案)
1、官网:PyTorch
2、复制安装命令
选项一:GPU上运行安装(查看cuda版本: nvidia-smi )
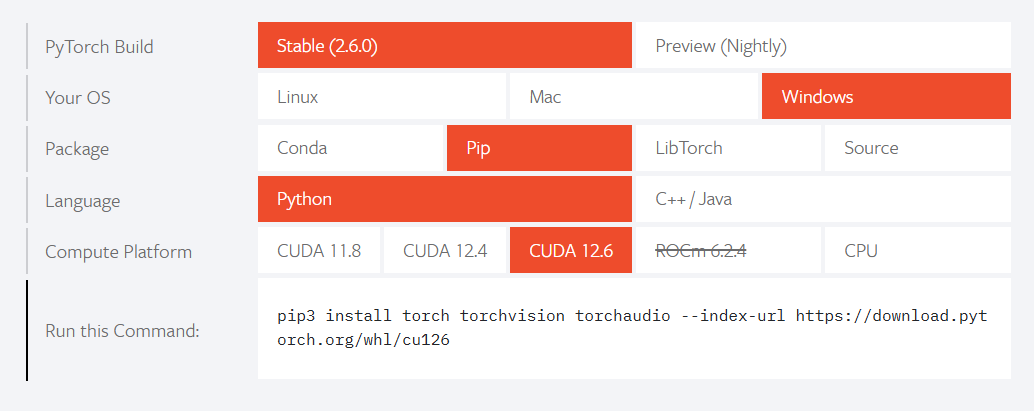
pip3 install torch torchvision torchaudio --index-url https://download.pytorch.org/whl/cu126选项二:在CPU上安装运行
pip3 install torch torchvision torchaudio3、安装Xinference
pip install xinference[all]使用清华源安装,更快速
pip install "xinference[all]" -i https://pypi.tuna.tsinghua.edu.cn/simple
二、解决pytorch下载缓慢问题,其他下载缓慢组件同理
1、找链接,下载时候会给出资源链接(此处只是举例)

2、使用IDM下载
官网:Internet Download Manager is a powerful download accelerator
破解插件: 阿里云盘分享 提取码:f13m
破解插件使用方式:直接双击启动->点击crack->点击finish
3、复制链接到IDM下载资源,下载完成复制文件地址
4、在终端输入(文件地址需要引号)
添加清华源,辅助安装其他依赖。
pip install "复制的文件地址" -i https://pypi.tuna.tsinghua.edu.cn/simple
5、出现的问题和解决方式
问题1、ERROR: Failed to build installable wheels for some pyproject.toml based projects (llama-cpp-python)
解决方法(未实验,待定......): 安装 Visual Studio Build Tools。可以从 这里 下载并安装,安装时要勾选 “C++ 生成工具”。
三、使用Docker来一键部署Xinference
docker run -e XINFERENCE_MODEL_SRC=modelscope -p 9997:9997 --gpus all xprobe/xinference:latest xinference-local -H 0.0.0.0 --log-level debug
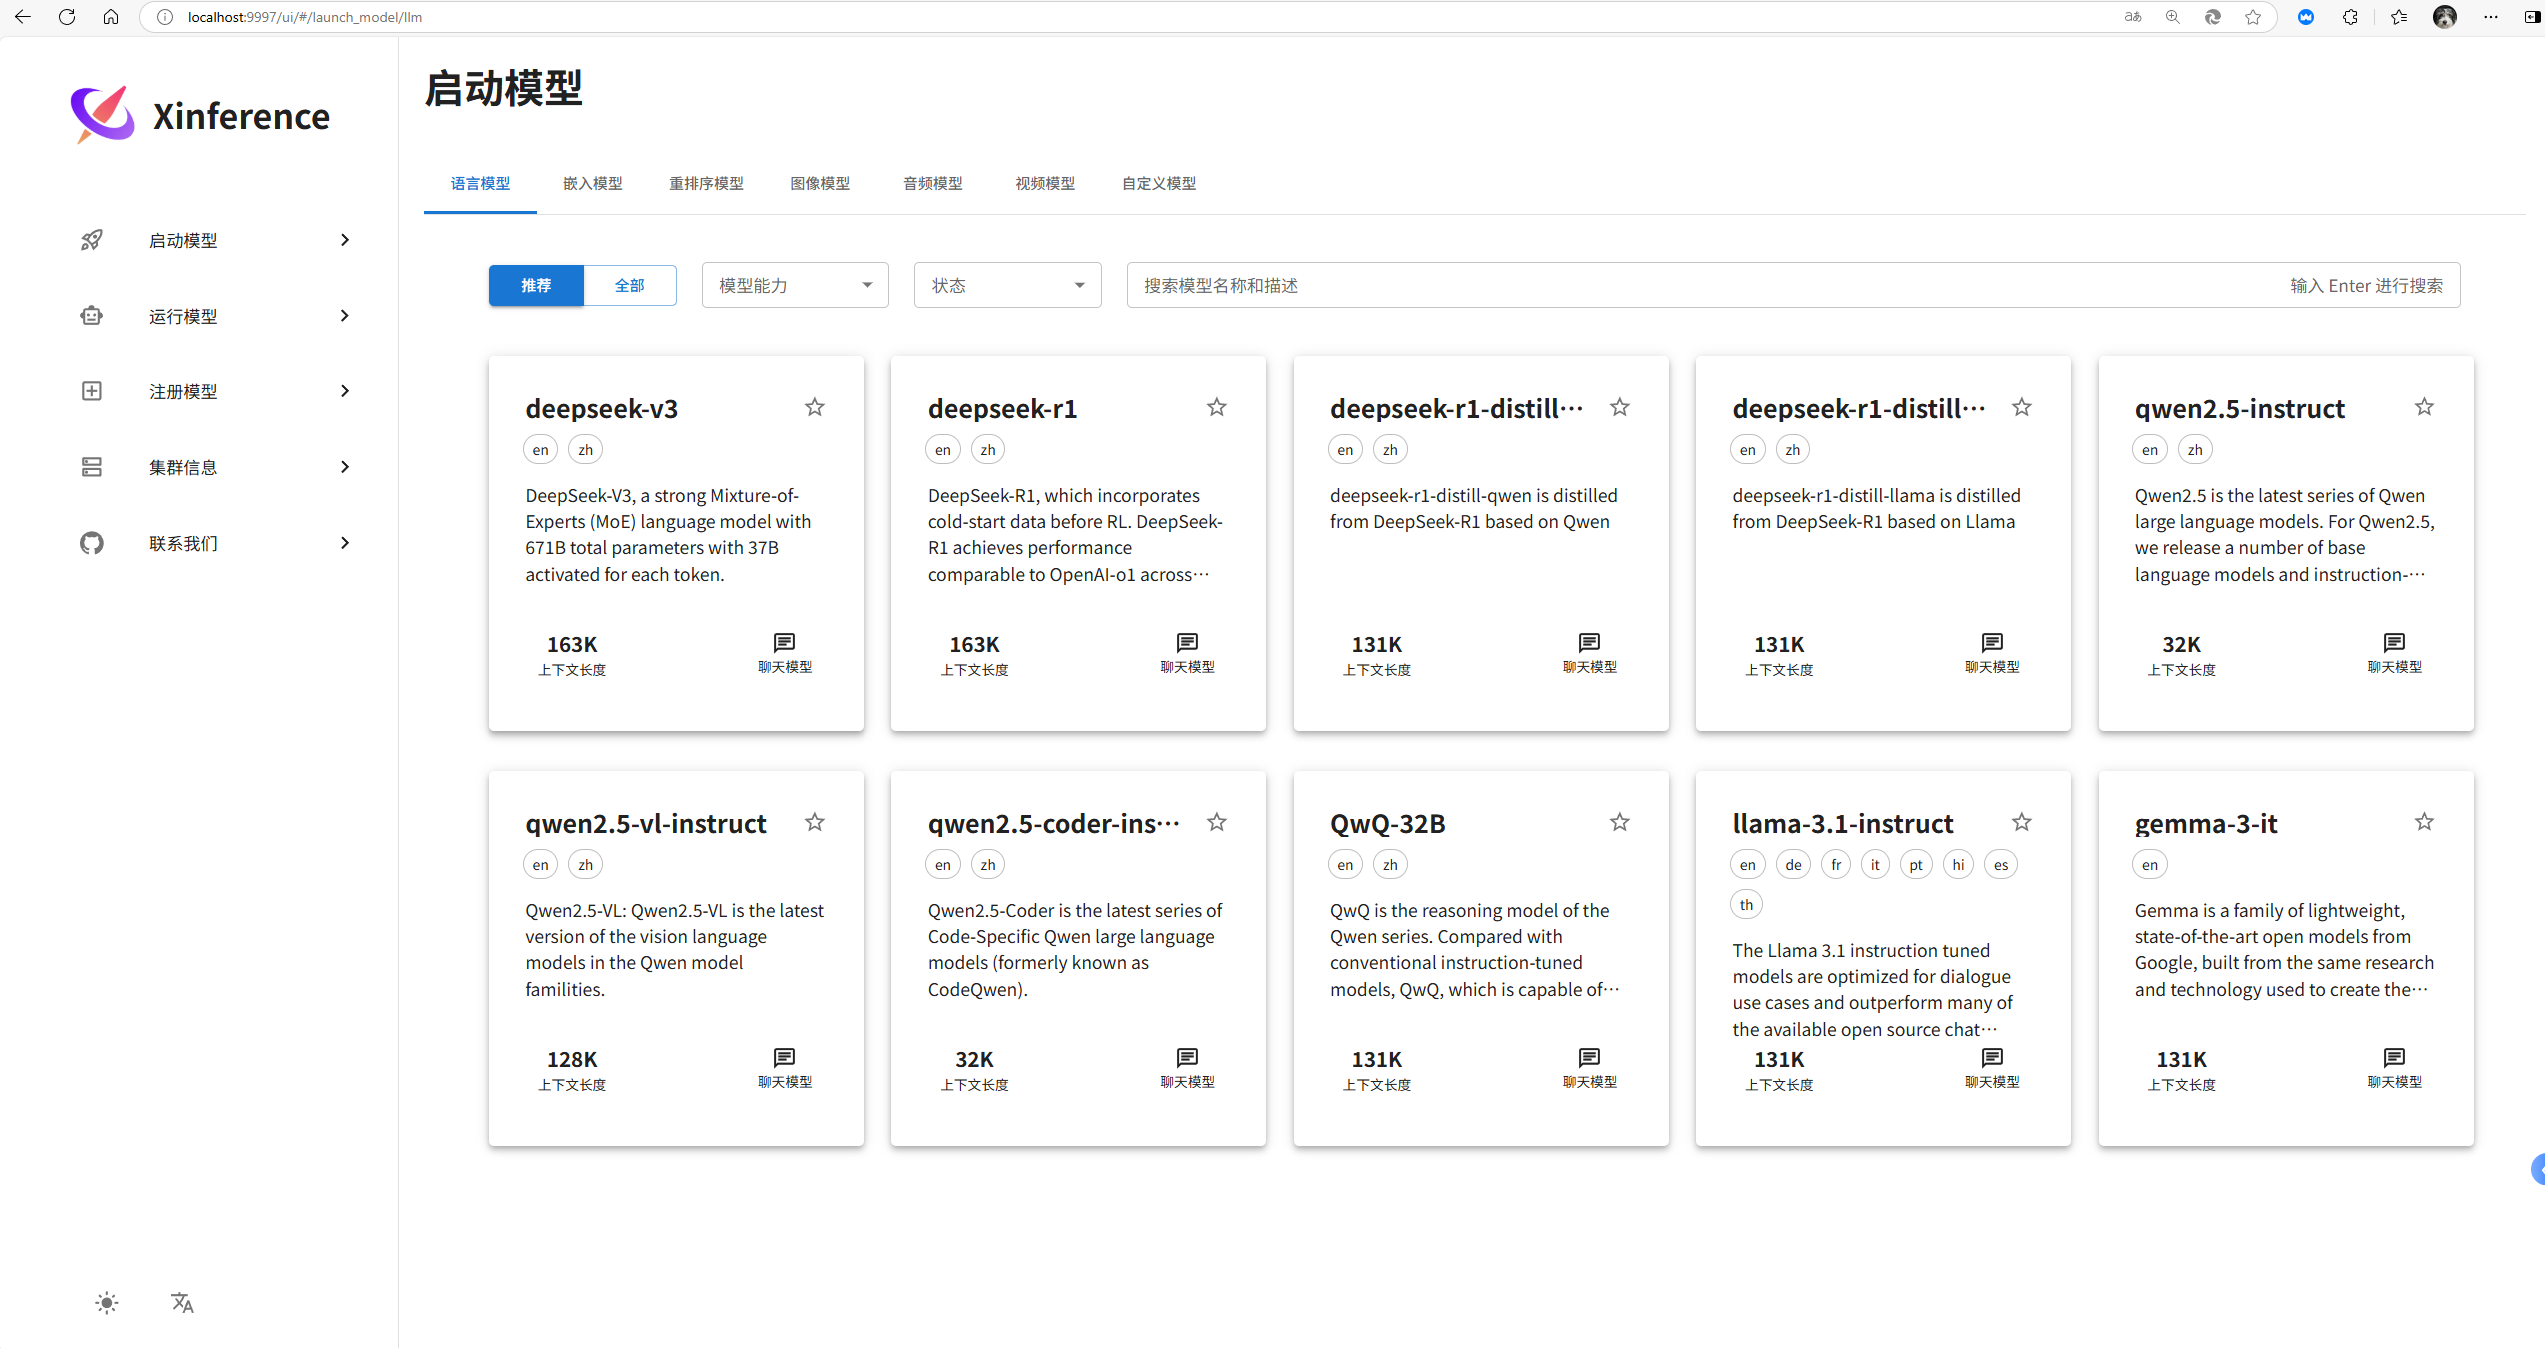
四、Xinference部署本地大模型
五、Ragflow使用Docker一键部署
1、官网:开始使用 |抹布流
# Use CPU for embedding and DeepDoc tasks:
docker compose -f docker-compose.yml up -d

# To use GPU to accelerate embedding and DeepDoc tasks:
docker compose -f docker-compose-gpu.yml up -d
2、配置Xinference安装的大模型
在设置当中的模型供应商选择Xinference。当在docker当中启动Xinference时候,地址为下列所示。使用conda部署的使用对应主机和端口地址就行。
http://host.docker.internal:9997 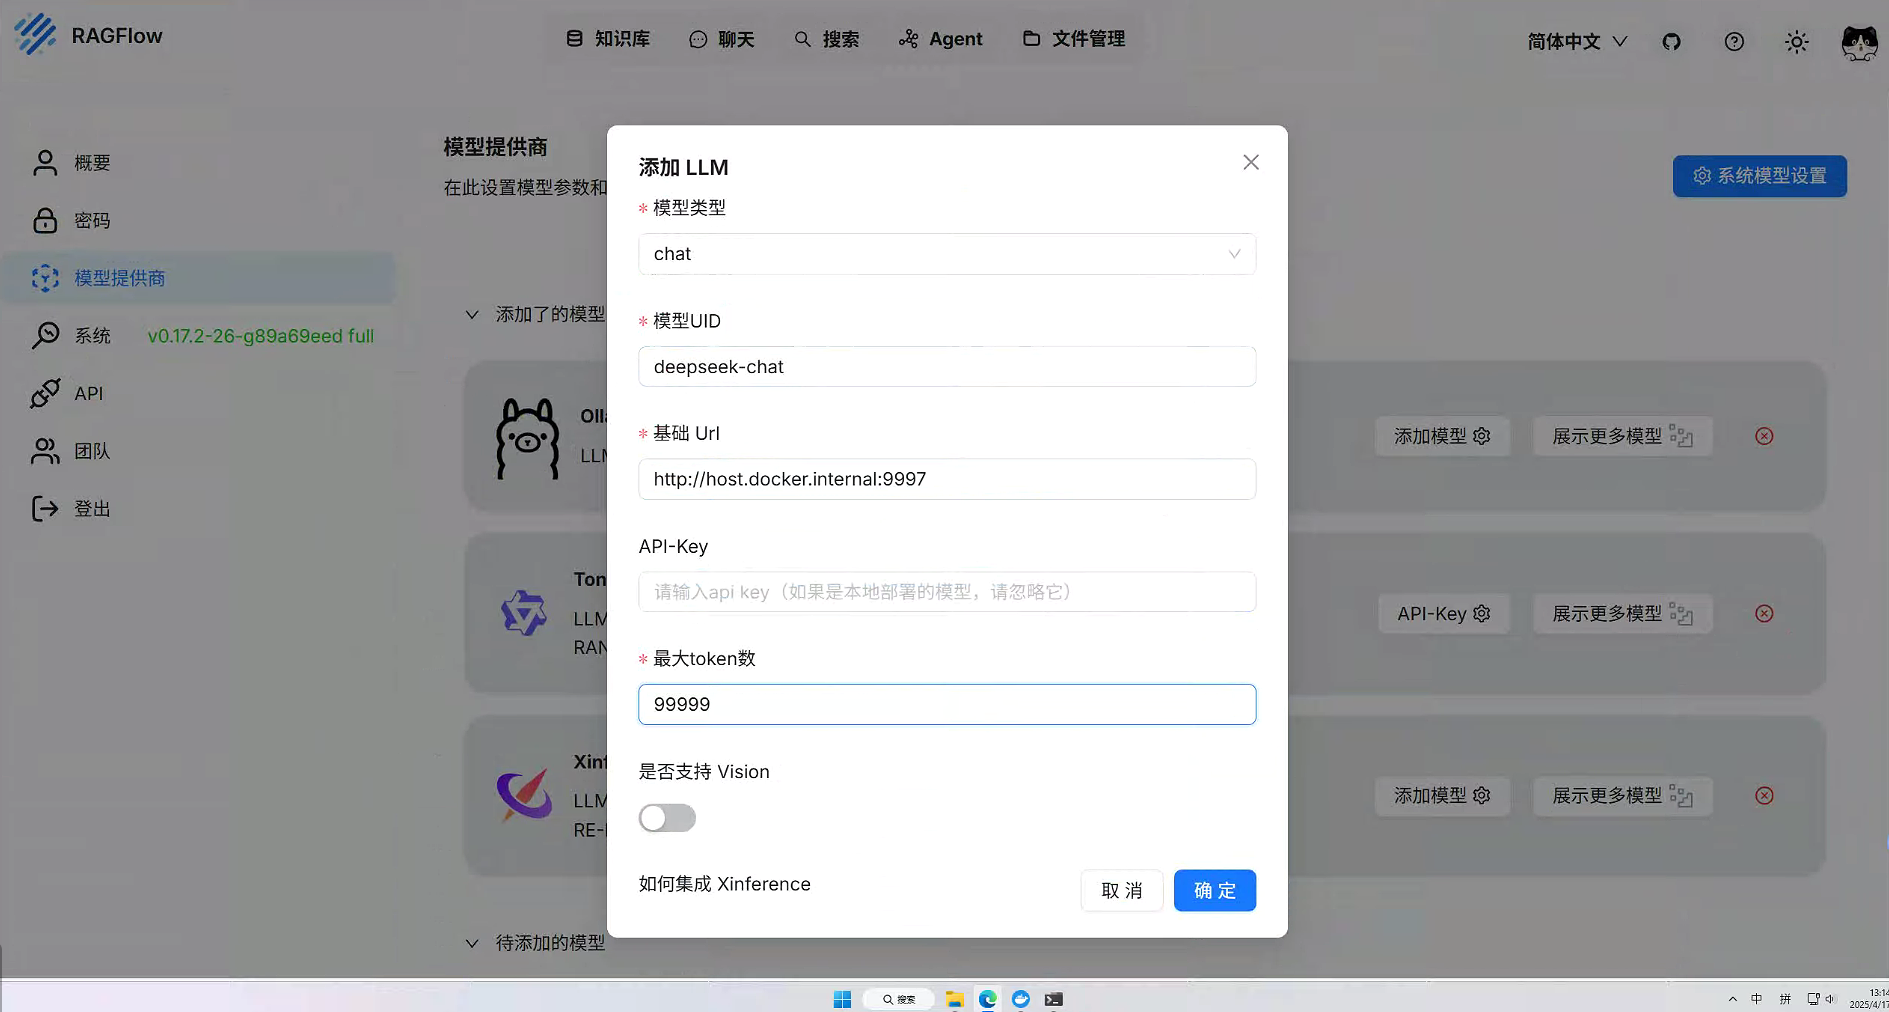
六、Dify使用Docker一键部署
Dify官网: Docker Compose 部署 | Dify
1、先去GitHub下载Dify的文件
2、进入docker的文件夹
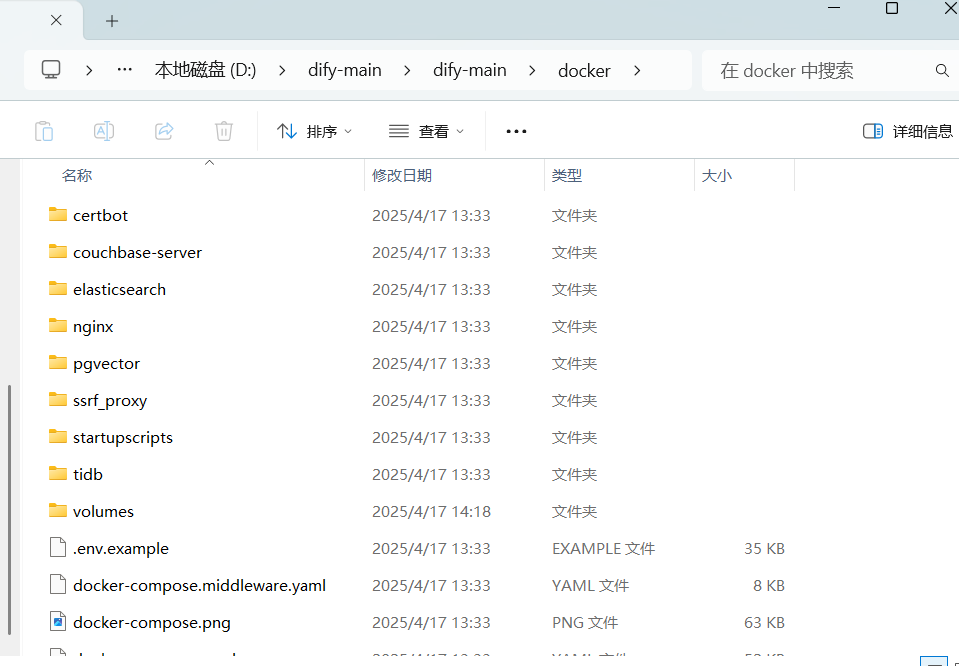
3、在该目录下打开控制台
启动Dify: docker compose up -d
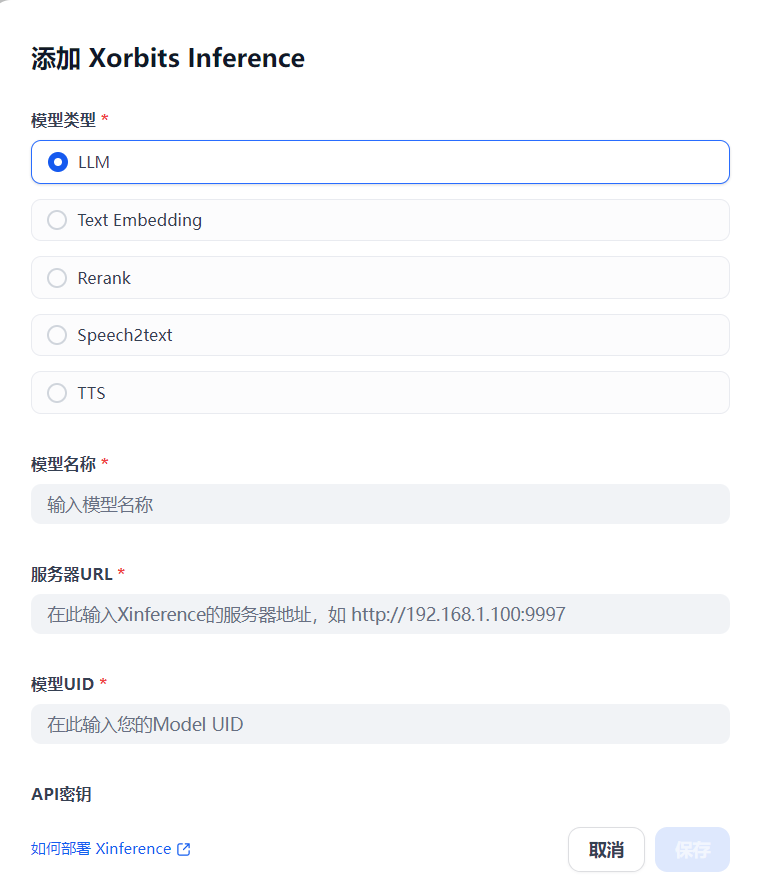
4、配置模型供应商(Xinference)
模型类型选择自己实际的类型,常规是LLM。
服务器url:http://host.docker.internal:9997
模型名称与模型UID填写一样的就行

有“AI”的1024 = 2048,欢迎大家加入2048 AI社区
更多推荐


 6
6 0
0- 0


 已为社区贡献2条内容

所有评论(0)