TypeScript 快速上手
TypeScript 快速上手
⼀、TypeScript 简介
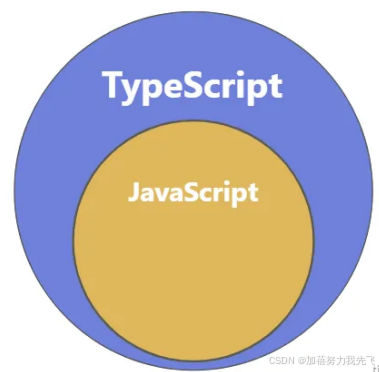
- TypeScript 由微软开发,是基于 JavaScript 的⼀个扩展语⾔。
- TypeScript 包含了 JavaScript 的所有内容,即: TypeScript 是 JavaScript 的超集。
- TypeScript 增加了:静态类型检查、接⼝、 泛型等很多现代开发特性,更适合⼤型项⽬的开发。
- TypeScript 需要编译为 JavaScript ,然后交给浏览器或其他 JavaScript 运⾏环 境执⾏。
⼆、为何需要 TypeScript
1️⃣今⾮昔⽐的 JavaScript(了解)
● JavaScript 当年诞⽣时的定位是浏览器脚本语⾔,⽤于在⽹⻚中嵌⼊简单的逻辑,且代码 量很少。
● 随着时间的推移,JavaScript 变得越来越流⾏,如今的 JavaScript 已经可以全栈编程 了。
● 现如今的 JavaScript 应⽤场景⽐当年丰富的多,代码量也⽐当年⼤很多,随便⼀个 JavaScript 项⽬的代码量,可以轻松的达到⼏万⾏,甚⾄⼗⼏万⾏!
● 然⽽ JavaScript 当年“出⽣简陋”,没考虑到如今的应⽤场景和代码量,逐渐就出现了很多 困扰。
2️⃣JavaScript 中的困扰
- 不清楚的数据类型
let welcome = 'hello'
welcome() // 此⾏报错:TypeError: welcome is not a function
- 有漏洞的逻辑
const str = Date.now() % 2 ? '奇数' : '偶数'
if (str !== '奇数') {
 alert('hello') } else if (str === '偶数') {
 alert('world')
 }
- 访问不存在的属性
const obj = { width: 10, height: 15 };
const area = obj.width * obj.heigth;
- 低级的拼写错误
const message = 'hello,world'
message.toUperCase()
3️⃣『静态类型检查』
● 在代码运⾏前进⾏检查,发现代码的错误或不合理之处,减⼩运⾏时出现异常的⼏率,此种检 查叫『静态类型检查』,TypeScript 和核⼼就是『静态类型检查』,简⾔之就是把运⾏时的 错误前置。
● 同样的功能,TypeScript 的代码量要⼤于 JavaScript,但由于 TypeScript 的代码结构更加 清晰,在后期代码的维护中 TypeScript 却胜于 JavaScript。
三、编译 TypeScript
浏览器不能直接运⾏ TypeScript 代码,需要编译为 JavaScript 再交由浏览器解析器执⾏。
1. 命令⾏编译
要把 .ts ⽂件编译为 .js ⽂件,需要配置 TypeScript 的编译环境,步骤如下:
● 第⼀步:创建⼀个 demo.ts ⽂件,例如:
const person = {
 name:'李四',
 age:18
}
console.log(`我叫${person.name},我今年${person.age}岁了`)
● 第⼆步:全局安装 TypeScript
npm i typescript -g
● 第三步:使⽤命令编译 .ts ⽂件
tsc demo.ts
2. ⾃动化编译
● 第⼀步:创建 TypeScript 编译控制⽂件
tsc --init
- ⼯程中会⽣成⼀个 tsconfig.json 配置⽂件,其中包含着很多编译时的配置。
- 观察发现,默认编译的 JS 版本是 ES7 ,我们可以⼿动调整为其他版本。
● 第⼆步:监视⽬录中的 .ts ⽂件变化
tsc --watch 或 tsc -w
● 第三步:⼩优化,当编译出错时不⽣成 .js ⽂件
tsc --noEmitOnError --watch
备注:当然也可以修改 tsconfig.json 中的 noEmitOnError 配置
四、类型声明
使⽤ : 来对变量或函数形参,进⾏类型声明:
let a: string //变量a只能存储字符串
let b: number //变量b只能存储数值
let c: boolean //变量c只能存储布尔值 a = 'hello'
a = 100 //警告:不能将类型“number”分配给类型“string”
b = 666
b = '你好'//警告:不能将类型“string”分配给类型“number”
c = true
c = 666 //警告:不能将类型“number”分配给类型“boolean”
// 参数x必须是数字,参数y也必须是数字,函数返回值也必须是数字
function demo(x:number,y:number):number{
 return x + y
}
demo(100,200)
demo(100,'200') //警告:类型“string”的参数不能赋给类型“number”的参数
demo(100,200,300) //警告:应有 2 个参数,但获得 3 个
demo(100) //警告:应有 2 个参数,但获得 1 个
在 : 后也可以写字⾯量类型,不过实际开发中⽤的不多。
let a: '你好' //a的值只能为字符串“你好”
let b: 100 //b的值只能为数字100
a = '欢迎'//警告:不能将类型“"欢迎"”分配给类型“"你好"”
b = 200 //警告:不能将类型“200”分配给类型“100
五、类型推断
TS 会根据我们的代码,进⾏类型推导,例如下⾯代码中的变量 d ,只能存储数字
let d = -99 //TypeScript会推断出变量d的类型是数字 d = false //警告:不能将类型“boolean”分配给类型“number
但要注意,类型推断不是万能的,⾯对复杂类型时推断容易出问题,所以尽量还是明确的编写类 型声明!
六、类型总览
JavaScript 中的数据类型
① string
② number
③ boolean
④ null
⑤ undefined
⑥ bigint
⑦ symbol
⑧ object
备注:其中 object 包含: Array 、 Function 、 Date 、 Error 等......
TypeScript 中的数据类型
1. 上述所有 JavaScript 类型
2. 六个新类型:
① any
② unknown
③ never
④ void
⑤ tuple
⑥ enum
3. 两个⽤于⾃定义类型的⽅式:
① type
② interface
注意点!
在 JavaScript 中的这些内置构造函数: Number 、 String 、 Boolean ,⽤于 创建对应的包装对象, 在⽇常开发时很少使⽤,在 TypeScript 中也是同理,所以 在 TypeScript 中进⾏类型声明时,通常都是⽤⼩写的 number 、 string 、 boolean
例如下⾯代码:
let str1: string
str1 = 'hello'
str1 = new String('hello') //报错
let str2: String
str2 = 'hello'
str2 = new String('hello')
console.log(typeof str1)
console.log(typeof str2)
- 原始类型 VS 包装对象
● 原始类型:如 number 、 string 、 boolean ,在 JavaScript 中是简单数据
类型,它们在内存中占⽤空间少,处理速度快。
● 包装对象:如 Number 对象、 String 对象、 Boolean 对象,是复杂类型,在 内存中占⽤更多空间,在⽇常开发时很少由开发⼈员⾃⼰创建包装对象。- ⾃动装箱:JavaScript 在必要时会⾃动将原始类型包装成对象,以便调⽤⽅法或访问属性
// 原始类型字符串
let str = 'hello';
// 当访问str.length时,JavaScript引擎做了以下⼯作:
let size = (function() {
 // 1. ⾃动装箱:创建⼀个临时的String对象包装原始字符串
 let tempStringObject = new String(str);
 // 2. 访问String对象的length属性
 let lengthValue = tempStringObject.length;
 // 3. 销毁临时对象,返回⻓度值
 // (JavaScript引擎⾃动处理对象销毁,开发者⽆感知)
 return lengthValue; })();
console.log(size); // 输出: 5
七、常⽤类型与语法
1. any
any 的含义是:任意类型,⼀旦将变量类型限制为 any ,那就意味着放弃了对该变量的类型 检查。
// 明确的表示a的类型是 any —— 【显式的any】
let a: any
// 以下对a的赋值,均⽆警告 a = 100
a = '你好'
a = false
// 没有明确的表示b的类型是any,但TS主动推断出来b是any —— 隐式的any
let b
//以下对b的赋值,均⽆警告 b = 100
b = '你好'
b = false
注意点: any 类型的变量,可以赋值给任意类型的变量
/* 注意点:any类型的变量,可以赋值给任意类型的变量 */
let c:any
c = 9
let x: string
x = c // ⽆警告
2. unknown
unknown 的含义是:未知类型,适⽤于:起初不确定数据的具体类型,要后期才能确定
- unknown 可以理解为⼀个类型安全的 any 。
// 设置a的类型为unknown
let a: unknown
//以下对a的赋值,均符合规范 a = 100
a = false
a = '你好'
// 设置x的数据类型为string
let x: string
x = a //警告:不能将类型“unknown”分配给类型“string”
- unknown 会强制开发者在使⽤之前进⾏类型检查,从⽽提供更强的类型安全性。
// 设置a的类型为unknown
let a: unknown
a = 'hello'

let x: string
//第⼀种⽅式:加类型判断
if(typeof a === 'string'){
 x = a
 console.log(x) }
//第⼆种⽅式:加断⾔ x = a as string
//第三种⽅式:加断⾔ x = <string>a
- 读取 any 类型数据的任何属性都不会报错,⽽ unknown 正好与之相反。
let str1: string
str1 = 'hello'
str1.toUpperCase() //⽆警告
let str2: any
str2 = 'hello'
str2.toUpperCase() //⽆警告
let str3: unknown
str3 = 'hello';
str3.toUpperCase() //警告:“str3”的类型为“未知”
// 使⽤断⾔强制指定str3的类型为string
(str3 as string).toUpperCase() //⽆警告
3. never
never 的含义是:任何值都不是,即:不能有值,例如 undefined 、 null 、 '' 、 0 都不⾏!
- ⼏乎不⽤ never 去直接限制变量,因为没有意义,例如:
/* 指定a的类型为never,那就意味着a以后不能存任何的数据了 */
let a: never
// 以下对a的所有赋值都会有警告 a = 1 a = true
a = undefined
a = null
- never ⼀般是 TypeScript 主动推断出来的,例如:
// 指定a的类型为string
let a: string
// 给a设置⼀个值 a = 'hello'
if (typeof a === 'string') {
 console.log(a.toUpperCase())
} else {
 console.log(a) // TypeScript会推断出此处的a是never,因为没有任何⼀个值符合此处的逻辑
}
- never 也可⽤于限制函数的返回值
// 限制throwError函数不需要有任何返回值,任何值都不⾏,像undeifned、null都不⾏
function throwError(str: string): never {
 throw new Error('程序异常退出:' + str)
}
4. void
void 的含义是空,即:函数不返回任何值,调⽤者也不应依赖其返回值进⾏任何操作!
- void 通常⽤于函数返回值声明
function logMessage(msg:string):void{
 console.log(msg) }
logMessage('你好')
注意:编码者没有编写 return 指定函数返回值,所以 logMessage 函数是没有显式 返回值的,但会有⼀个隐式返回值 ,是 undefined ,虽然函数返回类型为 void ,但 也是可以接受 undefined 的,简单记: undefined 是 void 可以接受的⼀种“空”。
- 以下写法均符合规范
// ⽆警告
function logMessage(msg:string):void{
 console.log(msg) }
// ⽆警告
function logMessage(msg:string):void{
 console.log(msg)
 return; }
// ⽆警告
function logMessage(msg:string):void{
 console.log(msg)
 return undefined
}
- 那限制函数返回值时,是不是 undefined 和 void 就没区别呢?—— 有区别。因为还有 这句话 :【返回值类型为 void 的函数,调⽤者不应依赖其返回值进⾏任何操作!】对⽐下 ⾯两段代码:
function logMessage(msg:string):void{
 console.log(msg) }
let result = logMessage('你好')
if(result){ // 此⾏报错:⽆法测试 "void" 类型的表达式的真实性
 console.log('logMessage有返回值') }
function logMessage(msg:string):undefined{
 console.log(msg) }
let result = logMessage('你好')
if(result){ // 此⾏⽆警告
 console.log('logMessage有返回值') }
理解 void 与 undefined
● void 是⼀个⼴泛的概念,⽤来表达“空”,⽽ undefined 则是这种“空”的具体 实现。
● 因此可以说 undefined 是 void 能接受的⼀种“空”的状态。
● 也可以理解为: void 包含 undefined ,但 void 所表达的语义超越了 undefined , void 是⼀种意图上的约定,⽽不仅仅是特定值的限制。
总结:
如果⼀个函数返回类型为 void ,那么:
- 从语法上讲:函数是可以返回 undefined 的,⾄于显式返回,还是隐式返回,这⽆ 所谓!
- 从语义上讲:函数调⽤者不应关⼼函数返回的值,也不应依赖返回值进⾏任何操作! 即使我们知道它返回了 undefined 。
5. object
关于 object 与 Object ,直接说结论:实际开发中⽤的相对较少,因为范围太⼤了。
object(⼩写)
object (⼩写)的含义是:所有⾮原始类型,可存储:对象、函数、数组等,由于限制 的范围⽐较宽泛,在实际开发中使⽤的相对较少。
let a:object //a的值可以是任何【⾮原始类型】,包括:对象、函数、数组等
// 以下代码,是将【⾮原始类型】赋给a,所以均符合要求
a = {}
a = {name:'张三'}
a = [1,3,5,7,9]
a = function(){}
a = new String('123')
class Person {}
a = new Person()
// 以下代码,是将【原始类型】赋给a,有警告 a = 1 // 警告:不能将类型“number”分配给类型“object”
a = true // 警告:不能将类型“boolean”分配给类型“object”
a = '你好' // 警告:不能将类型“string”分配给类型“object”
a = null // 警告:不能将类型“null”分配给类型“object”
a = undefined // 警告:不能将类型“undefined”分配给类型“object”
Object(⼤写)
- 官⽅描述:所有可以调⽤ Object ⽅法的类型。
- 简单记忆:除了 undefined 和 null 的任何值。
- 由于限制的范围实在太⼤了!所以实际开发中使⽤频率极低。
let b:Object //b的值必须是Object的实例对象(除去undefined和null的任何值)
// 以下代码,均⽆警告,因为给a赋的值,都是Object的实例对象
b = {}
b = {name:'张三'}
b = [1,3,5,7,9]
b = function(){}
b = new String('123')
class Person {}
b = new Person()
b = 1 // 1不是Object的实例对象,但其包装对象是Object的实例
b = true // true不是Object的实例对象,但其包装对象是Object的实例
b = '你好' // “你好”不是Object的实例对象,但其包装对象是Object的实例
// 以下代码均有警告
b = null // 警告:不能将类型“null”分配给类型“Object”
b = undefined // 警告:不能将类型“undefined”分配给类型“Object”
声明对象类型
- 实际开发中,限制⼀般对象,通常使⽤以下形式
// 限制person1对象必须有name属性,age为可选属性
let person1: { name: string, age?: number }
// 含义同上,也能⽤分号做分隔
let person2: { name: string; age?: number }
// 含义同上,也能⽤换⾏做分隔
let person3: {
 name: string
 age?: number
}
// 如下赋值均可以
person1 = {name:'李四',age:18}
person2 = {name:'张三'}
person3 = {name:'王五'}
// 如下赋值不合法,因为person3的类型限制中,没有对gender属性的说明
person3 = {name:'王五',gender:'男'}
- 索引签名: 允许定义对象可以具有任意数量的属性,这些属性的键和类型是可变的, 常⽤于:描述类型不确定的属性,(具有动态属性的对象)。
// 限制person对象必须有name属性,可选age属性但值必须是数字,同时可以有任意数 量、任意类型的其他属性
let person: {
 name: string
 age?: number
 [key: string]: any // 索引签名,完全可以不⽤key这个单词,换成其他的也可以
}
// 赋值合法
person = {
 name:'张三',
 age:18,
 gender:'男'
}
声明函数类型
let count: (a: number, b: number) => number
count = function (x, y) {
return x + y
}
备注:
● TypeScript 中的 => 在函数类型声明时表示函数类型,描述其参数类型和返回类
型。
● JavaScript 中的 => 是⼀种定义函数的语法,是具体的函数实现。
● 函数类型声明还可以使⽤:接⼝、⾃定义类型等⽅式,下⽂中会详细讲解。
声明数组类型
let arr1: string[]
let arr2: Array<string>
arr1 = ['a','b','c']
arr2 = ['hello','world']
备注:上述代码中的 Array 属于泛型,下⽂会详细讲解。
6. tuple
元组 (Tuple) 是⼀种特殊的数组类型,可以存储固定数量的元素,并且每个元素的类型是已 知的且可以不同。元组⽤于精确描述⼀组值的类型, ? 表示可选元素。
// 第⼀个元素必须是 string 类型,第⼆个元素必须是 number 类型。
let arr1: [string,number]
// 第⼀个元素必须是 number 类型,第⼆个元素是可选的,如果存在,必须是 boolean 类型。
let arr2: [number,boolean?]
// 第⼀个元素必须是 number 类型,后⾯的元素可以是任意数量的 string 类型
let arr3: [number,...string[]]
// 可以赋值
arr1 = ['hello',123]
arr2 = [100,false]
arr2 = [200]
arr3 = [100,'hello','world']
arr3 = [100]
// 不可以赋值,arr1声明时是两个元素,赋值的是三个
arr1 = ['hello',123,false]
7. enum
枚举( enum )可以定义⼀组命名常量,它能增强代码的可读性,也让代码更好维护。
如下代码的功能是:根据调⽤ walk 时传⼊的不同参数,执⾏不同的逻辑,存在的问题是调⽤ walk 时传参时没有任何提示,编码者很容易写错字符串内容;并且⽤于判断逻辑的 up 、 down 、 left 、 right 是连续且相关的⼀组值,那此时就特别适合使⽤ 枚举( enum )。
function walk(str:string) {
 if (str === 'up') {
 console.log("向【上】⾛");
 } else if (str === 'down') {
 console.log("向【下】⾛");
 } else if (str === 'left') {
 console.log("向【左】⾛");
 } else if (str === 'right') {
 console.log("向【右】⾛");
 } else {
 console.log("未知⽅向");
 }
 //#regin   ---代码折叠
// if (str === 'up') {
// console.log("向【上】⾛");
// } else if (str === 'down') {
// console.log("向【下】⾛");
// } else if (str === 'left') {
// console.log("向【左】⾛");
// } else if (str === 'right') {
// console.log("向【右】⾛");
// } else {
// console.log("未知⽅向");
// }
//#endregin
}
walk('up')
walk('down')
walk('left')
walk('right')
- 数字枚举
数字枚举⼀种最常⻅的枚举类型,其成员的值会⾃动递增,且数字枚举还具备反向映射的特点,在下⾯代码的打印中,不难发现:可以通过值来获取对应的枚举成员名称 。
// 定义⼀个描述【上下左右】⽅向的枚举Direction
enum Direction {
 Up,
 Down,
 Left,
 Right
}
console.log(Direction) // 打印Direction会看到如下内容
/*
 {
 0:'Up',
 1:'Down',
 2:'Left',
 3:'Right',
 Up:0,
 Down:1,
 Left:2,
 Right:3
 }
*/
// 反向映射
console.log(Direction.Up)
console.log(Direction[0])
// 此⾏代码报错,枚举中的属性是只读的
Direction.Up = 'shang'
也可以指定枚举成员的初始值,其后的成员值会⾃动递增。
enum Direction {
 Up = 6,
 Down,
 Left,
 Right
}
console.log(Direction.Up); // 输出: 6
console.log(Direction.Down); // 输出: 7
使⽤数字枚举完成刚才 walk 函数中的逻辑,此时我们发现: 代码更加直观易读,⽽且类 型安全,同时也更易于维护。
enum Direction {
 Up,
 Down,
 Left,
 Right,
}
function walk(n: Direction) {
 if (n === Direction.Up) {
 console.log("向【上】⾛");
 } else if (n === Direction.Down) {
 console.log("向【下】⾛");
 } else if (n === Direction.Left) {
 console.log("向【左】⾛");
 } else if (n === Direction.Right) {
 console.log("向【右】⾛");
 } else {
 console.log("未知⽅向");
 } }
walk(Direction.Up)
walk(Direction.Down)
- 字符串枚举
枚举成员的值是字符串
enum Direction {
 Up = "up",
 Down = "down",
 Left = "left",
 Right = "right"
}
let dir: Direction = Direction.Up;
console.log(dir); // 输出: "up"
- 常量枚举
官⽅描述:常量枚举是⼀种特殊枚举类型,它使⽤ const 关键字定义,在编译时会被 内联,避免⽣成⼀些额外的代码。
何为编译时内联? 所谓“内联”其实就是 TypeScript 在编译时,会将枚举成员引⽤替换为它们的实际值, ⽽不是⽣成额外的枚举对象。这可以减少⽣成的 JavaScript 代码量,并提⾼运⾏时性 能。
使⽤普通枚举的 TypeScript 代码如下:
enum Directions {
 Up,
 Down,
 Left,
 Right
}
let x = Directions.Up;
编译后⽣成的 JavaScript 代码量较⼤ :
"use strict";
var Directions; (function (Directions) {
 Directions[Directions["Up"] = 0] = "Up";
 Directions[Directions["Down"] = 1] = "Down";
 Directions[Directions["Left"] = 2] = "Left";
 Directions[Directions["Right"] = 3] = "Right"; })(Directions || (Directions = {}));
let x = Directions.Up;
使⽤常量枚举的 TypeScript 代码如下:
const enum Directions {
 Up,
 Down,
 Left,
 Right
}
let x = Directions.Up;
编译后⽣成的 JavaScript 代码量较⼩:
"use strict";
let x = 0 /* Directions.Up */;
8. type
type 可以为任意类型创建别名,让代码更简洁、可读性更强,同时能更⽅便地进⾏类型复⽤和 扩展
- 基本⽤法
类型别名使⽤ type 关键字定义, type 后跟类型名称,例如下⾯代码中 num 是类型别名。
type num = number;
let price: num
price = 100
- 联合类型
联合类型是⼀种⾼级类型,它表示⼀个值可以是⼏种不同类型之⼀。
type Status = number | string
type Gender = '男' | '⼥'
function printStatus(status: Status) {
 console.log(status);
}
function logGender(str:Gender){
 console.log(str)
}
printStatus(404);
printStatus('200');
printStatus('501');
logGender('男')
logGender('⼥')
3.交叉类型
交叉类型(Intersection Types)允许将多个类型合并为⼀个类型。合并后的类型将拥 有所有被合并类型的成员。交叉类型通常⽤于对象类型。
//⾯积
type Area = {
 height: number; //⾼
 width: number; //宽
};
//地址
type Address = {
 num: number; //楼号
 cell: number; //单元号
 room: string; //房间号
};
// 定义类型House,且House是Area和Address组成的交叉类型
type House = Area & Address;
const house: House = {
 height: 180,
 width: 75,
 num: 6,
 cell: 3,
 room: '702'
};
9. ⼀个特殊情况
先来观察如下两段代码:
代码段1(正常)
在函数定义时,限制函数返回值为 void ,那么函数的返回值就必须是空。
function demo():void{
 // 返回undefined合法
 return undefined
 // 以下返回均不合法
 return 100
 return false
 return null
 return []
}
demo()
代码段2(特殊)
使⽤ 限制函数返回值为 void 时, TypeScript 并不会严格要求函数返回空。
type LogFunc = () => void
const f1: LogFunc = () => {
 return 100; // 允许返回⾮空值
};
const f2: LogFunc = () => 200; // 允许返回⾮空值
const f3: LogFunc = function () {
 return 300; // 允许返回⾮空值
};
为什么会这样?
是为了确保如下代码成⽴,我们知道 Array.prototype.push 的返回值是⼀个数字, ⽽ Array.prototype.forEach ⽅法期望其回调的返回类型是 void 。
const src = [1, 2, 3];
const dst = [0];
src.forEach((el) => dst.push(el));
10. 复习类相关知识
本⼩节是复习类相关知识,如果有相关基础可以跳过。
类 class
class Person {
 // 属性声明
 name: string
 age: number
 // 构造器
 constructor(name: string, age: number) {
 this.name = name
 this.age = age
 }
 // ⽅法
 speak() {
 console.log(`我叫:${this.name},今年${this.age}岁`)
 }
}
// Person实例
const p1 = new Person('周杰伦', 38)
Student 继承 Person
class Student extends Person {
 grade: string
 // 构造器
 constructor(name: string, age: number, grade: string) {
 super(name, age)
 this.grade = grade
 }
 // 备注本例中若Student类不需要额外的属性,Student的构造器可以省略
 // 重写从⽗类继承的⽅法
 override speak() {
 console.log(`我是学⽣,我叫:${this.name},今年${this.age}岁,在读${this.grade} 年级`,)
 }
 // ⼦类⾃⼰的⽅法
 study() {
 console.log(`${this.name}正在努⼒学习中......`)
 } }
11. 属性修饰符

public 修饰符
Person 类
class Person {
 // name写了public修饰符,age没写修饰符,最终都是public修饰符
 public name: string
 age: number
 constructor(name: string, age: number) {
 this.name = name
 this.age = age
 }
 speak() {
 // 类的【内部】可以访问public修饰的name和age
 console.log(`我叫:${this.name},今年${this.age}岁`)
 } }
const p1 = new Person('张三', 18)
// 类的【外部】可以访问public修饰的属性
console.log(p1.name)
Student 继承 Person
class Student extends Person {
 constructor(name: string, age: number) {
 super(name, age)
 }
 study() {
 // 【⼦类中】可以访问⽗类中public修饰的:name属性、age属性
 console.log(`${this.age}岁的${this.name}正在努⼒学习`)
 } }
属性的简写形式
class Person {
 public name: string;
 public age: number;
 constructor(name: string, age: number) {
 this.name = name;
 this.age = age;
 }
}
class Person {
 constructor(public name: string,public age: number) { }
}
protected 修饰符
Person类
class Person {
 // name和age是受保护属性,不能在类外部访问,但可以在【类】与【⼦类】中访问
 constructor(
 protected name: string,
 protected age: number
 ) {}
 // getDetails是受保护⽅法,不能在类外部访问,但可以在【类】与【⼦类】中访问
 protected getDetails(): string {
 // 类中能访问受保护的name和age属性
 return `我叫:${this.name},年龄是:${this.age}`
 }
 // introduce是公开⽅法,类、⼦类、类外部都能使⽤
 introduce() {
 // 类中能访问受保护的getDetails⽅法
 console.log(this.getDetails());
 } }
const p1 = new Person('杨超越',18)
// 可以在类外部访问introduce
p1.introduce()
// 以下代码均报错
// p1.getDetails()
// p1.name
// p1.age
Student 继承 Person
class Student extends Person {
 constructor(name:string,age:number){
 super(name,age)
 }
 study(){
 // ⼦类中可以访问introduce
 this.introduce()
 // ⼦类中可以访问name
 console.log(`${this.name}正在努⼒学习`)
 } }
const s1 = new Student('tom',17)
s1.introduce()
private 修饰符
class Person {
 constructor(
 public name: string,
 public age: number,
 // IDCard属性为私有的(private)属性,只能在【类内部】使⽤
 private IDCard: string
 ) { }
 private getPrivateInfo(){
 // 类内部可以访问私有的(private)属性 —— IDCard
 return `身份证号码为:${this.IDCard}`
 }
 getInfo() {
 // 类内部可以访问受保护的(protected)属性 —— name和age
 return `我叫: ${this.name}, 今年刚满${this.age}岁`;
 }
 getFullInfo(){
 // 类内部可以访问公开的getInfo⽅法,也可以访问私有的getPrivateInfo⽅法
 return this.getInfo() + ',' + this.getPrivateInfo()
 } }
const p1 = new Person('张三',18,'110114198702034432')
console.log(p1.getFullInfo())
console.log(p1.getInfo())
// 以下代码均报错
// p1.name
// p1.age
// p1.IDCard
// p1.getPrivateInfo()
readonly 修饰符
class Car {
 constructor(
 public readonly vin: string, //⻋辆识别码,为只读属性
 public readonly year: number,//出⼚年份,为只读属性
 public color: string,
 public sound: string
 ) { }
 // 打印⻋辆信息
 displayInfo() {
 console.log(`
 识别码:${this.vin},
 出⼚年份:${this.year},
 颜⾊:${this.color},
 ⾳响:${this.sound}
 `);
 } }
const car = new Car('1HGCM82633A123456', 2018, '⿊⾊', 'Bose⾳响');
car.displayInfo()
// 以下代码均错误:不能修改 readonly 属性
// car.vin = '897WYE87HA8SGDD8SDGHF';
// car.year = 2020;
12. 抽象类
● 概述:抽象类是⼀种⽆法被实例化的类,专⻔⽤来定义类的结构和⾏为,类中可以写抽象 ⽅法,也可以写具体实现。抽象类主要⽤来为其派⽣类提供⼀个基础结构,要求其派⽣类 必须实现其中的抽象⽅法。
● 简记:抽象类不能实例化,其意义是可以被继承,抽象类⾥可以有普通⽅法、也可以有抽 象⽅法。
通过以下场景,理解抽象类:
我们定义⼀个抽象类 Package ,表示所有包裹的基本结构,任何包裹都有重量属性 weight ,包裹都需要计算运费。但不同类型的包裹(如:标准速度、特快专递)都有不同的运费计算 ⽅式,因此⽤于计算运费的calculate ⽅法是⼀个抽象⽅法,必须由具体的⼦类来实现。
Package 类
abstract class Package {
 constructor(public weight: number) { }
 // 抽象⽅法:⽤来计算运费,不同类型包裹有不同的计算⽅式
 abstract calculate(): number
 // 通⽤⽅法:打印包裹详情
 printPackage() {
 console.log(`包裹重量为: ${this.weight}kg,运费为: ${this.calculate()}`);
 }
}
StandardPackage 类继承了 Package ,实现了 calculate ⽅法:
StandardPackage 类 (标快包裹)
// 标准包裹
class StandardPackage extends Package {
 constructor(
 weight: number,
 public unitPrice: number // 每公⽄的固定费率
 ) { super(weight) }
 // 实现抽象⽅法:计算运费
 calculate(): number {
 return this.weight * this.unitPrice;
 } }
// 创建标准包裹实例
const s1 = new StandardPackage(10,5)
s1.printPackage()
ExpressPackage 类继承了 Package ,实现了 calculate ⽅法:
ExpressPackage 类(特快包裹)
class ExpressPackage extends Package {
 constructor(
 weight: number,
 private unitPrice: number, // 每公⽄的固定费率(快速包裹更⾼)
 private additional: number // 超出10kg以后的附加费
 ) { super(weight) }
 // 实现抽象⽅法:计算运费
 calculate(): number {
 if(this.weight > 10){
 // 超出10kg的部分,每公⽄多收additional对应的价格
 return 10 * this.unitPrice + (this.weight - 10) * this.additional
 }else {
 return this.weight * this.unitPrice;
 }
 } }
// 创建特快包裹实例
const e1 = new ExpressPackage(13,8,2)
e1.printPackage()
总结:何时使⽤抽象类?
- 定义 通用接口:为⼀组相关的类定义通⽤的⾏为(⽅法或属性)时。
- 提供基础实现 :在抽象类中提供某些⽅法或为其提供基础实现,这样派⽣类就可以继承这 些实现。
- 确保关键实现 :强制派⽣类实现⼀些关键⾏为。
- 共享代码和逻辑:当多个类需要共享部分代码时,抽象类可以避免代码重复。
13. interface(接⼝)
interface 是⼀种定义结构的⽅式,主要作⽤是为:类、对象、函数等规定⼀种契约,这样 可以确保代码的⼀致性和类型安全,但要注意 interface 只能定义格式,不能包含任何实 现 !
定义类结构
// PersonInterface接⼝,⽤与限制Person类的格式
interface PersonInterface {
 name: string
 age: number
 speak(n: number): void
}
// 定义⼀个类 Person,实现 PersonInterface 接⼝
class Person implements PersonInterface {
 constructor(
 public name: string,
 public age: number
 ) { }
 // 实现接⼝中的 speak ⽅法
 speak(n: number): void {
 for (let i = 0; i < n; i++) {
 // 打印出包含名字和年龄的问候语句
 console.log(`你好,我叫${this.name},我的年龄是${this.age}`);
 }
 }
}
// 创建⼀个 Person 类的实例 p1,传⼊名字 'tom' 和年龄 18
const p1 = new Person('tom', 18);
p1.speak(3)
定义对象结构
interface UserInterface {
 name: string
 readonly gender: string // 只读属性
 age?: number // 可选属性
 run: (n: number) => void
}
const user: UserInterface = {
 name: "张三",
 gender: '男',
 age: 18,
 run(n) {
 console.log(`奔跑了${n}⽶`)
 }
};
定义函数结构
interface CountInterface {
 (a: number, b: number): number;
}
const count: CountInterface = (x, y) => {
 return x + y
}
接⼝之间的继承
⼀个 interface 继承另⼀个 interface ,从⽽实现代码的复⽤
interface PersonInterface {
 name: string // 姓名
 age: number // 年龄
}
interface StudentInterface extends PersonInterface {
 grade: string // 年级
}
const stu: StudentInterface = {
 name: "张三",
 age: 25,
 grade: '⾼三',
}
接⼝⾃动合并(可重复定义)
// PersonInterface接⼝
interface PersonInterface {
 // 属性声明
 name: string
 age: number
}
// 给PersonInterface接⼝添加新属性
interface PersonInterface {
 // ⽅法声明
 speak(): void
}
// Person类实现PersonInterface
class Person implements PersonInterface {
 name: string
 age: number
 // 构造器
 constructor(name: string, age: number) {
 this.name = name
 this.age = age
 }
 // ⽅法
 speak() {
 console.log('你好!我是⽼师:', this.name)
 }
}
总结:何时使⽤接⼝?
- 定义对象的格式: 描述数据模型、API 响应格式、配置对象…等等,是开发中⽤的最多 的场景。
- 类的契约:规定⼀个类需要实现哪些属性和⽅法。
- 扩展已有接⼝:⼀般⽤于扩展第三⽅库的类型, 这种特性在⼤型项⽬中可能会⽤到。
14. ⼀些相似概念的区别
14.1. interface 与 type 的区别
相同点: interface 和 type 都可以⽤于定义对象结构,在定义对象结构时两者可以 互换。
不同点:
1️⃣ interface :更专注于定义对象和类的结构,⽀持继承、合并。
2️⃣ type :可以定义类型别名、联合类型、交叉类型,但不⽀持继承和⾃动合并。
interface 和 type 都可以定义对象结构
// 使⽤ interface 定义 Person 对象
interface PersonInterface {
 name: string;
 age: number;
 speak(): void; }
// 使⽤ type 定义 Person 对象
type PersonType = {
 name: string;
 age: number;
 speak(): void; };
// 使⽤PersonInterface
/* let person: PersonInterface = {
 name:'张三',
 age:18,
 speak(){
 console.log(`我叫:${this.name},年龄:${this.age}`)
 }
} */
// 使⽤PersonType
let person: PersonType = {
 name:'张三',
 age:18,
 speak(){
 console.log(`我叫:${this.name},年龄:${this.age}`)
 } }
interface 可以继承、合并
interface PersonInterface {
 name: string // 姓名
 age: number // 年龄 }
interface PersonInterface {
 speak: () => void
}
interface StudentInterface extends PersonInterface {
 grade: string // 年级 }
const student: StudentInterface = {
 name: '李四',
 age: 18,
 grade: '⾼⼆',
 speak() {
 console.log(this.name,this.age,this.grade)
 } }
type 的交叉类型
// 使⽤ type 定义 Person 类型,并通过交叉类型实现属性的合并
type PersonType = {
 name: string; // 姓名
 age: number; // 年龄 } & {
 speak: () => void; };
// 使⽤ type 定义 Student 类型,并通过交叉类型继承 PersonType
type StudentType = PersonType & {
 grade: string; // 年级 };
const student: StudentType = {
 name: '李四',
 age: 18,
 grade: '⾼⼆',
 speak() {
 console.log(this.name, this.age, this.grade);
 } };
14.2. interface 与 抽象类的区别
相同点:都能定义⼀个类的格式(定义类应遵循的契约)
不相同:
1️⃣ 接⼝:只能描述结构,不能有任何实现代码,⼀个类可以实现多个接⼝。
2️⃣ 抽象类:既可以包含抽象⽅法,也可以包含具体⽅法, ⼀个类只能继承⼀个抽象类。
⼀个类可以实现多个接⼝
// FlyInterface 接⼝
interface FlyInterface {
 fly(): void; }
// 定义 SwimInterface 接⼝
interface SwimInterface {
 swim(): void; }
// Duck 类实现了 FlyInterface 和 SwimInterface 两个接⼝
class Duck implements FlyInterface, SwimInterface {
 fly(): void {
 console.log('鸭⼦可以⻜');
 }
 swim(): void {
 console.log('鸭⼦可以游泳');
 } }
// 创建⼀个 Duck 实例
const duck = new Duck();
duck.fly(); // 输出: 鸭⼦可以⻜
duck.swim(); // 输出: 鸭⼦可以游泳
⼋、泛型
泛型允许我们在定义函数、类或接⼝时,使⽤类型参数来表示未指定的类型,这些参数在具体 使⽤时,才被指定具体的类型,泛型能让同⼀段代码适⽤于多种类型,同时仍然保持类型的安全性。
举例:如下代码中<T>就是泛型,(不⼀定⾮叫 T ),设置泛型后即可在函数中使⽤ T 来表 示该类型:
泛型函数
function logData<T>(data: T): T {
 console.log(data)
 return data
}
logData<number>(100)
logData<string>('hello')
泛型可以有多个
function logData<T, U>(data1: T, data2: U): T | U {
 console.log(data1,data2)
 return Date.now() % 2 ? data1 : data2
}
logData<number, string>(100, 'hello')
logData<string, boolean>('ok', false)
泛型接⼝
interface PersonInterface<T> {
 name: string,
 age: number,
 extraInfo: T
}
let p1: PersonInterface<string>
let p2: PersonInterface<number>
p1 = { name: '张三', age: 18, extraInfo: '⼀个好⼈' }
p2 = { name: '李四', age: 18, extraInfo: 250 }
泛型约束
interface LengthInterface {
 length: number
}
// 约束规则是:传⼊的类型T必须具有 length 属性
function logPerson<T extends LengthInterface>(data: T): void {
 console.log(data.length)
}
logPerson<string>('hello')
// 报错:因为number不具备length属性
// logPerson<number>(100)
泛型类
class Person<T> {
 constructor(
 public name: string,
 public age: number,
 public extraInfo: T
 ) { }
 speak() {
 console.log(`我叫${this.name}今年${this.age}岁了`)
 console.log(this.extraInfo)
 }
}
// 测试代码1
const p1 = new Person<number>("tom", 30, 250);
// 测试代码2
type JobInfo = {
 title: string;
 company: string;
}
const p2 = new Person<JobInfo>("tom", 30, { title: '研发总监', company: '发发发科技公司' });
九、类型声明⽂件
类型声明⽂件是 TypeScript 中的⼀种特殊⽂件,通常以 .d.ts 作为扩展名。它的主要作⽤ 是为现有的 JavaScript 代码提供类型信息,使得 TypeScript 能够在使⽤这些 JavaScript 库 或模块时进⾏类型检查和提示。
demo.js
export function add(a, b) {
 return a + b; }
export function mul(a, b) {
 return a * b; }
demo.d.ts
declare function add(a: number, b: number): number;
declare function mul(a: number, b: number): number;
export { add, mul };
index.ts
// example.ts
import { add, mul } from "./demo.js";
const x = add(2, 3); // x 类型为 number
const y = mul(4, 5); // y 类型为 number
console.log(x,y)
十、装饰器
一、简介
- 装饰器本质是一种特殊的函数,它可以对:类、属性、方法、参数进行扩展,同时能让代码更简洁。
- 装饰器自
2015年在ECMAScript-6中被提出到现在,已将近10年。 - 截止目前,装饰器依然是实验性特性 ,需要开发者手动调整配置,来开启装饰器支持。
- 装饰器有 5 种:
1⃣类装饰器
2⃣属性装饰器
3⃣方法装饰器
4⃣访问器装饰器
5⃣参数装饰器
备注:虽然
TypeScript5.0中可以直接使用**类装饰器**,但为了确保其他装饰器可用,现阶段使用时,仍建议使用experimentalDecorators配置来开启装饰器支持,而且不排除在来的版本中,官方会进一步调整装饰器的相关语法!
参考:《TypeScript 5.0发版公告》
二、类装饰器
基本语法
:::info
类装饰器是一个应用在类声明上的函数,可以为类添加额外的功能,或添加额外的逻辑。
:::
/*
  Demo函数会在Person类定义时执行
  参数说明:
    ○ target参数是被装饰的类,即:Person
*/
function Demo(target: Function) {
  console.log(target)
}

// 使用装饰器
@Demo
class Person { }
应用举例
:::tips
需求:定义一个装饰器,实现Person实例调用toString时返回JSON.stringify的执行结果。
:::
// 使用装饰器重写toString方法 + 封闭其原型对象
function CustomString(target: Function) {
  // 向被装饰类的原型上添加自定义的 toString 方法
  target.prototype.toString = function () {
    return JSON.stringify(this)
  }
  // 封闭其原型对象,禁止随意操作其原型对象
  Object.seal(target.prototype)
}

// 使用 CustomString 装饰器
@CustomString
class Person {
  constructor(public name: string, public age: number) { }
  speak() {
    console.log('你好呀!')
  }
}

/* 测试代码如下 */
let p1 = new Person('张三', 18)
// 输出:{"name":"张三","age":18}
console.log(p1.toString())
// 禁止随意操作其原型对象
interface Person {
  a: any
}
// Person.prototype.a = 100 // 此行会报错:Cannot add property a, object is not extensible
// console.log(p1.a)
关于返回值
:::info
类装饰器有返回值:若类装饰器返回一个新的类,那这个新类将替换掉被装饰的类。
类装饰器无返回值:若类装饰器无返回值或返回undefined,那被装饰的类不会被替换。
:::
function demo(target:Function){
  // 装饰器有返回值时,该返回值会替换掉被装饰的类
  return class {
    test(){
      console.log(200)
      console.log(300)
      console.log(400)
    }
  }
}

@demo
class Person {
  test(){
    console.log(100)
  }
}

console.log(Person)
关于构造类型
在 TypeScript 中,
Function类型所表示的范围十分广泛,包括:普通函数、箭头函数、方法等等。但并非Function类型的函数都可以被new关键字实例化,例如箭头函数是不能被实例化的,那么 TypeScript 中概如何声明一个构造类型呢?有以下两种方式:
/*
  ○ new     表示:该类型是可以用new操作符调用。
  ○ ...args 表示:构造器可以接受【任意数量】的参数。
  ○ any[]   表示:构造器可以接受【任意类型】的参数。
  ○ {}      表示:返回类型是对象(非null、非undefined的对象)。
*/

// 定义Constructor类型,其含义是构造类型
type Constructor = new (...args: any[]) => {};

function test(fn:Constructor){}
class Person {}
test(Person)
// 定义一个构造类型,且包含一个静态属性 wife
type Constructor = {
  new(...args: any[]): {}; // 构造签名
  wife: string; // wife属性
};

function test(fn:Constructor){}
class Person {
  static wife = 'asd'
}
test(Person)
替换被装饰的类
对于高级一些的装饰器,不仅仅是覆盖一个原型上的方法,还要有更多功能,例如添加新的方法和状态。
:::tips
需求:设计一个LogTime装饰器,可以给实例添加一个属性,用于记录实例对象的创建时间,再添加一个方法用于读取创建时间。
:::
// User接口
interface User {
  getTime(): Date
  log(): void
}

// 自定义类型Class
type Constructor = new (...args: any[]) => {}

// 创建一个装饰器,为类添加日志功能和创建时间
function LogTime<T extends Constructor>(target: T) {
  return class extends target {
    createdTime: Date;
    constructor(...args: any[]) {
      super(...args);
      this.createdTime = new Date(); // 记录对象创建时间
    }
    getTime() {
      return `该对象创建时间为:${this.createdTime}`;
    }
  };
}

@LogTime
class User {
  constructor(
    public name: string,
    public age: number
  ) { }
  speak() {
    console.log(`${this.name}说:你好啊!`)
  }
}

const user1 = new User('张三', 13);
user1.speak()
console.log(user1.getTime())
三、装饰器工厂
装饰器工厂是一个返回装饰器函数的函数,可以为装饰器添加参数,可以更灵活地控制装饰器的行为。
:::tips
需求**:**定义一个LogInfo类装饰器工厂,实现Person实例可以调用到introduce方法,且introduce中输出内容的次数,由LogInfo接收的参数决定。
:::
interface Person {
  introduce: () => void
}

// 定义一个装饰器工厂 LogInfo,它接受一个参数 n,返回一个类装饰器
function LogInfo(n:number) {
  // 装饰器函数,target 是被装饰的类
  return function(target: Function){
    target.prototype.introduce = function () {
      for (let i = 0; i < n; i++) {
        console.log(`我的名字:${this.name},我的年龄:${this.age}`)
      }
    }
  }
}

@LogInfo(5)
class Person {
  constructor(
    public name: string,
    public age: number
  ) { }
  speak() {
    console.log('你好呀!')
  }
}

let p1 = new Person('张三', 18)
// console.log(p1) // 打印的p1是:_classThis,转换的JS版本比较旧时,会出现,不必纠结
p1.speak()
p1.introduce()
四、装饰器组合
装饰器可以组合使用,执行顺序为:先【由上到下】的执行所有的装饰器工厂,依次获取到装饰器,然后再【由下到上】执行所有的装饰器。
//装饰器
function test1(target:Function) {
  console.log('test1')
}
//装饰器工厂
function test2() {
  console.log('test2工厂')
  return function (target:Function) {
    console.log('test2')
  }
}
//装饰器工厂
function test3() {
  console.log('test3工厂')
  return function (target:Function) {
    console.log('test3')
  }
}
//装饰器
function test4(target:Function) {
  console.log('test4')
}

@test1
@test2()
@test3()
@test4
class Person { }

/*
  控制台打印:
    test2工厂
    test3工厂
    test4
    test3
    test2
    test1
*/
// 自定义类型Class
type Constructor = new (...args: any[]) => {}

interface Person {
  introduce():void
  getTime():void
}

// 使用装饰器重写toString方法 + 封闭其原型对象
function customToString(target: Function) {
  // 向被装饰类的原型上添加自定义的 toString 方法
  target.prototype.toString = function () {
    return JSON.stringify(this)
  }
  // 封闭其原型对象,禁止随意操作其原型对象
  Object.seal(target.prototype)
}

// 创建一个装饰器,为类添加日志功能和创建时间
function LogTime<T extends Constructor>(target: T) {
  return class extends target {
    createdTime: Date;
    constructor(...args: any[]) {
      super(...args);
      this.createdTime = new Date(); // 记录对象创建时间
    }
    getTime() {
      return `该对象创建时间为:${this.createdTime}`;
    }
  };
}

// 定义一个装饰器工厂 LogInfo,它接受一个参数 n,返回一个类装饰器
function LogInfo(n:number) {
  // 装饰器函数,target 是被装饰的类
  return function(target: Function){
    target.prototype.introduce = function () {
      for (let i = 0; i < n; i++) {
        console.log(`我的名字:${this.name},我的年龄:${this.age}`)
      }
    }
  }
}

@customToString
@LogInfo(3)
@LogTime
class Person {
  constructor(
    public name: string,
    public age: number
  ) { }
  speak() {
    console.log('你好呀!')
  }
}

const p1 = new Person('张三',18)
console.log(p1.toString())
p1.introduce()
console.log(p1.getTime())
五、属性装饰器
基本语法
/*
  参数说明:
    ○ target: 对于静态属性来说值是类,对于实例属性来说值是类的原型对象。
    ○ propertyKey: 属性名。
*/
function Demo(target: object, propertyKey: string) {
  console.log(target,propertyKey)
}

class Person {
  @Demo name: string
  @Demo age: number
  @Demo static school:string

  constructor(name: string, age: number) {
    this.name = name
    this.age = age
  }
}

const p1 = new Person('张三', 18)
关于属性遮蔽
如下代码中:当构造器中的
this.age = age试图在实例上赋值时,实际上是调用了原型上age属性的set方法。
class Person {
  name: string
  age: number
  constructor(name: string, age: number) {
    this.name = name
    this.age = age
  }
}

let value = 99
// 使用defineProperty给Person原型添加age属性,并配置对应的get与set
Object.defineProperty(Person.prototype, 'age', {
  get() {
    return value
  },
  set(val) {
    value = val
  }
})

const p1 = new Person('张三', 18)
console.log(p1.age) //18
console.log(Person.prototype.age)//18
应用举例
:::tips
需求:定义一个State属性装饰器,来监视属性的修改。
:::
// 声明一个装饰器函数 State,用于捕获数据的修改
function State(target: object, propertyKey: string) {
  // 存储属性的内部值
  let key = `__${propertyKey}`;

  // 使用 Object.defineProperty 替换类的原始属性
  // 重新定义属性,使其使用自定义的 getter 和 setter
  Object.defineProperty(target, propertyKey, {
    get () {
      return this[key]
    },
    set(newVal: string){
      console.log(`${propertyKey}的最新值为:${newVal}`);
      this[key] = newVal
    },
    enumerable: true,
    configurable: true,
  });
}

class Person {
  name: string;
  //使用State装饰器
  @State age: number;
  school = 'atguigu';
  constructor(name: string, age: number) {
    this.name = name;
    this.age = age;
  }
}

const p1 = new Person('张三', 18);
const p2 = new Person('李四', 30);

p1.age = 80
p2.age = 90

console.log('------------------')
console.log(p1.age) //80
console.log(p2.age) //90
六、方法装饰器
基本语法
/*
  参数说明:
    ○ target: 对于静态方法来说值是类,对于实例方法来说值是原型对象。
    ○ propertyKey:方法的名称。
    ○ descriptor: 方法的描述对象,其中value属性是被装饰的方法。
*/
function Demo(target: object, propertyKey: string, descriptor: PropertyDescriptor){
  console.log(target)
  console.log(propertyKey)
  console.log(descriptor)
}

class Person {
  constructor(
    public name:string,
    public age:number,
  ){}
  // Demo装饰实例方法
  @Demo speak(){
    console.log(`你好,我的名字:${this.name},我的年龄:${this.age}`)
  }
  // Demo装饰静态方法
  @Demo static isAdult(age:number) {
    return age >= 18;
  }
}

const p1 = new Person('张三',18)
p1.speak()
应用举例
:::tips
需求:
- 定义一个
Logger方法装饰器,用于在方法执行前和执行后,均追加一些额外逻辑。 - 定义一个
Validate方法装饰器,用于验证数据。
:::
function Logger(target: object, propertyKey: string, descriptor: PropertyDescriptor){
  // 保存原始方法
  const original = descriptor.value;
  // 替换原始方法
  descriptor.value = function (...args:any[]) {
    console.log(`${propertyKey}开始执行......`)
    const result = original.call(this, ...args)
    console.log(`${propertyKey}执行完毕......`)
    return result;
  }
}

function Validate(maxValue:number){
  return function (target: object, propertyKey: string, descriptor: PropertyDescriptor){
    // 保存原始方法
    const original = descriptor.value;
    // 替换原始方法
    descriptor.value = function (...args: any[]) {
      // 自定义的验证逻辑
      if (args[0] > maxValue) {
        throw new Error('年龄非法!')
      }
      // 如果所有参数都符合要求,则调用原始方法
      return original.apply(this, args);
    };
  }
}

class Person {
  constructor(
    public name:string,
    public age:number,
  ){}
  @Logger speak(){
    console.log(`你好,我的名字:${this.name},我的年龄:${this.age}`)
  }
  @Validate(120)
  static isAdult(age:number) {
    return age >= 18;
  }
}

const p1 = new Person('张三',18)
p1.speak()
console.log(Person.isAdult(100))
七、访问器装饰器
基本语法
/*
  参数说明:
    ○ target:
        1. 对于实例访问器来说值是【所属类的原型对象】。
        2. 对于静态访问器来说值是【所属类】。
    ○ propertyKey:访问器的名称。
    ○ descriptor: 描述对象。
*/
function Demo(target: object, propertyKey: string, descriptor: PropertyDescriptor) {
  console.log(target)
  console.log(propertyKey)
  console.log(descriptor)
}

class Person {
  @Demo
  get address(){
    return '北京宏福科技园'
  }
  @Demo
  static get country(){
    return '中国'
  }
}
应用举例
:::tips
需求:对Weather类的temp属性的set访问器进行限制,设置的最低温度-50,最高温度50
:::
function RangeValidate(min: number, max: number) {
  return function (target: object, propertyKey: string, descriptor: PropertyDescriptor) {
    // 保存原始的 setter 方法,以便在后续调用中使用
    const originalSetter = descriptor.set;

    // 重写 setter 方法,加入范围验证逻辑
    descriptor.set = function (value: number) {
      // 检查设置的值是否在指定的最小值和最大值之间
      if (value < min || value > max) {
        // 如果值不在范围内,抛出错误
        throw new Error(`${propertyKey}的值应该在 ${min} 到 ${max}之间!`);
      }

      // 如果值在范围内,且原始 setter 方法存在,则调用原始 setter 方法
      if (originalSetter) {
        originalSetter.call(this, value);
      }
    };
  };
}

class Weather {
  private _temp: number;
  constructor(_temp: number) {
    this._temp = _temp;
  }
  // 设置温度范围在 -50 到 50 之间
  @RangeValidate(-50,50)
  set temp(value) {
    this._temp = value;
  }
  get temp() {
    return this._temp;
  }
}

const w1 = new Weather(25);
console.log(w1)
w1.temp = 67
console.log(w1)
八、参数装饰器
基本语法
/*
  参数说明:
    ○ target:
      1.如果修饰的是【实例方法】的参数,target 是类的【原型对象】。
      2.如果修饰的是【静态方法】的参数,target 是【类】。
    ○ propertyKey:参数所在的方法的名称。
    ○ parameterIndex: 参数在函数参数列表中的索引,从 0 开始。
*/
function Demo(target: object, propertyKey: string, parameterIndex: number) {
  console.log(target)
  console.log(propertyKey)
  console.log(parameterIndex)
}

// 类定义
class Person {
  constructor(public name: string) { }
  speak(@Demo message1: any, mesage2: any) {
    console.log(`${this.name}想对说:${message1},${mesage2}`);
  }
}
应用举例
:::tips
需求:定义方法装饰器Validate,同时搭配参数装饰器NotNumber,来对speak方法的参数类型进行限制。
:::
function NotNumber(target: any, propertyKey: string, parameterIndex: number) {
  // 初始化或获取当前方法的参数索引列表
  let notNumberArr: number[] = target[`__notNumber_${propertyKey}`] || [];
  // 将当前参数索引添加到列表中
  notNumberArr.push(parameterIndex);
  // 将列表存储回目标对象
  target[`__notNumber_${propertyKey}`] = notNumberArr;
}

// 方法装饰器定义
function Validate(target: any, propertyKey: string, descriptor: PropertyDescriptor) {
  const method = descriptor.value;
  descriptor.value = function (...args: any[]) {
    // 获取被标记为不能为空的参数索引列表
    const notNumberArr: number[] = target[`__notNumber_${propertyKey}`] || [];
    // 检查参数是否为 null 或 undefined
    for (const index of notNumberArr) {
      if (typeof args[index] === 'number') {
        throw new Error(`方法 ${propertyKey} 中索引为 ${index} 的参数不能是数字!`)
      }
    }
    // 调用原始方法
    return method.apply(this, args);
  };

  return descriptor;
}

// 类定义
class Student {
  name: string;
  constructor(name: string) {
    this.name = name;
  }
  @Validate
  speak(@NotNumber message1: any, mesage2: any) {
    console.log(`${this.name}想对说:${message1},${mesage2}`);
  }
}

// 使用
const s1 = new Student("张三");
s1.speak(100, 200);

有“AI”的1024 = 2048,欢迎大家加入2048 AI社区
更多推荐


 13
13 0
0- 0


 已为社区贡献2条内容

所有评论(0)