ImGui 学习笔记(三)—— 隐藏主窗口&窗口关闭检测
ImGui 的主窗口是平台窗口,默认是可见的,这会影响视觉效果。那么怎么隐藏 ImGui 的主窗口呢?
这很简单,但是需要针对后端做一些修改。
本文仅介绍在 glfw+opengl3 和 win32+dx11 两种实现上如何修改。
在 win32+dx11 实现上,隐藏主窗口首先需要找到 issues 中关于窗口背景透明度的临时解决方案,实施这些方案。我们最好在窗口透明的基础上隐藏平台窗口。
你可以参考:
为 DX12 后端添加 DirectComposition (用于透明度) 作者 Soreepeong ·拉取请求 #7462 ·奥科努特/IMGUI
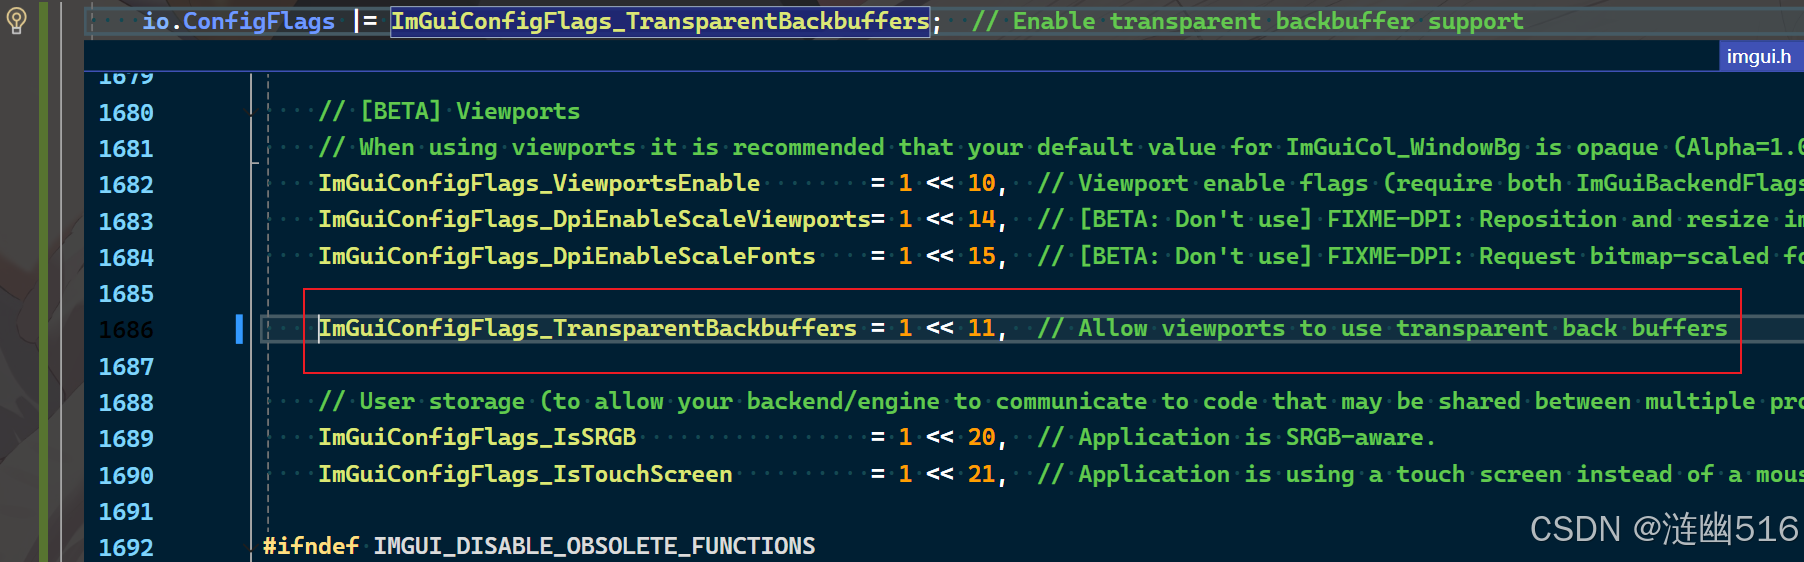
然后,我们现在可以为 Viewports 开启混合透明(每像素透明度)。然后,设置 clear_color 的Alpha 通道数值为0,也就是完全透明。
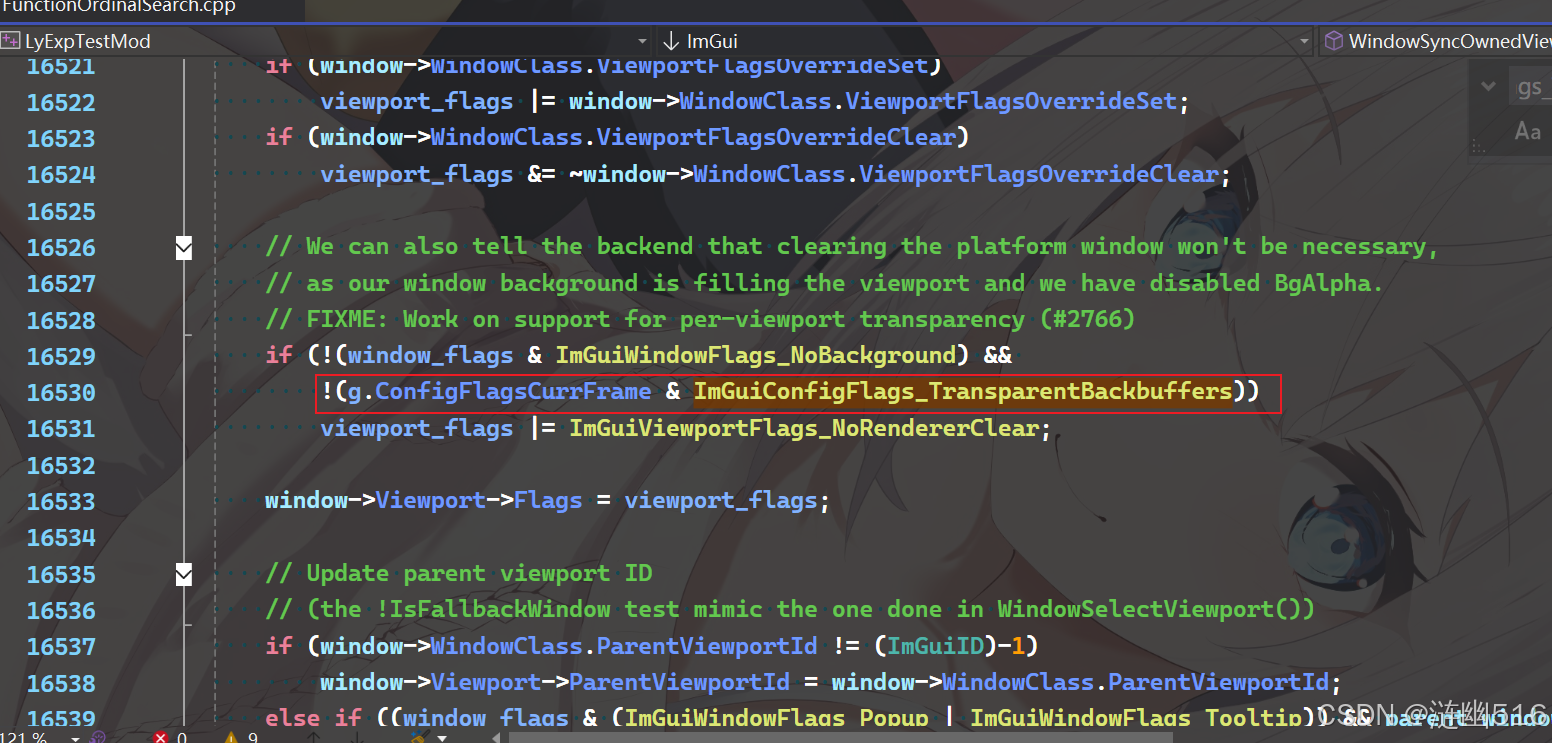
在 imgui.cpp 的 void ImGui::WindowSyncOwnedViewport(ImGuiWindow* window, ImGuiWindow* parent_window_in_stack) 函数中:
启用背景透明时候,要去除渲染层上面的填充颜色(清屏背景色无填充),否则背景为黑色,这等同于设置无背景:
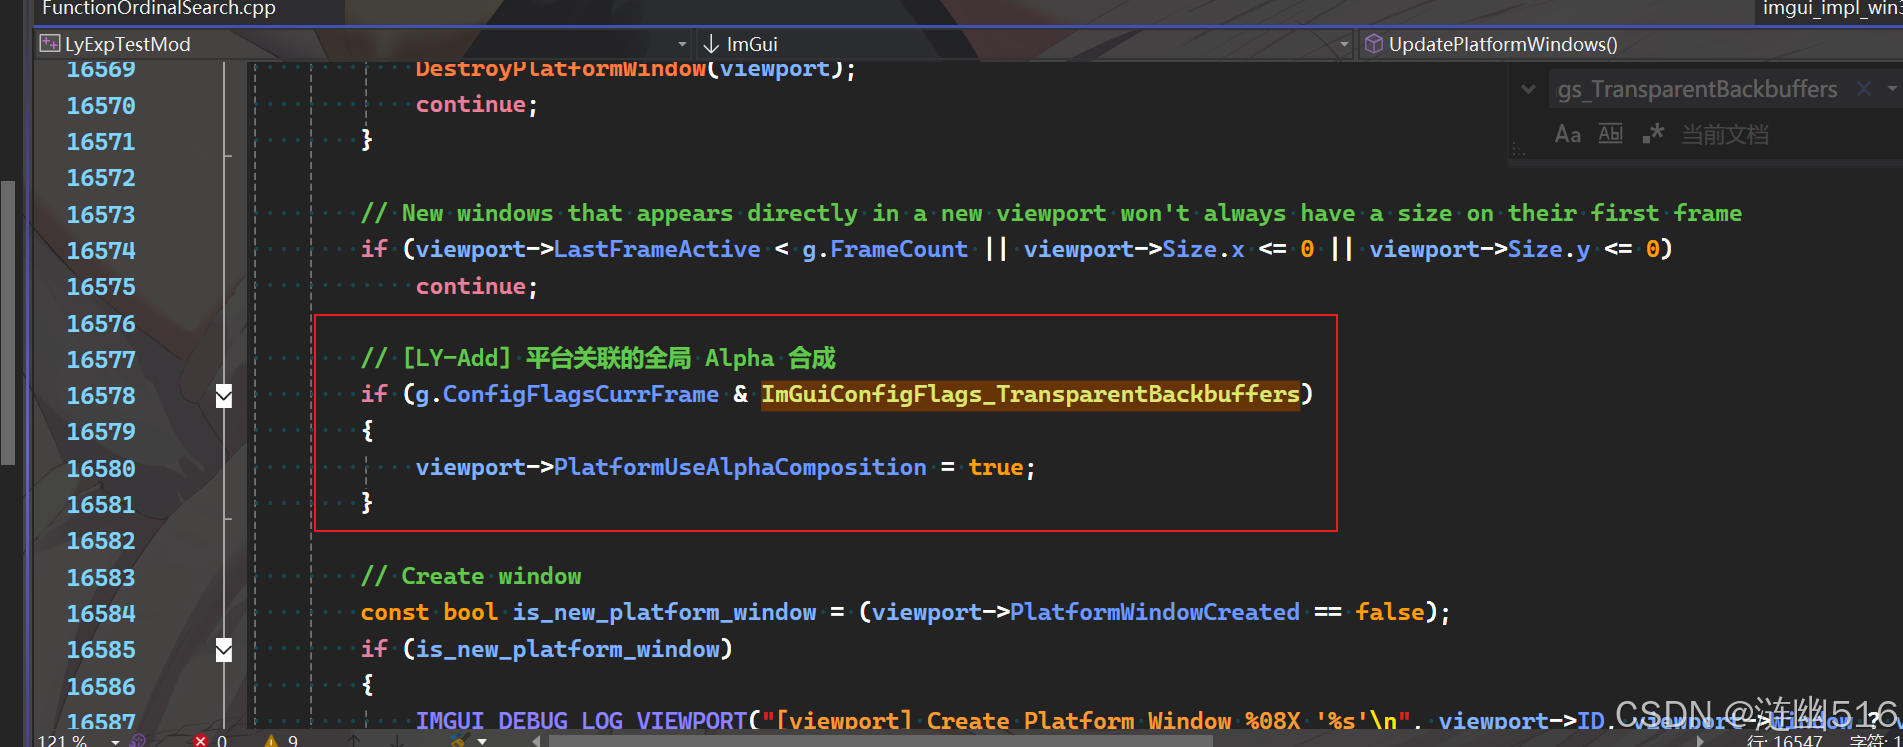
在 void ImGui::UpdatePlatformWindows() 函数中:
在窗口创建前启用设置:
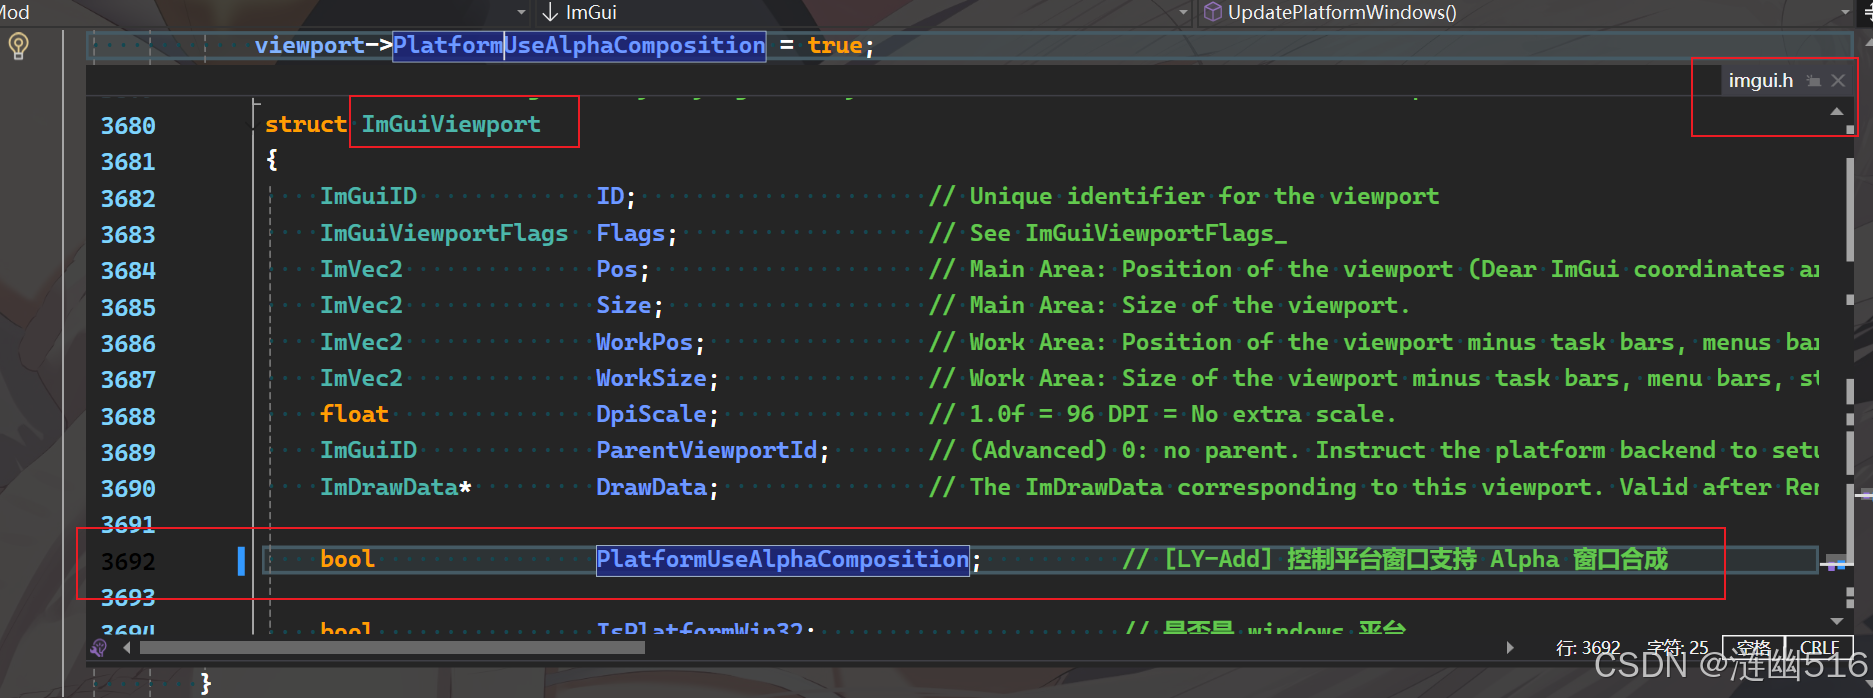
在 ImGuiViewport 结构体中添加成员:
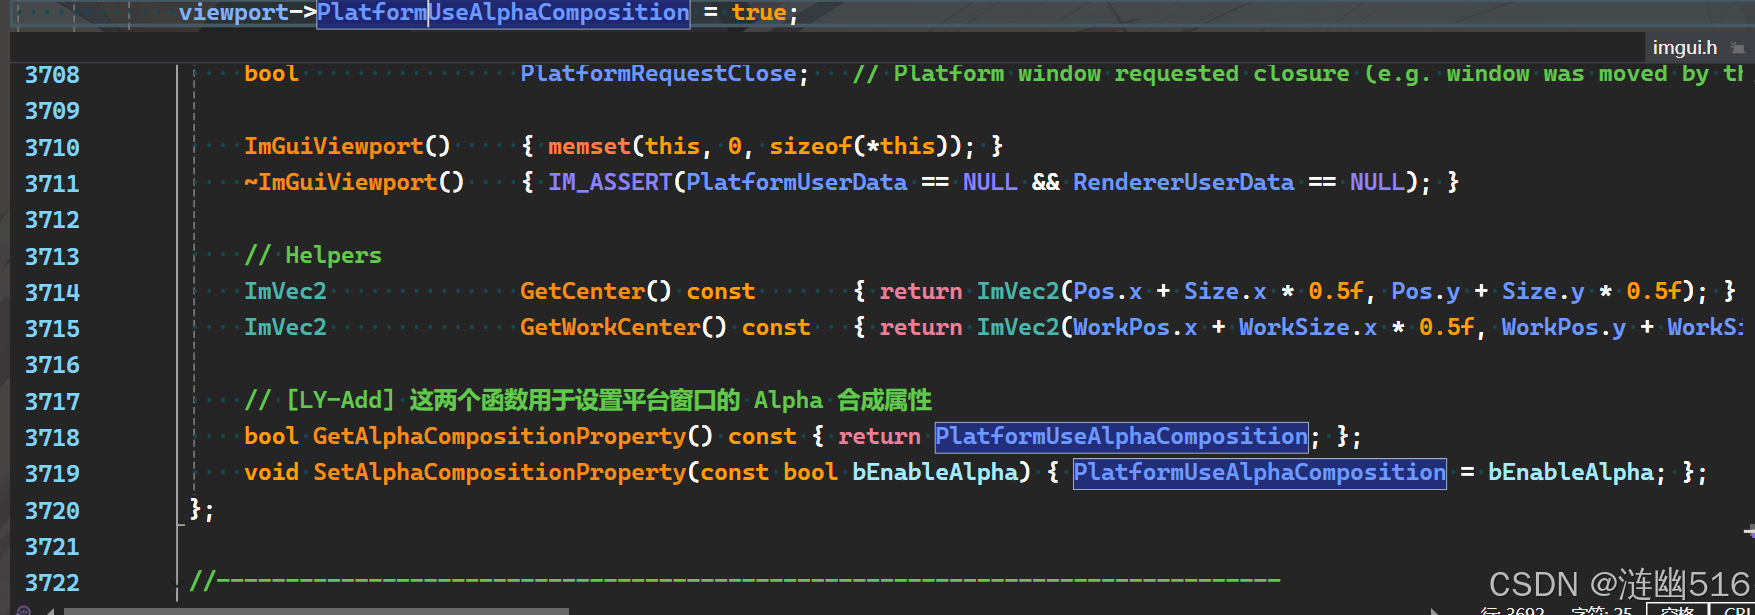
在 imgui_impl_win32.cpp 中 static void ImGui_ImplWin32_CreateWindow(ImGuiViewport* viewport) 函数中添加:
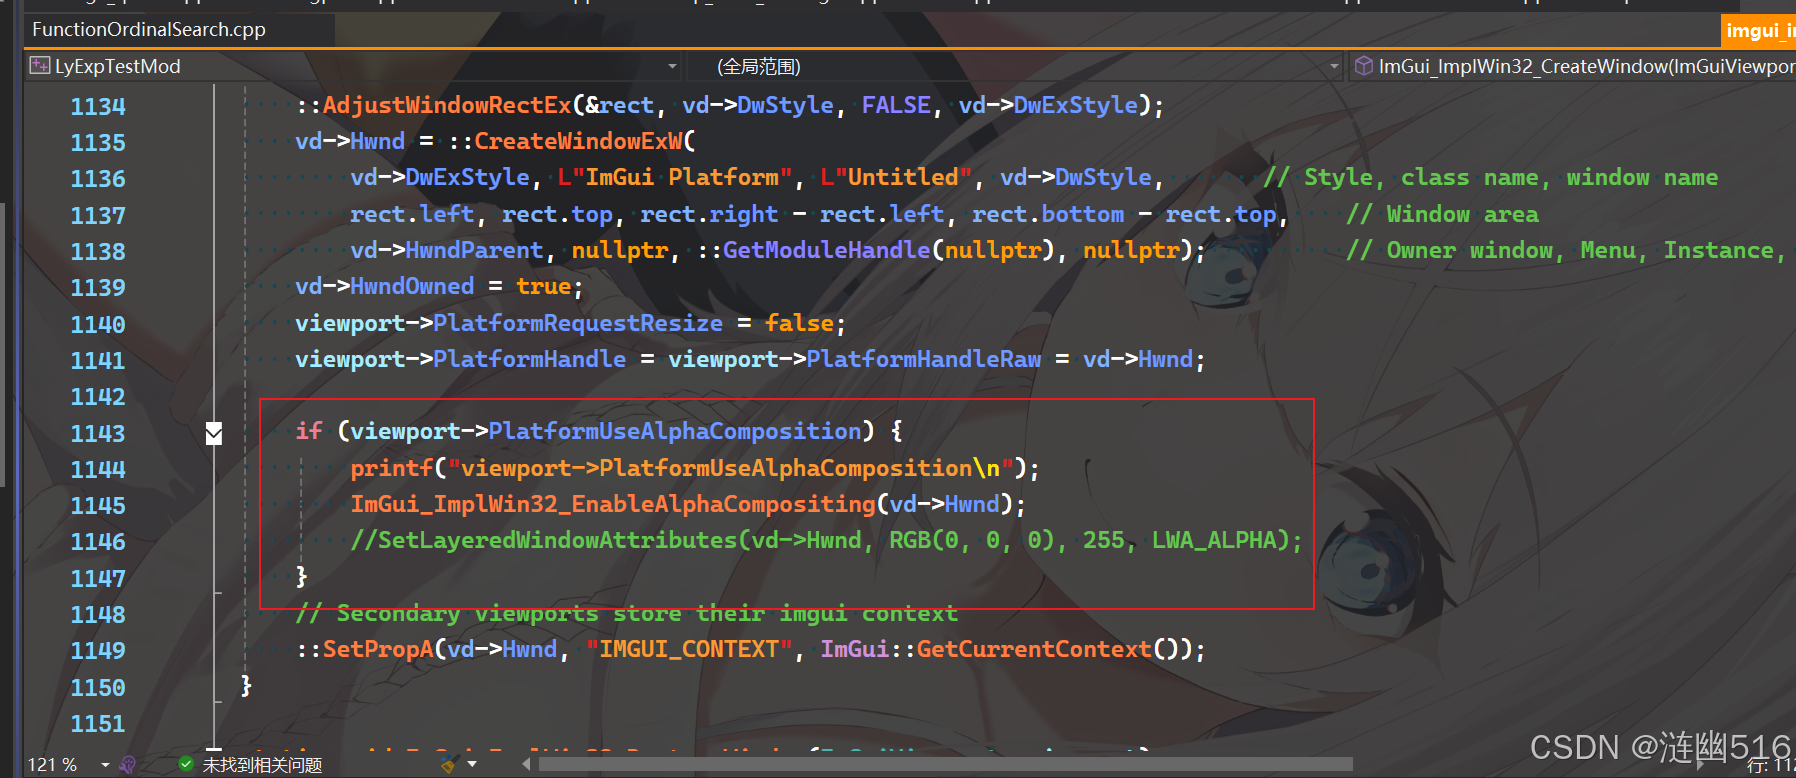
ImGui 的 Alpha 透明使用的是 DwmBlurBehind :
// [experimental]
// Borrowed from GLFW's function updateFramebufferTransparency() in src/win32_window.c
// (the Dwm* functions are Vista era functions but we are borrowing logic from GLFW)
void ImGui_ImplWin32_EnableAlphaCompositing(void* hwnd)
{
    if (!_IsWindowsVistaOrGreater())
        return;

    BOOL composition;
    if (FAILED(::DwmIsCompositionEnabled(&composition)) || !composition)
        return;

    BOOL opaque;
    DWORD color;
    if (_IsWindows8OrGreater() || (SUCCEEDED(::DwmGetColorizationColor(&color, &opaque)) && !opaque))
    {
        HRGN region = ::CreateRectRgn(0, 0, -1, -1);
        DWM_BLURBEHIND bb = {};
        bb.dwFlags = DWM_BB_ENABLE | DWM_BB_BLURREGION;
        bb.hRgnBlur = region;
        bb.fEnable = TRUE;
        ::DwmEnableBlurBehindWindow((HWND)hwnd, &bb);
        ::DeleteObject(region);
    }
    else
    {
        DWM_BLURBEHIND bb = {};
        bb.dwFlags = DWM_BB_ENABLE;
        ::DwmEnableBlurBehindWindow((HWND)hwnd, &bb);
    }
}
在 void ImGui::RenderWindowDecorations(ImGuiWindow* window, const ImRect& title_bar_rect, bool title_bar_is_highlight, bool handle_borders_and_resize_grips, int resize_grip_count, const ImU32 resize_grip_col[4], float resize_grip_draw_size)
中跳过窗口装饰中的背景颜色设置(原本在任何模式下都是无 Alpha 的):
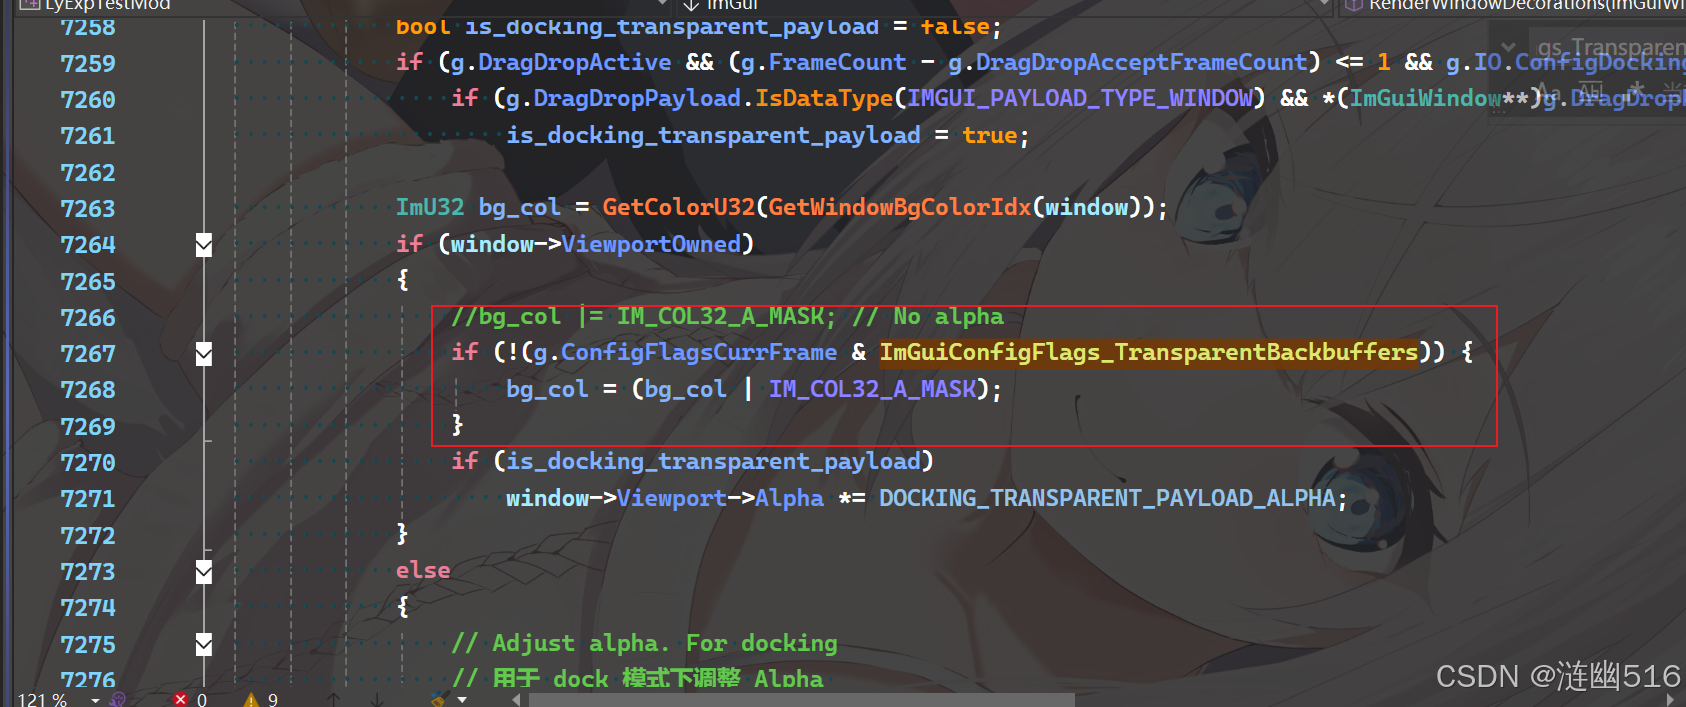
这样,主视口(ID: 0x11111111)上面将不会渲染任何颜色。
1)隐藏主视口的平台窗口
随后,我们将 Win32 窗口的设置进行调整,主要是消除任务栏图标、窗口边框、标题栏、以及使得窗口不遮挡任何屏幕内容。
其实最简单的方法是取消自动合并 Viewports 后直接 ShowWindow SW_HIDE 隐藏主窗口! 是我之前被一些旧的教程带偏了(
你可能会觉得使用 WS_EX_TRANSPATENT 有用,其实它只在使用分层透明度时候比较合适,而分层透明的效率没有混合透明高,所以我没采用。
然后,我们在平台窗口创建时候,指定 WS_POPUP WS_EX_TOOLWINDOW 以便于不在任务栏显示平台窗口的图标。
设置窗口位置大小为 pos = (0,0) , size = (1,1),矩形大小不能为 0,为 0 会导致 Imgui 的一些异常状态,最终导致界面无法响应。
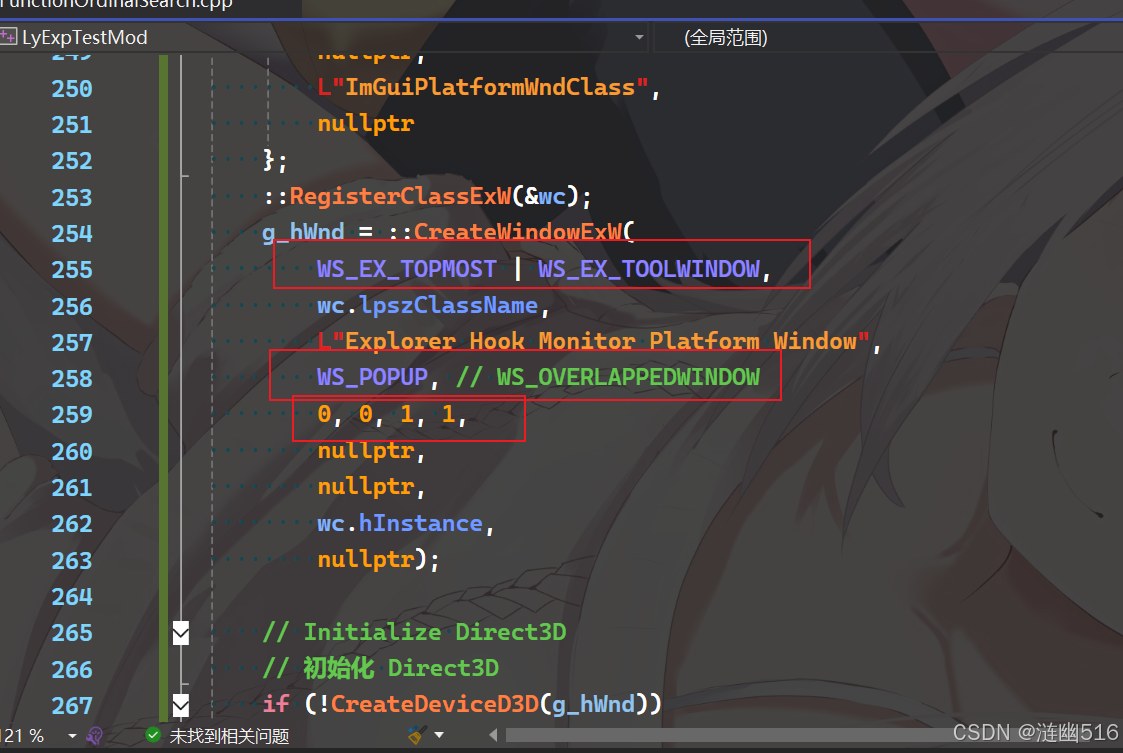
其实到这里已经实现了隐藏主视口的平台窗口了。但是有一些细节仍需要处理。
接下来在 ImGuiWindow 结构中添加一个字段 bool WindowInitFocused。在 imgui_internal.h 中添加声明:
IMGUI_API void FocusRootPlatformWindow(ImGuiWindow* window);然后在 imgui.cpp 的最后,添加实现:
void FocusRootPlatformWindow(ImGuiWindow* window)
{
    ImGuiContext& g = *GImGui;
    ImGuiWindow* rootWnd = window->RootWindow;
    if (!rootWnd->WindowInitFocused)   // I don't know why the status was overwritten
    {
        // Before updating the platform window data for the first frame,
        // PlatformUserData may be nullptr, and no actual processing should be performed at this time.
        if (rootWnd->Viewport->PlatformUserData == nullptr) return;
        g.PlatformIO.Platform_SetWindowFocus(rootWnd->Viewport);
        rootWnd->WindowInitFocused = true;
    }
}
这样在 每次 ImGui::Begin() 后都可以调用一次:
ImGui::FocusRootPlatformWindow(ImGui::GetCurrentWindow());来触发平台窗口的焦点获取,ImGui 在获取焦点时候才会去检查更新 Viewport 和 Window 的关系。任务栏不显示图标的原因就在这里面,但我还没有具体确定具体原因。强制平台窗口获取焦点暂时解决了任务栏不显示图标的问题。
当前的 WindowSelectViewport(window) 调用(未来可能被重写)会将 ImGui 窗口移动到新的 Viewport。不过存在一个 bug,即使用 Imgui 窗口的 id, pos 和 size 作为 viewport 的相应参数,这会导致什么呢?平台窗口的边框和标题栏占据空间,使得 imgui 窗口不对齐。
WindowSelectViewport(window);
SetCurrentViewport(window, window->Viewport);
window->FontDpiScale = (g.IO.ConfigFlags & ImGuiConfigFlags_DpiEnableScaleFonts) ? window->Viewport->DpiScale : 1.0f;
SetCurrentWindow(window);
目前,一种方法是修复 WindowSelectViewport 中的 AddUpdateViewport 的最后一个参数,由默认标识符改为 NoDecoration 即无平台窗口装饰。

其实也不能说这里有错,其实并没有错,只是我们在使用的时候需要注意:
需要在 WindowSelectViewport 调用之后为 Viewport 添加 ImGuiViewportFlags_NoDecoration 这个标识符,来正确去除平台窗口的装饰,而不是自己去调用 SetWindowLongPtr 这样的 api:
WindowSelectViewport(window);
window->Viewport->Flags |= ImGuiViewportFlags_NoDecoration;
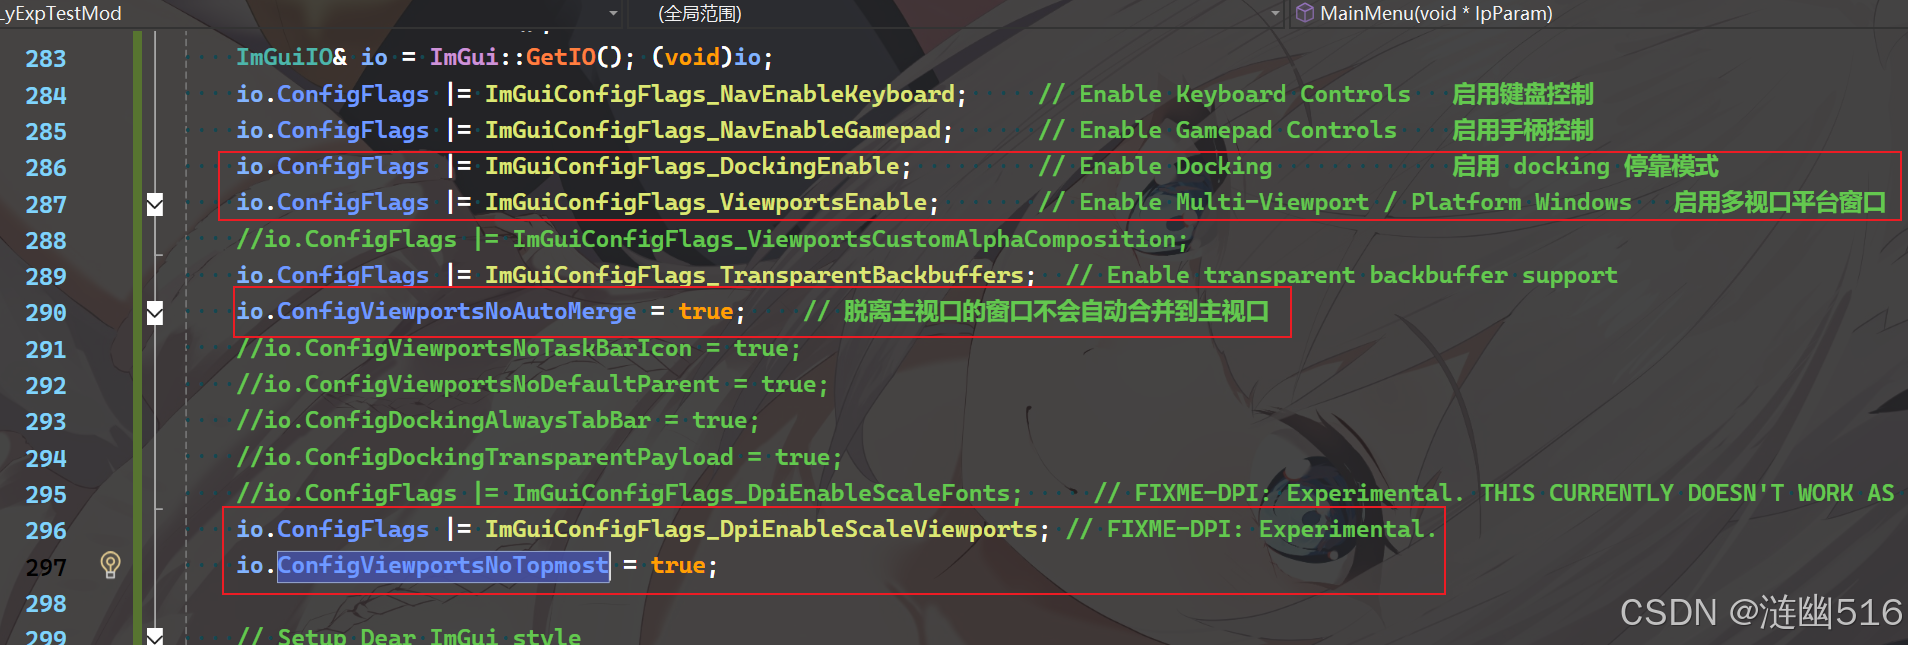
关于脱离主视口,建议的 ImGui 主配置如下:
另一种隐藏平台窗口的实现是使用分层透明,这里我也介绍一下,就是在 Win32 窗口创建时使用纯色画刷,然后使用 SetLayeredWindowAttribute 将背景色去除,将平台窗口设置为无边框全屏窗口(注意不是独占显示器的窗口),然后给窗口添加 WS_EX_TRANSPARENT 样式,这将允许在窗口完全透明的位置穿透鼠标、键盘消息。看上去就像没有窗口了一般。
diff --git a/examples/example_win32_directx11/main.cpp b/examples/example_win32_directx11/main.cpp
index fe462e74..b73f127a 100644
--- a/examples/example_win32_directx11/main.cpp
+++ b/examples/example_win32_directx11/main.cpp
@@ -28,7 +28,7 @@ int main(int, char**)
     // Create application window
     WNDCLASSEX wc = { sizeof(WNDCLASSEX), CS_CLASSDC, WndProc, 0L, 0L, GetModuleHandle(NULL), NULL, NULL, NULL, NULL, _T("ImGui Example"), NULL };
     ::RegisterClassEx(&wc);
-    HWND hwnd = ::CreateWindow(wc.lpszClassName, _T("Dear ImGui DirectX11 Example"), WS_OVERLAPPEDWINDOW, 100, 100, 1280, 800, NULL, NULL, wc.hInstance, NULL);
+    HWND hwnd = ::CreateWindowEx(WS_EX_LAYERED, wc.lpszClassName, _T("Dear ImGui DirectX11 Example"), WS_POPUP, 0, 0, GetSystemMetrics(SM_CXSCREEN), GetSystemMetrics(SM_CYSCREEN), NULL, NULL, wc.hInstance, NULL);

     // Initialize Direct3D
     if (!CreateDeviceD3D(hwnd))
@@ -75,7 +75,7 @@ int main(int, char**)
     // Our state
     bool show_demo_window = true;
     bool show_another_window = false;
-    ImVec4 clear_color = ImVec4(0.45f, 0.55f, 0.60f, 1.00f);
+    float clear_color[] = { 0, 0, 0, 0 };

     // Main loop
     MSG msg;
@@ -115,7 +115,7 @@ int main(int, char**)
             ImGui::Checkbox("Another Window", &show_another_window);

             ImGui::SliderFloat("float", &f, 0.0f, 1.0f);            // Edit 1 float using a slider from 0.0f to 1.0f
-            ImGui::ColorEdit3("clear color", (float*)&clear_color); // Edit 3 floats representing a color
+            ImGui::ColorEdit3("clear color", clear_color); // Edit 3 floats representing a color

             if (ImGui::Button("Button"))                            // Buttons return true when clicked (most widgets return true when edited/activated)
                 counter++;
@@ -139,11 +139,28 @@ int main(int, char**)
         // Rendering
         ImGui::Render();
         g_pd3dDeviceContext->OMSetRenderTargets(1, &g_mainRenderTargetView, NULL);
-        g_pd3dDeviceContext->ClearRenderTargetView(g_mainRenderTargetView, (float*)&clear_color);
+        g_pd3dDeviceContext->ClearRenderTargetView(g_mainRenderTargetView, clear_color);
         ImGui_ImplDX11_RenderDrawData(ImGui::GetDrawData());

+
+        BLENDFUNCTION blend = { AC_SRC_OVER, 0, 0, AC_SRC_ALPHA };
+        POINT pt = { 0, 0 };
+        SIZE sz = { 0, 0 };
+        IDXGISurface1 *pSurface = NULL;
+        HDC hDC = NULL;
         g_pSwapChain->Present(1, 0); // Present with vsync
         //g_pSwapChain->Present(0, 0); // Present without vsync
+        g_pSwapChain->GetBuffer(0, IID_PPV_ARGS(&pSurface));
+
+        DXGI_SURFACE_DESC desc;
+        pSurface->GetDesc(&desc);
+        sz.cx = desc.Width;
+        sz.cy = desc.Height;
+
+        pSurface->GetDC(FALSE, &hDC);
+        ::UpdateLayeredWindow(hwnd, nullptr, nullptr, &sz, hDC, &pt, 0, &blend, ULW_COLORKEY);
+        pSurface->ReleaseDC(nullptr);
+        pSurface->Release();
     }

     // Cleanup
@@ -162,16 +179,18 @@ int main(int, char**)

 bool CreateDeviceD3D(HWND hWnd)
 {
+    RECT rcWnd;
+    GetWindowRect(hWnd, &rcWnd);
     // Setup swap chain
     DXGI_SWAP_CHAIN_DESC sd;
     ZeroMemory(&sd, sizeof(sd));
     sd.BufferCount = 2;
-    sd.BufferDesc.Width = 0;
-    sd.BufferDesc.Height = 0;
-    sd.BufferDesc.Format = DXGI_FORMAT_R8G8B8A8_UNORM;
+    sd.BufferDesc.Width = rcWnd.right - rcWnd.left;
+    sd.BufferDesc.Height = rcWnd.bottom - rcWnd.top;
+    sd.BufferDesc.Format = DXGI_FORMAT_B8G8R8A8_UNORM;
     sd.BufferDesc.RefreshRate.Numerator = 60;
     sd.BufferDesc.RefreshRate.Denominator = 1;
-    sd.Flags = DXGI_SWAP_CHAIN_FLAG_ALLOW_MODE_SWITCH;
+    sd.Flags = DXGI_SWAP_CHAIN_FLAG_ALLOW_MODE_SWITCH | DXGI_SWAP_CHAIN_FLAG_GDI_COMPATIBLE;
     sd.BufferUsage = DXGI_USAGE_RENDER_TARGET_OUTPUT;
     sd.OutputWindow = hWnd;
     sd.SampleDesc.Count = 1;
glfw+opengl3 实现上:
使用 ImGui 的 docking 分支(需要 Multi Viewports 功能(官方描述:Multi-viewports is the feature allowing you to seamlessly extract Dear ImGui windows out of your main rendering context.)
然后使用 glfw 创建一个 offscreen context ,即在创建窗口前加入以下代码即可。
glfwWindowHint(GLFW_VISIBLE, GLFW_FALSE);  // 设置 offscreen context 的标志位

// 需要在创建窗口前设置标志
// Create window with graphics context
GLFWwindow* window = glfwCreateWindow(200, 1, "Dear ImGui GLFW+OpenGL3 example", NULL, NULL);
同时记得检查代码中的这一部分内容,检查有没有启动 docking 和 viewport 支持,假如这一段编译错误,说明还没有切换到 docking 分支。
// Setup Dear ImGui context
IMGUI_CHECKVERSION();
ImGui::CreateContext();
ImGuiIO& io = ImGui::GetIO();
(void)io;   // 避免 unused 变量的警告
io.ConfigFlags |= ImGuiConfigFlags_NavEnableKeyboard;       // Enable Keyboard Controls
//io.ConfigFlags |= ImGuiConfigFlags_NavEnableGamepad;      // Enable Gamepad Controls
io.ConfigFlags |= ImGuiConfigFlags_DockingEnable;           // !!! 启用 docking 功能的支持
io.ConfigFlags |= ImGuiConfigFlags_ViewportsEnable;         // !!! 启用 viewport 功能的支持
io.ConfigViewportsNoAutoMerge = true;                       // 参考评论,建议加上这行
//io.ConfigViewportsNoTaskBarIcon = true;
效果图:
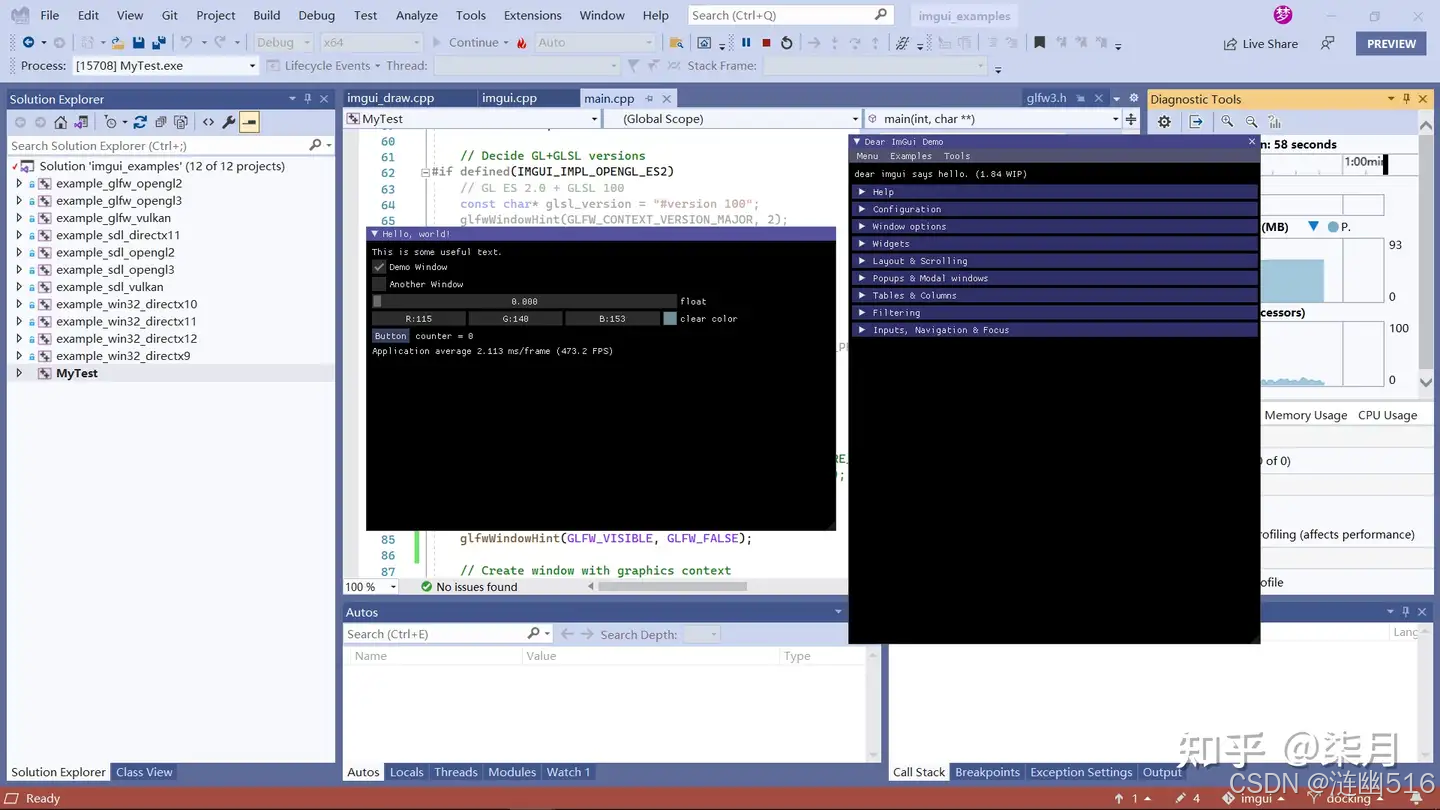
此方法来源:https://www.zhihu.com/question/336183356/answer/1948292375。
最后,貌似还有一种折中的办法,就是把 ImGui Main Window 的大小绘制得和平台窗口一样大即可,并且去除平台窗口的边框装饰,将平台窗口改成背景透明使得拖动时候不会“穿帮”。
例如 dx11 的实现:
主要通过移除 imgui 窗口标题栏并使其填充整个 DirectX11 窗口,将两个窗口“融合”在一起。
要实现此操作,只需在 ImGui::Begin()中将 ImGuiWindowFlags_NoTitleBar 标志传递给 ImGui 窗口(根据需要,可能还需要 ImGuiWindowFlags_NoMove 和 ImGuiWindowFlags_NoResize)
在 ImGui::Begin()之前添加 ImGui::SetNextWindowPos()和 ImGui::SetNextWindowSize()指令,将 imgui 窗口放置在左上角并调整其大小以适应 DirectX11 窗口
最终,你应该有类似下面的东西:
ImGuiWindowFlags window_flags = 0;
window_flags |= ImGuiWindowFlags_NoTitleBar;
window_flags |= ImGuiWindowFlags_NoMove;
window_flags |= ImGuiWindowFlags_NoResize;

while(...) {

    ...

    ImGui::SetNextWindowPos(ImVec2(0.0f, 0.0f)); // place the next window in the top left corner (0,0)
    ImGui::SetNextWindowSize(ImGui::GetIO().DisplaySize); // make the next window fullscreen
    ImGui::Begin("imgui window", NULL, window_flags) // create a window

    ...
}
该方法来自:
https://stackoverflow.com/questions/74954814/remove-the-parent-default-window-in-imgui。
2)实现遍历窗口列表,新增窗口关闭检测(模仿 raylib):
添加下面代码,函数名也可以叫 GetWin32WindowShouldClose() / GetXXWindowShouldClose()。glfw 里面有一个叫 glfwSetWindowShouldClose 的实现来着。
namespace ImGui {
    ImVector<ImGuiWindow*> GetImGuiWindowList()
    {
        ImGuiContext& g = *GImGui;
        return g.Windows;
    }

    bool WindowCanShutdownNow(bool* p_open_main)
    {
        bool window_has_active = false;
        if (!p_open_main || !(*p_open_main))
        {
            ImVector<ImGuiWindow*> windows = GetImGuiWindowList();
            if (!windows.size())
            {
                return false;
            }

            for (const auto& window : windows)
            {
                // The "Debug##Default" window ImGui creates internally in NewFrame()
                // It is hidden and has no owner Viewport.
                if (window->Name && !stricmp(window->Name, "Debug##Default"))
                    continue;

                //if (window->Active && window->ViewportOwned)
                if (window->Active && !window->Hidden)
                {
                    window_has_active = true;
                    break;
                }
            }
        }
        else
        {
            return false;
        }
        return !window_has_active;
    }
}
GetImGuiWindowList 在 imgui_internal.h 中声明,WindowCanShutdownNow 在 imgui.h 中声明。
窗口关闭检测怎么使用?
在消息循环中添加这样的代码:
while (!done)
{
    // Poll and handle messages (inputs, window resize, etc.)
    // See the WndProc() function below for our to dispatch events to the Win32 backend.
    // 轮询和处理消息(输入、窗口大小调整等)
    // 请参阅位于此页下方的 WndProc() 函数,了解如何将事件调度到 Win32 后端。
    MSG msg;
    while (::PeekMessage(&msg, nullptr, 0U, 0U, PM_REMOVE))
    {
        ::TranslateMessage(&msg);
        ::DispatchMessage(&msg);
        if (msg.message == WM_QUIT)
            done = true;
    }
    if (done)
        break;

    // 下面是添加的窗口关闭检测,当所有 Imgui 窗口被关闭时,自动关闭平台窗口,并使得消息循环得以正常结束。
    if (ImGui::WindowCanShutdownNow(&show_main_window))
        PostMessageW(hwnd, WM_CLOSE, NULL, NULL);

......
}
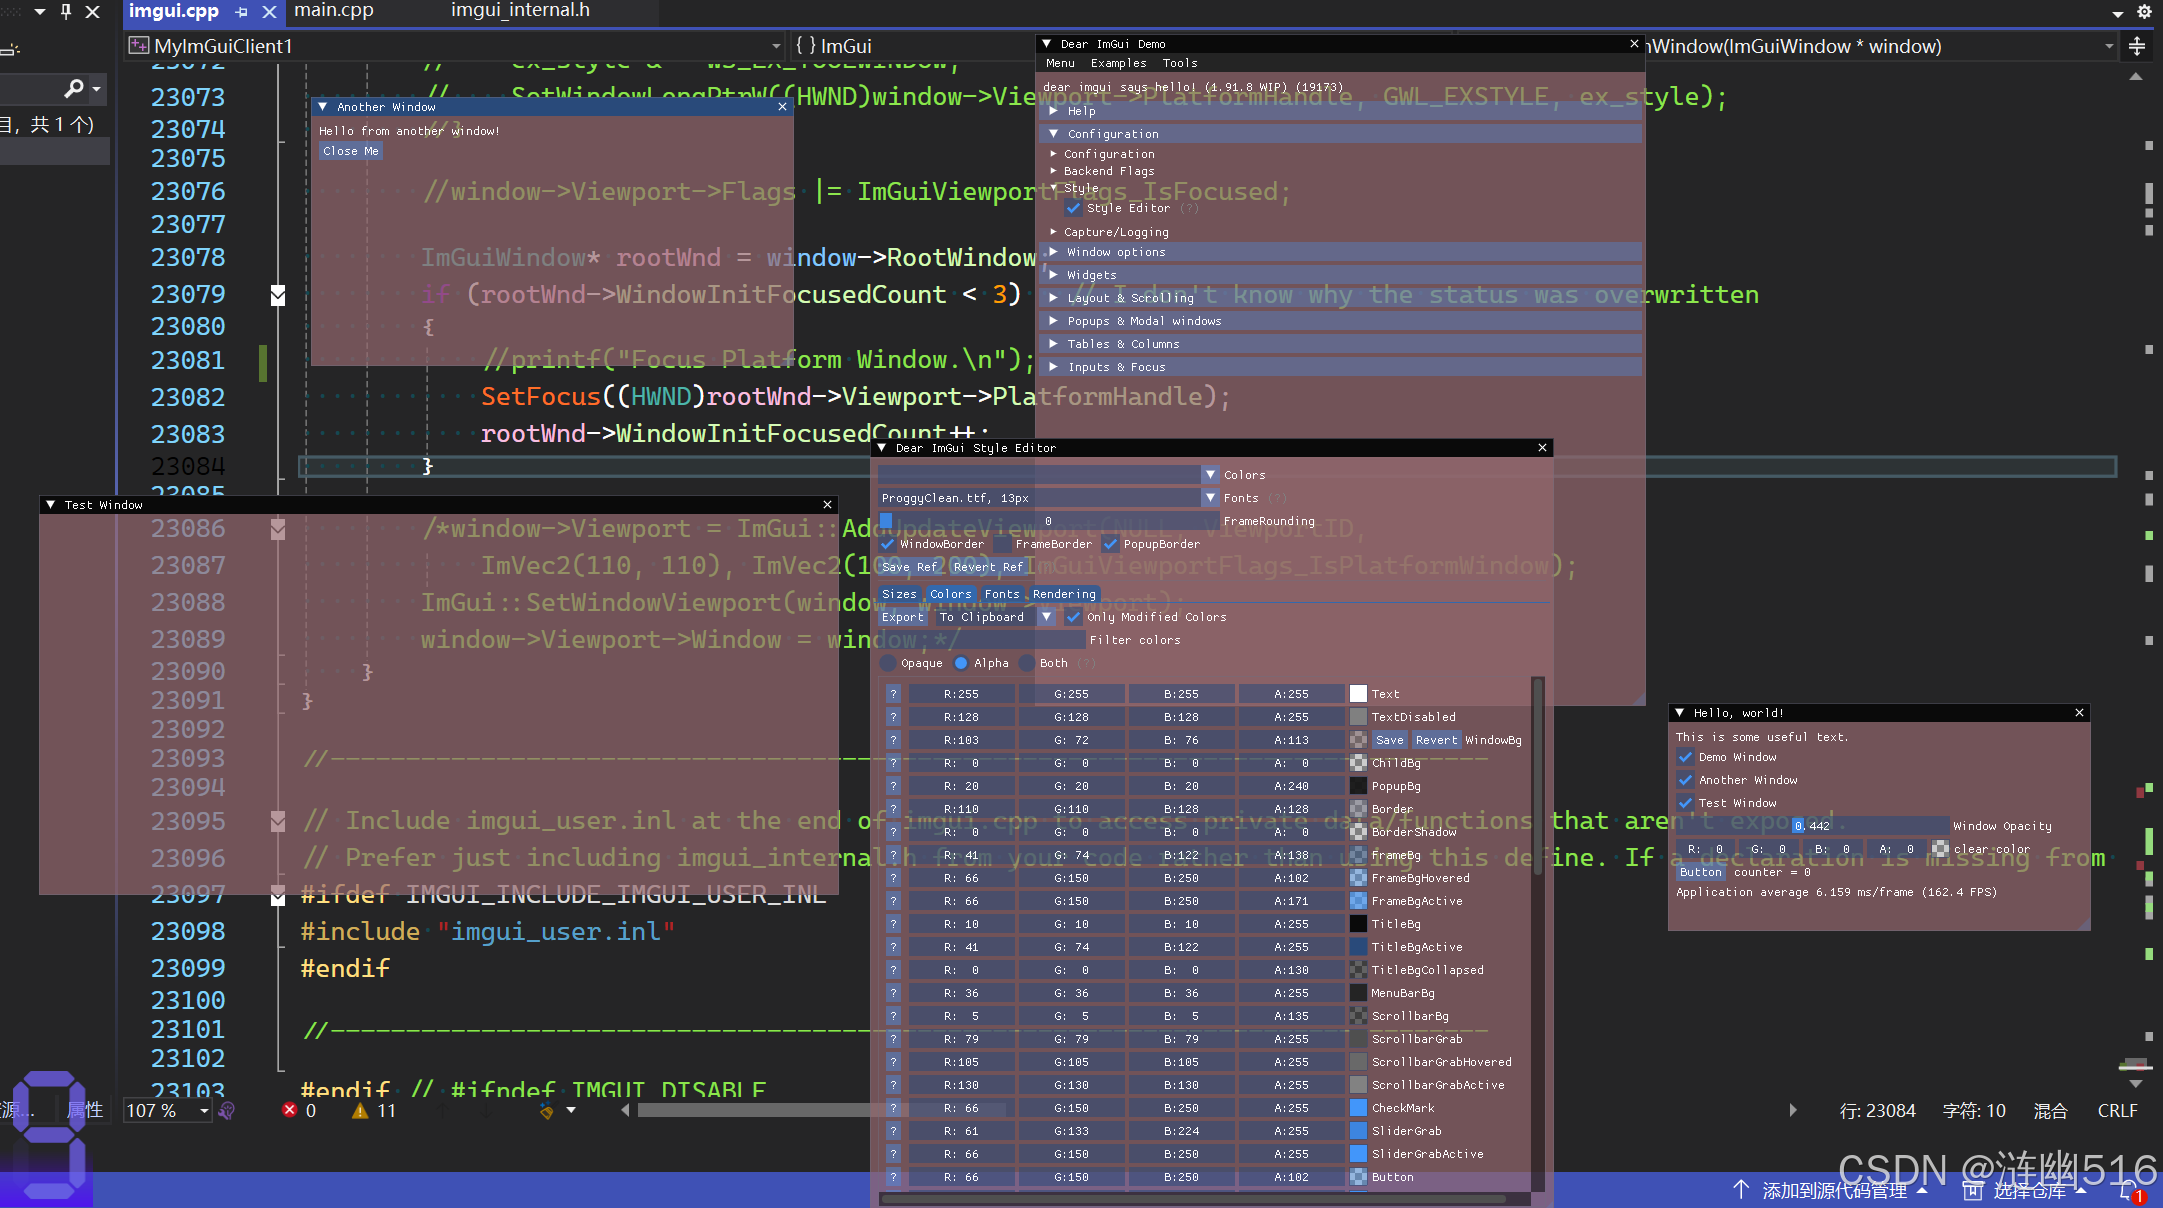
最终的效果:
本文出处链接:https://blog.csdn.net/qq_59075481/article/details/145773493。

有“AI”的1024 = 2048,欢迎大家加入2048 AI社区
更多推荐


 21
21 0
0- 0


 已为社区贡献5条内容

所有评论(0)