umi 4 中配置动态路由
前言
umi版本:v4.x
在umi中为我们内置了两个方法钩子patchRoutes/patchClientRoutes,可供我们动态修改路由列表信息。
参考文档 umi 运行时配置
⚠️经过实践目前patchRoutes要早于render执行,故而无法在render 中获取请求结果,也就无法与 render配合使用,关于这个相关问题在 Issues 上也有提及。
本文将以patchClientRoutes钩子函数进行动态路由的配置。
⚠️window.location.href跳转会使render与patchClientRoutes重新渲染
patchClientRoutes实现
patchClientRoutes({ routes })修改被react-router渲染前的树状路由表
这里简单的示范一下基础的使用方法,patchClientRoutes其参数可以解构出routes对象,routes对象中包含这当前的路由表信息
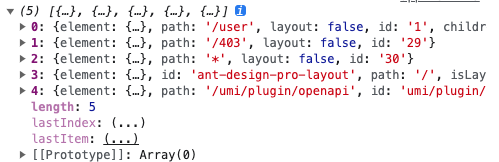
如下述中,在routes的前面添加一个新的路由信息
import Page from '@/extraRoutes/foo';

export function patchClientRoutes({ routes }) {
  routes.unshift({
    path: '/foo',
    element: <Page />,
  });
}
更多使用查看 官方文档
接下来将介绍使用patchClientRoutes实现动态路由
获取数据
首先我们在app.tsx中添加render 钩子函数,用于请求获取路由信息
// app.tsx

// ...
import { fetchRouter } from '@/services/User/api'

export function render(oldRender: () => void) {
  fetchRouter().then((res: any) => {
    console.log(res)
    oldRender()
  })
}

// ...
render(oldRender)在渲染前之前执行,在这个我们可以请求接口,进行一些处理
⚠️ 处理之后需要调用oldRender()方法进行覆盖
上面代码中的fetchRouter请求方法,本文暂以Promise模拟请求
// services/User/api.ts

import { request } from '@umijs/max';

const RouterList = [
  	{
        icon: 'icon-list',
        menuID: 40,
        menuName: 'list',
        pid: 0,
        page: '/List',
        url: '/list',
    },
  	{
        icon: 'icon-table',
        menuID: 41,
        menuName: 'table',
        pid: 0,
        url: '/table',
      	children: [
            {
                menuID: 42,
                menuName: 'tableTest',
                pid: 41,
                page: '/Table/Test',
                url: '/table/test',
            }
        ],
    }
]

export async function fetchRouter() {
    return new Promise((resolve, reject) => {
        setTimeout(() => {
            resolve(RouterList)
        }, 1000)
    })
}
定义patchClientRoutes
在app.tsx中添加patchClientRoutes钩子函数,定义extraRoutes变量用来存储记录在render中请求的结果。
// app.tsx
// ...
let extraRoutes: any[] = [];

export function patchClientRoutes({ routes }) {
  // 找到'/'根路由下的routes信息
  const routerIndex = routes.findIndex((item: RouteItem) => item.path === '/')
  const parentId = routes[routerIndex].id

}

// ...
生成动态路由所需的数据
创建loopMenuItem方法,用来递归遍历生成patchClientRoutes所需的路由格式信息
⚠️这里我们需要用到React.lazy懒加载组件
let Component = React.lazy(() => import(`./pages/Table/Test`))
其次我们需要注意在每个children下,添加一个重定向<Navigate />,重定向children下第一个子路由
import { Navigate } from 'umi';

{
    path: '/table',
    element: <Navigate to='/table/test' replace />,
}
loopMenuItem完整代码如下
const loopMenuItem = (menus: MenuItem[], pId: number | string): RouteItem[] => {
  return menus.flatMap((item) => {
    let Component: React.ComponentType<any> | null = null;
    if (item.page) {
      // 防止配置了路由,但本地暂未添加对应的页面,产生的错误
      Component = React.lazy(() => new Promise((resolve, reject) => {
          import(`@/pages${item.page}`)
              .then(module => resolve(module))
              .catch((error) => resolve(import(`@/pages/404.tsx`)))
      }))
    }
    if (item.children) {
      return [
        {
          path: item.url,
          name: item.menuName,
          icon: item.icon,
          id: item.menuID,
          parentId: pId,
          children: [
            {
              path: item.url,
              element: <Navigate to={item.children[0].url} replace />,
            },
            ...loopMenuItem(item.children, item.menuID)
          ]
        }
      ]
    } else {
      return [
        {
          path: item.url,
          name: item.menuName,
          icon: item.icon,
          id: item.menuID,
          parentId: pId,
          element: (
            <React.Suspense fallback={<div>Loading...</div>}>
              {Component && <Component />}
            </React.Suspense>
          )
        }
      ]
    }
  })
}
到这里我们就可以在app.tsx处理路由数据
let extraRoutes: any[] = [];

export function patchClientRoutes({ routes }) {
  const routerIndex = routes.findIndex((item: RouteItem) => item.path === '/')
  const parentId = routes[routerIndex].id

  if (extraRoutes) {
    routes[routerIndex]['routes'].push(
      ...loopMenuItem(extraRoutes, parentId)
    )
  }
}
到这里就结束了!
整个完整代码如下
// app.tsx

// ...
import React from 'react'
import { Navigate } from 'umi';
import { fetchRouter } from '@/services/User/api';

interface MenuItem {
  url: string;
  menuName: string;
  icon: string;
  menuID: number | string;
  page?: string;
  children?: MenuItem[];
}
interface RouteItem {
  path?: string;
  name?: string;
  icon?: string;
  id?: number | string;
  parentId?: number | string;
  element?: JSX.Element;
  children?: RouteItem[];
}

let extraRoutes: any[] = [];

export function patchClientRoutes({ routes }) {
  const routerIndex = routes.findIndex((item: RouteItem) => item.path === '/')
  const parentId = routes[routerIndex].id

  if (extraRoutes) {
    routes[routerIndex]['routes'].push(
      ...loopMenuItem(extraRoutes, parentId)
    )
  }
}

const loopMenuItem = (menus: MenuItem[], pId: number | string): RouteItem[] => {
  return menus.flatMap((item) => {
    let Component: React.ComponentType<any> | null = null;
    if (item.page) {
      // 防止配置了路由,但本地暂未添加对应的页面,产生的错误
      Component = React.lazy(() => new Promise((resolve, reject) => {
          import(`@/pages${item.page}`)
              .then(module => resolve(module))
              .catch((error) => resolve(import(`@/pages/404.tsx`)))
      })))
    }
    if (item.children) {
      return [
        {
          path: item.url,
          name: item.menuName,
          icon: item.icon,
          id: item.menuID,
          parentId: pId,
          children: [
            {
              path: item.url,
              element: <Navigate to={item.children[0].url} replace />,
            },
            ...loopMenuItem(item.children, item.menuID)
          ]
        }
      ]
    } else {
      return [
        {
          path: item.url,
          name: item.menuName,
          icon: item.icon,
          id: item.menuID,
          parentId: pId,
          element: (
            <React.Suspense fallback={<div>Loading...</div>}>
              {Component && <Component />}
            </React.Suspense>
          )
        }
      ]
    }
  })
}

export function render(oldRender: () => void) {
  fetchRouter().then((res: any) => {
    extraRoutes = res

    oldRender()
  })
}

// ...
踩坑
⚠️ react.lazy 需与Suspense搭配一起使用,否则在切换路由时就会报错
let Components = React.lazy(() => import('./pages/xxx/xxx')

const App = () => (
  <React.Suspense fallback={<div>Loading...</div>}>
    <Components />
  </React.Suspense>
)
如需将loopMenuItem方法提取至公共方法utils中时,注意将import(./pages${item.page})替换为import(@/pages${item.page})
⚠️import导出错误拦截
import语句是用于动态导入模块的语法。如果尝试导入一个不存在的模块,import语句会抛出一个Module not found错误。由于这是一个运行时错误,因此不能直接通过try块来捕获和处理。
然而,我们可以使用动态导入的返回值来检查模块是否成功加载。动态导入返回一个Promise对象,当模块加载成功时,Promise将解析为模块的导出值。我们可以使用.then()方法和.catch()方法来处理成功和失败的情况。
如下示例代码
import('./utils')
  .then((module) => {
    // 模块加载成功,可以使用module.default获取默认导出,或者使用module.someExport获取其他导出
    const defaultExport = module.default;
    // 使用默认导出或特定导出
  })
  .catch((error) => {
    // 模块加载失败,可以在catch块中处理错误
    console.error('无法加载模块', error);
  });
可以通过这种方式在代码中使用动态导入,并处理模块加载成功或失败的情况,而不需要使用try块来捕获异常。

有“AI”的1024 = 2048,欢迎大家加入2048 AI社区
更多推荐
 6
6 0
0- 0


 已为社区贡献1条内容

所有评论(0)