【ONNX】ONNX的基本使用
ONNX Simplifier 的主要功能是通过分析和优化 ONNX 模型的计算图,移除冗余操作、合并相邻节点、优化常量节点等,从而减小模型的大小和计算量。这不仅可以提高模型的推理速度,还能使模型结构更加清晰,便于理解和部署(若模型结构没问题,其实ONNX Simplifier用处不大)直接使用ONNX搭建计算图的开发效率有些低,通常都是Pytorch转ONNX。类似于链表,注意处理好待删除节点的
·
目录
一、Pytorch导出ONNX
接下来的讲解都使用这个简单的模型
class ImageClassificationModel(nn.Module):
    def __init__(self):
        super(ImageClassificationModel, self).__init__()
        self.conv1 = nn.Conv2d(in_channels=3, out_channels=6, stride=1, kernel_size=3)
        self.pool1 = nn.MaxPool2d(kernel_size=2, stride=2)
        self.conv2 = nn.Conv2d(in_channels=6, out_channels=16, stride=1, kernel_size=3)
        self.pool2 = nn.MaxPool2d(kernel_size=2, stride=2)
        self.linear1 = nn.Linear(2704, 120)
        self.linear2 = nn.Linear(120, 84)
        self.linear3 = nn.Linear(84, 10)

    def forward(self, data):
        data = torch.relu(self.conv1(data))
        data = self.pool1(data)
        data = torch.relu(self.conv2(data))
        data = self.pool2(data)
        data = data.reshape(data.size(0), -1) # (N, C, H, W) -> (N, -1)
        data = torch.relu(self.linear1(data))
        data = torch.relu(self.linear2(data))
        output = self.linear3(data)
        return torch.sigmoid(output)
上述代码实现的是一个简单的图像分类模型
def export():
    model = ImageClassificationModel()
    for name, module in model.named_modules():
        print(f"Name: {name}, Type: {type(module).__name__}")

    # 执行一次inference, 确保模型搭建正确
    # batch_size, channel, height, weight
    input = torch.randn([4, 3, 60, 60])
    output = model(input)
    print(output) # [4, 10] batch_size, class_number

    torch.onnx.export(
        model,                        # PyTorch 模型
        input,                        # 模型输入
        "image_classification.onnx",  # 输出文件路径
        export_params=True,           # 是否导出模型参数
        opset_version=11,             # ONNX 算子集版本
        do_constant_folding=True,     # 是否执行常量折叠优化
        input_names=["input"],        # 输入节点名称
        output_names=["output"],      # 输出节点名称
        dynamic_axes={"input": {0: "batch_size"}, "output": {0: "batch_size"}}  # 动态轴
    )
可以使用Netorn查看ONNX的结构

ONNX使用之前可以 check 和简化一下
def simplify_onnx():
    model = onnx.load("image_classification.onnx")
    onnx.checker.check_model(model)
    model_simplified, check = simplify(model)
    assert check
    onnx.save(model_simplified, 'simplified_model.onnx')
ONNX Simplifier 的主要功能是通过分析和优化 ONNX 模型的计算图,移除冗余操作、合并相邻节点、优化常量节点等,从而减小模型的大小和计算量。这不仅可以提高模型的推理速度,还能使模型结构更加清晰,便于理解和部署(若模型结构没问题,其实ONNX Simplifier用处不大)

二、新增节点
def add_new_node():
    model = onnx.load("simplified_model.onnx")
    graph = model.graph

    # 定义权重
    linear_weight = helper.make_tensor(
        name='linear4.weight',                            # 权重名称
        data_type=TensorProto.FLOAT,                     # 数据类型
        dims=[32, 10],                                   # 权重形状
        vals=np.random.randn(32, 10).flatten().tolist()  # 权重值
    )
    linear_bias = helper.make_tensor(
        name='linear4.bias',               # 偏置名称
        data_type=TensorProto.FLOAT,       # 数据类型
        dims=[32],                         # 偏置形状
        vals=np.random.randn(32).tolist()  # 偏置值
    )
    # 将其添加到模型的initializer列表中, 解决节点输入未定义问题
    model.graph.initializer.append(linear_weight)
    model.graph.initializer.append(linear_bias)

    up_stream_node = next(node for node in graph.node if node.name == "/linear3/Gemm")
    up_stream_node_index = next(index for index, node in enumerate(model.graph.node) if node.name == "/linear3/Gemm")
    down_stream_node = next(node for node in graph.node if node.name == "/Sigmoid")
    new_node_input = up_stream_node.output[0]
    new_node_output = "/linear4/Gemm_output_0"

    # 创建新的 linear 节点
    new_node = helper.make_node(
        name="/linear4/Gemm",            # 节点名称
        op_type="Gemm",                  # 节点操作类型
        inputs=[new_node_input, linear_weight.name, linear_bias.name],   # 输入张量名称列表
        outputs=[new_node_output],       # 输出张量名称列表
        transB=1                         # 矩阵相乘时对第二个矩阵进行转置
    )

    down_stream_node.input[0] = new_node_output
    graph.node.insert(up_stream_node_index + 1, new_node)

    onnx.checker.check_model(model)
    onnx.save(model, 'add_node_model.onnx')

三、删除节点
def del_node():
    model = onnx.load("add_node_model.onnx")
    graph = model.graph

    del_node = next(node for node in graph.node if node.name == "/linear4/Gemm")
    up_stream_node = next(node for node in graph.node if node.name == "/linear3/Gemm")
    down_stream_node = next(node for node in graph.node if node.name == "/Sigmoid")

    model.graph.node.remove(del_node)
    down_stream_node.input[0] = up_stream_node.output[0]

    onnx.checker.check_model(model)
    onnx.save(model, 'del_node_model.onnx')
类似于链表,注意处理好待删除节点的上下游节点之间的链接关系

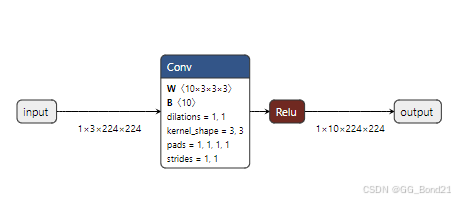
四、构建模型
def make_model():
    # 定义输入和输出
    input_tensor = helper.make_tensor_value_info("input", onnx.TensorProto.FLOAT, [1, 3, 224, 224])
    output_tensor = helper.make_tensor_value_info("output", onnx.TensorProto.FLOAT, [1, 10, 224, 224])
    # 创建卷积层的权重和偏置
    conv_weight = helper.make_tensor (
        "conv_weight",
        onnx.TensorProto.FLOAT,
        [10, 3, 3, 3],  # 输出通道数、输入通道数、卷积核大小
        np.random.randn(10, 3, 3, 3).flatten().tolist()  # 随机初始化权重
    )
    conv_bias = helper.make_tensor (
        "conv_bias",
        onnx.TensorProto.FLOAT,
        [10],  # 偏置数量
        np.random.randn(10).tolist()  # 随机初始化偏置
    )
    # 创建卷积节点
    conv_node = helper.make_node (
        "Conv",
        inputs=["input", "conv_weight", "conv_bias"],
        outputs=["conv_output"],
        kernel_shape=[3, 3],    # 卷积核大小
        strides=[1, 1],         # 步长
        pads=[1, 1, 1, 1],      # 填充
        dilations=[1, 1],       # 膨胀率
        group=1                 # 分组
    )
    # 创建ReLU激活函数节点
    relu_node = helper.make_node (
        "Relu",
        inputs=["conv_output"],
        outputs=["output"]
    )
    # 创建图结构
    graph = helper.make_graph (
        nodes=[conv_node, relu_node],
        name="Conv + ReLU Model",
        inputs=[input_tensor],
        outputs=[output_tensor],
        initializer=[conv_weight, conv_bias]  # 添加权重和偏置
    )
    # 创建模型
    model = helper.make_model(graph)
    model.ir_version = onnx.IR_VERSION
    model.producer_name = "ONNX Example"
    model.producer_version = "1.0"
    model.opset_import.append(helper.make_operatorsetid("ai.onnx", 12))
    onnx.checker.check_model(model)
    # 保存模型
    onnx.save(model, "make_model.onnx")
直接使用ONNX搭建计算图的开发效率有些低,通常都是Pytorch转ONNX。遇到某些不支持的算子或者计算图调整时才使用ONNX
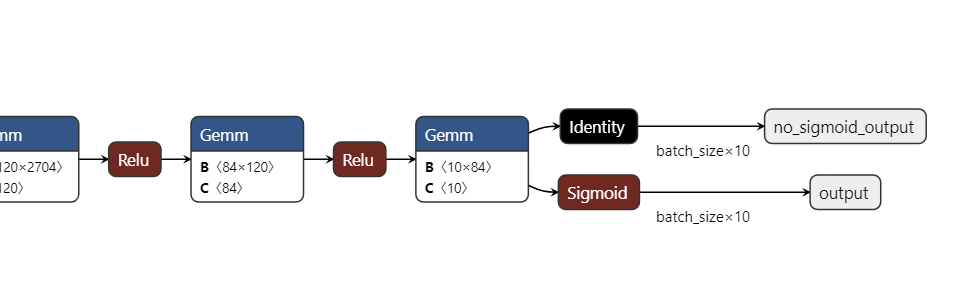
五、增加输出
在某些业务情况下,需要提取模型中特殊输出进行特殊处理,这时就需修改ONNX计算图添加输出
原ONNX

import onnx
import onnx.helper as helper

def add_new_output(onnx_path):
    model = onnx.load(onnx_path)

    # 找到要获取其输出的节点
    target_node = None
    for node in model.graph.node:
        if node.name == '/linear3/Gemm':
            target_node = node
            break
    print(target_node.output)

    new_output = helper.make_tensor_value_info('no_sigmoid_output', onnx.TensorProto.FLOAT, [-1, 10])
    dim1 = new_output.type.tensor_type.shape.dim[0]
    dim1.dim_param = "batch_size"
    model.graph.output.extend([new_output]) # 尾插输出,使用时注意输出顺序

    target_node_output = target_node.output[0]
    new_output_node = onnx.helper.make_node(
        op_type='Identity',  # 使用Identity操作作为示例
        inputs=[target_node_output],
        outputs=['no_sigmoid_output'],
        name='no_sigmoid'
    )
    model.graph.node.append(new_output_node)
    onnx.checker.check_model(model)

    print("Inputs:")
    for input in model.graph.input:
        print(f"Name: {input.name}, Type: {input.type}")
    print("\nOutputs:")
    for output in model.graph.output:
        print(f"Name: {output.name}, Type: {output.type}")

    onnx.save(model, "model_new.onnx")


if __name__ == "__main__":
    onnx_path = "./model.onnx"
    add_new_output(onnx_path)

有“AI”的1024 = 2048,欢迎大家加入2048 AI社区
更多推荐


 8
8 0
0- 0


 已为社区贡献9条内容

所有评论(0)