局域网内搭建浏览器可信任的SSL证书
转载自:局域网内搭建浏览器可信任的SSL证书 – 唐玥璨 | 博客
PS:亲测成功,简单易上手,故转发,记录,希望对需要的朋友们有所帮助。
★★★不看过程,直接开干★★★
文中标记了文字 “执行命令1” ~ "执行命令5",网页搜索“执行命令”,按照顺序直接开干。
★★★不看过程,直接开干★★★
目录
首先是为什么要干这个事情,你可能会说随便搞个自签名证书难道不能用吗?答案是还真的不能用,的确对于开发来说搞个自签名的证书就行了。但是一旦放到生产环境浏览器对证书有效性进行验证的时候便是不可信状态,这时就必须要用户点击一下继续访问,但是对于我们即将实施项目的自动化要求来说没法这样干。你可能又会说了现在这个环境在阿里云、华为云这些平台上随便申请一个免费的证书难道不行吗?答案是真的不行,因为项目的特殊要求最终我们部署的环境是完全没有外网访问的,就只能在局域网环境下运行及意味着不光是SSL证书的问题我们连DNS服务器都要自己建。这时候你可能又要说了那么直接用http访问就可以了,干嘛要用ssl证书呀?答案是这个项目需要使用WebRTC进行音视频多人会议,而WebRTC只能在https下运行。
其实上面的说法有一个点需要更正一下,自签名证书其实也可以但是一旦对超过100个客户端进行分发简直是要命的事情,所以我们通过Windows域控的方式统一对下属计算机进行证书分发保证可用性。
1.原理
SSL证书的信任机制其实是非常简单的,第一需要一个机构证书,第二是需要服务端证书,一般来说机构证书被称为CA证书,而服务端证书就称为服务器证书吧。那么为啥https非常安全呢?答案其实不复杂,下面就是一段逻辑性描述来说明为啥https是安全的。
通常情况下我们在给Nginx、Tomcat、IIS上配置的证书便是服务器证书,那么它是怎么保证客户端访问的地址绝对没有被拦截修改的呢?其实也不复杂,当我们的浏览器发起一个请求的时候到服务端上时,对应web服务器会通过证书的秘钥将http响应值进行一次加密,然后将密文与明文同时返回出来,客户端浏览器接收到响应之后会将密文对称解码然后和明文进行对比,这样一来便可以保证响应值没有被串改。
这个时候逻辑上稍微厉害一点都会发现一个问题,客户端是怎么解码的?这里的答案就是服务端在响应的时候同时会将证书的公钥也返回,这个公钥只能解码对应私钥加密的信息,同时这个公钥无法加密只能解密,这样一来如果如果某人想要拦截http请求便必须知道对应的私钥才行,否则浏览器一旦发现解密信息对不上便知道了响应数据已经被拦截修改过了。
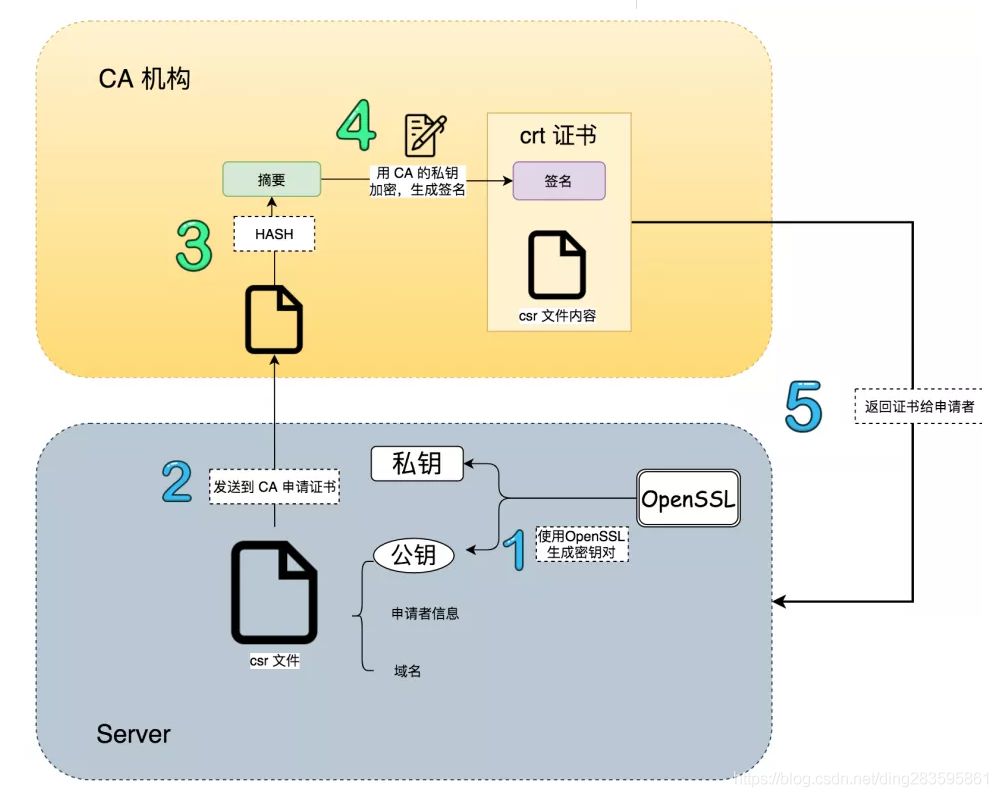
如果你反应过来了你会发现一个新的问题,那么假设拦截这自己搞了一对有效的私钥和公钥然后伪装为服务器不就行了,恭喜你盲生发现了华点。这里就需要CA证书来处理了。其实服务器证书的公钥是由CA证书的秘钥配对加密来的,这样一来当请求返回的服务器公钥和通过CA证书进行验证时便会发现这个公钥是不是由机构签发的公钥,一旦对应不上则说明服务器不是原来CA证书签发服务器证书,这就证明你的请求被第三方拦截了。同时CA证书对于浏览器而言只有公钥,也就是说安装证书时本质上就是将CA证书的公钥导入到你的电脑上了,至此除开CA机构的证书发放者没有知道CA证书的秘钥是什么这样一来便可以保证下面几个非常关键的安全性:
- 你请求的服务绝对是官方的服务器,绝对不是黑客自建的服务器。
- 服务器响应给你的数据绝对是正确的,期间黑客绝对无法对其进行修改。
证书的结构如下:
这里还有一个问题便是这些CA证书是哪来的,自己的电脑上又重来没有导入过什么证书。这里便是一个非常无耻躺着赚钱的商业模式了,微软、谷歌、苹果等公司提供了操作系统和浏览器,他们便是第一方的CA机构,他们的系统自己肯定信任自己对吧?所以系统安装的时候他们的CA公钥已经安装到你们的系统里面了,然后这几家巨头合伙说那么这些CA公钥在每种系统都有,然后就是一写第三方公司和这些巨头打成了合作,这些公司的机构证书也被巨头们信任所以理所当然的入库了,这些三方机构便是大名鼎鼎的Symantec、GeoTrust几个巨头,这些机构一个单域名的签名证书都敢直接拿出来卖,一年好几千,对他们而言无法就是给下发的证书进行一次签名而已,真正的躺着赚钱。
2.开始制作证书
这里我使用的证书工具是openssl,经典工具,坦白的说非常难用。
2.1创建CA证书
首先第一步肯定是制作一个机构证书也就是CA证书出来,这里有两种方案,第一是直接用openssl创建CA证书,另一种是windows域控生成域组织的CA证书,我们分开说。
2.1.1通过openssl创建CA证书
第一步是创建一个秘钥,这个便是CA证书的根本,之后所有的东西都来自这个秘钥:
# 通过rsa算法生成2048位长度的秘钥
- 执行命令1:
openssl genrsa -out myCA.key 2048第二步是通过秘钥加密机构信息形成公钥:
# 公钥包含了机构信息,在输入下面的指令之后会有一系列的信息输入,这些信息便是机构信息,公司名称地址什么的
# 这里还有一个过期信息,CA证书也会过期,openssl默认是一个月,我们直接搞到100年
- 执行命令2:
openssl req -utf8 -new -x509 -key myCA.key -out myCA.cer -days 36500这一步需要输入的机构信息有点,分别说一下:
| 参数名称 | 参数值 |
|---|---|
| Country Name | 国家代码,比如中国就是CN |
| State or Province Name | 省名称 |
| Locality Name | 城市名称 |
| Organization Name | 机构名称 |
| Organizational Unit Name | 机构单位名称 |
| Common Name | 重点参数:授权给什么,因为机构是根节点所以是授权给自己 |
| Email Address | 邮件地址 |
2.1.2通过windows域控创建CA证书
PS:本章节和2.1.1,二选一,区别是使用不同的方式制作CA证书。
本章节必须为Windows Server操作系统,因为域控功能只有Server版操作系统才有。
这种便是我采用的方案,执行上比直接用openssl创建证书复杂多了,但是好处也非常多,一方面域控下级的所有计算机天然对域控服务就是信任状态,第二是域控制器能够通过组策略域内同步CA证书,本质上来讲相对于多了一个CA证书同步与分发的机制。我这边使用的Windows Server 2016,其他版本区别也不大。
第一步是在域控上启用证书服务

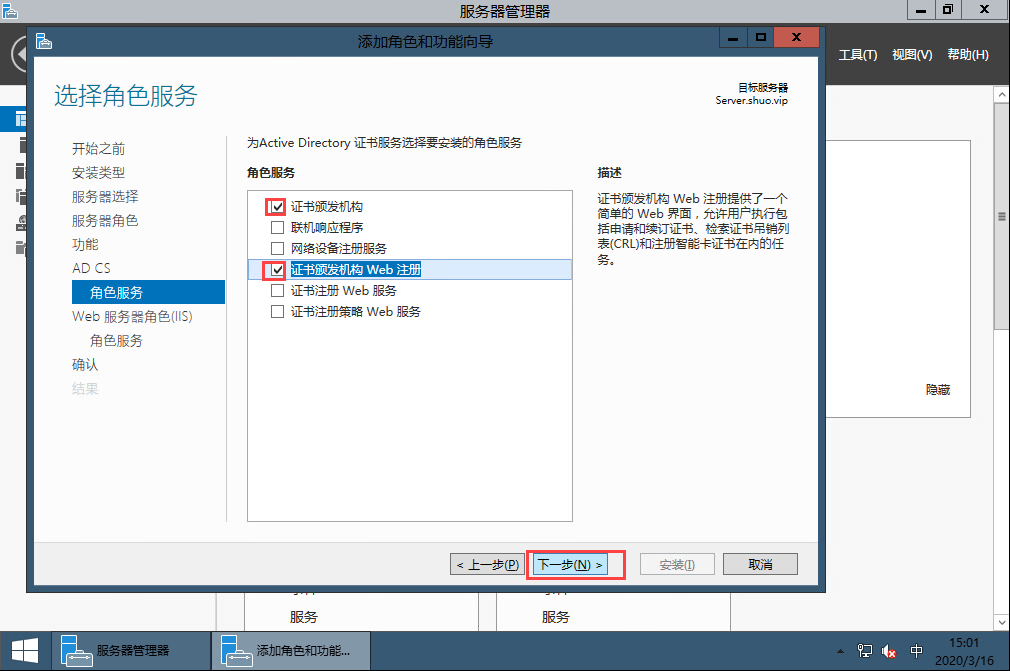
第二步是安装完毕之后配置证书
这里非常简单,我都不想说了,直接根据提示输入相关信息就行了,在过期时间那一步最好将时间拉长,我还是使用的100年。
第三步是通过组策略进行分发
策略路径是:计算机策略/Windows设置/安全设置/公钥策略/受信任的根证书颁发机构和计算机策略/Windows设置/安全设置/公钥策略/受信任的发布者证书。将上面创建的证书导出之后,在这里导入即可。
2.2创建服务器证书
在得到CA证书之后,需要通过openssl工具对证书进行转换得到公钥(.crt文件)和密钥(.key文件),无论CA证书是怎么来的到这里之后就没有任何区别了,服务器证书的制作流程相较CA证书要复杂一点点。
第一步通过openssl工具创建服务器的秘钥:
# 通过RSA算法生成长度2048位的秘钥
- 执行命令3:
openssl genrsa -out server.key 2048第二步这里是创建一个签名请求
需要将服务器信息写入到请求文件之中,然后通过CA机构证书对请求签名形成服务器证书公钥,这一步要复杂一些,很多网上的教程在这里都GG了主要原因没有把原理搞清楚。
首先https证书的公钥不同于自定义情况下的加密证书,这里需要安装浏览器标准进行配置,首先openssl默认的证书版本是V1,V1在支持https时部分浏览器依旧会认为不安全,所以需要使用V3版本;同时openssl即便是使用V3版本依旧没有附带V3的subjectAltName字段数据(这里是证书对应的IP地址或者域名,可以用通配符)。但是这些东西命令行没法指定所以需要配置文件,我这里准备了一个:
tsa_policy2 = 1.2.3.4.5.6
tsa_policy3 = 1.2.3.4.5.7
[ ca ]
default_ca = CA_default  # The default ca section
[ CA_default ]
dir  = ./demoCA  # Where everything is kept
certs  = $dir/certs  # Where the issued certs are kept
crl_dir  = $dir/crl  # Where the issued crl are kept
database = $dir/index.txt # database index file.
new_certs_dir = $dir/newcerts  # default place for new certs.
certificate = $dir/cacert.pem  # The CA certificate
serial  = $dir/serial   # The current serial number
crlnumber = $dir/crlnumber # the current crl number
crl  = $dir/crl.pem   # The current CRL
private_key = $dir/private/cakey.pem# The private key
RANDFILE = $dir/private/.rand # private random number file
x509_extensions = usr_cert  # The extentions to add to the cert
name_opt  = ca_default  # Subject Name options
cert_opt  = ca_default  # Certificate field options
default_days = 365   # how long to certify for
default_crl_days= 30   # how long before next CRL
default_md = default  # use public key default MD
preserve = no   # keep passed DN ordering
policy  = policy_match
[ policy_match ]
countryName  = match
stateOrProvinceName = match
organizationName = match
organizationalUnitName = optional
commonName  = supplied
emailAddress  = optional
[ policy_anything ]
countryName  = optional
stateOrProvinceName = optional
localityName  = optional
organizationName = optional
organizationalUnitName = optional
commonName  = supplied
emailAddress  = optional
[ req ]
default_bits  = 1024
default_keyfile  = privkey.pem
distinguished_name = req_distinguished_name
attributes  = req_attributes
x509_extensions = v3_ca # The extentions to add to the self signed cert
string_mask = utf8only
req_extensions = v3_req # The extensions to add to a certificate request
[ req_distinguished_name ]
countryName   = Country Name (2 letter code)
countryName_default  = CN
countryName_min   = 2
countryName_max   = 2
stateOrProvinceName  = State or Province Name (full name)
stateOrProvinceName_default = BeiJing
localityName   = Locality Name (eg, city)
0.organizationName  = Organization Name (eg, company)
0.organizationName_default = myca
organizationalUnitName  = Organizational Unit Name (eg, section)
commonName   = Common Name (e.g. server FQDN or YOUR name)
commonName_max   = 64
emailAddress   = Email Address
emailAddress_max  = 64
[ req_attributes ]
challengePassword  = A challenge password
challengePassword_min  = 4
challengePassword_max  = 20
unstructuredName  = An optional company name
[ usr_cert ]
basicConstraints=CA:FALSE
nsCertType = client, email, objsign
keyUsage = nonRepudiation, digitalSignature, keyEncipherment
nsComment   = "OpenSSL Generated Certificate"
subjectKeyIdentifier=hash
authorityKeyIdentifier=keyid,issuer
[ svr_cert ]
basicConstraints=CA:FALSE
nsCertType   = server
keyUsage = nonRepudiation, digitalSignature, keyEncipherment, dataEncipherment, keyAgreement
subjectKeyIdentifier=hash
authorityKeyIdentifier=keyid,issuer
extendedKeyUsage = serverAuth,clientAuth
[ v3_req ]
subjectAltName = @alt_names
# 这里是重点,需要将里面配置为最终服务端需要的域名或者IP
# 这里可以写多个,能够自行添加DNS.X = XXXXXX
[ alt_names ]
DNS.1 = greenlgy.com
# DNS.2 = *.xunshi.com
# IP.1 = 192.168.0.2
# IP.2 = 192.168.0.3
[ v3_ca ]
subjectKeyIdentifier=hash
authorityKeyIdentifier=keyid:always,issuer
basicConstraints = CA:true
[ crl_ext ]
authorityKeyIdentifier=keyid:always
[ proxy_cert_ext ]
basicConstraints=CA:FALSE
nsComment   = "OpenSSL Generated Certificate"
subjectKeyIdentifier=hash
authorityKeyIdentifier=keyid,issuer
proxyCertInfo=critical,language:id-ppl-anyLanguage,pathlen:3,policy:foo
[ tsa ]
default_tsa = tsa_config1 # the default TSA section
[ tsa_config1 ]
dir  = ./demoCA  # TSA root directory
serial  = $dir/tsaserial # The current serial number (mandatory)
crypto_device = builtin  # OpenSSL engine to use for signing
signer_cert = $dir/tsacert.pem  # The TSA signing certificate
     # (optional)
certs  = $dir/cacert.pem # Certificate chain to include in reply
     # (optional)
signer_key = $dir/private/tsakey.pem # The TSA private key (optional)
default_policy = tsa_policy1  # Policy if request did not specify it
     # (optional)
other_policies = tsa_policy2, tsa_policy3 # acceptable policies (optional)
digests  = md5, sha1  # Acceptable message digests (mandatory)
accuracy = secs:1, millisecs:500, microsecs:100 # (optional)
clock_precision_digits  = 0 # number of digits after dot. (optional)
ordering  = yes # Is ordering defined for timestamps?
    # (optional, default: no)
tsa_name  = yes # Must the TSA name be included in the reply?
    # (optional, default: no)
ess_cert_id_chain = no # Must the ESS cert id chain be included?
# (optional, default: no)将上面的配置内容保存为openssl.cnf放到生成的服务器证书文件的目录下(注意:修改alt_names里面的域名或者IP为最终部署需要的地址,支持通配符),然后执行创建签名申请文件即可,执行运行:
# 和创建CA时一样这里需要输入一堆服务器信息,输入项也是相同的。
# 不过在输入Common Name(CN)最好直接输入服务器的IP地址或者域名。
- 执行命令4:(需要一个openssl.cnf文件,请从下文copy做成)
openssl req -utf8 -config openssl.cnf -new -out server.req -key server.keyPS:上述配置文件使用sha1算法生产的证书,部分浏览器已经已经不信任该算法了,如果你使用的时候遇到sha1相关的问题,可以参考评论区的kevin同学提供的方案。
如果你遇到sha1问题,用稍微新一点的openssl.cnf文件 https://github.com/openssl/openssl/blob/master/apps/openssl.cnf
同时还要在这个文件里稍微改一下,把下述的配置加入进去
“`
[ v3_req ]
subjectAltName = @alt_names
# 这里是重点,需要将里面配置为最终服务端需要的域名或者IP
# 这里可以写多个,能够自行添加DNS.X = XXXXXX
[ alt_names ]
DNS.1 = xunshi.com
DNS.2 = *.xunshi.com
“`
加上。
最后用请求生成密钥的时候 用下面这个指令 使用sha384代替默认的sha1
openssl x509 -req -extfile openssl.cnf -extensions v3_req -in server.req -out server.cer -CAkey myCA.key -CA myCA.cer -sha384 -days 36500 -CAcreateserial -CAserial serial
PS:上面这一段很重,请仔细阅读。
不读也没关系,不用去找了,我直接贴过来,并且按照上面说的改好了。
你只需要把最后 [alt_names] 中的DNS改成你自己域名就行了。
openssl.cnf 文件:
#
# OpenSSL example configuration file.
# See doc/man5/config.pod for more info.
#
# This is mostly being used for generation of certificate requests,
# but may be used for auto loading of providers

# Note that you can include other files from the main configuration
# file using the .include directive.
#.include filename

# This definition stops the following lines choking if HOME isn't
# defined.
HOME			= .

# Use this in order to automatically load providers.
openssl_conf = openssl_init

# Comment out the next line to ignore configuration errors
config_diagnostics = 1

# Extra OBJECT IDENTIFIER info:
# oid_file       = $ENV::HOME/.oid
oid_section = new_oids

# To use this configuration file with the "-extfile" option of the
# "openssl x509" utility, name here the section containing the
# X.509v3 extensions to use:
# extensions		=
# (Alternatively, use a configuration file that has only
# X.509v3 extensions in its main [= default] section.)

[ new_oids ]
# We can add new OIDs in here for use by 'ca', 'req' and 'ts'.
# Add a simple OID like this:
# testoid1=1.2.3.4
# Or use config file substitution like this:
# testoid2=${testoid1}.5.6

# Policies used by the TSA examples.
tsa_policy1 = 1.2.3.4.1
tsa_policy2 = 1.2.3.4.5.6
tsa_policy3 = 1.2.3.4.5.7

# For FIPS
# Optionally include a file that is generated by the OpenSSL fipsinstall
# application. This file contains configuration data required by the OpenSSL
# fips provider. It contains a named section e.g. [fips_sect] which is
# referenced from the [provider_sect] below.
# Refer to the OpenSSL security policy for more information.
# .include fipsmodule.cnf

[openssl_init]
providers = provider_sect

# List of providers to load
[provider_sect]
default = default_sect
# The fips section name should match the section name inside the
# included fipsmodule.cnf.
# fips = fips_sect

# If no providers are activated explicitly, the default one is activated implicitly.
# See man 7 OSSL_PROVIDER-default for more details.
#
# If you add a section explicitly activating any other provider(s), you most
# probably need to explicitly activate the default provider, otherwise it
# becomes unavailable in openssl.  As a consequence applications depending on
# OpenSSL may not work correctly which could lead to significant system
# problems including inability to remotely access the system.
[default_sect]
# activate = 1


####################################################################
[ ca ]
default_ca	= CA_default		# The default ca section

####################################################################
[ CA_default ]

dir		= ./demoCA		# Where everything is kept
certs		= $dir/certs		# Where the issued certs are kept
crl_dir		= $dir/crl		# Where the issued crl are kept
database	= $dir/index.txt	# database index file.
#unique_subject	= no			# Set to 'no' to allow creation of
					# several certs with same subject.
new_certs_dir	= $dir/newcerts		# default place for new certs.

certificate	= $dir/cacert.pem 	# The CA certificate
serial		= $dir/serial 		# The current serial number
crlnumber	= $dir/crlnumber	# the current crl number
					# must be commented out to leave a V1 CRL
crl		= $dir/crl.pem 		# The current CRL
private_key	= $dir/private/cakey.pem # The private key

x509_extensions	= usr_cert		# The extensions to add to the cert

# Comment out the following two lines for the "traditional"
# (and highly broken) format.
name_opt 	= ca_default		# Subject Name options
cert_opt 	= ca_default		# Certificate field options

# Extension copying option: use with caution.
# copy_extensions = copy

# Extensions to add to a CRL. Note: Netscape communicator chokes on V2 CRLs
# so this is commented out by default to leave a V1 CRL.
# crlnumber must also be commented out to leave a V1 CRL.
# crl_extensions	= crl_ext

default_days	= 365			# how long to certify for
default_crl_days= 30			# how long before next CRL
default_md	= default		# use public key default MD
preserve	= no			# keep passed DN ordering

# A few difference way of specifying how similar the request should look
# For type CA, the listed attributes must be the same, and the optional
# and supplied fields are just that :-)
policy		= policy_match

# For the CA policy
[ policy_match ]
countryName		= match
stateOrProvinceName	= match
organizationName	= match
organizationalUnitName	= optional
commonName		= supplied
emailAddress		= optional

# For the 'anything' policy
# At this point in time, you must list all acceptable 'object'
# types.
[ policy_anything ]
countryName		= optional
stateOrProvinceName	= optional
localityName		= optional
organizationName	= optional
organizationalUnitName	= optional
commonName		= supplied
emailAddress		= optional

####################################################################
[ req ]
default_bits		= 2048
default_keyfile 	= privkey.pem
distinguished_name	= req_distinguished_name
attributes		= req_attributes
x509_extensions	= v3_ca	# The extensions to add to the self signed cert

# Passwords for private keys if not present they will be prompted for
# input_password = secret
# output_password = secret

# This sets a mask for permitted string types. There are several options.
# default: PrintableString, T61String, BMPString.
# pkix	 : PrintableString, BMPString (PKIX recommendation before 2004)
# utf8only: only UTF8Strings (PKIX recommendation after 2004).
# nombstr : PrintableString, T61String (no BMPStrings or UTF8Strings).
# MASK:XXXX a literal mask value.
# WARNING: ancient versions of Netscape crash on BMPStrings or UTF8Strings.
string_mask = utf8only

# req_extensions = v3_req # The extensions to add to a certificate request

[ req_distinguished_name ]
countryName			= Country Name (2 letter code)
countryName_default		= AU
countryName_min			= 2
countryName_max			= 2

stateOrProvinceName		= State or Province Name (full name)
stateOrProvinceName_default	= Some-State

localityName			= Locality Name (eg, city)

0.organizationName		= Organization Name (eg, company)
0.organizationName_default	= Internet Widgits Pty Ltd

# we can do this but it is not needed normally :-)
#1.organizationName		= Second Organization Name (eg, company)
#1.organizationName_default	= World Wide Web Pty Ltd

organizationalUnitName		= Organizational Unit Name (eg, section)
#organizationalUnitName_default	=

commonName			= Common Name (e.g. server FQDN or YOUR name)
commonName_max			= 64

emailAddress			= Email Address
emailAddress_max		= 64

# SET-ex3			= SET extension number 3

[ req_attributes ]
challengePassword		= A challenge password
challengePassword_min		= 4
challengePassword_max		= 20

unstructuredName		= An optional company name

[ usr_cert ]

# These extensions are added when 'ca' signs a request.

# This goes against PKIX guidelines but some CAs do it and some software
# requires this to avoid interpreting an end user certificate as a CA.

basicConstraints=CA:FALSE

# This is typical in keyUsage for a client certificate.
# keyUsage = nonRepudiation, digitalSignature, keyEncipherment

# PKIX recommendations harmless if included in all certificates.
subjectKeyIdentifier=hash
authorityKeyIdentifier=keyid,issuer

# This stuff is for subjectAltName and issuerAltname.
# Import the email address.
# subjectAltName=email:copy
# An alternative to produce certificates that aren't
# deprecated according to PKIX.
# subjectAltName=email:move

# Copy subject details
# issuerAltName=issuer:copy

# This is required for TSA certificates.
# extendedKeyUsage = critical,timeStamping

[ v3_req ]

# Extensions to add to a certificate request

basicConstraints = CA:FALSE
keyUsage = nonRepudiation, digitalSignature, keyEncipherment

[ v3_ca ]


# Extensions for a typical CA


# PKIX recommendation.

subjectKeyIdentifier=hash

authorityKeyIdentifier=keyid:always,issuer

basicConstraints = critical,CA:true

# Key usage: this is typical for a CA certificate. However since it will
# prevent it being used as an test self-signed certificate it is best
# left out by default.
# keyUsage = cRLSign, keyCertSign

# Include email address in subject alt name: another PKIX recommendation
# subjectAltName=email:copy
# Copy issuer details
# issuerAltName=issuer:copy

# DER hex encoding of an extension: beware experts only!
# obj=DER:02:03
# Where 'obj' is a standard or added object
# You can even override a supported extension:
# basicConstraints= critical, DER:30:03:01:01:FF

[ crl_ext ]

# CRL extensions.
# Only issuerAltName and authorityKeyIdentifier make any sense in a CRL.

# issuerAltName=issuer:copy
authorityKeyIdentifier=keyid:always

[ proxy_cert_ext ]
# These extensions should be added when creating a proxy certificate

# This goes against PKIX guidelines but some CAs do it and some software
# requires this to avoid interpreting an end user certificate as a CA.

basicConstraints=CA:FALSE

# This is typical in keyUsage for a client certificate.
# keyUsage = nonRepudiation, digitalSignature, keyEncipherment

# PKIX recommendations harmless if included in all certificates.
subjectKeyIdentifier=hash
authorityKeyIdentifier=keyid,issuer

# This stuff is for subjectAltName and issuerAltname.
# Import the email address.
# subjectAltName=email:copy
# An alternative to produce certificates that aren't
# deprecated according to PKIX.
# subjectAltName=email:move

# Copy subject details
# issuerAltName=issuer:copy

# This really needs to be in place for it to be a proxy certificate.
proxyCertInfo=critical,language:id-ppl-anyLanguage,pathlen:3,policy:foo

####################################################################
[ tsa ]

default_tsa = tsa_config1	# the default TSA section

[ tsa_config1 ]

# These are used by the TSA reply generation only.
dir		= ./demoCA		# TSA root directory
serial		= $dir/tsaserial	# The current serial number (mandatory)
crypto_device	= builtin		# OpenSSL engine to use for signing
signer_cert	= $dir/tsacert.pem 	# The TSA signing certificate
					# (optional)
certs		= $dir/cacert.pem	# Certificate chain to include in reply
					# (optional)
signer_key	= $dir/private/tsakey.pem # The TSA private key (optional)
signer_digest  = sha256			# Signing digest to use. (Optional)
default_policy	= tsa_policy1		# Policy if request did not specify it
					# (optional)
other_policies	= tsa_policy2, tsa_policy3	# acceptable policies (optional)
digests     = sha1, sha256, sha384, sha512  # Acceptable message digests (mandatory)
accuracy	= secs:1, millisecs:500, microsecs:100	# (optional)
clock_precision_digits  = 0	# number of digits after dot. (optional)
ordering		= yes	# Is ordering defined for timestamps?
				# (optional, default: no)
tsa_name		= yes	# Must the TSA name be included in the reply?
				# (optional, default: no)
ess_cert_id_chain	= no	# Must the ESS cert id chain be included?
				# (optional, default: no)
ess_cert_id_alg		= sha256	# algorithm to compute certificate
				# identifier (optional, default: sha256)

[insta] # CMP using Insta Demo CA
# Message transfer
server = pki.certificate.fi:8700
# proxy = # set this as far as needed, e.g., http://192.168.1.1:8080
# tls_use = 0
path = pkix/

# Server authentication
recipient = "/C=FI/O=Insta Demo/CN=Insta Demo CA" # or set srvcert or issuer
ignore_keyusage = 1 # potentially needed quirk
unprotected_errors = 1 # potentially needed quirk
extracertsout = insta.extracerts.pem

# Client authentication
ref = 3078 # user identification
secret = pass:insta # can be used for both client and server side

# Generic message options
cmd = ir # default operation, can be overridden on cmd line with, e.g., kur

# Certificate enrollment
subject = "/CN=openssl-cmp-test"
newkey = insta.priv.pem
out_trusted = apps/insta.ca.crt # does not include keyUsage digitalSignature
certout = insta.cert.pem

[pbm] # Password-based protection for Insta CA
# Server and client authentication
ref = $insta::ref # 3078
secret = $insta::secret # pass:insta

[signature] # Signature-based protection for Insta CA
# Server authentication
trusted = $insta::out_trusted # apps/insta.ca.crt

# Client authentication
secret = # disable PBM
key = $insta::newkey # insta.priv.pem
cert = $insta::certout # insta.cert.pem

[ir]
cmd = ir

[cr]
cmd = cr

[kur]
# Certificate update
cmd = kur
oldcert = $insta::certout # insta.cert.pem

[rr]
# Certificate revocation
cmd = rr
oldcert = $insta::certout # insta.cert.pem

[ v3_req ]
subjectAltName = @alt_names
# 这里是重点,需要将里面配置为最终服务端需要的域名或者IP
# 这里可以写多个,能够自行添加DNS.X = XXXXXX
[ alt_names ]
DNS.1 = xxx.com
DNS.2 = *.xxx.com
第三步通过CA机构证书对服务器证书进行签名认证
# 这里没有什么需要说的,本质上就是将签名请求文件进行签名最终得到服务器的公钥
openssl x509 -req -extfile openssl.cnf -extensions v3_req -in server.req -out server.cer -CAkey myCA.key -CA myCA.cer -days 36500 -CAcreateserial -CAserial serial
PS:按照前面说的,上面这个命令也要修改, 修改后如下:
- 执行命令5:
openssl x509 -req -extfile openssl.cnf -extensions v3_req -in server.req -out server.cer -CAkey myCA.key -CA myCA.cer -sha384 -days 36500 -CAcreateserial -CAserial serial第四步部署证书
这里应该没有什么需要说的了,我们通过Nginx部署,最终得到server.key就是秘钥,server.cer文件就是公钥只需要配置给Nginx就行了。
PS:还是贴个图吧
    server {
        listen       443 ssl;
		http2 on;
        server_name  xxx.com;

        # 注意路径用你真实的路径,也支持绝对路径
		ssl_certificate      ssl/server.cer;
		ssl_certificate_key  ssl/server.key;
		ssl_protocols TLSv1.2 TLSv1.3;
    }
3.信任CA机构证书
如果通过Windows域控创建的CA证书,其证书本身通过组策略便可以给每一个域下计算机添加机构信任。如果你没有域控只是通过openssl创建的CA证书也没有关系,只需要将CA证书的公钥(myCA.cer文件)导入到系统信任的根证书颁发机构里面就行了:
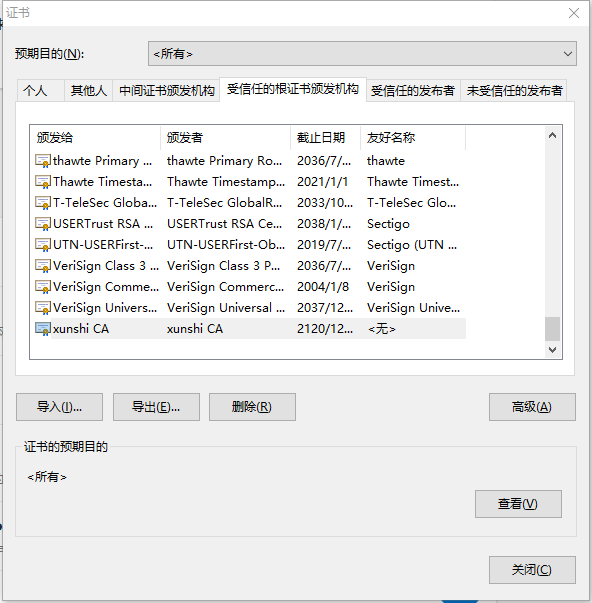
这个界面在windows的internet选型->内容->证书可以打开,导入即可,也可以直接双击cer文件进行证书安装,最终不光是windows系统,任何操作系统都可以安装证书来进行对CA机构的进行信任操作。
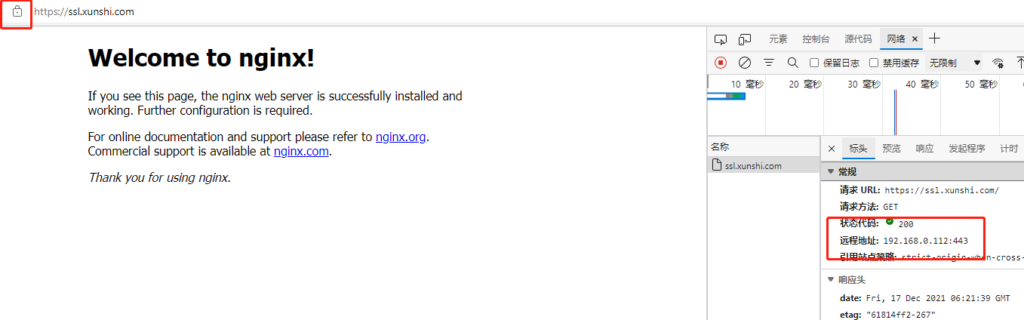
在对证书进行信任之后通过https打开浏览器进入内网DNS或者host配置的域名便可以得到没有任何警告的内容的安全连接:
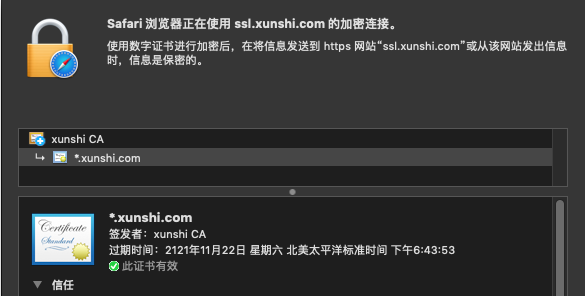
如果是Mac系统访问逻辑也是一样的通过安装CA证书并且在钥匙串内添加信任之后依然可以正常访问:
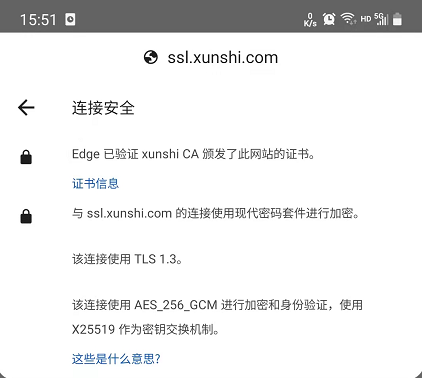
在Android手机上也是一样,安装并且信任证书之后可以正常访问:
4.总结
本来对我对https的认证逻辑其实理解没有多深入,以前也只是用过SSL证书进行TCP传输加密而已,经过对openssl的学习现在至少在理解上达到了及格水平,不过这次学习论证与探索的过程我个人极其不愉快,本来这东西在有了理解之后大家都看得出来不是什么很难的东西,事实上我也只用了一天半就搞定了。但是网上充斥大量垃圾内容,不光没有什么正向内容甚至不少内容还TM起了误导的作用,整个中文互联网检索体系下就没有找到一篇文章稍微详细描述整个搭建逻辑与流程,简直了,最终我只能从https原理和openssl的官方文档开始看起,过于离谱了。基本上可以得到一个结论现在天天写一些所谓干货的博主简直就是滥竽充数,其内容千篇一律大多数也是抄袭来的基本上什么都没有说清楚简直浪费时间。
最后说一下https的原理,在解释清楚之后其实不是绝对上的安全,结合本文各位可以想一下怎样去伪造一个页面出来?假设我是黑客来搞入侵其实只需要一个小小的脚本就可以了,我们自行制作CA和服务证书之后,通过修改HOST文件对域名解析进行劫持将其引导到我们自己的服务器,然后将我们自己制作CA证书注入目标电脑的受信任证书组,这样一来对于被入侵者已经看到是安全连接但是其请求已经被我们拦截了。所以各位不要看到https就以为安全了,一旦你的电脑本身就被入侵了那么https也是形同虚设的,所以在执行高风险操作的时候最好还是点开站点的证书看看对应的CA机构是不是被修改过。

有“AI”的1024 = 2048,欢迎大家加入2048 AI社区
更多推荐


 15
15 0
0- 0


 已为社区贡献1条内容

所有评论(0)