debian12安装后的一些设置
之前在家里捣鼓的都是CentOS,后来听说停止维护了,这次安装Debian系统,由于是第一次安装,遇到了一些奇奇怪怪的问题,这里记录一下。
之前在家里捣鼓的都是CentOS,后来听说停止维护了,这次安装Debian系统,由于是第一次安装,遇到了一些奇奇怪怪的问题,这里记录一下
1. 开启root登录
由于我是安装的带GUI界面的,我在安装后发现和CentOS不同的一点是使用root用户无法在GUI界面上登录,查询资料才发现为了安全着想默认是无法使用root登录的,需要手动开启
- 普通用户登录进系统之后打开终端使用
su root命令切换到root vi /etc/gdm3/daemon.conf修改daemon.conf文件,在 [security] 下面添加AllowRoot=true保存退出vi /etc/pam.d/gdm-password修改gdm-password文件,将auth required pam_succeed_if.so user != root quiet_success注释掉
其实这时已经可以使用root登录系统了,但是不知道为什么在使用root登录的时候无法打开终端,但是切换普通用户登录就可以,如果你也遇到了这个问题可以按下面方式操作
使用root登录系统之后找到/root/.profile文件 注释最后两行即可
# Installed by Debian Installer:"
#  no localization for root because zh_CN.UTF-8"
#  cannot be properly displayed at the Linux console"
#LANG=C
#LANGUAGE=C
然后就完成了
2. 切换镜像源
默认源更新下载软件包比较慢,可能服务器在国外吧,这里切换成国内的源即可,我这里是换的清华源
清华源地址
按说明照做即可,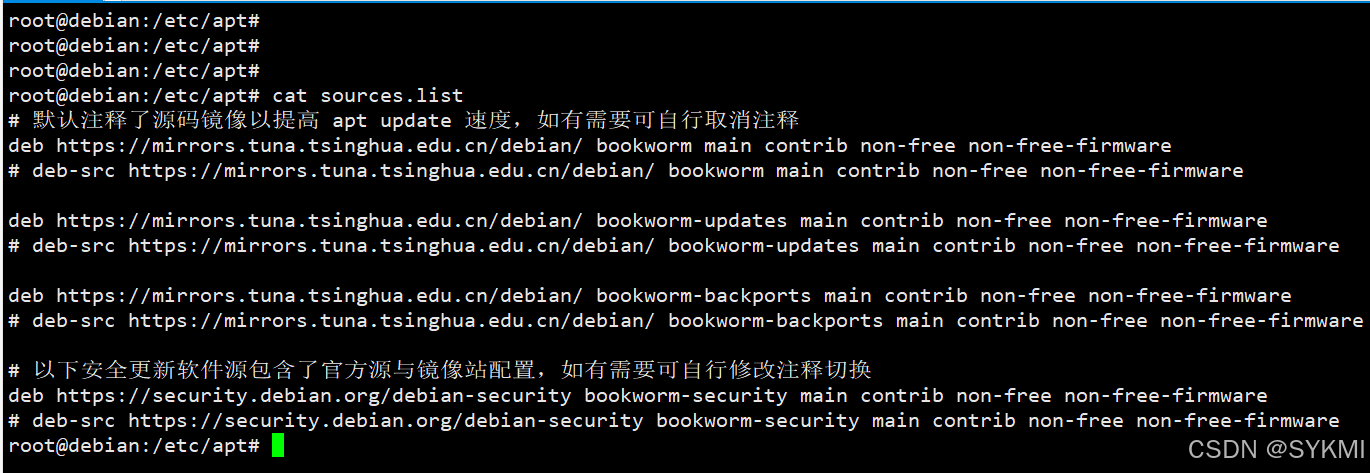
在修改前记得备份下source.list
切换完成可以更新下软件包 apt-get update/upgrade
3. 安装SSH
我在安装系统的时候没有选择SSH服务,这里需要安装一下
- sudo systemctl status sshd查看安装了SSH没有
- 如果没有则键入命令安装
sudo apt-get install openssh-server,安装完成之后找到/etc/ssh/sshd_config文件去编辑内容,将PermitRootLogin和PasswordAuthentication改为yes并放开注释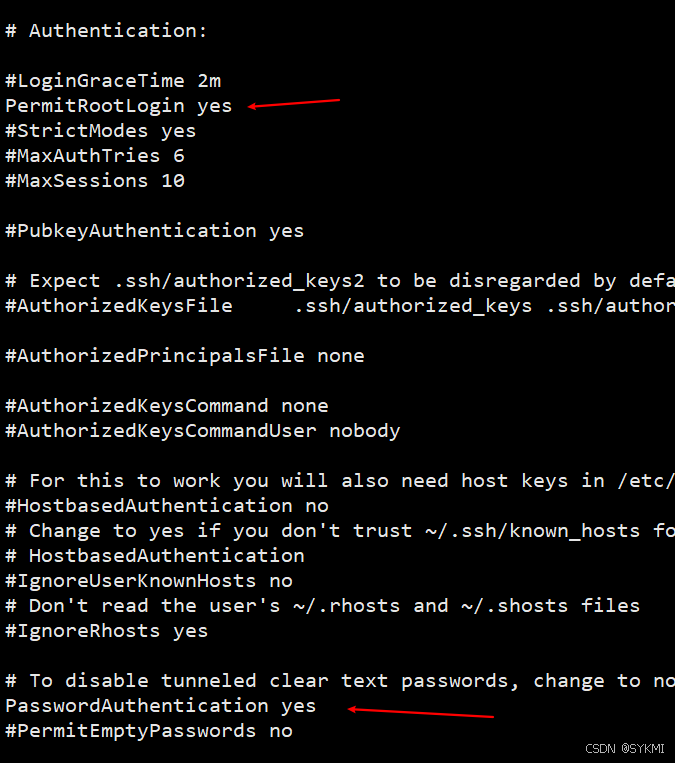
- 最后启动SSH服务即可
我这里已经安装完成并运行了,所以是运行中的状态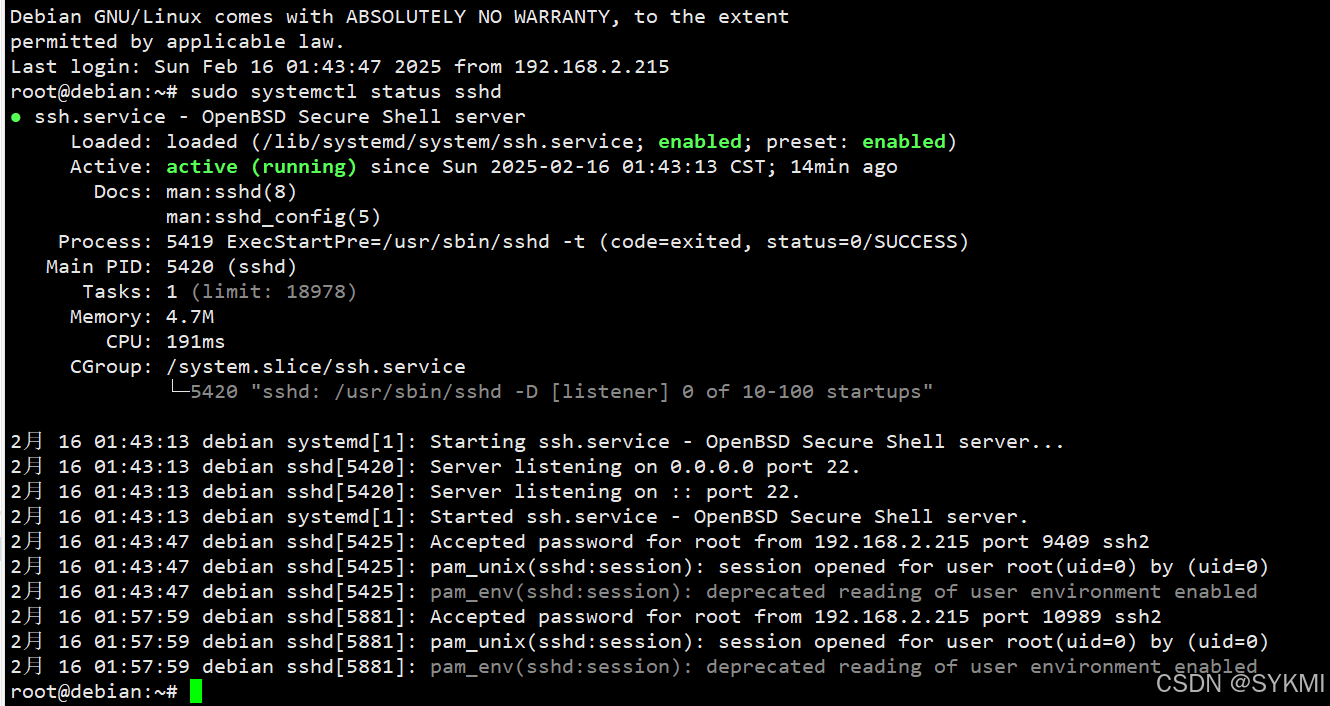
4. 关闭休眠模式
Debian系统和CentOS感觉不太一样,我开启SSH之后确实可以远程登录,但是十几分钟就断开了,主机进入了低功耗模式,休眠了,好像是Debian系统的默认设置,你动动鼠标或按一下开机键就重新运行了,这个休眠要关掉,不然麻烦死
操作系统级别,关闭休眠模式:
systemctl status sleep.target
- 显示休眠模式开启的状态:

- 关闭休眠模式:root用户 或者 sudo执行
systemctl mask sleep.target suspend.target hibernate.target hybrid-sleep.target
关闭之后再次查看-服务已经被屏蔽
使用段时间发现上述的配置虽然确实可以关闭休眠模式,但是在SSH连接时还是会发出The system will suspend now!的警告,只是并不会真的进入休眠状态,这样的体验也不算好,查询资料地址发现可能我们只是禁止了系统休眠的功能,但是系统并不知道,还是会照常发出提示,只是无法进入休眠状态了。按照别人给出的解决方案,我们做如下操作:sudo mkdir -p /etc/systemd/sleep.conf.d/ --创建/sleep.conf.d文件夹vi /etc/systemd/sleep.conf.d/customer-sleep.conf --在该文件夹下新建配置文件
填入以下内容
[Sleep]
AllowSuspend=no
AllowHibernation=no
AllowSuspendThenHibernate=no
AllowHybridSleep=no
最后重启系统
关于为何自己新建的配置文件会被系统检测到,我查看了原本的配置文件的描述
root@debian:/# cat /etc/systemd/sleep.conf
#  This file is part of systemd.
#
#  systemd is free software; you can redistribute it and/or modify it under the
#  terms of the GNU Lesser General Public License as published by the Free
#  Software Foundation; either version 2.1 of the License, or (at your option)
#  any later version.
#
# Entries in this file show the compile time defaults. Local configuration
# should be created by either modifying this file, or by creating "drop-ins" in
# the sleep.conf.d/ subdirectory. The latter is generally recommended.
# Defaults can be restored by simply deleting this file and all drop-ins.
#
# See systemd-sleep.conf(5) for details.

[Sleep]
#AllowSuspend=yes
#AllowHibernation=yes
#AllowSuspendThenHibernate=yes
#AllowHybridSleep=yes
#SuspendMode=
#SuspendState=mem standby freeze
#HibernateMode=platform shutdown
#HibernateState=disk
#HybridSleepMode=suspend platform shutdown
#HybridSleepState=disk
#HibernateDelaySec=
#SuspendEstimationSec=60min
以下是描述的翻译,看完就明白了
此文件是systemd的一部分。
systemd是自由软件;您可以在自由软件基金会发布的GNU较宽松通用公共许可证(GNU Lesser General Public
License)的条款下重新分发和/或修改它。该许可证的版本可以是2.1版,或者(根据您的选择)任何后续版本。此文件中的条目显示的是编译时的默认值。本地配置应该通过修改此文件或在sleep.conf.d/子目录中创建“附加配置文件”(drop-ins)来创建。通常推荐使用后者。通过简单地删除此文件和所有附加配置文件,可以恢复默认值。
有关详细信息,请参阅systemd-sleep.conf(5)手册页
5. 设置静态IP
- 查看网卡名称 ip address / ipconfig 我的是enp0s31f6
root@debian:~# ip address
1: lo: <LOOPBACK,UP,LOWER_UP> mtu 65536 qdisc noqueue state UNKNOWN group default qlen 1000
    link/loopback 00:00:00:00:00:00 brd 00:00:00:00:00:00
    inet 127.0.0.1/8 scope host lo
       valid_lft forever preferred_lft forever
    inet6 ::1/128 scope host noprefixroute
       valid_lft forever preferred_lft forever
2: enp0s31f6: <BROADCAST,MULTICAST,UP,LOWER_UP> mtu 1500 qdisc fq_codel state UP group default qlen 1000
    link/ether 6c:4b:90:1e:4c:46 brd ff:ff:ff:ff:ff:ff
    inet 192.168.2.100/24 brd 192.168.2.255 scope global enp0s31f6
       valid_lft forever preferred_lft forever
    inet6 fe80::6e4b:90ff:fe1e:4c46/64 scope link
       valid_lft forever preferred_lft forever
3: wlp2s0: <BROADCAST,MULTICAST> mtu 1500 qdisc noop state DOWN group default qlen 1000
    link/ether ce:ac:49:b9:1a:c7 brd ff:ff:ff:ff:ff:ff permaddr 50:76:af:7c:05:b5
-
编辑配置文件
vi /etc/network/interfaces(先备份一份文件),由于我已经配置完成了,这里看下内容,红框标出的是新添加的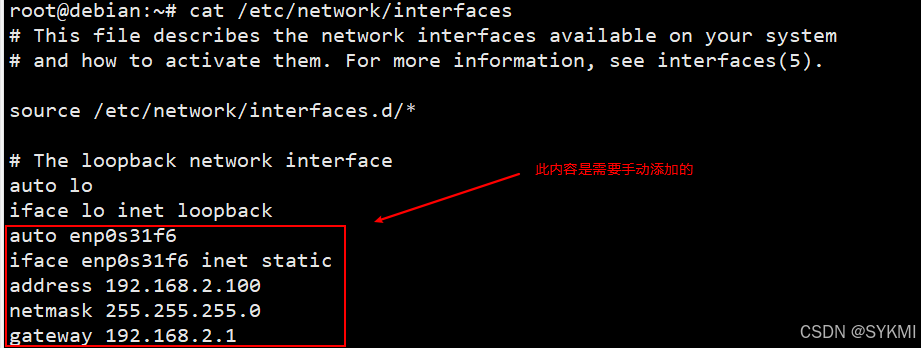
-
配置DNS
vi /etc/resolv.conf(备份一下,如果没有就新建一个该文件)
添加nameserver
root@debian:~# cat /etc/resolv.conf
# Generated by NetworkManager
search lan
# DNS
nameserver 114.114.114.114
nameserver 8.8.8.8
配置完成后reboot重启,然后使用新IP地址连接即可。
或者使用下面第二个方法
root@debian:/etc# nmcli connection
NAME                UUID                                  TYPE      DEVICE
lo                  17b298f4-217d-456f-9664-af39aeb2e71c  loopback  lo
QWERTY-5G           7628a577-c263-4494-b78e-fd2b93557421  wifi      --
Wired connection 1  92774f3a-06e6-4e14-827f-4a802299d15f  ethernet  --
我的是网线连接,所以是Wired connection 1,使用下面命令指定DNS
nmcli connection modify Wired\ connection\ 1 ipv4.dns '114.114.114.114 8.8.8.8'
查看
root@debian:/etc# nmcli connection show Wired\ connection\ 1 | grep 'ipv4.dns'
ipv4.dns:                               114.114.114.114,8.8.8.8
ipv4.dns-search:                        --
ipv4.dns-options:                       --
ipv4.dns-priority:                      0
OK
5. 配置防火墙
Debian12默认是没有防火墙的,我这里简易配置下UFW防火墙
- 安装ufw
sudo apt-get install ufw - 查看ufw状态
sudo ufw status
root@debian:~# sudo ufw status
Status: inactive
发现默认未打开服务,我们开启ufw服务 sudo ufw enable ,这里注意下,如果你是通过ssh连接到主机的,在开启服务之前最好开放一下ssh默认端口22或者是你设置的其他端口sudu ufw allow 22/tcp,防止开启服务后连接断开,开启服务后再次查看状态(如果你开放22端口后开启服务提示Command may disrupt existing ssh connections. Proceed with operation (y|n)? 不用管,直接y同意,这个只是警告你可能会断开ssh服务)
root@debian:~# sudo ufw status
Status: active

To                         Action      From
--                         ------      ----
22/tcp                     ALLOW       Anywhere
22/tcp (v6)                ALLOW       Anywhere (v6)
可以看到已经开放了22端口。到这一步基本就已经完成了,如果你需要设置其他的端口开放与否(MySQL3306、网页80/443啥的),可以自行设定,设定完使用sudo ufw reload重启防火墙查看是否生效
关闭防火墙sudo ufw disable

有“AI”的1024 = 2048,欢迎大家加入2048 AI社区
更多推荐
 11
11 0
0- 0


 已为社区贡献3条内容

所有评论(0)