Latex插入以及引用图片,和图片的相关操作
将图片放置在页面当前位置(h)(非强制性的),页面的顶部(t),或者在页面的底部(b),或者单独放置在一页(p)在 LaTeX 中导入图片通常使用 graphicx 宏包中的。我的tex和imgs同级,1.jpg在imgs里面。或者提取图片的路径,编辑器将会自己搜索。trim必须和clip一起用才会生效。多个操作用英文逗号间隔。
·
1 导入宏包
在 LaTeX 中导入图片通常使用 graphicx 宏包中的 \includegraphics 命令。
\usepackage{graphicx}
2 导入图片
我的tex和imgs同级,1.jpg在imgs里面。
\begin{figure}[h]
  \centering
  \includegraphics[width=0.5\textwidth]{imgs/1} %后面写图片路径,基本路径或者相对路径。直接写图片名字,不需要后缀
  \caption{示例图片}
  \label{exampleId}
\end{figure}

%图片引用
图\ref{exampleId}
将图片放置在页面当前位置(h)(非强制性的),页面的顶部(t),或者在页面的底部(b),或者单独放置在一页(p)
设置图片路径
或者提取图片的路径,编辑器将会自己搜索
\documentclass[UTF8]{article}
\usepackage{CTEX}
\usepackage{graphicx}
\graphicspath{ {imgs} }
%\graphicspath{ {imgs} {imgs1} } %多个图片路径声明
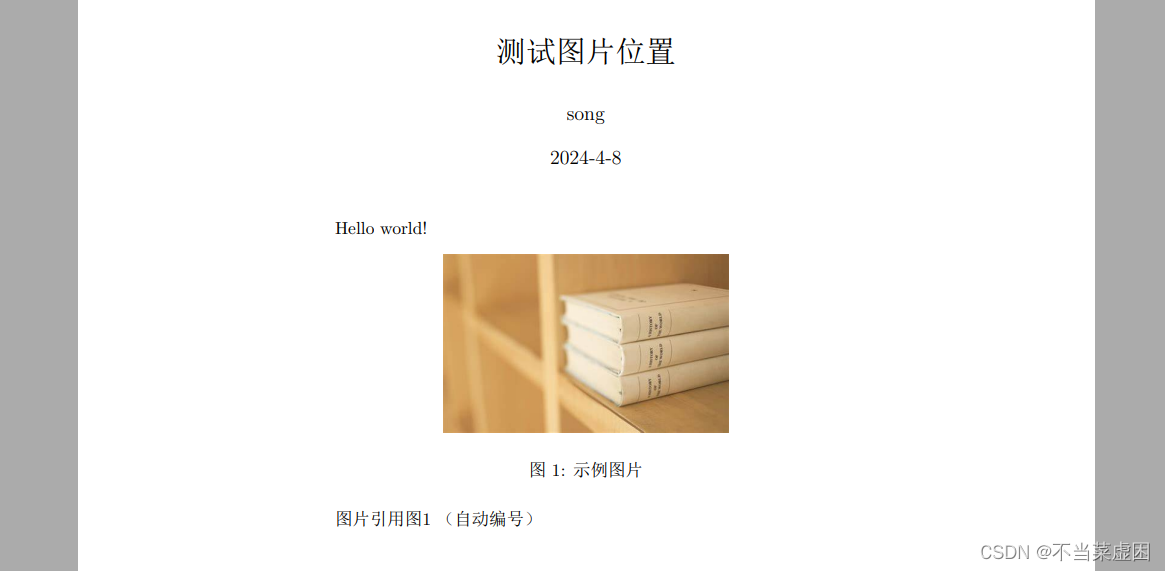
\title{测试图片位置}
\author{song}
\date{2024-4-8}
\begin{document}
\maketitle
Hello world!
\begin{figure}[h]
\centering
\includegraphics[width=0.5\textwidth]{1} % 直接写图片名字,不需要后缀
\caption{示例图片}
\label{exampleId}
\end{figure}
图片引用 图\ref{exampleId} (自动编号)
\end{document}
3 图片引用
%图片引用
\ref{exampleId}
4 相关操作
多个操作用英文逗号间隔
大小
宽度相关参数
| 单位 | 意义 | 单位 | 意义 |
|---|---|---|---|
| \textwidth | 栏宽 | \textheight | 栏高 |
| \linewidth | 行宽 | \columnwidth | 列宽 |
| \oddsidemargin | 奇数页页边距宽度 | \evensidemargin | 偶数页页边距宽度 |
| \marginparwidth | 边注的宽度 | \marginparsep | 边注与正文之间的间距 |
| \paperwidth | 纸张的宽度 |
\includegraphics[width=0.5\textwidth]{1}
\includegraphics[height=0.2\textheight]{1}
\includegraphics[width=0.5\textwidth,height=0.2\textheight]{1}
旋转
\includegraphics[angle=45]{1}   % 逆时针旋转45度
\includegraphics[angle=-45]{1}  % 顺时针旋转45度
裁剪
trim必须和clip一起用才会生效
trim = <left> <bottom> <right> <top>, clip
\includegraphics[width=0.5\textwidth, trim=2cm 4cm 2cm 2cm, clip]{1}

有“AI”的1024 = 2048,欢迎大家加入2048 AI社区
更多推荐
 5
5 0
0- 0


 已为社区贡献3条内容

所有评论(0)