【GAMES101】作业2(提高)(附带解决黑边问题)
作业描述在上次作业中,虽然我们在屏幕上画出一个线框三角形,但这看起来并不是那么的有趣。所以这一次我们继续推进一步——在屏幕上画出一个实心三角形,换言之,栅格化一个三角形。上一次作业中,在视口变化之后,我们调用了函数rasterize_wireframe(const Triangle& t)。但这一次,你需要自己填写并调用函数 rasterize_triangle(const Triangl
作业描述
在上次作业中,虽然我们在屏幕上画出一个线框三角形,但这看起来并不是那么的有趣。所以这一次我们继续推进一步——在屏幕上画出一个实心三角形,换言之,栅格化一个三角形。上一次作业中,在视口变化之后,我们调用了函数rasterize_wireframe(const Triangle& t)。但这一次,你需要自己填写并调用函数 rasterize_triangle(const Triangle& t)。该函数的内部工作流程如下:
- 创建三角形的 2 维 bounding box。
- 遍历此 bounding box 内的所有像素(使用其整数索引)。然后,使用像素中 心的屏幕空间坐标来检查中心点是否在三角形内。
- 如果在内部,则将其位置处的插值深度值 (interpolated depth value) 与深度 缓冲区 (depth buffer) 中的相应值进行比较。
- 如果当前点更靠近相机,请设置像素颜色并更新深度缓冲区 (depth buffer)。 你需要修改的函数如下:
• rasterize_triangle(): 执行三角形栅格化算法
• static bool insideTriangle(): 测试点是否在三角形内。你可以修改此函数的定义,这意味着,你可以按照自己的方式更新返回类型或函数参数。因为我们只知道三角形三个顶点处的深度值,所以对于三角形内部的像素,我们需要用插值的方法得到其深度值。我们已经为你处理好了这一部分,因为有关这方面的内容尚未在课程中涉及。插值的深度值被储存在变量 z_interpolated中。
请注意我们是如何初始化 depth buffer 和注意 z values 的符号。为了方便同学们写代码,我们将 z 进行了反转,保证都是正数,并且越大表示离视点越远。
在此次作业中,你无需处理旋转变换,只需为模型变换返回一个单位矩阵。最后,我们提供了两个 hard-coded 三角形来测试你的实现,如果程序实现正确,你将看到如下所示的输出图像: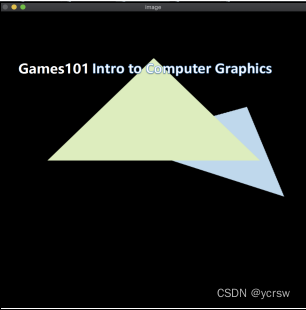
解
insideTriangle 判断是否在三角形内
static bool insideTriangle(int x, int y, const Vector3f* _v)
{
    // TODO : Implement this function to check if the point (x, y) is inside the triangle represented by _v[0], _v[1], _v[2]
    std::vector<Vector3f> ver, ver2;

    ver.push_back({_v[1].x()-_v[0].x(),_v[1].y()-_v[0].y(),0}); ver2.push_back({x-_v[0].x(),y-_v[0].y(),0});
    ver.push_back({_v[2].x()-_v[1].x(),_v[2].y()-_v[1].y(),0}); ver2.push_back({x-_v[1].x(),y-_v[1].y(),0});
    ver.push_back({_v[0].x()-_v[2].x(),_v[0].y()-_v[2].y(),0}); ver2.push_back({x-_v[2].x(),y-_v[2].y(),0});//对应存储接下来要进行叉乘的向量

    for(int i=0;i<3;i++){//逆时针叉乘,因为右手定则,只要有一个叉乘结果z坐标为负,则说明在三角形外
        if(ver[i].cross(ver2[i]).z() < 0)
            return false;
    }
    return true;
}
rasterize_triangle 三角形光栅化
//Screen space rasterization
void rst::rasterizer::rasterize_triangle(const Triangle& t) {
    auto v = t.toVector4();
    float alpha, beta, gamma, lmin=INT_MAX, rmax=INT_MIN, tmax=INT_MIN, bmin=INT_MAX;
    // TODO : Find out the bounding box of current triangle.
    for(auto &k:v){//找到bounding box的边界坐标
        lmin = int(std::min(lmin,k.x()));
        rmax = std::max(rmax,k.x());rmax = rmax == int(rmax) ? int(rmax)-1 : rmax;
        tmax = std::max(tmax,k.y());tmax = tmax == int(tmax) ? int(tmax)-1 : tmax;
        bmin = int(std::min(bmin,k.y()));
    }
    // iterate through the pixel and find if the current pixel is inside the triangle
    for(float i = lmin; i <= rmax; i++){//遍历bounding box像素
        for(float j = bmin; j <= tmax; j++){
            if(insideTriangle(i, j, t.v)){//如果在三角形内
                // If so, use the following code to get the interpolated z value.
                std::tie(alpha, beta, gamma) = computeBarycentric2D(i+0.5, j+0.5, t.v);//对当前像素坐标z值插值

                float w_reciprocal = 1.0/(alpha / v[0].w() + beta / v[1].w() + gamma / v[2].w());
                float z_interpolated = alpha * v[0].z() / v[0].w() + beta * v[1].z() / v[1].w() + gamma * v[2].z() / v[2].w();
                z_interpolated *= w_reciprocal;
                if(-z_interpolated < depth_buf[get_index(i,j)]){//如果当前z值比像素z值小(这里是把z值换成正数比较的)
                    // TODO : set the current pixel (use the set_pixel function) to the color of the triangle (use getColor function) if it should be painted.
                    set_pixel({i,j,1},t.getColor());
                    depth_buf[get_index(i,j)] = -z_interpolated;//设置像素颜色,修改像素当前深度
                }
            }
        }
    }
}
rasterize_triangle(MSAA) 超采样光栅化
(注意:使用MSAA时要将insideTriangle函数的参数类型从int改为float型,否则传入的采样点坐标会无效)
//Screen space rasterization
void rst::rasterizer::rasterize_triangle(const Triangle& t) {
    auto v = t.toVector4();
    std::vector<float> a{0.25,0.25,0.75,0.75,0.25};
    float alpha, beta, gamma, lmin=INT_MAX, rmax=INT_MIN, tmax=INT_MIN, bmin=INT_MAX, mindep = INT_MAX, count = 0;
    // TODO : Find out the bounding box of current triangle.
    for(auto &k:v){//找到bounding box的边界坐标
        lmin = int(std::min(lmin,k.x()));
        rmax = std::max(rmax,k.x());rmax = rmax == int(rmax) ? int(rmax)-1 : rmax;
        tmax = std::max(tmax,k.y());tmax = tmax == int(tmax) ? int(tmax)-1 : tmax;
        bmin = int(std::min(bmin,k.y()));
    }
    // iterate through the pixel and find if the current pixel is inside the triangle
    for(float i = lmin; i <= rmax; i++){//遍历bounding box像素
        for(float j = bmin; j <= tmax; j++){
            count = 0;
            for(int k = 0; k < 4; k++){{//遍历像素的每个样本
                if(insideTriangle(i+a[k], j+a[k+1], t.v)){//如果样本在三角形内
                    // If so, use the following code to get the interpolated z value.
                    std::tie(alpha, beta, gamma) = computeBarycentric2D(i+a[k], j+a[k+1], t.v);
                    float w_reciprocal = 1.0/(alpha / v[0].w() + beta / v[1].w() + gamma / v[2].w());
                    float z_interpolated = alpha * v[0].z() / v[0].w() + beta * v[1].z() / v[1].w() + gamma * v[2].z() / v[2].w();
                    z_interpolated *= w_reciprocal;
                    mindep = std::min(mindep, -z_interpolated);
                    count += 0.25;
                }
            }
            if(count > 0 && mindep < depth_buf[get_index(i,j)]){//如有在三角形内的采样点,而且它们的最小深度比该像素点深度靠前,计算该像素点的颜色,更改它的深度
				// TODO : set the current pixel (use the set_pixel function) to the color of the triangle (use getColor function) if it should be painted.
				set_pixel({i,j,1},t.getColor() * count);
				depth_buf[get_index(i,j)] = mindep;
			}
		}
    }
}
效果
基础

MSAA
可以看到,经过超采样以后反走样对边界的优化效果有很明显的体现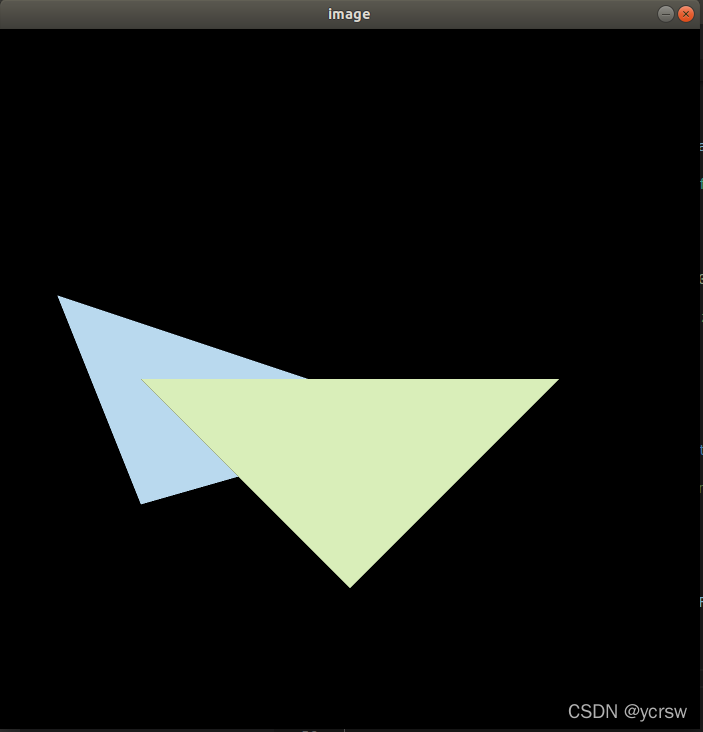
黑边解决
分析
反走样成功了,但是我们发现,在两个三角形的边界处出现了明显的黑边:
猜测是因为颜色设置的问题,回顾之前颜色设置部分的代码:
if(count > 0 && mindep < depth_buf[get_index(i,j)]){//如有在三角形内的采样点,而且它们的最小深度比该像素点深度靠前,计算该像素点的颜色,更改它的深度
	// TODO : set the current pixel (use the set_pixel function) to the color of the triangle (use getColor function) if it should be painted.
	set_pixel({i,j,1},t.getColor() * count);
	depth_buf[get_index(i,j)] = mindep;
}
可以看到,根据判断条件,对应像素的颜色其实是根据当前像素点被当前三角形覆盖率来决定的,但是看到两个三角形交界处,如果靠前的三角形只覆盖了该像素的1/4,剩下3/4应该是被另一个三角形覆盖的,但是因为深度不够没能覆盖这个像素的颜色,这样如果单纯把颜色设置为原来的1/4的话,就会更靠近背景的黑色了,所以才出现了黑边,这不符合我们采样的目的,所以像素的最终颜色应该根据之前求得的每个样本的颜色深度计算才对,接下来看到作业要求中的提示: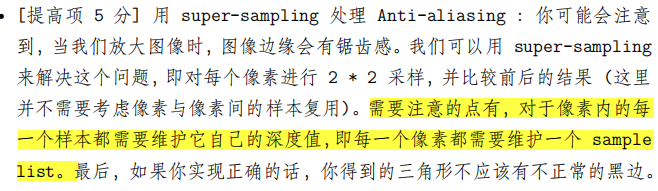
那么接下来要做的事就很清楚了,我们新建立两个样本表,记录所有像素中的样本的深度值和颜色(因为是2*2采样,所以大小是像素深度、颜色表的4倍),最后每个像素的颜色就应该是这四个样本求得的颜色的平均,深度就应该是样本中最小的,这样就不会导致因rgb过小产生的黑边了:
代码
rasterizer.hpp 头文件内定义样本深度、颜色表
namespace rst
{
	...
	private:
		std::vector<Eigen::Vector3f> frame_sample;
		std::vector<float> depth_sample;
	...
}
rasterizer(int w, int h) : width(w), height(h) 定义样本深度、颜色表大小
rst::rasterizer::rasterizer(int w, int h) : width(w), height(h)
{
    frame_buf.resize(w * h);
    depth_buf.resize(w * h);
    frame_sample.resize(w * h * 4);
    depth_sample.resize(w * h * 4);
}
clear(rst::Buffers buff) 初始化样本深度、颜色表
void rst::rasterizer::clear(rst::Buffers buff)
{
    if ((buff & rst::Buffers::Color) == rst::Buffers::Color)
    {
        std::fill(frame_buf.begin(), frame_buf.end(), Eigen::Vector3f{0, 0, 0});
        std::fill(frame_sample.begin(), frame_sample.end(), Eigen::Vector3f{0, 0, 0});
    }
    if ((buff & rst::Buffers::Depth) == rst::Buffers::Depth)
    {
        std::fill(depth_buf.begin(), depth_buf.end(), std::numeric_limits<float>::infinity());
        std::fill(depth_sample.begin(), depth_sample.end(), std::numeric_limits<float>::infinity());
    }
}
rasterize_triangle(MSAA) 去黑边超采样
//Screen space rasterization
void rst::rasterizer::rasterize_triangle(const Triangle& t) {
    auto v = t.toVector4();
    std::vector<float> a{0.25,0.25,0.75,0.75,0.25};
    Vector3f color; //color at each vertex;
    float alpha, beta, gamma, lmin=INT_MAX, rmax=INT_MIN, tmax=INT_MIN, bmin=INT_MAX, mindep = INT_MAX, count = 0, eid;
    // TODO : Find out the bounding box of current triangle.
    for(auto &k:v){//找到bounding box的边界坐标
        lmin = int(std::min(lmin,k.x()));
        rmax = std::max(rmax,k.x());rmax = rmax == int(rmax) ? int(rmax)-1 : rmax;
        tmax = std::max(tmax,k.y());tmax = tmax == int(tmax) ? int(tmax)-1 : tmax;
        bmin = int(std::min(bmin,k.y()));
    }
    // iterate through the pixel and find if the current pixel is inside the triangle
    for(float i = lmin; i <= rmax; i++){
        for(float j = bmin; j <= tmax; j++){//遍历bounding box像素
            count = 0; mindep = INT_MAX, eid = get_index(i,j)*4;
            for(int k = 0; k < 4; k++){//遍历像素的每个样本
                if(insideTriangle(i+a[k], j+a[k+1], t.v)){//如果样本在三角形内
                    // If so, use the following code to get the interpolated z value.
                    std::tie(alpha, beta, gamma) = computeBarycentric2D(i+a[k], j+a[k+1], t.v);
                    float w_reciprocal = 1.0/(alpha / v[0].w() + beta / v[1].w() + gamma / v[2].w());
                    float z_interpolated = alpha * v[0].z() / v[0].w() + beta * v[1].z() / v[1].w() + gamma * v[2].z() / v[2].w();
                    z_interpolated *= w_reciprocal;
                    if (-z_interpolated < depth_sample[eid + k]){//如果该样本的深度更小,更新样本深度、颜色表
                        depth_sample[eid + k] = -z_interpolated;
                        frame_sample[eid + k] = t.getColor() / 4;//这里直接除以4,之后就不用再除了,直接四个样本颜色相加即可保证光强不变
                    }
                    mindep = std::min(depth_sample[eid + k], mindep);
                }
            }
            // TODO : set the current pixel (use the set_pixel function) to the color of the triangle (use getColor function) if it should be painted.
            color = frame_sample[eid] + frame_sample[eid + 1] + frame_sample[eid + 2] + frame_sample[eid + 3];
            set_pixel({i,j,1}, color);
            depth_buf[get_index(i,j)] = std::min(depth_buf[get_index(i,j)], mindep);
        }
    }
}
附件
附上源代码,有兴趣的朋友可以自己尝试一下效果:
CSDN:【GAMES101】作业2(提高)(附带解决黑边问题)
GITHUB:【GAMES101】作业合集

有“AI”的1024 = 2048,欢迎大家加入2048 AI社区
更多推荐


 23
23 0
0- 0


 已为社区贡献3条内容

所有评论(0)