【MySQL】学习笔记(五)—— java操作数据库
mysql-connector-java-5.1.47.jar(导入)mysql是5.0版本的就用5.0开头的,是8.0版本的就用8.0开头的。一个程序是不能直接连接数据库的,需要数据库驱动才行,这个数据库驱动由数据库厂商去提供。一个程序如何去连接不同厂商生产的不同驱动都要程序员去学习,学习成本很大的!java连接mysql数据库需要3个jar包。程序员只需要去学习JDBC的接口就好了!没有什么是
一、数据库驱动和JDBC
一个程序是不能直接连接数据库的,需要数据库驱动才行,这个数据库驱动由数据库厂商去提供。
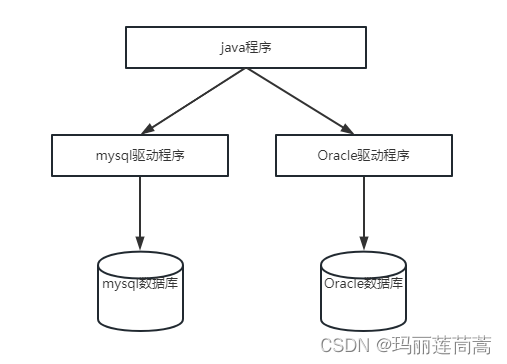
一个程序如何去连接不同厂商生产的不同驱动都要程序员去学习,学习成本很大的!
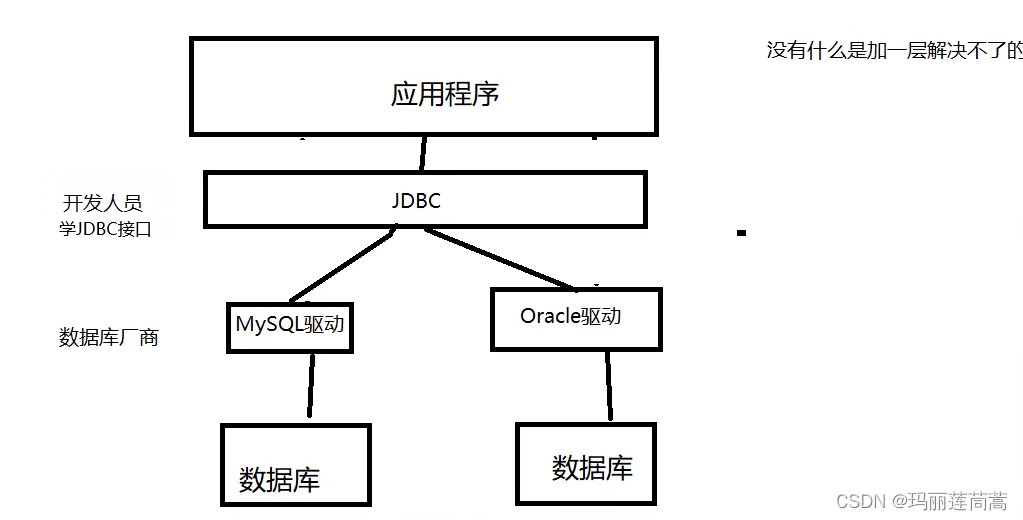
没有什么是加一层解决不了的!
Sun公司提供JDBC!
程序员只需要去学习JDBC的接口就好了!
二、java连接数据库——第一个JDBC程序
2.1 新建一个maven项目,导入jar包
java连接mysql数据库需要3个jar包
-
java.sql (自带)
-
javax.sql (自带)
-
mysql-connector-java-5.1.47.jar(导入)mysql是5.0版本的就用5.0开头的,是8.0版本的就用8.0开头的
        <dependency>
            <groupId>mysql</groupId>
            <artifactId>mysql-connector-java</artifactId>
            <version>5.1.47</version>
        </dependency>
2.2 新建数据库
CREATE DATABASE `jdbcStudy` CHARACTER SET utf8 COLLATE utf8_general_ci;

USE `jdbcStudy`;

CREATE TABLE `users`(
 `id` INT PRIMARY KEY,
 `NAME` VARCHAR(40),
 `PASSWORD` VARCHAR(40),
 `email` VARCHAR(60),
 birthday DATE
);

 INSERT INTO `users`(`id`,`NAME`,`PASSWORD`,`email`,`birthday`)
VALUES('1','zhangsan','123456','zs@sina.com','1980-12-04'),
('2','lisi','123456','lisi@sina.com','1981-12-04'),
('3','wangwu','123456','wangwu@sina.com','1979-12-04')
2.3 java程序连接数据库
import java.sql.*;

public class Demo01 {
    public static void main(String[] args) throws ClassNotFoundException, SQLException {
        //加载驱动,抛出ClassNotFound的异常
        Class.forName("com.mysql.jdbc.Driver");

        //连接数据库 1)url/主机地址 2)用户名 3)密码
            //背过后面的一串参数【?useUnicode=true&characterEncoding=utf8&useSSL=true】
        String url = "jdbc:mysql://localhost:3306/jdbcstudy?useUnicode=true&characterEncoding=utf8&useSSL=true";
        String username = "root";
        String password = "123456";
        Connection connection = DriverManager.getConnection(url, username, password); //获取数据库对象

        //获取执行SQL的对象
        Statement statement = connection.createStatement();

        //statement去执行SQL
        String sql = "SELECT * FROM users";
        ResultSet resultSet = statement.executeQuery(sql);
        while (resultSet.next()) {  //游标遍历
            System.out.print("id ="+ resultSet.getObject("id")+"  ");
            System.out.print("姓名 ="+ resultSet.getObject("NAME")+"  ");
            System.out.print("密码 ="+ resultSet.getObject("PASSWORD")+"  ");
            System.out.print("邮箱 ="+ resultSet.getObject("email")+"  ");
            System.out.println("生日 ="+ resultSet.getObject("birthday")+"  ");
        }

        //释放连接
        resultSet.close();
        statement.close();
        connection.close();
    }
}
执行结果
id =1  姓名 =zhangsan  密码 =123456  邮箱 =zs@sina.com  生日 =1980-12-04
id =2  姓名 =lisi  密码 =123456  邮箱 =lisi@sina.com  生日 =1981-12-04
id =3 姓名 =wangwu 密码 =123456 邮箱 =wangwu@sina.com 生日 =1979-12-04 注意01:只有select用executeQuery(),返回查找的结果集;insert和delete以及update一律用executeUpdate(),返回变动的记录数
//返回查询的结果集
ResultSet resultSet = statement.executeQuery(sql);
//返回插入、修改、删除操作改变的记录数
int i = statement.executeUpdate(sql);
//执行任何sql语句,安全性差,一般不用
boolean ifSuccess = statement.execute(sql);注意02:加载驱动有两种写法。
//写法(一) 不建议
DriverManager.registerDriver(new com.mysql.jdbc.Driver());

//写法(二)
Class.forName("com.mysql.jdbc.Driver");注意03:结果集ResultSet
//如果不知道属性是什么类型的数据,就用getObject()
resultSet.getObject("id");
//一般是知道属性类型的,直接指定类型
int name = resultSet.getInt("name");
String name1 = resultSet.getString("name");
Date name2 = resultSet.getDate("name");
boolean name3 = resultSet.getBoolean("name");
double name4 = resultSet.getDouble("name");

resultSet.next(); //游标遍历,移动到下一个
resultSet.beforeFirst(); //游标移动到最前面(比如已经遍历一遍了,此时游标指到最后一行,还想再遍历一遍
resultSet.afterLast(); //游标移动到最后面
resultSet.previous(); //游标移动到前一行
resultSet.absolute(row); //游标移动到指定行
2.4 把上面的代码封装一下
(1)配置文件
在上面的代码中,我们把mysql的登录信息直接写在代码里,这样是不好的,要解耦合到配置文件中。
我们在src文件夹下新建一个db.properties文件,注意等号左右不能有空格
driver=com.mysql.jdbc.Driver
url=jdbc:mysql://localhost:3306/jdbcstudy?useUnicode=true&characterEncoding=utf8&userSSL=true
username=root
password=123456
(2)封装工具类
和数据库建立连接、和数据库断开连接的操作我们直接写成工具类。
package com.test.demo02;

import java.io.FileInputStream;
import java.io.IOException;
import java.io.InputStream;
import java.sql.*;
import java.util.Properties;

public class jdbcUtils {
    private static String driver=null;
    private static String url=null;
    private static String username=null;
    private static String password=null;

    //jdbc只需要加载一次,所以我们写在静态代码块里,
    static{
        try {
            //先读取配置文件
            //InputStream inputStream = jdbcUtils.class.getClassLoader().getResourceAsStream("E:\\Java Project\\connectMysql\\src\\db.properties");
            FileInputStream inputStream = new FileInputStream("E:\\Java Project\\connectMysql\\src\\db.properties");
            if(inputStream == null){
                System.out.println("null");
            }
            Properties properties = new Properties();
            properties.load(inputStream);
            driver=properties.getProperty("driver");
            url=properties.getProperty("url");
            username=properties.getProperty("username");
            password=properties.getProperty("password");
            System.out.println(driver+ " "+url+" "+username+" "+password);
            //加载jdbc
            Class.forName(driver);
        } catch (IOException e) {
            e.printStackTrace();
        } catch (ClassNotFoundException e) {
            e.printStackTrace();
        }

    }

    //连接数据库,返回数据库对象
    public static Connection getConnection() throws SQLException {
        Connection connection = DriverManager.getConnection(url, username, password);
        return connection;
    }

    //断开数据库连接,释放资源
    public static void closeConnection(Connection conn, Statement statement, ResultSet resultSet){
        if(resultSet!=null){
            try {
                resultSet.close();
            } catch (SQLException e) {
                e.printStackTrace();
            }
        }
        if(statement != null){
            try {
                statement.close();
            } catch (SQLException e) {
                e.printStackTrace();
            }
        }

        if(resultSet !=null){
            try {
                conn.close();
            } catch (SQLException e) {
                e.printStackTrace();
            }
        }

    }
}
(3)增删改查.java
查找:
package com.test.demo02;

import java.sql.*;

public class QueryTest {
    public static void main(String[] args) {
        Connection connection = null;
        Statement statement =null;
        ResultSet resultSet = null;
        try {
            //建立数据库连接
            connection = jdbcUtils.getConnection();
            //执行sql
            statement = connection.createStatement();
            String sql = "SELECT * FROM users";
            resultSet = statement.executeQuery(sql);
            while(resultSet.next()){
                System.out.print("id ="+ resultSet.getInt("id")+"  ");
                System.out.print("姓名 ="+ resultSet.getString("NAME")+"  ");
                System.out.print("密码 ="+ resultSet.getString("PASSWORD")+"  ");
                System.out.print("邮箱 ="+ resultSet.getString("email")+"  ");
                System.out.println("生日 ="+ resultSet.getObject("birthday")+"  ");
            }

        } catch (SQLException throwables) {
            throwables.printStackTrace();

        }finally {//关闭资源必须写在finally里
            //断开数据库连接,释放资源
            jdbcUtils.closeConnection(connection,statement,resultSet);
        }


    }
}
更新:
package com.test.demo02;

import java.sql.*;

public class UpdateTest {
    public static void main(String[] args) {
        Connection connection = null;
        Statement statement =null;
        ResultSet resultSet = null;
        int num = 0;
        try {
            //建立数据库连接
            connection = jdbcUtils.getConnection();
            //执行sql
            statement = connection.createStatement();
            //String sql = "SELECT * FROM users";
            String sql = "UPDATE users SET `NAME`='1月29' WHERE `id`=1";
            num = statement.executeUpdate(sql);
            if(num>0){
                System.out.println("更新成功!");
            }

        } catch (SQLException throwables) {
            throwables.printStackTrace();

        }finally {//关闭资源必须写在finally里
            //断开数据库连接,释放资源
            jdbcUtils.closeConnection(connection,statement,resultSet);
        }


    }
}
插入、删除都是同样的代码,不写了
三、Statement对象和PreparedStatement对象
3.1 SQL注入
web安全攻击的一种。举两个易于理解的例子
例(1)攻击者输入用“;”隔开的用户名,“;”后面跟着删除、批量插入等语句,就可以删库或者插入大量记录造成数据库崩溃
例(2)利用OR 1=1把条件变成true
改用户名时,系统要求我们输入旧的用户名,我们输入“' OR 1=1 OR'”,就可以把所有用户的名字都改成“笨蛋们”。同理,密码也可以这样改
String oldName = "' OR 1=1 OR'";
String newName = "笨蛋们";
String sql = "UPDATE users SET `NAME`='"+newName+"' WHERE `NAME`='"+oldName+ "'";
那么如何防止sql注入呢?就是要写一套程序去检查用户输入的SQL语句有没有以上“漏洞”,可以理解为编译器的语法分析,检查完后/过滤后再去执行SQL语句。
3.2 用PreparedStatement对象替代statement对象可以防止sql注入攻击
插入:
package com.test.demo02;

import java.sql.*;

public class InsertTest {
    public static void main(String[] args) {
        Connection connection = null;
        PreparedStatement pStatement =null;  //!!!
        ResultSet resultSet = null;
        int num = 0;
        try {
            //建立数据库连接
            connection = jdbcUtils.getConnection();
            //创建prepareStatement对象执行sql语句
            //String sql = "INSERT INTO users(`id`,`NAME`,`PASSWORD`,`email`,`birthday`) VALUES(?,?,?,?,?)";  //用占位符?替代将来用户传入的参数
            String sql = "insert into users values(?,?,?,?,?)";
            pStatement = connection.prepareStatement(sql); //预编译SQL,先写sql,不执行

            //手动给参数赋值 index指明第几个?(规定index从1开始)
            pStatement.setInt(1,6);
            pStatement.setString(2,"qinjiang");
            pStatement.setString(3,"123456");
            pStatement.setString(4,"885522@qq.com");
                        //注意:给mysql传时间时,要用java.sql.Date类,其构造方法的参数(时间戳)由Java.util.Date类的getTime方法提供
            pStatement.setDate(5,new java.sql.Date(new java.util.Date().getTime()));

            //执行sql
            num = pStatement.executeUpdate(); //记得把参数去掉!!!
            if(num>0){
                System.out.println("插入成功!");
            }

        } catch (SQLException throwables) {
            throwables.printStackTrace();

        }finally {//关闭资源必须写在finally里
            //断开数据库连接,释放资源
            jdbcUtils.closeConnection(connection,pStatement,resultSet);
        }
    }
}
删除:
package com.test.demo02;

import java.sql.*;

public class DeleteTest {
    public static void main(String[] args) {
        Connection connection = null;
        PreparedStatement pStatement =null;  //!!!
        ResultSet resultSet = null;
        int num = 0;
        try {
            //建立数据库连接
            connection = jdbcUtils.getConnection();
            //创建prepareStatement对象执行sql语句
            String sql = "DELETE FROM users WHERE id=?";
            pStatement = connection.prepareStatement(sql); //预编译SQL,先写sql,不执行

            //手动给参数赋值 index指明第几个?(规定index从1开始)
            pStatement.setInt(1,5);

            //执行sql
            num = pStatement.executeUpdate(); //记得把参数去掉!!!
            if(num>0){
                System.out.println("删除成功!");
            }

        } catch (SQLException throwables) {
            throwables.printStackTrace();

        }finally {//关闭资源必须写在finally里
            //断开数据库连接,释放资源
            jdbcUtils.closeConnection(connection,pStatement,resultSet);
        }

    }
}
注意01:
-
下标从1开始
-
赋值的时候不需要为字符串变量的两边加上’’,直接
ps.setString(1, “liguang”); 因为PreparedStatement会为占位符?的两边自动加上单引号,这也是PreparedStatement防止SQL注入的本质!
-
占位符只能替换值,不能替换表名、字段名或者其他关键词。同样因为PreparedStatement会为占位符?的两边自动加上单引号,这样会使得SQL语句不可执行,比如使用将表名设置为占位符,数据库执行sql语句时,表名会用单引号引起来。
注意02:
如果报出如下错误:
com.mysql.jdbc.exceptions.jdbc4.MySQLSyntaxErrorException: You have an error in your SQL syntax; check the manual that corresponds to your MySQL server version for the right syntax to use near '?,?,?,?,?)'原因是:executeUpdate()方法没有去掉参数
num = pStatement.executeUpdate(sql); //这里没有去掉参数因为PreparedStatement类是statement类的子类,PreparedStatement类executeUpdate()方法是无参方法,如果executeUpdate(sql)这样写,调用的是父类的有参方法。
3.3 PreparedStatement是如何防止sql注入的
其实我们上面已经讲了,PreparedStatement防止SQL注入的本质就是给参数的两边自动加上'',这样输入的一切东西都是字符串了。
把上面那段sql注入的代码用preparedStatement修改,就失效了。
//创建prepareStatement对象执行sql语句
String oldName = "'' OR 1=1";
String newName = "笨蛋们";
String sql = "UPDATE users SET `NAME`=? WHERE `NAME`=?";
pStatement = connection.prepareStatement(sql); //预编译SQL,先写sql,不执行
//手动给参数赋值 index指明第几个?(规定index从1开始)
pStatement.setString(1,newName);
pStatement.setString(2,oldName);
//执行sql
num = pStatement.executeUpdate(); //记得把参数去掉!!!
if(num>0){
System.out.println("修改成功!");
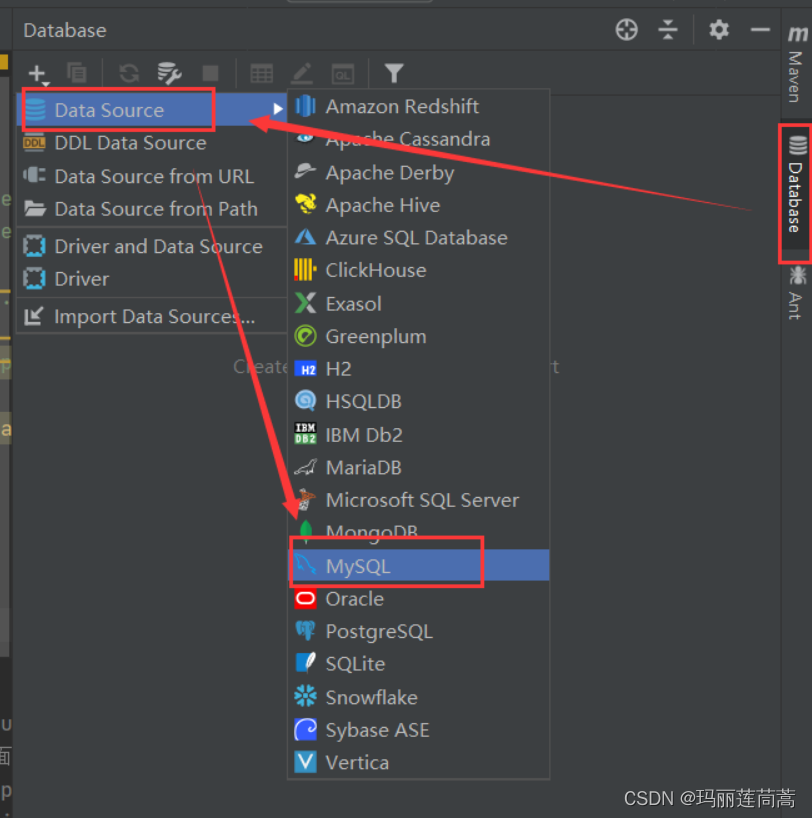
}四、IDEA充当DBMS(替代sqlyog)
抛弃sqlyog,完全用伟大的IDEA!
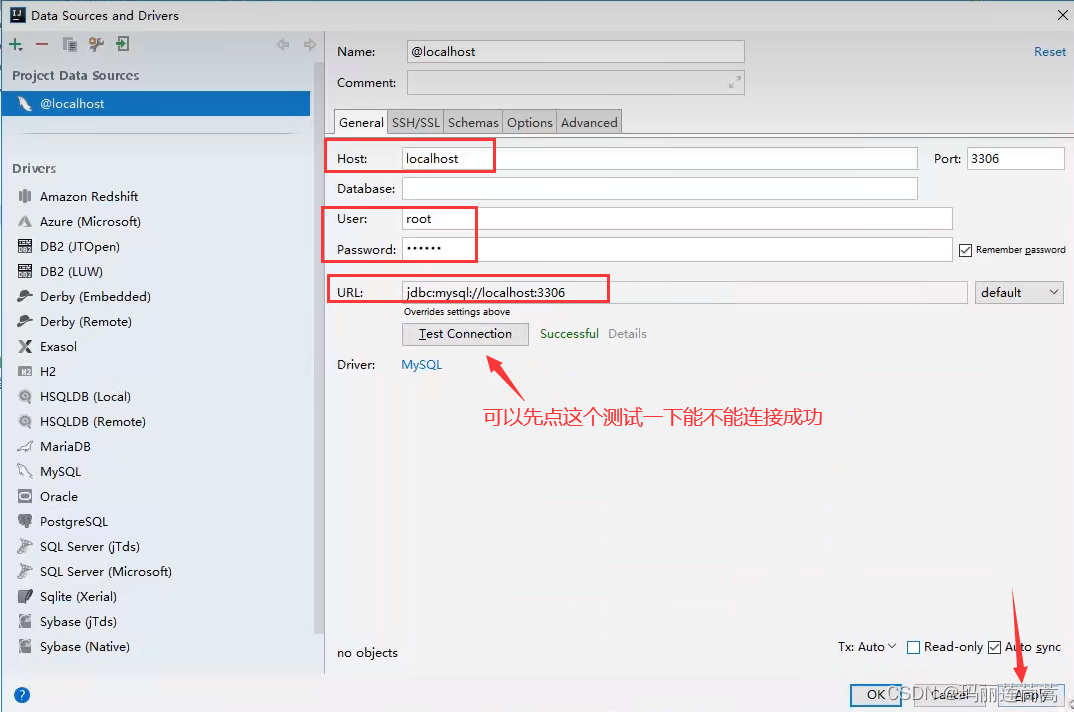
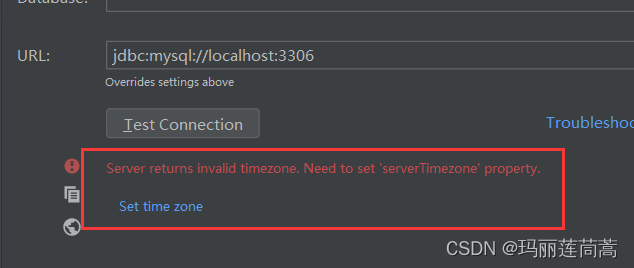
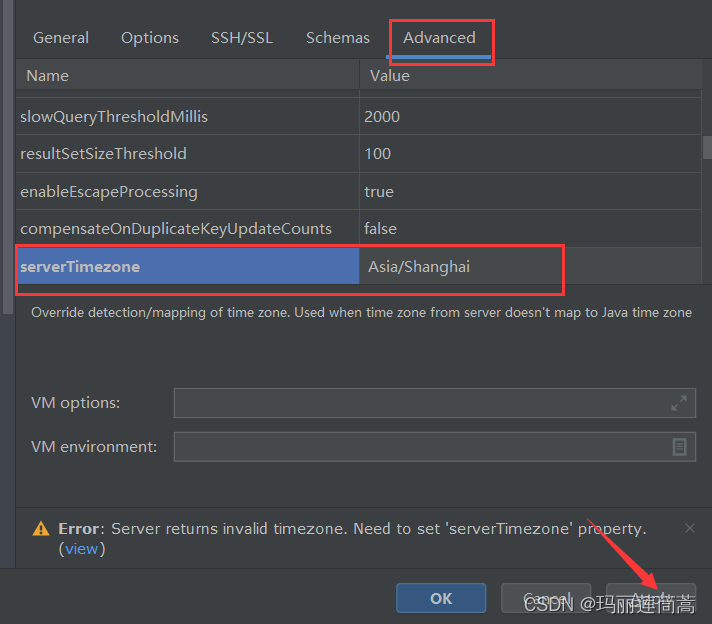
如果提示时区问题,可以在Advanced里改成上海:
然后就连接成功了。注意,我们是用root这个用户登录的,如果此时sqlyog也登录了root用户或者java程序连接数据库时登录了root用户,此时会被强行断开,相当于被挤下线了。
但是此时我们还看不到都有哪些数据库,
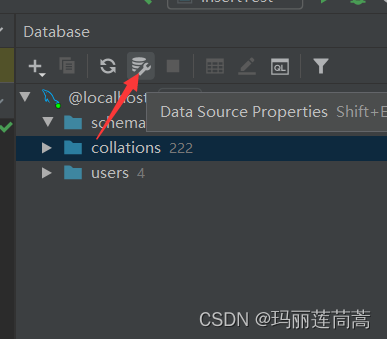
把我们想要的模式导入进来
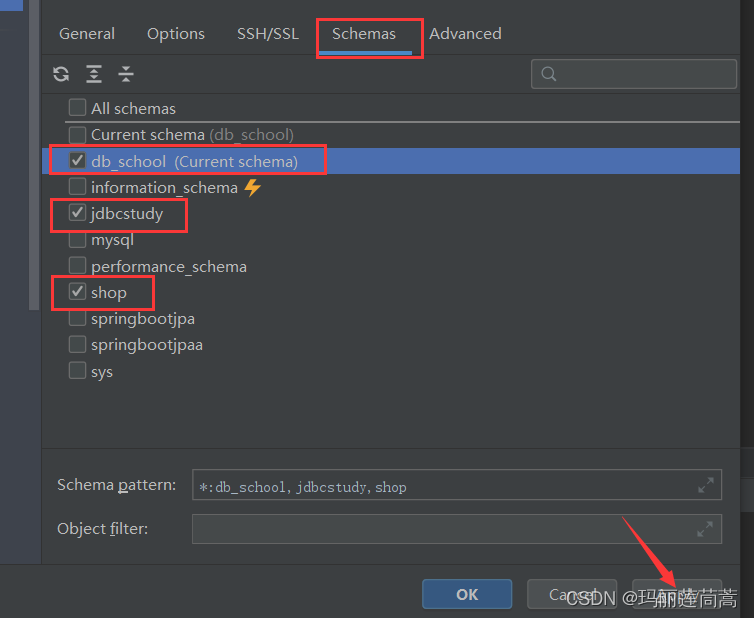
然后就能看见都有哪些表和字段了!
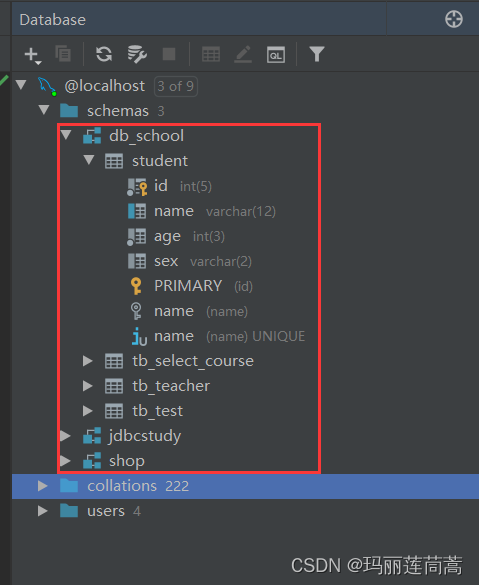
如何查看表?双击表!

如何修改属性?双击属性!
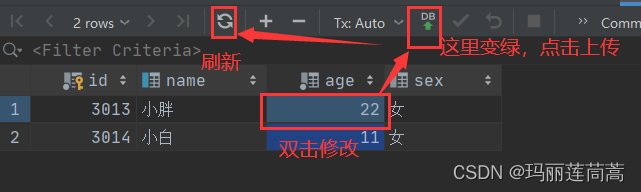
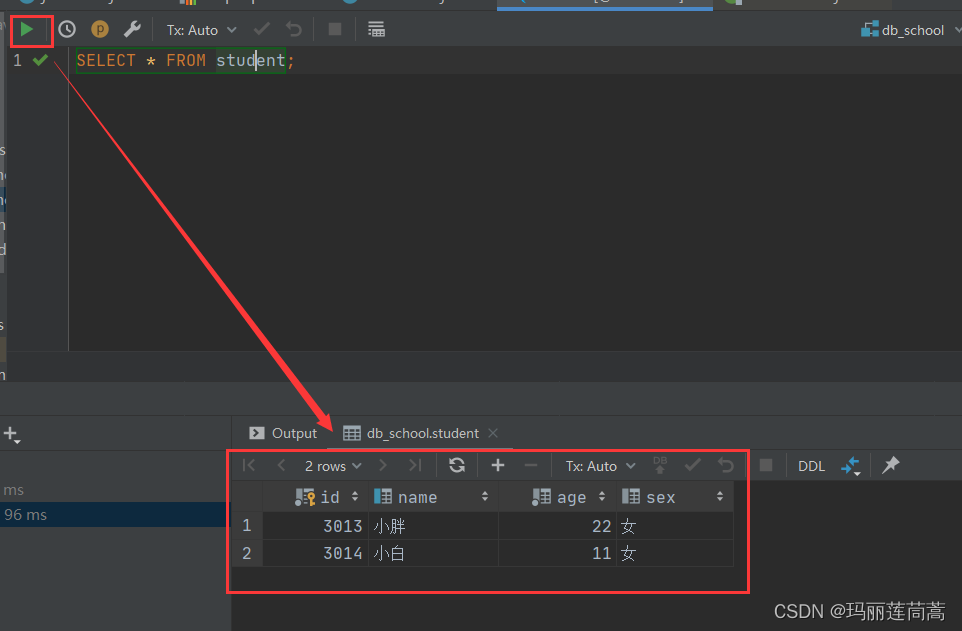
如何写SQL语句?

执行!
五、jdbc操作事务
5.1 转账成功的例子
在jdbcstudy数据库下执行如下代码:
/*创建账户表,用于jdbc事务的测试*/
CREATE TABLE account(
id INT PRIMARY KEY AUTO_INCREMENT,
name varchar(40),
money float
);
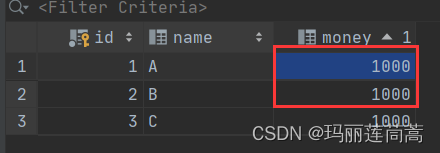
/*插入测试数据*/
insert into account(id, name, money) VALUES(1,'A',1000);
insert into account(id, name, money) VALUES(2,'B',1000);
insert into account(id, name, money) VALUES(3,'C',1000);新建了account表

A给B转账100元的代码:
package com.test.demo02;

import java.sql.Connection;
import java.sql.PreparedStatement;
import java.sql.ResultSet;
import java.sql.SQLException;

public class TransactionTest {
    public static void main(String[] args) {
        Connection connection = null;
        PreparedStatement preparedStatement = null;
        ResultSet resultSet = null;
        try {
            //连接上数据库
            connection = jdbcUtils.getConnection();
            //关闭数据库事务自动提交,自动开启
            connection.setAutoCommit(false);

            String sql1 = "UPDATE account SET money=money-100 WHERE name='A'";
            preparedStatement = connection.prepareStatement(sql1);//预编译
            preparedStatement.executeUpdate();

            String sql2 = "UPDATE account SET money=money+100 WHERE name='B'";
            preparedStatement = connection.prepareStatement(sql2);//预编译
            preparedStatement.executeUpdate();

            //手动提交事务
            connection.commit();
            System.out.println("成功!");

        } catch (SQLException throwables) {
            try {
                //如果失败,就回滚
                connection.rollback();
            } catch (SQLException e) {
                e.printStackTrace();
            }
            throwables.printStackTrace();
        }finally {
            jdbcUtils.closeConnection(connection,preparedStatement,resultSet);
        }
    }
}
结果:
PS: 可以不在catch中手动写回滚,如果失败默认会回滚的
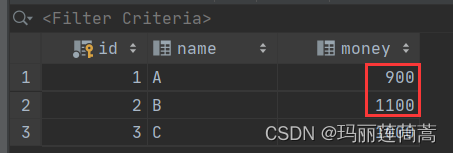
5.2 测试转账失败
在两个sql语句之间加一句错误代码。事务执行了A-100后会失败,然后回滚。
String sql1 = "UPDATE account SET money=money-100 WHERE name='A'";
preparedStatement = connection.prepareStatement(sql1);//预编译
preparedStatement.executeUpdate();

int x = 1/0;  //事务在这里会失败

String sql2 = "UPDATE account SET money=money+100 WHERE name='B'";
preparedStatement = connection.prepareStatement(sql2);//预编译
preparedStatement.executeUpdate();
查看结果:
转账是安全的!
六、数据库连接池
数据库连接池和线程池一样,都是池化技术,他们的思想也一样。
池化技术:数据库“连接-断开”以及线程“创建-销毁”的过程十分浪费资源,那我们就在池子中预先准备好“已经连接上的数据库”和“已经创建好的线程”。谁要用就去取,用完以后也不“断开数据库连接”或者“销毁线程”,而是再放回池子当中去。
假如连接池里一共有15个资源,池子可以设置两个参数:
最少连接数:平常池子中准备多少合适呢?可以设为10个,让其他5个先闲着。
最大连接数:高峰期,最多15个。
排队等待:如果15个连接都被占用了,那么第16个连接请求就要排队等待。
6.1 编写连接池
自己编写连接池的话需要实现DateSource接口,这里有别人写好的开源的连接池:
-
DBCP
-
C3P0
-
Druid:阿里巴巴写的
-
Hikari:Springboot默认集成的
-
。。。大佬们不断推出更好的数据源
使用了连接池后,我们在程序中就不需要自己写连接-释放数据库的操作了。而是调用大佬给出的接口。
省去了如下jdbcUtils中我们自己读取properties配置文件的代码:
    static{
        try {
            //先读取配置文件
            //InputStream inputStream = jdbcUtils.class.getClassLoader().getResourceAsStream("E:\\Java Project\\connectMysql\\src\\db.properties");
            //FileInputStream inputStream = new FileInputStream("E:\\Java Project\\connectMysql\\src\\db.properties");
            //if(inputStream == null){
            //    System.out.println("null");
            //}
           // Properties properties = new Properties();
            properties.load(inputStream);
            driver=properties.getProperty("driver");
            url=properties.getProperty("url");
            username=properties.getProperty("username");
            password=properties.getProperty("password");
            System.out.println(driver+ " "+url+" "+username+" "+password);
            //加载jdbc
            Class.forName(driver);
        } catch (IOException e) {
            e.printStackTrace();
        } catch (ClassNotFoundException e) {
            e.printStackTrace();
        }

    }
6.2 使用DBCP连接池
(1)导入jar包
需要导入两个包,这里我们导入老版本(现在已经推出新的了,像我们下面用的commons-pool-1.6.jar已经是2012年的了)
-
commons-dbcp-1.4.jar
-
commons-pool-1.6.jar
<dependency>
    <groupId>commons-dbcp</groupId>
    <artifactId>commons-dbcp</artifactId>
    <version>1.4</version>
</dependency>

<dependency>
    <groupId>commons-pool</groupId>
    <artifactId>commons-pool</artifactId>
    <version>1.6</version>
</dependency>
(2)编写properities配置文件
DBCP给我们提供了模板,里面的参数必须按照DBCP规定的写,不然DBCP读不出来
在src下新建dbcp.properties文件
#连接设置
driverClassName=com.mysql.jdbc.Driver
url=jdbc:mysql://localhost:3306/jdbcstudy?useUnicode=true&characterEncoding=utf8&useSSL=true
username=root
password=123456

#<!-- 初始化连接 -->
initialSize=10

#最大连接数量
maxActive=50

#<!-- 最大空闲连接 -->
maxIdle=20

#<!-- 最小空闲连接 -->
minIdle=5

#<!-- 超时等待时间以毫秒为单位 6000毫秒/1000等于60秒 -->
maxWait=60000
#JDBC驱动建立连接时附带的连接属性属性的格式必须为这样:【属性名=property;】
#注意:"user" 与 "password" 两个属性会被明确地传递,因此这里不需要包含他们。
connectionProperties=useUnicode=true;characterEncoding=UTF8

#指定由连接池所创建的连接的自动提交(auto-commit)状态。
defaultAutoCommit=true

#driver default 指定由连接池所创建的连接的只读(read-only)状态。
#如果没有设置该值,则“setReadOnly”方法将不被调用。(某些驱动并不支持只读模式,如:Informix)
defaultReadOnly=

#driver default 指定由连接池所创建的连接的事务级别(TransactionIsolation)。
#可用值为下列之一:(详情可见javadoc。)NONE,READ_UNCOMMITTED, READ_COMMITTED, REPEATABLE_READ, SERIALIZABLE
defaultTransactionIsolation=READ_UNCOMMITTED
(3)连接池工具类jdbcUtila_DBCP.java
package com.test.pool;

import org.apache.commons.dbcp.BasicDataSourceFactory;

import javax.sql.DataSource;
import java.io.FileInputStream;
import java.io.IOException;
import java.sql.*;
import java.util.Properties;

public class jdbcUtils_DBCP {
    private static DataSource dataSource = null;
    //jdbc只需要加载一次,所以我们写在静态代码块里,
    static{
        try {
            //先读取配置文件
            FileInputStream inputStream = new FileInputStream("E:\\Java Project\\connectMysql\\src\\dbcp.properties");
            if(inputStream == null){
                System.out.println("null");
            }
            Properties properties = new Properties();
            properties.load(inputStream);

            //创建数据源  工厂模式
            dataSource = BasicDataSourceFactory.createDataSource(properties);

        } catch (Exception e) {
            e.printStackTrace();
        }

    }

    //连接数据库,返回数据库对象
    public static Connection getConnection() throws SQLException {
        return dataSource.getConnection(); //数据源去获取连接,代替了原来我们用DriverManager.getConnection()
    }

    //断开数据库连接,实际上是放回连接池中?
    public static void closeConnection(Connection conn, Statement statement, ResultSet resultSet){
        if(conn!=null){
            try {
                conn.close();
            } catch (SQLException e) {
                e.printStackTrace();
            }
        }
        if(statement != null){
            try {
                statement.close();
            } catch (SQLException e) {
                e.printStackTrace();
            }
        }

        if(resultSet !=null){
            try {
                conn.close();
            } catch (SQLException e) {
                e.printStackTrace();
            }
        }

    }
}
(4) 测试
测试代码只需要改两个地方,把工具类换成jdbcUtils_DBCP就行了
package com.test.pool;

import com.test.demo02.jdbcUtils;

import java.sql.Connection;
import java.sql.PreparedStatement;
import java.sql.ResultSet;
import java.sql.SQLException;

public class UpdateTest {
    public static void main(String[] args) {
        Connection connection = null;
        PreparedStatement pStatement =null;
        ResultSet resultSet = null;
        int num = 0;
        try {
            //不同之处(一),jdbcUtils_DBCP使用数据源建立数据库连接!!!
            connection = jdbcUtils_DBCP.getConnection();

            String oldName = "笨蛋们";
            String newName = "1月30";
            String sql = "UPDATE users SET `NAME`=? WHERE `NAME`=?";
            pStatement = connection.prepareStatement(sql);
            pStatement.setString(1,newName);
            pStatement.setString(2,oldName);
            num = pStatement.executeUpdate();
            if(num>0){
                System.out.println("修改成功!");
            }

        } catch (SQLException throwables) {
            throwables.printStackTrace();

        }finally {
            //不同之处(二) jdbcUtils_DBCP
            jdbcUtils_DBCP.closeConnection(connection,pStatement,resultSet);
        }
    }
}
6.3 使用C3P0连接池
(1)导入jar包
<dependency>
    <groupId>com.mchange</groupId>
    <artifactId>c3p0</artifactId>
    <version>0.9.5.5</version>
</dependency>

<dependency>
    <groupId>com.mchange</groupId>
    <artifactId>mchange-commons-java</artifactId>
    <version>0.2.19</version>
</dependency>
(2)c3p0-config.xml配置文件
也是C3P0给定的模板
第一个是默认配置,后面可以自己加配置,用name区分
在src下新建c3p0-config.xml文件
<?xml version="1.0" encoding="UTF-8"?>
<c3p0-config>
<!--
c3p0的缺省(默认)配置
如果在代码中"ComboPooledDataSource ds=new ComboPooledDataSource();"这样写就表示使用的是c3p0的缺省(默认)-->account
<default-config>
<property name="driverClass">com.mysql.jdbc.Driver</property>
<property name="jdbcUrl">jdbc:mysql://localhost:3306/jdbcstudy?useUnicode=true&characterEncoding=utf8&useSSL=true</property>
<property name="user">root</property>
<property name="password">123456</property>
<property name="acquireIncrement">5</property>
<property name="initialPoolSize">10</property>
<property name="minPoolSize">5</property>
<property name="maxPoolSize">30</property>
</default-config>
<!-- 新增配置
在代码中"ComboPooledDataSource ds=new ComboPooledDataSource("Oracle");"这样写就表示使用的是name为Oracle的配置-->
<name-config name="Oracle">
<property name="driverClass">com.mysql.jdbc.Driver</property>
<property name="jdbcUrl">jdbc:mysql://localhost:3306/jdbcstudy?useUnicode=true&characterEncoding=utf8&useSSL=true</property>
<property name="user">root</property>
<property name="password">123456</property>
<property name="acquireIncrement">5</property>
<property name="initialPoolSize">10</property>
<property name="minPoolSize">5</property>
<property name="maxPoolSize">20</property>
</name-config>
</c3p0-config>xml不需要程序去读,会默认匹配
(3)连接池工具类
但是测试的时候getConnect一直出错,连接不上数据库,不知道为什么!
package com.test.pool;

import com.mchange.v2.c3p0.ComboPooledDataSource;

import java.sql.Connection;
import java.sql.ResultSet;
import java.sql.SQLException;
import java.sql.Statement;

public class jdbcUtils_C3P0 {
    private static ComboPooledDataSource dataSource = null;
    static {
        //创建数据源 工厂模式
        dataSource = new ComboPooledDataSource(); //读取默认配置
        /**
         * 测试用
         */
        if(dataSource!=null){
            System.out.println("DataSource不是空的");
        }else{
            System.out.println("DataSource是空的!");
        }
    }

    public static Connection getConnection() throws SQLException {
        /**
         * 这里连接不上,不知道为什么!
         */
        Connection connection = dataSource.getConnection();
        /**
         * 测试用
         */
        if(connection != null){
            System.out.println("connection不是空的");
        }else{
            System.out.println("connection是空的!");
        }
        return connection;
    }

    //断开数据库连接,实际上是放回连接池中?
    public static void closeConnection(Connection conn, Statement statement, ResultSet resultSet) {
        if (conn != null) {
            try {
                conn.close();
            } catch (SQLException e) {
                e.printStackTrace();
            }
        }
        if (statement != null) {
            try {
                statement.close();
            } catch (SQLException e) {
                e.printStackTrace();
            }
        }

        if (resultSet != null) {
            try {
                conn.close();
            } catch (SQLException e) {
                e.printStackTrace();
            }
        }
    }
}
(4)测试
package com.test.pool;

import com.test.demo02.jdbcUtils;

import java.sql.Connection;
import java.sql.PreparedStatement;
import java.sql.ResultSet;
import java.sql.SQLException;

public class InsertTest {
    public static void main(String[] args) {
        Connection connection = null;
        PreparedStatement pStatement =null;
        ResultSet resultSet = null;
        int num = 0;
        try {
            //不同之处(一),jdbcUtils_C3P0使用数据源建立数据库连接!!!
            connection = jdbcUtils_C3P0.getConnection();

            String oldName = "1月30";
            String newName = "有目标就可以奋战超过6小时";
            String sql = "UPDATE users SET `NAME`=? WHERE `NAME`=?";
            pStatement = connection.prepareStatement(sql);
            pStatement.setString(1,newName);
            pStatement.setString(2,oldName);
            num = pStatement.executeUpdate();
            if(num>0){
                System.out.println("修改成功!");
            }

        } catch (SQLException throwables) {
            throwables.printStackTrace();

        }finally {
            //不同之处(二) jdbcUtils_C3P0
            jdbcUtils_C3P0.closeConnection(connection,pStatement,resultSet);
        }
    }
}
有“AI”的1024 = 2048,欢迎大家加入2048 AI社区
更多推荐


 3
3 0
0- 0


 已为社区贡献9条内容

所有评论(0)