父子组件传值
父子组件那些事一. 组件的封装二. 组件的传值props | 父传子ref一. 组件的封装封装:<template><div class="helloWorld">HelloWorld</div></template><script>export default {// 命名name: "HelloWorld",}</script&
父子组件传值
一、Vue 2
一、基本结构
- 子组件:
<template>
	<div>子组件</div>
</template>

<script>
  export default {
    // 命名
    name: "HelloWorld",
  }
</script>

<style>
</style>
- 父组件:
<template>
  <div id="app">
  	<!-- 3.使用 -->
    <hello-world></hello-world>
  </div>
</template>

<script>
  // 1.导入
  import HelloWorld from './components/HelloWorld.vue'
  export default {
    name: 'App',
    // 2.注册
    components: {
      HelloWorld
    },
  }
</script>

<style>
</style>
建议大家遵守下 vue代码规范,不遵守的话,打包到线上时,可能会直接报错的哦!


二. 组件的传值
1、props | 父传子
例🌰一: 静态赋值
- 子组件:
<template>
  <div class="helloWorld">
	<div>姓名:{{ name }}</div>
	<div>年龄:{{ age }}</div>
  </div>
</template>

<script>
  export default {
    props: ['name', 'age'],
  }
</script>

<style>
</style>
- 父组件:
<template>
  <div id="app">
  	<!-- 3.使用 -->
    <hello-world name="阿狸" age="21"></hello-world>
  </div>
</template>

<script>
  // 1.导入
  import HelloWorld from './components/HelloWorld.vue'
  export default {
    name: 'App',
    // 2.注册
    components: {
      HelloWorld
    },
  }
</script>

<style>
</style>
页面显示: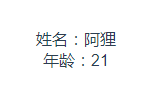
例🌰二: 动态赋值 ( 通过 v-bind )
- 子组件:
核心代码:
props:['hobby']
<template>
  <div class="helloWorld">
	<div>爱好:{{ hobby }}</div>
  </div>
</template>

<script>
  export default {
    props:['hobby'],
  },
  data() {
      return {
		hobby:'',
	  }
  },
  created() {
	// 父组件的值:
	console.log( "父组件的值:", this.hobby )
  }
</script>

<style>
</style>
- 父组件:
核心代码:
:hobby="要传递的值"
<template>
  <div id="app">
    <hello-world :hobby="hobby"></hello-world>
  </div>
</template>

<script>
  import HelloWorld from './components/HelloWorld.vue'
  export default {
    name: 'App',
    components: {
      HelloWorld
    },
    data() {
      return {
        hobby: '英雄联盟'
      }
    },
  }
</script>

<style>
</style>
页面显示: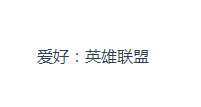
例🌰三: 类型校验
- 子组件:
<template>
  <div class="helloWorld">
	<div>性别:{{ sex?'渣男':'渣女' }}</div>
    <div>爱人:{{ love.join(',') }}</div>
  </div>
</template>

<script>
  export default {
    name: "HelloWorld",
    props:['hobby'],
  }
</script>

<style>
</style>
- 父组件:
<template>
  <div id="app">
  	<!-- 使用这个组件的时候, 数据的传递就不能乱写了哦 -->
    <hello-world msg="Welcome to Your Vue.js App" :sex=sex :love=love></hello-world>
  </div>
</template>

<script>
  import HelloWorld from './components/HelloWorld.vue'
  export default {
    name: 'App',
    components: {
      HelloWorld
    },
    props: {
      // 验证规则:
      sex: {
        type: Boolean,
        default: true
      },
      love: {
        type: Array,
        default: () => {
          return ['迪丽热巴', '鞠婧祎']
        }
      }
    },
    data() {
      return {
        // 数据的传递就不能乱写了
        sex: true,
        love: ['阿狸', '皎月']
      }
    },
  }
</script>

<style>
</style>
页面显示: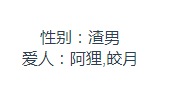
props 验证
1. 可以直接为组件的 prop 属性指定基础的校验类型,从而防止组件的使用者为其绑定错误类型的数据
export default {
	props: {             // 支持的 8 中基础类型:
		propA: String,   // 字符串类型
		propB: Number,   // 数字类型
		propC: Boolean,  // 布尔值类型
		propD: Array,    // 数组类型
		propE: Object,   // 对象类型
		propF: Date,     // 日期类型
		propG: Function, // 函数类型
		propH: Symbol    // 符号类型
	}
}
2. 多个可能的类型
如果某个prop 属性值的类型不唯一,此时可以通过数组的形式,为其指定多个可能的类型:
export default {
	props: {
		propA: [String, Number],    // propA 属性的值可以是“字符串”或“数字”
	}
}
3. 必填项校验
如果组件的某个 prop 属性是必填项,必须让组件的使用者为其传递属性的值
export default {
	props: {
		propB: {
			type: String,
			required: true
		}
	}
}
4. 属性默认值
在封装组件时,可以为某个prop 属性 指定默认值
export default {
	props: {
		propC: {
			type: Number,
			default: 100
		}
	}
}
5. 自定义验证函数
在封装组件时,可以为 prop 属性指定自定义的验证函数,从而对 prop 属性的值进行更加精确的控制
export default {
	props: {
		propD: {
			validator(value) {
				return ['success', 'warning', 'danger'].indexOf(value) !== -1
			}
		}
	}
}
2、emit | 子传父
- 子组件:
核心代码:
this.$emit("reconfirm", 要传递的值 )
<template>
	<div @click="doIt"></div>
</template>

<script>
	export default {
		methods: {
      		doIt() {
        		// 传值给父组件:
        		this.$emit("reconfirm", "小弟弟!")
      		},
    	},
	}
</script>
- 父组件:
核心代码:
@reconfirm="reconfirm"
<template>
  <div>
    <hello-world @reconfirm="reconfirm"></hello-world>
  </div>
</template>

<script>
  import HelloWorld from './components/HelloWorld.vue'
  export default {
    components: {
      HelloWorld
    },
    methods:{
		// 获取子组件值:
		reconfirm(data) {
        	console.log("子组件值:", data)
      },
	}
  }
</script>
3、综合
父传子:用
props
子传父:用emit
- 父组件:
<developmentInfoEditDialog-switch
      :switch-val="switchVal"
      @reconfirm="reconfirm"
      ></developmentInfoEditDialog-switch>

<script>
	import PasswordDialog from './PasswordDialog'
	import DevelopmentInfoEditDialogSwitch from './DevelopmentInfoEditDialogSwitch'
	export default {
		components: {
			DevelopmentInfoEditDialogSwitch,
		},
		data(){
			switchVal:["我","是","你","爸","爸"],
		},
		methods: {
			// 获取子组件值:
      		reconfirm(data) {
        		console.log("子组件传过来的值:"+ data)
      		},
		}
    }
</script>
- 子组件:
<script>
	export default {
    	// eslint-disable-next-line vue/require-prop-types
    	props: ['switchVal'],
    	created(){
			console.log("父组件传过来的值:" + this.switchVal)
		}
    	methods: {
			doIPCancel() {
	        	// 传值给父组件:
		        this.$emit('reconfirm', "我是小弟弟!")
	      	},
    },
    }
</script>
4、子传父时,父组件自带额外的参数
注意一下父组件中的
$event
子组件:
this.$emit("reconfirm", "哈哈", "嘿嘿");
父组件:
<developmentInfoEditDialog-switch
      @reconfirm="reconfirm($event, '嗷嗷~')"
      ></developmentInfoEditDialog-switch>

	// 获取子组件值:
	reconfirm(data, info) {
		console.log("子组件传过来的值:"+ data)
		console.log("父组件自带的值:"+ info)
	},

三、provide 和 inject
可以父子传值,还可以祖孙传值
1. 父节点通过 provide 共享数据
父节点的组件可以通过 provide 方法,对其子孙组件共享数据
export default {
	data() {
		return {
			// 1. 定义“父组件”要向“子孙组件”共享的数据
			color: 'red'
		}
	},
	provide() { // 2. provide 函数 return 要共享的数据
		return {
			color: this.color,
		}
	}
}
2. 子孙节点通过inject接收数据
子孙节点可以使用 inject 数组,接收父级节点向下共享的数据
<template>
  <h5>子孙组件 {{color}}</h5>
</template>

<script>
export default {
    inject: ['color']
}
</script>
3. 父节点对外共享响应式的数据
父节点使用 provide 向下共享数据时,可以结合 computed 函数向下共享响应式的数据
import { computed } from 'vue'

export default {
	data() {
		return {
			color: 'red'
		}
	},
	provide() {
		return {
			// 使用 computed 函数,可以把要共享的数据包装为响应式的数据
			color: computed(()=> this.color)
		}
	}
}
4. 子孙节点使用响应式的数据
如果父级节点共享的是响应式的数据,则子孙节点必须以 .value 的形式进行使用
<template>
	<!-- 响应式的数据,必须以 .value 的形式进行使用 -->
	<h5>子孙组件 {{color.value}}</h5>
</template>

<script>
export default {
    inject: ['color']
}
</script>
ref
- 父组件中用
this.$refs.子组件ref的值,等于进入子组件中并调用了子组件的this。 - 子组件中用
this.$parent,等于进入父组件并调用了父组件的this。 - 同一个组件中,可以给 DOM 节点加
ref='值',并通过this.$refs.值操作此节点。
🌰子:
子组件:
<template>
  <div class="HelloWorld">
    <p ref="infoP_son">{{info}}</p>
    <button @click ="btnClick">子组件中获取父组件</button>
    <!-- 渲染父组件的信息到页面  -->
    <p>{{getInfo}}</p>
  </div>
</template>

<script>
export default {
  name: "HelloWorld",
  data() {
    return {
      info:"子组件",
      message:"来自子组件的数据",
      getInfo:''
    };
  },
  components: {},
  created() {},
  mounted() {},
  methods: {
    btnClick(){
      this.getInfo += this.$parent.message
    }
  }
};
</script>
<style lang='less' scoped>
.HelloWorld{
  background-color: red;
}
</style>
父组件:
<template>
  <div class="App">
    <p class="info" ref="infoP">{{info}}</p>
    <HelloWorld ref="HelloWorld"></HelloWorld>
    <button @click="btnClick">父组件中获取子组件</button>
    <!-- 渲染子组件的信息到页面  -->
    <p>{{getInfo}}</p>
  </div>
</template>

<script>
import HelloWorld from "./components/HelloWorld";
export default {
  name: "App",
  data() {
    return {
      info: "父组件",
      message:"来自父组件的信息",
      getInfo:''
    };
  },
  components: {
    HelloWorld
  },
  created() {},
  mounted() {
    // ref 疯狂操作 DOM
    this.$refs.infoP.style.color = 'pink'
    this.$refs.infoP.style.fontSize = '28px'
    this.$refs.HelloWorld.$refs.infoP_son.style.color = '#599eff'
    this.$refs.HelloWorld.$refs.infoP_son.style.fontSize = '28px'
  },
  methods: {
    btnClick() {
      // 获取子组件的信息
      this.getInfo += this.$refs.HelloWorld.message;
      window.console.log(this.$refs.HelloWorld.message);
    }
  }
};
</script>
<style lang='less' scoped>
.App {
  background-color: greenyellow;
}
</style>

你可能需要:react 组件间的传值。
二、Vue 3
父传子 defineProps
需求:父组件传值给子组件;且在子组件调用父组件中的方法。
父组件:
<template>
  <UserDialog :objValue="objValue" @refresh="refresh"></UserDialog>
</template>

<script lang="ts" setup>
import { reactive } from "vue";
import UserDialog from "./components/userDialog.vue";

interface ITable{
  username: string;
  phone: string;
}

const objValue= reactive<ITable>({
  username: "",
  phone: "",
});

const refresh = (value: string) => {
	console.log("...", value)
}
</script>
子组件:
<template>
	<div>{{ objValue }}</div>
	<div @click="doRefresh">点击调用父组件的 refresh 方法</div>
</template>

<script lang="ts" setup>
import { ref, defineProps, toRefs, defineEmits } from "vue"; // 导入相关模块

const props = defineProps({
	objValue: {
		type: Object,
	    default: {},
	},
}); // 1.1.定义父组件传过来的数据的类型

const { objValue } = toRefs(props); // 1.2.接收父组件传过来的数据 objValue

const try = () => {
	const value: any = props.objValue; // 1.3.使用父组件传过来的数据 objValue
	console.log("...", value)
}

const emit = defineEmits(["refresh"]);

const doRefresh = () => {
  emit("refresh", "hello"); // 调用父组件的 refresh 方法,同时传参 hello
};
</script>
父传子孙 provide & inject
父组件:
<template>
	<div>{{ username }}</div>
	<div @click="add">改名啦</div>
</template>

<script lang="ts" setup>
import { ref, provide } from "vue";

const username = ref<string>("");
provide("username", username); // 传值给子组件

const add= () => {
  username.value = "小三";
};
</script>
子组件:
<template>
	<div>{{ username }}</div>
</template>

<script lang="ts" setup>
import { inject } from "vue";

const username : any = inject("username "); // 接收父级组件传的数据
</script>

有“AI”的1024 = 2048,欢迎大家加入2048 AI社区
更多推荐
 1
1 0
0- 0


 已为社区贡献2条内容

所有评论(0)