activiti学习(二十二)——常规任务节点跳转(退回、自由跳转功能)
概述通过前面几篇文章的了解,目前我们已经具备足够的知识进行常规userTask的跳转。在“中国式流程”中,驳回、自由跳转等皆是通过这种改方式实现。可以说这也是玩activiti流程比较重要的一环。activiti本身没有提供驳回和自由跳转的api,可能在老外的思维里,流程是不存在倒着走,或者随意跳转的,必须严格按照连线去走。我们必须通过自己手动去实现这样的功能。但是比较头疼的问题包括:如果逐个调用
概述
通过前面几篇文章的了解,目前我们已经具备足够的知识进行常规userTask的跳转。在“中国式流程”中,驳回、自由跳转等皆是通过这种改方式实现。可以说这也是玩activiti流程比较重要的一环。
activiti本身没有提供驳回和自由跳转的api,可能在老外的思维里,流程是不存在倒着走,或者随意跳转的,必须严格按照连线去走。我们必须通过自己手动去实现这样的功能。但是比较头疼的问题包括:
- 如果逐个调用实体管理类修改数据库记录,首先必须彻底摸透流程虚拟机执行情况以及流程运转时数据库变化情况,这个无论从学习还是实现都过于复杂;
- 即使搞清楚了,如此精细的操作,万一有所遗漏或者逻辑判断上出现一些小问题,可能整个流程就坏了。
为了解决上面的问题,必须调整思路,能用现有的一些api,我们要尽可能用上,而不是自己去一步一步折腾。
解决思路
通过《activiti学习(二十一)——流程虚拟机源码分析(三)——从进入到离开userTask》一文,我们大致了解了如何进入和离开userTask。流程跳转的过程,实际上就是离开当前userTask,然后进入指定的userTask这两步。
我们看下上一篇文章中离开userTask需要做什么:
- 设置execution的流程变量;
- 触发任务监听器complete事件,触发全局事件转发器TASK_COMPLETED事件;
- 添加act_ru_identitylink表记录;
- 删除当前任务;
- 触发执行监听器end事件
- 离开当前节点,按连线走到下一个节点。
可以看出我们不能让其执行第5步,否则流程就运行到下一个节点而不是自由跳转了。所以我们不能执行task.complete,而要自己实现前四步,然后再进入指定节点。
幸运的是,进入指定节点,我们不需要做太多事,根据前面的文章看到,我们直接调用execution.performOperation(TRANSITION_CREATE_SCOPE)就差不多了,需要注意的是此前必须调用execution.setActivity()把指定的activitiImpl设置为当前活动,另外调用execution.setTransition(null),就可以了。还有另一个更简便的是调用executionEntity.executeActivity(),设置参数为指定的节点即可。
具体实现
如果我们要使用实体管理类操作数据库记录的话,因为其插入、修改等等都是到缓存的,所以最好使用命令类。待命令类结束之时,通过回调自动刷新缓存到数据库中。新建命令类CommonJumpCmd.java
public class CommonJumpCmd implements Command {

	private String taskId;
	private Map<String, Object> variables;
	private String desActivityId;

	public CommonJumpCmd(String taskId, Map<String, Object> variables, String desActivityId) {
		this.taskId = taskId;
		this.variables = variables;
		this.desActivityId = desActivityId;
	}

	public Object execute(CommandContext commandContext) {
		TaskEntityManager taskEntityManager = commandContext.getTaskEntityManager();
		TaskEntity taskEntity = taskEntityManager.findTaskById(taskId);
		ExecutionEntity executionEntity = taskEntity.getExecution();
		// 设置流程变量
		executionEntity.setVariables(variables);

		// 触发执行监听器complete事件
		taskEntity.fireEvent(TaskListener.EVENTNAME_COMPLETE);

		// 触发全局事件转发器TASK_COMPLETED事件
		if (Context.getProcessEngineConfiguration().getEventDispatcher().isEnabled()) {
			Context.getProcessEngineConfiguration().getEventDispatcher().dispatchEvent(ActivitiEventBuilder
					.createEntityWithVariablesEvent(ActivitiEventType.TASK_COMPLETED, this, variables, false));
		}

		// 添加act_ru_identitylink表记录。常规流程实例id与执行id相同
		if (Authentication.getAuthenticatedUserId() != null && executionEntity.getProcessInstanceId() != null) {
			executionEntity.involveUser(Authentication.getAuthenticatedUserId(), IdentityLinkType.PARTICIPANT);
		}

		// 删除任务
		taskEntityManager.deleteTask(taskEntity, TaskEntity.DELETE_REASON_COMPLETED, false);

		//触发执行监听器end事件
		ScopeImpl scope = (ScopeImpl)executionEntity.getActivity();
		List<ExecutionListener> exectionListeners = scope.getExecutionListeners("end");
		for(ExecutionListener listener : exectionListeners) {
			executionEntity.setEventName("end");
			executionEntity.setEventSource(scope);
			try {
				listener.notify(executionEntity);
			} catch (Exception e) {
				e.printStackTrace();
			}
		}

		String processDefinitionId = executionEntity.getProcessDefinitionId();
		ProcessDefinitionEntity processDefinitionEntity = Context.getProcessEngineConfiguration().getDeploymentManager()
				.findDeployedProcessDefinitionById(processDefinitionId);
		ActivityImpl desActivityimpl = processDefinitionEntity.findActivity(desActivityId);

		executionEntity.executeActivity(desActivityimpl);

		return null;
	}
}
代码不复杂,对应的注释也都写好了。当然为了看起来简洁,这里并没有对一些异常情况进行处理,例如若传入的taskId和desActivityId找不到对应的记录时是否要抛出异常等。
CommonJumpCmd虽然代码不复杂而且逻辑清晰,但是也有几个坑需要重点注意:
- 35行deleteTask方法,一定要使用void deleteTask(TaskEntity task, String deleteReason, boolean cascade)这个方法,而不是void deleteTask(String taskId, String deleteReason, boolean cascade)。如果使用后者,会因为其判断taskId对应的TaskEntity的executionId是否为空,非空则抛出异常,导致无法删除任务。
- 38-48行获取当前活动节点对应的执行监听器并触发end事件,进而会调用内置的记录监听器。如果漏了这一步骤,会影响历史表记录。
- 52行通过DeploymentManager的findDeployedProcessDefinitionById查询ProcessDefinitionEntity。可能有个直观的想法是使用ProcessDefinitionEntityManager来查询ProcessDefinitionEntity。不过当你使用后者查出ProcessDefinitionEntity,有可能在40行findActivity时返回null,这是为什么?原因在于ActivityImpl是通过对象解析产生的,而ProcessDefinitionEntityManager的findProcessDefinitionById不会进行对象解析。那么如果执行该函数前流程引擎没有对象解析的话,则返回必然是null。而DeploymentManager的findDeployedProcessDefinitionById是会调用对象解析的,所以不存在这个问题。
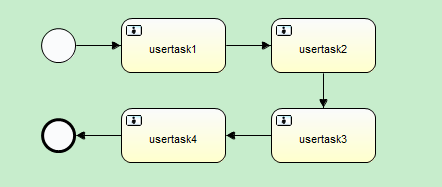
接下来我们测试一下,建一个流程图commonJump.bpmn
<?xml version="1.0" encoding="UTF-8"?>
<definitions xmlns="http://www.omg.org/spec/BPMN/20100524/MODEL" xmlns:xsi="http://www.w3.org/2001/XMLSchema-instance" xmlns:xsd="http://www.w3.org/2001/XMLSchema" xmlns:activiti="http://activiti.org/bpmn" xmlns:bpmndi="http://www.omg.org/spec/BPMN/20100524/DI" xmlns:omgdc="http://www.omg.org/spec/DD/20100524/DC" xmlns:omgdi="http://www.omg.org/spec/DD/20100524/DI" typeLanguage="http://www.w3.org/2001/XMLSchema" expressionLanguage="http://www.w3.org/1999/XPath" targetNamespace="http://www.activiti.org/test">
  <process id="commonJump" name="Common Jump" isExecutable="true">
    <startEvent id="startevent1" name="Start"></startEvent>
    <userTask id="usertask1" name="usertask1" activiti:assignee="${assignee}"></userTask>
    <sequenceFlow id="flow1" sourceRef="startevent1" targetRef="usertask1"></sequenceFlow>
    <userTask id="usertask2" name="usertask2" activiti:assignee="${assignee}"></userTask>
    <sequenceFlow id="flow2" sourceRef="usertask1" targetRef="usertask2"></sequenceFlow>
    <userTask id="usertask3" name="usertask3" activiti:assignee="${assignee}"></userTask>
    <sequenceFlow id="flow3" sourceRef="usertask2" targetRef="usertask3"></sequenceFlow>
    <userTask id="usertask4" name="usertask4" activiti:assignee="${assignee}"></userTask>
    <sequenceFlow id="flow4" sourceRef="usertask3" targetRef="usertask4"></sequenceFlow>
    <endEvent id="endevent2" name="End"></endEvent>
    <sequenceFlow id="flow6" sourceRef="usertask4" targetRef="endevent2"></sequenceFlow>
  </process>
  <bpmndi:BPMNDiagram id="BPMNDiagram_commonJump">
    <bpmndi:BPMNPlane bpmnElement="commonJump" id="BPMNPlane_commonJump">
      <bpmndi:BPMNShape bpmnElement="startevent1" id="BPMNShape_startevent1">
        <omgdc:Bounds height="35.0" width="35.0" x="150.0" y="220.0"></omgdc:Bounds>
      </bpmndi:BPMNShape>
      <bpmndi:BPMNShape bpmnElement="usertask1" id="BPMNShape_usertask1">
        <omgdc:Bounds height="55.0" width="105.0" x="230.0" y="210.0"></omgdc:Bounds>
      </bpmndi:BPMNShape>
      <bpmndi:BPMNShape bpmnElement="usertask2" id="BPMNShape_usertask2">
        <omgdc:Bounds height="55.0" width="105.0" x="380.0" y="210.0"></omgdc:Bounds>
      </bpmndi:BPMNShape>
      <bpmndi:BPMNShape bpmnElement="usertask3" id="BPMNShape_usertask3">
        <omgdc:Bounds height="55.0" width="105.0" x="380.0" y="300.0"></omgdc:Bounds>
      </bpmndi:BPMNShape>
      <bpmndi:BPMNShape bpmnElement="usertask4" id="BPMNShape_usertask4">
        <omgdc:Bounds height="55.0" width="105.0" x="230.0" y="300.0"></omgdc:Bounds>
      </bpmndi:BPMNShape>
      <bpmndi:BPMNShape bpmnElement="endevent2" id="BPMNShape_endevent2">
        <omgdc:Bounds height="35.0" width="35.0" x="150.0" y="310.0"></omgdc:Bounds>
      </bpmndi:BPMNShape>
      <bpmndi:BPMNEdge bpmnElement="flow1" id="BPMNEdge_flow1">
        <omgdi:waypoint x="185.0" y="237.0"></omgdi:waypoint>
        <omgdi:waypoint x="230.0" y="237.0"></omgdi:waypoint>
      </bpmndi:BPMNEdge>
      <bpmndi:BPMNEdge bpmnElement="flow2" id="BPMNEdge_flow2">
        <omgdi:waypoint x="335.0" y="237.0"></omgdi:waypoint>
        <omgdi:waypoint x="380.0" y="237.0"></omgdi:waypoint>
      </bpmndi:BPMNEdge>
      <bpmndi:BPMNEdge bpmnElement="flow3" id="BPMNEdge_flow3">
        <omgdi:waypoint x="432.0" y="265.0"></omgdi:waypoint>
        <omgdi:waypoint x="432.0" y="300.0"></omgdi:waypoint>
      </bpmndi:BPMNEdge>
      <bpmndi:BPMNEdge bpmnElement="flow4" id="BPMNEdge_flow4">
        <omgdi:waypoint x="380.0" y="327.0"></omgdi:waypoint>
        <omgdi:waypoint x="335.0" y="327.0"></omgdi:waypoint>
      </bpmndi:BPMNEdge>
      <bpmndi:BPMNEdge bpmnElement="flow6" id="BPMNEdge_flow6">
        <omgdi:waypoint x="230.0" y="327.0"></omgdi:waypoint>
        <omgdi:waypoint x="185.0" y="327.0"></omgdi:waypoint>
      </bpmndi:BPMNEdge>
    </bpmndi:BPMNPlane>
  </bpmndi:BPMNDiagram>
</definitions>
流程图很简单,就是四个普通的userTask串行。接着我们部署和启动,部署流程文档路径和启动流程id因读者各自不同而不同:
public void deploy() {
	RepositoryService repositoryService = pe.getRepositoryService();
	DeploymentBuilder deploymentBuilder = repositoryService.createDeployment();

	InputStream inputStream = null;
	try {
		inputStream = App.class.getClassLoader().getResource("bpmn/jump/commonJump.bpmn").openStream();
		deploymentBuilder.addInputStream("commonJump.bpmn", inputStream);
		deploymentBuilder.name("commonJumpDeployment");
		Deployment deployment = deploymentBuilder.deploy();
		System.out.println("部署完成");
	} catch (IOException e) {
		e.printStackTrace();
	}
}

public void startProcessByIdWithVar() {
	RuntimeService runtimeService = pe.getRuntimeService();
	Map<String, Object> vars = new HashMap<String, Object>();
	vars.put("assignee", "张三");
	ProcessInstance pi = runtimeService.startProcessInstanceById("commonJump:1:4", vars);
	System.out.println("流程定义ID:" + pi.getProcessInstanceId());
	System.out.println("流程实例ID:" + pi.getId());
}
此时查看act_ru_execution表:

act_ru_task表:

接下来我们调用自由跳转到userTask3试一试效果:
public void commonJump() {
	String taskId = "2505";
	Map<String, Object> variables = new HashMap<String, Object>();
	variables.put("assignee", "李四");
	String desActivityId = "usertask3";
	CommonJumpCmd commonJumpCmd = new CommonJumpCmd(taskId, variables, desActivityId);
	ServiceImpl service = (ServiceImpl)pe.getRepositoryService();
	CommandExecutor commandExecutor = service.getCommandExecutor();
	commandExecutor.execute(commonJumpCmd);
}
执行完毕后查看act_ru_execution表,此时已经跳转到userTask3了:

再看act_ru_task表:

上述都显示流程已正常跳转到userTask3上,其他变量表、历史表等可以自行查看,这里不展示了。
之后通过正常task.complete提交流程到userTask4节点上:
public void completeTaskWithVar() {
	Map<String, Object> vars = new HashMap<String, Object>();
	vars.put("assignee", "王五");
	TaskService taskService = pe.getTaskService();
	taskService.complete("5002", vars);
	System.out.println("完成提交");
}
查看act_ru_execution表和act_ru_task表,执行均无异常:


接下来我们想把流程回退到userTask3:
public void commonJump() {
	String taskId = "7502";
	Map<String, Object> variables = new HashMap<String, Object>();
	variables.put("assignee", "赵六");
	String desActivityId = "usertask3";
	CommonJumpCmd commonJumpCmd = new CommonJumpCmd(taskId, variables, desActivityId);
	ServiceImpl service = (ServiceImpl)pe.getRepositoryService();
	CommandExecutor commandExecutor = service.getCommandExecutor();
	commandExecutor.execute(commonJumpCmd);
}
查看act_ru_execution表和act_ru_task表,已成功退回userTask3无异常。


小结
本文完成了userTask的常规跳转,然而对于多实例userTask,以及分支节点并不适用。多实例情况和分支情况后面随着流程虚拟机的分析再去实现。常规的流程跳转,已经能满足很多简单流程的使用。另外通过本次实践,我们对如何拆解虚拟机的调用更有经验。
可以说activiti学习写了这么多篇,对不少快速上手百度查答案的人来说,这才算是第一篇稍微有点意义和价值的文章(偷笑)。其实我在写这个系列之前,已经知道如何跳转,但是自己只懂依葫芦画瓢,完全没有实质的理解。通过前面一系列的铺垫和学习,懂得流程虚拟机的走向,发生意外情况(例如上面说的两个坑),懂得如何调试,如何解决问题。虽说activiti流程跳转操纵的关键来来去去就那几个,但是如果不能从原理上去理解,那么如何使工作流引擎与业务逻辑耦合,会是一个大难题。

有“AI”的1024 = 2048,欢迎大家加入2048 AI社区
更多推荐
 7
7 0
0- 0


 已为社区贡献4条内容

所有评论(0)