Spring boot maven 插件 build image
spring boot使用maven 插件打包 docker 镜像
Spring boot maven 插件 build image
首先项目本身要在 spring boot 2.5 以上,并且导入spring-boot-mavne 插件
<build>
        <plugins>
            <plugin>
                <groupId>org.springframework.boot</groupId>
                <artifactId>spring-boot-maven-plugin</artifactId>
                <configuration>
                    <image>
<!--                       镜像的命名和版本号设定 -->
                        <name>registry.cn-hangzhou.aliyuncs.com/hanxuelei/${project.artifactId}:${project.version}</name>
                        <publish>true</publish>
                        <env>
<!--                           定义构建的jvm版本号 -->
                            <BP_JVM_VERSION>8.0.312</BP_JVM_VERSION>
                        </env>
                        <bindings>
<!--                           这个是由于 github 直接下载文件很慢,可能会导致 timeout,重新定义 bindings 文件 -->
                            <binding>
                                D:/JavaProject/mall4cloud/bellsoft-jdk-config:/platform/bindings/bellsoft-jdk-config
                            </binding>
                        </bindings>
                    </image>
                    <docker>
<!--                       如果需要推送阿里云或者docker hub需要用户名和密码 -->
                        <publishRegistry>
                            <username>username</username>
                            <password>password</password>
                            <url>https://registry.cn-hangzhou.aliyuncs.com</url>
                            <email>2407411399@qq.com</email>
                        </publishRegistry>
                        <builderRegistry>
                            <username>username</username>
                            <password>password</password>
                            <url>https://registry.cn-hangzhou.aliyuncs.com</url>
                            <email>2407411399@qq.com</email>
                        </builderRegistry>
                    </docker>
                </configuration>
            </plugin>
        </plugins>
    </build>
如果网络没有问题的话,可以把如下xml删除
<publish>true</publish>
<env>
<!-- 定义构建的jvm版本号 -->
    <BP_JVM_VERSION>8.0.312</BP_JVM_VERSION>
</env>
<bindings>
<!-- 这个是由于 github 直接下载文件很慢,可能会导致 timeout,重新定义 bindings 文件 -->
    <binding>
        D:/JavaProject/mall4cloud/bellsoft-jdk-config:/platform/bindings/bellsoft-jdk-config
    </binding>
</bindings>
构建并且发布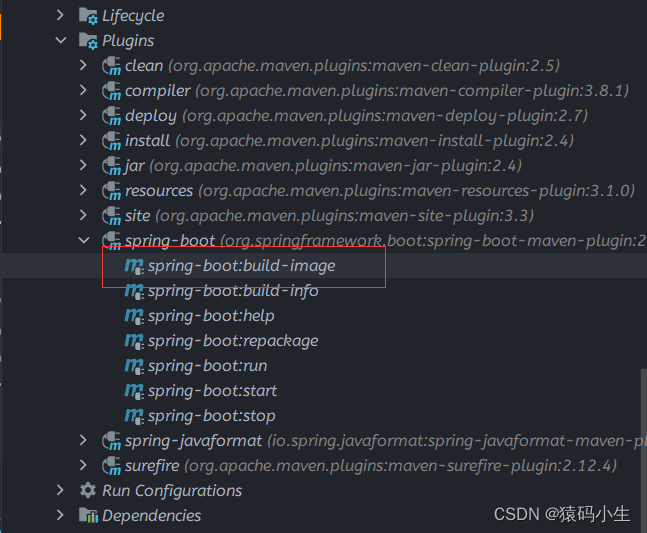
定义完pom.xml之后可能会出现的问题
docker环境搭建
首先本身需要安装docker
win
https://docs.docker.com/desktop/install/windows-install/
linux
curl -fsSL https://get.docker.com | bash -s docker --mirror Aliyun
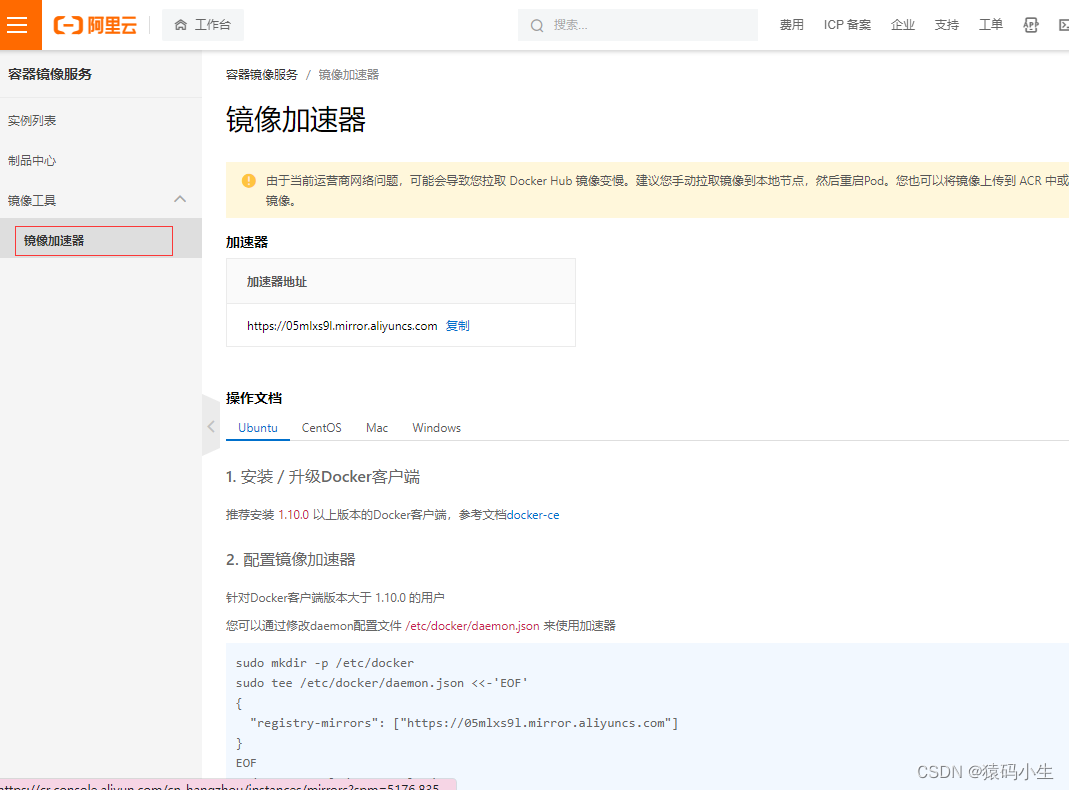
阿里云镜像加速
提前准备
因为spring-boot-maven-plugin本身会在docker中pull两个镜像,在里面下载可能会比较慢,这里可以提前拉取到本地
docker pull paketobuildpacks/builder:base
docker pull paketobuildpacks/run:base-cnb
可能出现的问题
unable to download
如果是内网,或者网络不佳的情况下,可能会出现 unable to download https://github.com/
报错如下:
Paketo BellSoft Liberica Buildpack 5.2.1
  https://github.com/paketo-buildpacks/bellsoft-liberica
  Build Configuration:
    $BP_JVM_VERSION              11.0.9          the Java version
  Launch Configuration:
    $BPL_JVM_HEAD_ROOM           0               the headroom in memory calculation
    $BPL_JVM_LOADED_CLASS_COUNT  35% of classes  the number of loaded classes in memory calculation
    $BPL_JVM_THREAD_COUNT        250             the number of threads in memory calculation
    $JAVA_TOOL_OPTIONS                           the JVM launch flags
  BellSoft Liberica JDK 11.0.9: Contributing to layer
    Downloading from https://github.com/bell-sw/Liberica/releases/download/11.0.9.1+1/bellsoft-jdk11.0.9.1+1-linux-amd64.tar.gz
unable to invoke layer creator
unable to get dependency jdk
unable to download https://github.com/bell-sw/Liberica/releases/download/11.0.9.1+1/bellsoft-jdk11.0.9.1+1-linux-amd64.tar.gz
unable to request https://github.com/bell-sw/Liberica/releases/download/11.0.9.1+1/bellsoft-jdk11.0.9.1+1-linux-amd64.tar.gz
ERROR: failed to build: exit status 1
解决办法:
- 第一步创建文件夹
mkdir bellsoft-jdk-config && cd bellsoft-jdk-config
- 第二步,写入文件
echo "dependency-mapping" >> type
- 第三步,查询三个插件所对应的sha256, 地址在下面,找buildpack.toml
 [[metadata.dependencies]]
    cpes = ["cpe:2.3:a:oracle:jre:1.8.0:update362:*:*:*:*:*:*:*"]
    id = "jre"
    name = "BellSoft Liberica JRE"
    purl = "pkg:generic/bellsoft-jre@8.0.352?arch=amd64"
    sha256 = "8641017d42750c29055a83129ad6251261bd7ec8caf308b223ef1d29552f997a"
    stacks = ["io.buildpacks.stacks.bionic", "io.paketo.stacks.tiny", "*"]
    uri = "https://github.com/bell-sw/Liberica/releases/download/8u362+9/bellsoft-jre8u362+9-linux-amd64.tar.gz"
    version = "8.0.362"
- 第一个插件 https://github.com/paketo-buildpacks/bellsoft-liberica
- 第二个插件 https://github.com/paketo-buildpacks/syft
- 第三个插件 https://github.com/paketo-buildpacks/spring-boot
注意: 如果在buildpack.toml没有找到,那么去release中查找,通过releases/download/11.0.9.1+1/bellsoft-jdk11.0.9.1+1-linux-amd64.tar.gz版本号查询对应的sha256的值
然后创建文件,名称就是sha256的值,文件内容就是你所填写的url地址
注意:这里的url地址必须要是可以被访问到的地方,否则还是会出现错误.
最终结果如图所示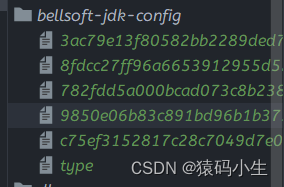
到这里并没有完结,有两种方法,第一种使用pack工具,重新打包一个镜像,修改原有镜像的值.第二种,使用buildings来修改,如下所示:
<build>
        <plugins>
            <plugin>
                <groupId>org.springframework.boot</groupId>
                <artifactId>spring-boot-maven-plugin</artifactId>
                <configuration>
                    <image>
                        <bindings>
<!--                           这个是由于 github 直接下载文件很慢,可能会导致 timeout,重新定义 bindings 文件 -->
                            <binding>
                                D:/JavaProject/mall4cloud/bellsoft-jdk-config:/platform/bindings/bellsoft-jdk-config
                            </binding>
                        </bindings>
                    </image>
                </configuration>
            </plugin>
        </plugins>
    </build>
注意: D:/JavaProject/mall4cloud/bellsoft-jdk-config:/platform/bindings/bellsoft-jdk-config:前面前面的是标题处新建的 bellsoft-jdk-config所在的位置,linux比较简单,而win可能需要填写绝对地址,防止出现其他问题
dial tcp: lookup XX on ip: read udp ip:port->ip:port i/o timeout
这里如果是插件导致的,目前并不知道原因是因为什么,很多帖子说可能是网络DNS的问题,我这里没有仔细去研究,但是解决办法是有的.我们可以直接手动下载的本地来进行处理.同样这里有三个文件需要处理.
我这里使用的jdk版本是8u312,如果不一样的话,可以通过报错的地方手动下载.
- https://github.com/bell-sw/Liberica/releases?page=4
- https://github.com/paketo-buildpacks/syft/releases?page=3
- https://repo.spring.io/ui/native/release/org/springframework/cloud/spring-cloud-bindings/1.8.0/spring-cloud-bindings-1.8.0.jar
注意:github下载较慢的可以使用代理 fastgithub 或者 stream++亦或者使用下面提供的代理网站
https://ghproxy.com
三个文件如下
https://download.csdn.net/download/m0_46596655/87576657
之后可能需要搭建nginx来处理,这样的话是直接走本机的虚拟网卡,不需要走dns就可以解决问题 - 首先运行一个nginx
docker run -p 80:80 --name nginx -d nginx:latest
- 将nginx文件拷贝出来
docker cp [containerId]:/etc/nginx nginx
- 创建html文件夹和log文件夹用于挂载docker目录
mkdir html
mkdir log
- 重新运行nginx
docker run --name nginx -p 80:80 --net host -v ./conf.d:/etc/nginx/conf.d -v ./nginx.conf:/etc/nginx/nginx.conf -v ./html:/usr/share/nginx/html -v ./log:/var/log/nginx -e LANG=C.UTF-8 -e LC_ALL=C.UTF-8 -d nginx:latest
上传文件,这里使用的是xshell,可以自行下载或者自己上传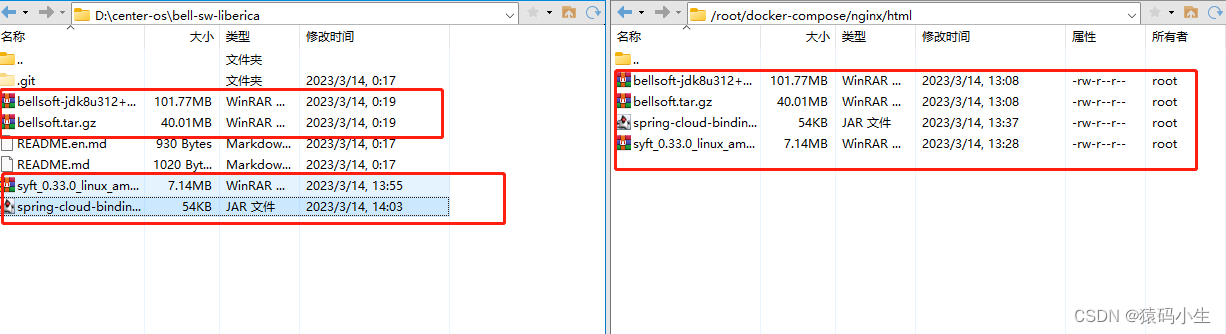
上传到nginx的html目录下,这样最简单可以直接处理http请求
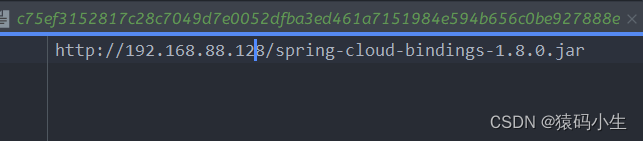
最后将三个文件的地址进行填写
-
jre运行环境

-
syft

-
spring jar
完成之后重新打包,查看输出信息是否符合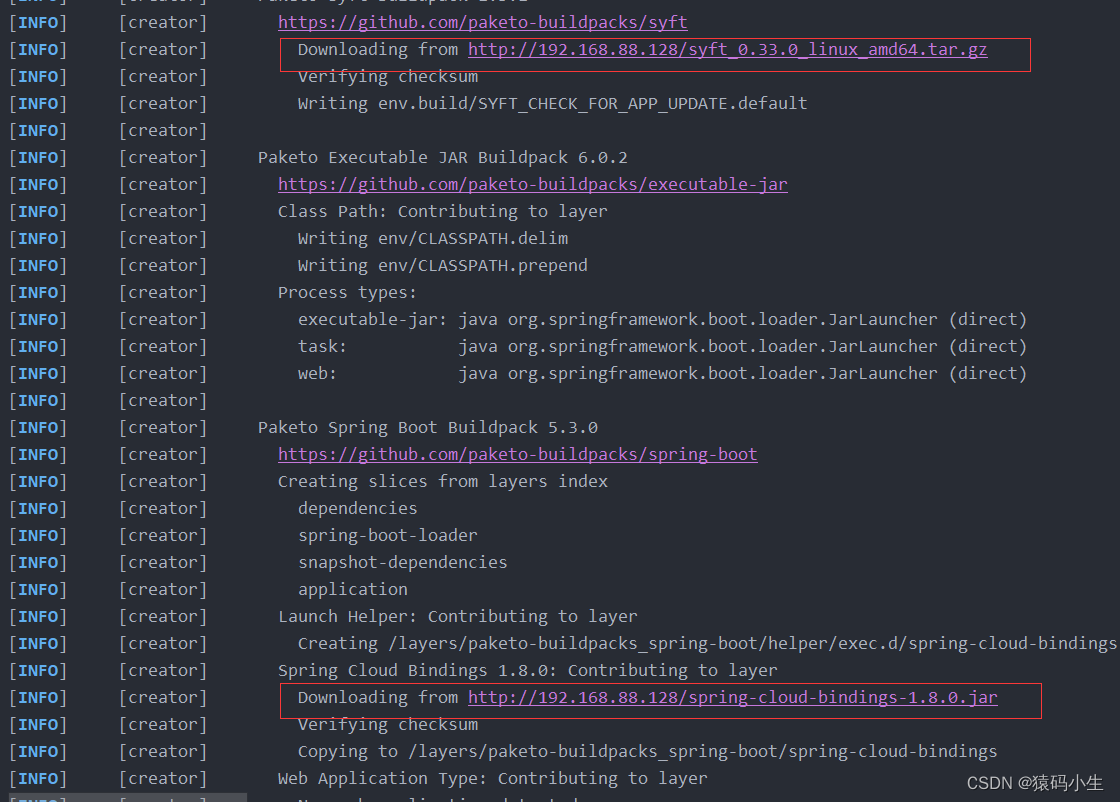
这里最后就可以构建成功了

有“AI”的1024 = 2048,欢迎大家加入2048 AI社区
更多推荐

 4
4 0
0- 0


 已为社区贡献1条内容

所有评论(0)