Unity New Input System
New Input System
安装
Input System是新的输入系统,用来取代旧的Input Manager,方便接收不同的输入设备
在Package Manager里安装,通过url添加,com.unity.inputsystem

安装后可以选择只使用新的Input System,或选Both两者都使用,考虑很多插件还在使用旧的Input Manager,推荐选择Both
映射
右键 -> Create -> Input Actions,就可以创建一个名为xxx.inputactions的资源,它管理输入事件和输入设备之间的映射关系

主要有两种方式来接受用户的输入,一种是在角色身上挂Player Input脚本,然后脚本引用这个inputactions,通过事件来触发逻辑

另一种是勾选Generate C# Class,会生成对应类的脚本,脚本中记录了有哪些InputAction,用Json记录映射关系,通过类对象来读取输入,这种方式可以更好的解耦,推荐使用这种方式

点击Edit asset编辑映射关系,左边的Action Maps(动作表)定义了一系列InputAction(输入事件)集合,每个集合可以看作是一套输入方案,开发中可能需要设计不同的输入方案,它们的映射关系不同,例如这里定义两个输入方案Gamepad1和Gamepad2,可以根据使用场景激活其中一个输入方案
public class SimpleInput : MonoBehaviour
{
    public enum InputPlan
    {
        Gamepad1,
        Gamepad2,
    }

    private GameInput _gameInput;
    private InputPlan _inputPlan;

    public void Awake()
    {
        _gameInput = new GameInput();
    }

    public void OnEnable()
    {
        _gameInput.Enable();
        switch (_inputPlan)
        {
            case InputPlan.Gamepad1:
                _gameInput.Gamepad1.Enable();
                _gameInput.Gamepad2.Disable();
                break;
            case InputPlan.Gamepad2:
                _gameInput.Gamepad1.Disable();
                _gameInput.Gamepad2.Enable();
                break;
        }
    }

    public void OnDisable()
    {
        _gameInput.Disable();
    }
}
GameInput 是通过asset文件生成的类,这里使用枚举来切换当前使用的输入方案,注意_gameInput.Enable() 会把所有的Action Maps都激活,所以需要根据当前使用的方案单独激活对应的Action Map

中间的Actions定义InputAction(输入事件),右边的Action Properties定义相关属性,一个InputAction可以绑定多个设备,这里Move这个InputAction绑定了键盘的WASD键,上下左右方向键和左摇杆,两个设备的输入都会触发Move这个输入事件

点击加号绑定设备
| 类型 | 描述 |
|---|---|
| Add Binding | 普通绑定,可以绑定一个按钮,光标,摇杆 |
| Add Positive/Negative Binding | 两个按钮组合,一个按钮代表正,一个按钮代表负,返回值为float,例如左右键 |
| Add Up/Down/Left/Right | 四个按钮组合,或者摇杆,返回值为Vector2 |
| Add Binding With One Modifier | 两个按钮组合键,如Ctrl + b |
| Add Binding With Two Modifiers | 三个按钮组合键,如Shift + Ctrl + b |

新建一个Input Action,点击Path进行设备绑定,点击Listen监听当前的输入设备,进行快速选择

Action Type有三种类型
| Action Type | 描述 |
|---|---|
| Value | 各种连续变化的输入,如鼠标移动,键盘的WASD,手柄的摇杆,它会监听所有的输入设备,选择输入值最大的作为输入源,它有 Started,Performed, Canceled 三个阶段 |
| Button | 按钮输入,键盘,鼠标,手柄按钮,在按下,按住,抬起时会调用输入事件 |
| Pass Through | 和Value基本相同,但它会获取所有设备的输入,每次值变化时只会触发 Performed |
比如,当 Action Type 为Value时,左摇杆向右稍微移动产生一个输入值,假设为(0.3,0),输入源是手柄,此时按下键盘的w键,产生输入值(0,1),因为(0,1)向量模长更大,输入源就切换到键盘
当 Action Type 为Pass Through时,这个 Action 会执行两次,先输出(0,1),然后输出(0.3,0)

操作类型(Control Type)是输入值的类型,一般移动或改视角都用Vector2
对于Value这种连续变化的值,需要在Update中读取值,然后再做相应的逻辑
    public void Update()
    {
        Vector2 move = _gameInput.Gamepad1.Move.ReadValue<Vector2>();
        Move(move);
    }

    private void Move(Vector2 direction)
    {
        if (direction.sqrMagnitude < 0.01)
            return;
        //DoSomething
        Debug.LogError(direction);
    }
对于按钮类型的事件,它有三个阶段
| 阶段 | 描述 |
|---|---|
| wasPressedThisFrame | 按下,触发一次 |
| isPressed | 按住,按住时一直触发,即触发多次 |
| wasReleasedThisFrame | 抬起,触发一次 |
键盘操作
// old
if (Input.GetKeyDown(KeyCode.A)) //按下A键
	DoSomething();
if (Input.GetKeyUp(KeyCode.A))   //抬起
	DoSomething();
if (Input.GetKey(KeyCode.A))     //按住
	DoSomething();

// new
if (Keyboard.current.aKey.wasPressedThisFrame) 	//按下A键
	DoSomething();
if (Keyboard.current.aKey.wasReleasedThisFrame) //抬起
	DoSomething();
if (Keyboard.current.aKey.isPressed)     		//按住
	DoSomething();
鼠标操作
// old
Vector2 mousePos = Input.mousePosition; //鼠标位置
if (Input.GetMouseButtonDown(0)) 	    //按下鼠标左键
	DoSomething();
if (Input.GetMouseButtonUp(1))   		//抬起右键
	DoSomething();
if (Input.GetMouseButton(2))     		//按住中键
	DoSomething();

// new
Vector2 mousePos = Mouse.current.position.value;
if (Mouse.current.leftButton.wasPressedThisFrame) 	//按下鼠标左键
	DoSomething();
if (Mouse.current.rightButton.wasReleasedThisFrame) //抬起右键
	DoSomething();
if (Mouse.current.middleButton.isPressed)     		//按住中键
	DoSomething();
手柄操作
if (Gamepad.current.leftShoulder.wasPressedThisFrame) 	//按下左肩键
    DoSomething();
if (Gamepad.current.rightTrigger.wasReleasedThisFrame)  //抬起右扳机键
    DoSomething();
if (Gamepad.current.buttonNorth.isPressed)     		    //按住右侧上方的按键
    DoSomething();

手柄有时候需要获取扳机键的按压力度,用来实现游戏中油门,刹车,射箭等功能,这时需要把它映射到Axis上。
float value = Config.Input.GamepadLT.ReadValue<float>();
这样就可以读取到按压力度
三个阶段
对于每个InputAction,它有三个阶段
| 阶段 | 描述 |
|---|---|
| started | 开始阶段,类似按钮按下,触发一次 |
| performed | 执行阶段,类似按钮按住,但默认触发一次 |
| canceled | 取消阶段,类似按钮抬起,触发一次 |

以这个名为Attack的InputAction为例
    public void Awake()
    {
        _gameInput = new GameInput();

        _gameInput.Gamepad1.Attack.started += context =>
        {
            Debug.LogError("started--" + Time.time);
        };
        _gameInput.Gamepad1.Attack.performed += context =>
        {
            Debug.LogError("performed--" + Time.time);
        };
        _gameInput.Gamepad1.Attack.canceled += context =>
        {
            Debug.LogError("canceled--" + Time.time);
        };
    }

可以看到,默认情况下,started 和 performed 是在同一时间

Interactions 交互操作

Hold,长按,按住时间到达Hodl Time才会触发performed阶段。Press Point指按钮按下幅度阈值,0未按下,1按下,超过0.5就表示按下,使用默认值就行,也可以取消Default前面的勾选,自己设定值

Tap,快速按下并抬起,当按住时间 <= Max Tap Duration,抬起时会触发 performed 阶段,但是不会触发 canceled 阶段,当按住时间 > Max Tap Duration,会触发 canceled 阶段

Slow Tap,按下至少一段时间后抬起,当按住时间 < Min Tap Duration,抬起时会触发 canceled 阶段,,当按住时间 > Min Tap Duration,抬起时会触发 performed 阶段

Multi Tap,连点,短时间内连点Tap Count次,两次点击的间隔不能超过Max Tap Spacing,单次点击按下的时间不能超过Max Tap Duration

Press,按下或抬起时触发事件,选择Press Only,按下时触发started 和 performed 阶段,选择Release Only,抬起时触发 performed 和 canceled 阶段,选择Press And Release,按下时触发started 和 performed 阶段,抬起时触发 performed 和 canceled 阶段
一个按钮上可以绑定多个Interactions,根据类型执行不同的逻辑
    _gameInput.Gamepad1.Attack.performed += context =>
    {
        if (context.interaction is HoldInteraction)
        {
            //长按逻辑
        }
        else if (context.interaction is TapInteraction)
        {
            //快点按下并抬起
        }
    };
Processors 输入值处理
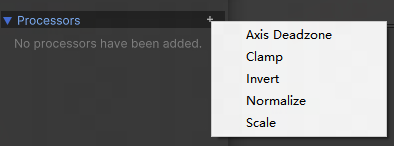

Axis Deadzone 处理死区,输入值小于 min 的为 0,输入值大于 max 的为 1
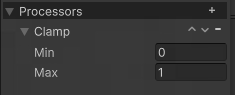
Clamp 限制输入值范围
Invert 对输入值取反
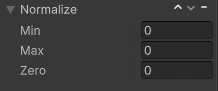
Normalize 归一化处理,如果 Zero <= Min,则归一化的结果返回一个 [0…1] 的值。如果 Min < Zero < Max,则归一化的结果返回一个[-1…1]的值。
Scale 对输入值进行缩放处理
UI 输入操作

EventSystem 默认使用Standalone Input Module,它是用旧的Input Manager驱动的,点击Replace with Input System UI Input Module

一般不需要修改,使用默认值就行

也可以定义UI上的点击操作,比如左键攻击,右键释放技能

UI上的摇杆,只要在Image挂上On Screen Stick脚本,Control Path 选择摇杆,那么它会创建一个虚拟摇杆作为输入,Movement Range是摇杆可移动范围
游戏中一般是左摇杆移动,屏幕右侧拖动改变视角,这个屏幕拖动的逻辑就得在UI中写逻辑实现

屏幕上的按钮添加On Screen Button脚本,也会创建一个虚拟按键作为输入
组合键和单独按键冲突
比如,b键定义了方法1,ctrl + b定义了方法2,按下ctrl后再按b键,方法1和方法2会同时触发,针对这种冲突的情况需要在代码中处理
     if (Keyboard.current.bKey.wasPressedThisFrame)
     {
         if(Keyboard.current.ctrlKey.isPressed)
             //执行 ctrl + b 操作
         else
             //执行 b键 操作
     }
手柄按键冲突也一样
    if (Gamepad.current.buttonNorth.wasPressedThisFrame)
    {
        if(Gamepad.current.leftShoulder.isPressed)
            //执行 leftShoulder + buttonNorth 操作
        else
            //执行 buttonNorth 操作
    }
监听输入设备变化
public void Start()
{
    InputSystem.onDeviceChange += OnDeviceChange;
}

private void OnDeviceChange(InputDevice device, InputDeviceChange change)
{
    if (change == InputDeviceChange.Added && device is Gamepad)
    {
        //添加手柄
    }
    else if(change == InputDeviceChange.Removed && device is Gamepad)
    {
        //移除手柄
    }
}
测试手柄可以正确识别,键盘识别的不准确,不管是否连接键盘 Keyboard.current 都不为空,可能是插件的 bug 或者识别到了软键盘,通过蓝牙和2.4g连接的也不行
Control Scheme 分组

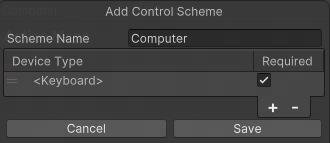
Control Scheme 用来实现分组的功能,一个 Control Scheme 可以关联一个或多个设备,如果勾选生成 c# 代码,也会生成对应的 Scheme 对象
//inputAsset 是生成的 c# 代码
inputAsset.bindingMask = InputBinding.MaskByGroup(config.ComputerScheme.name);
ComputerScheme 关联了键盘,当设置了 bindingMask 为 ComputerScheme,那就只能接收键盘的输入,其他设备的输入将被忽略
inputAsset.bindingMask = null;
设为 null,则可接收所有设备输入
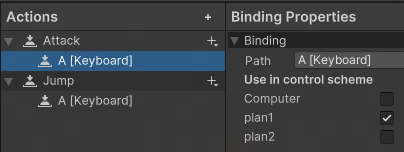
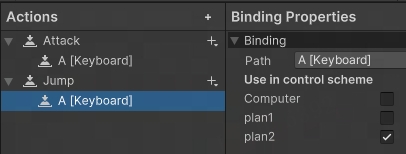
游戏中同一个按键在不同模式下,可能触发的事件不一样,假设玩法1(plan1)中按 A 键攻击,玩法2(plan2)中按 A 键跳跃,针对这种情况,可以创建两个关联键盘的 Scheme,plan1 和 plan2,按键绑定右边分别勾选上对应的 scheme,这样切换模式时,只要设置下 bindingMask 就可以屏蔽其他 Scheme 的输入
运行时修改绑定
移除绑定
// 移除 fire 这个 action 的第一个绑定
playerInput.actions["fire"].ChangeBinding(0).Erase();

// 移除 2DVector 这个 composite
playerInput.actions["move"].ChangeCompositeBinding("2DVector").Erase();
添加绑定
// gei fire 添加一个 绑定,多次调用会添加多次
playerInput.actions["fire"].AddBinding("<Mouse>/leftButton");

// 添加一个 WASD composite
playerInput.actions["move"]
    .AddCompositeBinding("2DVector")
        .With("Up", "<Keyboard>/w")
        .With("Left", "<Keyboard>/a")
        .With("Down", "<Keyboard>/s")
        .With("Right", "<Keyboard>/d");
自定义输入设备
InputSystem 支持大部分常用设备,也支持自定义设备
public struct CustomDeviceState : IInputStateTypeInfo
{
    // FourCC type codes are used to identify the memory layouts of state blocks.
    public FourCC format => new FourCC('C', 'U', 'S', 'T');

    [InputControl(name = "LeftButton", layout = "Button")]
    public byte LeftButton;

    [InputControl(name = "RightButton", layout = "Button")]
    public byte RightButton;

    [InputControl(name = "Trigger", layout = "Axis", parameters = "clamp=true,clampMin=-1,clampMax=1")]
    public float Trigger;
}

[InputControlLayout(stateType = typeof(CustomDeviceState))]
public class CustomDevice : InputDevice
{
    public ButtonControl LeftButton;
    public ButtonControl RightButton;
    public AxisControl Trigger;

    private CustomDeviceState _state;

    protected override void FinishSetup()
    {
        LeftButton = GetChildControl<ButtonControl>("LeftButton");
        RightButton = GetChildControl<ButtonControl>("RightButton");
        Trigger = GetChildControl<AxisControl>("Trigger");
        base.FinishSetup();
    }

    public void ClickDownLeftButton()
    {
        _state.LeftButton = 1;
        InputSystem.QueueStateEvent(this, _state);
    }

    public void ClickUpLeftButton()
    {
        _state.LeftButton = 0;
        InputSystem.QueueStateEvent(this, _state);
    }
}
在 CustomDevice 中定义了两个按钮和一个一维线性轴(Trigger),CustomDeviceState 这个结构体定义了 CustomDevice 内存布局,每个字段和一个组件关联,修改 CustomDeviceState 的值并调用 InputSystem.QueueStateEvent 即可触发对应的组件
InputSystem.RegisterLayout<CustomDevice>("CustomDevice");
InputDevice custom = InputSystem.AddDevice<CustomDevice>();
使用前需要注册并添加设备
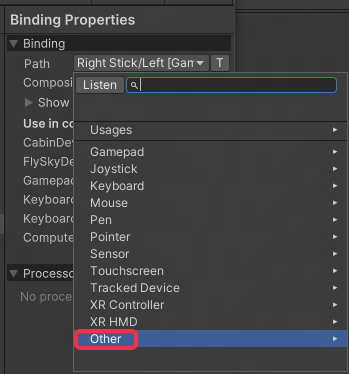
之后就能在 InputActions 中的 Other 里看到自定义设备,每次修改代码触发重新编译就看不到自定义设备了,需要再次注册并添加设备才能看到,这样就能把自定义设备的组件绑定到某个 InputAction 上了
Switch Pro 手柄连接问题
老版本的 Input System,蓝牙连接 Switch Pro 手柄有问题,左摇杆没有移动但是一直有输入值,导致移动没法用,如下面的代码会有随机值
Vector2 move = _playerInput.Player.Move.ReadValue<Vector2>();
升级到更高版本可以解决这个问题

参考

有“AI”的1024 = 2048,欢迎大家加入2048 AI社区
更多推荐

 13
13 0
0- 0


 已为社区贡献8条内容

所有评论(0)