[ROS] URDF 模型,关节类型(Joint)
[ROS] URDF 模型,关节类型(joint)文章目录[ROS] URDF 模型,关节类型(joint)1. Fixed Joint(固定关节)1. 创建一个 link1,box 形状,尺寸(0.1, 0.2, 0.3)2. 创建一个link2,box 形状,尺寸(0.05,0.1,0.6)1. 完整模型代码:joint_fixed.urdf2. 更新后的 display.launch 文件2
[ROS] URDF 模型,关节类型(joint)
文章目录
1. Fixed Joint(固定关节)
1. 创建一个 link1,box 形状,尺寸(0.1, 0.2, 0.3)
<?xml version="1.0" encoding="utf-8" ?>
<robot name="box">

    <!-- link1 -->
    <link name="link1">
        <visual>
            <origin xyz="0 0 0" rpy="0 0 0"></origin>
            <geometry>
                <box size="0.1 0.2 0.3" />
            </geometry>
            <material name="green">
                <color rgba="0 1.0 0 0.8"></color>
            </material>
        </visual>
    </link>
</robot>
- 默认的世界坐标系原点坐标(0,0,0)
<origin xyz="0 0 0" rpy="0 0 0"></origin>表示 link1_box 的坐标系重合,并且无偏转
显示结果
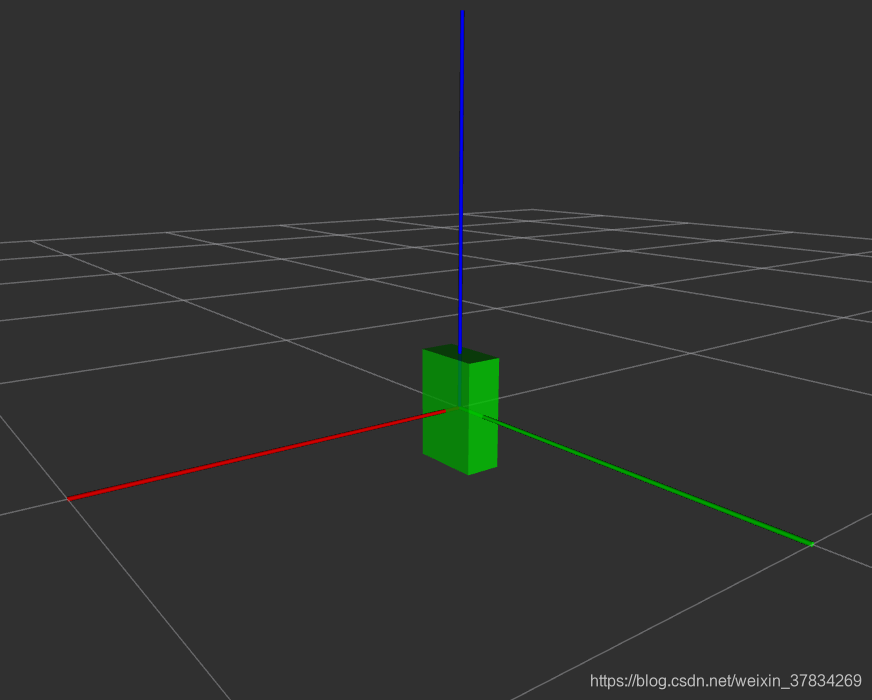
- 此时 link1_box 中心(也就是自身坐标系的原点)与世界坐标系原点重合
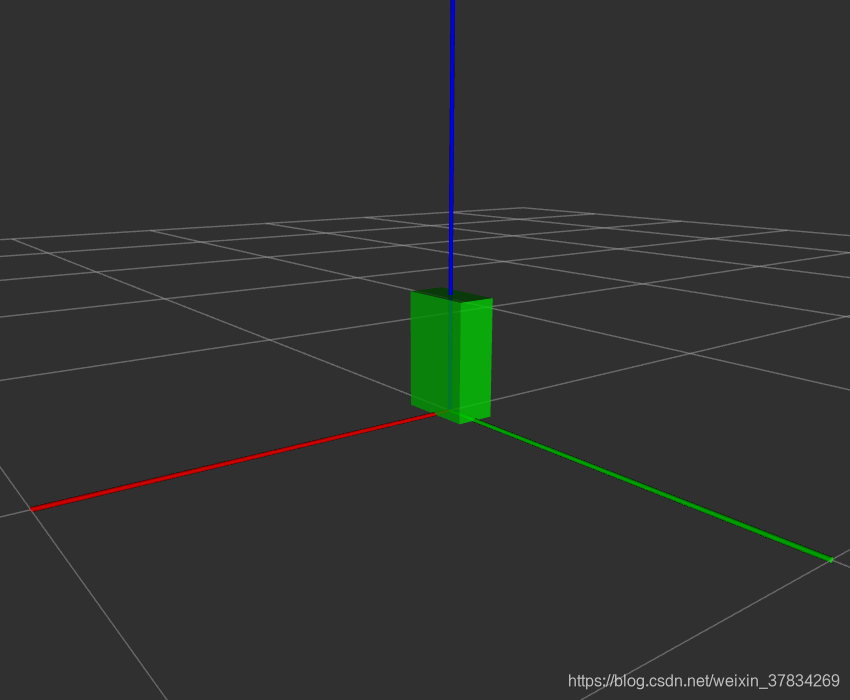
- 要使物体底面与世界坐标系 z=0 平面重合,将自身坐标系重新设为(相对于世界坐标系)
<origin xyz="0 0 0.15" rpy="0 0 0"></origin>- 因为 link1_box 的高度是 0.3, 所以需要提升 0.15 个单位
显示结果
2. 创建一个link2,box 形状,尺寸(0.05,0.1,0.6)
通过 joint 关节连接 link1
1. 完整模型代码:joint_fixed.urdf
<?xml version="1.0" encoding="utf-8" ?>
<robot name="box">

    <!-- link1 -->
    <link name="link1">
        <visual>
            <origin xyz="0 0 0.15" rpy="0 0 0"></origin>
<!--            <origin xyz="0 0 0.25" rpy="0 0 0"></origin>-->
            <geometry>
                <box size="0.1 0.2 0.3" />
            </geometry>
            <material name="green">
                <color rgba="0 1.0 0 0.8"></color>
            </material>
        </visual>
    </link>

    <!-- link2 -->
    <link name="link2">
        <visual>
            <origin xyz="0 0 0.3" rpy="0 0 0"></origin>
            <geometry>
                <box size="0.05 0.1 0.6" />
            </geometry>
            <material name="red">
                <color rgba="1.0 0 0 0.8"></color>
            </material>
        </visual>
    </link>

    <joint name="joint1" type="fixed">
        <origin xyz="0 0 0.3" rpy="0 0 0"></origin>
        <parent link="link1" />
        <child link="link2"/>
    </joint>

</robot>
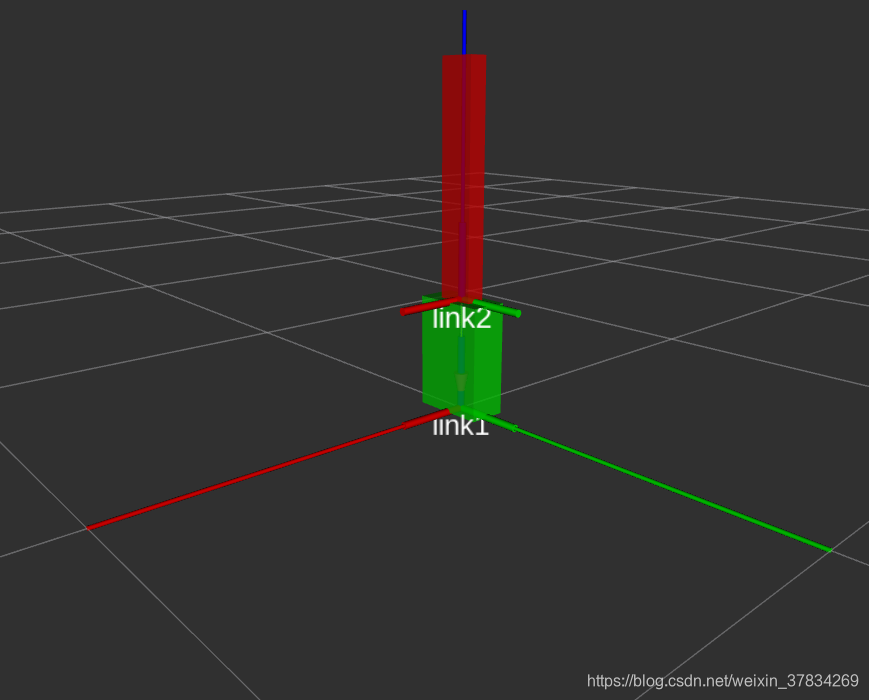
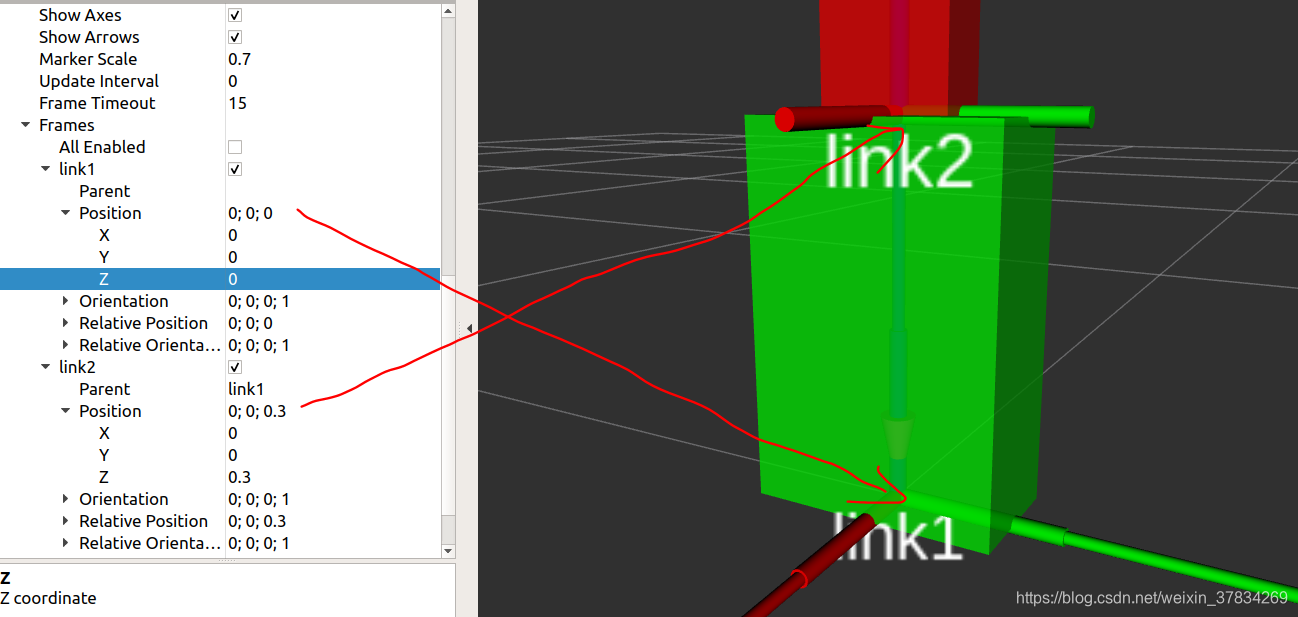
- link1 是父连杆,他的几何中心相对于世界坐标系(+z 0.15)
- link2 是自连杆,他的几何中心相对于世界坐标系(+z 0.3)
- joint 连接 父连杆 link1,子连杆 link2,它的位置相对于世界坐标系(+z 0.3),也就是 link1 的上表面,link2 的下表面
显示图像
- 子连杆指向父连杆
- TF(transformation frames,转换框架)中每一个link的坐标系轴
- 世界坐标系轴
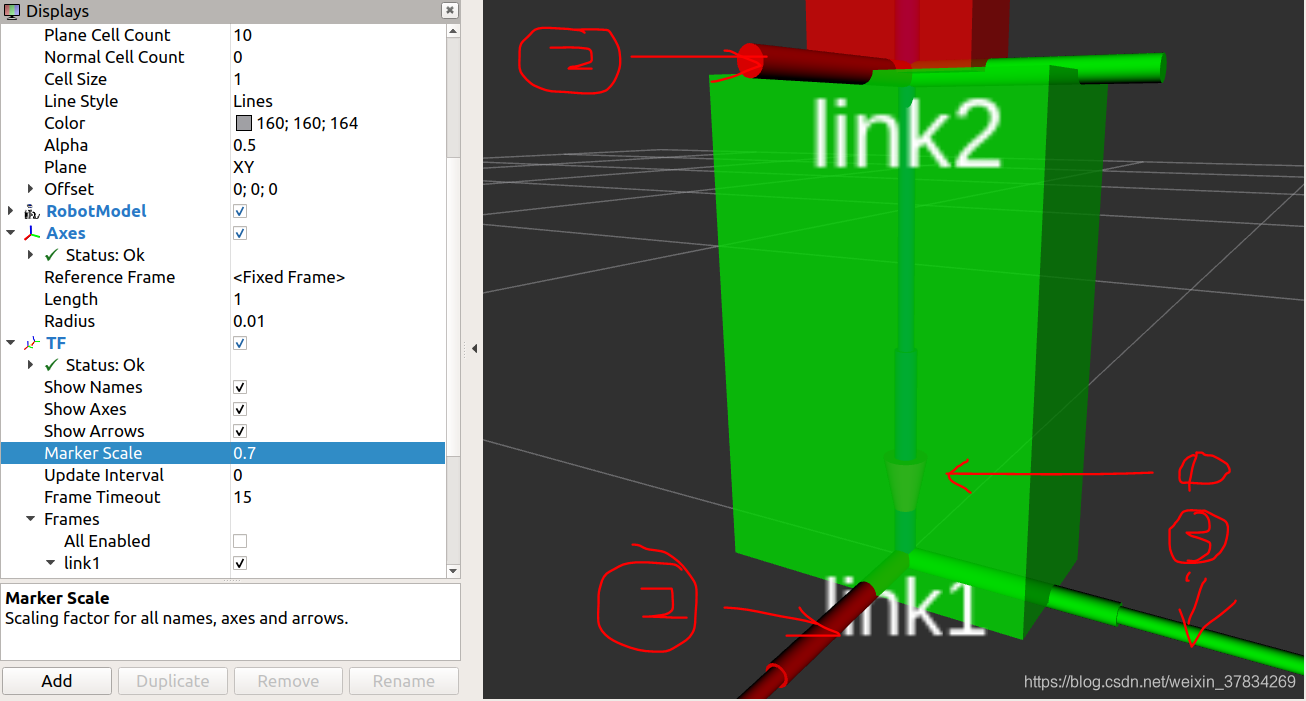
提问:为什么 TF 的 linkX 坐标系在那个位置,见截图,同时 Position 中的指无法在 rviz gui 中修改。
补充:orientation 的意思是姿态,用四元数表示(x,y,z,w)。
2. 更新后的 display.launch 文件
<launch>

    <arg name="model" default="helloworld.urdf" />

    <param name="robot_description" command="$(find xacro)/xacro -i $(find demo_urdf)/urdf/$(arg model)"></param>

    <node pkg="rviz" type="rviz" name="rviz" args="-d $(find demo_urdf)/rviz/demo01.rviz"></node>
    <node name="joint_state_publisher" pkg="joint_state_publisher" type="joint_state_publisher" />
    <node name="robot_state_publisher" pkg="robot_state_publisher" type="robot_state_publisher" />

</launch>
添加了两个启动节点:
2. Revolute Joint(旋转连杆)
1. 完整模型代码:joint_revolute.urdf
<?xml version="1.0" encoding="utf-8" ?>
<robot name="box">

    <!-- link1 -->
    <link name="link1">
        <visual>
            <origin xyz="0 0 0.15" rpy="0 0 0"></origin>
<!--            <origin xyz="0 0 0.25" rpy="0 0 0"></origin>-->
            <geometry>
                <box size="0.1 0.2 0.3" />
            </geometry>
            <material name="green">
                <color rgba="0 1.0 0 0.8"></color>
            </material>
        </visual>
    </link>

    <!-- link2 -->
    <link name="link2">
        <visual>
            <origin xyz="0 0 0.3" rpy="0 0 0"></origin>
            <geometry>
                <box size="0.05 0.1 0.6" />
            </geometry>
            <material name="red">
                <color rgba="1.0 0 0 0.8"></color>
            </material>
        </visual>
    </link>

    <joint name="joint1" type="revolute">
        <origin xyz="0 0 0.3" rpy="0 0 0"></origin>
        <parent link="link1" />
        <child link="link2"/>
        <limit effort="30" velocity="1.0" lower="-1.57" upper="1.57" />
    </joint>

</robot>
显示结果
2. 修改 .launch 文件,添加 use_gui 选项
<launch>

    <arg name="model" default="helloworld.urdf" />

    <param name="robot_description" command="$(find xacro)/xacro -i $(find demo_urdf)/urdf/$(arg model)"></param>
<!--    <param name="use_gui" value="true"></param>-->

    <node pkg="rviz" type="rviz" name="rviz" args="-d $(find demo_urdf)/rviz/demo01.rviz"></node>
<!--    <node name="joint_state_publisher" pkg="joint_state_publisher" type="joint_state_publisher" />-->
    <node name="robot_state_publisher" pkg="robot_state_publisher" type="robot_state_publisher" />
    <node name="joint_state_publisher_gui" pkg="joint_state_publisher_gui" type="joint_state_publisher_gui" />

</launch>
- 可以不需要
<param name="use_gui" value="true"></param>- 但是必须修改
joint_state_publisher成joint_state_publisher_gui,参考问题解决3
3. 沿轴转动
通过 axis 参数控制转动方向,完整 .launch 文件如下
<?xml version="1.0" encoding="utf-8" ?>
<robot name="box">

    <!-- link1 -->
    <link name="link1">
        <visual>
            <origin xyz="0 0 0.15" rpy="0 0 0"></origin>
<!--            <origin xyz="0 0 0.25" rpy="0 0 0"></origin>-->
            <geometry>
                <box size="0.1 0.2 0.3" />
            </geometry>
            <material name="green">
                <color rgba="0 1.0 0 0.8"></color>
            </material>
        </visual>
    </link>

    <!-- link2 -->
    <link name="link2">
        <visual>
            <origin xyz="0 0 0.3" rpy="0 0 0"></origin>
            <geometry>
                <box size="0.05 0.1 0.6" />
            </geometry>
            <material name="red">
                <color rgba="1.0 0 0 0.8"></color>
            </material>
        </visual>
    </link>

    <joint name="joint1" type="revolute">
        <origin xyz="0 0 0.3" rpy="0 0 0"></origin>
        <parent link="link1" />
        <child link="link2"/>

        <!-- revolute around x-axis -->
        <axis xyz="1 0 0" />
        <!-- revolute around y-axis -->
        <axis xyz="0 1 0" />
        <!-- revolute around z-axis -->
        <axis xyz="0 0 1" />
        <!-- revolute around x+y+z-axis -->
        <axis xyz="1 1 1" />

        <limit effort="30" velocity="1.0" lower="-1.57" upper="1.57" />
    </joint>

</robot>
4. 无限制转动
转动时没有角度限制,可以绕任意轴转动到任意角度
<?xml version="1.0" encoding="utf-8" ?>
<robot name="box">

    <!-- link1 -->
    <link name="link1">
        <visual>
            <origin xyz="0 0 0.15" rpy="0 0 0"></origin>
<!--            <origin xyz="0 0 0.25" rpy="0 0 0"></origin>-->
            <geometry>
                <box size="0.1 0.2 0.3" />
            </geometry>
            <material name="green">
                <color rgba="0 1.0 0 0.8"></color>
            </material>
        </visual>
    </link>

    <!-- link2 -->
    <link name="link2">
        <visual>
            <origin xyz="0 0 0.3" rpy="0 0 0"></origin>
            <geometry>
                <box size="0.05 0.1 0.6" />
            </geometry>
            <material name="red">
                <color rgba="1.0 0 0 0.8"></color>
            </material>
        </visual>
    </link>

        <joint name="joint1" type="continuous">
            <origin xyz="0 0 0.3" rpy="0 0 0"></origin>
            <parent link="link1" />
            <child link="link2"/>

            <!-- revolute around x-axis -->
            <axis xyz="1 0 0" />
            <!-- revolute around y-axis -->
            <!--        <axis xyz="0 1 0" />-->
            <!-- revolute around z-axis -->
            <!--        <axis xyz="0 0 1" />-->
            <!-- revolute around x+y+z-axis -->
            <!--        <axis xyz="1 1 1" />-->
        </joint>

</robot>
5. 平移
平移操作必须要设定 limit 属性
<?xml version="1.0" encoding="utf-8" ?>
<robot name="box">

    <!-- link1 -->
    <link name="link1">
        <visual>
            <origin xyz="0 0 0.15" rpy="0 0 0"></origin>
<!--            <origin xyz="0 0 0.25" rpy="0 0 0"></origin>-->
            <geometry>
                <box size="0.1 0.2 0.3" />
            </geometry>
            <material name="green">
                <color rgba="0 1.0 0 0.8"></color>
            </material>
        </visual>
    </link>

    <!-- link2 -->
    <link name="link2">
        <visual>
            <origin xyz="0 0 0.3" rpy="0 0 0"></origin>
            <geometry>
                <box size="0.05 0.1 0.6" />
            </geometry>
            <material name="red">
                <color rgba="1.0 0 0 0.8"></color>
            </material>
        </visual>
    </link>

    <joint name="joint1" type="prismatic">
        <origin xyz="0 0 0.3" rpy="0 0 0"></origin>
        <parent link="link1" />
        <child link="link2"/>

        <!-- revolute around x-axis -->
        <axis xyz="1 0 0" />
        <!-- revolute around y-axis -->
        <!--        <axis xyz="0 1 0" />-->
        <!-- revolute around z-axis -->
        <!--        <axis xyz="0 0 1" />-->
        <!-- revolute around x+y+z-axis -->
        <!--        <axis xyz="1 1 1" />-->
        <limit effort="30" velocity="1.0" lower="-3" upper="3" />
    </joint>

</robot>
- 可以设定沿轴平移
- lower:移动距离的一个极值
- upper:移动距离的另一个极值
6. 案例 1,ABB Scara
1. ABB Scara 机器臂简介
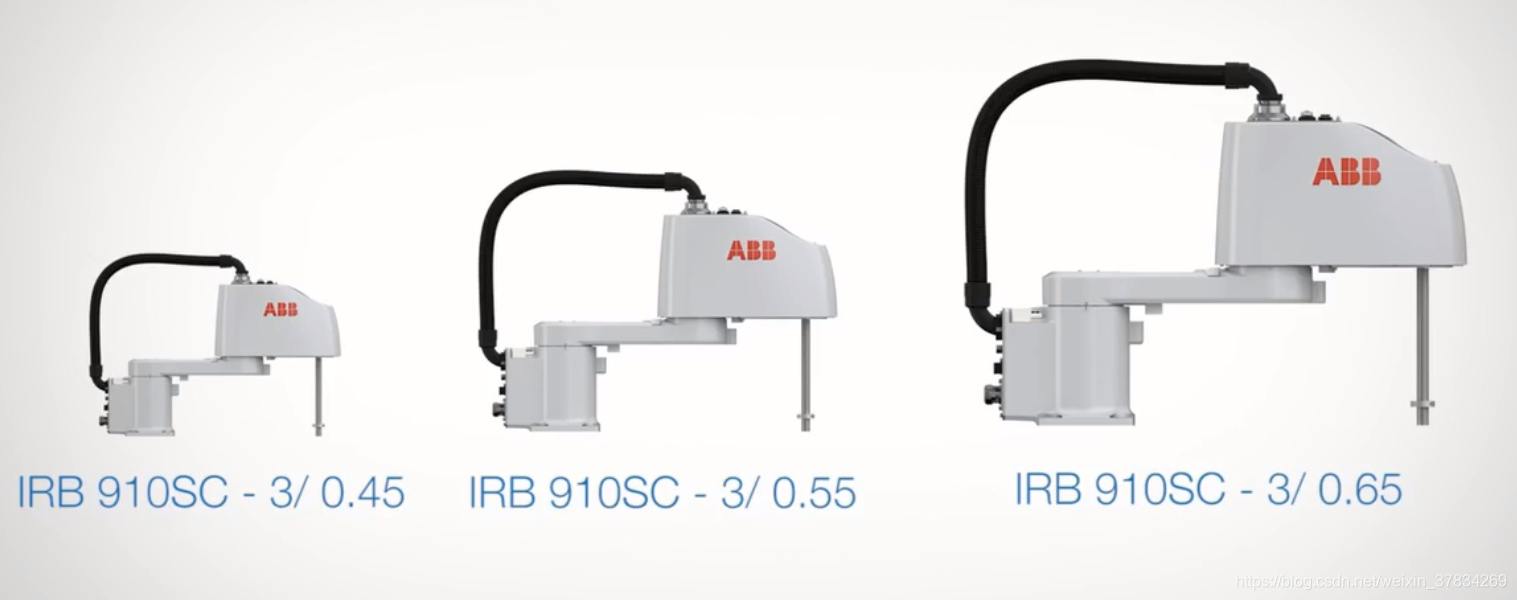
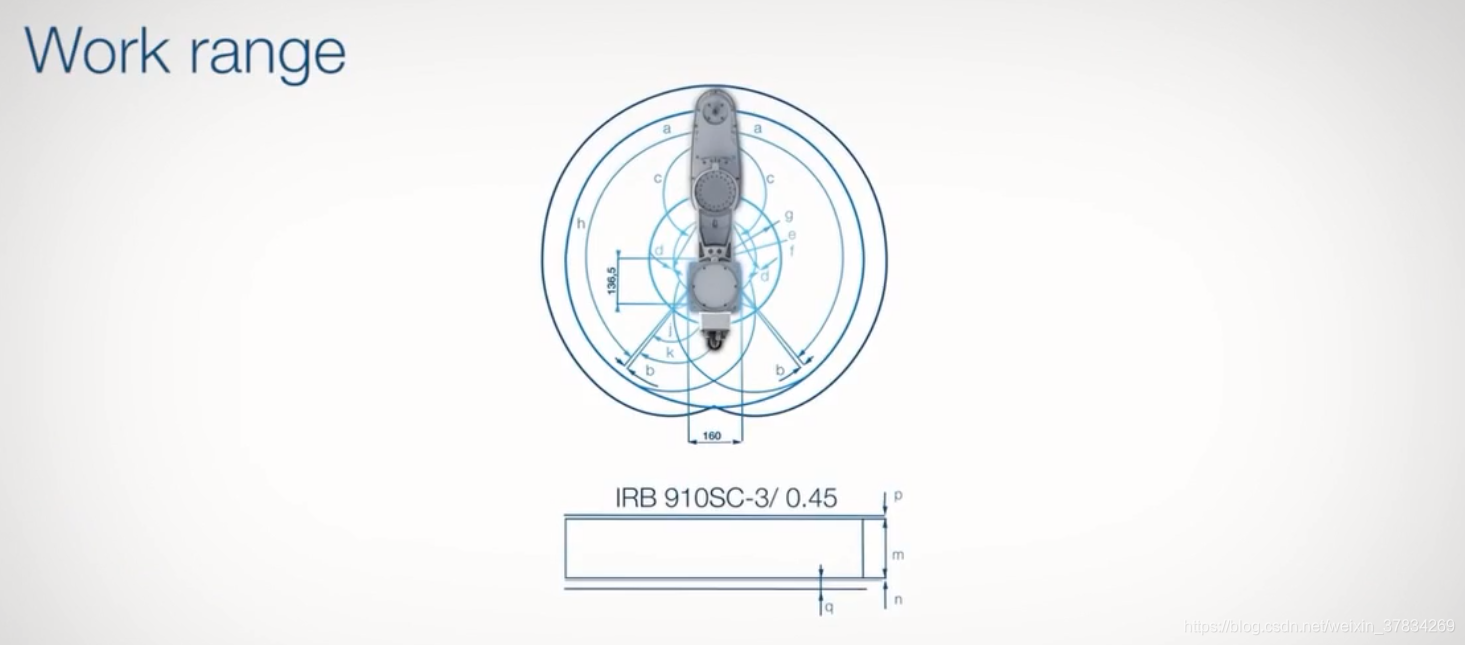
自由度:2R1P,一共3个自由度。
2. 底座 + 连杆实现
代码实现
<?xml version="1.0" encoding="utf-8" ?>
<robot name="box">

    <!-- link1 -->
    <link name="link1">
        <visual>
            <origin xyz="0 0 0.15" rpy="0 0 0"></origin>
            <geometry>
                <box size="0.1 0.2 0.3" />
            </geometry>
            <material name="green">
                <color rgba="0 1.0 0 0.8"></color>
            </material>
        </visual>
    </link>

    <!-- link2 -->
    <link name="link2">
        <visual>
            <origin xyz="0 0.2 0.02" rpy="0 0 0"></origin>
            <geometry>
                <box size="0.1 0.6 0.04" />
            </geometry>
            <material name="red">
                <color rgba="1.0 0 0 0.8"></color>
            </material>
        </visual>
    </link>

    <joint name="joint1" type="revolute">
        <origin xyz="0 0 0.3" rpy="0 0 0"></origin>
        <parent link="link1" />
        <child link="link2"/>
        <!-- revolute around z-axis -->
        <axis xyz="0 0 1" />
        <limit effort="30" velocity="1.0" lower="-1.57" upper="1.57" />
    </joint>

</robot>
- link2 的坐标系是建立在 link1 坐标系上的,link2 坐标系依赖于 link1 坐标系,link1 坐标系 依赖于 世界坐标系
- 每一个link 的 origin 的数值表示的是 此坐标系相对于其依赖的坐标系向着对应的方向 正向 或 负向 移动,比如,link2 的 origin 表示 其坐标系 相对于 link1 的坐标系向着 y 轴 以及 z 轴的 正向 移动了 0.2 个距离
- joint1 关节的位置
显示效果
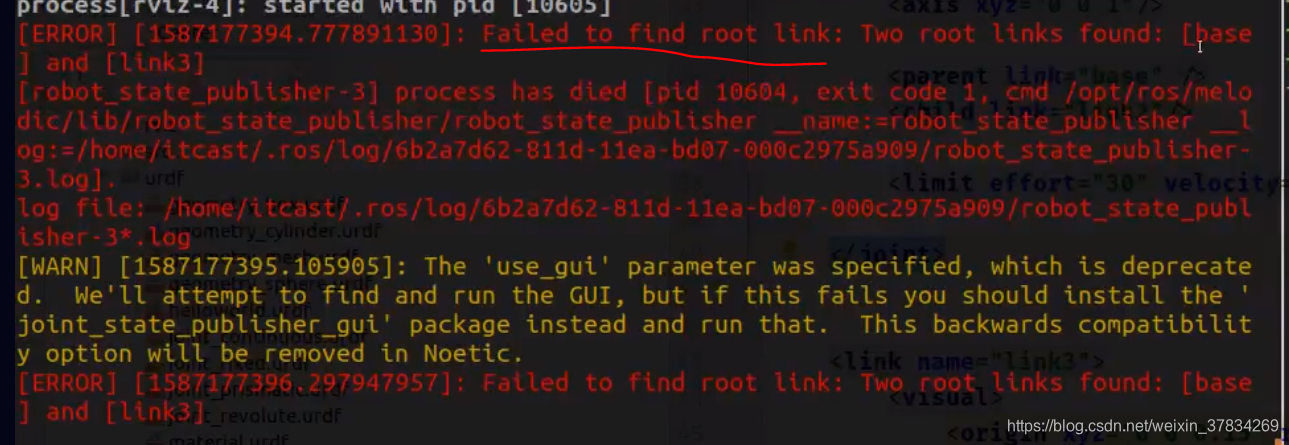
7. 案例 2,ABB Scara
注:每一个 urdf 模型只能有一共 base link,其他的 link 必须直接或间接的与 base link 通过关节相连接。不然会报错,错误如下:failed to find root link
1. 连杆 + 工作部实现
代码实现
<?xml version="1.0" encoding="utf-8" ?>
<robot name="box">

    <!-- link1 -->
    <link name="link1">
        <visual>
            <origin xyz="0 0 0.15" rpy="0 0 0"></origin>
            <geometry>
                <box size="0.1 0.2 0.3" />
            </geometry>
            <material name="green">
                <color rgba="0 1.0 0 0.8"></color>
            </material>
        </visual>
    </link>

    <!-- link2 -->
    <link name="link2">
        <visual>
            <origin xyz="0 0.2 0.02" rpy="0 0 0"></origin>
            <geometry>
                <box size="0.1 0.6 0.04" />
            </geometry>
            <material name="red">
                <color rgba="1.0 0 0 0.8"></color>
            </material>
        </visual>
    </link>

    <joint name="joint1" type="revolute">
        <origin xyz="0 0 0.3" rpy="0 0 0"></origin>
        <parent link="link1" />
        <child link="link2"/>

        <!-- revolute around z-axis -->
        <axis xyz="0 0 1" />

        <limit effort="30" velocity="1.0" lower="-1.57" upper="1.57" />
    </joint>

    <link name="link3">
        <visual>
            <origin xyz="0 0.1 0.1" rpy="0 0 0"></origin>
            <geometry>
                <box size="0.1 0.4 0.2" />
            </geometry>
            <material name="blue">
                <color rgba="0 0 1.0 0.8"></color>
            </material>
        </visual>
    </link>

    <joint name="joint2" type="revolute">
        <origin xyz="0 0.4 0.04" rpy="0 0 0"></origin>
        <parent link="link2" />
        <child link="link3"/>

        <!-- revolute around z-axis -->
        <axis xyz="0 0 1" />
        <limit effort="30" velocity="1.0" lower="-1.57" upper="1.57" />
    </joint>

</robot>
通过 joint2 的 origin 可以再次确定,joint2 的坐标是以 parent link 为参照系的。此时的 parent link 是连杆,所以为了到达连杆的上表面,joint2 的坐标系需要向 parent link z 轴的正向移动 0.04 个单位。
显示效果
8. 案例 3,ABB Scara
1. 工作部 + 伸缩柱实现
代码实现
<?xml version="1.0" encoding="utf-8" ?>
<robot name="box">

    <!-- link1 -->
    <link name="link1">
        <visual>
            <origin xyz="0 0 0.15" rpy="0 0 0"></origin>
            <geometry>
                <box size="0.1 0.2 0.3" />
            </geometry>
            <material name="green">
                <color rgba="0 1.0 0 0.8"></color>
            </material>
        </visual>
    </link>

    <!-- link2 -->
    <link name="link2">
        <visual>
            <origin xyz="0 0.2 0.02" rpy="0 0 0"></origin>
            <geometry>
                <box size="0.1 0.6 0.04" />
            </geometry>
            <material name="red">
                <color rgba="1.0 0 0 0.8"></color>
            </material>
        </visual>
    </link>

    <joint name="joint1" type="revolute">
        <origin xyz="0 0 0.3" rpy="0 0 0"></origin>
        <parent link="link1" />
        <child link="link2"/>

        <!-- revolute around z-axis -->
        <axis xyz="0 0 1" />

        <limit effort="30" velocity="1.0" lower="-1.57" upper="1.57" />
    </joint>

    <link name="link3">
        <visual>
            <origin xyz="0 0.1 0.1" rpy="0 0 0"></origin>
            <geometry>
                <box size="0.1 0.4 0.2" />
            </geometry>
            <material name="blue">
                <color rgba="0 0 1.0 0.8"></color>
            </material>
        </visual>
    </link>

    <joint name="joint2" type="revolute">
        <origin xyz="0 0.4 0.04" rpy="0 0 0"></origin>
        <parent link="link2" />
        <child link="link3"/>

        <!-- revolute around z-axis -->
        <axis xyz="0 0 1" />

        <limit effort="30" velocity="1.0" lower="-1.57" upper="1.57" />
    </joint>

    <link name="link4">
        <visual>
            <origin xyz="0 0 0.3" rpy="0 0 0"></origin>
            <geometry>
                <cylinder length="0.5" radius="0.008"/>
            </geometry>
            <material name="gold">
                <color rgba="0 1.0 1.0 0.8"></color>
            </material>
        </visual>
    </link>

    <joint name="joint3" type="prismatic">
        <origin xyz="0 0.2 -0.05" rpy="0 0 0"></origin>
        <axis xyz="0 0 1" />
        <parent link="link3" />
        <child link="link4"/>
        <limit effort="30" velocity="1.0" lower="-0.3" upper="0" />
    </joint>

</robot>
显示效果
*. 参考
*. 问题解决
1. 在 Revolute Joint 中:Joint [joint1] is of type REVOLUTE but it does not specify limits
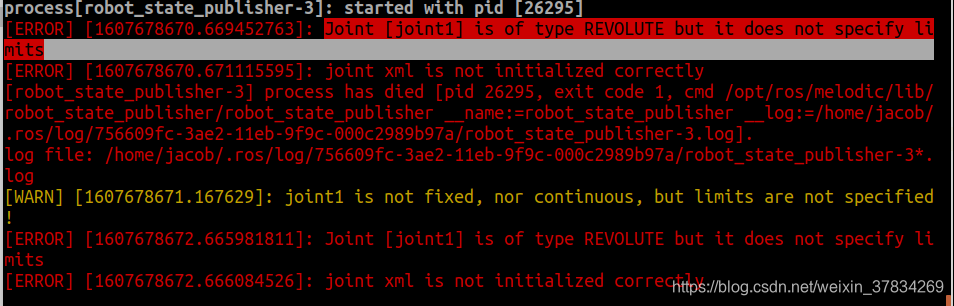
解决
- 在 joint_revolute.urdf 文件中的 标签中添加 属性
<limit effort="30" velocity="1.0" lower="-1.57" upper="1.57" />
- effort:扭力
- velocity:旋转速度
- lower:旋转范围最小值,弧度值
- upper:旋转范围最大值,弧度值
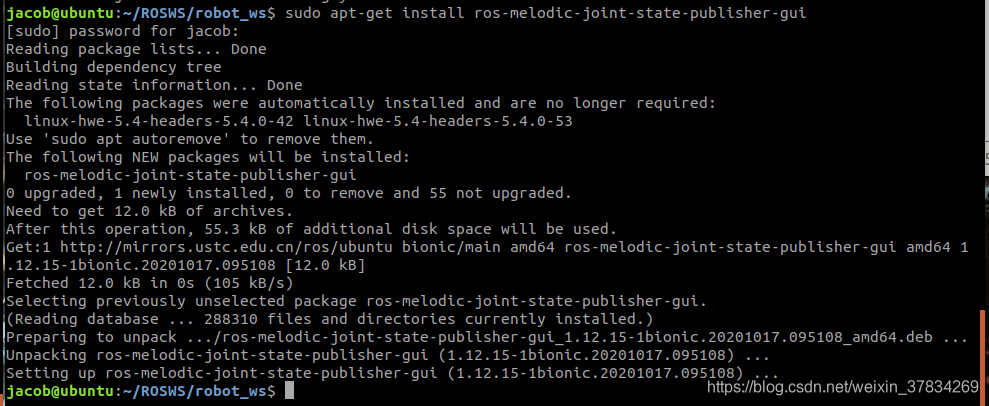
2. 在 Revolute Joint 中:Could not find the GUI, install the ‘joint_state_publisher_gui’ package

set use_gui true 后 启动 joint_revolute.urdf 的 launch 文件,失败
解决
- 安装 joint-state-publisher-gui 包:
sudo apt-get install ros-melodic-joint-state-publisher-guirosparam set use_gui true- 启动 launch 文件
3. 在 Revolute Joint 中:[WARN] [1607686266.949045]: The ‘use_gui’ parameter was specified, which is deprecated.
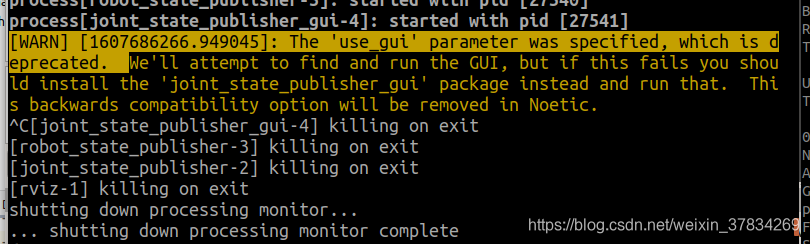
解决
- 安装
joint-state-publisher-gui包:sudo apt-get install ros-melodic-joint-state-publisher-gui- 在 .launch 文件中,将所有
robot_state_publisher换成robot_state_publisher_gui- 参考:The ‘use_gui’ parameter was specified, which is deprecated. We’ll attempt to find and run the GUI
*. rough

有“AI”的1024 = 2048,欢迎大家加入2048 AI社区
更多推荐

 25
25 0
0- 0


 已为社区贡献5条内容

所有评论(0)