不同AI框架(PyTorch, TensorFlow)对GPU的支持
GPU加速已成为深度学习框架的核心能力。PyTorch和TensorFlow均提供完善的GPU支持,包括张量设备管理、CUDA操作、内存优化和分布式训练等关键功能。PyTorch通过直观的.to(device)方法和DataParallel实现GPU加速,TensorFlow则提供灵活的GPU配置和混合精度训练支持。两者都实现了多GPU和分布式训练策略,如PyTorch的DDP和TensorFlo
1. GPU加速在深度学习中的重要性
图形处理单元(GPU)已成为现代深度学习工作负载不可或缺的组成部分。与主要针对顺序处理优化的中央处理单元(CPU)不同,GPU采用大规模并行架构,拥有数千个小型高效核心,能够同时执行大量计算。这种架构特性使GPU特别适合深度学习中常见的矩阵运算和张量计算。
深度学习模型的训练过程通常涉及:
- 前向传播中的大量矩阵乘法
- 激活函数的元素级计算
- 反向传播中的梯度计算
- 参数更新操作
这些操作都可以高度并行化,在GPU上能够获得比CPU快数十倍甚至上百倍的加速效果。随着模型规模不断扩大,从几百万参数发展到数千亿参数,GPU支持已成为AI框架的核心能力。
2. PyTorch的GPU支持
2.1 张量设备管理
PyTorch通过直观的设备指定机制管理GPU张量。以下代码展示了PyTorch中基本的GPU操作:
import torch
import torch.nn as nn

# 检查GPU可用性
device = torch.device('cuda' if torch.cuda.is_available() else 'cpu')
print(f"使用设备: {device}")

# 在GPU上创建张量
x = torch.tensor([1.0, 2.0, 3.0]).to(device)
y = torch.tensor([4.0, 5.0, 6.0]).to(device)

# 直接创建在GPU上的张量
z = torch.randn(3, 3, device=device)

# GPU上的张量运算
result = torch.matmul(x, y)
print(f"结果设备: {result.device}")

# 模型转移到GPU
model = nn.Linear(10, 5)
model = model.to(device)

# 多GPU数据并行
if torch.cuda.device_count() > 1:
    model = nn.DataParallel(model)
2.2 CUDA操作与同步
PyTorch提供了对CUDA操作的细粒度控制:
# 非阻塞张量传输
x_cpu = torch.randn(1000, 1000)
x_gpu = x_cpu.to(device, non_blocking=True)

# CUDA流管理
stream = torch.cuda.Stream()
with torch.cuda.stream(stream):
    y_gpu = torch.randn(1000, 1000, device=device)
    result = torch.matmul(x_gpu, y_gpu)

# 等待流完成
torch.cuda.synchronize()

# 内存管理
print(f"已分配内存: {torch.cuda.memory_allocated() / 1024**2:.2f} MB")
print(f:缓存分配器内存: {torch.cuda.memory_reserved() / 1024**2:.2f} MB")

# 清空缓存
torch.cuda.empty_cache()
2.3 分布式训练支持
PyTorch提供了多种分布式训练策略:
import torch.distributed as dist
from torch.nn.parallel import DistributedDataParallel as DDP

# 初始化进程组
dist.init_process_group(backend='nccl')
local_rank = dist.get_rank()
torch.cuda.set_device(local_rank)

# 使用DistributedDataParallel
model = nn.Linear(10, 5).cuda()
model = DDP(model, device_ids=[local_rank])

# 分布式数据采样器
from torch.utils.data.distributed import DistributedSampler
dataset = torch.utils.data.TensorDataset(torch.randn(1000, 10), torch.randn(1000, 5))
sampler = DistributedSampler(dataset)
dataloader = torch.utils.data.DataLoader(dataset, sampler=sampler, batch_size=32)
3. TensorFlow的GPU支持
3.1 GPU设备配置
TensorFlow提供了灵活的GPU配置选项:
import tensorflow as tf

# 检查GPU可用性
gpus = tf.config.experimental.list_physical_devices('GPU')
if gpus:
    print(f"找到 {len(gpus)} 个GPU")
    for gpu in gpus:
        print(f"GPU名称: {gpu.name}")

# 设置GPU内存增长
for gpu in gpus:
    tf.config.experimental.set_memory_growth(gpu, True)

# 限制GPU内存使用
tf.config.experimental.set_memory_limit(gpus[0], 1024 * 8)  # 8GB限制

# 设备放置策略
tf.debugging.set_log_device_placement(True)

# 手动设备放置
with tf.device('/GPU:0'):
    a = tf.constant([[1.0, 2.0], [3.0, 4.0]])
    b = tf.constant([[5.0, 6.0], [7.0, 8.0]])
    c = tf.matmul(a, b)

print(f"结果: {c}")
print(f"设备: {c.device}")
3.2 混合精度训练
TensorFlow对混合精度训练提供了完善支持:
# 启用混合精度
policy = tf.keras.mixed_precision.Policy('mixed_float16')
tf.keras.mixed_precision.set_global_policy(policy)

# 构建使用混合精度的模型
model = tf.keras.Sequential([
    tf.keras.layers.Dense(256, activation='relu', input_shape=(784,)),
    tf.keras.layers.Dense(128, activation='relu'),
    tf.keras.layers.Dense(10, activation='softmax')
])

# 使用LossScaleOptimizer防止梯度下溢
optimizer = tf.keras.optimizers.Adam()
optimizer = tf.keras.mixed_precision.LossScaleOptimizer(optimizer)

model.compile(optimizer=optimizer,
              loss='sparse_categorical_crossentropy',
              metrics=['accuracy'])

# 自定义训练循环中的混合精度
@tf.function
def train_step(x, y):
    with tf.GradientTape() as tape:
        predictions = model(x, training=True)
        loss = model.loss(y, predictions)
        scaled_loss = optimizer.get_scaled_loss(loss)

    scaled_gradients = tape.gradient(scaled_loss, model.trainable_variables)
    gradients = optimizer.get_unscaled_gradients(scaled_gradients)
    optimizer.apply_gradients(zip(gradients, model.trainable_variables))
    return loss
3.3 分布式策略
TensorFlow通过tf.distribute.Strategy提供多种分布式训练方案:
# 镜像策略(单机多GPU)
strategy = tf.distribute.MirroredStrategy()
print(f'设备数量: {strategy.num_replicas_in_sync}')

with strategy.scope():
    model = tf.keras.Sequential([
        tf.keras.layers.Dense(256, activation='relu', input_shape=(784,)),
        tf.keras.layers.Dense(128, activation='relu'),
        tf.keras.layers.Dense(10, activation='softmax')
    ])
    model.compile(optimizer='adam',
                  loss='sparse_categorical_crossentropy',
                  metrics=['accuracy'])

# 多工作者策略
# strategy = tf.distribute.MultiWorkerMirroredStrategy()

# 参数服务器策略
# strategy = tf.distribute.experimental.ParameterServerStrategy()
4. 性能对比分析
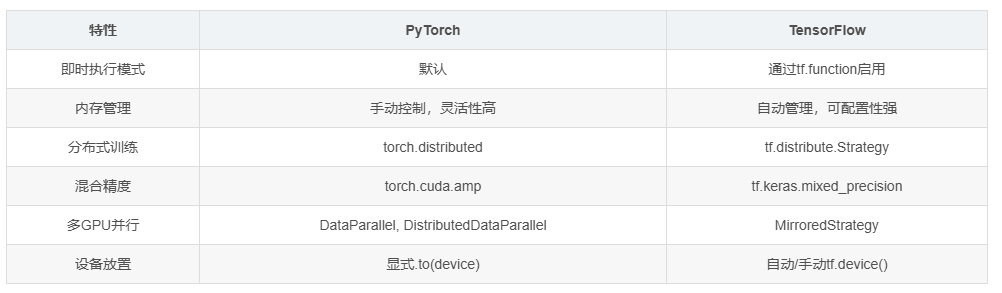
4.1 框架性能特征比较
| 特性 | PyTorch | TensorFlow |
|---|---|---|
| 即时执行模式 | 默认 | 通过tf.function启用 |
| 内存管理 | 手动控制,灵活性高 | 自动管理,可配置性强 |
| 分布式训练 | torch.distributed | tf.distribute.Strategy |
| 混合精度 | torch.cuda.amp | tf.keras.mixed_precision |
| 多GPU并行 | DataParallel, DistributedDataParallel | MirroredStrategy |
| 设备放置 | 显式.to(device) | 自动/手动tf.device() |
4.2 内存使用效率
# PyTorch内存基准测试
import torch
import time

def pytorch_memory_test():
    torch.cuda.empty_cache()
    start_memory = torch.cuda.memory_allocated()

    # 模拟训练迭代
    model = torch.nn.Sequential(
        torch.nn.Linear(1000, 5000),
        torch.nn.ReLU(),
        torch.nn.Linear(5000, 1000)
    ).cuda()

    optimizer = torch.optim.Adam(model.parameters())

    peak_memory = 0
    for i in range(100):
        x = torch.randn(512, 1000).cuda()
        y = model(x)
        loss = y.sum()
        loss.backward()
        optimizer.step()
        optimizer.zero_grad()

        current_memory = torch.cuda.memory_allocated()
        peak_memory = max(peak_memory, current_memory)

    return peak_memory - start_memory

# TensorFlow内存基准测试
def tensorflow_memory_test():
    tf.keras.backend.clear_session()

    model = tf.keras.Sequential([
        tf.keras.layers.Dense(5000, activation='relu', input_shape=(1000,)),
        tf.keras.layers.Dense(1000)
    ])

    model.compile(optimizer='adam', loss='mse')

    # 训练过程中的内存使用需要通过外部工具监控
    x = tf.random.normal((512, 1000))
    y = tf.random.normal((512, 1000))

    history = model.fit(x, y, epochs=100, verbose=0)
    return history.history['loss'][-1]
5. 实际应用场景选择指南
5.1 研究原型开发
对于研究型项目,快速迭代和调试便利性至关重要:
# PyTorch的研究友好特性
import torch
import torch.nn as nn

# 动态图特性便于调试
class ResearchModel(nn.Module):
    def __init__(self):
        super().__init__()
        self.layers = nn.ModuleList([
            nn.Linear(100, 50),
            nn.ReLU(),
            nn.Linear(50, 10)
        ])

    def forward(self, x):
        print(f"输入形状: {x.shape}")  # 便于调试
        for i, layer in enumerate(self.layers):
            x = layer(x)
            print(f"第{i}层输出形状: {x.shape}")
        return x

# 即时执行,便于交互式调试
model = ResearchModel().cuda()
x = torch.randn(32, 100).cuda()
output = model(x)  # 立即执行,打印调试信息
5.2 生产环境部署
对于生产环境,性能和稳定性是首要考虑:
# TensorFlow的生产就绪特性
import tensorflow as tf

# SavedModel格式便于部署
class ProductionModel(tf.keras.Model):
    def __init__(self):
        super().__init__()
        self.dense1 = tf.keras.layers.Dense(50, activation='relu')
        self.dense2 = tf.keras.layers.Dense(10, activation='softmax')

    def call(self, inputs):
        x = self.dense1(inputs)
        return self.dense2(x)

# 构建并训练模型
model = ProductionModel()
model.compile(optimizer='adam', loss='categorical_crossentropy')

# 训练模型
# model.fit(...)

# 导出为SavedModel
tf.saved_model.save(model, 'production_model')

# 使用TensorFlow Serving进行部署
# docker run -p 8501:8501 --name=tf_serving --mount type=bind,source=/path/to/production_model,target=/models/production_model -e MODEL_NAME=production_model -t tensorflow/serving
6. 新兴趋势与未来发展方向
6.1 编译器优化
两种框架都在向编译器优化方向发展:
# PyTorch TorchScript
class MyModel(torch.nn.Module):
    def __init__(self):
        super().__init__()
        self.linear = torch.nn.Linear(10, 1)

    def forward(self, x):
        return self.linear(x)

model = MyModel().cuda()
scripted_model = torch.jit.script(model)
scripted_model.save("optimized_model.pt")

# TensorFlow图优化
@tf.function(jit_compile=True)  # 使用XLA编译
def optimized_function(x):
    return tf.matmul(x, x) + tf.nn.relu(x)

# 在GPU上执行优化后的函数
x = tf.random.normal((1000, 1000))
result = optimized_function(x)
6.2 跨平台支持
两种框架都在扩展对异构计算的支持:
# PyTorch ROCm支持(AMD GPU)
if torch.cuda.is_available() or torch.backends.hip.is_available():
    device = torch.device('cuda' if torch.cuda.is_available() else 'hip')

# TensorFlow PluggableDevice架构
# 支持自定义硬件加速器
7. 总结
PyTorch和TensorFlow都提供了强大的GPU支持,但在设计哲学和实现细节上存在差异。PyTorch以其直观的API和动态计算图见长,特别适合研究和小规模实验。TensorFlow则在生产环境部署和分布式训练方面表现出色,提供了更完善的工具链。
选择框架时需要考虑以下因素:
- 项目阶段(研究vs生产)
- 团队熟悉度
- 部署环境要求
- 性能需求
- 生态系统工具

有“AI”的1024 = 2048,欢迎大家加入2048 AI社区
更多推荐

 22
22 0
0- 0


 已为社区贡献28条内容

所有评论(0)